A Dutch braid is a beautiful way to style your hair. It’s a bit like a regular braid but with a twist.
Learning how to Dutch braid your own hair can seem tricky at first, but with practice, it becomes easy.
Braiding your own hair offers a great way to change up your look.
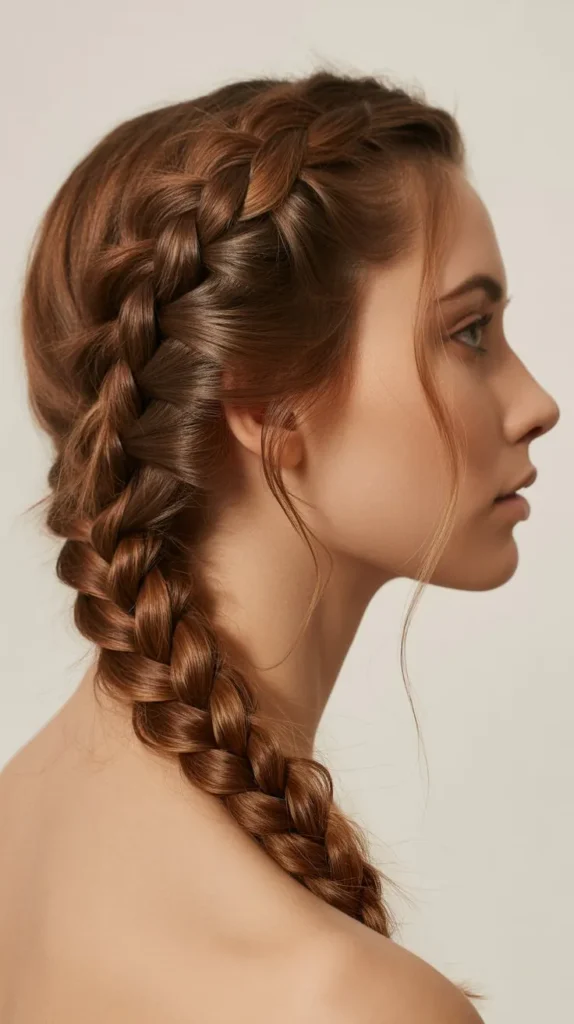
The Dutch braid, also known as an inverted or inside-out braid, creates a stunning and textured appearance.
Unlike a regular braid, the strands cross under each other, making the braid stand out more.
With a bit of patience and practice, you can master this stylish braid. Follow along to learn the steps and tips to Dutch braid your own hair.
Soon, you’ll be able to create this eye-catching style with ease.
In This Post......
1. Introduction To Dutch Braiding
Have you ever seen a Dutch braid and thought, “Wow, I wish I could do that?” Well, you can! Dutch braiding is a beautiful and practical way to style your hair.
It’s not just for special occasions; it’s perfect for every day too. Let’s dive into the fascinating world of Dutch braiding and learn how to master this technique.
2. History And Origin
The Dutch braid, also known as the “reverse French braid,” has a rich history. It originated in Africa, where it was a traditional style for many tribes.
Over time, the technique spread to Europe and became popular in the Netherlands, hence the name “Dutch braid.” It’s been loved for centuries because it’s both stylish and practical.
3. Benefits Of Dutch Braiding
Why should you learn to Dutch braid your hair? Here are some great reasons:
- Versatility: Dutch braids work for any hair type and length.
- Durability: The braid stays in place all day, even during activities.
- Elegance: It looks sophisticated and neat, perfect for any occasion.
- Protective Style: Keeps your hair safe from damage and tangles.
In short, Dutch braiding is not just a hairstyle; it’s a way to care for and showcase your hair. Ready to give it a try?
Let’s get started!
4. Essential Tools And Products
Learn how to Dutch braid your own hair with essential tools and products. Discover simple steps and techniques for a stylish look.
Practice makes perfect.
In this section, we’ll cover the essential tools and products needed for Dutch braiding your own hair.
Having the right tools at hand makes the process smoother and ensures a neat and lasting braid.
5. Combs And Brushes
A fine-tooth comb is crucial. It helps section your hair precisely. You will also need a paddle brush. It detangles your hair and keeps it smooth.
These tools prevent knots and make braiding easier.
Hair Ties And Clips
Hair ties are necessary to secure your braid. Choose small, clear elastics. They blend in and look neat. Clips help section your hair. They keep the parts you are not working on out of the way.
6. Styling Products
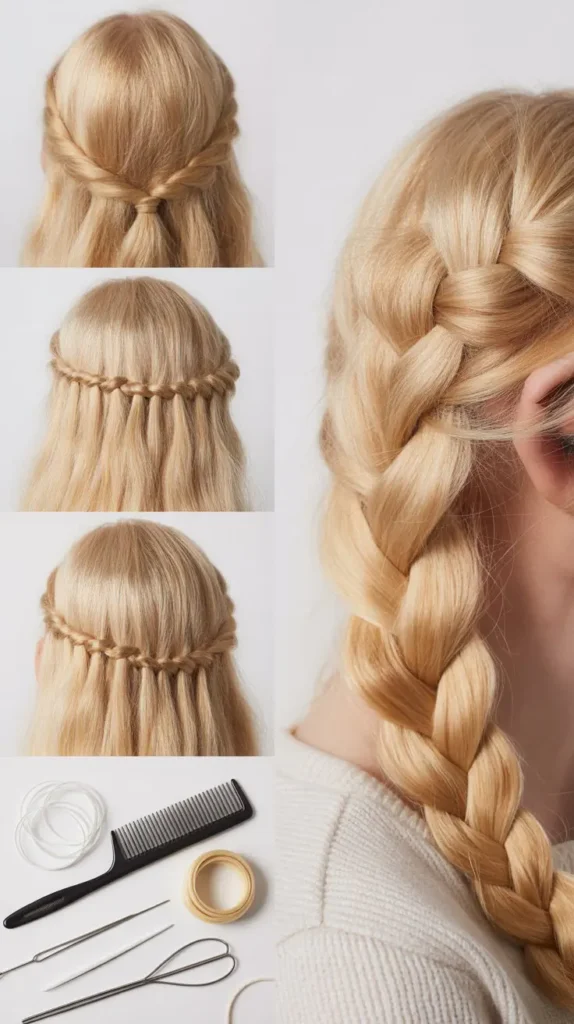
Styling products like mousse or gel add grip. They make your hair easier to handle. Use a light hairspray to set the braid. It keeps your braid tidy and in place all day.
7. Preparing Your Hair
Preparing your hair is the first step to creating a perfect Dutch braid. This stage ensures your hair is clean, smooth, and ready for styling.
Follow these simple steps to get your hair ready for a beautiful braid.
8. Washing And Conditioning
Start by washing your hair with a gentle shampoo. Clean hair makes braiding easier. Use a conditioner to keep your hair soft and manageable. Rinse thoroughly to remove all product residue. This helps in achieving a neat braid.
Detangling And Drying
After washing, gently detangle your hair using a wide-tooth comb. This prevents breakage and smooths out knots.
Allow your hair to air dry or use a blow dryer on a low heat setting. Dry hair holds braids better and reduces the risk of damage.
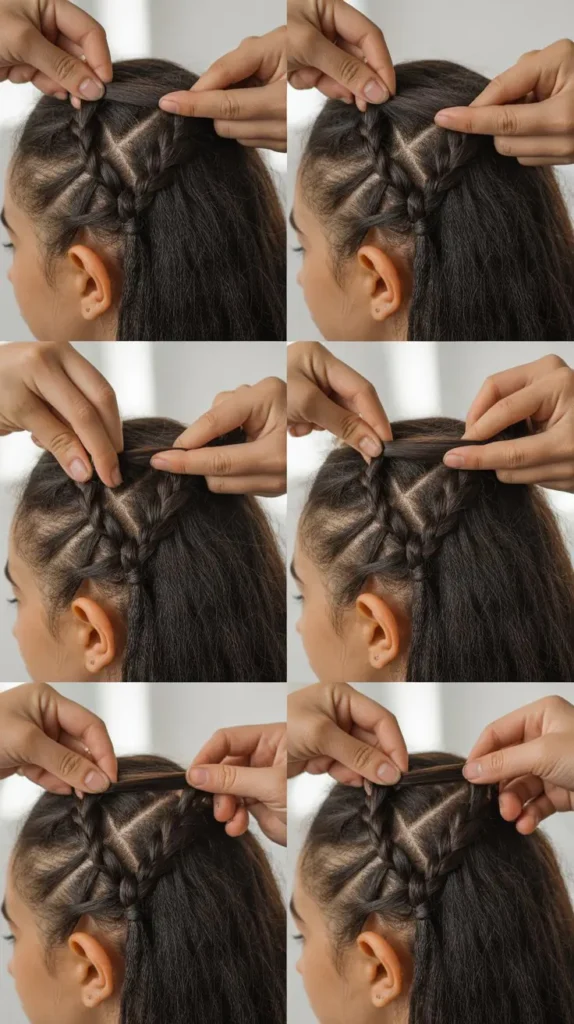
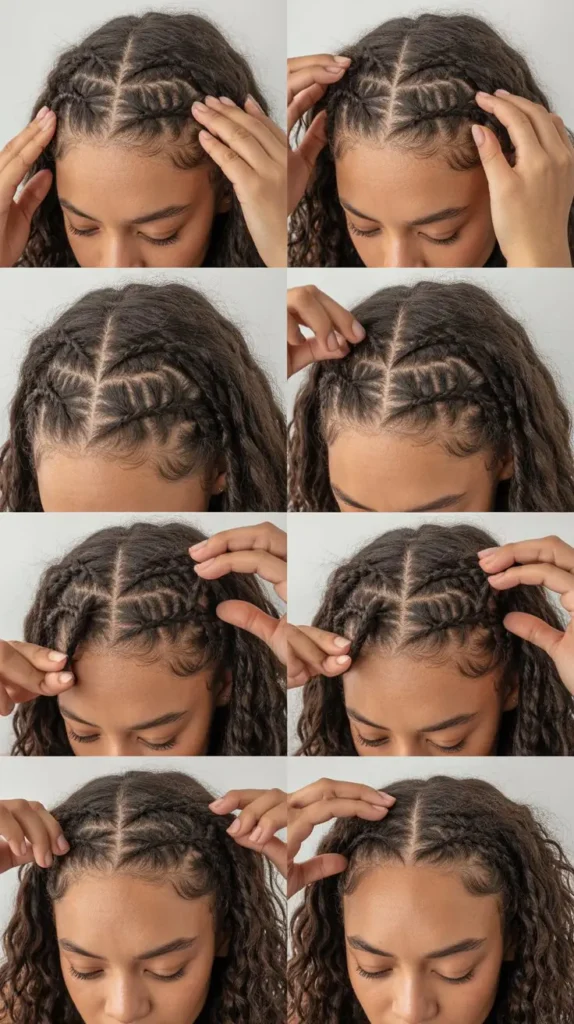
9. Sectioning Your Hair
Sectioning your hair is the foundation of achieving a flawless Dutch braid. It’s all about creating clean, even partitions that will make the braiding process easier and more effective.
Whether you are a beginner or have some experience, proper sectioning is key to a neat and tidy braid.
In this guide, we’ll break down the steps to help you master this essential technique.
10. Creating Partitions
Begin by ensuring your hair is free of tangles. Use a wide-tooth comb to gently detangle your hair, starting from the tips and working your way up to the roots.
This step prevents breakage and makes the sectioning process smoother.
Once your hair is detangled, use the handle of a rat-tail comb to create a center part. Divide your hair into two equal sections.
This middle part will serve as the foundation for your Dutch braid.
Next, take one of the sections and divide it into three smaller, equal parts. These will be the strands you use to start your braid.
Repeat the same process on the other side. It may seem tedious, but taking the time to create neat partitions will result in a more polished look.
11. Securing Sections
After creating your partitions, it’s important to secure the sections you are not working on to keep them out of the way.
Use hair clips or small elastics to hold the sections in place. This will make the braiding process much easier and prevent any unwanted strands from interfering.
For added security, you can use a bit of styling gel or mousse to smooth down any flyaways. This will help keep your sections neat and ensure that your braid looks sleek and professional.
As you begin braiding, remember to keep the sections tight and close to your scalp. This will give your Dutch braid its signature look and help it stay in place throughout the day.
In summary, sectioning your hair might seem like a small step, but it’s essential for achieving a perfect Dutch braid.
With clean partitions and secured sections, you’re well on your way to creating a stunning braid that will turn heads.
Ready to put these tips into action? Grab your comb, clips, and let’s get braiding!
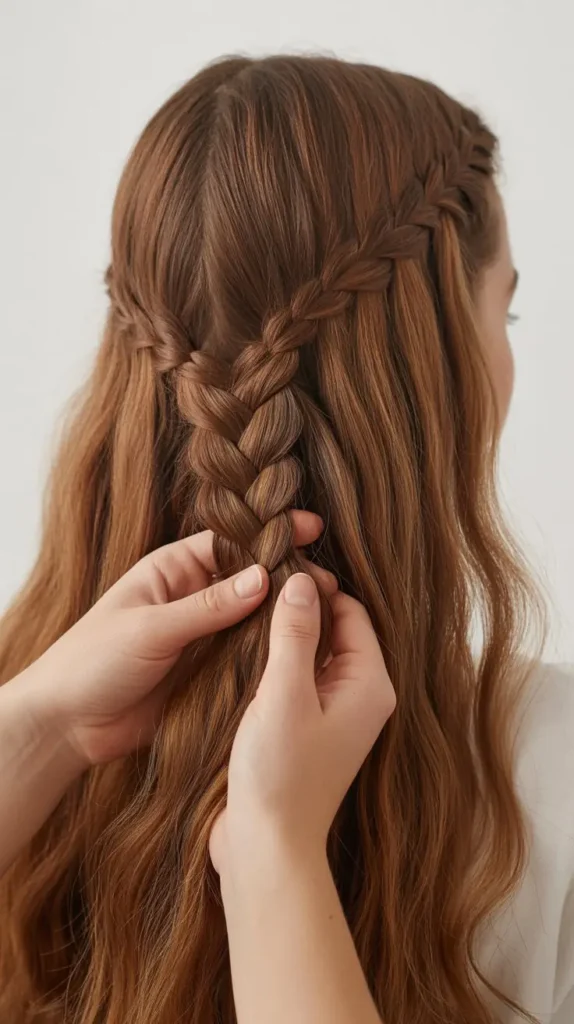
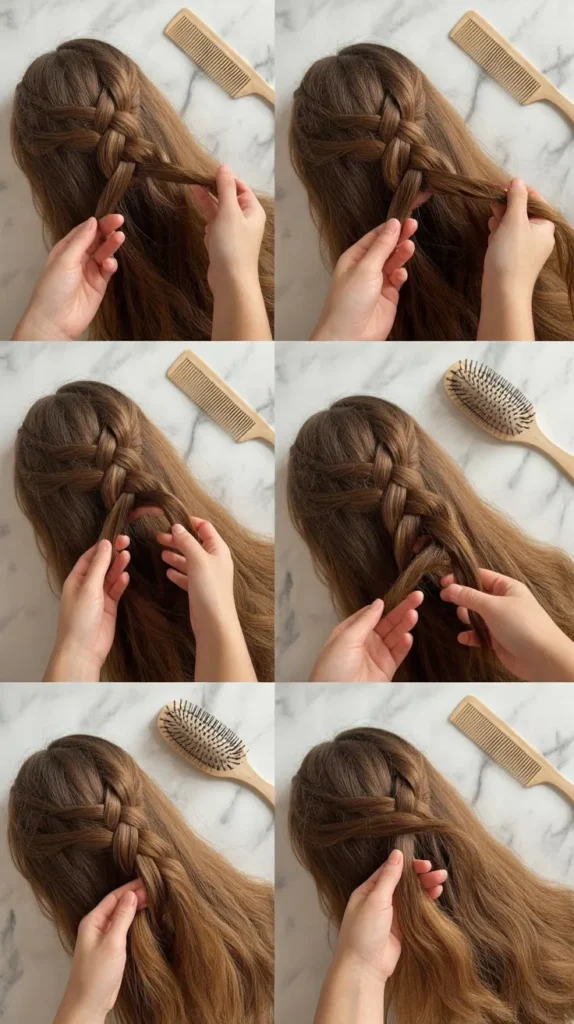
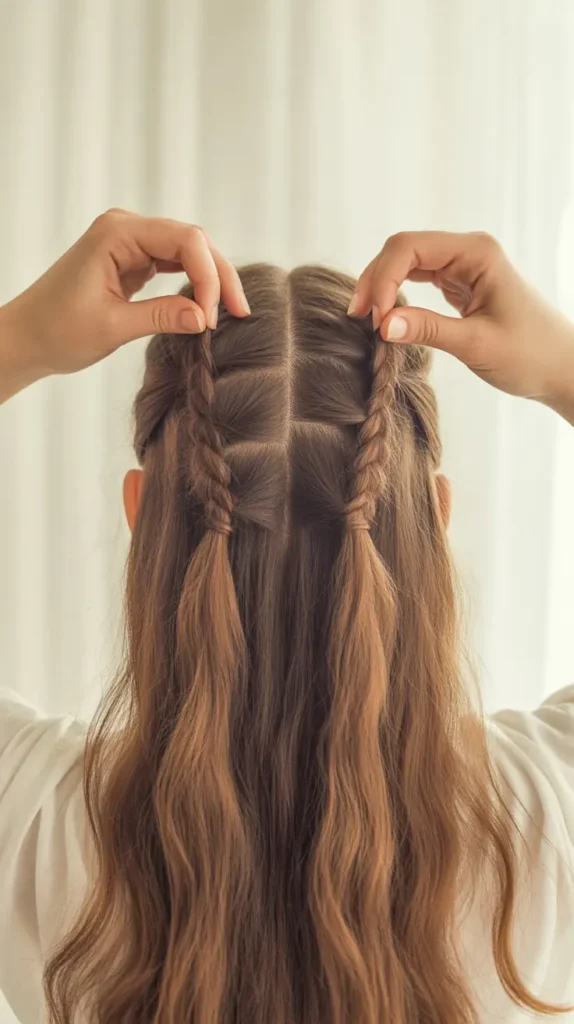
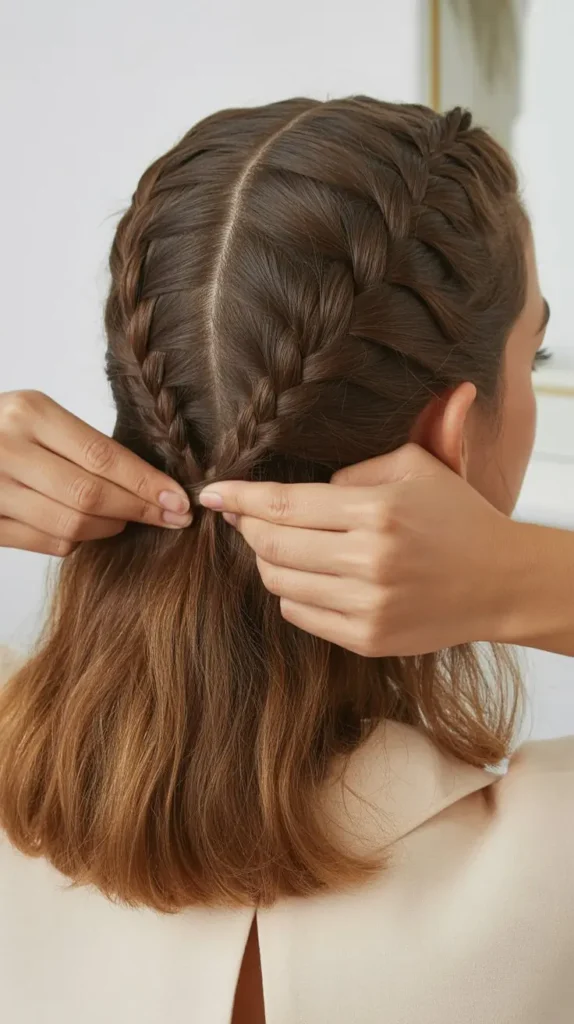
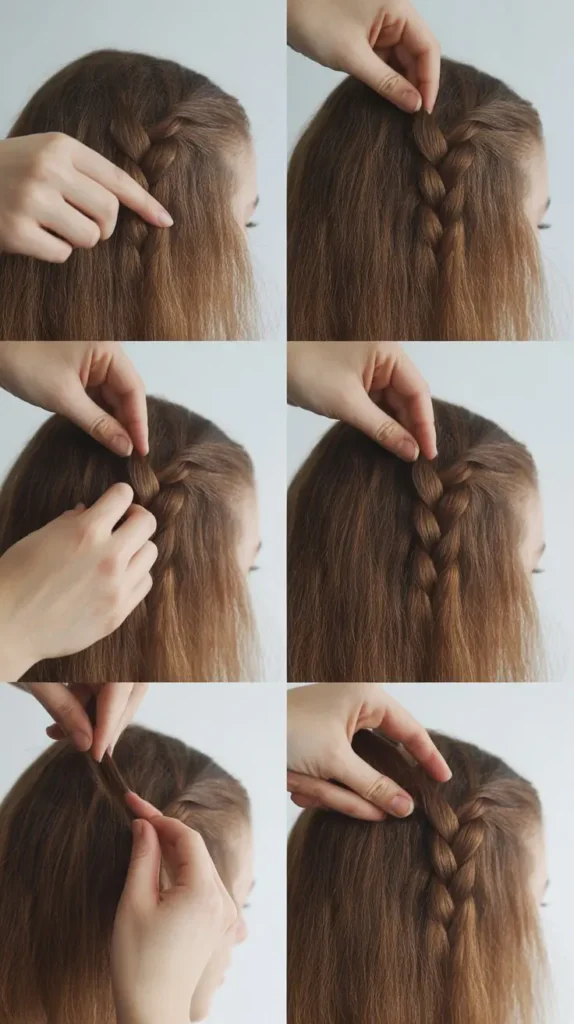
12. Starting The Dutch Braid
Starting a Dutch braid might seem tricky at first. But with some practice, it gets easier. The key is understanding the basics.
Let’s break down the steps to help you start your Dutch braid.
Positioning Your Hands
First, ensure your hair is tangle-free. Use a brush or a comb. Next, take a small section of hair from the top of your head.
Split this section into three equal parts. Hold the left section in your left hand. The right section in your right hand. And the middle section, pinched between your thumb and another finger.
It’s important to keep the sections tight. This will make your braid look neat. Now, you’re ready to start the weave.
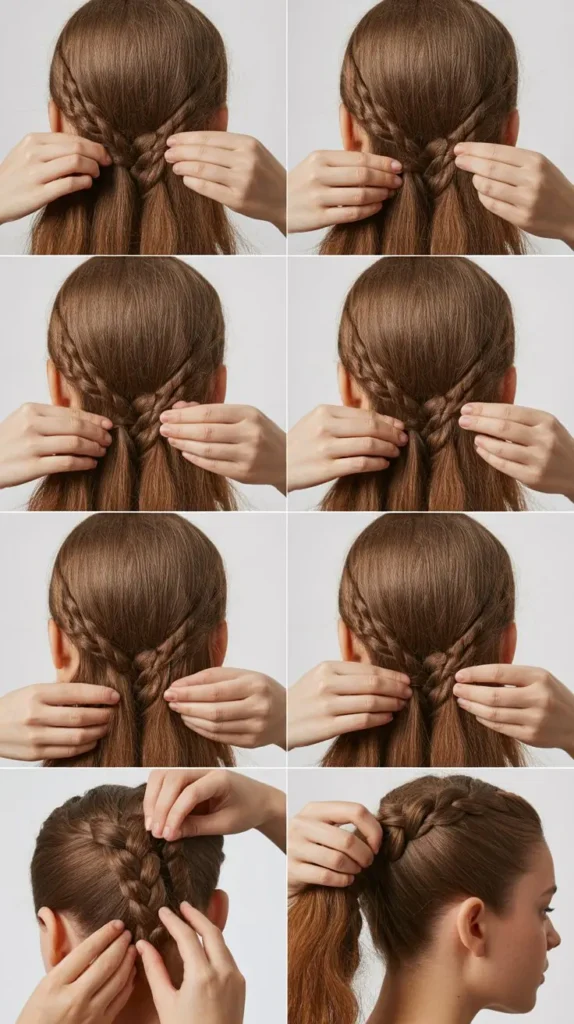
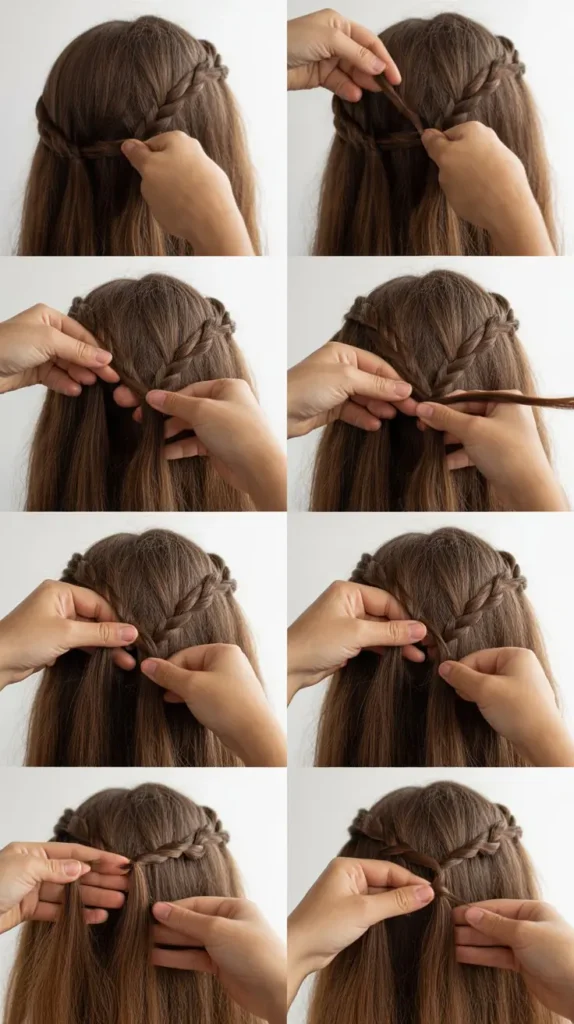
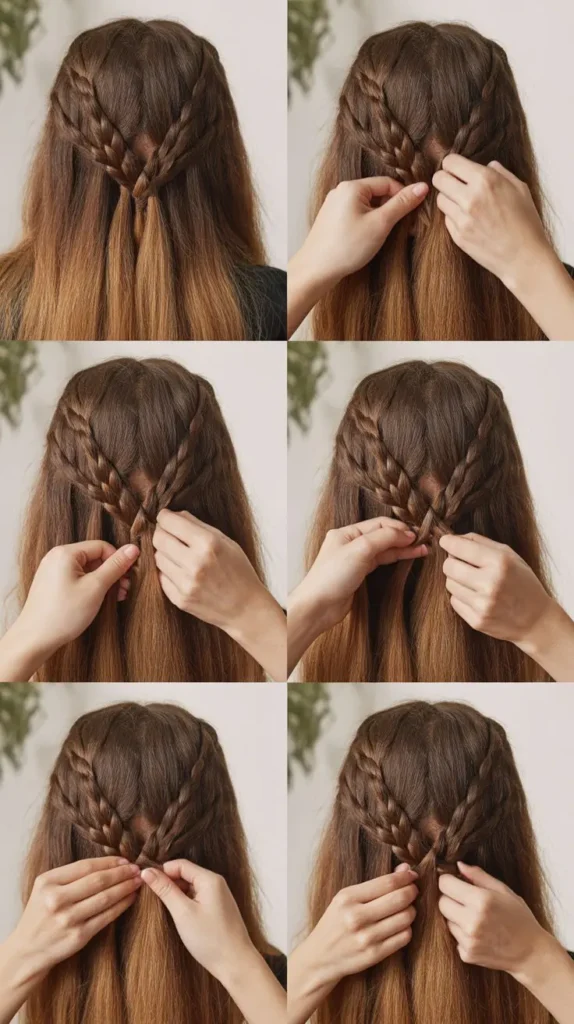
13. Beginning The Weave
Move the right section under the middle section. Now, the right section is the new middle section.
Next, move the left section under the new middle section. The left section is now the new middle section.
Each time you cross a section, add a little more hair. Take hair from the side of your head. Add it to the section before crossing it under the middle.
Continue this pattern. Move right under middle, left under middle. Add hair each time. Keep your hands close to your head. This helps keep the braid tight and neat.
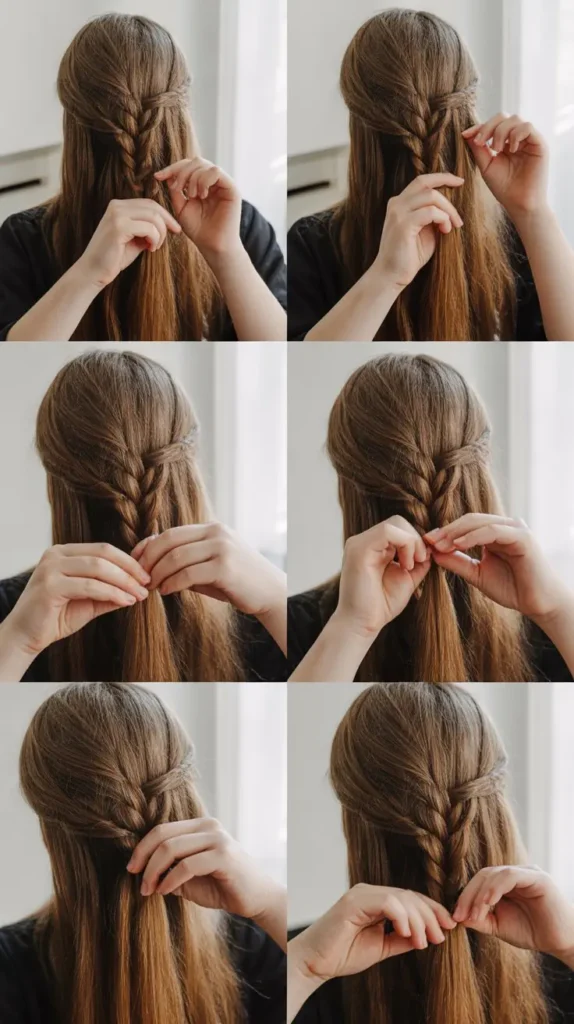
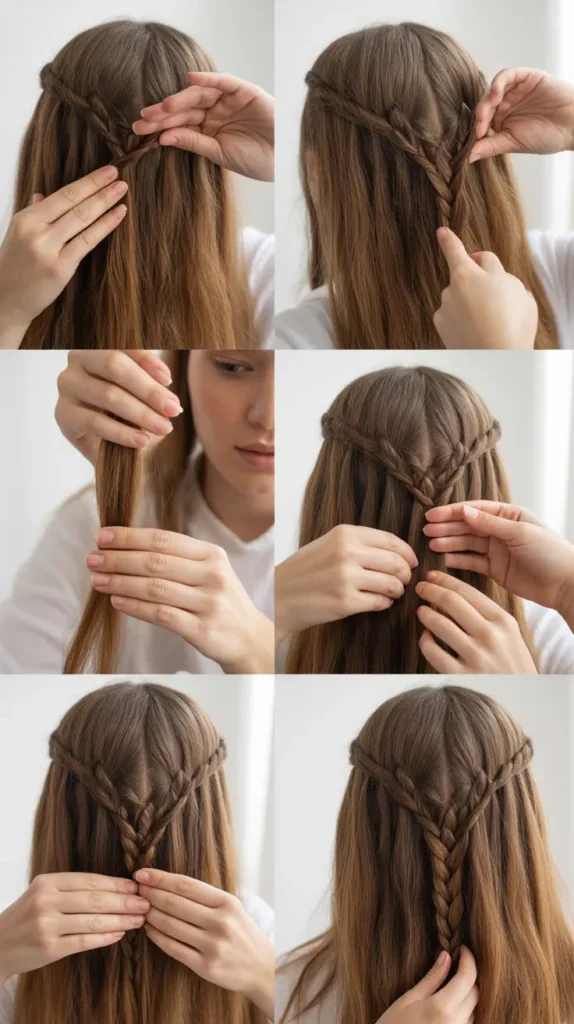
14. Braiding Down The Head
Braiding down the head may seem tricky, but it’s easier than you think. This method creates a beautiful, intricate pattern. It helps keep your hair neat and stylish.
Let’s break it down step-by-step.
15. Adding Hair To Each Section
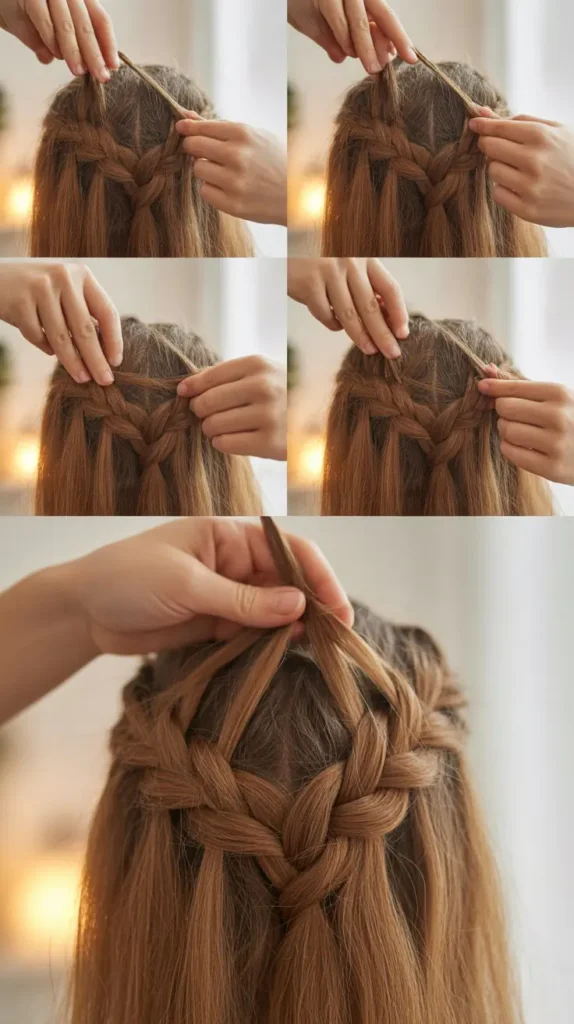
Start with three small sections of hair at the top of your head. Hold the right section in your right hand. Hold the middle section with your left hand.
Let the left section hang free for now. Cross the right section over the middle one. Now, pick up a small amount of hair from the left side. Add it to the left section.
Next, cross the left section over the middle one. Pick up a small amount of hair from the right side.
Add it to the right section. Continue this process down your head. Ensure you are adding hair evenly. This keeps the braid balanced and neat.
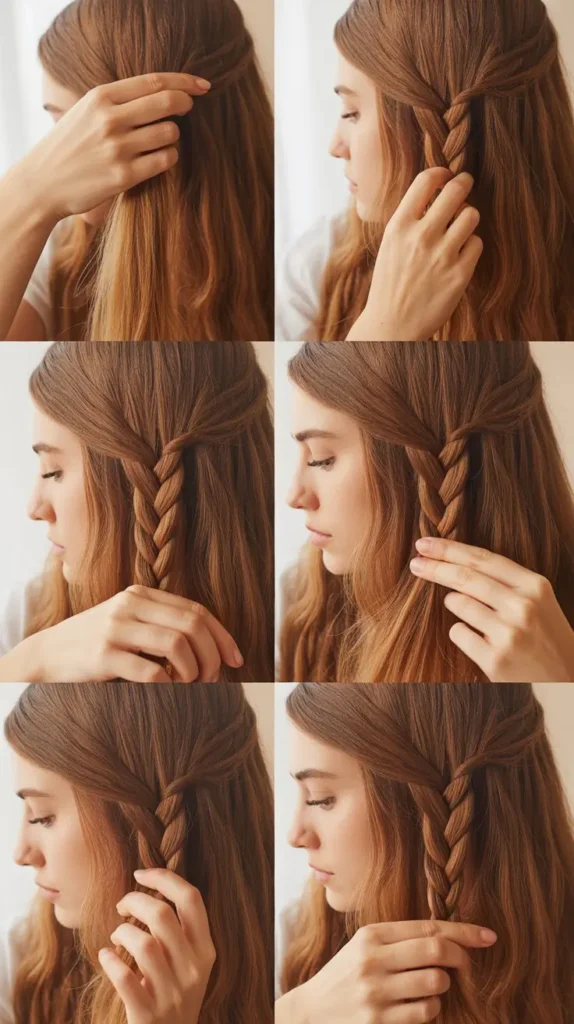
16. Maintaining Tension
Keeping the right amount of tension is crucial. Too loose, and the braid will fall apart. Too tight, and it will be uncomfortable. Hold the sections firmly but gently.
Consistency is key. As you braid, check your tension frequently. Adjust as needed.
If your arms get tired, take short breaks. Rest for a few seconds, then continue. It’s important to keep your hands and arms relaxed. This helps maintain an even tension throughout the braid.
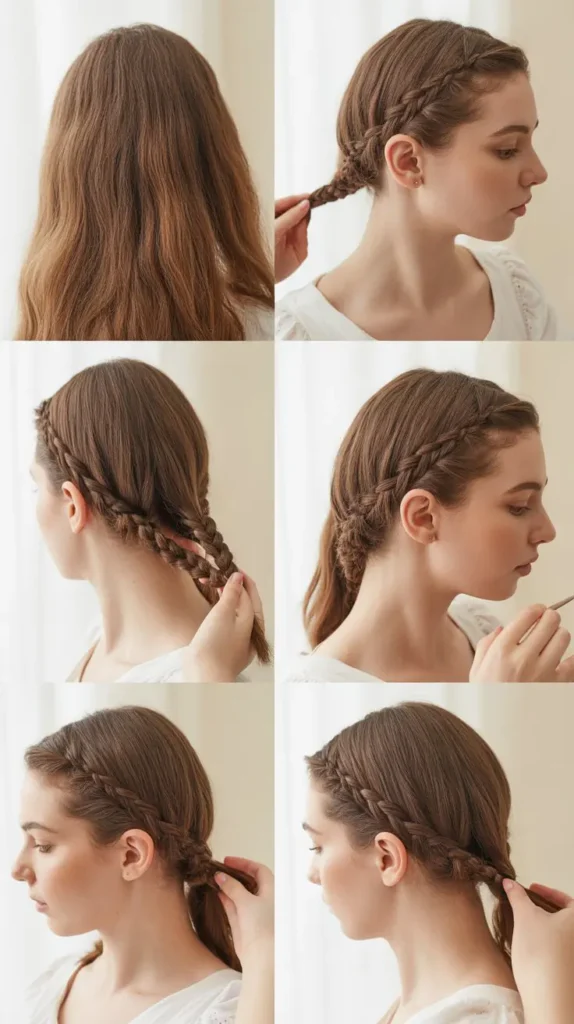
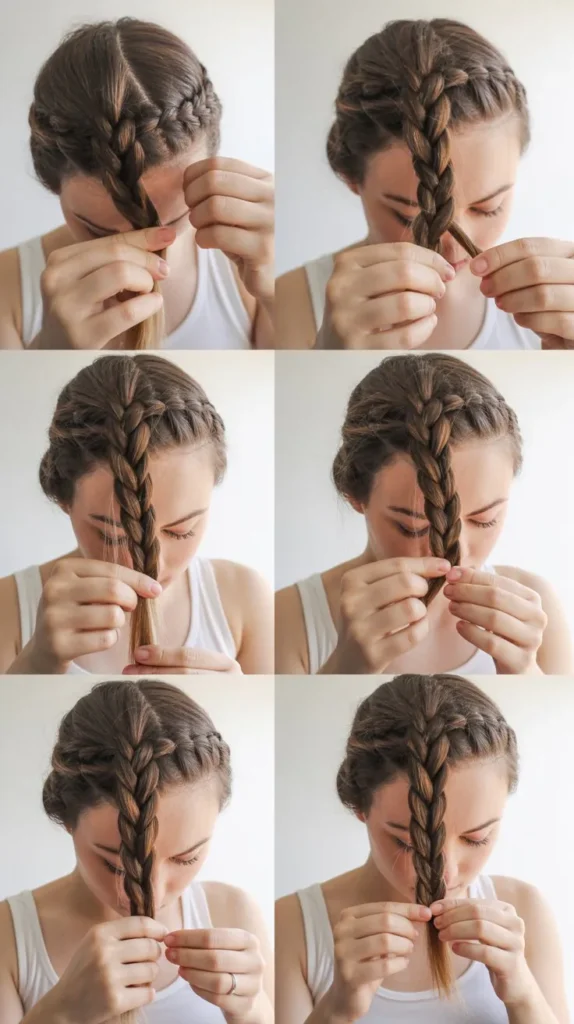
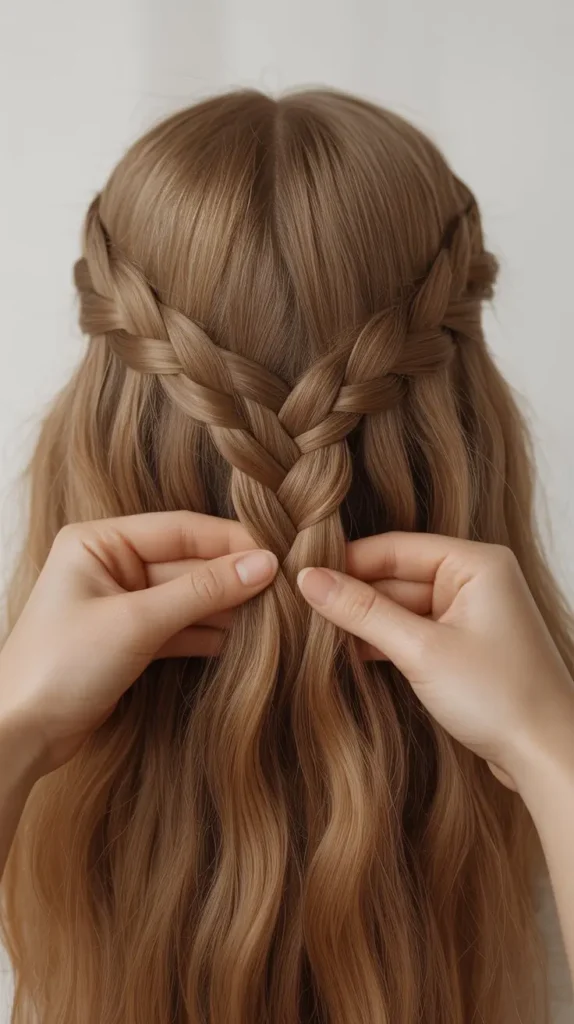
17. Finishing The Braid
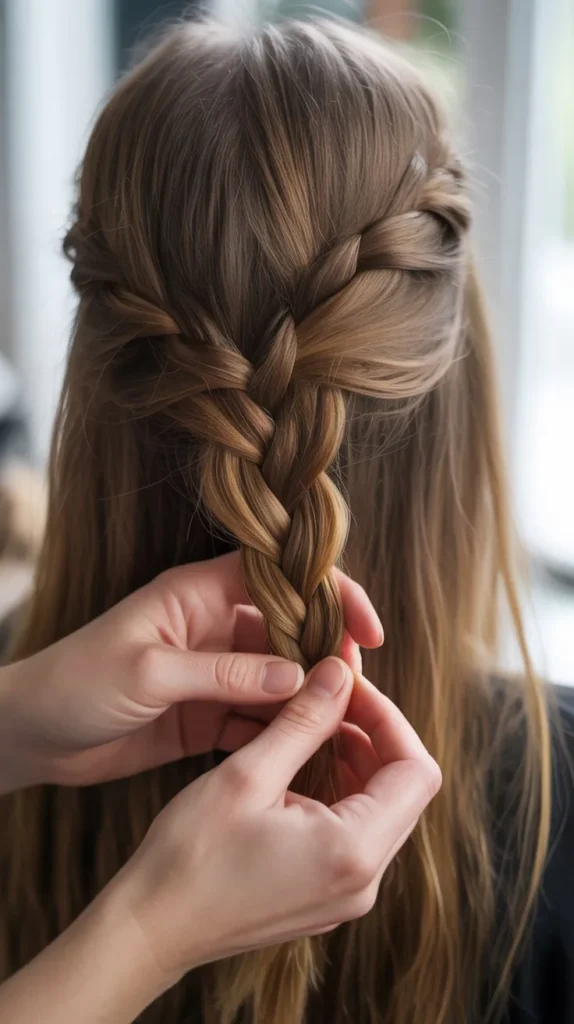
You’ve made it this far, and your Dutch braid is coming along beautifully! Now it’s time to secure your hard work and make sure your braid stays put.
This final step is crucial to ensure your braid looks polished and lasts all day. Let’s dive into the details of how to finish your Dutch braid.
18. Securing The End
First things first, you need to secure the end of your braid. This ensures that it doesn’t unravel and all your effort doesn’t go to waste. Here’s how you can do it:
- Elastic Bands: Use a small, clear elastic band to tie off the end of your braid. Clear elastics are great because they blend in with your hair, giving your braid a neat finish.
- Hairpins: If you prefer a more invisible option, hairpins can work wonders. Tuck the ends of your braid under and secure them with a couple of hairpins. This method is perfect for an elegant updo.
Tying Off The Braid
Once you’ve secured the end, it’s time to tie off the braid. This step is simple but important:
- Adjust the Tightness: Before you tie off the braid, gently tug at the sides of the braid to loosen it slightly. This makes the braid look fuller and more relaxed. Don’t pull too hard – just enough to give it a nice, even appearance.
- Tie and Secure: Wrap a hair tie around the end of the braid a few times to make sure it’s snug. If you’re using hairpins, make sure they are secure and hidden within the braid.
And there you have it! Your Dutch braid is now complete and ready to show off. Practice makes perfect, so don’t worry if it takes a few tries to get it just right. Keep experimenting and soon you’ll be braiding like a pro. Happy braiding!
19. Tips And Tricks
Mastering the Dutch braid can be a fun and rewarding experience. Knowing a few tips and tricks can make the process easier and the results more polished.
Here are some helpful hints to keep in mind.
Dealing With Layers
Layered hair can be tricky to braid. Use a bit of hair gel or mousse to tame flyaways. Start your braid with smaller sections to keep layers in place.
A tighter initial braid helps manage shorter pieces. Secure any loose ends with bobby pins.
Creating A Tighter Braid
A tight braid looks neater and lasts longer. Hold sections of hair firmly as you braid. Pull each strand taut before crossing it under.
Adjust tension as needed to keep the braid snug against your head. Practice will help you find the right balance.
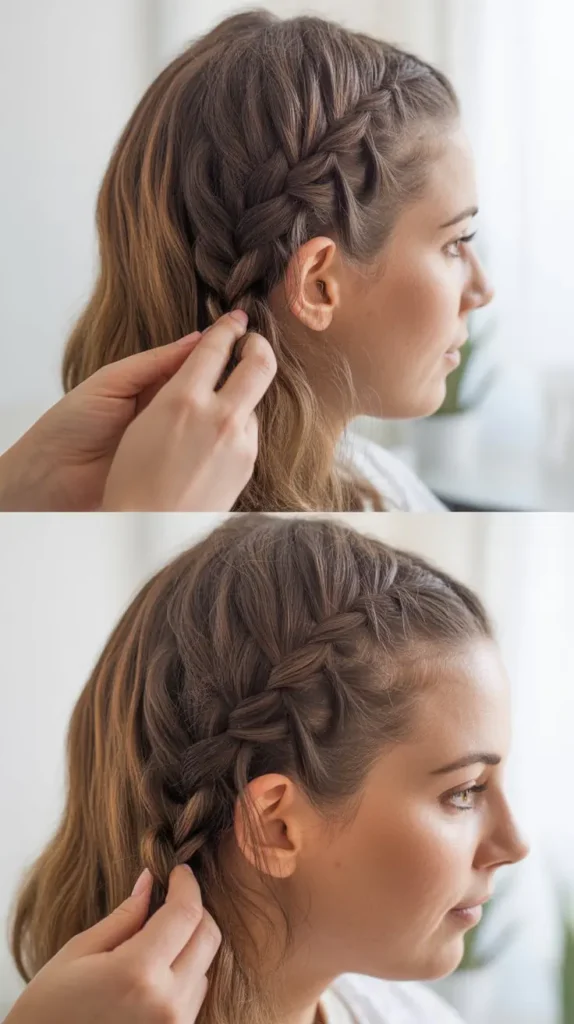
20. Styling Variations
Experiment with different styles for variety. Add ribbons or hair accessories for a fun twist. Try a side Dutch braid for a casual look.
Combine two Dutch braids into a single ponytail for a chic style. Play with the braid’s placement to suit your mood or occasion.
Common Mistakes To Avoid
If you’re new to Dutch braiding, you might find yourself making a few common mistakes along the way.
Don’t worry, it happens to the best of us! Here’s a helpful guide to steer you clear of the most frequent pitfalls.
Whether your braids are too loose, your sections are uneven, or you’re worried about hair breakage, we’ve got you covered.
21. Loose Braids
One of the most common issues when learning to Dutch braid is creating braids that are too loose. This can make your braid look messy and unstructured.
- Tighten Your Grip: As you braid, make sure to pull the strands tight. Not so tight that it hurts, but firm enough to keep the braid neat.
- Practice Makes Perfect: It might take a few tries to get the right tension, so keep practicing. Remember, even the pros started somewhere!
Uneven Sections
Another common mistake is having uneven sections of hair. This can make your braid look lopsided and unbalanced.
- Use a Comb: Before you start braiding, use a comb to divide your hair into even sections. This helps ensure each part of your braid is the same size.
- Check Your Sections: As you braid, periodically check your sections to make sure they’re still even. It’s easy for them to get mixed up as you go.
22. Hair Breakage
Nobody wants to damage their hair while braiding. Unfortunately, improper technique can lead to breakage.
| Tip | Explanation |
|---|---|
| Start with Smooth Hair: | Make sure your hair is smooth and free of tangles before you start. Use a detangling spray if necessary. |
| Don’t Pull Too Hard: | While it’s important to keep your braid tight, pulling too hard can cause hair breakage. Find a balance between firm and gentle. |
By avoiding these common mistakes, you’ll be well on your way to mastering the Dutch braid. Remember, practice makes perfect.
And, who knows, maybe you’ll soon be the one giving braiding tips to others!
Frequently Asked Questions
How To Do A Dutch Braid On Yourself For Beginners?
To do a Dutch braid on yourself, start by parting hair into three sections. Cross side strands under the middle, adding hair from the sides as you go. Continue braiding to the ends and secure with an elastic. Practice makes perfect!
Is Dutch Or French Braiding Easier?
Dutch braiding is generally easier for beginners. It involves weaving hair under, creating a raised look.
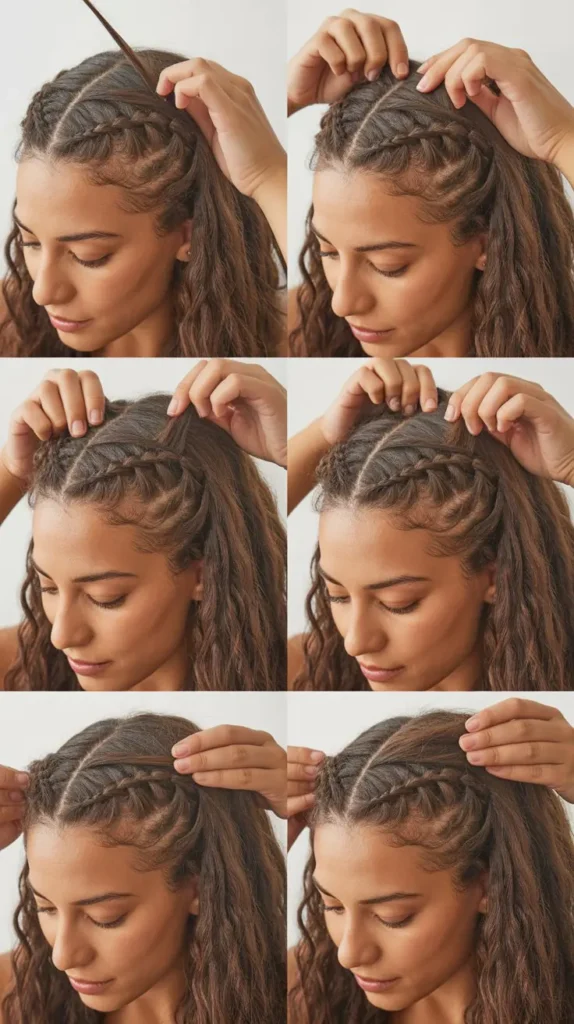
How To Do Two Dutch Braids In Your Own Hair?
To do two Dutch braids, part your hair down the middle. Start braiding from the hairline, adding sections as you go. Secure each braid with an elastic band.
Do You Go Over Or Under For A Dutch Braid?
You go under for a Dutch braid. This technique creates a raised, three-dimensional effect.
Conclusion
Braiding your own hair can be fun and rewarding. With practice, Dutch braids become easier. Remember to start with clean, tangle-free hair.
Use a mirror to check your progress. Don’t worry about perfection; practice makes perfect. Enjoy experimenting with different styles.
Share your braiding skills with friends. They might love it too. Happy braiding!