Learning how to do a French braid on yourself can seem tricky. But with practice, you can master it easily.
A French braid is a beautiful and timeless hairstyle. It looks complicated, but it’s quite simple once you get the hang of it.
This braid keeps your hair neat and stylish, perfect for any occasion.
Whether you are heading to work, school, or a special event, a French braid can be your go-to hairstyle.
In this guide, we will walk you through the steps.
You will learn how to create this classic look on your own.
Get ready to impress yourself and others with your new braiding skills!
In This Post......
Introduction To French Braiding
Learn how to create a French braid on your own with simple steps. Follow this guide for a neat, stylish look. Achieve a classic hairstyle without needing a helping hand.
Hey friends, today we’re diving into the world of French braiding.
Ever looked at those chic, intricate braids and thought, “I wish I could do that?” Well, good news. You can! And it’s easier than you might think.
French braiding is a classic hairstyle that never goes out of style.
It’s perfect for any occasion, whether you’re heading to a fancy event or just hanging out with friends. Plus, it keeps your hair neat and tidy all day long.
But why should you learn to braid?
What are the benefits of braiding your own hair?
Let’s break it down.
1. Why Learn To Braid
Learning to braid your own hair has so many perks. Here are a few reasons why you should give it a shot:
Saves Money: No need to book expensive salon appointments.
Convenience: You can do it anytime, anywhere.
Creativity: Unleash your inner stylist and try out new looks.
Confidence: Mastering a new skill feels amazing. And the best part? It doesn’t take long to learn. A little practice, and you’ll be braiding like a pro.
Benefits Of Braiding Your Own Hair
Braiding your own hair isn’t just about looking good. There are some real benefits, too.
Hair Health: Braids can help reduce hair breakage and split ends.
Time-Saving: Once you get the hang of it, braiding is quick and easy. – Versatile: From casual to formal, braids fit every occasion.
Personalized Style: Create unique styles that suit your personality. I remember when I first started braiding my hair. It was a bit tricky at first.
My arms got tired, and the braids looked messy. But with a bit of patience and practice, I got better.
Now, I can’t imagine my hair routine without it. So, are you ready to start your French braiding journey?
Let’s get those fingers moving and create some beautiful braids!
2. Essential Tools And Products
Hey friends, braiding your own hair can be a bit tricky at first, but with the right tools and products, it becomes so much easier.
Today, I’ll guide you through the essential items you need to successfully French braid your hair. Ready to get started? Let’s dive in!
Hairbrush And Comb
First things first, you need to make sure your hair is tangle-free. A good hairbrush and comb are your best friends here.
Use a brush to remove any knots and then a comb to part your hair evenly. Trust me, this step makes a world of difference.
- Hairbrush: Go for a paddle brush. It’s great for detangling and smoothing out your hair.
- Comb: A fine-tooth comb helps in making clean parts.
3. Hair Ties And Clips
Next up, you’ll need hair ties and clips.
These little tools keep everything in place while you braid.
I like to keep a few handy, just in case.
- Hair Ties: Use small, clear elastics. They are perfect for securing your braid without being too noticeable.
- Clips: Sectioning clips help keep the parts of your hair you’re not working on out of the way.
4. Styling Products
Lastly, some styling products can make a big difference. These products help your braid stay neat and last longer. Here’s what I recommend:
- Texturizing Spray: Adds grip to your hair, making it easier to braid.
- Hair Spray: Keeps everything in place. A light mist will do the trick.
- Hair Serum: Smoothes out any frizz and adds a nice shine.
And there you have it! With these essential tools and products, you’re all set to start French braiding your hair. Happy braiding!
Preparing Your Hair
Hey friends, ready to learn how to French braid your hair all by yourself?
Great! But before we dive into the braiding part, we need to prepare your hair. Proper preparation is key to making your braid look neat and stay in place longer.
This section will guide you through washing, conditioning, detangling, and blow-drying your hair. Let’s get started!
5. Washing And Conditioning
First things first, clean hair is a must. Start by washing your hair with a good shampoo.
This will remove any dirt or oil.
Then, follow up with a conditioner. Why? It makes your hair smooth and easy to manage.
Here’s a simple step-by-step:
- Wet your hair thoroughly.
- Apply a small amount of shampoo and lather up.
- Rinse out the shampoo completely.
- Apply conditioner, focusing on the ends of your hair.
- Leave the conditioner in for a few minutes, then rinse it out well.
Detangling Your Hair
Next up, you need to detangle your hair. This step is super important. Tangled hair can make braiding a real pain. Plus, it can hurt! Here’s how to detangle like a pro:
- Use a wide-tooth comb or a detangling brush.
- Start from the ends of your hair and work your way up to the roots.
- Be gentle. Tugging too hard can damage your hair.
Remember, patience is key here. Take your time to get all the knots out.
6. Blow-drying Tips
Now, it’s time to dry your hair. You can let it air dry if you prefer. But if you’re in a hurry, blow-drying is the way to go. Here’s how to do it right:
- Use a heat protectant spray. This protects your hair from heat damage.
- Section your hair into manageable parts.
- Use a round brush to dry each section, starting from the roots to the ends.
- Keep the dryer moving. Holding it in one spot can damage your hair.
And there you go! Your hair is now clean, detangled, and dry, ready for that fabulous French braid. Stay tuned for the next steps where we dive into the actual braiding process.
Fun fact: When I first learned to French braid my hair, I made sure to follow these steps. It made the whole process so much easier. So trust me, this preparation is worth it!
Basic Braiding Techniques
Hey there! So, you’re curious about learning how to do a French braid on yourself? Awesome!
It might seem tricky at first, but with a bit of practice and patience, you’ll get the hang of it.
Let’s break it down with some basic braiding techniques that will make the process easier for you. Ready? Let’s dive in!
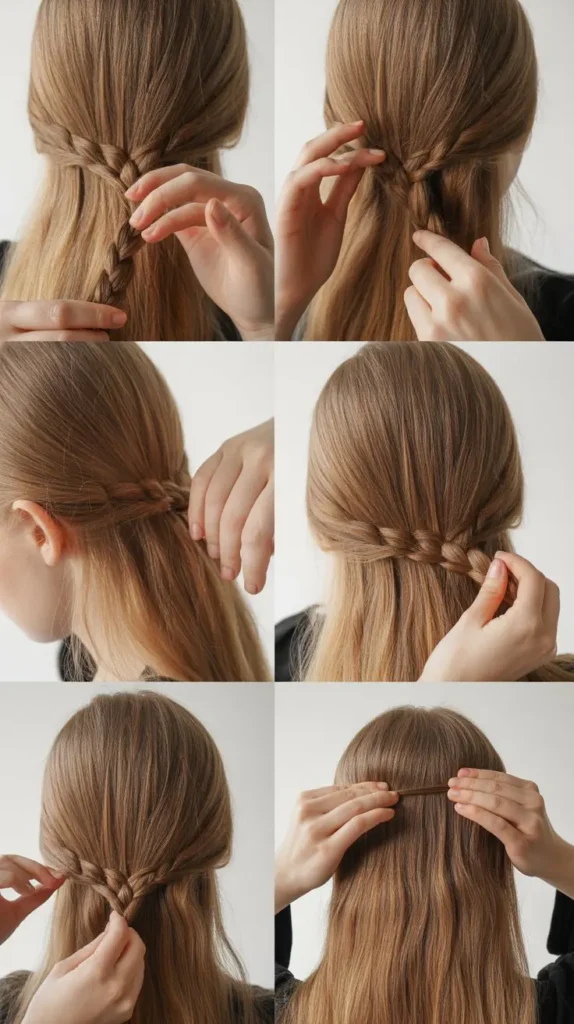
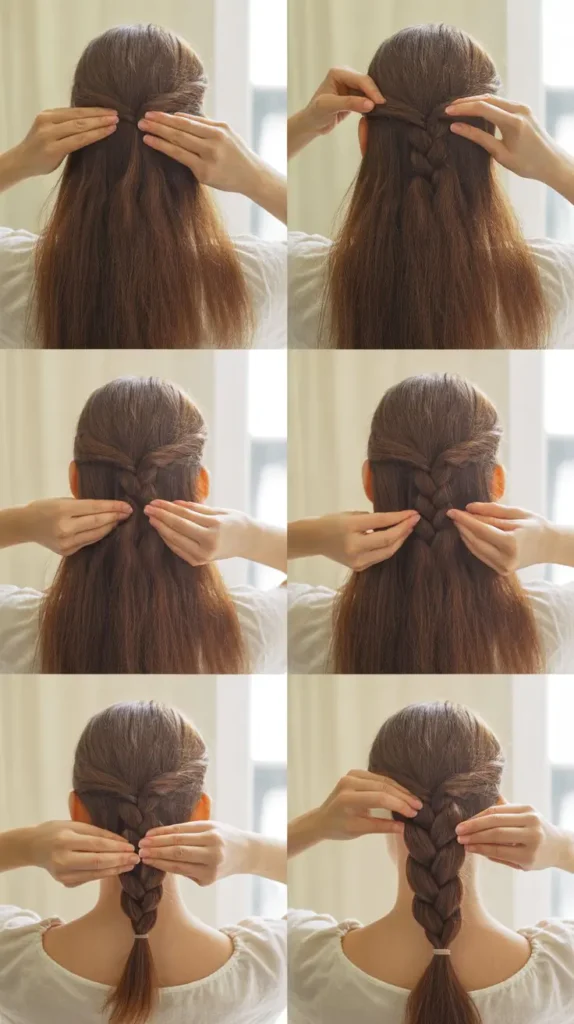
7. Sectioning Your Hair
First things first, you need to section your hair. This is crucial for a neat braid. Start by brushing your hair to remove any tangles.
Then, use a comb to divide your hair into three equal sections at the top of your head.
- Take a comb and create a horizontal part from one ear to the other.
- Use hair ties or clips to hold the bottom sections away from the top section.
- Divide the top section into three smaller, equal parts. These will be your starting strands for the braid.
Got it?
Great! Let’s move on to the next step.
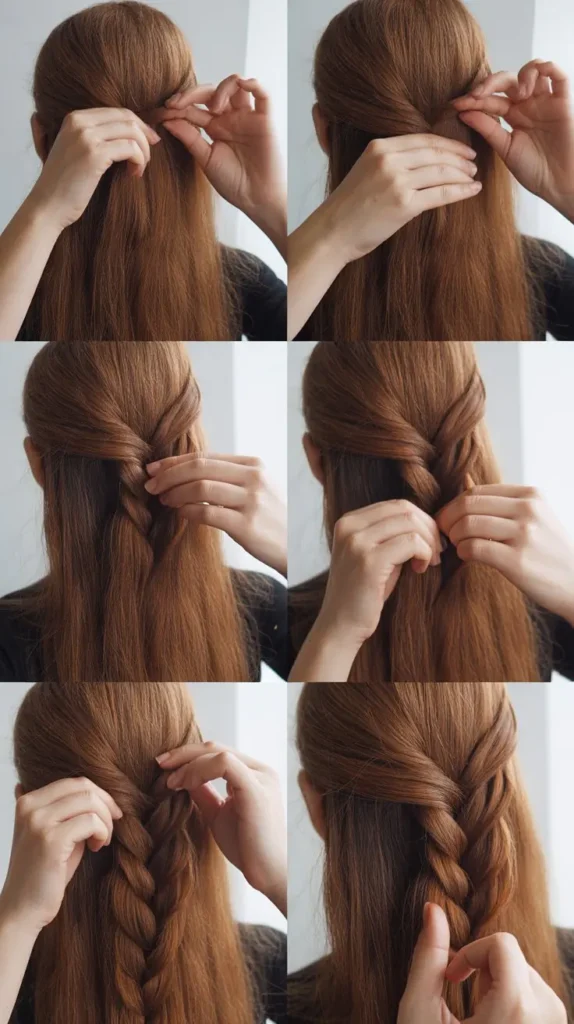
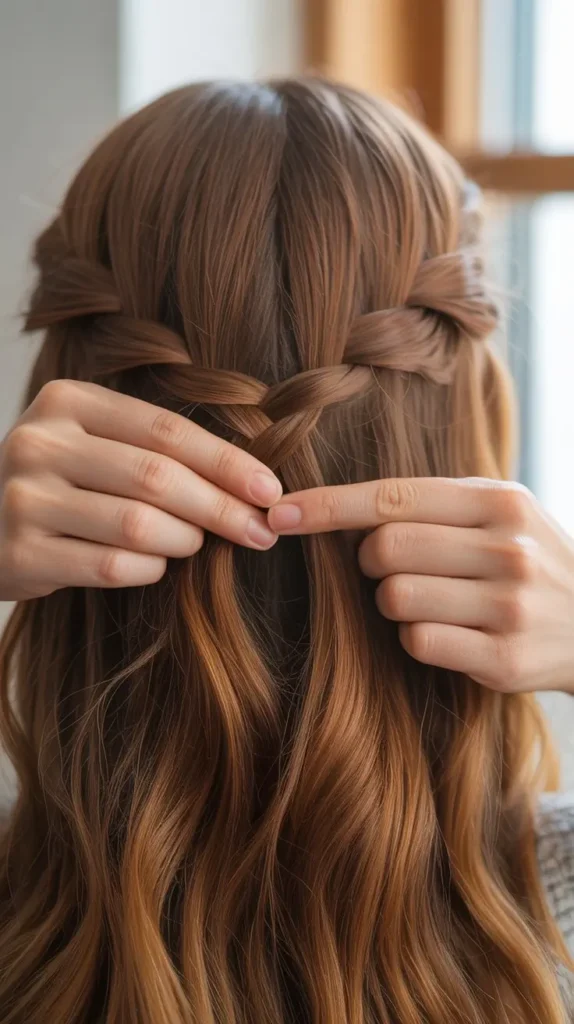
Starting The Braid
Now, let’s start the braid. Take the three sections you just made and begin a simple braid:
- Cross the right section over the middle section.
- Then, cross the left section over the new middle section.
Simple, right? This basic movement is the foundation of your French braid. Practice this a few times until you feel comfortable.
8. Adding Hair To The Braid
Here’s where it gets a bit more interesting. To create the French braid, you’ll need to add more hair to each section as you go:
- Take a small piece of hair from the right side of your head and add it to the right section.
- Then, cross this combined section over the middle section.
- Do the same on the left side: add a small piece of hair to the left section and cross it over the middle.
Keep repeating these steps, adding hair from the sides to each section before crossing over. Continue until you reach the nape of your neck.
Once all the hair is included in the braid, finish with a regular three-strand braid and secure it with a hair tie.
And there you have it! With these simple steps, you’ll be rocking a French braid in no time. Remember, practice makes perfect.
So, don’t get discouraged if it takes a few tries. Happy braiding!
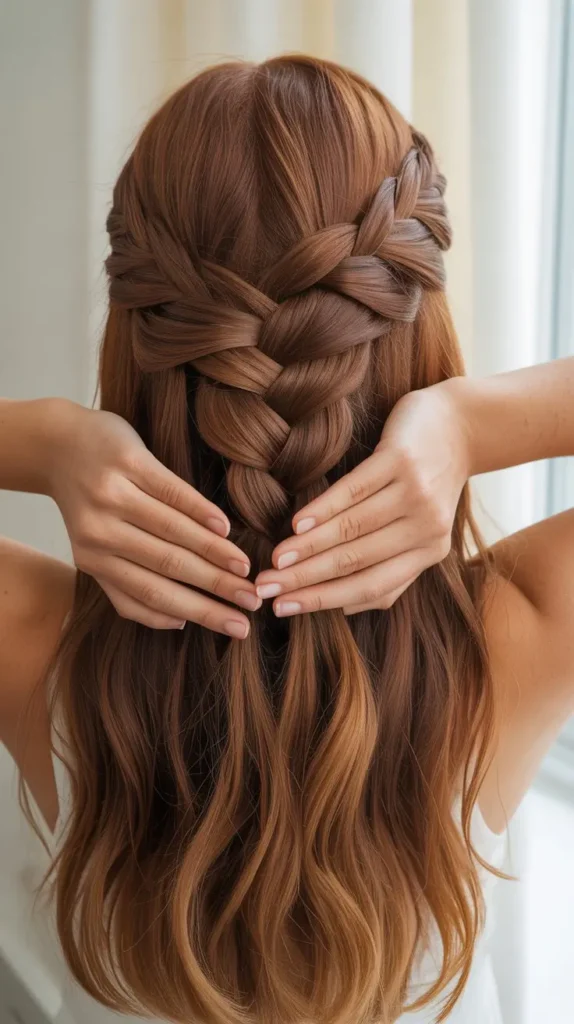
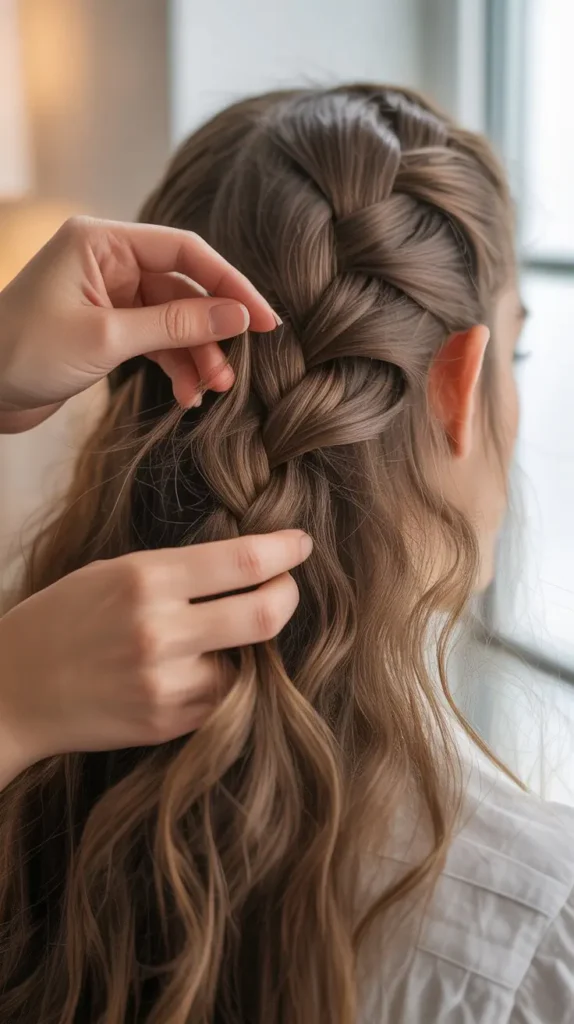
Creating A French Braid
Creating a French braid on yourself can seem challenging. But with some practice, it becomes easier.
This step-by-step guide will help you create a beautiful French braid. Follow these simple steps to achieve a neat and stylish braid.
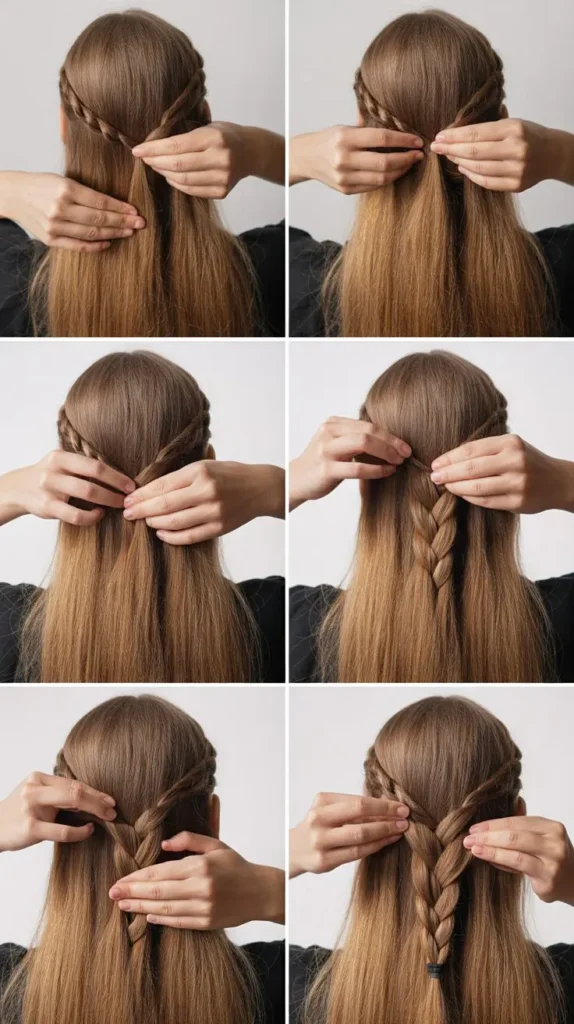
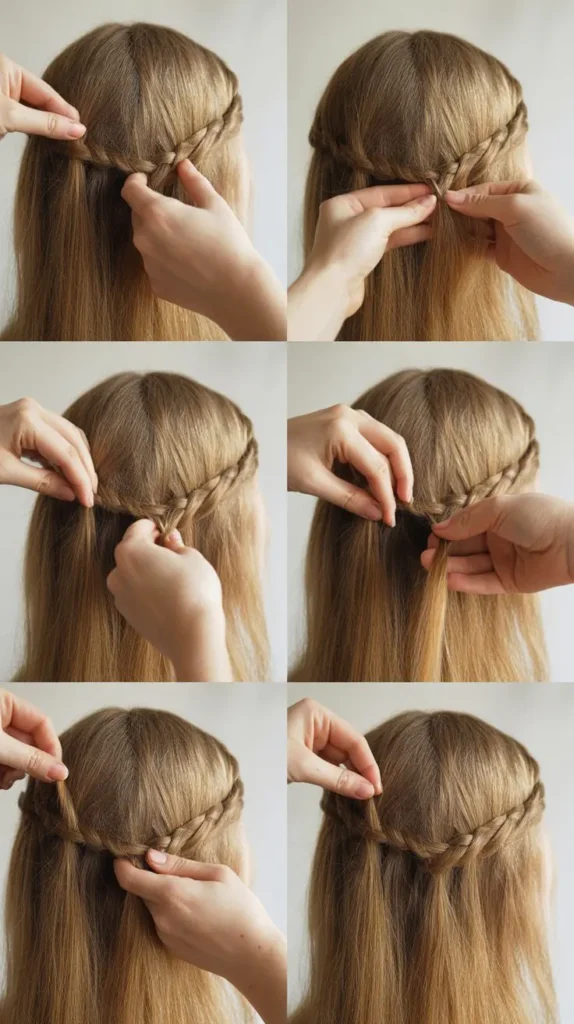
9. Starting At The Top
Begin by brushing your hair to remove tangles.
This makes the braiding process smoother.
Take a small section of hair from the crown of your head.
Divide this section into three equal strands.
Hold the right strand in your right hand, the left strand in your left hand, and the middle strand between your thumb and finger.
Incorporating Hair Strands
Start by crossing the right strand over the middle strand. Then, cross the left strand over the new middle strand. Pull tight to keep the braid neat.
Now, add a small section of hair from the right side of your head to the right strand. Cross it over the middle strand. Repeat on the left side.
Continue this pattern while adding hair each time. This ensures the braid stays close to your head.
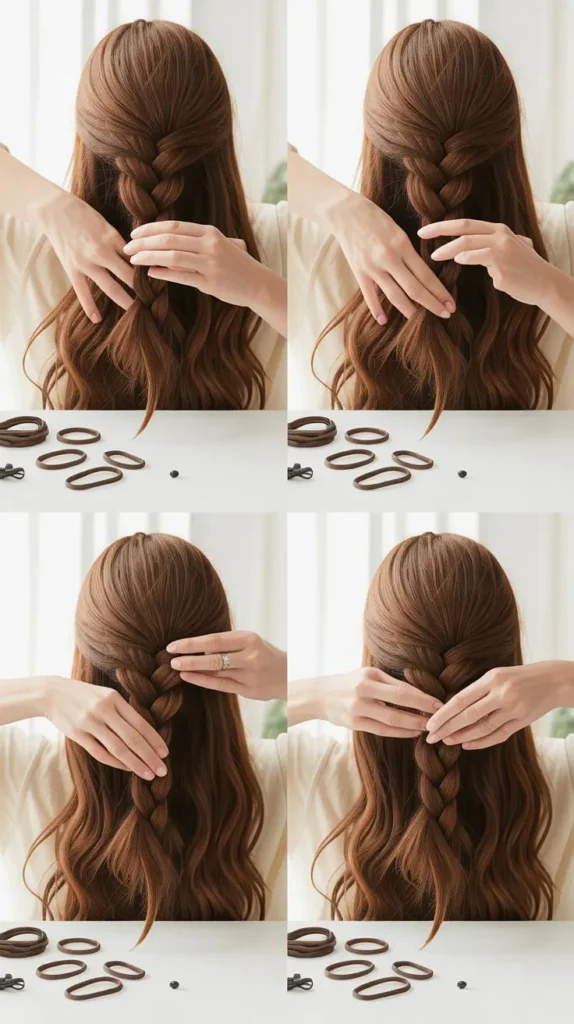
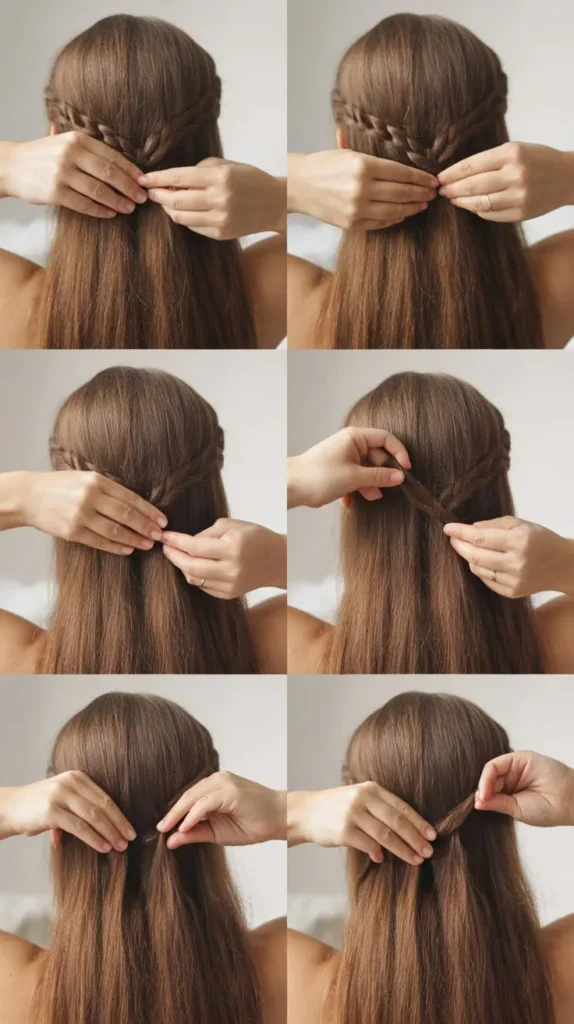
10. Securing The Braid
Once all your hair is incorporated, continue braiding until you reach the end of your hair.
Secure the braid with a hair tie.
Ensure the tie is tight to keep the braid from unraveling.
For a polished look, you can smooth down any loose hairs with a bit of hairspray.
Admire your beautiful French braid!
Common Mistakes To Avoid
Braiding your own hair can be tricky.
Many face common mistakes. Knowing these can help you achieve a perfect French braid.
Let’s explore these mistakes and how to avoid them.
Tightness Issues
One frequent mistake is braiding too tight. This can cause discomfort. It also makes the braid look unnatural.
Braid with a gentle hand. Ensure it feels comfortable.
Uneven Sections
Another common error is uneven hair sections. This can make your braid look messy.
Take time to part your hair evenly. Use a mirror to check your sections.
Loose Ends
Loose ends can ruin the look of your braid.
Ensure you secure the end well.
Use a small elastic band. For extra hold, use a bit of hairspray.
Styling Tips And Variations
Hey friends, thinking about doing a French braid on yourself? Great idea! French braids look stylish and can be worn in many ways.
In this section, I’ll share some cool styling tips and variations that can help you switch up your look. Let’s dive in!
Half-up French Braid
The Half-Up French Braid is perfect for when you want to keep your hair out of your face but still let some of it flow freely.
Here’s how you can do it:
- Start by parting your hair down the middle.
- Take a small section of hair from one side of the part.
- Begin braiding this section, incorporating more hair as you go along.
- Once you reach the crown of your head, secure the braid with a small elastic band.
Easy, right? This style is great for casual outings or even a quick coffee run. You get a little bit of structure while still enjoying the natural flow of your hair.
11. Double French Braids

Double French Braids give you that sporty and chic look. Here’s a step-by-step guide:
- Part your hair down the middle to create two equal sections.
- Start with one section and begin a French braid close to your scalp.
- Continue braiding, picking up more hair as you go down.
- Secure the end with an elastic band, and repeat on the other side.
These braids are great for workouts, outdoor activities, or just a day when you want to keep your hair out of the way.
I remember trying this look for a hiking trip—it kept my hair neat and I still looked stylish in all my photos!
French Braid Bun
If you’re aiming for a more elegant look, the French Braid Bun is for you. Here’s how you can achieve it:
- Start by making a regular French braid from the top of your head all the way down.
- Once the braid is complete, twist it into a bun at the nape of your neck.
- Secure the bun with bobby pins and an elastic band.
This style is perfect for formal events or even a day at the office. The braid adds a touch of detail, while the bun keeps everything polished.
So there you have it! Three easy variations to keep your French braid game strong. Try them out and see which one you like best!
Maintaining Your Braid
Keeping your French braid looking fresh and neat can be a challenge. It’s essential to take proper care of it.
This will ensure it lasts longer and remains stylish. Here are some tips on maintaining your braid.
Keeping The Braid Intact
To keep your braid intact, start by using a good hair tie. Secure the end tightly to avoid unraveling.
Avoid touching your braid too much. This can lead to frizz and loosen the braid.
Consider using a light hairspray to help hold the braid in place.
Refreshing Your Braid
If your braid begins to look messy, you can refresh it.
Gently pull on the sections of the braid to tighten them.
Use a small amount of dry shampoo at the roots.
This will absorb oil and add volume. You can also re-braid any sections that have come loose.
Removing The Braid Safely
When removing your braid, do it carefully to avoid damaging your hair.
Start at the bottom and work your way up.
Gently untie the hair tie and unravel the braid.
Use your fingers or a wide-tooth comb to detangle your hair.
Be patient to prevent breakage.
Frequently Asked Questions
How To Do A French Braid Step By Step For Beginners On Yourself?
Start by brushing your hair.
Divide it into three sections at the crown.
Cross the right section over the middle, then the left over the new middle.
Continue adding small hair sections, braiding to the end.
Secure with an elastic band.
Is It Easier To French Or Dutch Braid On Yourself?
French braiding is generally easier for beginners to do on themselves compared to Dutch braiding.
French braids lie flat, making the process simpler.
What Is The Easiest Braid To Do On Yourself?
The easiest braid to do on yourself is the simple three-strand braid.
It’s quick, classic, and beginner-friendly.
Is It Easier To French Braid Your Own Hair Wet Or Dry?
French braiding your hair is easier when it’s slightly damp.
Damp hair is more manageable and less prone to tangling.
Conclusion
Creating a French braid on yourself can seem hard at first. Practice makes it easier. Start by sectioning your hair. Keep your hands steady and follow each step.
Soon, you will braid with confidence. Remember, it’s all about patience and practice.
Don’t rush the process. Enjoy learning a new skill. With time, you will see improvement. Keep braiding and enjoy your stylish new look!