Every parent knows the daily struggle of keeping their child’s hair neatly styled and out of their face, especially during active playtime, school hours, or mealtime.
Finding hairstyles that are both practical and adorable while being quick enough to create during busy mornings can feel like an impossible task.
This comprehensive guide presents 37 Cute and Easy Kids’ Hairstyles to Keep Hair Out of the Face, offering solutions for every hair type, length, and skill level.
From simple ponytails with creative twists to intricate braided styles that stay put all day, these hairstyles combine functionality with fun, ensuring your child looks great while staying comfortable.
Whether you’re styling your daughter for school, sports activities, special occasions, or just everyday play, you’ll discover step-by-step techniques that work for toddlers through tweens, accommodating fine hair, thick hair, curly textures, and everything in between.
Get ready to transform your morning hair routine with styles that your kids will love wearing and you’ll love creating.
In This Post......
- 1. Classic High Ponytail
- 2. Double Dutch Braids
- 3. Side Swept Braid
- 4. Top Knot Bun
- 5. Braided Headband
- 6. Criss-Cross Ponytails
- 7. French Braid Crown
- 8. Bubble Ponytail
- 9. Low Twisted Bun
- 10. Pigtails with Braided Base
- 11. Waterfall Braid
- 12. Space Buns
- 13. Rope Braid Ponytail
- 14. Half-Up Top Knot
- 15. Braided Pigtails
- 16. Twisted Side Ponytail
- 17. Double Buns
- 18. Mohawk Braid
- 19. Twisted Crown
- 20. Pull-Through Braid
- 21. Side French Braid
- 22. Zigzag Part Ponytails
- 23. Low Braided Bun
- 24. Twisted Pigtails
- 25. Heart-Shaped Buns
- 26. Braided Ponytail with Ribbon
- 27. Dutch Braid Bun
- 28. Cornrow Ponytail
- 29. Side Bun with Twist
- 30. Multiple Mini Buns
- 31. Fishtail Braid
- 32. Bandana Wrapped Ponytail
- 33. Braided Headband with Ponytail
- 34. Rosette Bun
- 35. Boxer Braids
- 36. Scarf-Wrapped Bun
- 37. Half-Up Braided Crown
- Hair Type Considerations
- Age-Appropriate Styling
- Quick Morning Routine Tips
- Essential Tools and Products
- Dealing with Common Challenges
- Seasonal Styling Considerations
- Building Independence
- School Dress Code Compliance
- Cultural Considerations
- Special Occasion Styling
- Hygiene and Hair Health
- Budget-Friendly Styling
- Troubleshooting Common Issues
- Transition Hairstyles for Different Hair Lengths
- Sensory-Friendly Styling
- Environmental Considerations
- Building a Hairstyle Routine
- Conclusion
1. Classic High Ponytail
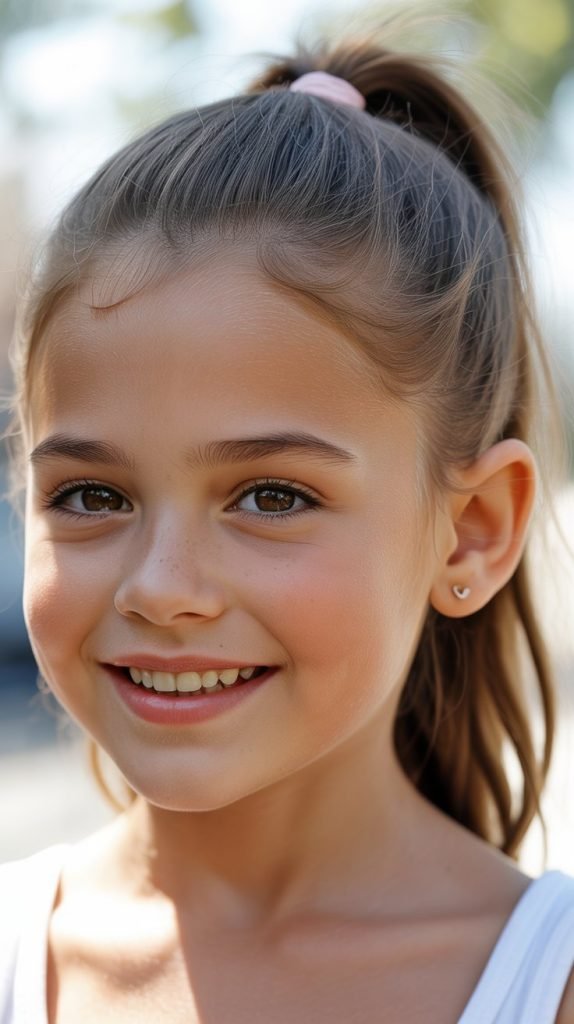
The classic high ponytail remains one of the most effective and timeless hairstyles for keeping hair completely off the face and neck.
This versatile style works for school, sports, and play, making it a go-to option for busy parents who need reliable results in minimal time.
Why It Works:
- The high placement on the crown ensures every strand is pulled away from the face, preventing hair from falling forward during activities.
- This style suits all hair types, from straight and fine to thick and curly, making it universally accessible.
- A single elastic band is all you need, making this the most budget-friendly and quick hairstyle option.
- The ponytail can be positioned higher or lower depending on your child’s comfort level and hair thickness.
Step-by-Step Process:
- Brush all hair upward toward the crown of the head, smoothing any bumps or tangles as you go.
- Gather the hair at the desired height, typically at the highest point of the head for maximum face clearance.
- Secure with a hair elastic, wrapping it multiple times to ensure the ponytail stays tight throughout the day.
- Use a bit of water or smoothing cream on flyaways if you want a polished look for special occasions.
Pro Tips:
- Choose fabric-covered elastics rather than rubber bands to prevent hair breakage and damage.
- For extra security during sports or active play, use two elastics stacked together.
- Add a colorful scrunchie or bow for a fun decorative element that kids love.
- If your child has a sensitive scalp, position the ponytail slightly lower to reduce tension.
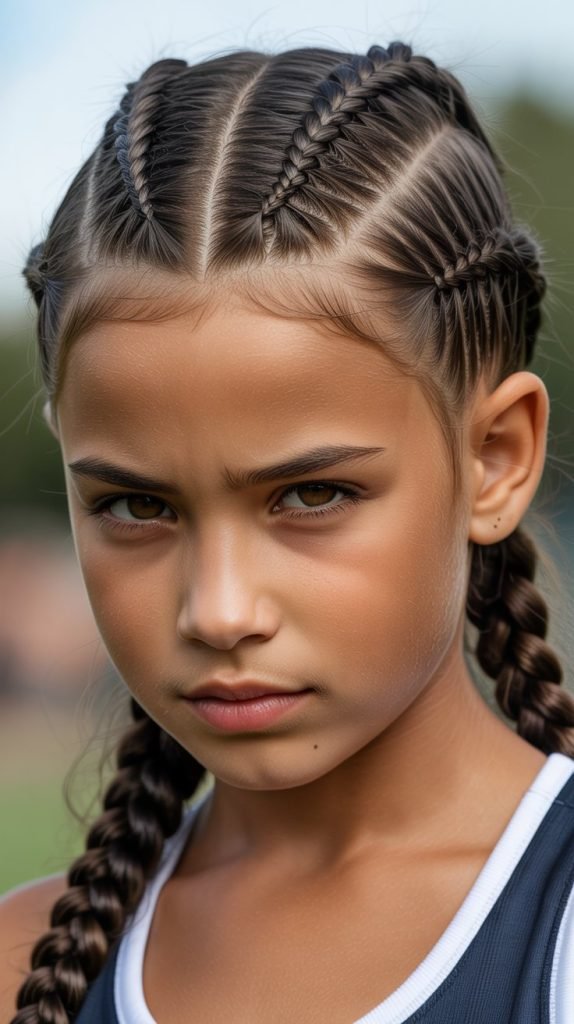
2. Double Dutch Braids
Double Dutch braids create a sporty, secure style that keeps hair completely contained from the hairline to the ends.
These raised braids sit on top of the head rather than lying flat, creating dimension while providing all-day hold that withstands even the most active children.
Technique Overview:
- Dutch braids are created by crossing hair sections under rather than over, making them stand out from the scalp.
- Starting at the hairline ensures that even the shortest face-framing pieces are incorporated into the braids.
- This style typically lasts multiple days with proper nighttime care, making it ideal for busy schedules.
- The tight weaving keeps hair secure during swimming, sports, or roughhousing without coming loose.
Creating the Style:
- Part hair down the center from forehead to nape, creating two equal sections.
- Begin at the hairline on one side, taking three small sections of hair to start the braid.
- Cross the outer sections under the middle section rather than over it, adding new hair with each crossing.
- Continue braiding down to the ends, then secure with an elastic and repeat on the other side.
Longevity Tips:
- Spray braids lightly with water and a leave-in conditioner before bed to maintain the style overnight.
- Have your child sleep in a silk or satin bonnet to prevent frizz and preserve the braids.
- These braids typically last 2-4 days depending on hair texture and activity level.
- When taking down braids, apply conditioner first to prevent tangles and breakage.
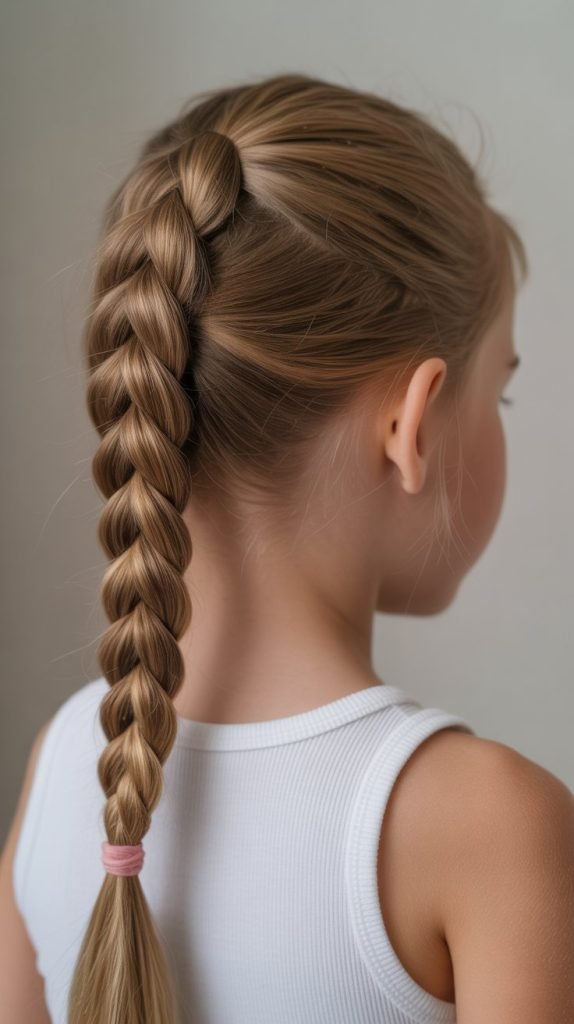
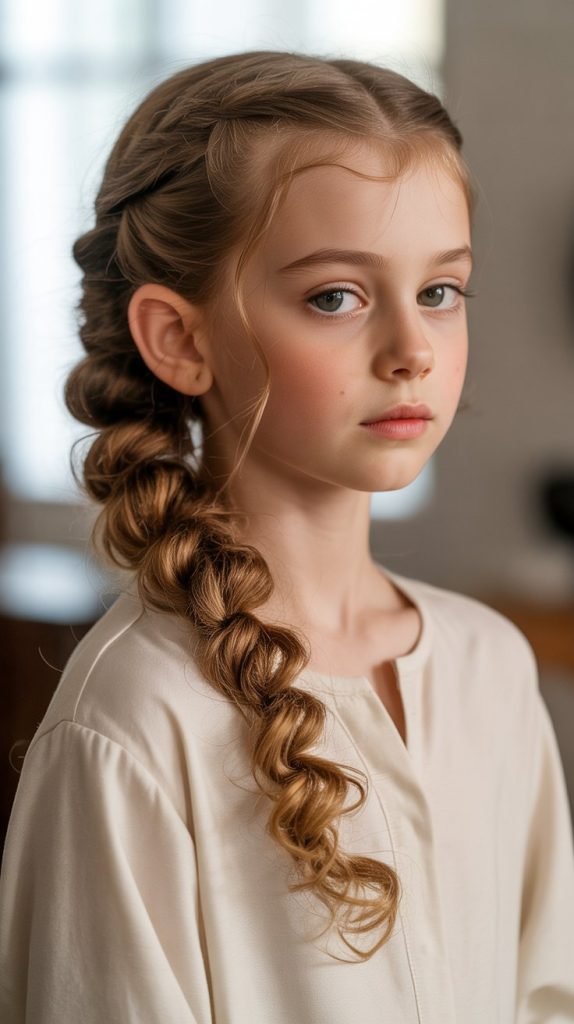
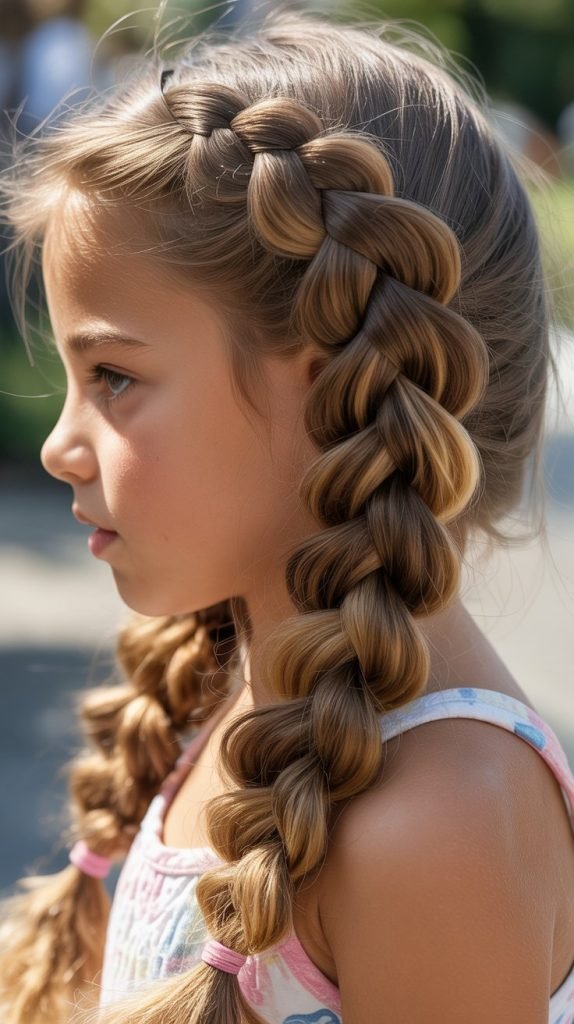
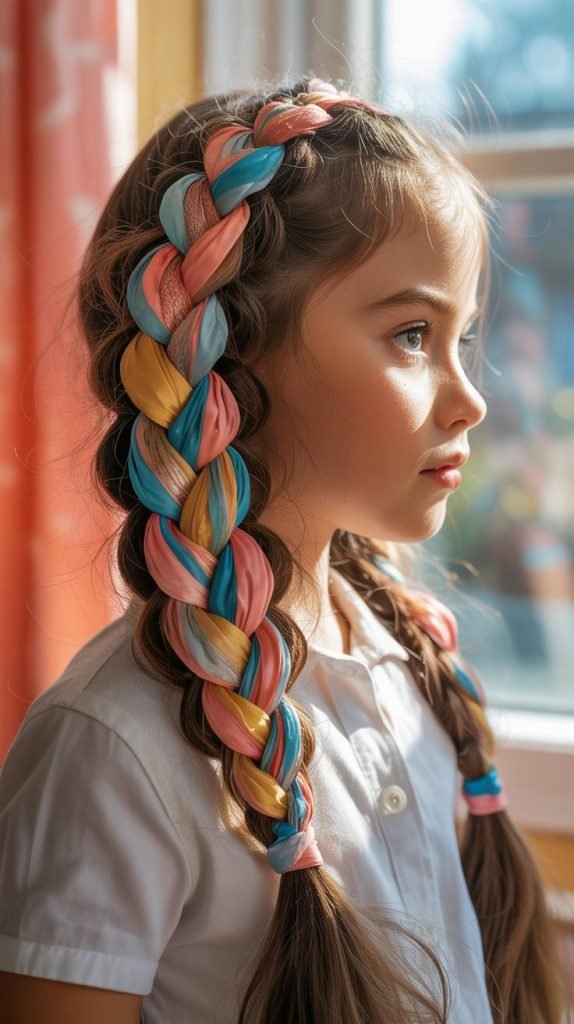
3. Side Swept Braid
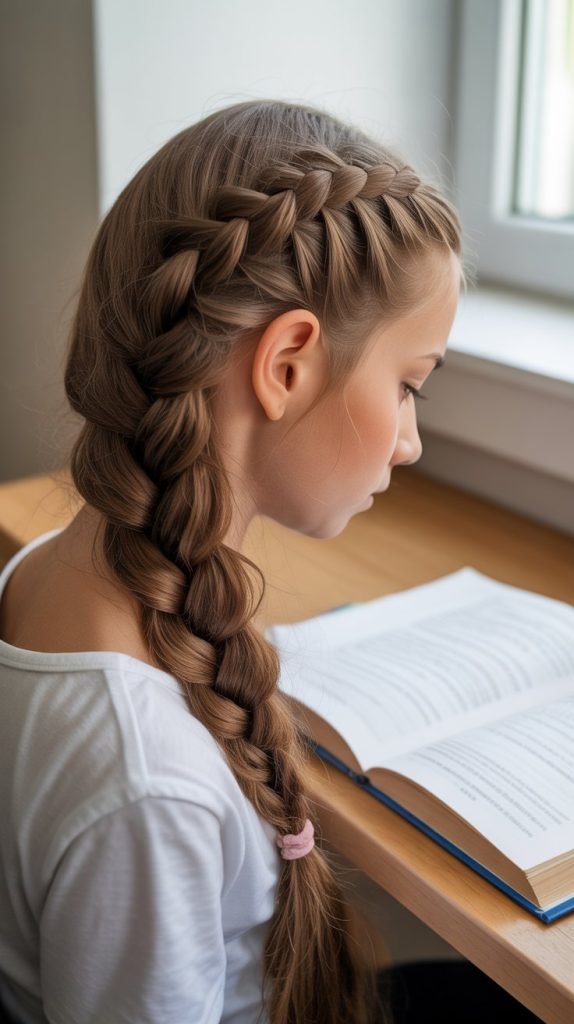
A side swept braid combines elegance with practicality, pulling all hair to one side and securing it in a braid that drapes over the shoulder.
This asymmetrical style is perfect for children who want something pretty but still functional for everyday activities.
Style Characteristics:
- All hair is gathered to one side before braiding begins, creating an asymmetrical look that’s both stylish and secure.
- This works particularly well for medium to long hair that has enough length to reach past the shoulder.
- The side placement means the braid stays visible to the child, allowing them to play with it or admire their hairstyle.
- Face-framing pieces are completely incorporated, ensuring no hair falls forward during activities.
How to Create:
- Brush all hair to one side of the head, positioning it behind the ear on the chosen side.
- Begin braiding at ear level, incorporating any remaining loose hair into the first few crossings.
- Continue with a standard three-strand braid down to the ends of the hair.
- Secure with an elastic and gently pull on the braid edges to create a fuller, more voluminous appearance if desired.
Variations:
- Create a Dutch or French braid starting at the temple for a more intricate look.
- Add small clips or flowers along the braid for special occasions.
- Incorporate ribbon into the braid by attaching it at the starting point for added decoration.
- For fine hair, pancake the braid by gently pulling the sections to make it appear thicker.
4. Top Knot Bun
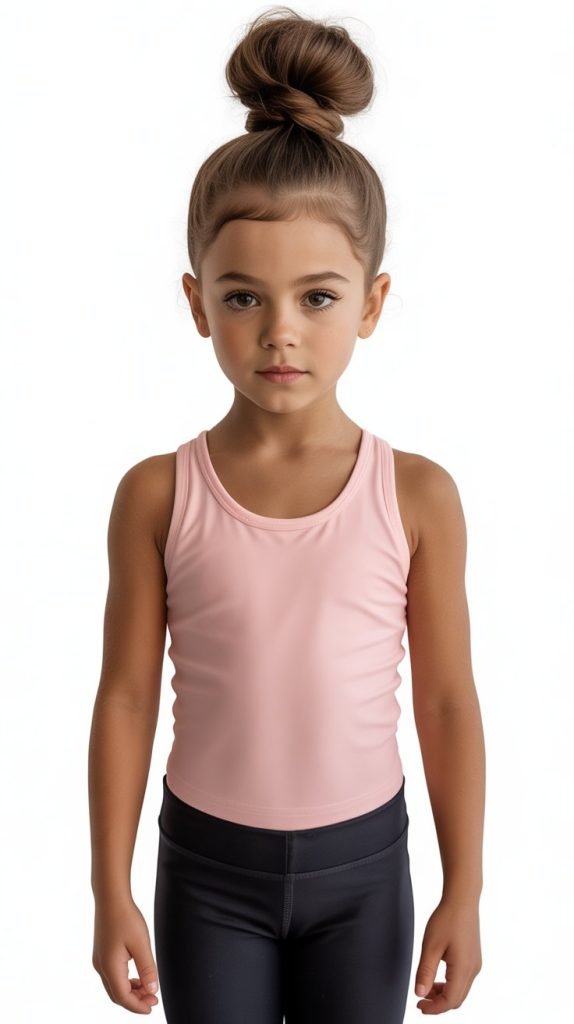
The top knot bun creates a fun, playful style that keeps every strand secured on top of the head in a contained bundle.
This style is particularly popular for dance classes, gymnastics, or any activity where loose hair would be distracting or dangerous.
Practical Benefits:
- Elevating all hair to the top of the head means zero hair touches the face, neck, or shoulders.
- The bun stays in place during flips, rolls, and upside-down positions, making it ideal for gymnastics.
- This style works for hair of various lengths, from shoulder-length to very long.
- The contained nature prevents hair from getting caught in equipment, zippers, or other hazards.
Construction Method:
- Gather all hair into a high ponytail at the crown, smoothing thoroughly as you pull upward.
- Secure the ponytail with a strong elastic, ensuring it’s tight enough to hold all day.
- Twist the ponytail length around the base of the elastic, coiling it into a bun shape.
- Use another elastic or bobby pins to secure the bun, tucking any loose ends underneath.
Securing Tips:
- For extra hold, use a hair donut or bun maker to create a fuller, more stable bun structure.
- Bobby pins should be inserted with the wavy side down against the scalp for better grip.
- A light spritz of hairspray helps control flyaways and keeps the style polished.
- For very active children, consider using a hair net over the bun for maximum security.
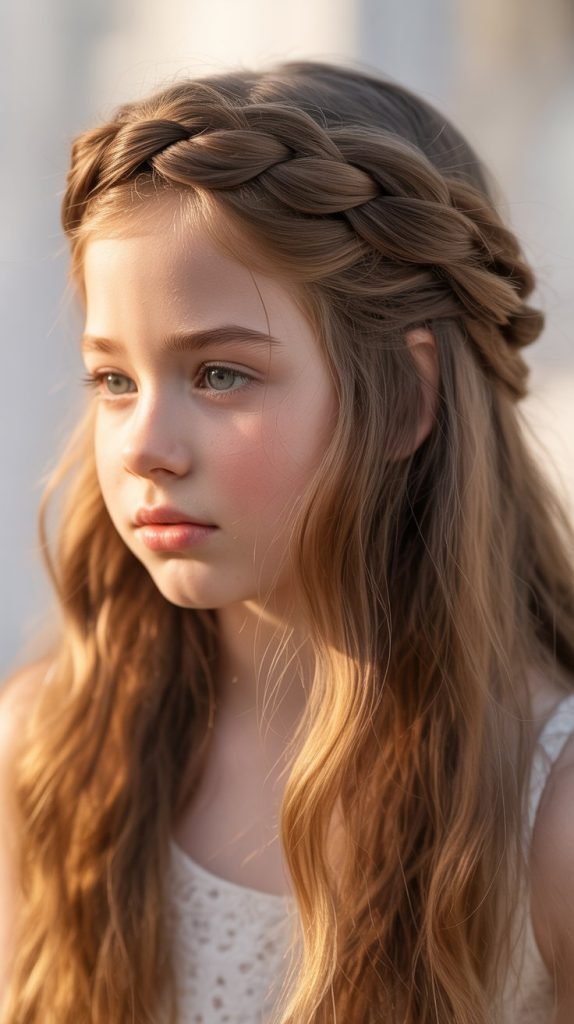
5. Braided Headband
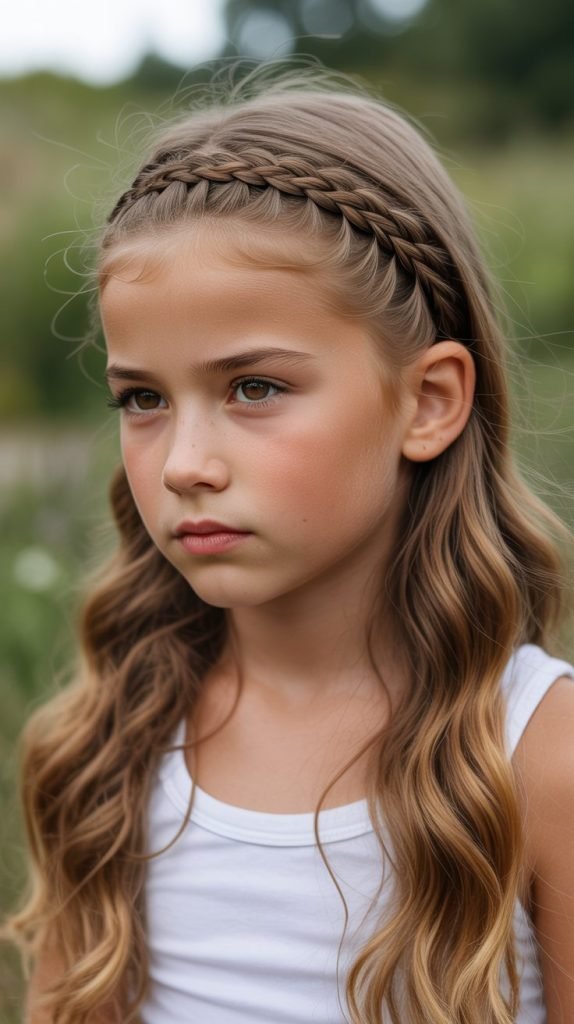
The braided headband style uses the child’s own hair to create a braid that arcs across the top of the head like a crown, keeping front sections secured while leaving the rest of the hair down or in another style.
This hybrid approach offers the best of both worlds—secured face-framing hair with the freedom of loose hair in back.
Design Features:
- A thin section of hair from one side is braided across the top of the head to the opposite side.
- This creates a natural headband effect without needing any accessories.
- The remaining hair can be left down, put in a ponytail, or styled in countless other ways.
- Face-framing sections are pulled back into the braid, keeping them out of the eyes.
Creating the Look:
- Part hair from ear to ear across the top of the head, clipping the back section out of the way.
- Take a small section from one side near the ear and divide into three pieces.
- Create a Dutch or French braid across the top of the head, adding hair only from the front section.
- When you reach the opposite ear, secure with a small elastic or bobby pins behind the ear.
Styling Options:
- Add small flowers, clips, or beads along the braided headband for special occasions.
- Create multiple thin braids instead of one for a more bohemian appearance.
- Combine with a low ponytail or bun for a complete updo variation.
- This style works beautifully for both casual daily wear and formal events like weddings or parties.
6. Criss-Cross Ponytails
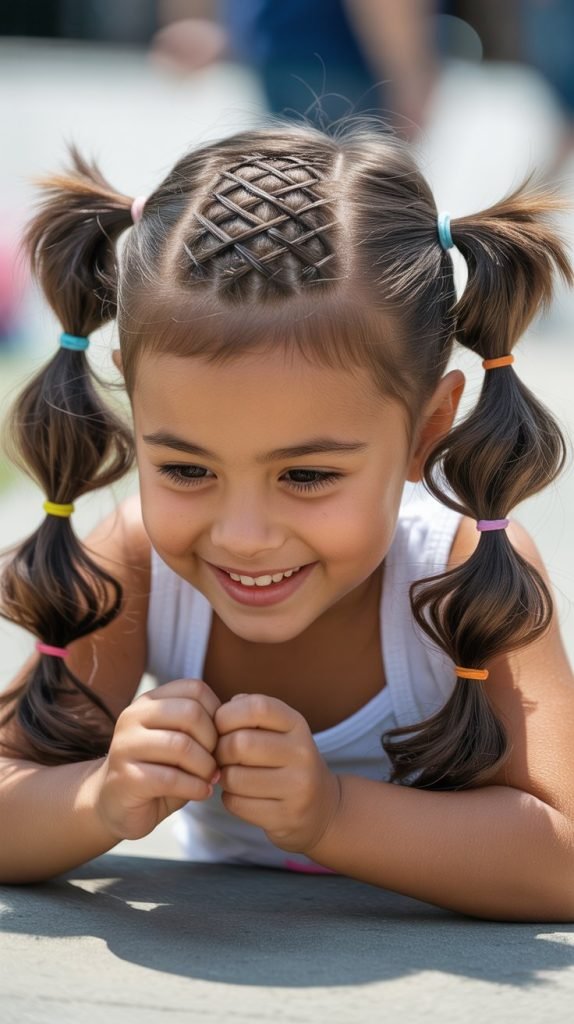
Criss-cross ponytails create an eye-catching geometric pattern on the head while effectively securing hair in two ponytails.
This playful style is particularly appealing to younger children who enjoy colorful and fun hairstyles that still serve the practical purpose of keeping hair controlled.
Pattern Details:
- The unique criss-cross parting creates visual interest that sets this style apart from basic double ponytails.
- Each ponytail incorporates hair from both sides of the head, creating the crossing pattern.
- The style works for various hair lengths, though it’s most effective on hair past shoulder length.
- Face-framing hair is completely secured on both sides, preventing any strands from falling forward.
Step-by-Step Instructions:
- Part hair from the center of the forehead back to the crown in a diagonal line going right.
- Create a second diagonal part going left, forming an X pattern on top of the head.
- Gather the right front and left back sections together into a ponytail on the right side.
- Repeat with the left front and right back sections, securing on the left side.
Making It Special:
- Use two different colored elastics to highlight the criss-cross design.
- Add matching ribbons or bows to each ponytail for a coordinated look.
- The ponytails can be positioned high, medium, or low depending on preference.
- This style works well for picture day or special events when you want something unique but not overly complicated.
7. French Braid Crown
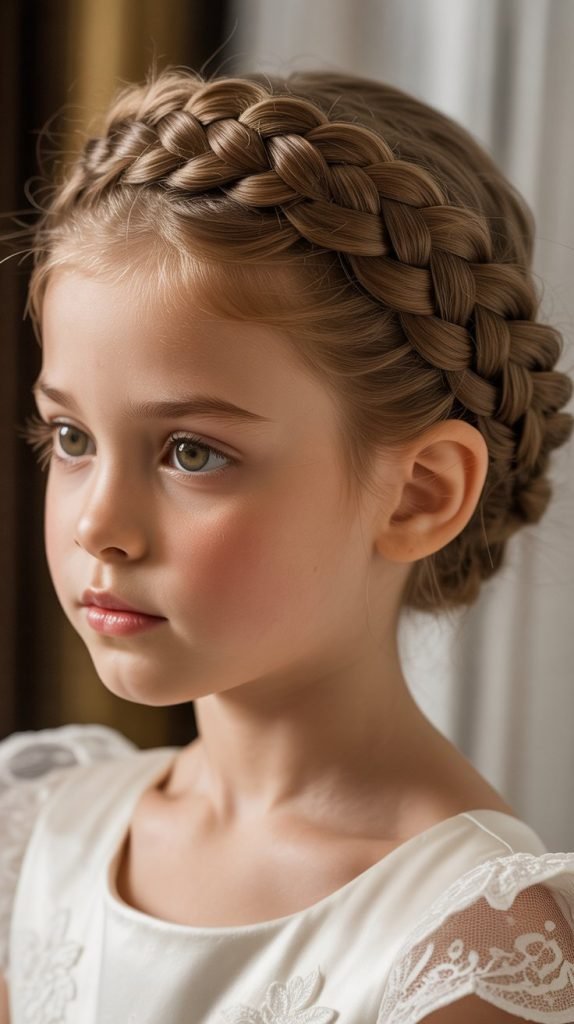
The French braid crown wraps around the head in a circular pattern, creating a regal appearance while securing every single strand of hair.
This all-encompassing style is perfect for special occasions or when you need hair to stay absolutely perfect all day long.
Crown Characteristics:
- The braid begins at one ear and curves around the head, ending where it started.
- All hair is incorporated into the braid, leaving nothing loose to fall into the face.
- This style has a fairy-tale quality that appeals to children who love princess aesthetics.
- Despite looking intricate, the crown braid is quite secure and lasts through active play.
Creating the Crown:
- Start at the hairline behind one ear with a small three-strand braid.
- Move around the head toward the forehead, adding hair from both the hairline and the interior as you braid.
- Continue around the entire head, curving the braid to follow the hairline.
- When you return to the starting point, finish the braid with remaining hair and tuck the end under the beginning.
Finishing Touches:
- Use small bobby pins to secure the braid to the head at intervals for extra stability.
- The tucked end can be pinned underneath the crown for an invisible finish.
- Add small flowers, pearls, or decorative pins along the crown for special events.
- A light mist of hairspray helps control any flyaways and adds polish to the finished look.
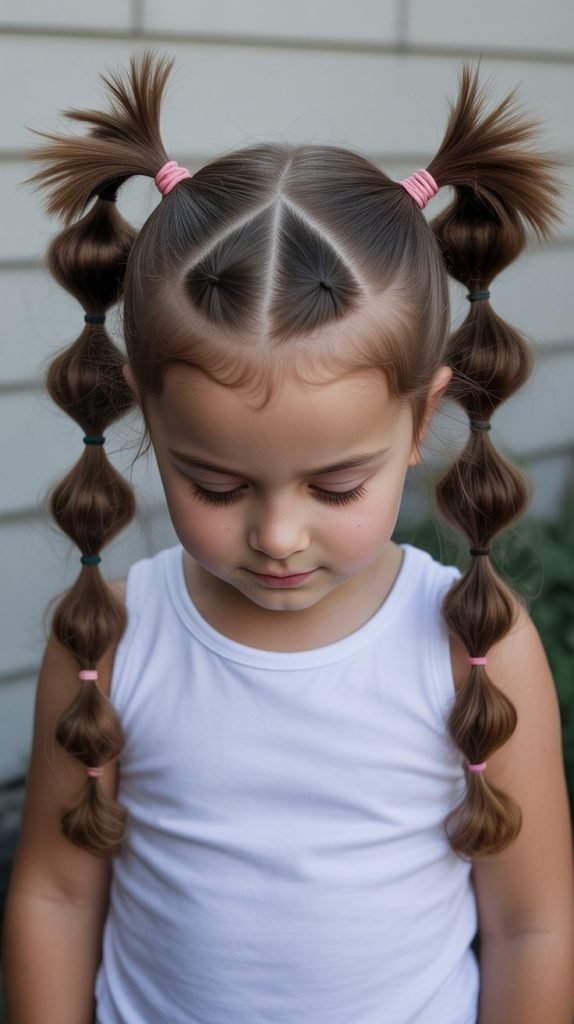
8. Bubble Ponytail
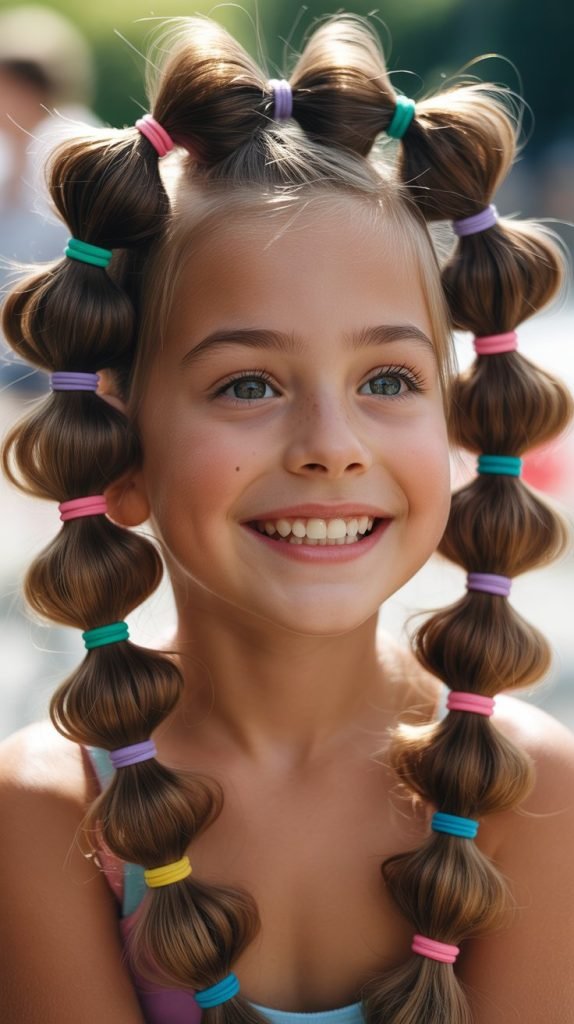
The bubble ponytail transforms a basic ponytail into a fun, dimensional style using multiple elastics spaced down the length.
This trendy look keeps hair secured at the top while creating visual interest that kids absolutely love.
Bubble Design:
- A high ponytail serves as the base, ensuring hair is pulled completely away from the face.
- Additional elastics are placed at regular intervals down the ponytail length.
- The sections between elastics are gently pulled apart to create rounded bubble shapes.
- This style works best on medium to long hair that has enough length for multiple bubbles.
Construction Process:
- Create a high ponytail and secure tightly with a strong elastic.
- Measure down 2-3 inches and add another elastic around the ponytail.
- Gently tug on the hair between the two elastics, pulling outward to create a bubble shape.
- Continue adding elastics and creating bubbles down the entire length of the ponytail.
Customization Ideas:
- Use colorful elastics in rainbow order for a vibrant, playful appearance.
- Adjust bubble sizes by changing the spacing between elastics.
- Add small bows or clips to each elastic for extra decoration.
- For special events, incorporate ribbon by tying it at the base and weaving it through the bubbles.
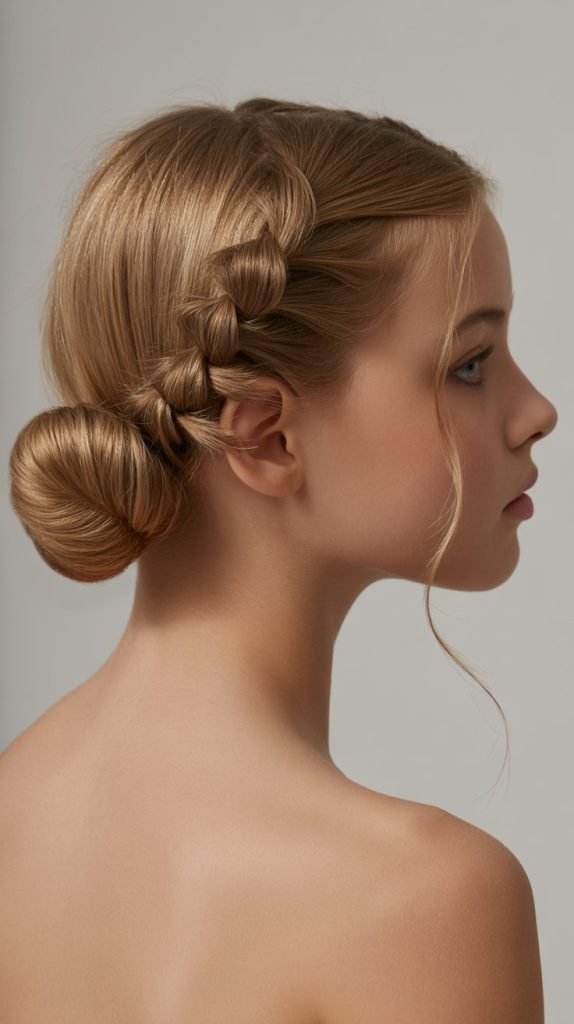
9. Low Twisted Bun
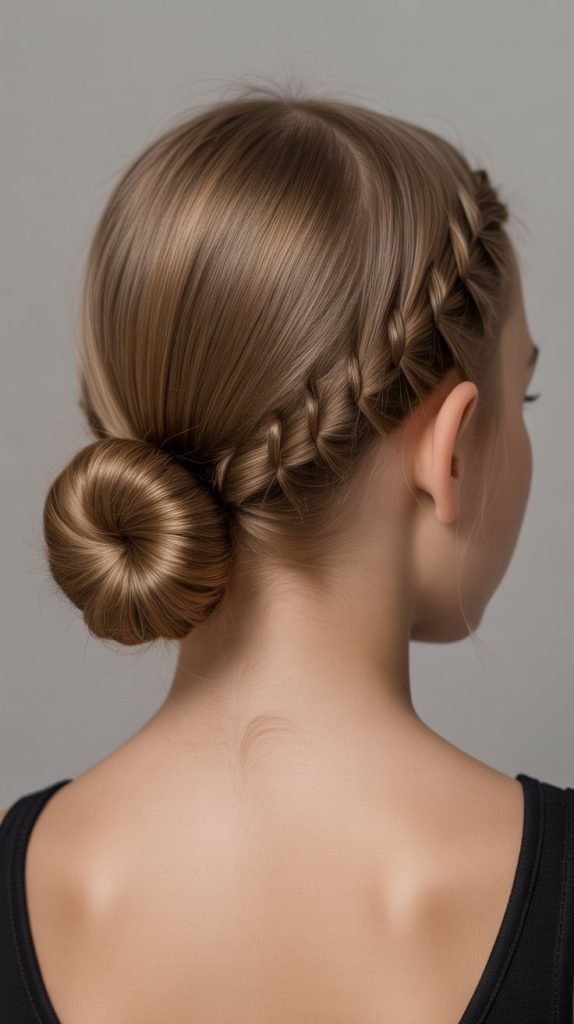
The low twisted bun sits at the nape of the neck, combining elegance with security through twisted sections that converge into a contained bun.
This sophisticated style works for both everyday wear and special occasions while keeping hair completely managed.
Elegant Elements:
- Hair is divided into sections that are twisted before being combined into the bun, adding texture and interest.
- The low placement makes it comfortable for children to lean back against car seats or chairs.
- This style keeps hair secure without the tension headaches that can come from high ponytails.
- The twisted elements make the style look more complex than it actually is to create.
Building the Style:
- Divide hair into two or three sections depending on thickness.
- Twist each section individually, keeping the twist tight as you work down the length.
- Bring all twisted sections together at the nape of the neck.
- Coil the combined twists around themselves to form a bun and secure with elastics and bobby pins.
Refinement Tips:
- Smooth the top section with a brush and light gel or spray for a polished finish.
- Leave a few face-framing pieces out for a softer, more romantic appearance.
- The bun can be positioned at the nape center or slightly to one side for variation.
- Use a decorative hair net over the bun for ballet, formal events, or extra security.
10. Pigtails with Braided Base
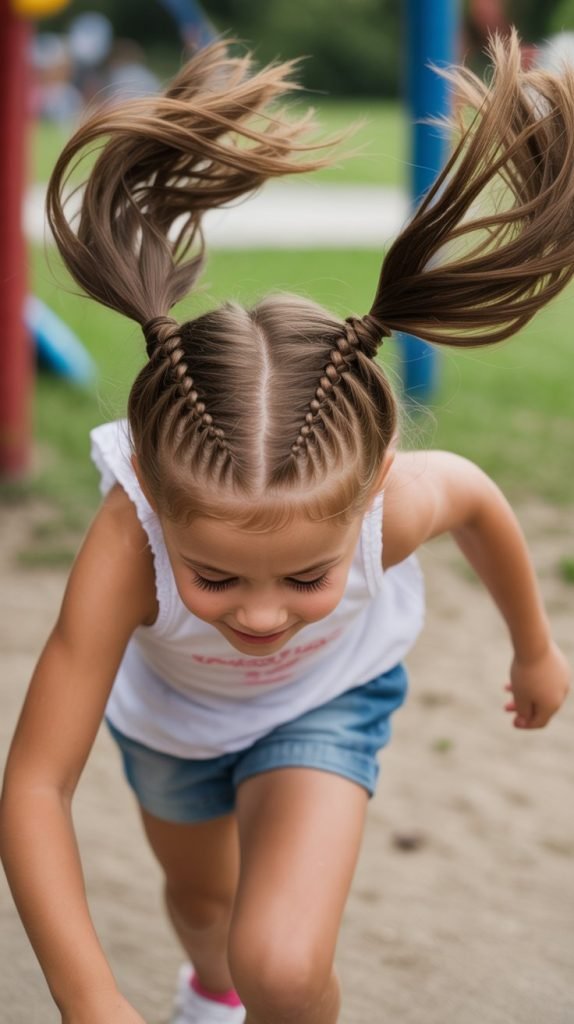
Pigtails with braided bases start with small braids at the scalp that transition into regular pigtails, combining the security of braids with the classic appeal of pigtails.
This hybrid style ensures the top sections stay completely secured while maintaining the playful bounce of loose pigtails.
Hybrid Design:
- Small braids begin at the hairline, incorporating face-framing pieces immediately.
- The braids extend 2-4 inches down before transitioning to regular ponytails.
- This creates extra security at the top where hair is most likely to escape.
- The loose pigtail ends maintain the carefree, youthful appearance children love.
Construction Steps:
- Part hair down the center from forehead to nape, creating two sections.
- On one side, begin a French or Dutch braid at the hairline, moving backward.
- After 2-4 inches of braiding, stop adding new hair and secure with an elastic.
- Leave the remaining hair as a loose pigtail, repeating the process on the other side.
Advantages:
- The braided tops prevent the “elevator doors” effect where hair separates at the part.
- Face-framing pieces are locked into the braids, keeping them from slipping out during play.
- This style lasts longer than regular pigtails without needing readjustment.
- The combination of secured and free hair appeals to children who want both structure and movement.
11. Waterfall Braid
The waterfall braid creates a cascading effect where sections of hair are dropped through the braid while new sections are picked up, creating a woven appearance.
While the back hair flows freely, the face-framing sections are secured within the braid structure.
Cascading Technique:
- This decorative braid moves horizontally across the head, typically from one side toward the back.
- Sections are deliberately dropped out of the braid while new sections are picked up, creating the waterfall effect.
- The braid secures the top layer while allowing the lower hair to hang freely.
- Front sections are incorporated into the braid, keeping them away from the face effectively.
Creating the Waterfall:
- Begin with a three-strand braid at the temple or near the ear.
- After the first crossing, drop the bottom section and pick up a new section from below.
- Continue this pattern across the head, dropping and picking up sections to create the cascade.
- Secure the braid with a small elastic when you reach the desired endpoint.
Best Applications:
- This style works beautifully for special occasions like parties, holidays, or school pictures.
- It’s most effective on medium to long hair that can showcase the cascading effect.
- While intricate-looking, the waterfall braid keeps face-framing hair secured for several hours.
- Combine with curls in the loose hair for an extra-special formal appearance.
12. Space Buns
Space buns feature two buns positioned high on either side of the head, creating a fun, youthful style popularized by various pop culture icons.
This playful look keeps all hair completely contained while delivering maximum personality.
Dual Bun Design:
- The two buns are positioned symmetrically on the upper sides of the head, typically above the ears.
- All hair is divided and secured into the two buns, leaving nothing loose to fall forward.
- This style creates a fun, spirited appearance that resonates with energetic children.
- The secure nature makes it suitable for sports, play, and all-day wear.
Assembly Instructions:
- Part hair down the center from forehead to nape, creating two equal sections.
- On one side, gather hair into a high ponytail positioned above and slightly behind the ear.
- Twist or coil the ponytail around its base to form a bun, securing with elastics and bobby pins.
- Repeat the process on the other side, ensuring both buns are positioned at equal heights.
Styling Variations:
- Create messy, loose buns for a casual look or tight, smooth buns for a polished appearance.
- Wrap small sections around the base of each bun before coiling for added detail.
- Use colorful elastics or scrunchies at the base of each bun for a pop of color.
- Add glitter spray or temporary color for special occasions or themed events.
13. Rope Braid Ponytail
The rope braid ponytail uses a simple two-strand twisting technique that creates a spiral appearance, offering a quick alternative to traditional three-strand braids.
This efficient style keeps hair secured while being one of the fastest braiding techniques to execute.
Twisting Technique:
- The rope braid involves only two strands instead of three, making it simpler and faster than traditional braiding.
- Each strand is twisted individually in one direction, then the two strands are wrapped around each other in the opposite direction.
- This creates a rope-like spiral appearance that’s both attractive and secure.
- The technique works on all hair types and is especially effective on thick or textured hair.
Creation Method:
- Gather hair into a ponytail at the desired height and secure with an elastic.
- Divide the ponytail into two equal sections.
- Twist each section clockwise (or your preferred direction) until fully twisted.
- Wrap the two twisted sections around each other counterclockwise to create the rope effect.
Practical Benefits:
- This technique is significantly faster than traditional braiding, making it perfect for rushed mornings.
- Children with limited patience for hairstyling tolerate this quick process more easily.
- The rope braid holds just as securely as a traditional braid but takes half the time.
- It’s an excellent style for parents still developing their braiding skills.
14. Half-Up Top Knot

The half-up top knot secures the top section of hair in a small bun while leaving the bottom half flowing freely.
This popular style keeps face-framing pieces controlled while maintaining the appearance and feel of loose hair.
Partial Updo Benefits:
- Only the top half of hair is secured, making this style feel less restrictive than full updos.
- Face-framing and bang areas are pulled up into the knot, keeping them from falling forward.
- The bottom section remains free, which many children prefer over completely contained styles.
- This versatile style works for various hair lengths, even relatively short hair.
Building the Half-Up:
- Section hair from ear to ear across the top of the head, leaving the bottom half loose.
- Gather the top section and secure in a high ponytail at the crown.
- Twist or coil the ponytail around its base to create a small bun.
- Secure the bun with another elastic or bobby pins, leaving the bottom hair flowing.
Styling Flexibility:
- The bun can be positioned higher for a more playful look or lower for something subtle.
- Add texture to the loose hair with waves or curls for special occasions.
- Use a scrunchie instead of a regular elastic for a trendy, ’90s-inspired appearance.
- This style transitions easily from school to after-school activities without looking overdone.
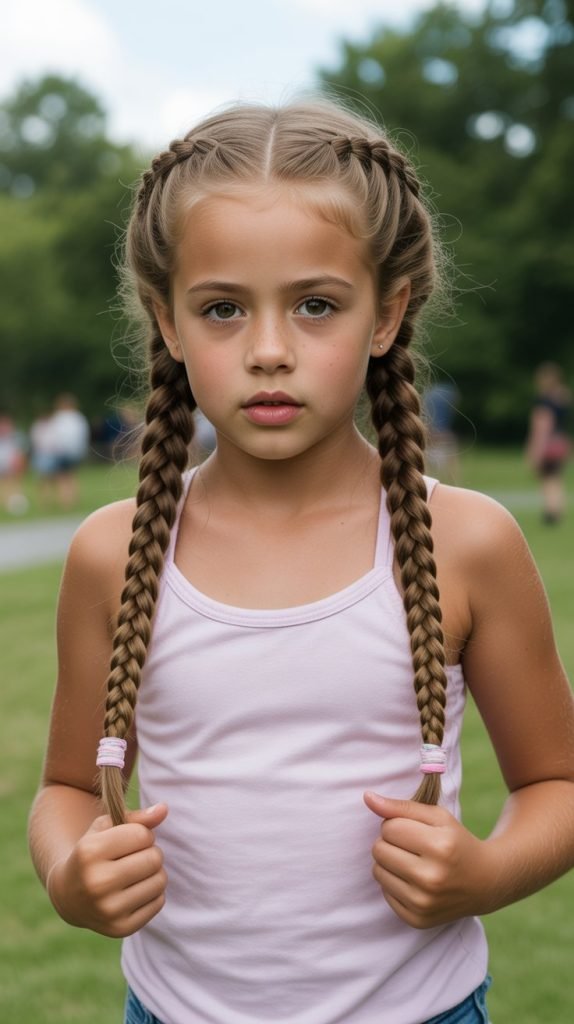
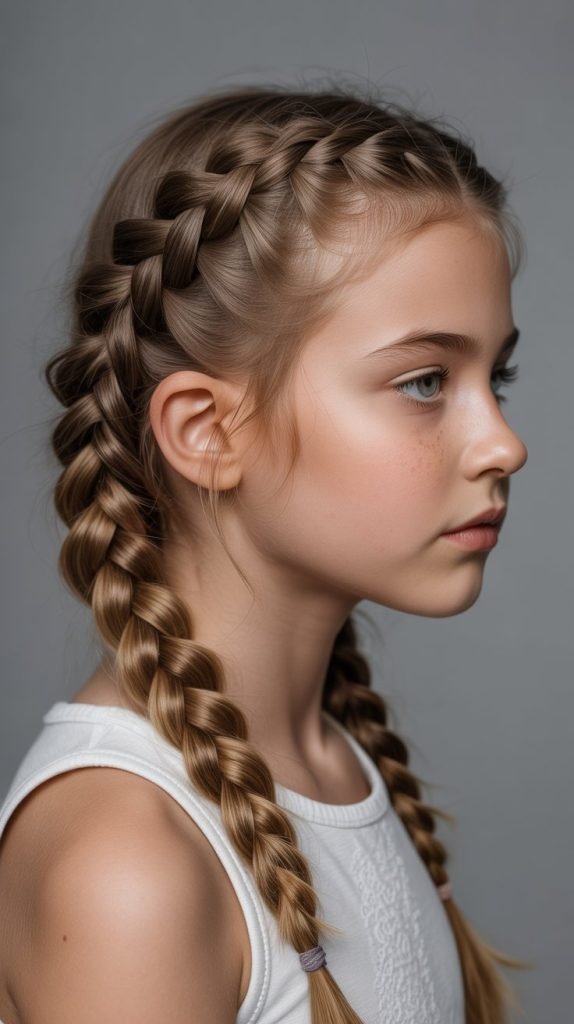
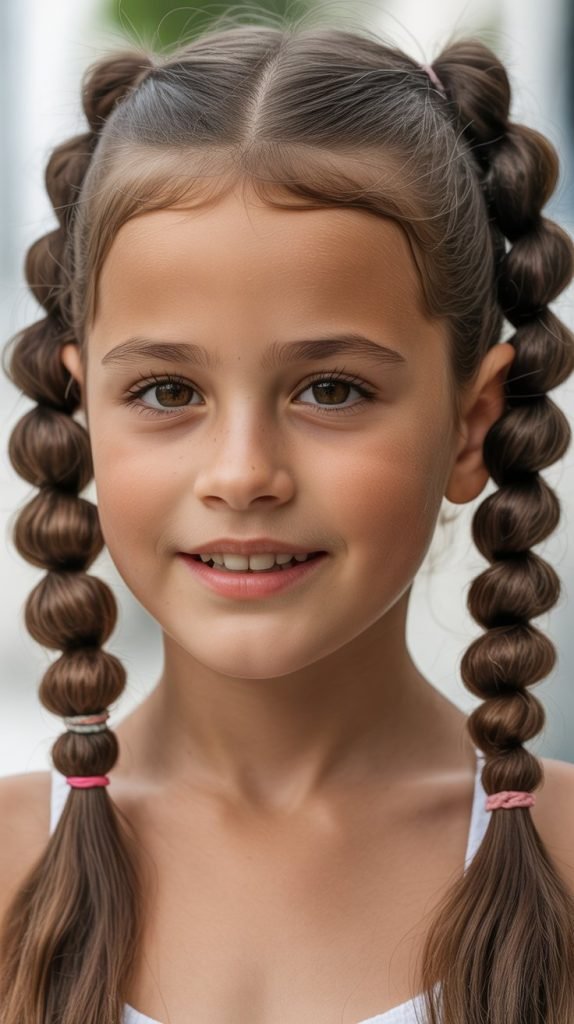
15. Braided Pigtails
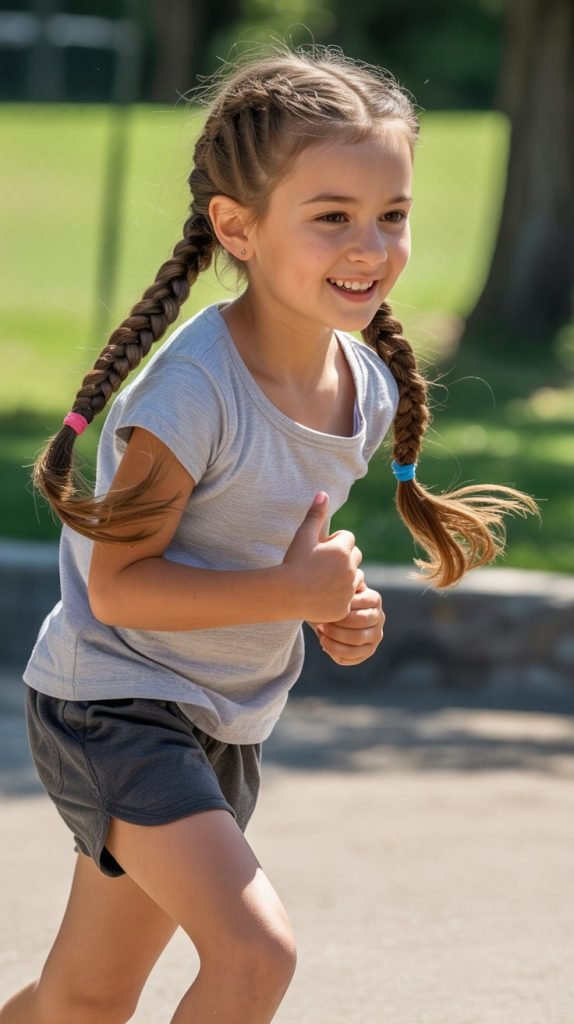
Braided pigtails combine the classic appeal of pigtails with the security of braids, creating a style that stays neat all day without constant adjustment.
This reliable option works for school, sports, and all activities where hair absolutely must stay out of the way.
Complete Security:
- Unlike loose pigtails that can come undone or tangle, braided pigtails maintain their structure all day.
- Every section of hair is woven into the braids, eliminating loose pieces that might fall forward.
- This style withstands wind, rain, and physical activity better than almost any other option.
- The braids can last multiple days with proper nighttime care, reducing daily styling time.
Braiding Process:
- Part hair down the center from forehead to nape, creating two equal sections.
- Secure one side temporarily while working on the other to prevent mixing.
- Create a tight three-strand braid from the hairline all the way to the ends.
- Secure with an elastic and repeat on the other side, ensuring both braids match in tightness and position.
Longevity Tips:
- Spray braids with a mixture of water and leave-in conditioner before bed to maintain moisture.
- Have your child sleep with the braids wrapped in a silk scarf or bonnet to prevent frizz.
- These braids typically last 2-3 days before needing to be redone.
- When removing, apply conditioner first and gently work through tangles to prevent breakage.
16. Twisted Side Ponytail
The twisted side ponytail incorporates twists into a ponytail positioned over one shoulder, adding visual interest while keeping hair contained on one side.
This asymmetrical style is both practical and pretty, appealing to children who want something slightly more special than a basic ponytail.
Asymmetrical Design:
- Hair is directed to one side of the head before being twisted and secured.
- Multiple twists or a single large twist can be incorporated depending on hair thickness and desired effect.
- The side placement keeps hair completely off the face while remaining accessible and visible to the child.
- This style works well for both everyday wear and dressier occasions.
Creating the Twists:
- Gather all hair to one side, positioning it behind the ear and over the shoulder.
- Divide hair into two or three sections depending on thickness.
- Twist each section individually before combining them into a ponytail.
- Secure with an elastic at the desired height on the shoulder.
Enhancement Options:
- Wrap a small section of hair around the elastic to hide it for a polished finish.
- Add a decorative clip or bow where the twists meet the ponytail.
- The ponytail portion can be braided for additional security if needed.
- Use a texturizing spray on the twists to prevent them from unraveling throughout the day.
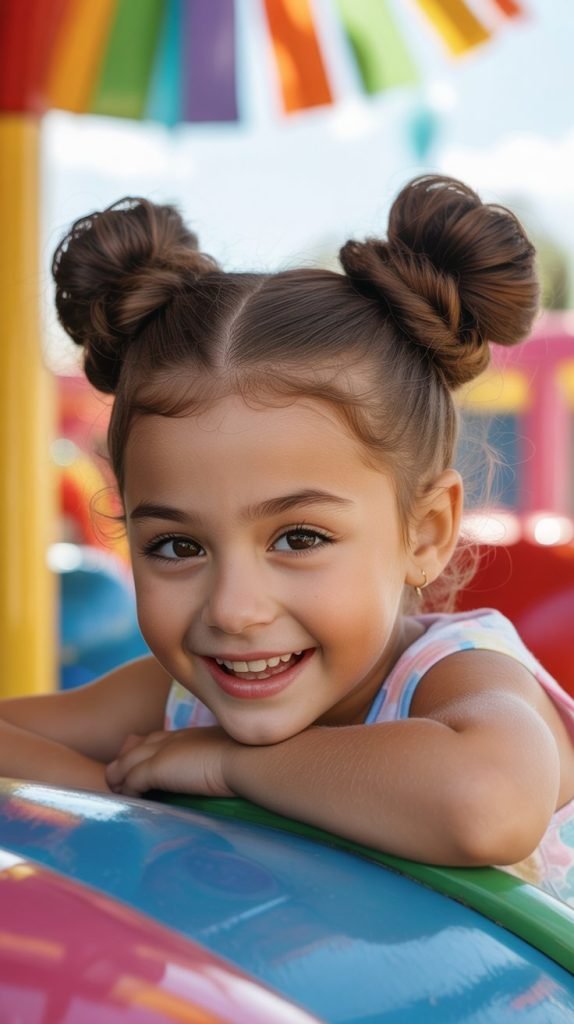
17. Double Buns
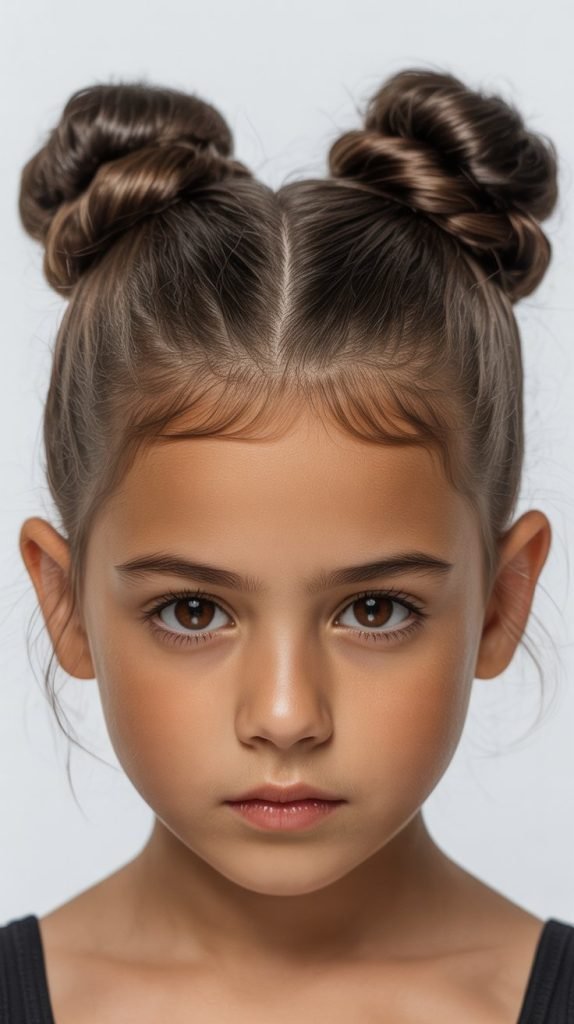
Double buns position two buns on either side of the head, similar to space buns but typically lower and more substantial.
This balanced style keeps all hair contained while creating a symmetrical, organized appearance.
Balanced Bun Placement:
- The two buns are typically positioned at or slightly above ear level rather than at the crown.
- This lower placement creates a more subdued look compared to high space buns.
- All hair is divided and secured into the two buns, leaving nothing loose.
- The style is comfortable for extended wear and doesn’t create tension headaches.
Construction Method:
- Part hair down the center from forehead to nape, dividing into two equal sections.
- On one side, gather hair into a ponytail at the desired height, typically at ear level.
- Twist the ponytail and coil it around the base to form a bun shape.
- Secure with elastics and bobby pins, then repeat on the other side.
Styling Options:
- Create tight, smooth buns for dance or gymnastics, or loose, messy buns for casual wear.
- Position the buns higher or lower depending on your child’s age and style preferences.
- Use a sock bun or foam donut inside each bun to create fuller, more dramatic shapes.
- Wrap decorative ribbons around each bun for special occasions or school spirit events.
18. Mohawk Braid
The mohawk braid creates a striking center braid that runs from the forehead to the nape along the center part line, with the sides pulled into the braid to create a mohawk effect.
This edgy yet practical style keeps all hair secured while making a bold statement.
Bold Center Design:
- A Dutch braid runs down the center of the head, standing raised from the scalp.
- Hair from both sides is gradually incorporated into the central braid as it progresses backward.
- The raised braid creates a mohawk silhouette without requiring any shaving or extreme cutting.
- This style is particularly popular for sports and activities where secure hair is essential.
Creating the Mohawk:
- Section hair from forehead to nape in a strip about 2-3 inches wide down the center.
- Clip the side sections out of the way temporarily.
- Begin a Dutch braid at the forehead, crossing sections under rather than over.
- Gradually add hair from the side sections into the braid as you work backward.
Athletic Applications:
- This style is ideal for soccer, basketball, swimming, and other high-intensity sports.
- The secure nature prevents any hair from escaping during flips, rolls, or rapid movement.
- Many young athletes prefer this style for its combination of functionality and cool appearance.
- The mohawk braid typically lasts through multiple practices before needing refreshing.
19. Twisted Crown
The twisted crown uses twisted sections of hair that wrap around the head like a crown, securing face-framing pieces while creating a romantic, bohemian appearance.
This gentle style works beautifully for both casual and dressy occasions.
Crown Construction:
- Sections from each side of the head are twisted back and pinned to create a crown effect.
- The twists can meet at the back center or continue all the way around the head depending on hair length.
- Face-framing pieces are incorporated into the twists, keeping them secured away from the eyes.
- The remaining hair can be left down, creating a half-up, half-down effect.
Assembly Process:
- Take a section of hair from above one ear and divide it into two pieces.
- Twist the two pieces around each other as you work backward along the head.
- Secure the twist with bobby pins when you reach the back center point.
- Repeat on the other side, either pinning separately or joining both twists together.
Decorative Elements:
- Add small flowers, pearls, or decorative pins along the twisted crown for special events.
- The crown can be thick and substantial or thin and delicate depending on section size.
- This style pairs beautifully with flower girl dresses, holiday outfits, or photo sessions.
- Leave a few face-framing tendrils out for a softer, more relaxed appearance.
20. Pull-Through Braid
The pull-through braid creates the appearance of a complex braid using only ponytails and no actual braiding technique.
This innovative style keeps hair secured while creating impressive dimension and volume that children love showing off.
Faux Braiding Technique:
- Multiple ponytails are stacked down the head and pulled through each other to create a braided appearance.
- No actual braiding occurs, making this accessible for those who struggle with traditional braiding.
- The result looks intricate and complex despite the simple technique involved.
- Pulling the sections apart creates volume and fullness that regular braids can’t achieve.
Creating the Effect:
- Create a ponytail at the crown and secure with a clear elastic.
- Below it, create a second ponytail, leaving a few inches of space.
- Split the first ponytail in half and pull the second ponytail through the center.
- Combine the split sections with new hair and create another ponytail below, repeating the process.
Volume Enhancement:
- Gently pull on each ponytail segment to create wider, fuller sections.
- This pancaking technique transforms a simple style into something that looks salon-quality.
- Use clear elastics throughout to make them less visible in the finished style.
- The pull-through braid works on all hair types but is especially dramatic on thick or long hair.
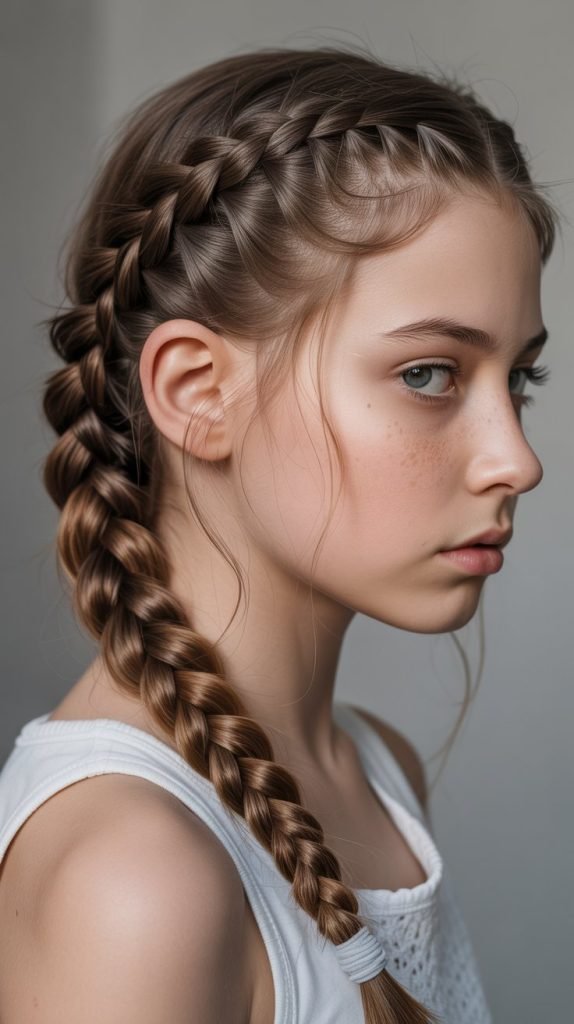
21. Side French Braid
The side French braid sweeps all hair to one side in a diagonal braid from the hairline to behind the opposite ear.
This asymmetrical style keeps every strand secured while creating an elegant, swept appearance.
Diagonal Design:
- The braid begins at the hairline on one side and travels diagonally across the head.
- All face-framing pieces are incorporated immediately, ensuring complete face clearance.
- The braid typically ends behind the opposite ear or continues down into a side ponytail.
- This directional styling creates visual interest while remaining highly functional.
Braiding Path:
- Start with a small section at the hairline on one side, near the temple.
- Begin a French braid, adding hair from both above and below as you work across the head.
- Follow a diagonal path toward the opposite side, curving gently behind the ear.
- Secure when all hair is incorporated, either continuing with a regular braid or ending with a ponytail.
Practical Applications:
- This style works exceptionally well for school days when hair needs to stay put during classes and recess.
- The diagonal direction prevents the braid from being uncomfortable when leaning back against chairs.
- Athletes appreciate how this style keeps hair contained without creating a bulky braid down the center back.
- The side placement allows children to see their hairstyle, which many find satisfying and fun.
22. Zigzag Part Ponytails
Zigzag part ponytails feature a creative parting pattern that adds visual interest while dividing hair into two ponytails.
This playful variation on classic pigtails takes only slightly more time but delivers significantly more style impact.
Creative Parting:
- Instead of a straight center part, the hair is divided in a zigzag pattern from forehead to nape.
- This decorative element adds personality without requiring complex styling skills.
- The zigzag is created using the pointed end of a rattail comb for precision.
- The two resulting ponytails can be positioned high, medium, or low depending on preference.
Creating the Zigzag:
- Start at the center of the forehead with the pointed end of a rattail comb.
- Move the comb backward in a zigzag motion, creating sharp angles as you progress toward the nape.
- Keep the zigzag angles consistent for a neat, intentional appearance.
- Gather each side into ponytails, ensuring the zigzag part remains visible and defined.
Styling Variations:
- Make the zigzag subtle with gentle curves or dramatic with sharp, pronounced angles.
- Add different colored elastics to each ponytail to complement the playful parting.
- This technique works with braided ponytails, regular ponytails, or even space buns.
- Children love watching the zigzag being created in the mirror, making styling time more engaging.
23. Low Braided Bun
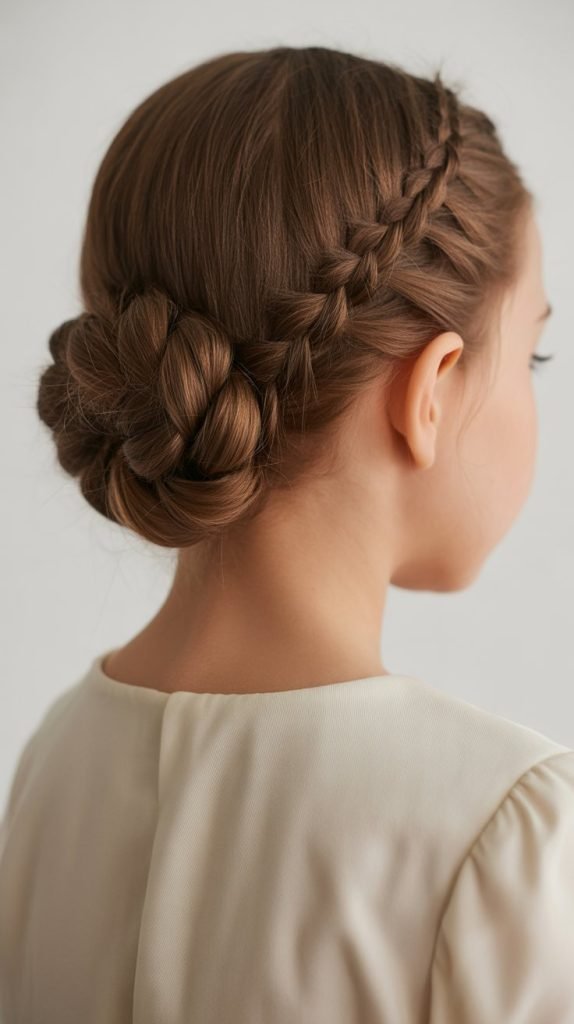
The low braided bun combines a braid with a bun positioned at the nape, creating a sophisticated style that’s secure enough for all-day wear.
This elegant option works beautifully for formal events while remaining practical for everyday activities.
Elegant Combination:
- Hair is first braided down the length before being coiled into a bun shape.
- The braided texture within the bun adds dimension and interest compared to simple twisted buns.
- The low placement at the nape is comfortable for extended wear and leaning back.
- This style keeps every strand contained, making it ideal for dance recitals, performances, or special occasions.
Assembly Instructions:
- Gather all hair at the nape and create a ponytail secured with an elastic.
- Braid the entire length of the ponytail using a three-strand braid.
- Coil the completed braid around the base of the ponytail to form a circular bun.
- Secure with bobby pins, tucking the end of the braid underneath and out of sight.
Refinement Details:
- Use a brush and smoothing product on the top section for a sleek, polished finish.
- The bun size can be adjusted based on hair thickness and length.
- Add a decorative hair net over the bun for ballet, gymnastics, or formal events.
- Small flowers or decorative pins can be inserted into the bun for special occasions.
24. Twisted Pigtails
Twisted pigtails replace traditional braiding with simple two-strand twists, creating a rope-like texture that’s faster to create while still keeping hair contained.
This efficient style appeals to both parents and children for its speed and effectiveness.
Twist Advantages:
- Twisting is significantly faster than braiding, making it ideal for rushed mornings.
- The technique is simpler for those who find traditional braiding challenging.
- Twisted pigtails hold just as securely as braided versions for most activities.
- Children with limited patience for hair styling tolerate the quicker process better.
Creating the Twists:
- Part hair down the center from forehead to nape, creating two sections.
- Gather one side into a ponytail at the desired height.
- Divide the ponytail into two sections and twist each section in the same direction.
- Wrap the two twisted sections around each other in the opposite direction, then secure and repeat on the other side.
Practical Benefits:
- This style works well on all hair types, including fine hair that sometimes slips out of braids.
- The twists can be positioned high for a playful look or low for something more subdued.
- Adding small elastics down the length creates segmented twists that hold even more securely.
- This technique can be taught to older children for independent styling.
25. Heart-Shaped Buns
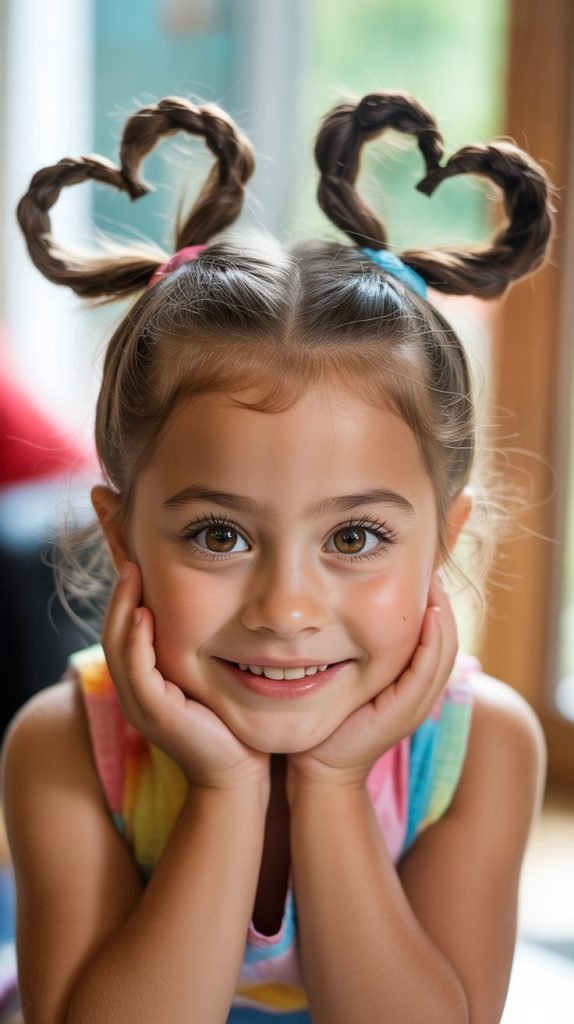
Heart-shaped buns use creative sectioning and pinning to form buns shaped like hearts, creating an adorable style perfect for Valentine’s Day or anytime your child wants something extra special.
This decorative approach keeps hair completely secured while delivering maximum cuteness.
Heart Formation:
- Hair is divided and shaped using specific pinning techniques to create recognizable heart shapes.
- This style works best with medium to long hair that has enough length to manipulate into shapes.
- The hearts can be positioned as space buns, double buns, or even as a single statement bun.
- While it looks complex, the technique becomes easier with practice.
Creating the Hearts:
- Gather hair into a high ponytail where you want the heart positioned.
- Split the ponytail in half and create a loop with each half, pinning the ends down.
- Shape each loop into half of a heart shape, creating the curved top edges.
- Pin the bottom sections together to form the pointed bottom of the heart.
Special Occasion Use:
- This style is perfect for Valentine’s Day, birthday parties, or themed school events.
- Add red or pink ribbons to enhance the heart theme.
- Small rhinestones or heart-shaped clips can be added for extra sparkle.
- Take photos from the back to capture the full heart effect.
26. Braided Ponytail with Ribbon
A braided ponytail enhanced with woven ribbon adds color and flair while keeping hair secured in a functional braid.
This decorated version transforms a practical style into something special enough for photos or celebrations.
Ribbon Integration:
- Ribbon is incorporated into the braid from the beginning, becoming a fourth strand in the weaving.
- The ribbon adds color, texture, and visual interest to a standard braid.
- This technique works with any braid type—three-strand, Dutch, French, or fishtail.
- The ribbon also helps secure the braid, adding an extra layer of hold.
Weaving Process:
- Attach ribbon at the base of a ponytail by tying it around the elastic or pinning it securely.
- Include the ribbon as you braid, treating it as one of the strands.
- The ribbon will wind through the braid, creating colorful accents with each crossing.
- Tie the ribbon into a bow at the end for a finished, decorative touch.
Ribbon Choices:
- Satin ribbon creates a formal, polished appearance suitable for special occasions.
- Grosgrain ribbon with patterns adds a playful, casual element perfect for everyday wear.
- Match ribbon colors to school colors, holiday themes, or outfit choices.
- Use multiple thin ribbons instead of one wide ribbon for a different textural effect.
27. Dutch Braid Bun
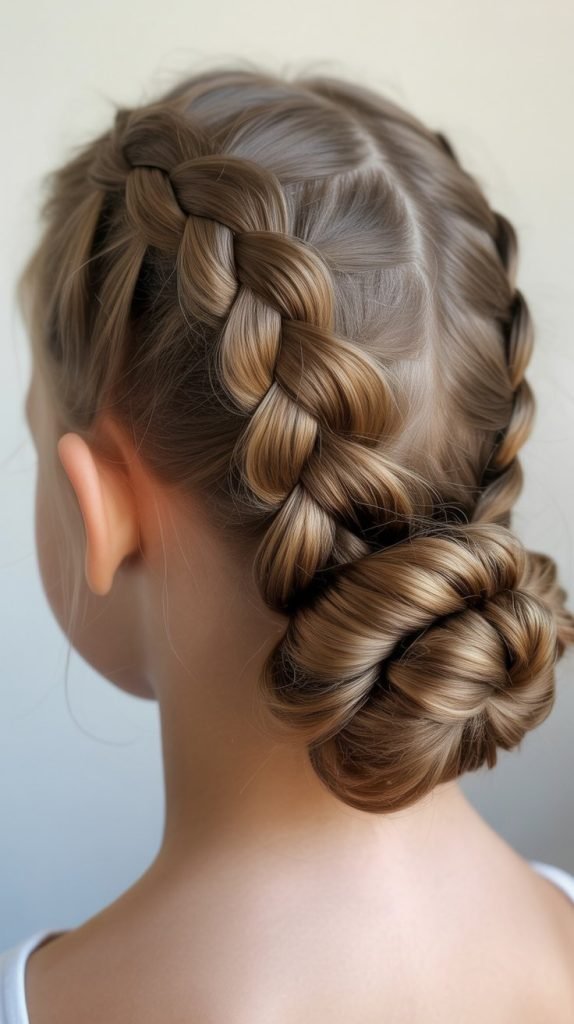
The Dutch braid bun features a raised Dutch braid that starts at the forehead and transitions into a bun at the crown or nape.
This combination style provides maximum security while creating dimensional texture that stands out from the head.
Combination Structure:
- The Dutch braid begins at the hairline, incorporating face-framing pieces immediately.
- As the braid progresses backward, it gradually gathers all hair into its structure.
- At a predetermined point, the braid transitions into a bun formation.
- The raised nature of the Dutch braid creates impressive dimension and texture.
Construction Method:
- Start a Dutch braid at the forehead, crossing sections under rather than over.
- Continue braiding backward, adding hair from both sides as you progress.
- When you reach the point where you want the bun (crown, mid-head, or nape), stop adding new hair.
- Braid the remaining length, then coil it into a bun and secure with elastics and bobby pins.
Styling Placement:
- Position the bun at the crown for a ballerina-inspired look perfect for dance class.
- A mid-head bun creates a casual, everyday style that’s comfortable and secure.
- A nape bun offers the most comfort for leaning back and is ideal for school.
- The versatility of placement makes this style suitable for multiple occasions.
28. Cornrow Ponytail
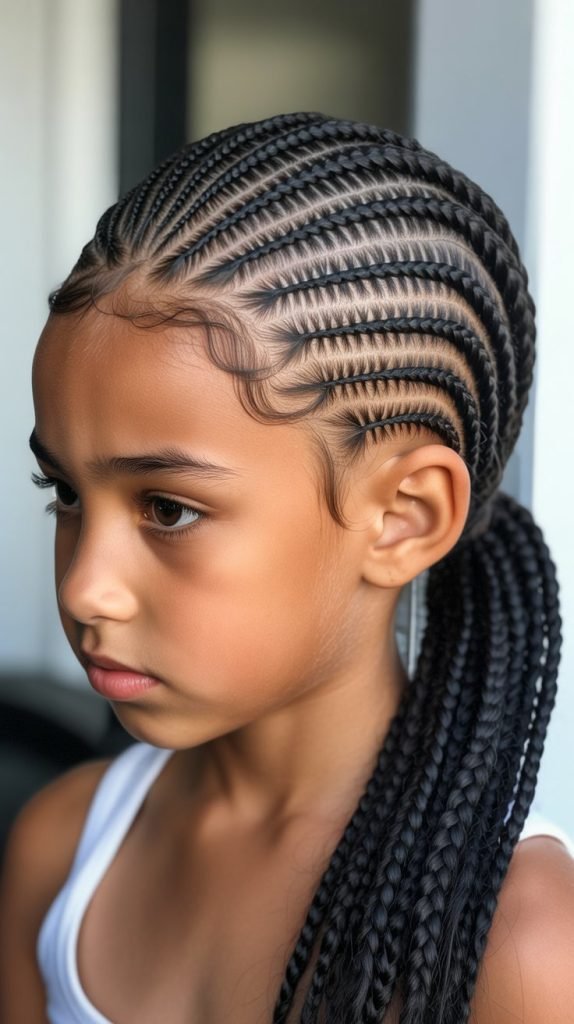
Cornrow ponytails feature multiple tight braids running from the hairline back to where they’re gathered into a single ponytail.
This protective and long-lasting style works exceptionally well for textured hair while keeping every strand secured against the scalp.
Protective Braiding:
- Multiple cornrows run parallel from the hairline toward the back, creating neat rows against the scalp.
- This technique is particularly beneficial for textured, curly, or coily hair types.
- The braids protect hair from breakage while keeping it completely managed.
- This style can last one to two weeks with proper care, reducing daily styling needs.
Creating Cornrows:
- Section hair into rows from forehead to nape, creating parallel parts.
- Begin each cornrow at the hairline, braiding very close to the scalp.
- Add hair from the scalp as you progress backward, similar to French braiding technique.
- When all cornrows reach the desired length, gather them together into a ponytail.
Maintenance and Care:
- Sleep with a satin or silk bonnet to preserve the style and prevent frizz.
- Apply lightweight oil to the scalp to prevent dryness during the extended wear period.
- The ponytail can be left loose, braided, or styled in various ways for versatility.
- When removing, apply conditioner and gently detangle to prevent breakage.
29. Side Bun with Twist
A side bun with twist incorporates twisted sections that lead into a bun positioned over one ear, creating an elegant asymmetrical style.
This romantic option works beautifully for special occasions while maintaining the practical benefit of completely contained hair.
Asymmetrical Elegance:
- All hair is directed to one side of the head where twisted sections converge into a bun.
- The twists add textural interest and sophistication compared to simple pulled-back styles.
- This placement keeps hair completely off the face while remaining visible and pretty to the child.
- The style works for flower girls, holiday events, or any occasion requiring dressed-up hair.
Building the Style:
- Divide hair into two or three sections depending on thickness.
- Twist each section individually as you direct it toward one side of the head.
- Gather all twisted sections at the chosen side, typically above or behind the ear.
- Coil the combined twisted hair into a bun shape and secure with elastics and bobby pins.
Decoration Options:
- Add small flowers, decorative pins, or sparkly accessories to the bun for special events.
- Leave a few face-framing tendrils on the opposite side for a softer appearance.
- The bun can be tight and polished or loose and romantic depending on the occasion.
- This style photographs beautifully, making it ideal for professional pictures or special celebrations.
30. Multiple Mini Buns
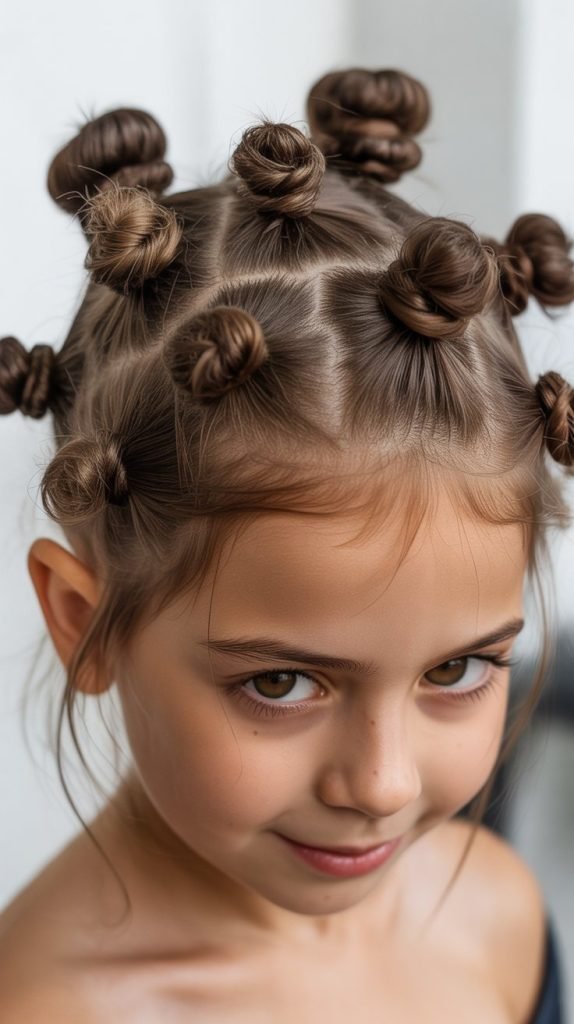
Multiple mini buns feature several small buns positioned across the head in various patterns, creating a playful, modern style that keeps all hair contained.
This trendy option appeals to fashion-forward children who want something unique and eye-catching.
Contemporary Design:
- Hair is divided into multiple sections, each formed into its own small bun.
- The buns can be arranged in rows, scattered randomly, or positioned in geometric patterns.
- This style keeps every strand secured while creating impressive visual impact.
- The number of buns can be adjusted based on hair thickness and desired effect.
Creating Multiple Buns:
- Section hair into the desired number of divisions using a comb for clean parts.
- Starting with one section, create a small ponytail and twist it into a tiny bun.
- Secure each bun with small elastics and bobby pins before moving to the next section.
- Continue until all sections are formed into buns, ensuring they’re evenly sized and positioned.
Pattern Variations:
- Create two rows of buns running from forehead to nape for a structured look.
- Position buns in a circular pattern around the head for something unique.
- Mix sizes by making some buns larger than others for dimensional interest.
- This style works well for festivals, themed events, or when your child wants to stand out.
31. Fishtail Braid
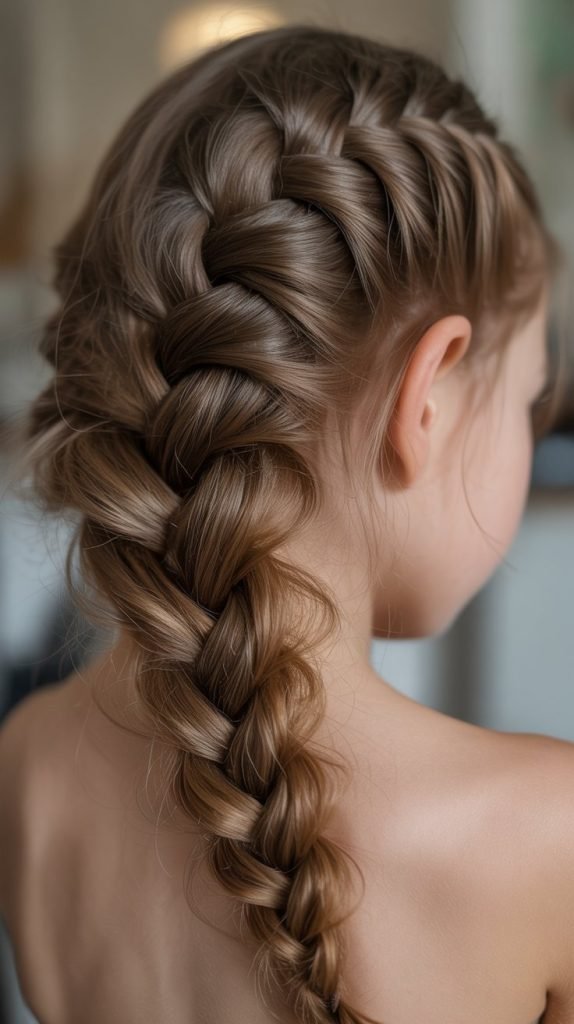
The fishtail braid creates an intricate woven pattern using only two sections of hair instead of three, resulting in a delicate, detailed appearance.
While it looks complex, this technique becomes quick and easy with practice, keeping hair secured in a beautiful braid.
Intricate Weaving:
- Unlike three-strand braids, the fishtail uses only two main sections with small pieces crossing between them.
- The resulting pattern is tighter and more detailed than regular braiding.
- This braid creates a sophisticated look that works for both casual and dressy occasions.
- The tight weaving provides excellent hold that lasts throughout active days.
Fishtail Technique:
- Divide hair into two large sections after securing in a ponytail or starting at the head.
- Take a small piece from the outer edge of the left section and cross it over to join the right section.
- Take a small piece from the outer edge of the right section and cross it over to join the left section.
- Continue alternating sides, keeping the small crossing pieces consistent in size for a uniform pattern.
Styling Tips:
- The smaller the crossing pieces, the more intricate and detailed the final braid appears.
- Gently pull on the braid edges after completion to create a fuller, more voluminous look.
- This braid works beautifully on all hair lengths from medium to very long.
- Secure the end with a clear elastic to keep the focus on the intricate braid pattern.
32. Bandana Wrapped Ponytail
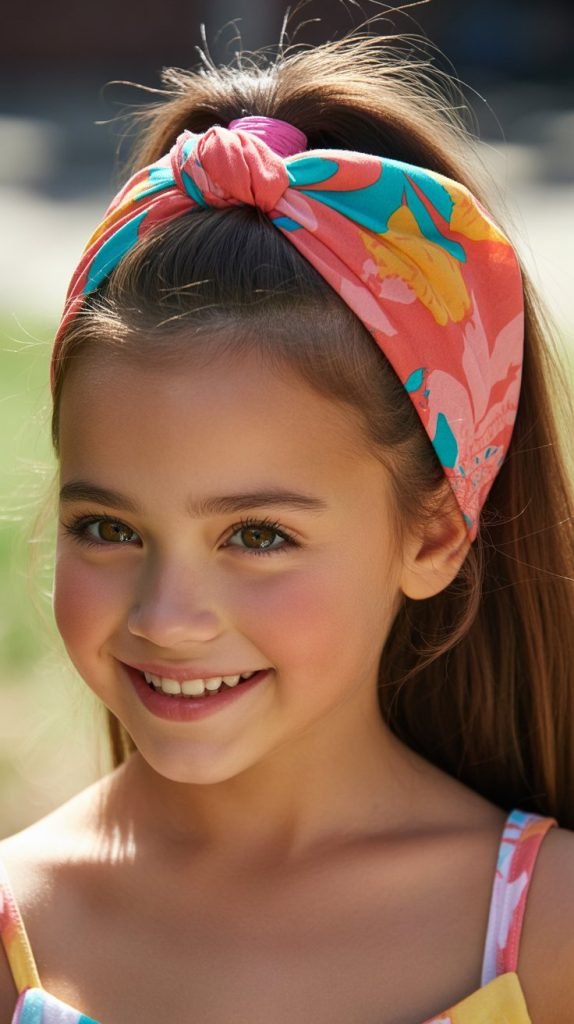
A bandana wrapped ponytail incorporates a colorful bandana or scarf wrapped around the ponytail base, adding style while helping secure flyaways and face-framing pieces.
This accessory-enhanced style combines practicality with personality.
Accessory Enhancement:
- A bandana or scarf is tied around the base of the ponytail, securing it while adding color.
- The fabric helps smooth flyaways and baby hairs that might otherwise escape.
- This technique adds visual interest without requiring complex braiding or styling skills.
- Bandanas are affordable and available in countless colors and patterns for endless variety.
Wrapping Method:
- Create a ponytail at the desired height and secure with an elastic.
- Fold a bandana into a long strip about 2-3 inches wide.
- Wrap the bandana around the ponytail base, covering the elastic completely.
- Tie the bandana ends into a knot or bow, allowing the tails to hang or tucking them under.
Style Variations:
- Use bandanas in school colors for spirit days or sporting events.
- Choose themed patterns for holidays, seasons, or special occasions.
- The bandana can be tied with tails hanging for a playful look or tucked for a neater appearance.
- This technique works with high ponytails, low ponytails, or side ponytails equally well.
33. Braided Headband with Ponytail
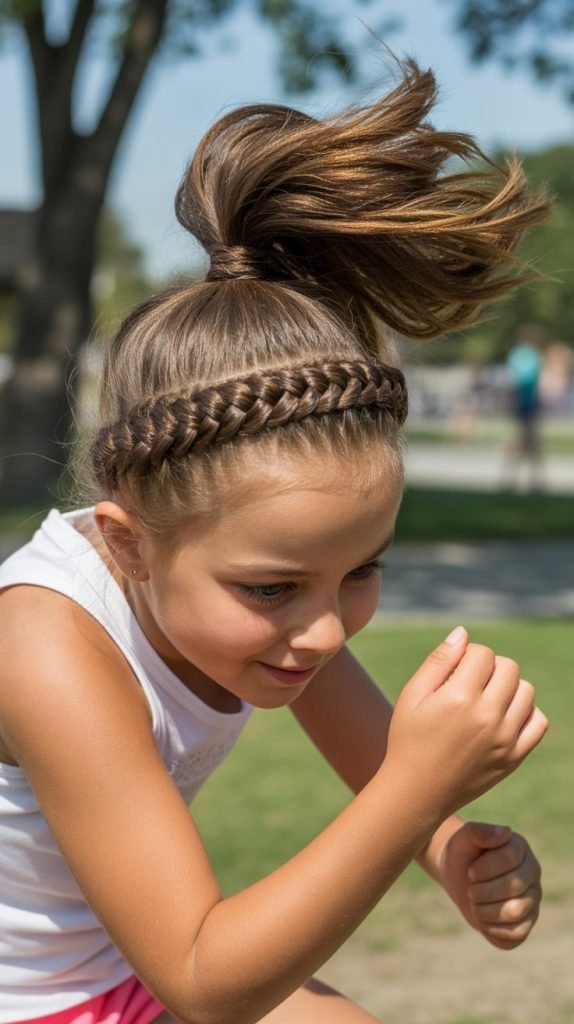
The braided headband with ponytail combines two techniques—a small braid across the hairline with a ponytail in back—to keep face-framing hair secured while gathering the rest.
This hybrid style offers multiple points of security for children who are especially active.
Dual Security System:
- A small braid runs across the front hairline from temple to temple, capturing all face-framing pieces.
- The remaining hair is gathered into a ponytail, keeping the bulk secured at the back.
- This combination ensures nothing falls forward during any activity level.
- The two elements can be created quickly once you develop a routine.
Creating the Combination:
- Section hair from temple to temple across the front, about 2 inches deep.
- Create a Dutch or French braid across this front section, moving from one side to the other.
- Secure the braid end with a small elastic or incorporate it into the ponytail.
- Gather all remaining hair, including the braid end, into a ponytail at the desired position.
Practical Applications:
- This style is ideal for sports where face visibility is crucial—soccer, basketball, swimming.
- The braided headband prevents hair from falling forward even during intense activity.
- Children appreciate being able to see clearly without constantly pushing hair away.
- The style remains secure for multiple activities without needing adjustment.
34. Rosette Bun
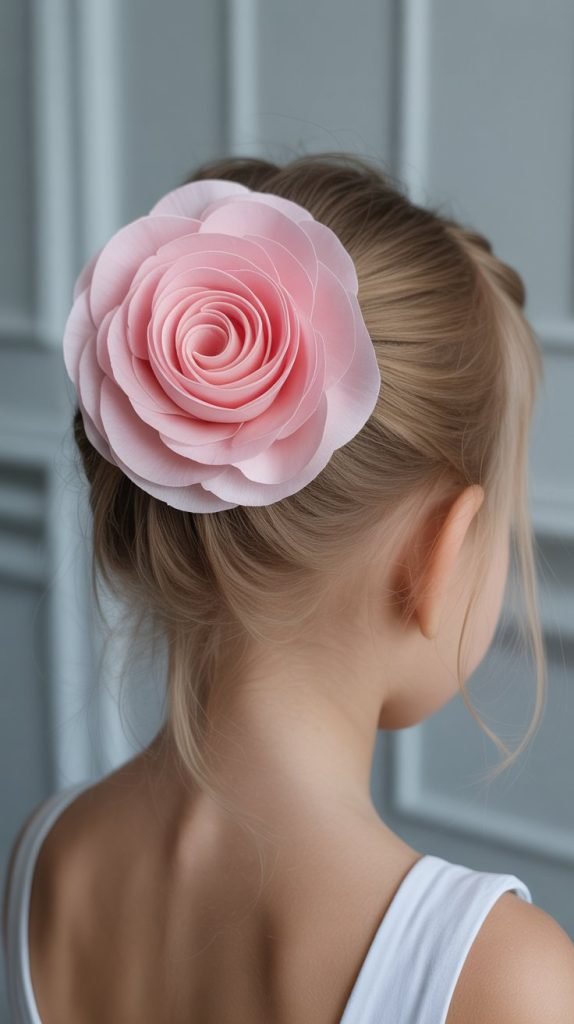
The rosette bun creates a flower-like spiral pattern by carefully coiling hair in a specific way, resulting in a beautiful decorative bun that resembles a rose.
This artistic style is perfect for special occasions when you want hair secured in something truly special.
Flower Formation:
- Hair is coiled in a specific spiral pattern that creates the appearance of rose petals.
- This technique requires some practice but delivers stunning results perfect for formal events.
- The bun keeps all hair completely contained while serving as a beautiful focal point.
- This style works best on medium to long hair that has enough length to manipulate into the rose shape.
Creating the Rosette:
- Gather hair into a ponytail at the desired location and secure with an elastic.
- Divide the ponytail into several sections (typically 3-5 depending on thickness).
- Begin coiling one section around the base, pinning as you create the center of the rose.
- Add additional sections around the center, coiling each to resemble rose petals and pinning securely.
Special Occasion Perfect:
- This style is ideal for flower girls, holiday photos, dance recitals, or formal family events.
- The rose shape can be enhanced with strategic pulling and shaping of the coiled sections.
- Add small pearl pins or decorative elements within the rose for extra elegance.
- Position the rosette at the crown, side, or nape depending on the overall look desired.
35. Boxer Braids
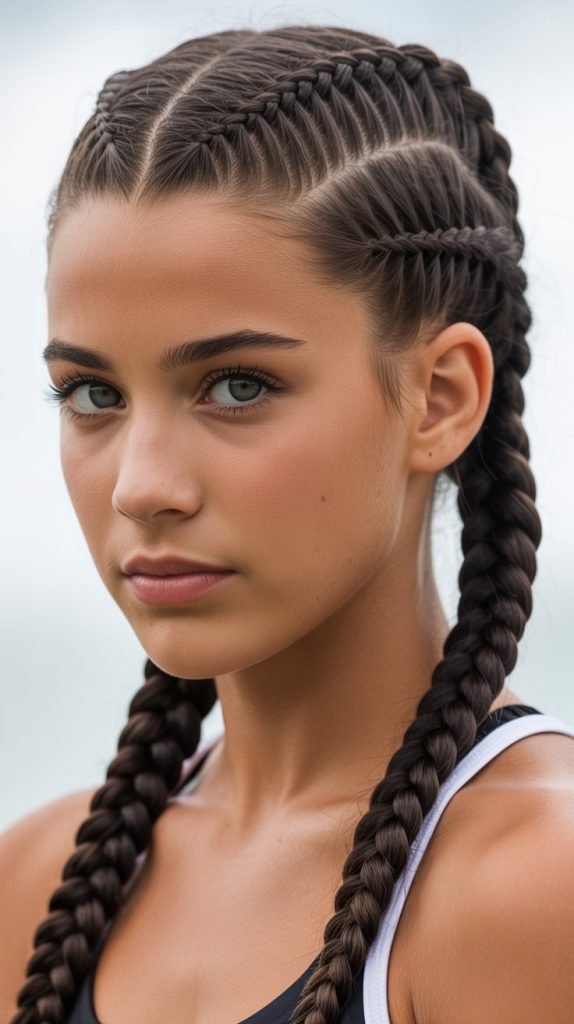
Boxer braids, also known as reverse Dutch braids, create two tight braids that run straight back from the hairline, lying close to the scalp.
his athletic style has become popular beyond sports for its secure hold and trendy appearance.
Athletic Origins:
- Originally popular among boxers and fighters who needed hair completely secured during competition.
- The braids lie flat against the head, preventing any hair from escaping or interfering with activities.
- This style has crossed into mainstream fashion while maintaining its excellent functionality.
- The tight braiding provides security that lasts for days with proper care.
Braiding Technique:
- Part hair straight down the center from forehead to nape, creating two sections.
- Begin a Dutch braid on one side at the hairline, braiding straight back toward the nape.
- Keep the braid very tight and close to the scalp for the characteristic boxer braid appearance.
- Secure at the nape and repeat on the other side, ensuring both braids are equally tight.
Versatility:
- While called boxer braids, this style works for any sport or physical activity.
- The braids can be left as is or gathered into ponytails at the ends for additional security.
- This style lasts 2-4 days when properly maintained, making it efficient for busy families.
- Many children love the athletic, cool appearance of this trendy style.
36. Scarf-Wrapped Bun
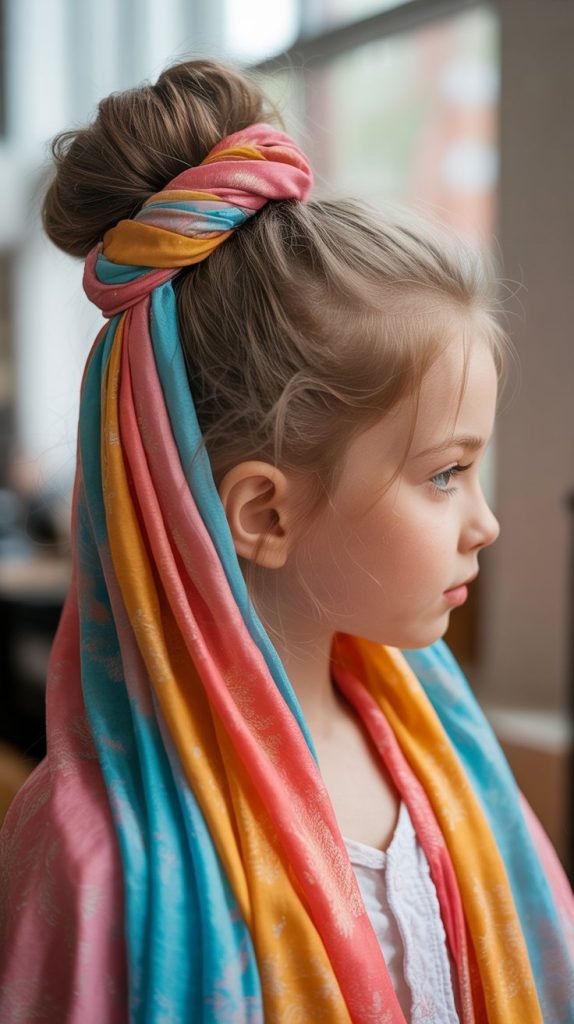
A scarf-wrapped bun features fabric wrapped around and through the bun structure, adding color, pattern, and additional security.
This bohemian-inspired style combines practical hair containment with artistic flair.
Fabric Integration:
- A lightweight scarf or fabric strip is woven through the bun as it’s being created.
- The fabric adds stability to the bun while providing decorative visual interest.
- This technique works with buns positioned at any location on the head.
- The scarf can match an outfit, coordinate with a theme, or provide a pop of contrasting color.
Wrapping Process:
- Create a ponytail at the desired location and secure with an elastic.
- Attach a scarf by tying it around the elastic base or pinning it securely.
- As you coil hair into a bun, wrap the scarf around and through the bun structure.
- Secure the bun with bobby pins, allowing scarf ends to hang decoratively or tucking them in.
Style Customization:
- Use silk scarves for elegant occasions or cotton bandanas for casual wear.
- Choose patterns that reflect seasons, holidays, or personal style preferences.
- The scarf provides extra grip that helps keep the bun intact longer.
- This technique allows for creativity and personal expression within a functional hairstyle.
37. Half-Up Braided Crown
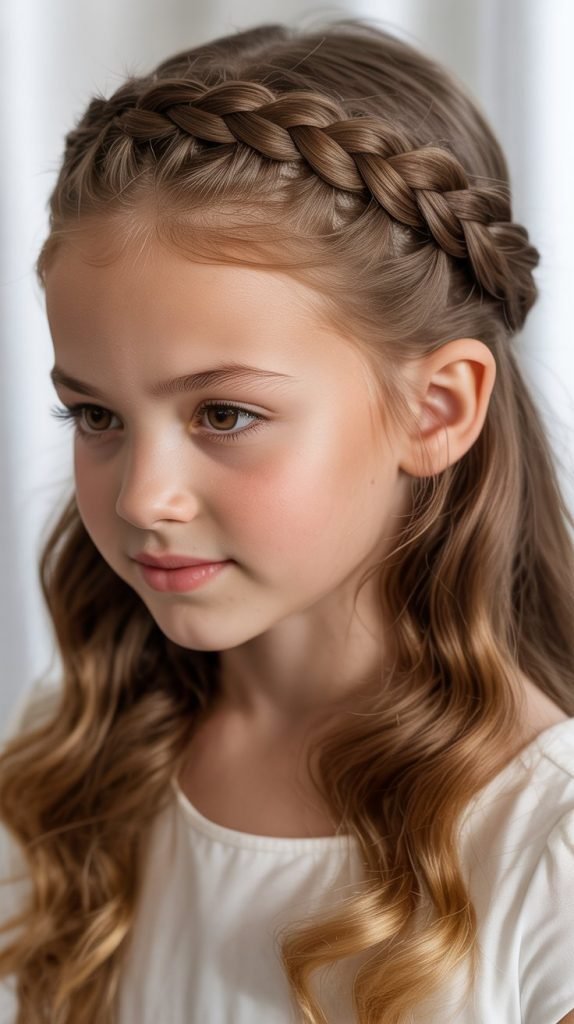
The half-up braided crown secures the top section of hair in a crown-like braid while leaving the bottom half flowing freely.
This princess-worthy style keeps face-framing pieces controlled while maintaining the beauty of loose hair.
Regal Appearance:
- A braid wraps around the crown area like a tiara, keeping the top section secured.
- The bottom half remains loose, providing the movement and flow that many children prefer.
- Face-framing pieces are incorporated into the crown braid, keeping them from falling forward.
- This style works beautifully for special occasions while being practical enough for daily wear.
Crown Creation:
- Section hair from ear to ear across the top of the head, leaving the bottom section loose.
- Beginning at one ear, create a Dutch or French braid moving across the top toward the opposite ear.
- The braid should follow the natural curve of the head, creating a crown shape.
- Secure at the opposite ear with bobby pins, either leaving the braid end loose or tucking it under.
Occasion Flexibility:
- This style transitions seamlessly from school to special events without looking out of place.
- Add small flowers or decorative pins along the crown braid for formal occasions.
- The loose bottom section can be left straight, curled, or styled in various ways.
- This princess-inspired look appeals to children who love fairy tale aesthetics while remaining functional.
Hair Type Considerations
Fine or Thin Hair:
- Styles that create volume and fullness work best, such as bubble ponytails or pull-through braids.
- Avoid styles that require very tight tension, which can cause breakage in delicate hair.
- Texturizing products can help fine hair hold styles better throughout the day.
- Multiple smaller braids or buns often work better than single large ones for fine hair.
Thick or Coarse Hair:
- Strong elastics and multiple bobby pins are essential for securing the weight of thick hair.
- Styles like Dutch braids, high buns, and cornrows work exceptionally well with this hair type.
- Thick hair often holds styles longer due to natural texture and grip.
- Consider dividing hair into multiple sections for easier management during styling.
Curly or Textured Hair:
- Protective styles like cornrows, twists, and braided ponytails help maintain hair health.
- Work with the natural curl pattern rather than fighting it for easier, more successful styling.
- Leave-in conditioners and oils help maintain moisture in curly hair during styled periods.
- Many styles last longer on textured hair due to natural grip and texture.
Straight Hair:
- Straight hair may need additional products like texturizing spray to help styles hold.
- Tighter braiding and secure elastics prevent straight hair from slipping out of styles.
- Styles with twists often need more frequent refreshing on straight hair.
- Consider slightly dampening hair before styling for better grip and hold.
Age-Appropriate Styling
Toddlers (Ages 2-4):
- Keep styles simple and quick—toddlers have limited patience for hair styling.
- High ponytails, simple buns, and quick twists work best for this age group.
- Avoid styles that require long periods of sitting still or create tension on sensitive scalps.
- Use soft, fabric-covered elastics to prevent discomfort and hair damage.
Young Children (Ages 5-8):
- This age group can tolerate slightly more complex styles like braids and multiple ponytails.
- Involve them in choosing styles to increase cooperation during styling time.
- Styles should withstand active playground time, sports, and classroom activities.
- Teaching simple styles allows children to begin developing independence in self-care.
Tweens (Ages 9-12):
- Older children often have opinions about their hairstyles and want input in decisions.
- More intricate styles like fishtail braids, multiple buns, and decorated styles appeal to this age.
- Consider current trends and what their peers are wearing when suggesting styles.
- Teach tweens to create simple styles themselves, building confidence and independence.
Quick Morning Routine Tips
The Night Before:
- Choose the hairstyle the night before to reduce morning decision-making stress.
- Braid hair loosely before bed to create waves that add texture and make styling easier.
- Prepare hair accessories by placing them in an easily accessible location.
- For longer-lasting styles like Dutch braids or cornrows, complete them the night before.
Streamlining Morning Process:
- Keep all hair supplies in one dedicated basket or drawer for quick access.
- Invest in a good detangling spray to make brushing faster and less painful.
- Apply leave-in conditioner or detangler to damp hair after washing to ease morning styling.
- Have your child sit in front of the TV or with a book to keep them occupied during styling.
Time-Saving Strategies:
- Master 2-3 go-to styles that you can create quickly on rushed mornings.
- Pre-section hair the night before for styles requiring multiple parts.
- Use fabric-covered elastics that don’t snag or tangle, speeding up the process.
- Keep hair at a manageable length that doesn’t require extensive styling time.
Essential Tools and Products
Must-Have Tools:
- A quality detangling brush or wide-tooth comb prevents breakage and makes styling easier.
- Rattail comb creates clean parts and precise sections for polished styles.
- Various sizes of fabric-covered elastics in neutral colors work with any outfit.
- Bobby pins in colors matching your child’s hair secure buns and tuck away loose ends.
Helpful Products:
- Detangling spray or leave-in conditioner makes morning brushing significantly easier and less painful.
- Light-hold hairspray keeps flyaways controlled without making hair stiff or crunchy.
- Hair gel or smoothing cream creates sleek, polished looks for special occasions.
- Texturizing spray helps styles hold better in fine or straight hair that tends to slip.
Optional Accessories:
- Colorful scrunchies, ribbons, and bows add personality and fun to basic styles.
- Decorative clips, flowers, and pins transform everyday styles into special occasion looks.
- Headbands and bandanas provide additional security and style enhancement.
- Hair donuts or bun makers create fuller, more professional-looking buns.
Dealing with Common Challenges
The Tender-Headed Child:
- Use a detangling spray liberally before brushing to minimize pain.
- Work in small sections rather than trying to brush through all hair at once.
- Start brushing from the ends and work your way up to the roots gradually.
- Choose styles with looser tension like low ponytails or gentle twists instead of tight braids.
The Wiggly Child:
- Set a timer and explain that they need to sit still until it goes off.
- Provide entertainment like a tablet, book, or favorite TV show during styling.
- Start with quicker styles and gradually work up to more time-consuming ones as patience builds.
- Involve them in the process by letting them hold supplies or watch in a mirror.
The Resistant Child:
- Offer choices between two or three parent-approved styles to give them control.
- Explain the practical benefits of keeping hair out of their face during activities they enjoy.
- Let them pick out fun accessories or colorful elastics to make styling more appealing.
- Praise them for sitting well and cooperating to encourage positive associations with hair care.
Hair That Won’t Stay:
- Fine or slippery hair may need texturizing spray before styling for better grip.
- Use smaller elastics wrapped multiple times for tighter, more secure hold.
- Add bobby pins at strategic points even in ponytails for additional security.
- Consider slightly dampening hair before styling to increase hold.
Seasonal Styling Considerations
Summer Styles:
- Prioritize styles that keep hair completely off the neck and face during hot weather.
- High buns, top knots, and updos provide maximum cooling and comfort.
- Swimming-friendly styles like Dutch braids and cornrows withstand pool and beach activities.
- Apply leave-in conditioner with UV protection to prevent sun damage.
Winter Styles:
- Static electricity becomes an issue—use anti-frizz products and leave-in conditioner.
- Styles that fit comfortably under hats prevent flattening and discomfort.
- Lower buns and braided styles work better with winter hats and coats.
- Indoor heating dries hair—increase conditioning treatments during winter months.
Fall and Spring:
- These transitional seasons allow for more styling variety with moderate weather.
- Wind can disrupt styles—choose more secure options like braids on windy days.
- Changing activity levels with new school years or sports may require adjusting style choices.
- Use this time to experiment with new styles before summer or winter extremes arrive.
Building Independence
Teaching Self-Styling:
- Start with the simplest style—a basic ponytail—and practice until mastered.
- Break down complex styles into steps, teaching one step at a time.
- Use a two-mirror setup so children can see the back of their heads.
Practice on weekends when time pressure is reduced and mistakes don’t matter.
Age-Appropriate Skills:
- Ages 5-6 can learn to brush their own hair and put it in a simple ponytail with practice.
- Ages 7-9 can master basic braiding, twists, and creating simple buns with guidance.
- Ages 10-12 can typically handle more complex styles independently, including Dutch braids and styled updos.
- Praise efforts and progress rather than perfection to build confidence and motivation.
Independence Benefits:
- Self-styling skills reduce morning stress for the entire family on busy school days.
- Children gain confidence and pride in their ability to manage their own appearance.
- Learning these skills teaches patience, fine motor control, and following multi-step processes.
- Independence in hair care is an important self-care skill that serves them into adulthood.
Supporting Learning:
- Create a child-height mirror station with all necessary supplies within easy reach.
- Make video tutorials together showing your child’s specific hair type and the family’s preferred styles.
- Celebrate successes and help problem-solve challenges without criticism.
- Allow children to make styling choices appropriate for school rules and family guidelines.
School Dress Code Compliance
Understanding School Rules:
- Review your school’s dress code policy regarding acceptable hairstyles and accessories.
- Some schools prohibit unnatural hair colors, excessive accessories, or distracting styles.
- Athletic programs may have specific requirements for practices and competitions.
- When in doubt, choose classic, neat styles that meet even strict dress codes.
Code-Compliant Favorites:
- Classic ponytails, simple braids, and neat buns typically meet all school requirements.
- Stick to hair accessories in neutral or school colors for guaranteed compliance.
- Save more elaborate or trendy styles for weekends and school breaks.
- Teach children the difference between school-appropriate and special occasion styling.
Activity-Specific Requirements:
- Physical education classes often require hair to be secured away from the face completely.
- Science labs may have safety requirements for contained hair around equipment.
- Music performances might specify certain hairstyles for uniformity among performers.
- Sports teams frequently have specific rules about hair containment during games and practices.
Cultural Considerations
Respecting Hair Heritage:
- Many cultures have significant traditions and meanings attached to specific hairstyles.
- Protective styling is particularly important for textured, curly, and coily hair types.
- Research and honor traditional styling methods appropriate for your child’s hair texture.
- Consult with family members who have expertise in caring for your child’s specific hair type.
Protective Styling Importance:
- Styles like cornrows, twists, and braids protect textured hair from breakage and damage.
- These styles reduce daily manipulation that can cause stress on delicate hair strands.
- Proper protective styling promotes healthy hair growth and length retention.
- Balance protective styling with giving hair breaks to prevent tension damage.
Cultural Appropriation Awareness:
- Be mindful about adopting styles with cultural significance outside your own heritage.
- Focus on styles appropriate and healthy for your child’s specific hair texture and type.
- Educate yourself about the history and meaning of styles before adopting them.
- Celebrate your child’s natural hair texture rather than trying to change it.
Special Occasion Styling
Birthday Parties:
- More elaborate styles like rosette buns, heart-shaped buns, or crowned braids work well.
- Add themed accessories like character clips, colorful ribbons, or sparkly pins.
- Consider temporary hair color sprays or chalk for extra birthday fun.
- Make sure the style will last through active party games and activities.
Holiday Styling:
- Incorporate holiday colors through ribbons, bows, and coordinating accessories.
- Festive styles like braided crowns with decorations suit formal holiday gatherings.
- Choose styles that will photograph well for holiday cards and family pictures.
- Consider comfort for extended family events where children may be sitting for meals.
School Picture Day:
- Schedule styling the morning of pictures to ensure maximum freshness and neatness.
- Choose classic styles that won’t look dated when reviewing pictures years later.
- Avoid trendy styles or accessories that might distract from your child’s face.
- Smooth any flyaways with appropriate products for a polished appearance.
Dance Recitals and Performances:
- Follow specific requirements from instructors regarding required hairstyles.
- Secure styles with extra bobby pins and hairspray to withstand movement and stage lights.
- Use hair nets over buns for maximum security during energetic dance routines.
- Complete styling several hours before performance to ensure it holds through warm-ups and shows.
Hygiene and Hair Health
Regular Washing Schedule:
- Establish an age-appropriate hair washing routine based on hair type and activity level.
- Active children may need more frequent washing, while curly hair often benefits from less frequent washing.
- Teach children proper shampooing and conditioning techniques appropriate for their age.
- Use gentle, child-appropriate hair products designed for their specific hair type.
Preventing Damage:
- Avoid hairstyles that are excessively tight, which can cause traction alopecia over time.
- Vary hairstyle types to prevent stress on the same hair sections repeatedly.
- Use fabric-covered elastics instead of rubber bands that snag and break hair.
- Minimize heat styling to prevent damage, opting for air-drying when possible.
Healthy Hair Practices:
- Regular trims every 6-8 weeks remove split ends and promote healthy growth.
- Deep conditioning treatments maintain moisture, especially in braided or protective styles.
- Silk or satin pillowcases reduce friction during sleep, preventing breakage and tangles.
- Proper nutrition including adequate protein and vitamins supports healthy hair growth.
Scalp Care:
- Clean, healthy scalps are essential for healthy hair growth and comfort.
- Address issues like dandruff, dryness, or irritation promptly with appropriate products.
- Massage the scalp gently during washing to promote circulation and healthy growth.
- Avoid styles so tight they cause scalp discomfort or visible tension.
Budget-Friendly Styling
Affordable Essential Supplies:
- Build a collection of basic supplies gradually rather than purchasing everything at once.
- Buy elastics, bobby pins, and basic accessories in bulk for significant savings.
- Generic or store-brand hair products often work as well as expensive name brands.
- Thrift stores and dollar stores offer affordable hair accessories in various styles.
DIY Accessories:
- Create custom bows, scrunchies, and headbands using inexpensive fabric and basic sewing skills.
- Repurpose ribbon from gift wrapping or craft supplies for braided ribbon ponytails.
- Make hair ties using elastic cord and fabric scraps for pennies per piece.
- Personalize plain clips and headbands with craft supplies like buttons, beads, or fabric paint.
Extending Style Life:
- Learning styles that last multiple days reduces the time and product needed overall.
- Properly caring for styles overnight with silk bonnets or scarves extends their wear.
- Refreshing styles with water spray and light product is more economical than complete restyling.
- Teaching children to care for their hairstyles helps them last longer between salon visits.
Troubleshooting Common Issues
Ponytail Bump or Dent:
- Smooth hair thoroughly before gathering to prevent bumps at the elastic.
- Use a brush or fine-tooth comb to eliminate any sections that might create ridges.
- Apply light smoothing gel or spray to problem areas before securing.
- If bumps persist, try positioning the ponytail at a slightly different angle or height.
Braids Coming Loose:
- Ensure braiding is tight and consistent from start to finish for better hold.
- Add small clear elastics every few inches down long braids for additional security.
- Apply a light-hold hairspray or gel before braiding to increase grip.
- Fine or slippery hair may need texturizing spray applied before braiding.
Buns Falling Apart:
- Use enough bobby pins—most buns need 6-10 pins minimum for security.
- Insert bobby pins with the wavy side down against the scalp for better grip.
- Create a ponytail base before forming the bun for additional foundation.
- Hair donuts or bun makers provide structure that helps buns stay intact.
Flyaways and Frizz:
- Apply a small amount of smoothing serum or light gel to problematic areas.
- Use an old toothbrush or clean mascara wand spritzed with hairspray to smooth flyaways.
- In humid weather, anti-frizz products applied before styling help maintain smoothness.
- Silk or satin bonnets at night prevent friction that creates flyaways.
Transition Hairstyles for Different Hair Lengths
Growing Out Short Hair:
- Headbands and clips become essential tools for managing awkward in-between lengths.
- Half-up styles work well during the transition, keeping shorter pieces secured.
- Small braids or twists along the hairline control face-framing pieces as they grow.
- Regular trims shape the growing hair, preventing an unkempt appearance during the transition.
Maintaining Medium Length:
- Medium length offers the most styling versatility, from updos to braids to ponytails.
- This length is often ideal for active children—long enough to style but not so long it’s cumbersome.
- Regular trims maintain the shape and remove split ends without significant length loss.
- Most of the styles in this article work beautifully on medium-length hair.
Managing Very Long Hair:
- Extra-long hair requires more time for brushing, washing, and styling.
- Protective styles that last multiple days become especially valuable with very long hair.
- Consider the child’s ability to care for long hair before allowing it to grow very long.
- Regular deep conditioning prevents damage and tangling in long hair.
Sensory-Friendly Styling
For Children with Sensory Sensitivities:
- Choose styles with minimal tension that don’t create uncomfortable pulling sensations.
- Avoid accessories with hard edges, rough textures, or parts that dig into the scalp.
- Use seamless elastics and soft fabric scrunchies instead of metal or plastic clips.
- Allow children to participate in choosing styles to ensure their comfort.
Accommodating Sensitivities:
- Low ponytails and loose styles often work better than tight updos for sensitive children.
- Break styling into multiple short sessions if sitting still for extended periods is challenging.
- Provide fidget toys or distractions during styling to help manage sensory discomfort.
- Never force a style that causes genuine discomfort—hair should never hurt.
Alternative Options:
- Very short haircuts eliminate the need for daily styling, which some children prefer.
- Simple, quick styles reduce the time children must tolerate hair manipulation.
- Identify which specific aspects bother your child (pulling, touching scalp, sitting still) and adapt accordingly.
- Work with occupational therapists if sensory issues around hair care are significant.
Environmental Considerations
Eco-Friendly Product Choices:
- Choose hair products with natural ingredients and minimal chemical processing.
- Look for brands that use recyclable packaging and sustainable manufacturing practices.
- Solid shampoo bars eliminate plastic bottle waste while working effectively.
- Reusable fabric hair ties and scrunchies reduce waste compared to disposable elastics.
Sustainable Accessories:
- Invest in quality accessories that last rather than frequently replacing cheap items.
- Choose wooden or bamboo brushes and combs instead of plastic versions.
- Natural fiber ribbons and fabric accessories are more environmentally friendly than synthetic materials.
- Donate outgrown or unused hair accessories rather than discarding them.
Water Conservation:
- Adjust washing frequency based on actual need rather than arbitrary schedules.
- Use dry shampoo between washes to extend time between full hair washing.
- Turn off water while applying shampoo and conditioner during washing.
- Teach children efficient washing techniques that minimize water waste.
Building a Hairstyle Routine
Creating Consistency:
- Establish specific days for certain styles to create predictable routines children can anticipate.
- Morning routines work better when hair styling has a designated time slot.
- Create a visual schedule showing which styles happen on which days for younger children.
- Consistency reduces morning arguments and decision fatigue for everyone.
Involving Children:
- Allow age-appropriate input in choosing styles within parent-set parameters.
- Create a style calendar together at the beginning of each week.
- Let children select accessories from pre-approved options to give them control.
- Praise cooperation and good sitting during styling to reinforce positive behavior.
Adapting Routines:
- Adjust timing and style complexity based on what realistically works for your family.
- Be flexible when sick days, rough mornings, or special circumstances arise.
- Simplify routines during particularly busy periods rather than abandoning hair care entirely.
- Recognize that routines will evolve as children age and schedules change.
Conclusion
Mastering these 37 Cute and Easy Kids’ Hairstyles to Keep Hair Out of the Face transforms daily hair struggles into opportunities for creativity, bonding, and practical problem-solving.
From quick two-minute ponytails perfect for rushed school mornings to elaborate braided styles suitable for special occasions, this collection offers solutions for every situation, hair type, and skill level.
The key to success lies in understanding your child’s unique hair characteristics, activity requirements, and personal preferences while building age-appropriate styling skills that grow with them.
Remember that the perfect hairstyle balances three essential elements—keeping hair functionally out of the face, maintaining comfort throughout active days, and making your child feel confident and beautiful.
With practice, patience, and the right techniques, you’ll develop a reliable repertoire of go-to styles that work for your family’s unique needs and schedule.
Whether you’re styling a wiggly toddler, an active grade-schooler, or an independent tween, these hairstyles provide the foundation for stress-free mornings and happy, comfortable children whose hair stays beautifully in place no matter what adventures the day brings.