When it comes to wedding day beauty, bridesmaids deserve hairstyles that are just as stunning as the bride’s, and nothing captures romance quite like an elegant updo adorned with delicate braids.
Whether you’re preparing for a rustic barn wedding, a beachside ceremony, or a grand ballroom celebration, the perfect braided updo can transform your entire bridal party look from ordinary to extraordinary.
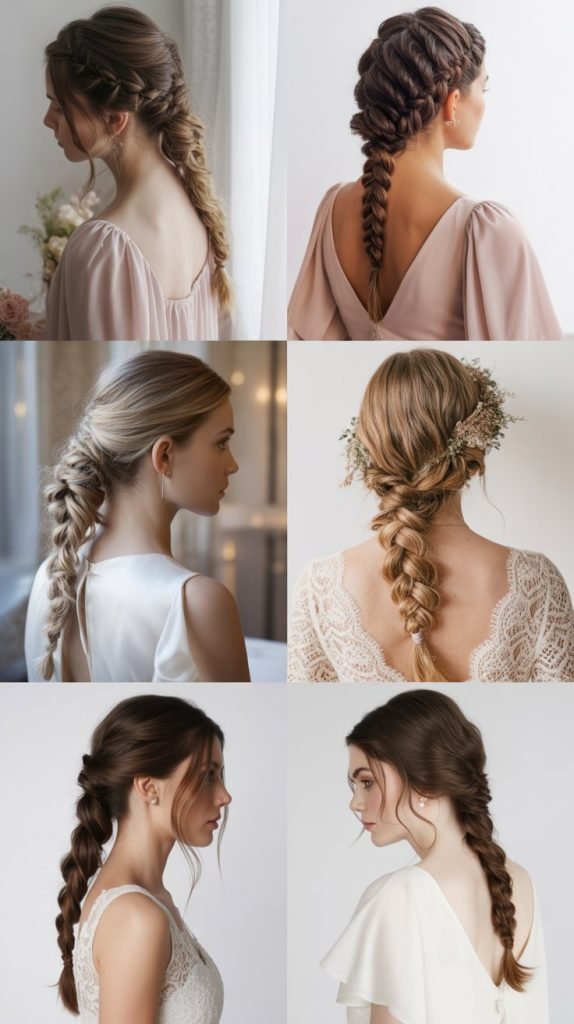
In this comprehensive guide to 33+ Romantic Bridesmaid Updo Hairstyles with Braid, you’ll discover an inspiring collection of styles ranging from classic twisted chignons to bohemian braided buns, each designed to complement different hair types, face shapes, and wedding themes.
We’ll walk you through timeless options, modern interpretations, and practical styling tips that will help you and your bridesmaids achieve picture-perfect hair that stays flawless from the ceremony through the last dance.
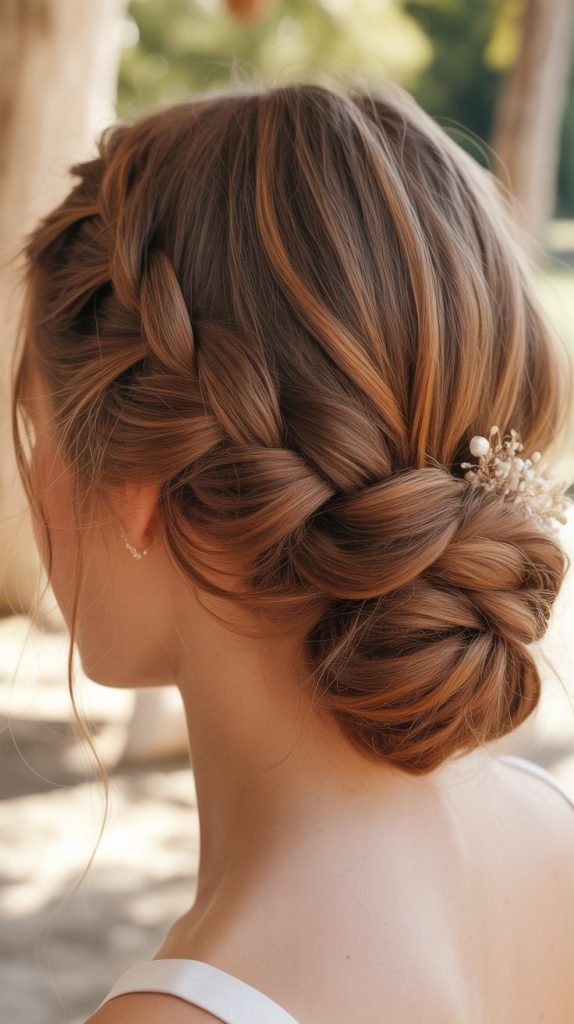
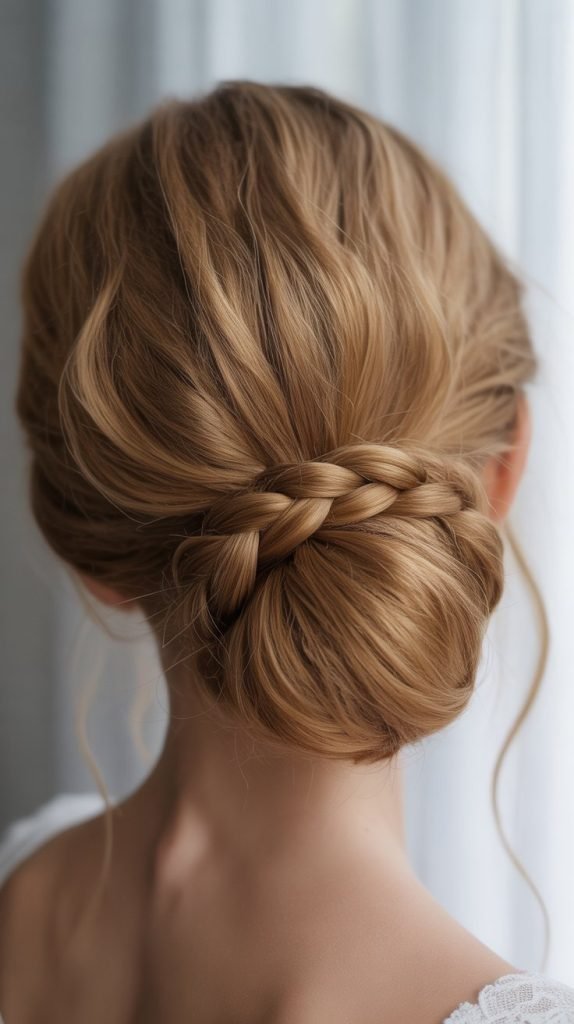
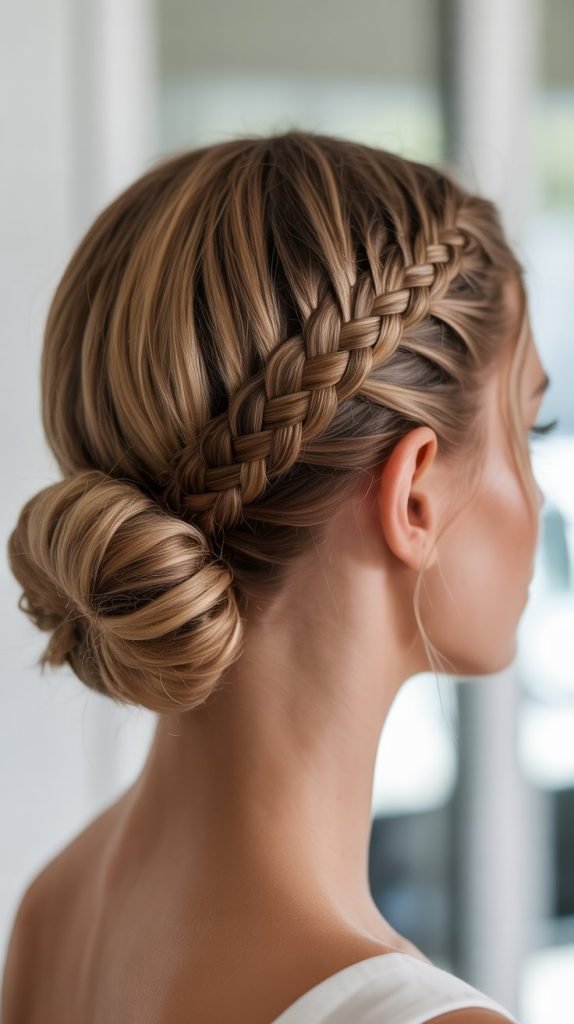
1. Classic Braided Chignon
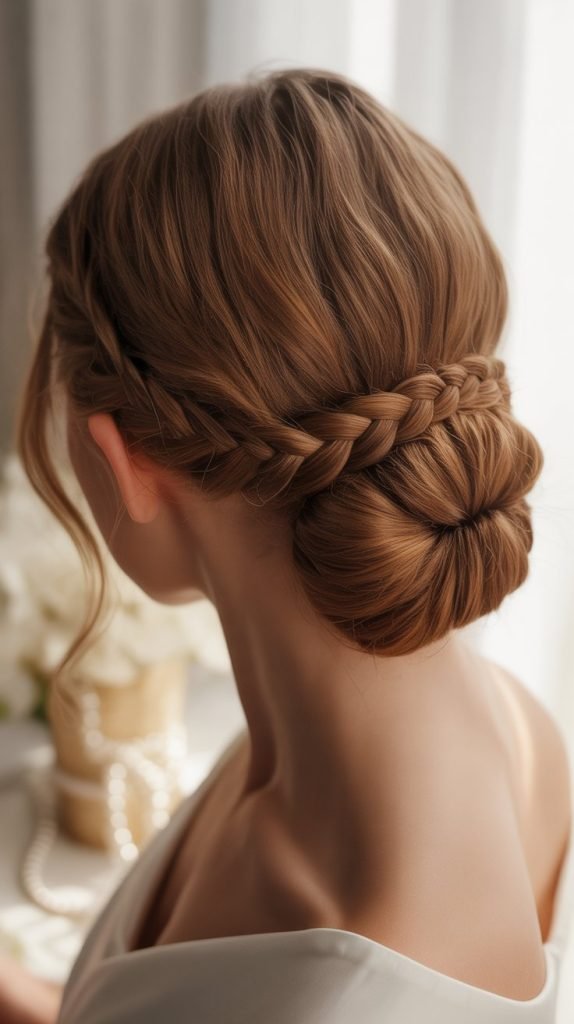
The braided chignon represents timeless elegance with a romantic twist, combining the sophistication of a low bun with the intricate beauty of woven braids.
- This style works exceptionally well for formal weddings and complements both vintage-inspired and contemporary bridal aesthetics.
- The chignon sits elegantly at the nape of the neck, creating a refined silhouette that photographs beautifully from every angle.
- Incorporating a braid adds texture and visual interest while keeping the overall look polished and wedding-appropriate.
Styling Approach:
- Begin by creating a deep side part or center part depending on face shape preferences.
- Braid a small section from one side and secure it temporarily while gathering the remaining hair.
- Twist the gathered hair into a low bun at the nape, then wrap the braid around the base for an elegant finishing touch.
- Secure everything with bobby pins and finish with strong-hold hairspray to ensure longevity throughout the celebration.
Best For:
- Bridesmaids with medium to long hair lengths.
- Formal and black-tie wedding settings.
- Those seeking a sophisticated, camera-ready hairstyle.
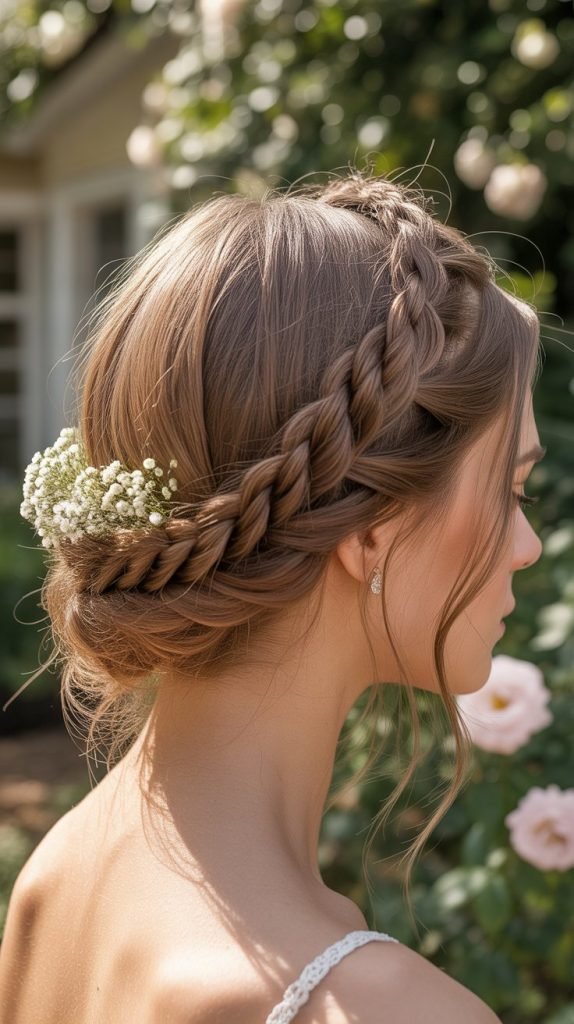
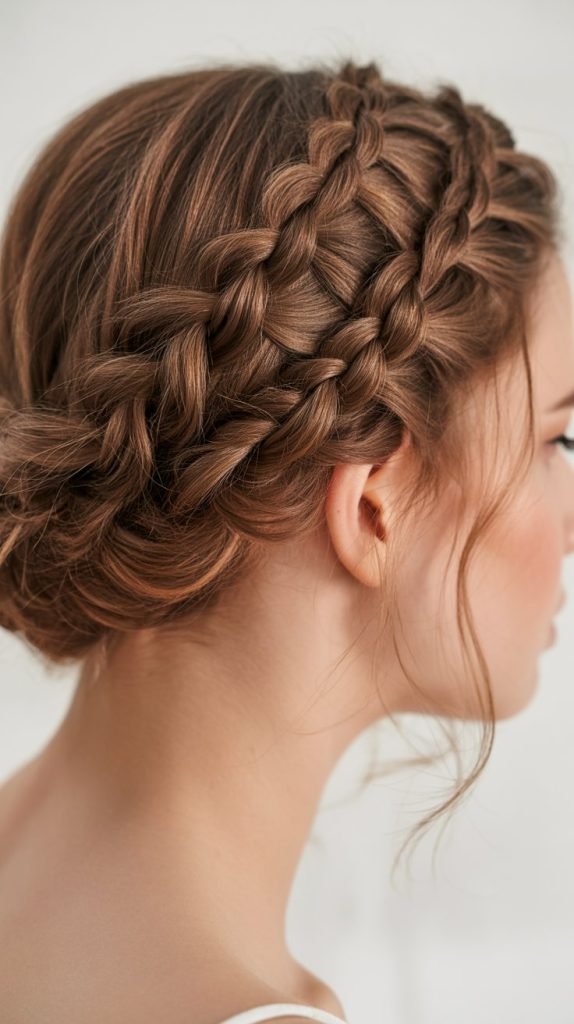
2. Bohemian Braided Crown Updo

The bohemian braided crown updo channels free-spirited romance with its soft, whimsical appearance that’s perfect for outdoor and rustic weddings.
- This ethereal style features braids that encircle the head like a crown before transitioning into a textured low bun.
- The relaxed, slightly undone quality creates an effortlessly romantic vibe that complements flowing bridesmaid dresses and natural wedding settings.
Construction Method:
- Create two Dutch braids starting from the front hairline on each side of the head.
- Continue braiding toward the back, gradually incorporating hair as you work down.
- Once both braids meet at the back, twist the remaining lengths together and pin into a loose, textured bun.
- Gently pull apart sections of the braids to create a fuller, more relaxed appearance.
- Finish by tucking in any flyaways and securing with decorative pins or fresh flowers.
Ideal Settings:
- Garden weddings and outdoor ceremonies.
- Rustic barn venues and countryside celebrations.
- Beach weddings with a natural, laid-back atmosphere.
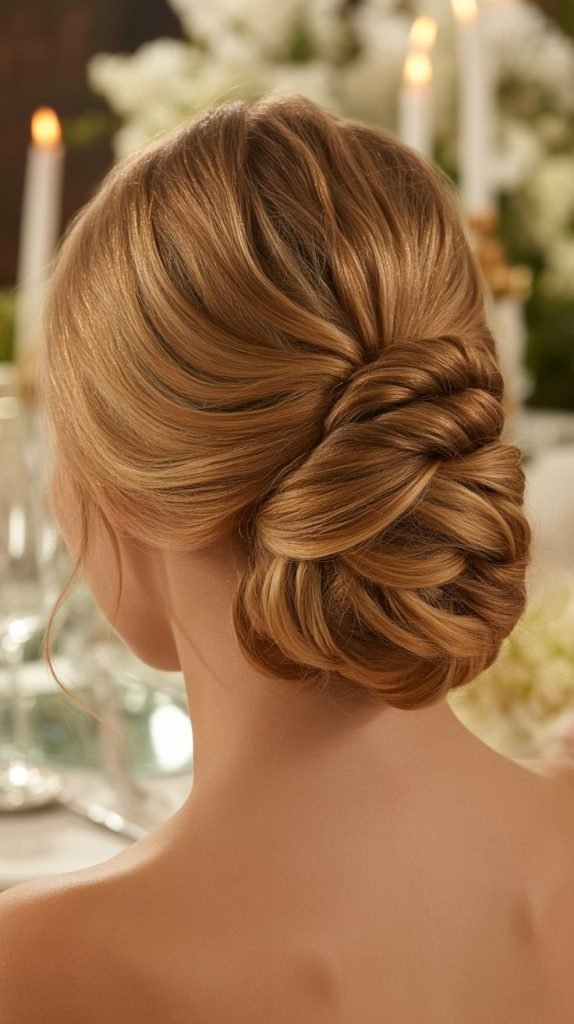
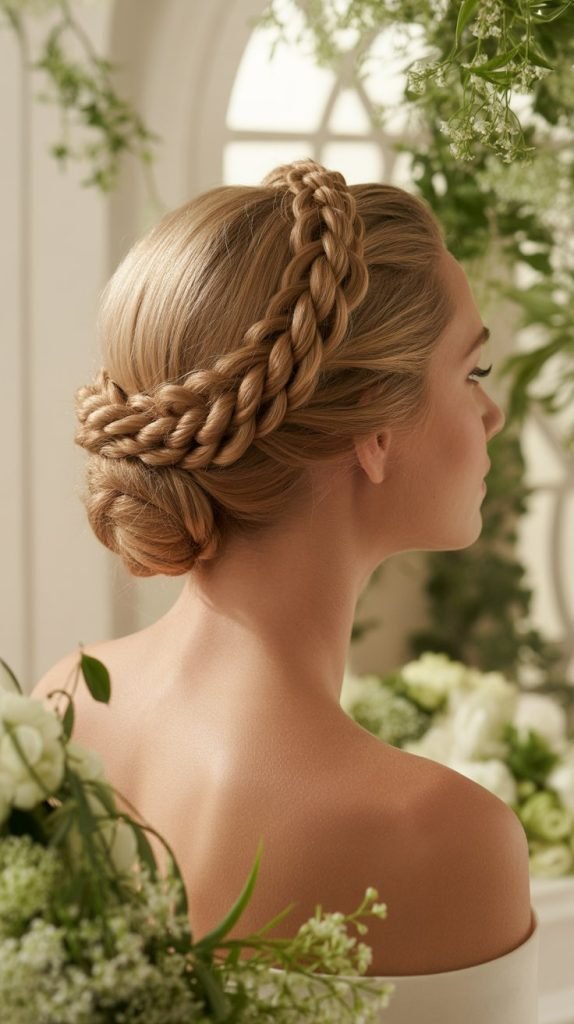
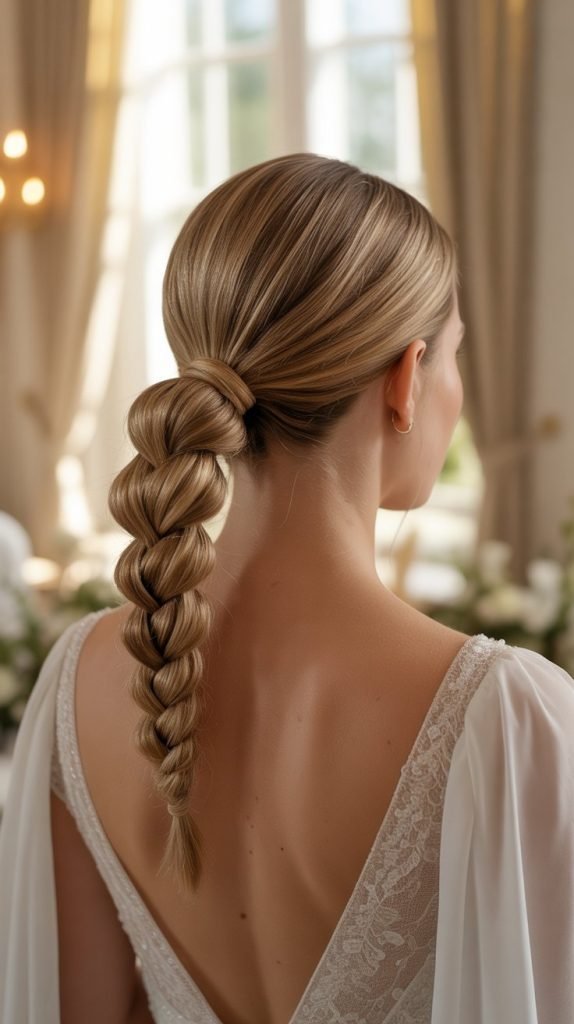
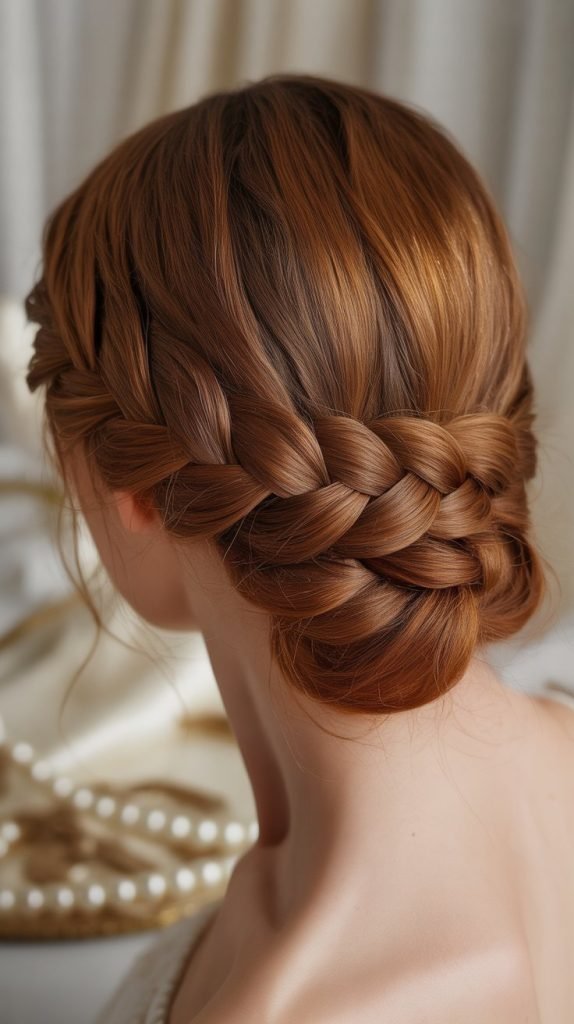
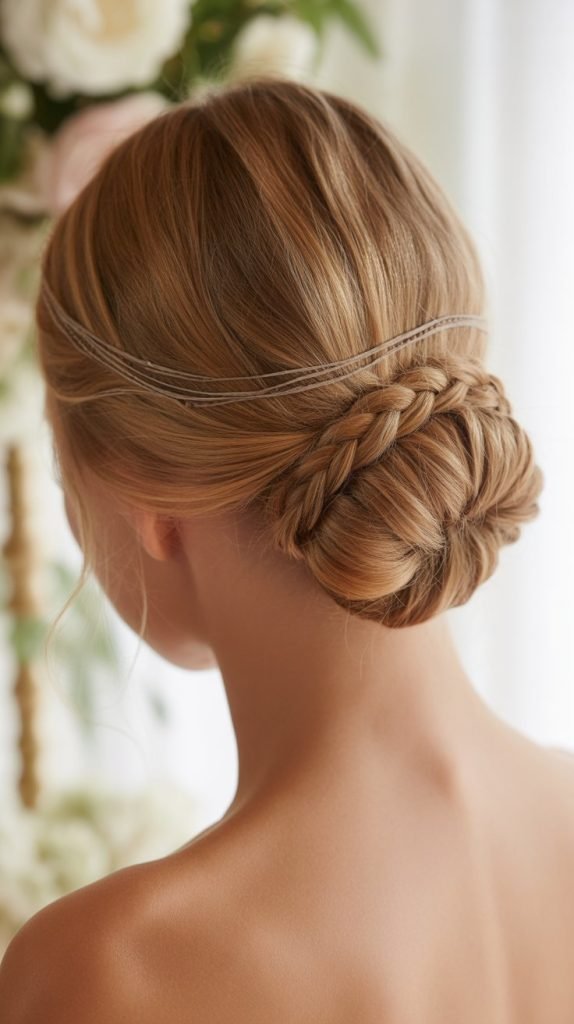
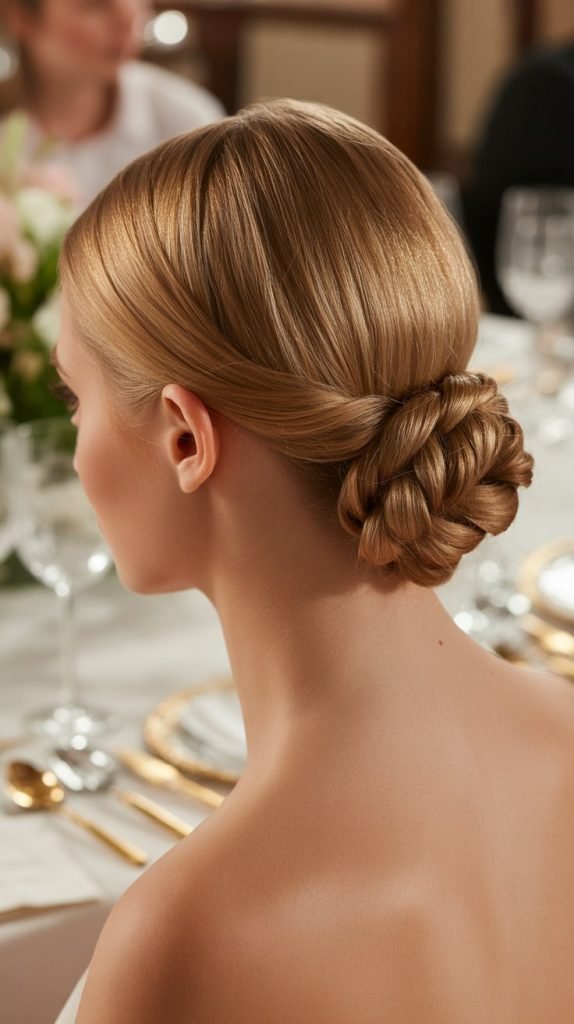
3. Twisted Rope Braid Updo
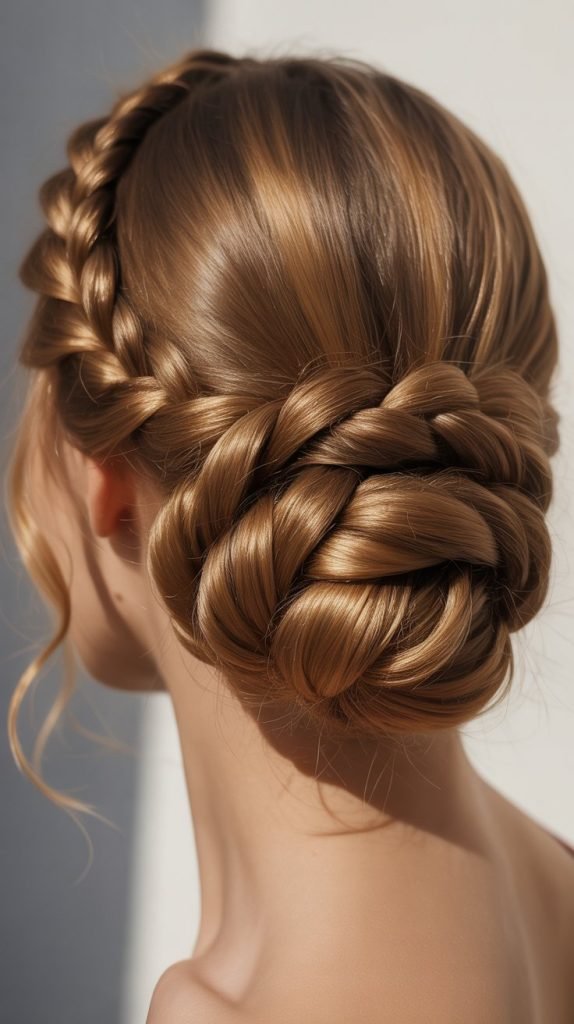
The twisted rope braid updo offers a modern interpretation of classic braiding techniques, creating striking visual dimension through simple twisting motions.
- This style is surprisingly easy to achieve yet delivers impressive results that look far more complicated than the actual technique requires.
- The rope twist creates a chunky, statement-making texture that stands out in wedding photos.
Step-by-Step Process:
- Divide hair into two equal sections at the back of the head.
- Twist each section clockwise individually, then wrap them around each other counterclockwise to create the rope effect.
- Continue twisting and wrapping until you reach the ends.
- Coil the twisted rope into a spiral bun shape and secure with pins.
- Smooth any bumps at the crown with a fine-tooth comb and light styling product.
Advantages:
- Requires minimal braiding skills while delivering maximum impact.
- Works beautifully on various hair textures including fine and thick hair.
- Holds securely throughout long wedding days and evening receptions.
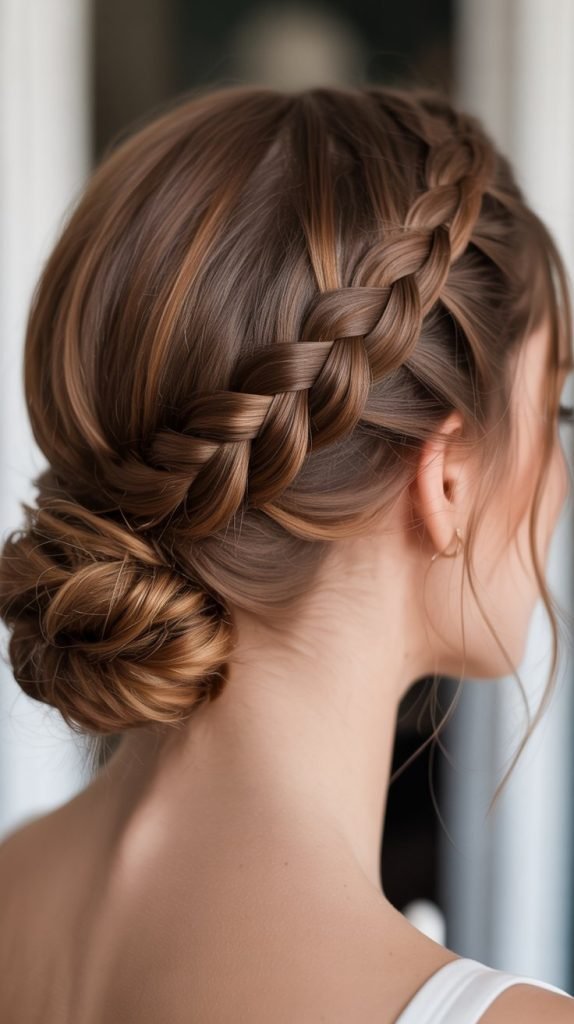
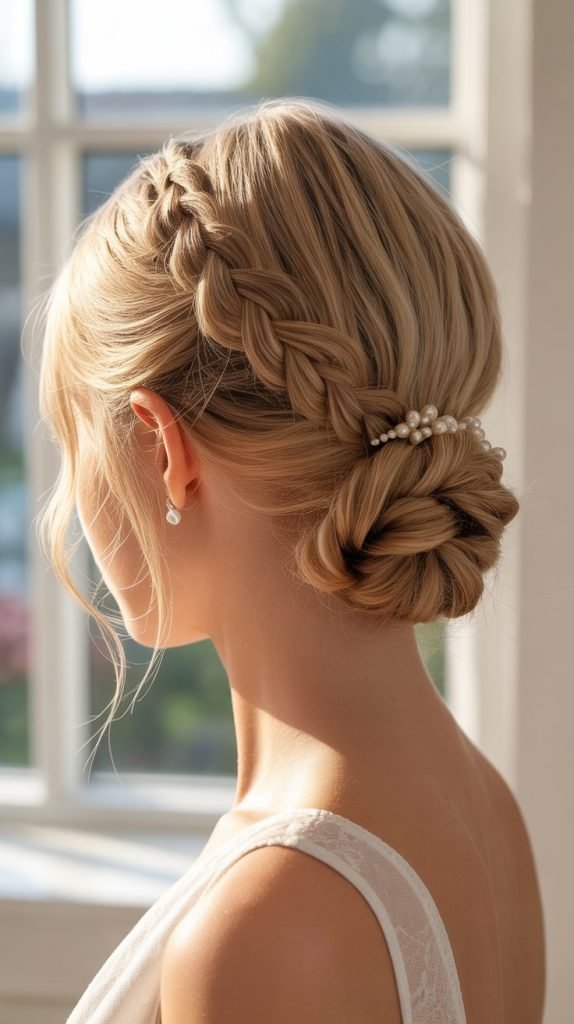
4. French Braid into Low Bun
The French braid into low bun combines continental elegance with practical styling, creating a seamless transition from intricate braid to polished bun.
- Starting with a French braid from the crown ensures all hair is securely contained while adding beautiful texture to the upper portion.
- This style provides excellent structure and stability, making it ideal for bridesmaids who’ll be dancing and celebrating throughout the event.
Execution Details:
- Begin French braiding at the crown, taking small sections from each side as you work downward.
- Continue the braid to the nape of the neck, then secure temporarily.
- Gather any remaining loose hair with the braid and twist everything into a classic low bun.
- Pin securely around the perimeter of the bun, ensuring all ends are tucked in neatly.
- Apply shine serum for a glossy, polished finish.
Perfect For:
- Bridesmaids seeking maximum hold and security.
- Long hair that needs to be elegantly controlled.
- Weddings with extensive dancing and activities.
5. Side-Swept Braided Bun
The side-swept braided bun brings asymmetrical beauty to bridesmaid styling, offering a contemporary twist on traditional updo placements.
- Positioning the bun to one side creates visual interest and allows for stunning profile photography.
- This style works particularly well for bridesmaids with side-swept bangs or those wanting to showcase statement earrings.
Creation Process:
- Create a deep side part and sweep all hair to the preferred side.
- Braid a section along the hairline from the opposite side, working toward the chosen placement.
- Gather remaining hair with the braid at the low side position near the ear or shoulder.
- Twist and pin into a romantic, slightly loose bun.
- Allow a few soft tendrils to frame the face for a softer, more romantic finish.
Styling Tips:
- Consider adding decorative hairpins or pearl accessories on the braided side for extra glamour.
- This style pairs beautifully with one-shoulder bridesmaid dresses.
- Works exceptionally well for bridesmaids with oval and heart-shaped faces.
6. Waterfall Braid Updo
The waterfall braid updo creates the illusion of cascading strands while maintaining the structure and elegance of a formal updo.
- This intricate-looking style features the signature waterfall technique where sections of hair are dropped through the braid, creating a stunning cascade effect.
- Despite its complex appearance, with practice, this style becomes manageable for at-home styling or salon appointments.
Technical Approach:
- Begin a waterfall braid from one side of the head, dropping sections as you braid across toward the opposite side.
- The dropped sections create beautiful streams of hair that add movement and dimension.
- Once the waterfall braid reaches the opposite side, gather all hair including the dropped strands.
- Twist and pin into an elegant low or side bun, allowing some of the waterfall effect to remain visible.
- Curl the dropped sections lightly for enhanced texture and romance.
Best Applications:
- Spring and summer weddings with light, flowing aesthetics.
- Bridesmaids with highlighted or balayage hair that showcases the dimensional technique.
- Medium to long hair lengths that can support the waterfall drops.
7. Dutch Braid Updo with Volume
The Dutch braid updo with volume makes a bold statement by combining raised, three-dimensional braiding with dramatic height and fullness.
- Dutch braids, also known as reverse French braids, sit on top of the hair rather than underneath, creating impressive texture and dimension.
- Adding volume at the crown before braiding creates a modern, fashion-forward look that photographs exceptionally well.
Volume-Building Method:
- Tease hair at the crown section to create foundation volume.
- Create one or two Dutch braids starting from the front, working backward while maintaining the lifted texture.
- Once braids reach the desired length, twist and pin into a high or mid-level bun.
- Gently pull on the outer edges of the braids to create even more width and dimension.
- Finish with flexible-hold hairspray to maintain volume without stiffness.
Considerations:
- This style works particularly well for bridesmaids with fine hair seeking more substantial-looking styles.
- The added height creates a lengthening effect for petite bridesmaids.
- Best suited for modern, fashion-forward wedding themes.
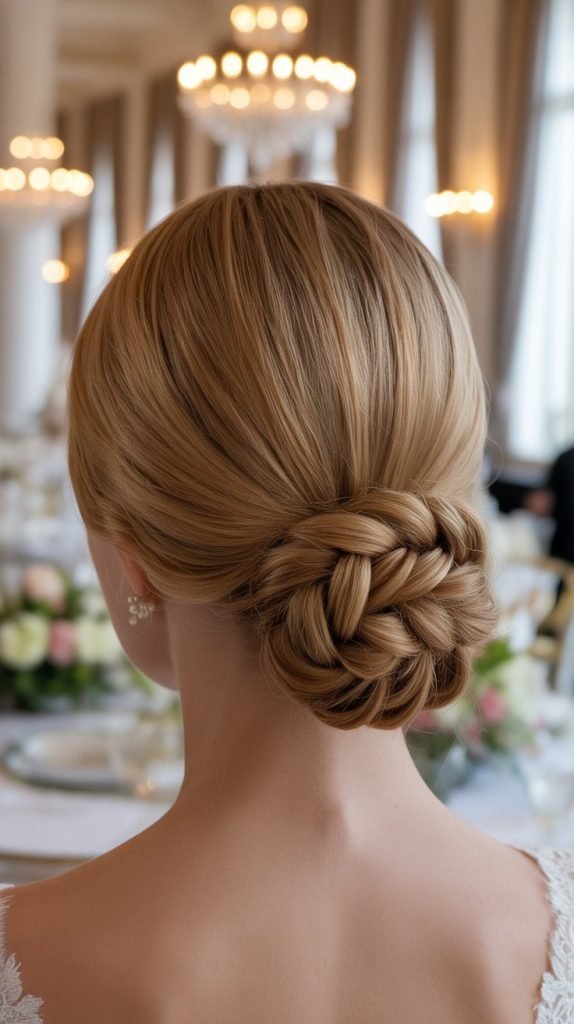
8. Fishtail Braid Chignon

The fishtail braid chignon merges the intricate beauty of fishtail braiding with the classic sophistication of a low chignon bun.
- Fishtail braids create a more detailed, scale-like pattern that adds extraordinary texture and visual interest.
- This style strikes the perfect balance between bohemian charm and refined elegance.
Fishtail Technique:
- Divide hair into two large sections.
- Take a small piece from the outer edge of the left section and cross it over to join the right section.
- Repeat on the opposite side, taking a small piece from the outer right edge and crossing to the left.
- Continue this alternating pattern until you reach the ends.
- Coil the completed fishtail braid into a low chignon shape at the nape.
- Pin securely and pancake the braid by gently pulling sections to create fuller, more romantic texture.
Styling Benefits:
- The detailed pattern catches light beautifully in photographs.
- Works wonderfully for both thick and thin hair textures.
- Can be styled sleek and tight or pulled apart for a softer, more relaxed appearance.
9. Braided Ballerina Bun
The braided ballerina bun channels graceful sophistication with its high placement and perfectly polished appearance.
- Inspired by classical ballet, this elevated style creates elegant height while the incorporated braid adds romantic softness.
- The high positioning makes this an excellent choice for showcasing necklines and statement necklaces.
Ballet-Inspired Construction:
- Gather hair into a high ponytail at the crown of the head, ensuring smooth, bump-free sides.
- Create a traditional three-strand braid with the ponytail, securing the end.
- Wrap the braid around the base of the ponytail in a circular motion, creating the classic bun shape.
- Secure with pins inserted in an “X” pattern for maximum hold.
- Use edge control product on the hairline for an ultra-sleek, dancer-inspired finish.
Best Suited For:
- Formal evening weddings and black-tie affairs.
- Bridesmaids with graceful, elongated necks.
- Those wearing high-neck or halter-style bridesmaid dresses.
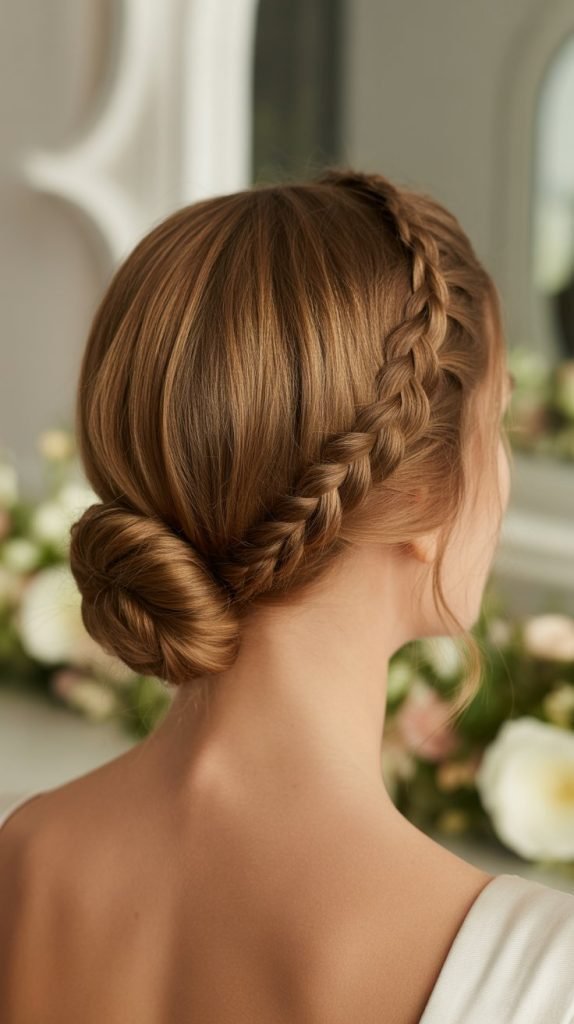
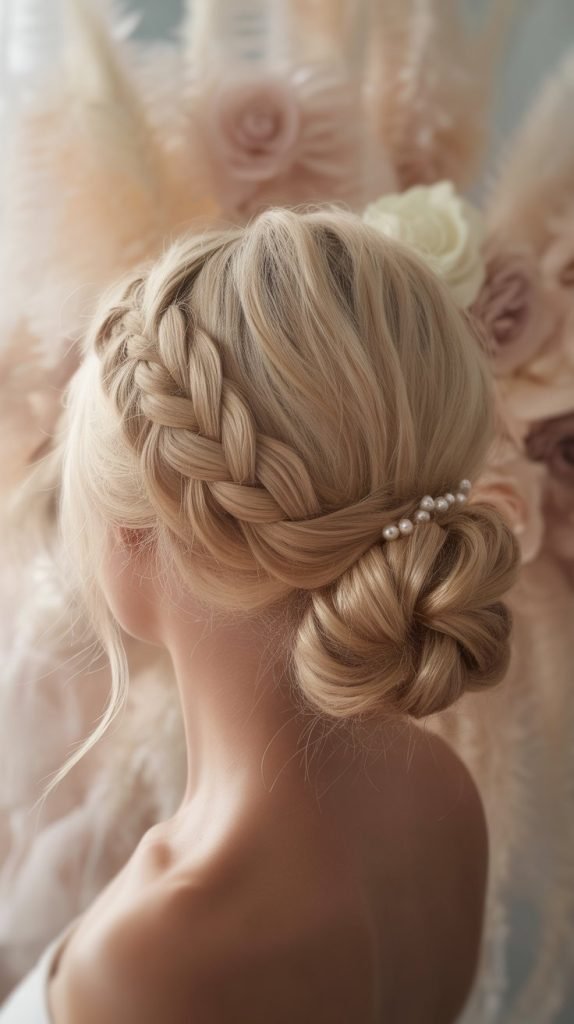
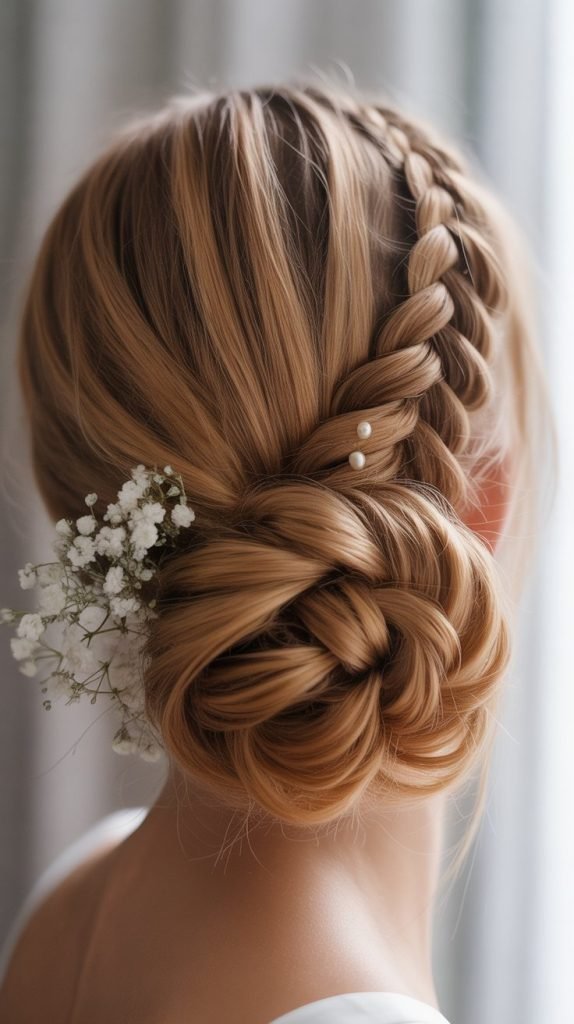
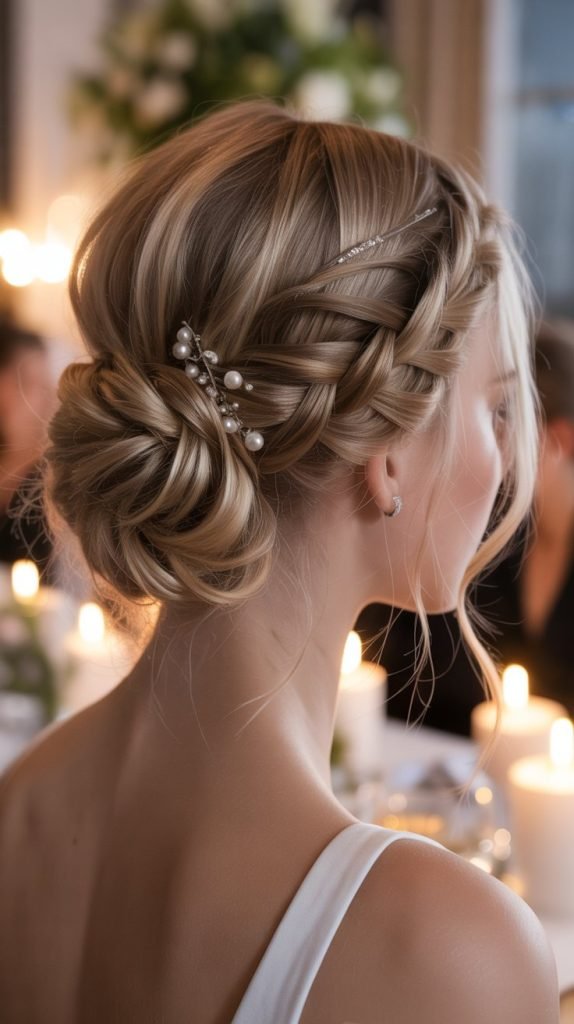
10. Halo Braid with Low Bun
The halo braid with low bun creates an angelic, ethereal appearance that’s perfect for romantic wedding themes.
- The braid encircles the entire head like a halo before connecting to a soft, low bun at the back.
- This style has a distinctly feminine, princess-like quality that complements fairy-tale wedding aesthetics.
Halo Creation Process:
- Begin braiding at one side of the head near the temple.
- Continue the braid around the head, following the natural hairline and incorporating sections as you go.
- When you return to the starting point, allow the remaining length to flow down.
- Combine this length with any hair left at the back into a soft, romantic low bun.
- Secure the halo braid with discreet pins along its path, ensuring it sits comfortably against the head.
Decorative Options:
- Weave small flowers throughout the halo braid for garden weddings.
- Add delicate pearl pins for classic elegance.
- Incorporate ribbon or thin metallic cord for bohemian flair.
11. Messy Braided Topknot
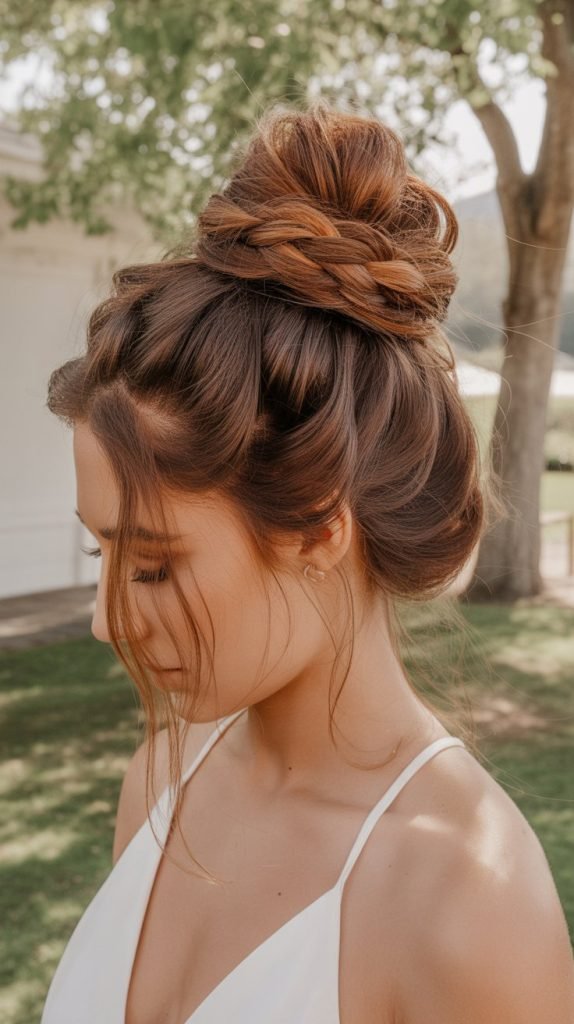
The messy braided topknot perfectly captures effortless chic with its deliberately undone aesthetic and relaxed vibe.
- This style embraces texture and imperfection, creating a fashion-forward look that feels current and approachable.
- The high placement keeps hair completely off the neck, making it ideal for warm-weather weddings.
Undone Styling Approach:
- Create texture throughout hair using salt spray or texturizing product.
- Loosely braid sections of hair without worrying about perfection or symmetry.
- Gather everything into a high ponytail, leaving some pieces intentionally loose around the face.
- Twist and wrap the braided ponytail into a topknot, allowing pieces to fall naturally.
- Pull apart the braid and bun to create intentional messiness and volume.
- Allow a few face-framing pieces to remain free for a softer, more romantic effect.
Modern Appeal:
- Perfect for contemporary, laid-back wedding styles.
- Particularly suited for outdoor summer ceremonies.
- Works beautifully with boho and rustic wedding themes.
12. Braided Twisted Updo
The braided twisted updo combines multiple textures and techniques for a dimensional, multi-faceted appearance.
- Incorporating both braids and twists creates visual complexity that looks custom-designed and special.
- This versatile style can be adapted to suit various wedding formality levels depending on how it’s finished.
Multi-Technique Method:
- Divide hair into several sections throughout the head.
- Create small braids in some sections while twisting others, working systematically around the head.
- Gradually gather all braided and twisted sections toward a central collection point at the back.
- Pin each piece individually, crisscrossing and layering them to create an intricate finished updo.
- The combination of techniques creates beautiful dimension and movement.
Customization Options:
- Vary the tightness of braids and twists for different aesthetic effects.
- Position the final gathering high, mid, or low depending on preference and dress style.
- Add accessories where braids and twists intersect for extra sparkle.
13. Side Fishtail into Bun
The side fishtail into bun offers asymmetrical elegance with the detailed beauty of fishtail braiding leading to a romantic side-positioned bun.
- Starting with a side fishtail creates a stunning diagonal line across the back of the head.
- This style provides excellent opportunities for showcasing hair color dimension and highlights.
Diagonal Design:
- Create a side part and bring all hair to one shoulder.
- Begin a fishtail braid at the opposite side of the part, working diagonally across the back of the head.
- Continue the fishtail technique until you reach the low side position where the bun will sit.
- Coil the remaining fishtail braid into a romantic, slightly loose bun.
- Pin securely and pancake both the braid and bun for enhanced fullness.
Visual Impact:
- The diagonal line creates dynamic movement in photographs.
- Side positioning allows for beautiful profile shots.
- Works exceptionally well for bridesmaids with long, thick hair.
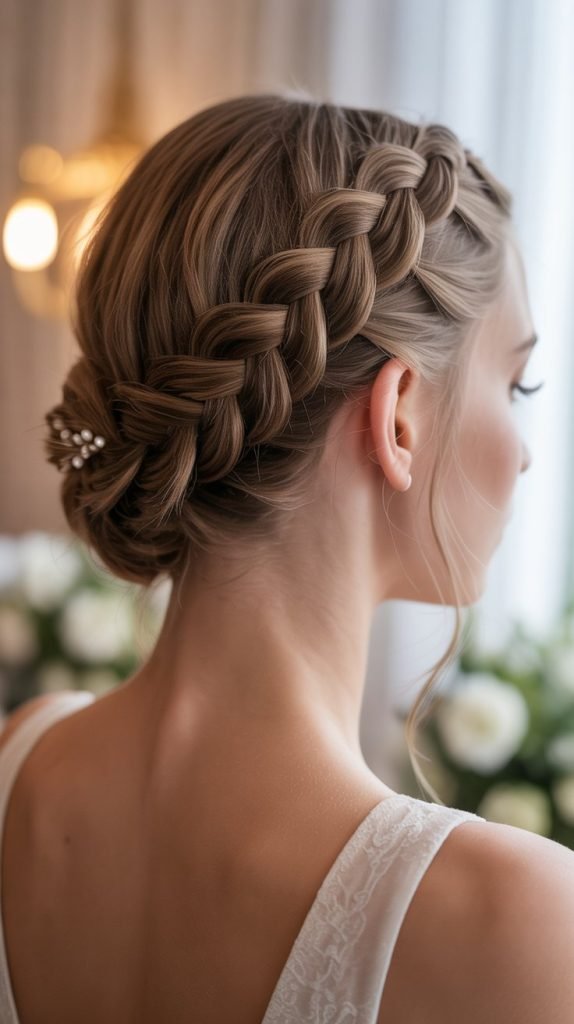
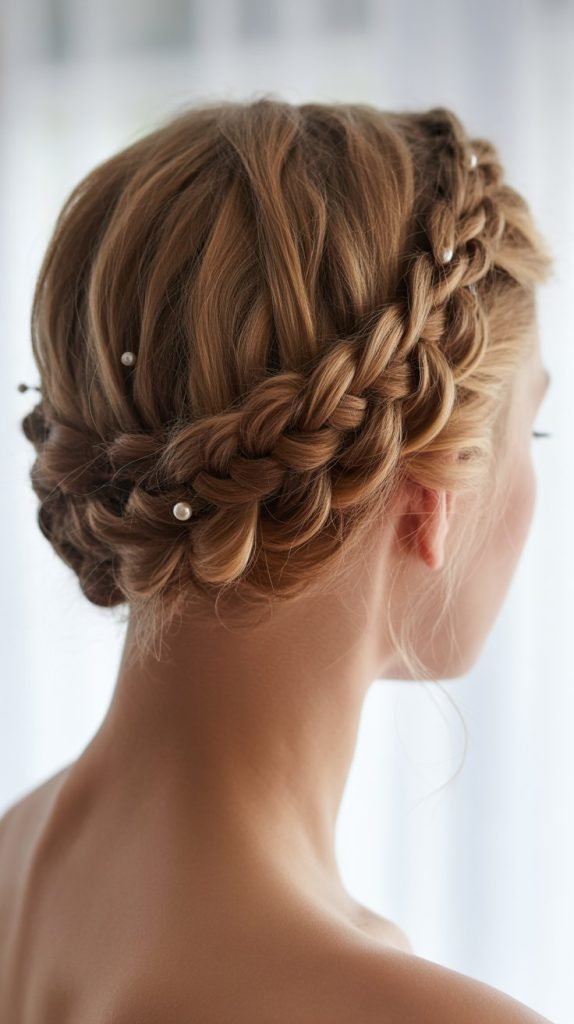
14. Crown Braid with Tucked Ends
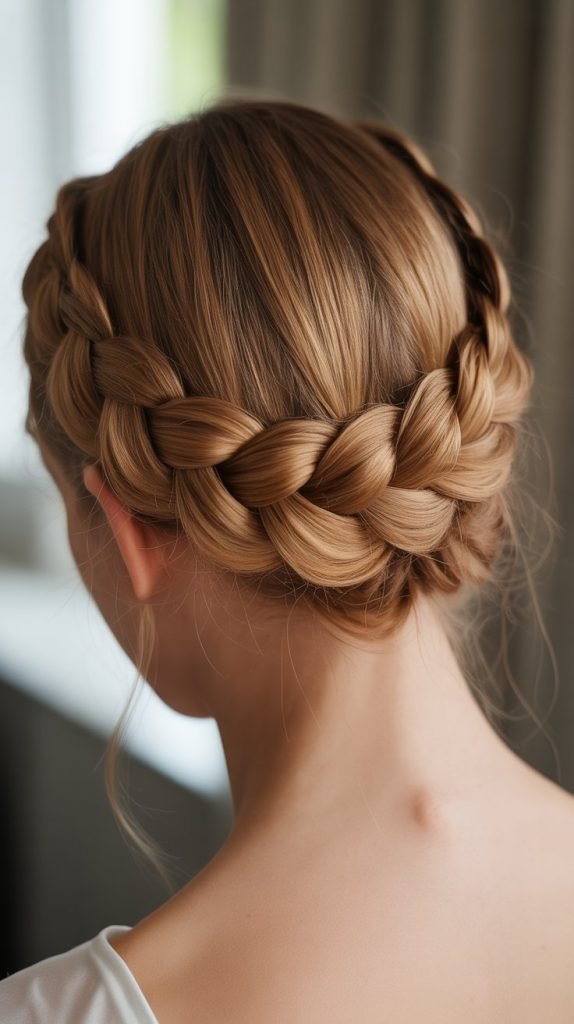
The crown braid with tucked ends creates a seamless, continuous braid around the head with no visible beginning or end.
- This style has a particularly polished, refined appearance perfect for formal weddings.
- The tucked ends create the illusion of an endless braid that encircles the head beautifully.
Seamless Technique:
- Section off hair around the perimeter of the head from temple to temple.
- Begin braiding along this section, working in a circular pattern.
- As you complete the circle, continue braiding the remaining length.
- Carefully tuck the braid ends underneath the starting point and pin invisibly.
- Gather any remaining center hair into a low bun or leave styled separately based on hair length.
Professional Finishing:
- The hidden ends create a clean, sophisticated appearance.
- This style holds exceptionally well throughout long events.
- Pairs beautifully with both simple and ornate bridesmaid dresses.
15. Braided Sock Bun
The braided sock bun delivers impressive fullness and perfect roundness through the use of a bun-shaping tool.
- Using a sock bun donut creates consistently beautiful, symmetrical buns regardless of natural hair thickness.
- Adding braided elements transforms this classic technique into something more special and wedding-appropriate.
Tool-Assisted Method:
- Create one or more braids from front sections of hair, leaving them aside temporarily.
- Gather remaining hair into a ponytail at the desired bun position.
- Place a bun donut or sock bun maker over the ponytail.
- Spread hair evenly around the donut and secure with another elastic at the base.
- Take the loose ends and wrap around the base to conceal the donut, or tuck underneath.
- Wrap the previously created braids around the bun or across the crown for added detail.
Reliability Benefits:
- Creates perfectly round, full buns every time.
- Excellent for bridesmaids with fine or thin hair who want fuller-looking styles.
- The donut provides structural support that lasts all day and night.
16. Infinity Braid Updo
The infinity braid updo features the unique figure-eight braiding pattern that creates stunning visual interest and complexity.
- This less common braiding technique stands out as something special and unique among traditional styles.
- The infinity pattern creates beautiful movement and dimension that catches attention in photographs.
Figure-Eight Technique:
- Divide hair into two sections as with a fishtail braid.
- Instead of crossing straight over, create a figure-eight motion by looping sections through the center.
- This creates the distinctive infinity or figure-eight pattern throughout the braid.
- Continue this pattern until reaching the desired length.
- Coil or pin the infinity braid into an updo formation, allowing the unique pattern to remain visible.
Distinctive Qualities:
- The uncommon technique ensures your bridesmaids’ hairstyles feel special and customized.
- Creates conversation-worthy styling that guests will admire.
- Photographs beautifully from all angles due to the dimensional pattern.
17. Braided Gibson Tuck
The braided Gibson tuck modernizes a vintage hairstyle favorite by incorporating romantic braided details.
- The Gibson tuck involves tucking hair into itself at the nape, creating a rolled, elegant appearance.
- Adding braids to this classic technique brings contemporary romance to a time-honored style.
Vintage-Modern Fusion:
- Create one or two braids along the sides or front of the hair.
- Gather remaining hair at the nape into a low ponytail.
- Roll the ponytail upward, tucking the ends into the rolled section at the nape.
- Secure with pins along the roll, ensuring everything feels tight and secure.
- Wrap the braids around or over the Gibson tuck for added detail and romance.
Nostalgic Appeal:
- Perfect for vintage-themed weddings or Great Gatsby aesthetics.
- Creates beautiful shape and structure that photographs gorgeously.
- Works particularly well for bridesmaid dresses with vintage-inspired designs.
18. Pull-Through Braid Bun
The pull-through braid bun creates the appearance of an intricate braid without traditional braiding techniques.
- This style uses stacked ponytails pulled through each other to create a braid-like effect that’s surprisingly easy to achieve.
- The resulting texture is fuller and more voluminous than traditional braids, creating impressive visual impact.
Stacked Ponytail Method:
- Create a ponytail at the crown and secure with a clear elastic.
- Split this ponytail in half and clip the sections aside temporarily.
- Create a second ponytail directly below the first using hair from underneath.
- Pull this second ponytail through the split halves of the first ponytail.
- Continue this pattern down the head, creating the pull-through effect.
- Once the pull-through braid is complete, coil it into a bun and secure with pins.
- Gently pancake each section for maximum fullness and volume.
Beginner-Friendly Advantages:
- No braiding skills required, yet delivers professional-looking results.
- Creates exceptional fullness that works beautifully for fine hair.
- The technique is easier to maintain than traditional braids, making touch-ups simple.
19. Braided Headband Updo

The braided headband updo uses a braid as a natural accessory, replacing traditional headbands with hair itself.
- Creating a braid across the crown area mimics the placement of a headband while maintaining an all-hair, cohesive look.
- This style offers opportunities for mixing braid types, with a different technique for the headband versus the remaining hair.
Headband Illusion Creation:
- Section off a band of hair from ear to ear across the top of the head.
- Braid this section using your preferred technique, keeping it relatively tight to maintain the headband shape.
- Secure the braid temporarily at the opposite ear.
- Style remaining hair into a low or mid-height bun.
- Bring the braided “headband” across the crown and integrate it into the bun, pinning securely.
Accessorizing Options:
- This style pairs beautifully with small decorative pins placed along the braided headband.
- Works wonderfully for outdoor weddings where actual headbands might feel too formal.
- Creates a cohesive look when bridesmaid dresses feature interesting neckline details.
20. Double Dutch Braids into Bun
The double Dutch braids into bun offers sporty elegance with two raised braids creating strong visual lines before merging into a single bun.
- Two parallel Dutch braids create a structured, symmetrical appearance that feels both athletic and refined.
- This style provides excellent security and hold, making it perfect for bridesmaids who want worry-free styling.
Parallel Braid Construction:
- Create a center part from forehead to nape, dividing hair into two equal sections.
- Dutch braid each section from front to back, keeping braids parallel and equidistant from the center part.
- Continue braiding until you reach the nape area where both braids naturally meet.
- Secure both braids together and twist or coil the combined ends into a single bun.
- Pin the bun securely where the braids converge.
Athletic Grace:
- Perfect for active bridesmaids or outdoor weddings with physical activities.
- The structured lines create a youthful, energetic vibe while maintaining sophistication.
- Works exceptionally well for bridesmaids with very long or thick hair that needs substantial control.
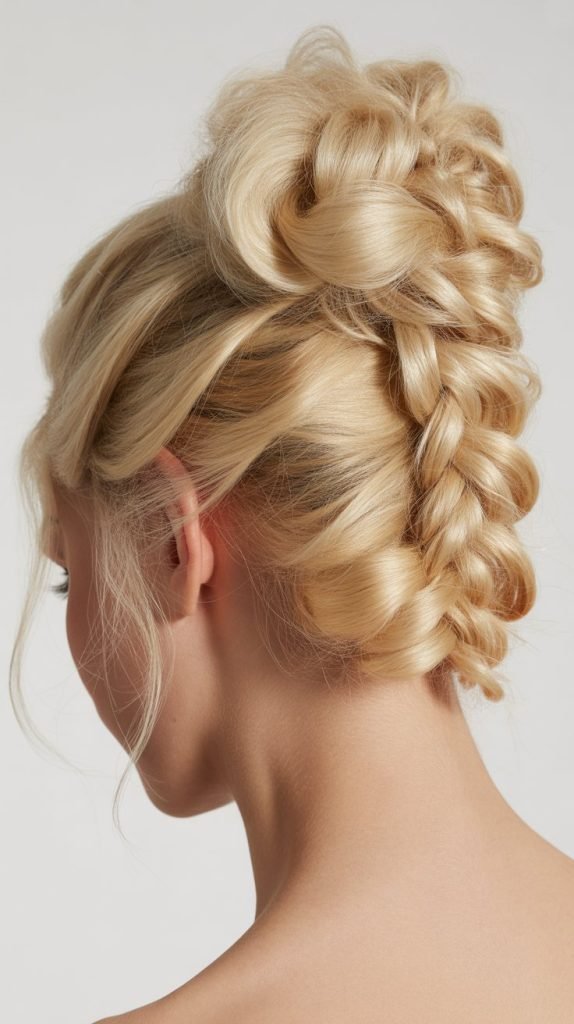
21. Braided Faux Hawk Updo

The braided faux hawk updo brings edgy sophistication to bridesmaid styling with its center-focused height and dramatic profile.
- This fashion-forward style creates impressive height through the center of the head while keeping sides sleek.
- Perfect for modern, fashion-conscious bridal parties seeking something beyond traditional romantic styles.
Edgy Construction:
- Slick back hair on both sides of the head, securing with gel or strong pomade.
- Create a section of hair running from forehead to crown down the center of the head.
- Braid this center section using a Dutch braid technique to create lift and dimension.
- Continue gathering center hair as you work backward, building height.
- At the crown or slightly below, coil the remaining braid into a textured bun or pin it into an architectural updo shape.
Modern Bride Appeal:
- Ideal for contemporary urban weddings and industrial venue settings.
- Pairs dramatically with modern, structured bridesmaid dress designs.
- Creates show-stopping photographs with its bold silhouette.
22. Rope Twist Crown Updo
The rope twist crown updo combines the texture of rope braiding with the romantic placement of a crown-style updo.
- Multiple rope twists worked around the head create dimension and movement without traditional braiding complexity.
- This style strikes a beautiful balance between structured and romantic.
Circular Rope Method:
- Divide hair into several sections around the perimeter of the head.
- Create rope twists with each section by twisting two strands around each other.
- Work these rope twists in a circular pattern around the head, similar to a crown braid.
- Pin each rope twist as you go, creating layers of texture around the head.
- Gather any remaining center hair into a small bun or leave some pieces loose for a softer effect.
Textural Benefits:
- Rope twists hold incredibly well and resist falling throughout long events.
- The technique works beautifully on all hair textures, including very straight or very curly hair.
- Creates dimensional depth that looks intricate without requiring advanced braiding skills.
23. Braided Low Bun with Volume
The braided low bun with volume adds drama to a classic style through intentional teasing and height creation at the crown.
- Combining volume at the crown with a low bun creates beautiful proportions and elegance.
- The added braid brings romantic detail to an otherwise simple silhouette.
Volume-Enhanced Approach:
- Begin by creating substantial volume at the crown through teasing or using a volumizing insert.
- Smooth the surface layer of hair over the teased section for a polished appearance.
- Create a braid from the mid-lengths to ends of the hair.
- Form the braid into a low bun at the nape, securing carefully to maintain crown volume.
- Use hairspray and pins to ensure the volume remains throughout the event.
Proportional Beauty:
- The added height creates a lengthening effect that flatters most face shapes.
- Works particularly well for petite bridesmaids seeking more presence.
- Balances beautifully with floor-length bridesmaid gowns.
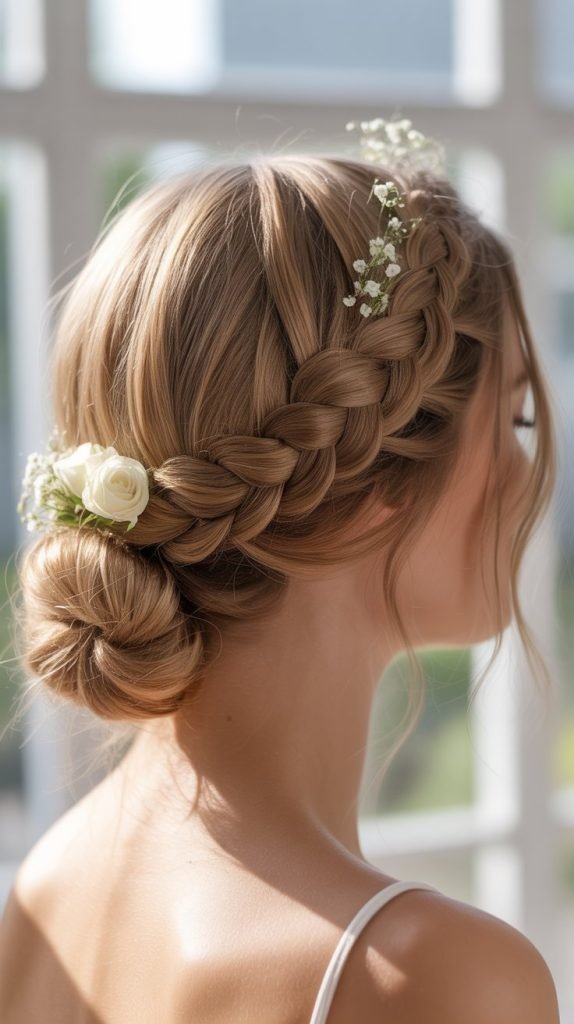
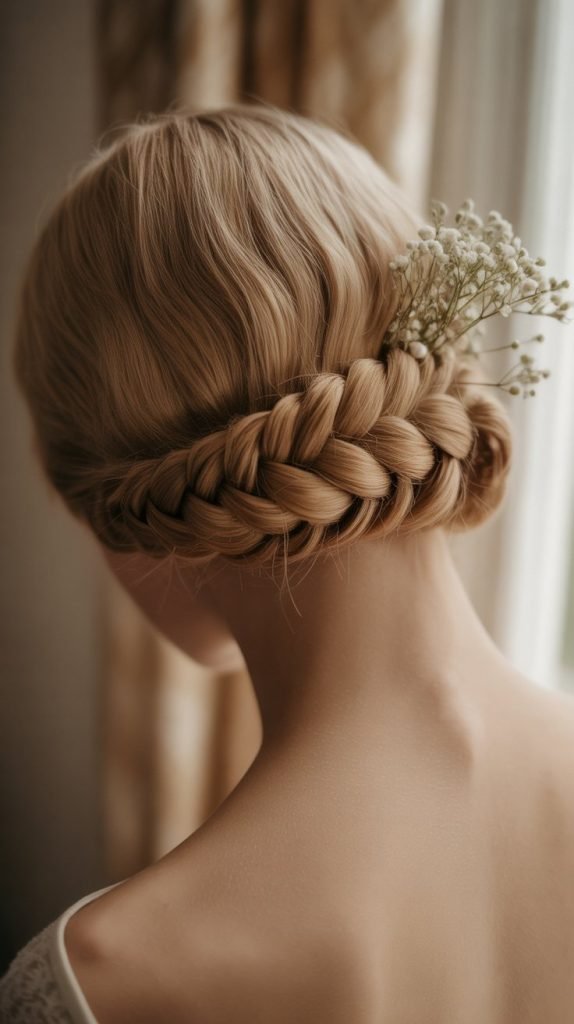
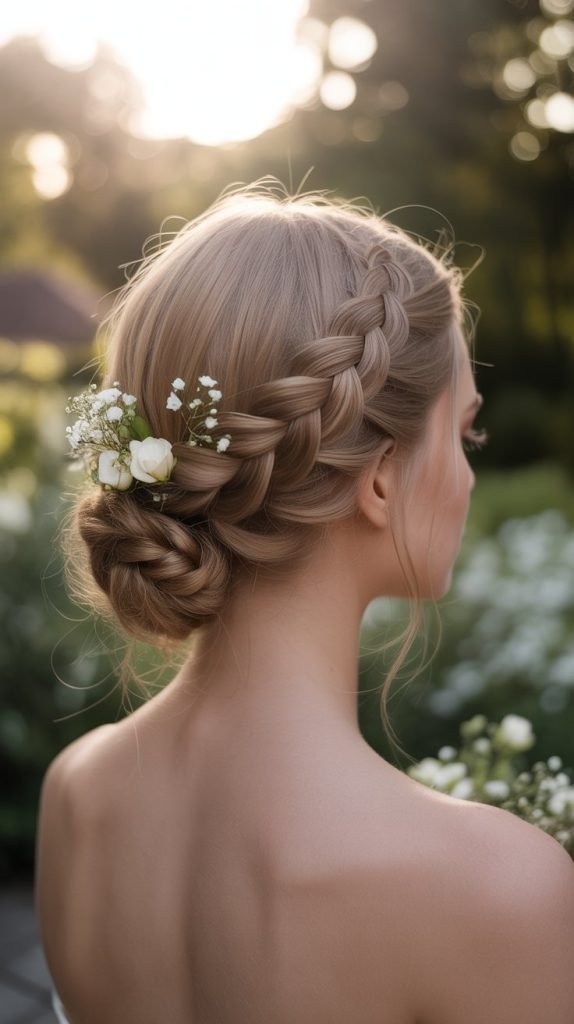
24. Milkmaid Braid Updo
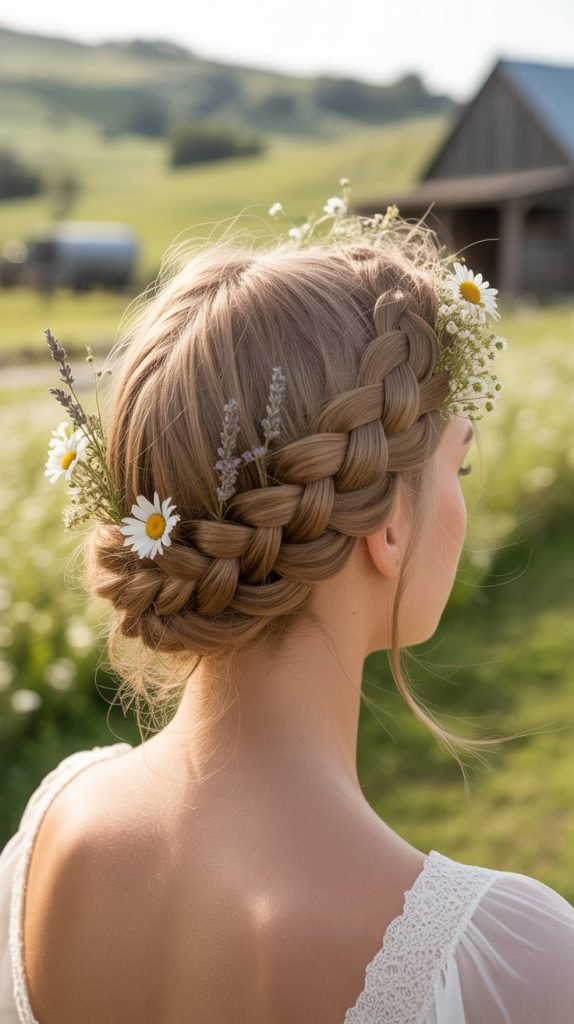
The milkmaid braid updo creates pastoral romance with braids that cross over the top of the head like a countryside maiden’s hairstyle.
- Two braids are brought up and over the crown, creating a soft, innocent appearance perfect for outdoor weddings.
- This style has a distinctly European, countryside charm that suits rustic and garden wedding themes beautifully.
Pastoral Construction:
- Create two braids, one on each side of the head, starting below the ears.
- Bring the left braid up and over the top of the head, pinning it along the right side.
- Bring the right braid up and over, pinning it along the left side, crossing over the first braid.
- The braids should meet and cross at the top of the head, creating a crown-like appearance.
- Tuck the ends of the braids underneath and pin securely, hiding all elastic bands and ends.
Countryside Charm:
- Perfect for outdoor farm or vineyard weddings.
- Pairs beautifully with flower crowns or individual blooms tucked into the braids.
- Creates an innocent, youthful appearance that photographs sweetly.
25. Braided Ponytail Updo
The braided ponytail updo elevates the classic ponytail into formal territory through strategic braiding and coiling techniques.
- A high or mid-height ponytail receives braided treatment before being secured into an updo formation.
- This style works wonderfully for showing off the back details of bridesmaid dresses.
Elevated Ponytail Technique:
- Create a sleek ponytail at the desired height, ensuring a smooth, bump-free base.
- Braid the entire ponytail using your preferred braiding technique.
- Wrap the braid around the base of the ponytail in a spiral formation, creating an elevated bun shape.
- Secure with pins inserted in multiple directions for maximum hold.
- Finish with shine spray to enhance the polished appearance.
Versatile Placement:
- High placement creates youthful energy and works well for more casual wedding styles.
- Mid-height placement offers classic elegance suitable for most wedding formalities.
- Low placement provides sophisticated refinement for formal evening affairs.
26. Lace Braid into Chignon
The lace braid into chignon features the delicate one-sided braiding technique that resembles intricate lace before transitioning into a classic chignon.
- Lace braids only add hair from one side, creating an asymmetrical, delicate appearance like French lace.
- This refined technique adds subtle detail without overwhelming the overall style.
One-Sided Braiding Method:
- Begin a standard braid near the hairline on one side.
- As you continue braiding, only add new sections from the top or one side, not from both sides.
- This creates the characteristic lace appearance with additions only from one direction.
- Continue the lace braid along the hairline or across the head to the desired ending point.
- Gather all hair including the lace braid into a low chignon at the nape, twisting and pinning securely.
- The lace braid creates a delicate frame around the face or along one side.
Delicate Detailing:
- The lace braid technique requires precision but delivers exceptionally refined results.
- Works beautifully for bridesmaids who want subtle detail rather than bold statements.
- The asymmetrical quality creates visual interest without feeling overly decorated.
Refined Applications:
- Perfect for sophisticated afternoon or evening weddings.
- Pairs elegantly with classic, timeless bridesmaid dress styles.
- Creates beautiful movement when viewed from the side or in profile photographs.
27. Braided Space Buns
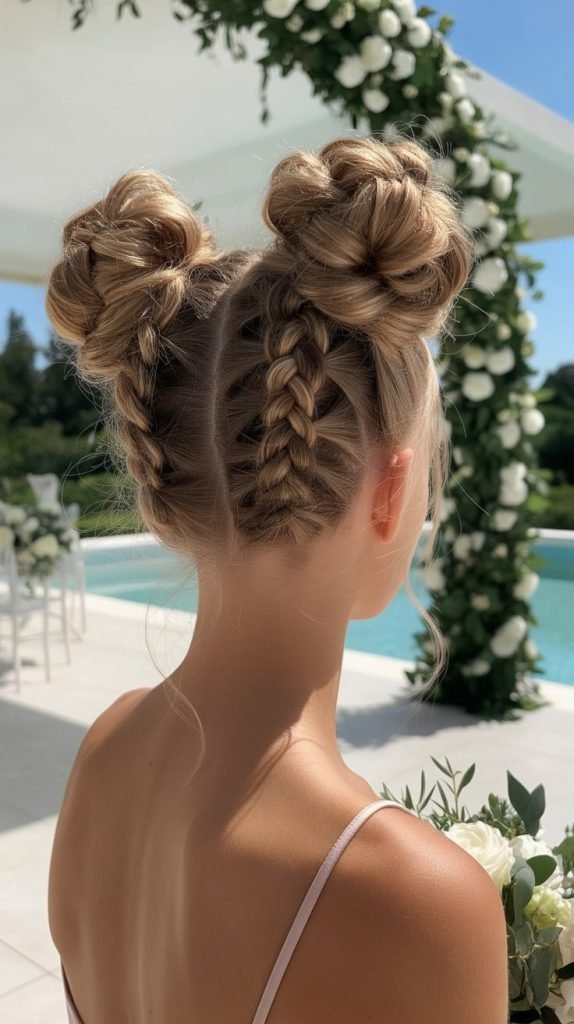
The braided space buns bring playful elegance to bridesmaid styling with two high buns positioned symmetrically on the head.
- While space buns can feel youthful and casual, incorporating braids elevates them into wedding-appropriate territory.
- This style works particularly well for modern, fun-loving bridal parties with a sense of humor and style.
Dual Bun Creation:
- Part hair down the center from forehead to nape, creating two equal sections.
- Create a high ponytail on each side of the part, positioning them symmetrically.
- Braid each ponytail completely, securing the ends.
- Wrap each braid around its ponytail base, creating two round buns.
- Pin securely and pancake the braids for fuller, more romantic-looking buns.
Playful Sophistication:
- Ideal for outdoor festival-style weddings or relaxed celebrations.
- Works wonderfully for younger bridesmaids or modern, trendy bridal parties.
- Creates a memorable, distinctive look that stands out in wedding photographs.
28. Four-Strand Braid Updo
The four-strand braid updo showcases advanced braiding technique with its complex, woven appearance that creates exceptional dimension.
- Using four sections instead of three creates a wider, flatter braid with intricate detail.
- This technique demonstrates hair artistry and creates a truly special, customized appearance.
Advanced Weaving Technique:
- Divide hair into four equal sections.
- Cross the far-right section under its neighboring section, then over the next section.
- Cross the far-left section under its neighboring section, then over the next.
- Continue this under-over pattern alternating from right to left.
- The resulting braid has a distinctive woven appearance that’s wider and flatter than traditional braids.
- Coil or pin the four-strand braid into an updo, ensuring the intricate pattern remains visible.
Artisan Quality:
- This technique requires practice but delivers professional, salon-quality results.
- The complex weave catches light beautifully, creating dimension in photographs.
- Perfect for bridesmaids who appreciate detailed craftsmanship in their styling.
29. Twisted Halo with Braided Detail
The twisted halo with braided detail combines rope twisting and braiding for a multi-textured crown effect around the head.
- Mixing twisted and braided sections creates visual variety and interest throughout the style.
- This combination technique ensures the style has depth and dimension from every viewing angle.
Mixed Technique Approach:
- Section hair around the perimeter of the head from temple to temple.
- Alternate between rope twisting some sections and braiding others as you work around the head.
- Continue the mixed-texture crown all the way around, connecting back to the starting point.
- Secure all pieces carefully, ensuring both twisted and braided sections are well-anchored.
- Style any remaining center hair into a complementary bun or leave gently curled.
Dimensional Appeal:
- The varied textures create a custom, hand-crafted appearance.
- Different techniques catch light in different ways, enhancing photographic appeal.
- Offers flexibility to adjust tightness and texture for different aesthetic effects.
30. Braided Bun with Wrapped Base
The braided bun with wrapped base features a classic bun with braided sections wrapped around the base for decorative detail.
- The wrapped braids create a finished, polished appearance while adding romantic texture.
- This style combines simplicity with elegance through strategic braided accents.
Accent Wrapping Method:
- Before creating the main bun, section off two or three small pieces of hair to braid separately.
- Gather remaining hair into a bun at the desired position using any bun technique.
- Braid the reserved sections, keeping them relatively thin for delicate wrapping.
- Wrap these braids around the base of the bun in different directions, creating textured bands.
- Pin each wrapped braid securely, tucking ends underneath the bun.
Finishing Touches:
- The wrapped braids provide a transition between the scalp and bun that looks intentionally designed.
- This technique works with any bun style, from sleek to messy.
- Offers opportunities to add ribbons or small decorative elements woven into the wrapped braids.
31. Braided Side Chignon with Flowers
The braided side chignon with flowers combines asymmetrical placement with natural floral elements for garden-wedding perfection.
- Positioning the chignon to one side creates romantic asymmetry ideal for outdoor celebrations.
- Fresh or silk flowers integrated with braids create a naturally beautiful, cohesive appearance.
Botanical Integration:
- Create one or more braids working toward one side of the head.
- As you braid, gently weave in small flower stems, securing them within the braid pattern.
- Continue to the low side position and form a soft chignon.
- Add additional flowers around the chignon, pinning them securely.
- Ensure flowers are well-hydrated if using fresh blooms, or select high-quality silk alternatives.
Natural Beauty Considerations:
- Choose flowers that complement the wedding’s color scheme and floral arrangements.
- Baby’s breath, small roses, and delicate wildflowers work particularly well for hair integration.
- Consider seasonal availability when planning floral hair elements.
32. Braided Twisted Crown
The braided twisted crown alternates braiding and twisting techniques in a circular pattern for maximum texture variation.
- Systematically alternating techniques creates rhythm and visual interest throughout the crown.
- This style demonstrates technical skill while maintaining romantic, wearable beauty.
Alternating Pattern Method:
- Section hair around the head in a crown pattern.
- Begin with a braid for one section, then switch to a rope twist for the next section.
- Continue alternating around the entire head, creating a varied textured crown.
- Pin each section as you complete it, ensuring secure attachment to the head.
- The alternating textures create a woven, basket-like appearance around the crown.
Technical Showcase:
- This style highlights hairstyling expertise through visible technique variation.
- The mixed textures create exceptional depth and dimension.
- Works beautifully for bridesmaids with highlighted or multi-tonal hair colors.
33. Stacked Braided Buns
The stacked braided buns create vertical interest with multiple small buns arranged one above another along the back of the head.
- This architectural style makes a bold statement with its vertical repetition and structured appearance.
- Perfect for bridesmaids seeking unique, fashion-forward styling that stands out.
Vertical Stacking Technique:
- Divide hair horizontally into three or four sections from the crown down to the nape.
- Create a small bun with the top section, securing it completely.
- Braid or twist the second section and form it into a bun directly below the first.
- Continue this pattern with remaining sections, creating a vertical line of buns down the back.
- Ensure each bun is securely pinned before moving to the next section.
Architectural Interest:
- The vertical arrangement creates unique visual impact rarely seen in traditional bridesmaid styling.
- Works exceptionally well for very long hair that provides enough length for multiple buns.
- Pairs dramatically with modern, architectural wedding venues.
34. Braided Bun with Twisted Sides
The braided bun with twisted sides combines sleek side twists with a textured braided bun for balanced, elegant contrast.
- The smooth twisted sides create clean lines while the braided bun provides romantic texture.
- This combination style suits a wide range of face shapes and wedding formalities.
Contrast Combination:
- Divide hair into three sections: left side, right side, and back center.
- Twist each side section smoothly and sleekly backward toward the center back.
- Gather the center back section and braid it completely.
- Combine the twisted sides with the braid at the back, forming everything into a unified bun.
- Pin securely, allowing some of the twisted texture to remain visible in the finished style.
Balanced Design:
- The smooth sides keep hair elegantly away from the face while maintaining softness.
- The textured bun provides interest without overwhelming the overall look.
- This style transitions beautifully from ceremony through reception.
Styling Tips and Maintenance
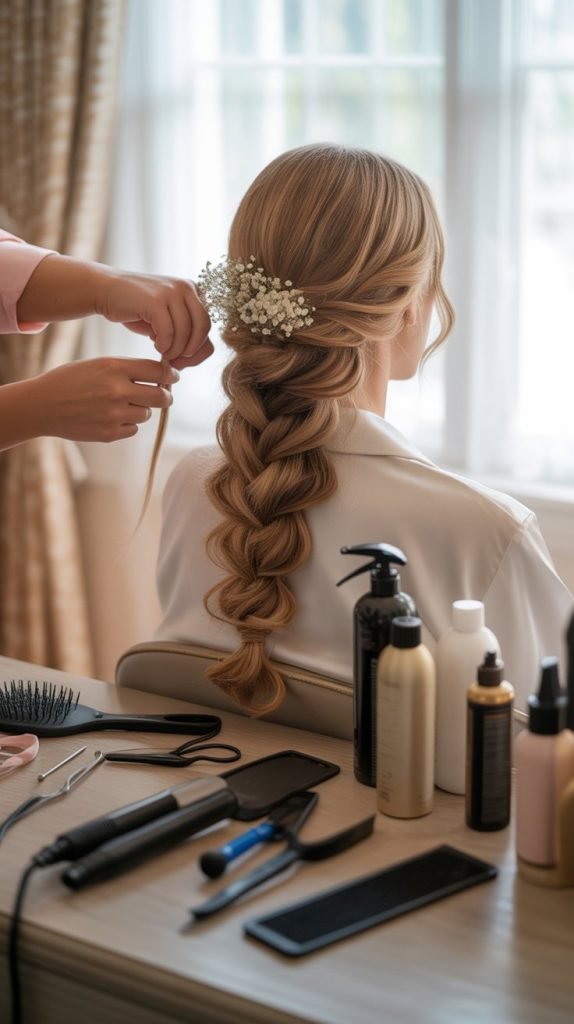
Successfully creating and maintaining romantic bridesmaid updo hairstyles with braids requires proper preparation, technique, and finishing products.
Pre-Styling Preparation:
- Begin with clean, completely dry hair that’s been washed the day before for optimal texture and grip.
- Apply volumizing mousse at the roots before blow-drying to create foundation volume and hold.
- Use a texturizing spray or dry shampoo throughout the lengths to add grip that helps braids and pins stay secure.
- For sleeker styles, apply smoothing serum or cream to control flyaways before styling begins.
Essential Styling Tools:
During-Styling Techniques:
- Work with hair in manageable sections rather than attempting to braid or style too much hair at once.
- Keep bobby pins easily accessible by securing them to your wrist with a magnetic pin holder or cloth band.
- Cross bobby pins in an “X” formation for maximum hold in crucial securing points.
- Don’t rush the braiding process—consistent tension creates more polished, lasting results.
Finishing and Setting:
- Apply flexible-hold hairspray from 10-12 inches away to avoid stiffness or visible product buildup.
- Use a fine-mist spray bottle with water to smooth any flyaways without adding more product.
- For styles featuring pulled-apart or pancaked braids, set with spray before gently pulling sections apart.
- Consider using a light shine spray as a final touch for photogenic glossiness.
Day-Of Timeline Considerations:
- Schedule hair appointments 2-3 hours before the ceremony begins for fresh styling.
- Have bridesmaids arrive with hair already blown dry to save time.
- Test hairstyles during pre-wedding trials to ensure they suit individual face shapes and dress styles.
- Build in buffer time for any necessary adjustments or touch-ups.
Maintaining the Style Throughout Events:
- Pack a small emergency kit with extra bobby pins, hairspray, and a small comb.
- Avoid touching or adjusting the updo frequently, as this loosens pins and braids.
- Use blotting papers on the hairline if needed rather than adding more product.
- For outdoor weddings, consider slightly tighter braiding to withstand weather elements.
Hair Type Adaptations:
- Fine hair benefits from extra teasing and texturizing products for hold and fullness.
- Thick hair may require more bobby pins and stronger-hold products for security.
- Curly hair should be stretched or blown out first for easier braiding and smoother results.
- Very straight, slippery hair needs extra texture spray and roughing up for pins to grip effectively.
Choosing the Right Braid Style
Selecting the perfect romantic bridesmaid updo with braid depends on multiple factors including wedding theme, dress style, and individual preferences.
Wedding Theme Alignment:
- Traditional formal weddings pair beautifully with classic braided chignons, French braids into buns, and sleek ballerina styles.
- Bohemian and rustic celebrations shine with waterfall braids, messy topknots, and crown braids adorned with flowers.
- Modern contemporary weddings suit braided faux hawks, twisted rope braids, and architectural stacked buns.
- Garden and outdoor affairs embrace milkmaid braids, halo braids with florals, and romantic side-swept styles.
Dress Neckline Considerations:
- Strapless and sweetheart necklines work with virtually any updo height, offering maximum flexibility.
- Halter and high-neck dresses showcase beautifully with high buns that expose the neckline details.
- Off-shoulder and one-shoulder styles pair elegantly with side-swept buns and asymmetrical placements.
- Detailed back designs benefit from styles that showcase the dress, like braided ponytail updos or low buns.
Face Shape Flattery:
- Oval faces suit nearly all braid and updo combinations without special considerations.
- Round faces benefit from height at the crown and side-swept elements that create length.
- Square faces soften with romantic, loose styles and side-swept asymmetry rather than severe center parts.
- Heart-shaped faces look lovely with fuller styles at the nape that balance wider foreheads.
- Long faces benefit from width rather than excessive height, with side volume and horizontal braid placements.
Hair Length Requirements:
- Shoulder-length hair works well with smaller buns, twisted updos, and braided chignons.
- Mid-back length hair supports most styles with ease, offering maximum versatility.
- Very long hair excels at dramatic braids, stacked buns, and styles with wrapped details.
- Shorter lengths may require clip-in extensions for fuller buns and longer braids.
Skill Level Assessments:
- Beginner-friendly options include simple three-strand braids, basic low buns, and pulled-through braid techniques.
- Intermediate styles encompass French braids, Dutch braids, fishtail braids, and rope twists.
- Advanced techniques like four-strand braids, infinity braids, and complex multi-braid combinations require practice and skill.
Conclusion
Creating the perfect look for your bridal party becomes effortless when you explore the diverse world of 33+ Romantic Bridesmaid Updo Hairstyles with Braid.
These elegant styles offer something special for every bridesmaid, regardless of hair type, face shape, or personal style preferences, ensuring everyone feels confident and beautiful on your special day.
From timeless braided chignons to modern twisted faux hawks, from bohemian crown braids to sophisticated Gibson tucks, the options are as varied as they are stunning.
The beauty of incorporating braids into updo hairstyles lies in their versatility—they add texture, romance, and visual interest while providing the structure needed to keep styles secure throughout long celebration days.
Whether your bridesmaids choose sleek and polished or soft and undone aesthetics, matching classic or contemporary wedding themes, these braided updo combinations ensure your bridal party looks cohesively beautiful while allowing each bridesmaid’s individual beauty to shine.
With proper preparation, the right tools, and these detailed styling guides, you can confidently create unforgettable hairstyles that will look absolutely stunning in person and remain picture-perfect in your cherished wedding photographs for years to come.