We’ve all been there—waking up to hair that looks less than fresh, with roots that seem to have developed their own oil production factory overnight.
But here’s a secret that seasoned stylists have known for years: greasy hair isn’t your enemy; it’s actually your styling ally.
The natural oils in your hair create texture, hold, and that coveted “lived-in” look that people pay good money to achieve at salons.
Instead of reaching for dry shampoo or planning another hair wash, why not embrace those oils and transform them into gorgeous, intentional hairstyles?
This comprehensive guide to 29 Effortless Greasy Hair Hairstyles to Try will show you exactly how to turn second-day (or third, or fourth) hair into stunning looks that work for every occasion—from casual coffee runs to important work meetings and even elegant evening events.
You’ll discover classic updos that gain extra polish from natural oils, trendy braided styles that hold better with a bit of grease, sleek ponytails that would otherwise require heavy styling products, and creative buns that transform oily roots into fashion statements.
Each hairstyle comes with practical tips, styling techniques, and the confidence to rock your natural hair texture without apology.
Get ready to save time, reduce hair washing frequency, and unlock a whole new world of hairstyling possibilities that celebrate your hair exactly as it is.
In This Post......
- 1. The Classic Slicked-Back Bun
- 2. The Textured Low Ponytail
- 3. The Braided Crown
- 4. The Messy Top Knot
- 5. The Sleek Side Part
- 6. The French Twist
- 7. The Half-Up Top Knot
- 8. The Twisted Side Braid
- 9. The Low Braided Bun
- 10. The Slicked Ponytail with Volume
- 11. The Double Dutch Braids
- 12. The Tucked-Under Bob
- 13. The Side-Swept Waves
- 14. The Bubble Ponytail
- 15. The Faux Hawk Braid
- 16. The Pinned-Back Pixie
- 17. The Rope Braid Ponytail
- 18. The Headband Tuck
- 19. The Side Fishtail Braid
- 20. The Slicked Ear Tuck
- 21. The Twisted Crown Updo
- 22. The Ponytail with Wrapped Sections
- 23. The Braided Side Sweep
- 24. The Knotted Ponytail
- 25. The Victory Rolls
- 26. The Ballerina Bun
- 27. The Braided Headband
- 28. The Textured Space Buns
- 29. The Low Twisted Chignon
- Hair Care Tips for Embracing Natural Oils
- External Resources for Hair Styling
- Tools and Accessories for Greasy Hair Styling
- Common Mistakes to Avoid
- Adapting Styles for Different Hair Types
- Seasonal Considerations
- Confidence and Mindset Shifts
- Troubleshooting Common Issues
- Conclusion
1. The Classic Slicked-Back Bun
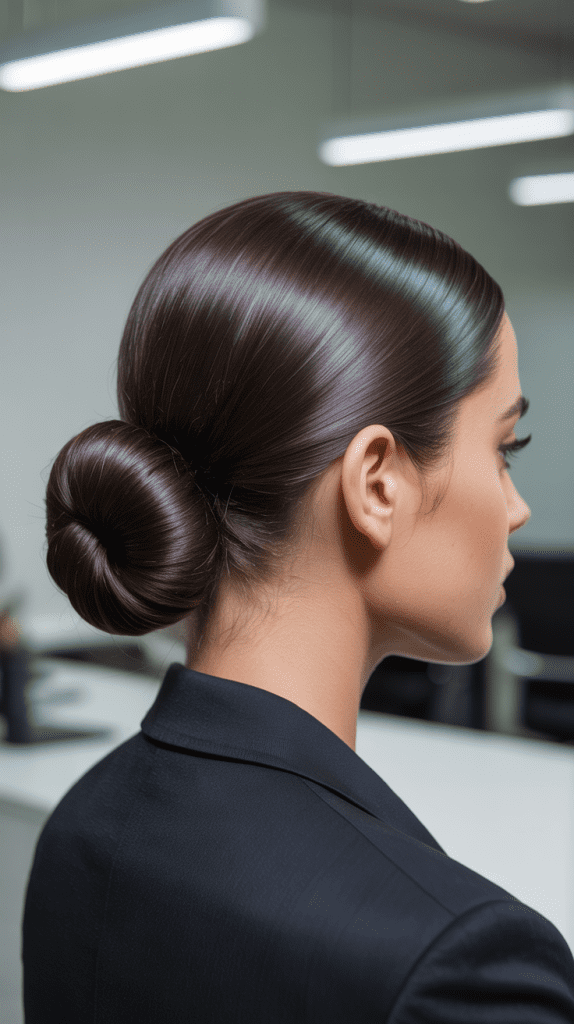
The slicked-back bun is perhaps the most iconic greasy hair solution, transforming oily roots into a sleek, sophisticated statement.
This timeless style works beautifully for professional settings, elegant dinners, or any occasion where you want to look polished and put-together.
The natural oils in your hair eliminate the need for gel or pomade, giving you that coveted glossy finish without any product buildup.
How to Create This Look:
- Brush all your hair straight back from your forehead using a fine-tooth comb or boar bristle brush
- Gather your hair at the crown or nape of your neck, depending on your preferred bun placement
- Twist the ponytail section tightly to create a rope-like texture
- Wrap the twisted hair around its base in a circular motion to form the bun shape
- Secure with bobby pins, inserting them at angles to catch both the bun and your scalp
- Smooth any flyaways with your fingers, using the natural oils to keep everything in place
- For extra security, wrap a hair elastic around the base of the bun
2. The Textured Low Ponytail
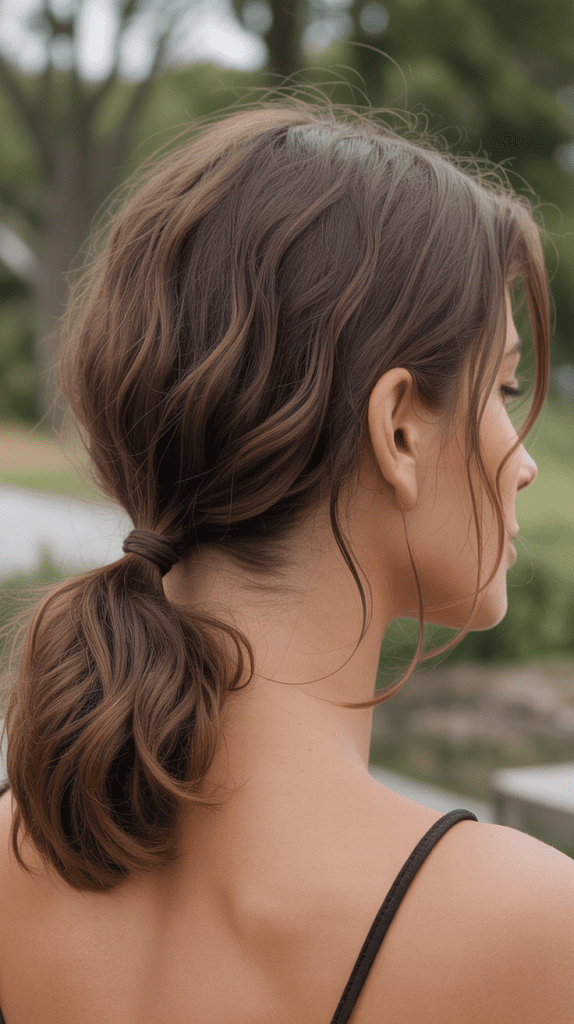
A low ponytail gains unexpected dimension and interest when created with slightly greasy hair.
The oils add weight and texture that make this simple style look intentionally undone rather than hastily thrown together.
This versatile look transitions seamlessly from day to night and works particularly well for those with fine or thin hair that lacks natural volume.
Styling Details:
- Part your hair in the center or slightly off-center for a modern look
- Use your fingers instead of a brush to gather hair at the nape of your neck
- Leave the texture slightly imperfect rather than smoothing everything down completely
- Secure with a fabric-covered elastic that won’t create creases or damage
- Pull out a few face-framing pieces around your ears and temples for softness
- Gently tug at the crown area to create slight elevation and prevent a flat appearance
- Wrap a small section of hair around the elastic to conceal it and add polish
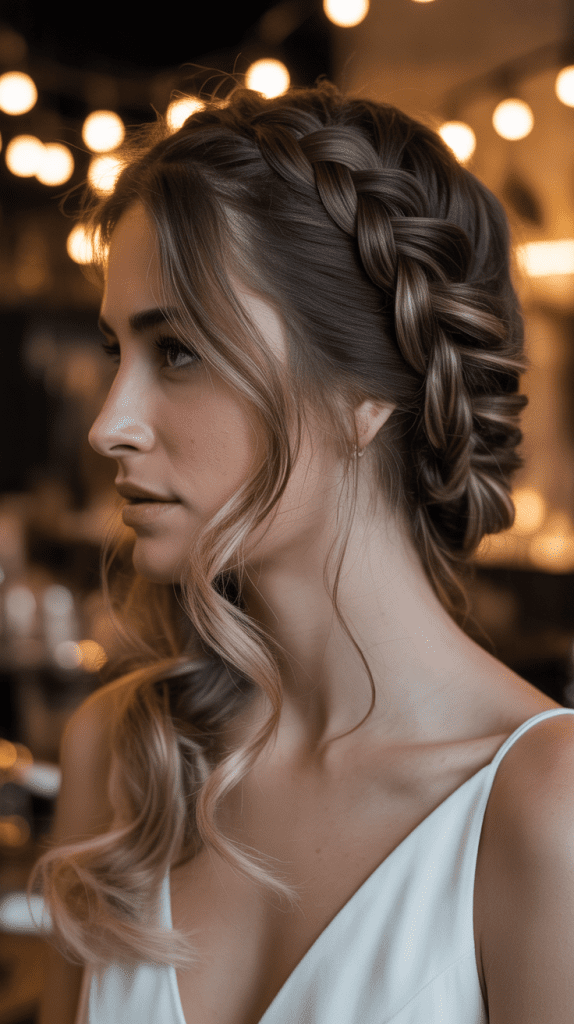
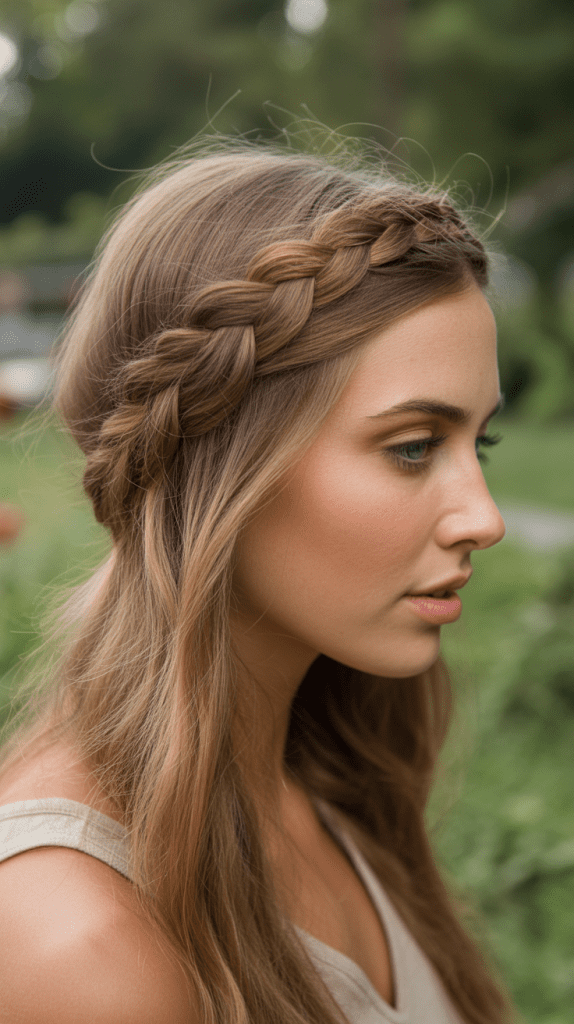
3. The Braided Crown
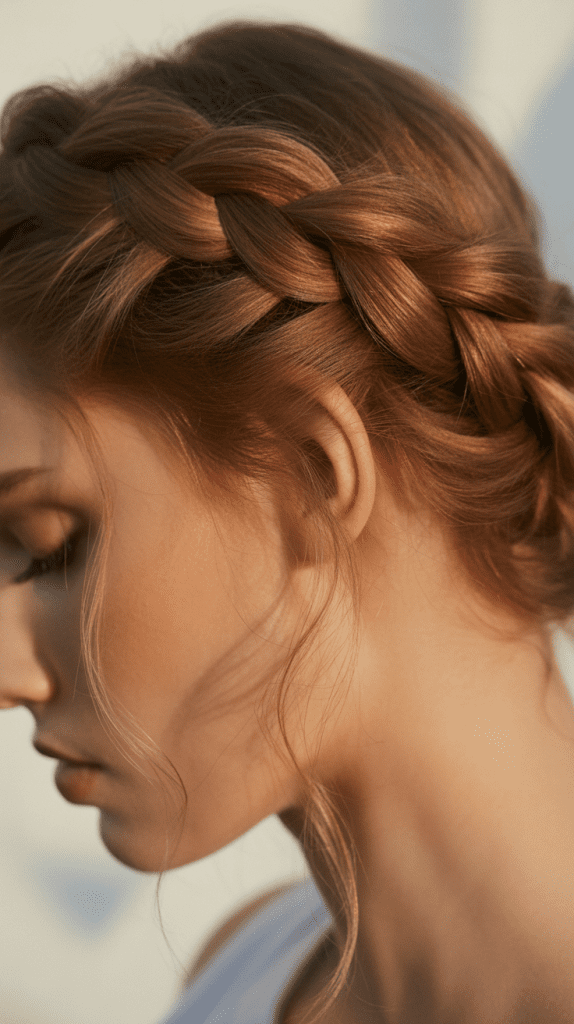
The braided crown transforms greasy hair into a romantic, bohemian masterpiece.
The natural oils actually help the braid hold its shape better and create that slightly undone, ethereal quality that makes this style so appealing.
This look works exceptionally well for festivals, outdoor events, or whenever you want to channel effortless goddess vibes.
Step-by-Step Instructions:
- Create a deep side part on either the left or right side of your head
- Begin a Dutch braid (where sections cross under rather than over) starting at the part
- Braid along your hairline, following the curve of your head toward the opposite ear
- Continue braiding all the way to the ends of your hair
- Wrap the braid across the top of your head like a crown or halo
- Secure the end behind your opposite ear with bobby pins
- Gently pull at the braid sections to make it fuller and more relaxed-looking
- Pin any loose sections along the way for security
4. The Messy Top Knot

The messy top knot is the ultimate “I woke up like this” hairstyle that actually benefits from second-day hair.
The natural oils provide grip and texture that make this intentionally disheveled style stay put throughout the day.
Perfect for running errands, working from home, or casual weekend activities, this style screams effortless cool.
Creating the Perfect Messy Top Knot:
- Flip your head upside down and gather all hair at the crown of your head
- Create a high ponytail but don’t pull the hair all the way through on the last wrap
- This creates a loop of hair that forms the base of your top knot
- Wrap the remaining tail around the base of the loop
- Secure everything with another elastic or bobby pins as needed
- Pull and tug at different sections to create intentional messiness
- Let some shorter pieces fall naturally around your face and neck
- The greasier your hair, the better this style holds its deliberately imperfect shape
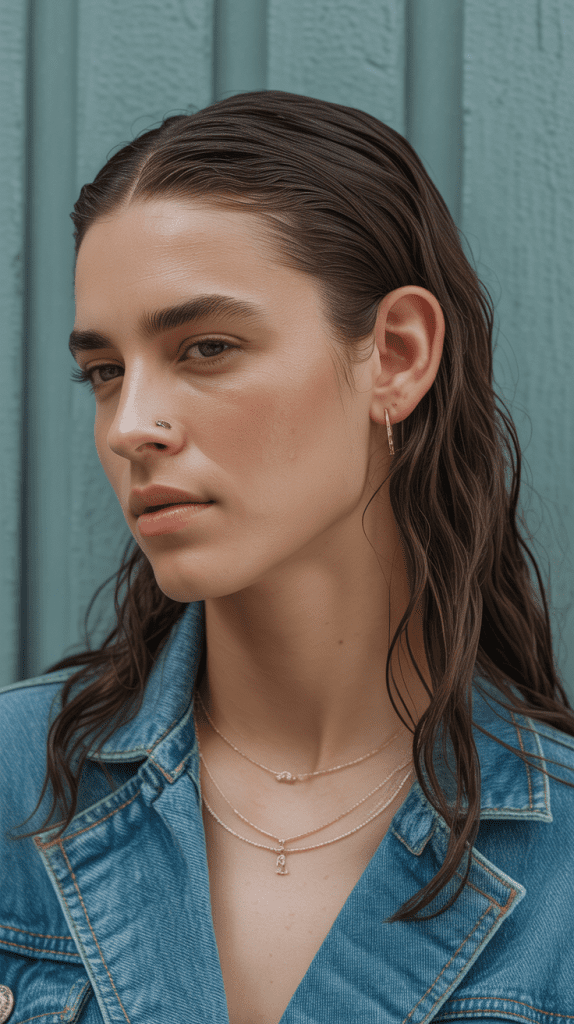
5. The Sleek Side Part
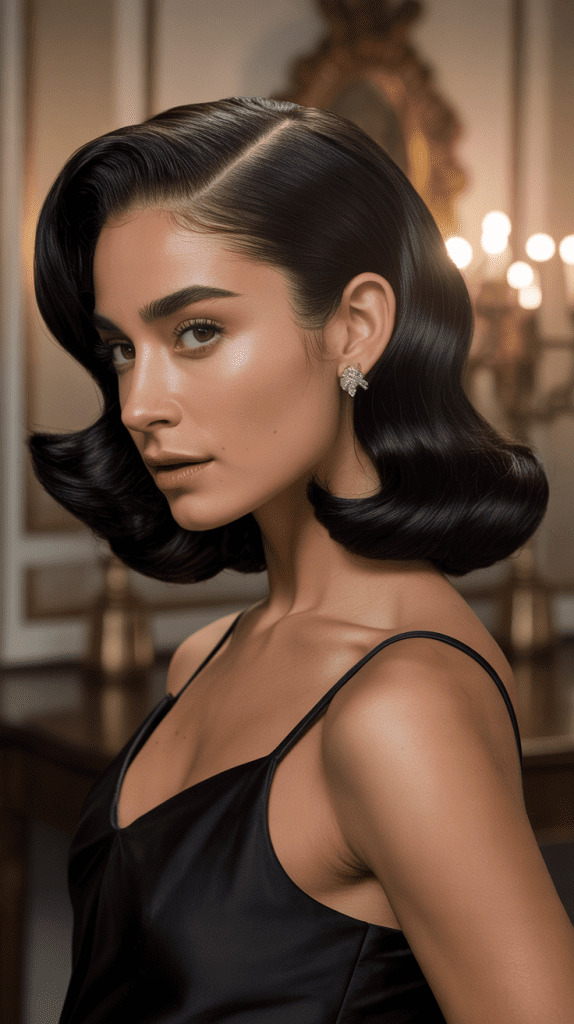
A deep side part with sleek, glossy roots creates an Old Hollywood glamour effect that greasy hair achieves naturally.
This sophisticated style works particularly well for evening events, date nights, or any time you want to channel vintage elegance.
The natural oils create that wet-look shine without any greasy-feeling products.
Achieving This Glamorous Look:
- Use a rat-tail comb to create a sharp, defined part on one side
- Comb all your hair to one side, letting it drape over your shoulder
- Use the natural oils to smooth down the roots on the heavier side
- Tuck the hair behind your ear on the side with less hair
- Secure with a decorative bobby pin or clip if desired for added elegance
- The oils will help your hair maintain this swept-over position naturally
- Apply a small amount of hair spray if you need extra hold for the evening
- This style works best on straight or slightly wavy hair textures
6. The French Twist
The French twist is a classic updo that gains unexpected ease when created with greasy hair.
The natural oils help this sophisticated style hold together without excessive pinning or product.
This timeless look remains perfect for formal events, professional presentations, or any occasion requiring refined elegance.
French Twist Technique:
- Gather all your hair to one side of your head at the nape of your neck
- Hold the gathered section with one hand while twisting it upward
- As you twist, guide the hair toward the center back of your head
- Continue twisting until all hair is rolled into a vertical column
- Tuck the ends into the twist and secure with bobby pins along the length
- Insert pins at a slight angle, pushing them into the twist and toward your scalp
- Smooth any bumps with your fingers, using the natural oils as styling aid
- For extra security, insert pins horizontally through the twist
7. The Half-Up Top Knot
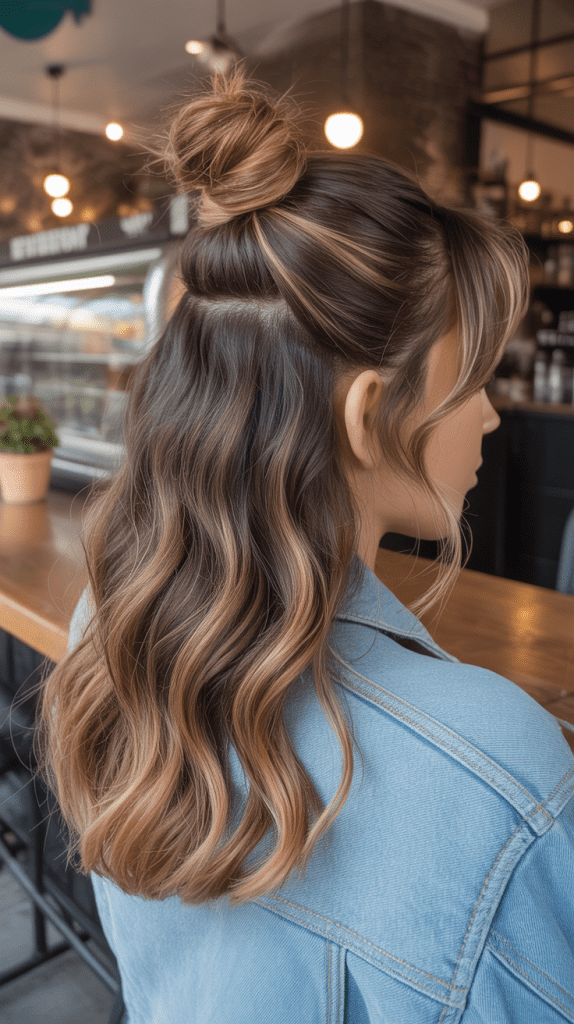
The half-up top knot combines the security of having hair pulled back with the softness of wearing some hair down.
Greasy roots actually benefit this style by adding weight to the bottom section while the top knot gains better hold.
This trendy look works for casual outings, brunch dates, or creative work environments.
How to Style:
- Section off the top half of your hair from temple to temple
- Gather this section at the crown of your head into a ponytail
- Twist the ponytail and wrap it around itself to create a small bun
- Secure with an elastic and bobby pins as needed
- Leave the bottom half of your hair down, letting the oils add texture
- The contrast between the secured top and loose bottom creates visual interest
- Pull out a few wispy pieces around your face for a softer frame
- This style works particularly well with balayage or highlighted hair
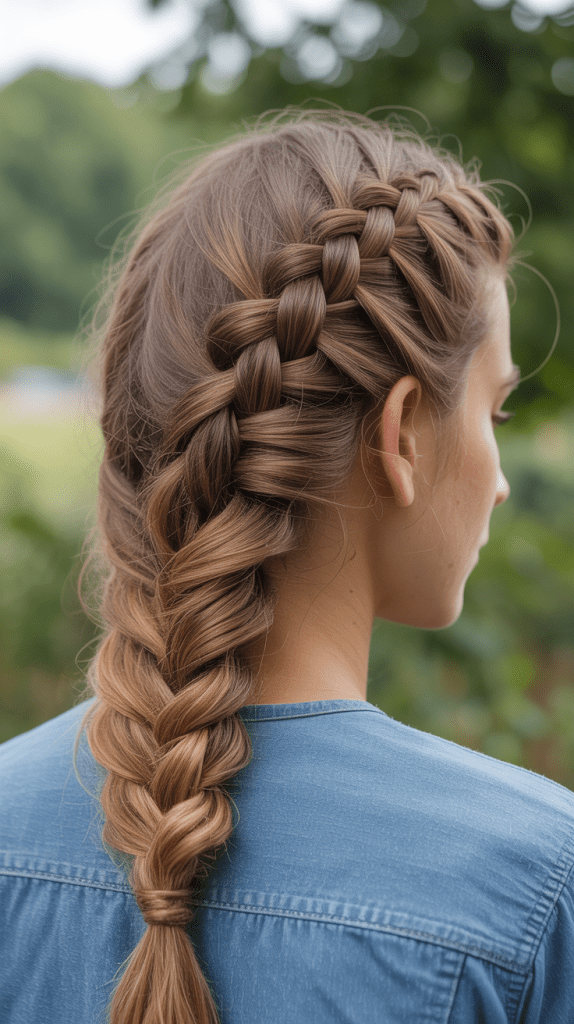
8. The Twisted Side Braid
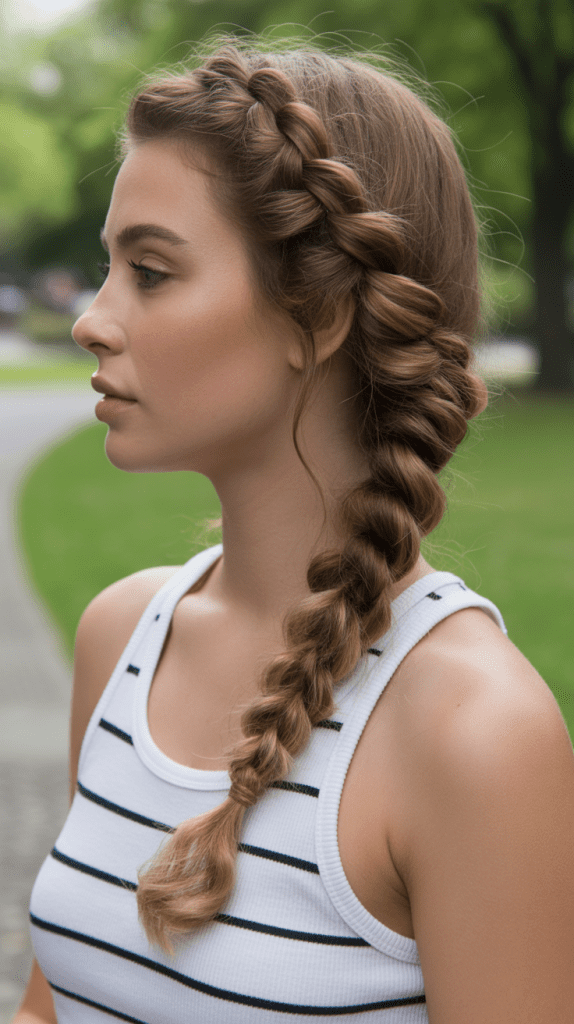
A twisted side braid offers an alternative to traditional braiding that looks intricate but requires minimal skill.
Greasy hair holds twists better than freshly washed hair, making this style more secure and longer-lasting.
The result is a romantic, bohemian look perfect for casual days or outdoor activities.
Creating the Twisted Braid:
- Sweep all your hair over one shoulder to your preferred side
- Divide the hair into two equal sections
- Twist each section clockwise (in the same direction) several times
- Then wrap the two twisted sections around each other counterclockwise
- This creates a rope-braid effect that looks complex but is quite simple
- Continue twisting and wrapping until you reach the ends
- Secure with a clear elastic band to maintain the twisted appearance
- Gently pull at the twists to make them fuller and more voluminous
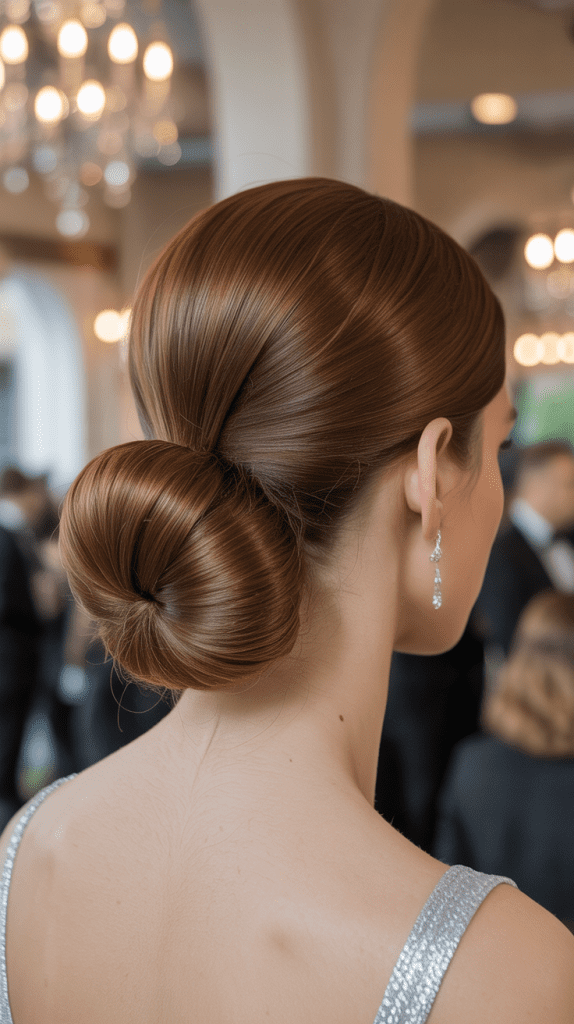
9. The Low Braided Bun

The low braided bun combines the elegance of a bun with the textured interest of a braid.
Greasy hair makes both the braiding and bun formation easier, as the oils prevent slippery strands from escaping.
This sophisticated style suits professional environments, formal events, or any occasion requiring polished elegance.
Braid-to-Bun Method:
- Create a low ponytail at the nape of your neck with all your hair
- Braid the entire ponytail using a standard three-strand technique
- Secure the end of the braid with a small elastic
- Wrap the braid around the base of the ponytail in a circular motion
- Tuck the end underneath the bun and secure with bobby pins
- The braid creates beautiful texture that’s visible within the bun shape
- Insert pins through the braid and into your scalp for maximum security
- This style stays put all day thanks to the grip provided by natural oils
10. The Slicked Ponytail with Volume
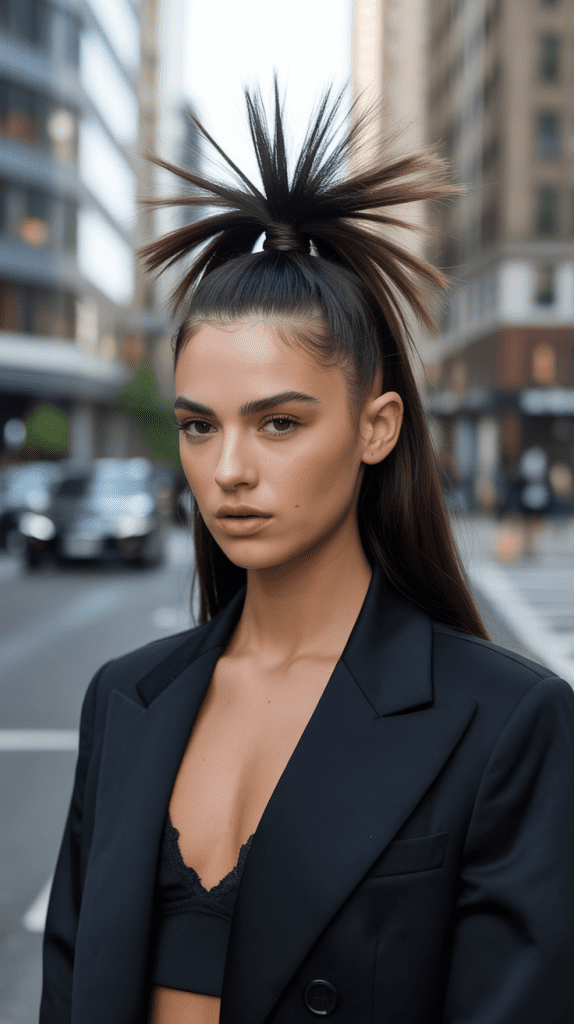
This modern ponytail style features ultra-sleek roots with dramatic volume at the crown, creating a high-fashion editorial look.
Greasy hair makes achieving the slicked effect effortless while strategic teasing adds the necessary height.
This bold style works for fashion-forward events, nights out, or making a statement.
Achieving the Volume:
- Section off the hair at your crown in a rectangular shape
- Backcomb or tease this section at the roots to create height
- Smooth the surface layer over the teased section to hide the backcombing
- Gather all remaining hair into a high or mid-level ponytail
- Use the natural oils to slick down the sides and back completely
- Secure the ponytail tightly to maintain the lifted crown
- The contrast between sleek sides and volumized crown creates drama
- Consider wrapping a section of hair around the elastic for added polish
11. The Double Dutch Braids
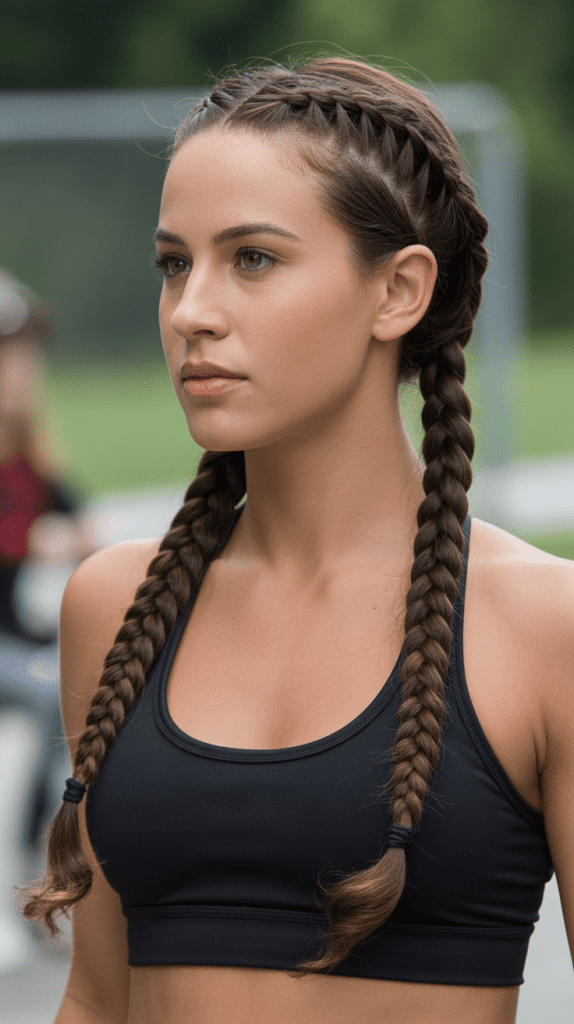
Double Dutch braids transform greasy hair into an athletic-chic style that’s both practical and trendy.
The natural oils help the braids hold tighter and last longer, making this perfect for workouts, busy days, or multi-day wear.
This look has transcended gym culture to become a mainstream fashion statement.
Braiding Both Sides:
- Create a center part from forehead to nape, dividing hair into two equal sections
- Begin a Dutch braid on one side, starting at the hairline near your forehead
- Remember that Dutch braids go under rather than over with each crossing
- Continue braiding close to your scalp, adding hair from the sides as you go
- Braid all the way to the ends and secure with an elastic
- Repeat the entire process on the other side, trying to match the tension
- The braids should be symmetrical and positioned parallel to your center part
- Gently pull at the braid sections for a fuller, more relaxed appearance
12. The Tucked-Under Bob
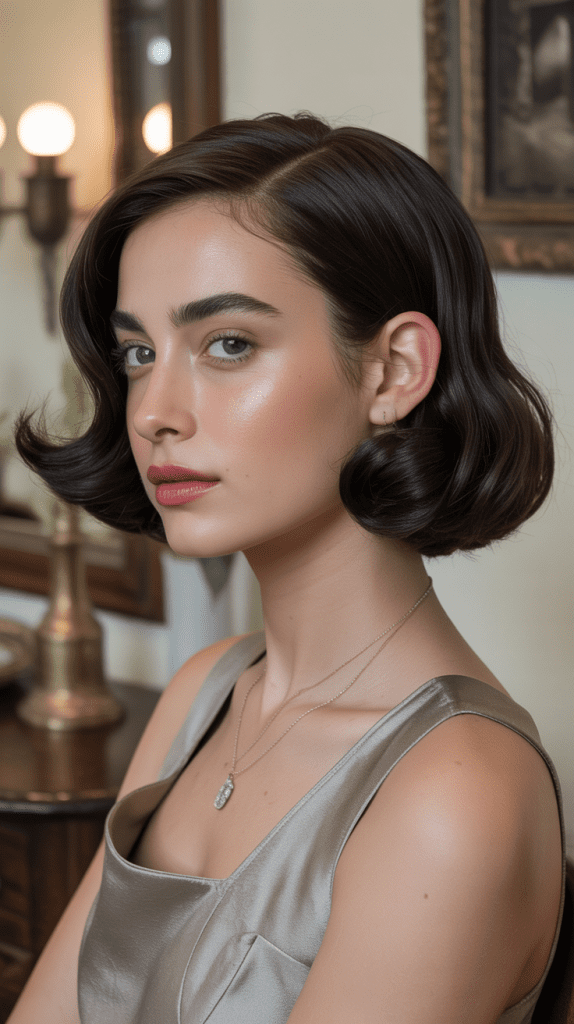
For those with shorter hair, the tucked-under bob creates a polished, vintage-inspired look that greasy hair actually perfects.
The natural oils add the weight needed to keep hair smoothly tucked under at the ends.
This sophisticated style works beautifully for professional settings or retro-themed events.
Styling Short Hair:
- Use a paddle brush to smooth your bob straight back and down
- The natural oils will help eliminate frizz and create shine
- Use your fingers to gently roll the ends of your hair under toward your neck
- Secure the tucked sections with small bobby pins along the perimeter
- Place pins horizontally and hide them within the folded hair
- The oils help the hair stay molded in this turned-under position
- This creates a smooth, rounded silhouette that frames your face beautifully
- Add a decorative headband for extra vintage flair if desired
13. The Side-Swept Waves
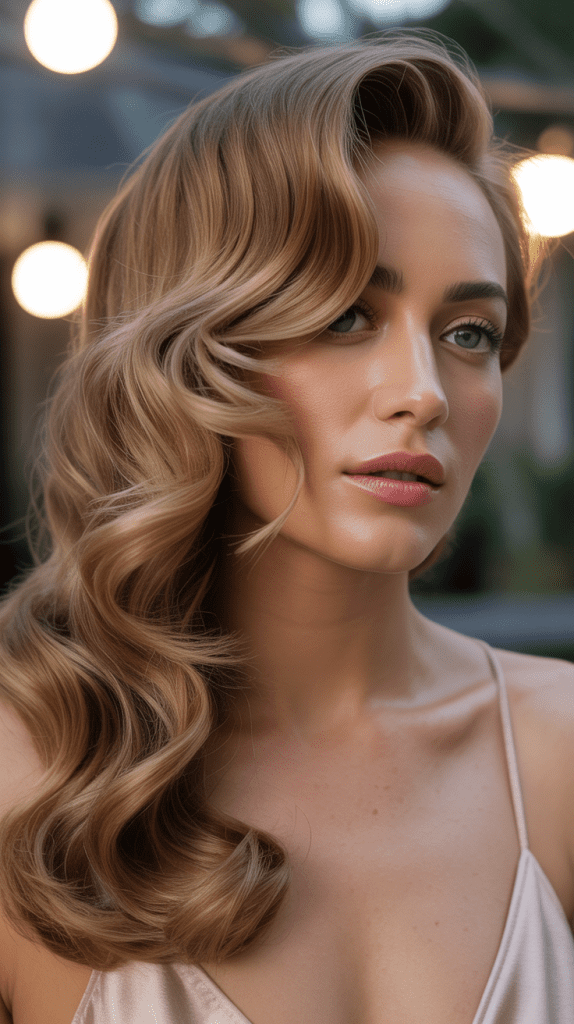
Side-swept waves create romantic, glamorous movement that’s enhanced by the texture greasy hair provides.
The natural oils help define wave patterns and add that coveted “beachy” texture without any styling products.
This feminine style works for dates, parties, or any occasion where you want to feel beautiful.
Creating the Waves:
- Create a deep side part to one side of your head
- Sweep all your hair over one shoulder
- If you have naturally wavy hair, the oils will enhance your existing texture
- Use your fingers to scrunch and define wave patterns as they fall
- For straight hair, twist small sections before pinning them and letting them set
- After removing pins, finger-comb the twists into soft waves
- The oils will help the waves hold their shape throughout the day
- Let face-framing pieces fall naturally for softness
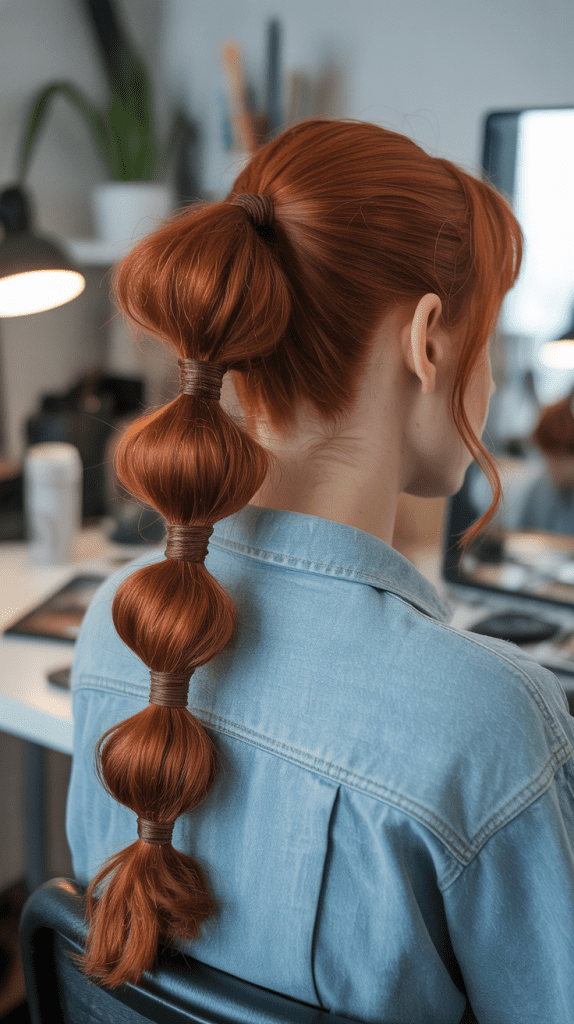
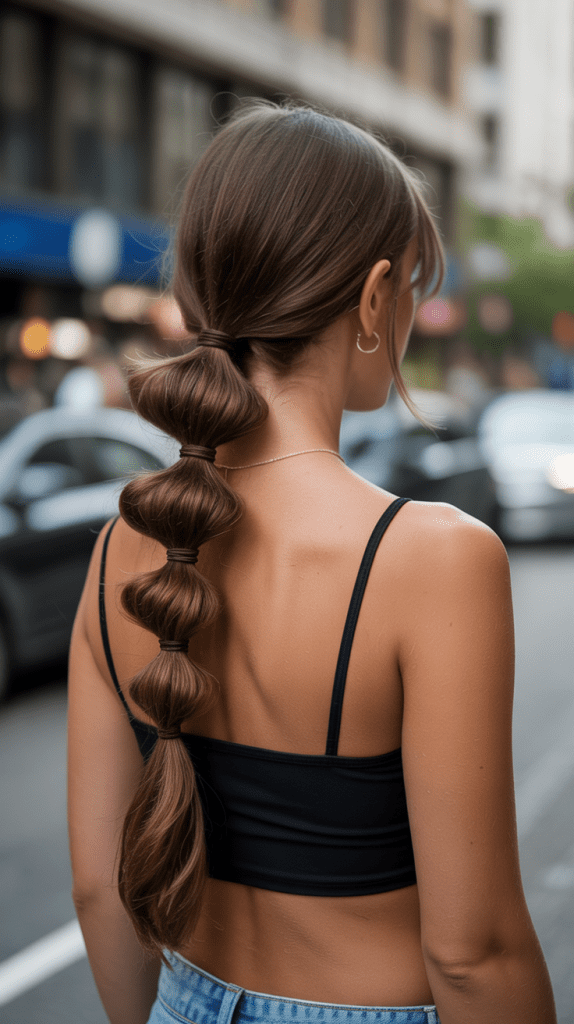
14. The Bubble Ponytail
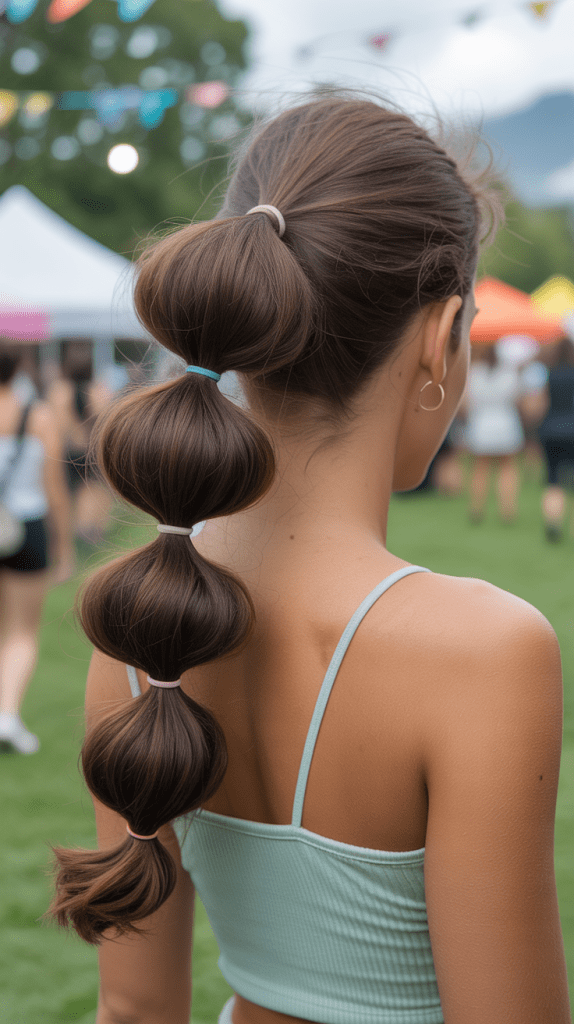
The bubble ponytail adds playful dimension to a basic ponytail by creating distinct sections along its length.
Greasy hair helps the bubbles hold their shape better and maintains tension between each elastic.
This trendy style works for festivals, parties, or adding fun to casual outings.
Creating the Bubbles:
- Pull all your hair into a high ponytail at the crown of your head
- Secure with a strong elastic that won’t slip
- Place another elastic several inches down from the first one
- Gently pull at the hair between the two elastics to create a rounded bubble shape
- Continue adding elastics every few inches down the length of the ponytail
- Create bubbles between each set of elastics by pulling the hair outward
- The number of bubbles depends on your hair length
- Natural oils help maintain the puffed-out shape of each bubble section
15. The Faux Hawk Braid
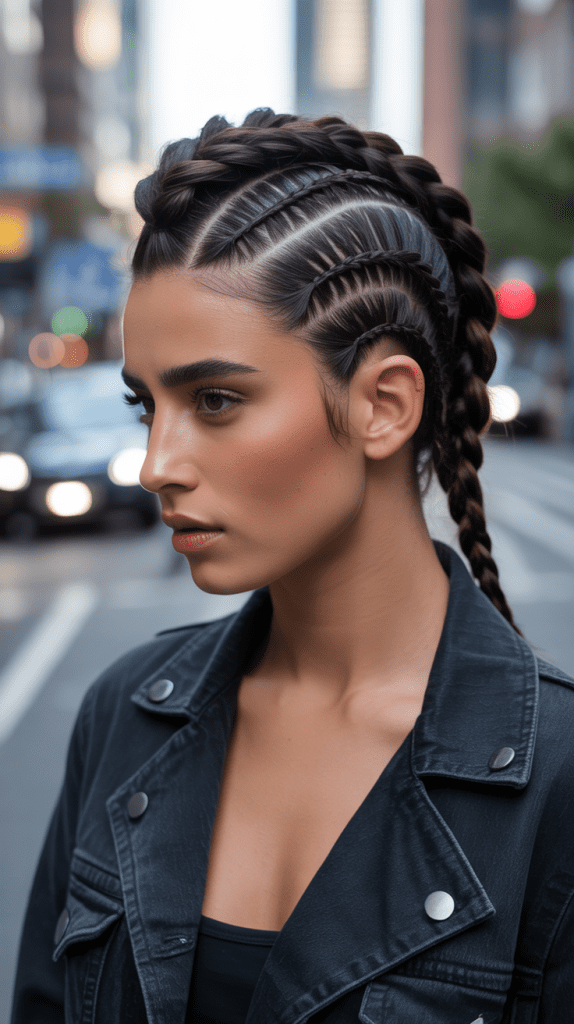
The faux hawk braid combines edgy style with intricate braiding for a bold statement look.
Greasy hair helps the braid lie flat against your scalp while adding the texture needed for the dramatic raised center.
This eye-catching style works for concerts, fashion events, or expressing your creative side.
Building the Faux Hawk:
- Create a section down the center of your head from forehead to nape
- Leave about 2-3 inches of width for this center mohawk section
- Temporarily clip the side sections out of the way
- Begin a Dutch braid with the center section starting at your forehead
- Braid tightly to keep everything close to your scalp
- Pull at the center of each braid section to make it stand up and out
- This creates the raised mohawk effect along the center of your head
- Style the side sections slicked back or with small braids for contrast
16. The Pinned-Back Pixie
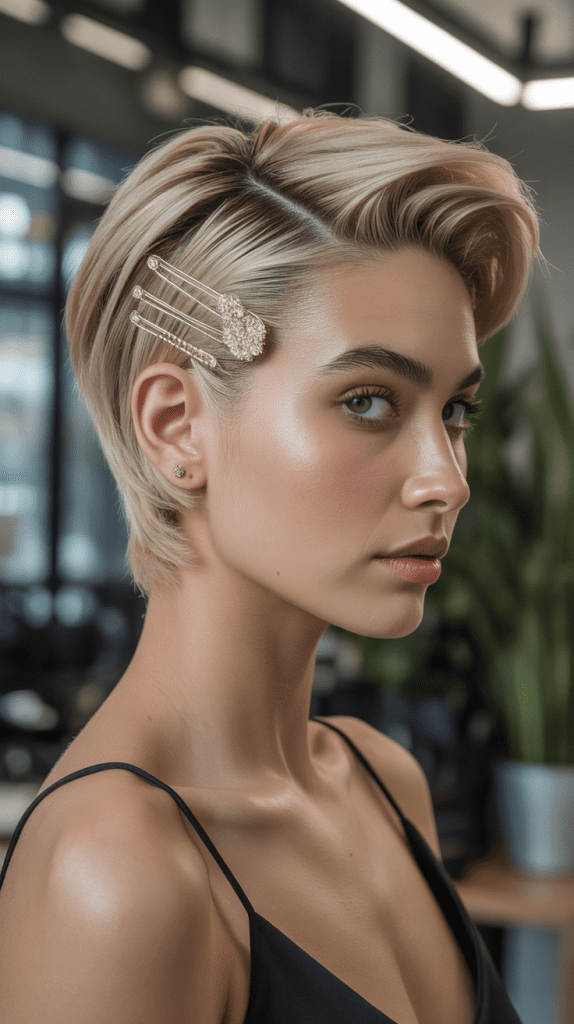
For those with pixie cuts or very short hair, pinning back sections creates a polished alternative to leaving everything down.
Greasy hair helps short sections stay in place that might otherwise stick out.
This refined approach to short hair works well for professional settings or dressing up a casual cut.
Short Hair Solutions:
- Use the natural oils to smooth your hair back from your face and forehead
- Take small sections from the sides and pin them back behind your ears
- Use decorative bobby pins or small clips that add visual interest
- The oils will help even very short pieces stay slicked back
- Create a side part for a more dramatic swept-back effect on one side
- This removes hair from your face while showcasing your features
- Layer multiple pins for an artistic, intentional look
- The shine from natural oils makes this style look deliberately styled rather than greasy
17. The Rope Braid Ponytail
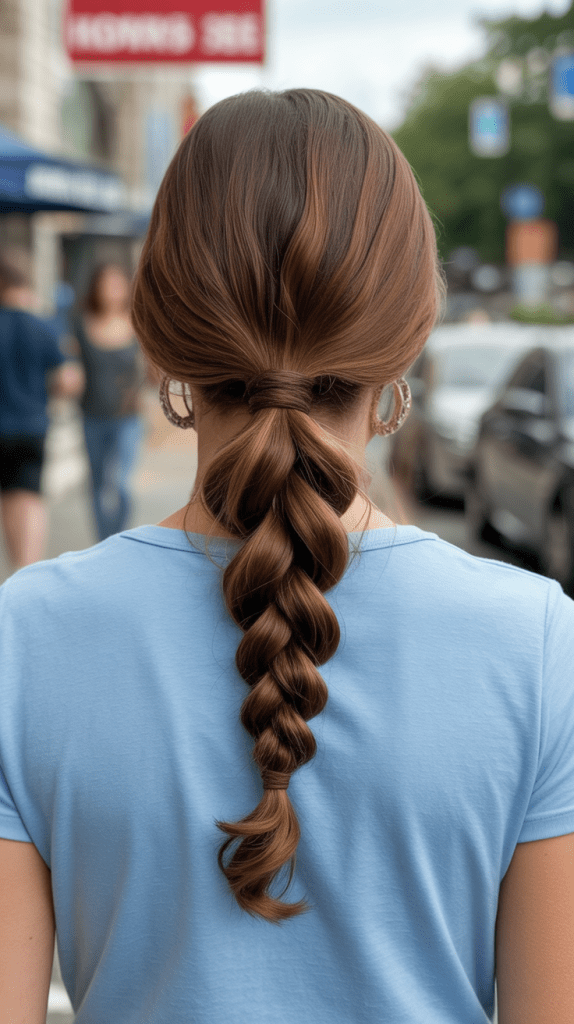
A rope braid ponytail offers textured interest that’s surprisingly simple to achieve.
Greasy hair makes the rope-twisting technique easier and helps the braid maintain its twisted shape throughout the day.
This elegant yet casual style works for various occasions from work to weekend activities.
Rope Braid Instructions:
- Pull all your hair into a ponytail at your desired height
- Divide the ponytail into two equal sections
- Twist each section tightly in the same direction (clockwise works well)
- Then wrap these twisted sections around each other in the opposite direction
- The twists naturally want to spiral together, creating the rope effect
- Continue twisting and wrapping until you reach the ends
- Secure with an elastic band to prevent unraveling
- The natural oils help each twist maintain definition and separation
18. The Headband Tuck
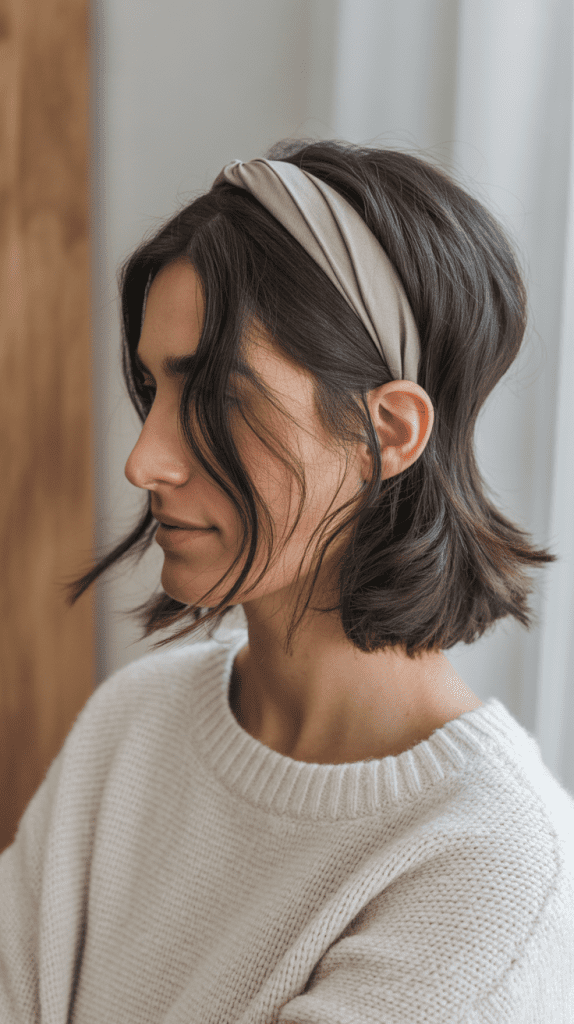
The headband tuck is a vintage-inspired technique that hides greasy roots while creating an elegant rolled style.
A simple elastic headband becomes a styling tool that holds hair in place while creating a sophisticated retro look.
This clever style works beautifully for themed events, date nights, or just feeling glamorous.
Using the Headband Technique:
- Place an elastic headband over your head like a crown
- Position it about an inch back from your hairline
- Take small sections of hair and tuck them up and over the headband
- Roll each section around the band, hiding the hair underneath it
- Continue working around your entire head until all hair is tucked
- The natural oils help the hair grip the headband and stay tucked
- This creates a rolled effect all around your head with no pins needed
- Adjust and smooth as needed for a polished final result
19. The Side Fishtail Braid
A side fishtail braid creates intricate texture that looks complex but becomes easier with slightly greasy hair.
The natural oils help the small sections stay separated and defined throughout the braiding process.
This bohemian-romantic style works for casual dates, outdoor events, or adding interest to everyday looks.
Fishtail Braiding Steps:
- Sweep all your hair over one shoulder to your preferred side
- Divide the hair into two large sections
- Take a thin strand from the outside of the left section
- Cross it over to join the right section
- Then take a thin strand from the outside of the right section
- Cross it over to join the left section
- Continue alternating sides, always taking from the outside edge
- The smaller your sections, the more intricate the fishtail pattern
- Secure at the bottom and gently pull the braid to make it fuller
20. The Slicked Ear Tuck
The slicked ear tuck is minimalist elegance at its finest, using greasy hair to create an ultra-smooth one-sided style.
This asymmetrical look showcases your profile and works particularly well for showing off statement earrings.
Perfect for evening events, this style radiates sophisticated simplicity.
One-Sided Styling:
- Create a deep side part on your preferred side
- On the side with less hair, use the natural oils to slick everything back smoothly
- Tuck this section firmly behind your ear
- Secure with one or two bobby pins placed horizontally behind the ear
- Leave the other side hanging naturally over your opposite shoulder
- The contrast between tucked and flowing creates visual interest
- This style highlights your face shape and cheekbones beautifully
- The glossy, slicked appearance looks intentional and polished
21. The Twisted Crown Updo
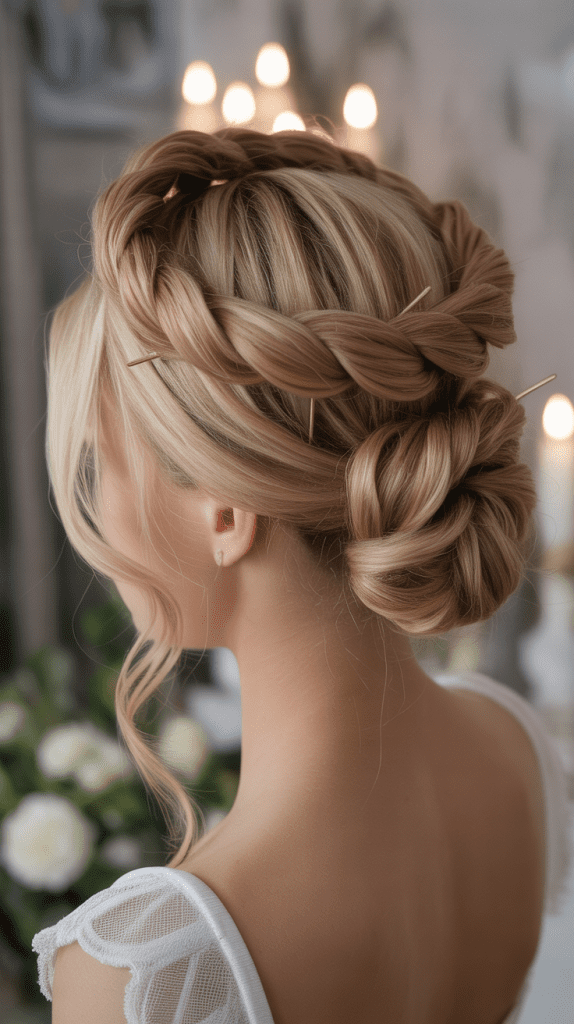
The twisted crown updo combines the romance of a crown with the elegance of an updo.
Greasy hair helps the twists hold their shape and makes pinning easier.
This sophisticated style works for weddings, formal events, or any occasion requiring an elevated, feminine look.
Crown Twist Method:
- Create a center or side part depending on your preference
- Take a section of hair from near your part on one side
- Twist this section as you bring it back toward the crown of your head
- Secure with bobby pins at the crown area
- Repeat with a section from the other side, meeting at the crown
- Continue taking sections from both sides and twisting them back
- Each twist should overlap slightly with the previous one, creating a crown effect
- Gather remaining hair at the nape into a low bun or leave it flowing
22. The Ponytail with Wrapped Sections
A wrapped-section ponytail elevates a basic ponytail by adding textured detail along its length.
Greasy hair helps the wrapped sections grip and stay in place without excessive pinning.
This creative style works for making a statement at work, parties, or whenever you want your ponytail to stand out.
Creating Wrapped Details:
- Pull your hair into a ponytail at your desired height
- Take a small section of hair from underneath the ponytail
- Wrap this section around the ponytail several times, covering the elastic
- Secure the end with a bobby pin hidden underneath
- Further down the ponytail, take another section from the underneath
- Wrap it around the ponytail at this new position
- Continue creating wrapped sections at intervals down the length
- The natural oils help each wrapped section maintain its hold
23. The Braided Side Sweep
The braided side sweep combines the elegance of a side part with the textured interest of a braid.
Greasy hair helps the braid hold tight against your head while the oils add shine to the swept sections.
This asymmetrical style works for both casual and dressy occasions.
Side Sweep Technique:
- Create a deep side part on your preferred side
- On the side with more hair, begin a tight French or Dutch braid at the part
- Braid along your hairline toward your ear
- Stop braiding at or just behind your ear
- Leave the remaining hair loose or gather it with the hair from the other side
- The braid creates structure on one side while the opposite side remains smooth
- Sweep all the loose hair over one shoulder for a romantic finish
- The contrast between braided and smooth creates dynamic visual interest
24. The Knotted Ponytail
The knotted ponytail uses actual knots instead of elastics to create a unique, editorial look.
Greasy hair helps the knots hold better and creates the texture needed for this artistic style.
This fashion-forward approach to ponytails works for creative events, photo shoots, or expressing your artistic side.
Knotting Technique:
- Divide your hair into two equal sections at the back of your head
- Tie these sections together in a simple overhand knot, like tying shoelaces
- Pull the knot tight to secure it at your desired position
- Create another knot below the first one using the same two sections
- Continue knotting down the length of your hair
- Each knot naturally creates texture and visual interest
- Secure the very end with a small elastic to prevent unraveling
- Gently pull at the knots to make them fuller and more prominent
25. The Victory Rolls
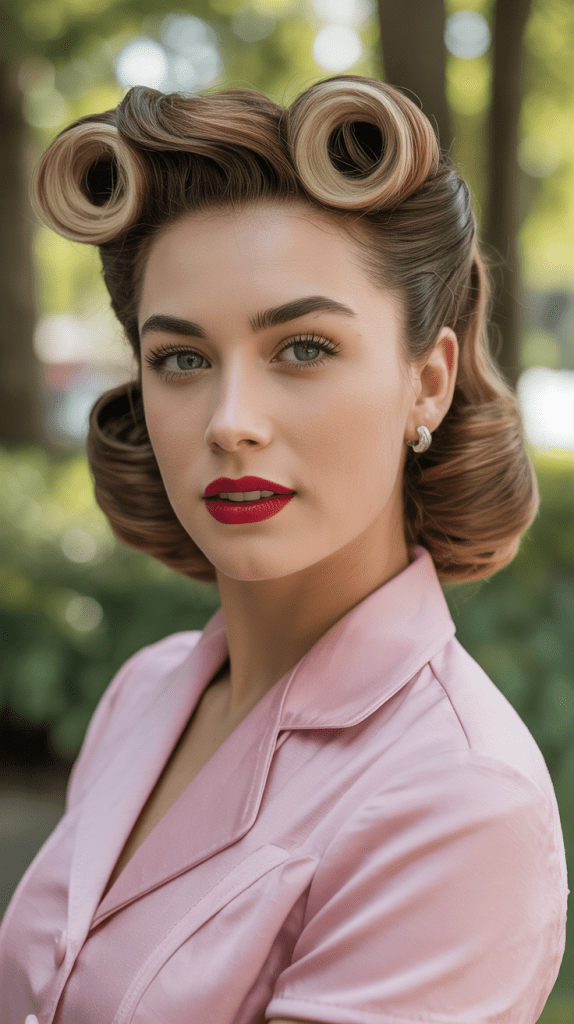
Victory rolls are a vintage 1940s style that greasy hair actually makes easier to achieve.
The natural oils provide grip and moldability that helps the rolls hold their shape.
This retro glamorous look works for themed events, pinup photoshoots, or embracing vintage fashion.
Creating Victory Rolls:
- Section off the front portions of your hair on both sides of a center part
- Take one front section and backcomb it at the roots for volume
- Roll the section back toward your scalp, creating a tube shape
- The roll should sit on top of your head like a small wave
- Secure with bobby pins from multiple angles
- Repeat the process on the other side, creating a symmetrical roll
- The rolls should frame your face and sit prominently at the front
- Style the remaining hair in curls or pin it up for a complete vintage look
26. The Ballerina Bun
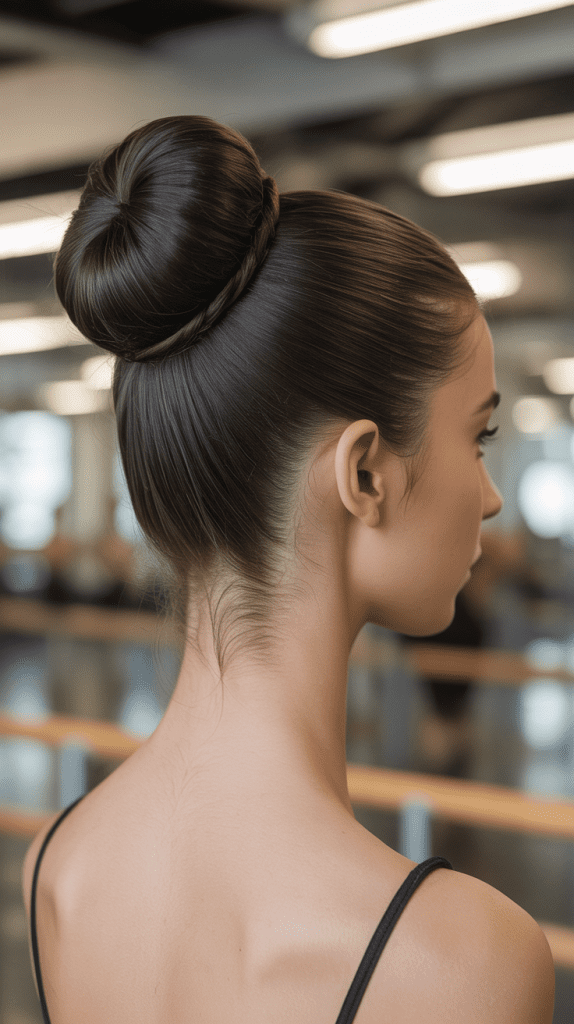
The classic ballerina bun gets enhanced by greasy hair, which helps create that sleek, disciplined look dancers are known for.
This elegant, timeless style works for dance classes, formal events, or any time you need hair completely secured.
The natural oils replace the need for gel or mousse.
Perfect Bun Placement:
- Brush all your hair up to the crown of your head using firm strokes
- The natural oils will help eliminate bumps and create a smooth surface
- Gather hair into a high ponytail and secure with a strong elastic
- Twist the ponytail tightly into a rope
- Wrap the twisted ponytail around its base in a spiral
- Tuck the ends underneath the bun
- Secure with bobby pins inserted at angles through the bun
- Use a hair net for extra security if needed for dance or performance
- Smooth any flyaways with the natural oils on your hands
27. The Braided Headband
A braided headband uses your own hair to create a bohemian accessory that frames your face.
Greasy hair helps the braid hold its shape and stay in position as a headband.
This romantic style works for festivals, casual dates, or adding a whimsical touch to everyday looks.
Self-Made Headband:
- Take a section of hair from behind one ear
- Braid this section all the way to the ends using a standard three-strand technique
- Bring the braid across the top of your head like a headband
- Position it wherever you’d like – at the hairline or further back
- Secure the end behind your opposite ear with bobby pins
- Leave the rest of your hair down, either straight or with natural texture
- The braid creates a natural accessory without needing an actual headband
- Adjust the braid’s tightness and position for your desired look
28. The Textured Space Buns
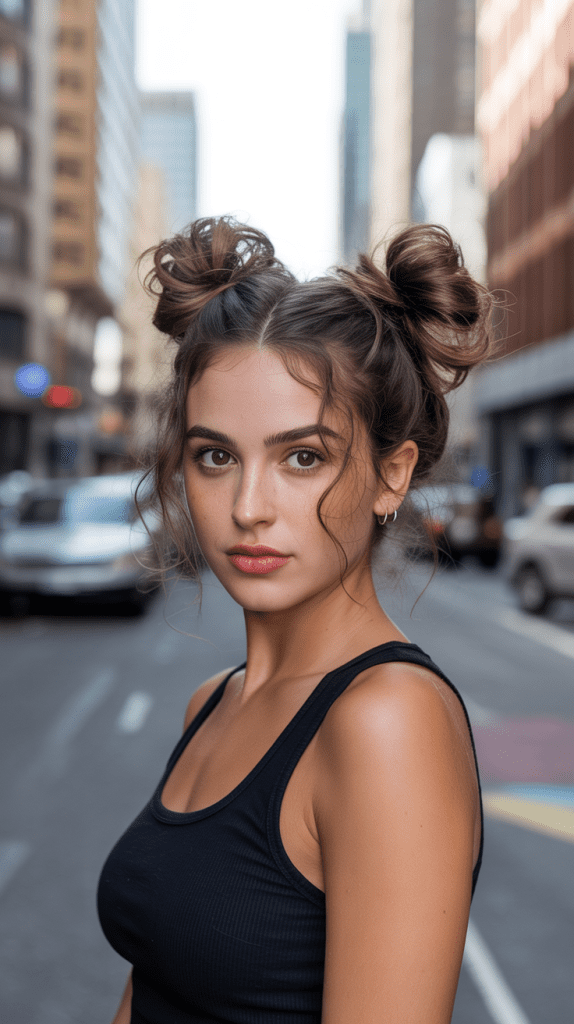
Space buns gain edgy dimension when created with greasy hair that adds texture and hold.
This playful, youthful style has evolved from a quirky trend to a mainstream fashion statement.
The natural oils help the buns maintain their shape throughout the day while adding a lived-in texture.
Double Bun Technique:
- Create a center part from forehead to nape, dividing hair into two sections
- Gather one section into a high ponytail near the crown
- Twist the ponytail loosely rather than tightly
- Wrap the twisted section around its base to create a bun
- Secure with bobby pins but leave it slightly messy and textured
- Repeat the entire process on the other side
- The two buns should sit symmetrically on top of your head
- Pull out a few pieces around your face for a softer, less severe look
29. The Low Twisted Chignon
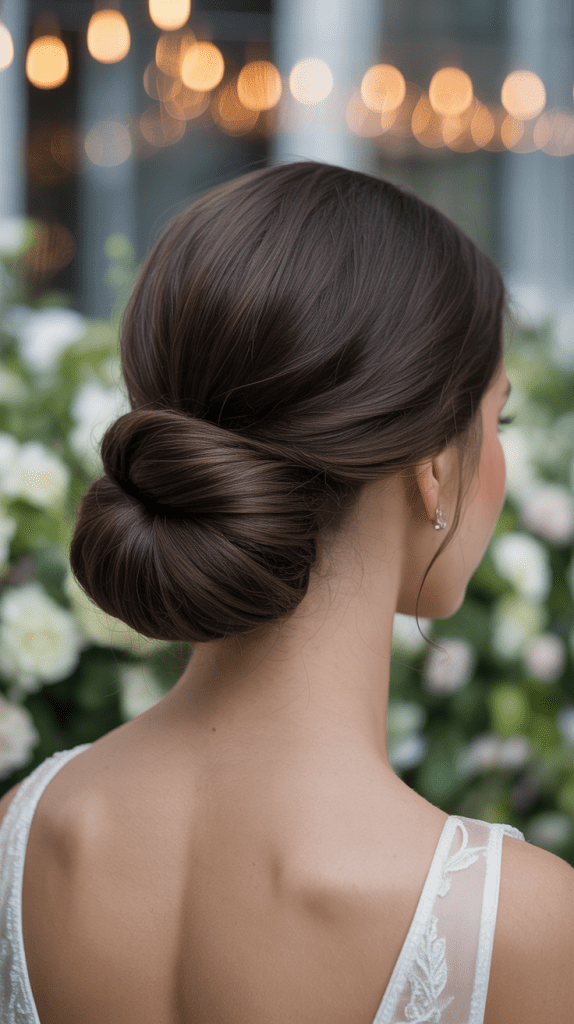
The low twisted chignon combines French sophistication with practical elegance.
Greasy hair makes the twisting easier and helps this refined updo hold its shape without excessive product.
This timeless style works for weddings, formal dinners, professional presentations, or any occasion requiring polished grace.
Elegant Chignon Steps:
- Gather all your hair at the nape of your neck into a low ponytail
- Divide the ponytail into two or three sections
- Twist each section individually in the same direction
- Then twist or braid these sections together
- Wrap the combined twist around the ponytail base in a coil shape
- Tuck the ends underneath the chignon to hide them
- Secure with bobby pins inserted at various angles for stability
- The natural oils give this style a refined, glossy finish
- Smooth any bumps at the crown with your fingers using the natural oils
Hair Care Tips for Embracing Natural Oils
Understanding Your Hair’s Natural Cycle:
- Most hair types produce oils that peak around day two or three after washing
- These natural oils, called sebum, actually protect your hair and scalp from damage and environmental stress
- Over-washing strips away beneficial oils, causing your scalp to overproduce sebum in compensation
- Training your hair to go longer between washes gradually reduces excess oil production
- The transition period typically lasts 2-4 weeks as your scalp adjusts to the new routine
- During this adjustment, the hairstyles in this guide become your best friends
Extending Time Between Washes:
- Gradually increase the days between washes rather than going cold turkey
- Use a boar bristle brush to distribute oils from roots to ends evenly
- Focus on cleansing your scalp rather than the length of your hair when you do wash
- Rinse with cool water to seal the hair cuticle and reduce oil appearance
- Avoid touching your hair throughout the day, as hands transfer additional oils
- Change your pillowcase regularly to prevent oil buildup from affecting freshly styled hair
When to Actually Wash:
- If your scalp feels itchy or uncomfortable rather than just oily
- When hair becomes genuinely dirty from sweat, environmental pollutants, or product buildup
- If oils have traveled so far down the hair shaft that styling becomes impossible
- When scalp health concerns arise, such as flaking or irritation
- Listen to your individual hair’s needs rather than following a strict schedule
External Resources for Hair Styling
For those looking to deepen their understanding of working with natural hair textures and oils, several reputable sources provide evidence-based information.
Healthline offers comprehensive articles about hair health and the science behind sebum production.
The American Academy of Dermatology provides expert guidance on scalp health and proper hair care techniques.
For step-by-step visual tutorials on braiding and updo techniques, YouTube hosts countless professional hairstylist channels with detailed instruction.
Fashion and beauty publications like Vogue and Allure regularly feature editorial content on trending hairstyles and how to adapt them for different hair types.
Tools and Accessories for Greasy Hair Styling
Essential Styling Tools:
- Boar bristle brush for smoothing and oil distribution without creating static
- Fine-tooth comb for creating clean parts and sleek sections
- Rat-tail comb for precise parting and sectioning during intricate styles
- Bobby pins in colors matching your hair for invisible hold
- Hair elastics without metal clasps to prevent breakage and creasing
- Small clear elastics for securing braids without visible bulk
- Hair nets for securing buns during athletic activities or dance
Optional Styling Accessories:
- Decorative bobby pins or clips that turn functional pins into fashion statements
- Elastic headbands for the tucked headband technique
- Hair donuts or bun forms for creating perfectly round, full buns
- Texturizing tools like crimpers for adding extra grip and volume when needed
- Silk or satin scrunchies that are gentler on hair than traditional elastics
- Hair sticks or decorative pins for securing buns with Asian-inspired elegance
Common Mistakes to Avoid
Styling Errors:
- Using too much force when brushing, which spreads oils faster and can damage hair
- Creating ponytails too tight, which causes headaches and potential hair loss over time
- Placing elastics in the same position repeatedly, leading to breakage at that point
- Trying to achieve perfectly smooth styles when your hair’s texture works against it
- Comparing your results to freshly washed, professionally styled reference photos
- Using products designed for clean hair, which can make greasy hair look worse
- Neglecting to secure styles properly, assuming natural oils will hold everything
Mindset Mistakes:
- Viewing greasy hair as dirty rather than naturally textured
- Feeling embarrassed about embracing your hair’s natural oil production
- Believing that you must wash daily to maintain professional appearance
- Thinking these styles only work as emergency solutions rather than intentional choices
- Assuming others notice or care about your hair’s oil level as much as you do
- Letting societal pressure override what’s actually healthiest for your hair
Adapting Styles for Different Hair Types
For Fine or Thin Hair:
- Greasy hair actually adds the weight and texture that fine hair often lacks
- These hairstyles can make thin hair appear fuller through strategic volume placement
- Avoid pulling hair too tight, which emphasizes thinness
- Embrace textured, messy styles that create the illusion of thickness
- The braided styles work particularly well as they make hair appear more voluminous
For Thick or Coarse Hair:
- Natural oils help tame thickness and make hair more manageable for styling
- These hairstyles provide structure and control for hair that can feel overwhelming when loose
- Focus on sleek, smooth styles that showcase your hair’s natural body
- Use more bobby pins and elastics than fine-haired individuals need for security
- The weight of thick hair means updos and buns will be more substantial and dramatic
For Curly or Textured Hair:
- Natural oils enhance curl definition and reduce frizz
- These styles work with your texture rather than fighting against it
- Avoid brushing curly hair when dry; use fingers or a wide-tooth comb instead
- The braided and twisted styles complement natural texture beautifully
- Embrace the volume and dimension your hair type naturally provides
For Straight Hair:
- Greasy straight hair becomes the easiest to slick, smooth, and shape
- These styles achieve that coveted glossy, polished appearance effortlessly
- Straight hair shows off intricate braiding patterns most clearly
- The sleek styles in this collection particularly suit straight hair textures
Seasonal Considerations
Summer Styling:
- Natural oils protect hair from sun damage and chlorine exposure
- Updos and braids keep hair off your neck during hot weather
- The bubble ponytail and space buns work especially well for summer festivals
- Beach and pool activities benefit from styles that secure hair completely
- Oils mixed with salt water create excellent texture for beachy waves
Winter Styling:
- Natural oils combat the drying effects of indoor heating
- Protective updos shield hair from harsh winter weather and static
- The French twist and elegant buns work well under winter hats
- Oils help reduce static electricity that plagues winter hair
- Lower winter washing frequency aligns perfectly with embracing natural oils
Transition Season Styling:
- Spring and fall weather fluctuations affect oil production
- Half-up styles adapt well to changing temperatures throughout the day
- Natural oils protect hair during seasonal transitions
- The versatile ponytail variations work across all weather conditions
Confidence and Mindset Shifts
Reframing Your Perspective:
- Society’s obsession with daily hair washing is actually quite recent historically
- Many cultures around the world embrace natural oils as beneficial
- Professional hairstylists often recommend less frequent washing for healthier hair
- The “greasy” look you fear is often only noticeable to you
- These intentional styles transform what you see as a flaw into a feature
Building Confidence:
- Start trying these styles at home before wearing them out publicly
- Notice how many compliments you receive when wearing these “greasy hair” styles
- Recognize that most people cannot tell the difference between Day 1 and Day 3 hair when properly styled
- Understand that hair health matters more than daily washing
- Remember that confident styling makes any look work
Environmental and Practical Benefits:
- Less frequent washing saves water and reduces environmental impact
- You’ll spend less money on shampoo, conditioner, and styling products
- Time saved on daily washing and drying adds up significantly
- Healthier hair results from less heat styling and chemical exposure
- Natural oils provide free, built-in conditioning and protection
Troubleshooting Common Issues
When Hair Feels Too Greasy:
- Focus oils away from your face by trying styles that pull hair back completely
- Use a small amount of dry shampoo only at the roots if absolutely necessary
- Choose styles with texture and dimension rather than smooth, slicked looks
- Consider that it might be time for an actual wash if styling becomes impossible
- Remember that slight greasiness provides the grip these styles need
When Styles Won’t Hold:
- Your hair might not be greasy enough yet; these styles work best on Day 2-4 hair
- Use more bobby pins than you think you need for security
- Make sure pins are inserted at angles that catch both the style and your scalp
- Twist or braid sections tighter than feels comfortable; they’ll relax naturally
- Consider your hair texture and adapt the technique accordingly
When You’re Running Late:
- The messy top knot takes under two minutes and looks intentionally styled
- A textured low ponytail requires minimal effort but appears polished
- The sleek ear tuck provides sophistication in seconds
- Keep emergency styling supplies (elastics, pins) in your bag, car, or desk
- Remember that these quick styles often look better than freshly washed hair that hasn’t been styled
Conclusion
Throughout this comprehensive guide to 29 Effortless Greasy Hair Hairstyles to Try, we’ve explored how what many consider a hair problem can actually become your greatest styling advantage.
From classic updos like the French twist and ballerina bun to trendy styles like space buns and bubble ponytails, each hairstyle demonstrates that natural oils enhance rather than hinder beautiful hair.
The techniques covered here span all skill levels, hair types, and occasions, ensuring you’ll always have a solution whether you’re heading to a job interview, a first date, a workout class, or simply running errands on a busy weekend.
These styles don’t just hide greasy hair—they celebrate the texture, hold, and shine that natural oils provide, often creating results that would require expensive products to achieve on freshly washed hair.
By embracing your hair’s natural cycle and working with its oils instead of constantly fighting against them, you’re not only making styling easier but also promoting healthier hair growth, saving valuable time and money, and reducing your environmental impact.
The confidence that comes from knowing you can transform any hair day into a great hair day is invaluable, freeing you from the anxiety of wondering whether your roots look acceptable or spending precious morning minutes on yet another shampoo session.
As you experiment with these 29 Effortless Greasy Hair Hairstyles to Try, remember that the most important styling product you have is confidence—rock these looks with the knowledge that you’re working with your hair’s natural state rather than against it, and watch as what once felt like a limitation becomes one of your most versatile styling tools.