Spring is the season of renewal, color, and effortless beauty — and your hair deserves to celebrate it too.
If you’ve been searching for fresh, eye-catching ways to style your locks this season, 27 Gorgeous Spring Braid Hairstyles to Try is exactly the guide you need.
From soft, romantic braids woven with flowers to bold, intricate styles that turn heads at every outdoor gathering, this article covers it all.
Whether your hair is long, short, thick, or fine, there’s a breathtaking braid waiting for you in these pages.
Get ready to be inspired, bookmark your favorites, and step into spring with confidence and style.
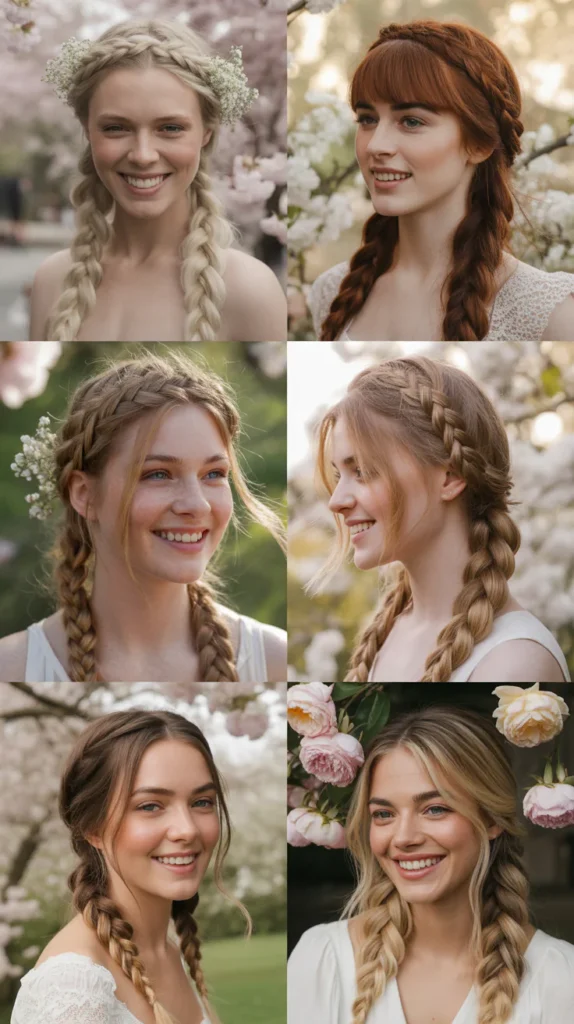
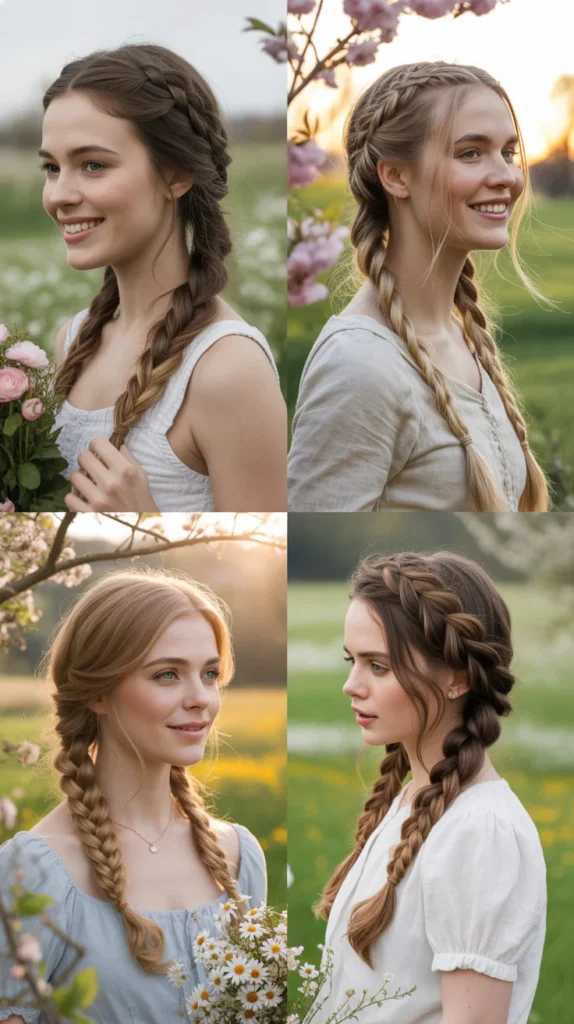
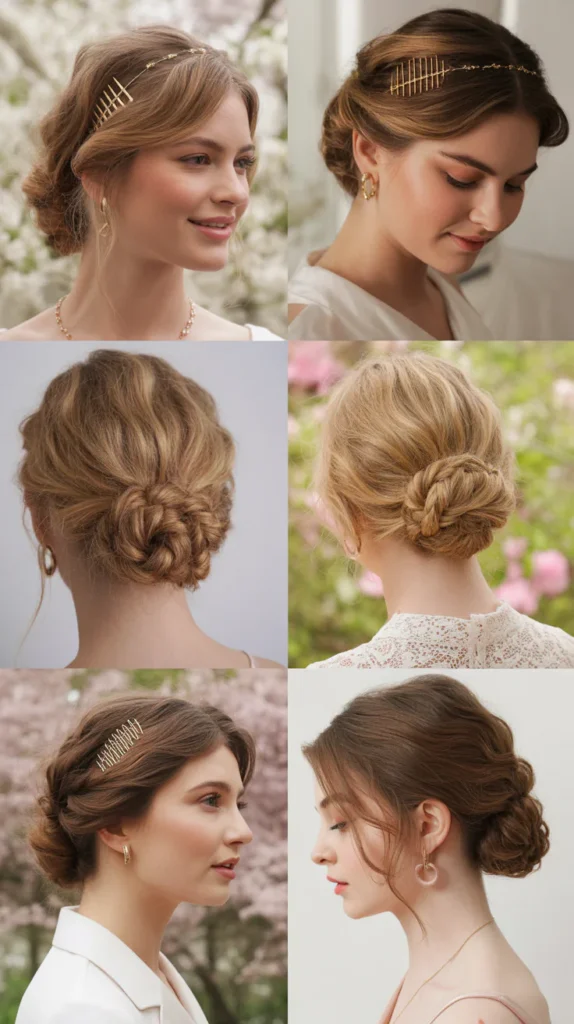
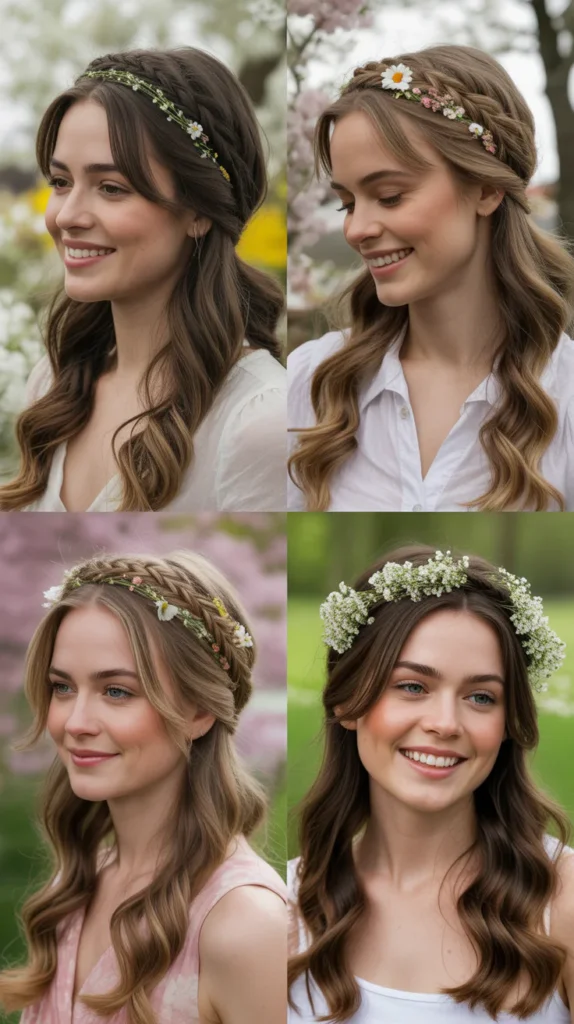
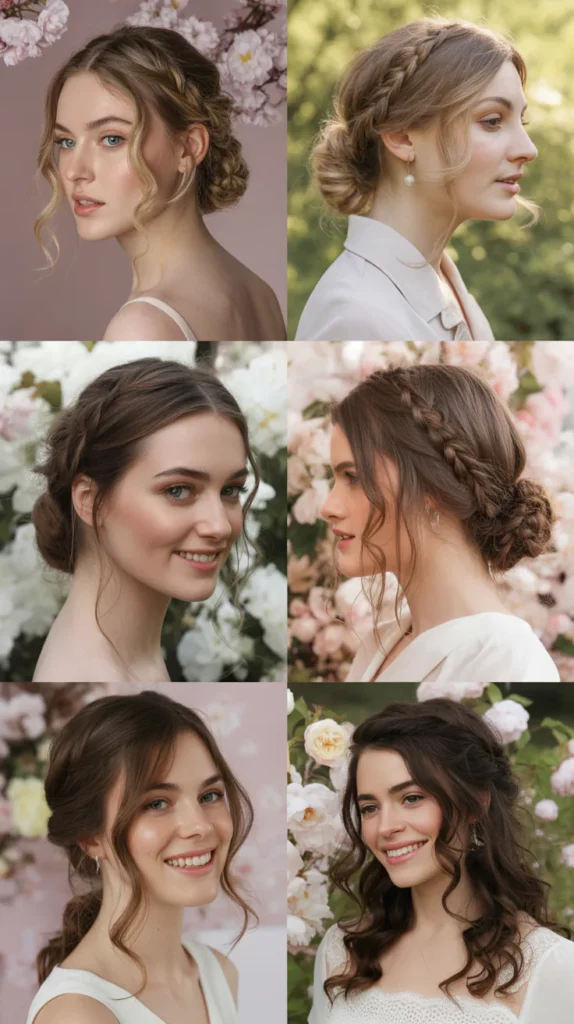
1. Classic French Braid With Floral Accents
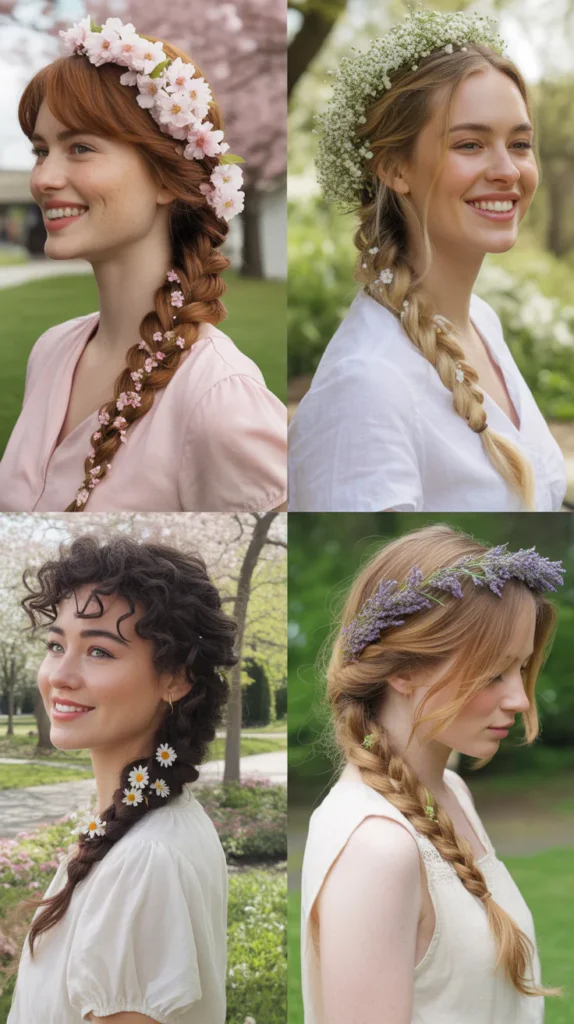
The Classic French Braid with Floral Accents is a timeless spring favorite that blends structure with natural beauty.
This style takes the elegant French braid you already love and elevates it with tiny fresh or faux flowers tucked along the braid.
It’s perfect for garden parties, brunches, or any spring occasion where you want to look effortlessly put-together.
- Start by brushing your hair smooth and parting it from the center or slightly to the side.
- Begin a French braid at the crown, picking up small sections of hair as you work downward.
- Secure the braid at the nape of the neck with a clear or floral elastic band.
- Gently tug the braid edges apart to create a fuller, more voluminous look.
- Tuck small flowers — like baby’s breath, daisies, or faux blooms — along the braid using bobby pins.
- Finish with a light-hold hairspray to keep everything in place throughout the day.
- This style works beautifully on medium to long hair and can last all day with minimal touch-ups.
2. Bohemian Fishtail Braid

The Bohemian Fishtail Braid is the ultimate free-spirited spring hairstyle for women who love that effortlessly undone look.
This style features a loosely woven fishtail braid that looks casually chic without appearing overly polished. It pairs perfectly with flowy sundresses, denim jackets, and all things spring fashion.
- Divide your hair into two equal sections before you begin braiding.
- Take a thin strand from the outer edge of one section and cross it over to join the other section.
- Repeat this motion, alternating sides, working all the way down to the ends.
- Intentionally pull the braid apart slightly after finishing to give it that boho, undone texture.
- Leave a few face-framing tendrils loose at the front for a soft, romantic feel.
- Wrap a small piece of hair around the elastic to hide it and add a polished finishing touch.
- Use a texturizing spray beforehand to add grip and make the style last longer.
3. Dutch Braid Crown
The Dutch Braid Crown is a regal and stunning style that frames the face like a floral wreath made entirely of hair.
Unlike the French braid, the Dutch braid sits on top of the hair, creating a bold 3D effect that looks incredibly intricate.
This style is ideal for spring weddings, photoshoots, or any event where you want to make a statement.
- Part your hair from ear to ear horizontally to create a top and bottom section.
- Start a Dutch braid at one temple, crossing strands under rather than over as you work.
- Continue braiding across the crown of the head, picking up small sections as you go.
- Pin the braid securely at the opposite temple when you reach the other side.
- Repeat the same technique from the opposite direction to create the second braid of the crown.
- Join both braids together at the back or simply overlap and pin them neatly.
- Loosen individual loops gently with a pin to make the crown look fuller and more dramatic.
4. Waterfall Braid
The Waterfall Braid is one of the most romantic and ethereal spring braiding styles you can wear.
It creates the illusion of cascading strands of hair falling through the braid, much like a gentle waterfall.
This style works exceptionally well for half-up looks and pairs beautifully with wavy or curly natural texture.
- Begin with a side part and start a regular three-strand braid just behind the ear on the heavier side.
- As you braid, drop the bottom strand instead of incorporating it, and replace it with a new section from above.
- Continue along the hairline, picking up new sections and dropping the lower strand each time.
- Secure the braid discreetly at the opposite side of the head with bobby pins.
- Leave the dropped strands loose to cascade freely for the signature waterfall effect.
- Curl the loose falling strands lightly for extra visual drama and a polished finish.
- Mist with a flexible hold spray to maintain the delicate shape throughout the day.
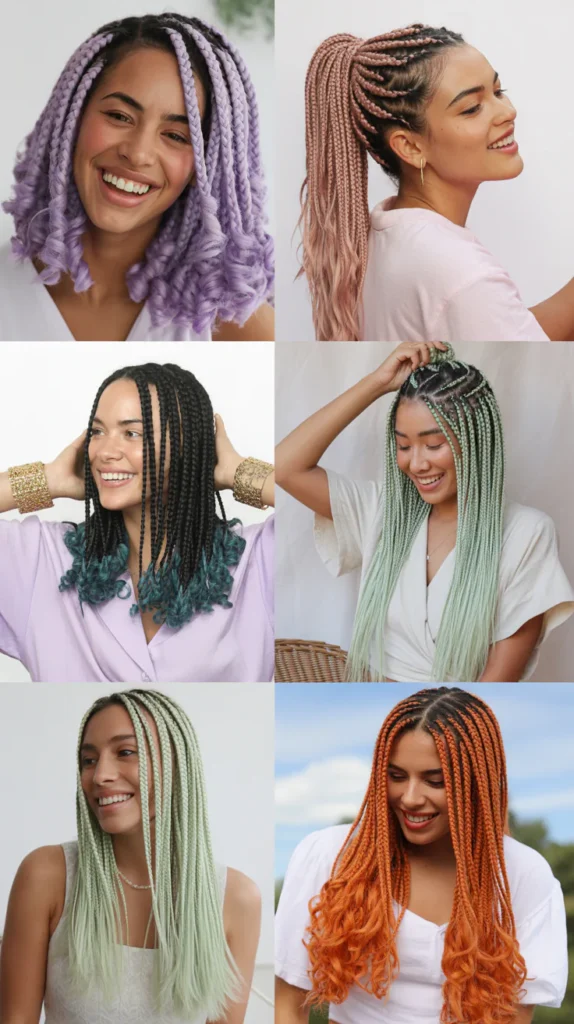
5. Spring Box Braids With Beads
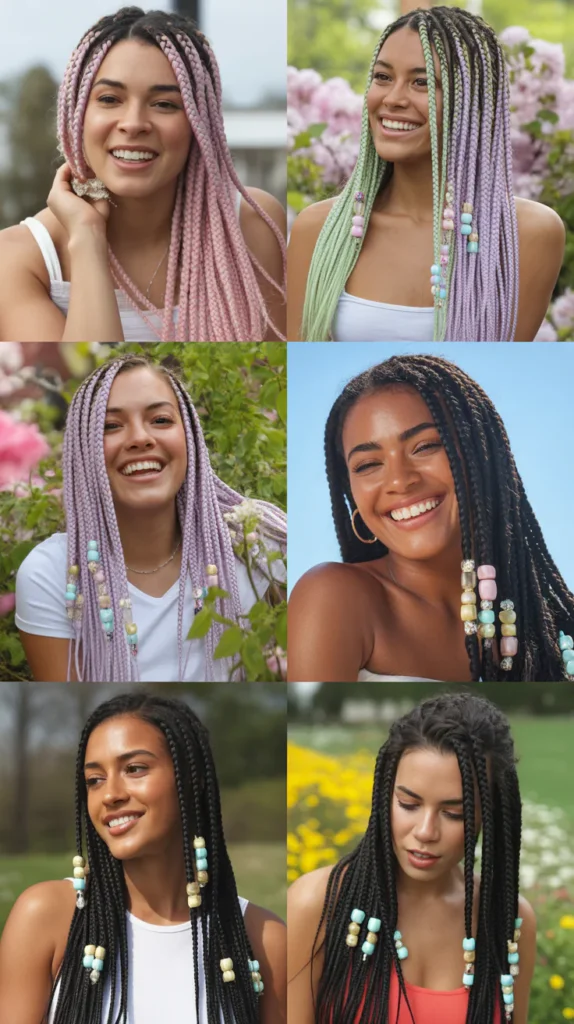
Spring Box Braids with Beads are a protective and fashionable style that celebrates cultural beauty while embracing the vibrant energy of the season.
This style involves sectioning the hair into neat squares and braiding each section from root to tip with added extensions.
Decorative beads in pastel, gold, or bright spring colors make this look truly seasonal and unique.
- Section the hair into clean, even square or triangular parts using a rat-tail comb.
- Attach braiding hair extensions at the root of each section for length and thickness.
- Braid tightly from the root down to the end, securing with a small elastic.
- Slide decorative beads — choose pastels like lavender, mint, and coral for spring — onto the braid ends.
- Mix different bead sizes and colors for a more playful and artistic finish.
- Keep the scalp moisturized with a light oil throughout the wear period.
- This protective style can last 4–8 weeks with proper nighttime care using a silk scarf.
| Bead Color | Spring Vibe It Gives |
|---|---|
| Lavender | Soft, romantic, dreamy |
| Coral | Warm, energetic, tropical |
| Mint Green | Fresh, cool, nature-inspired |
| Gold | Elegant, luxe, festival-ready |
| White Pearl | Delicate, bridal, ethereal |
6. Milkmaid Braid
The Milkmaid Braid is a charming and vintage-inspired style that wraps two braids across the top of the head like a halo.
It evokes pastoral spring beauty and looks stunning at picnics, outdoor festivals, and casual spring weddings.
This style is surprisingly easy to achieve and keeps hair neatly tucked away while looking incredibly elegant.
- Create two low pigtail braids on each side of the head, braiding all the way to the ends.
- Lift one braid up and over the top of the head, pinning it securely across the crown.
- Repeat with the second braid, overlapping it slightly with the first for a seamless look.
- Use bobby pins that match your hair color to keep the braids invisible and secure.
- Leave wispy baby hairs or face-framing pieces loose for a softer, more romantic effect.
- Tuck small spring flowers into the braid where the two sections meet for extra charm.
- Finish with a shine serum applied to the braids for a polished, healthy-looking result.
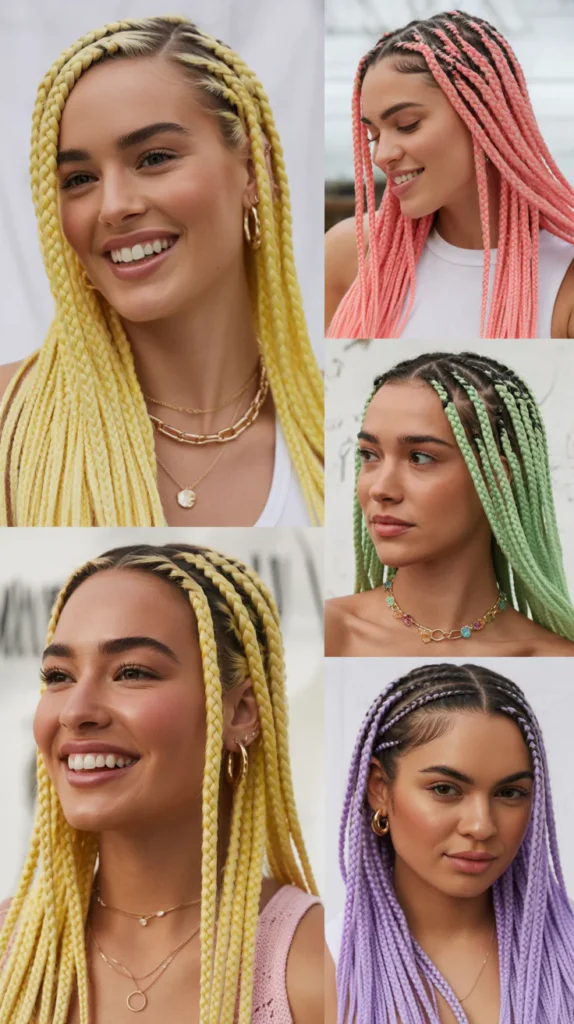
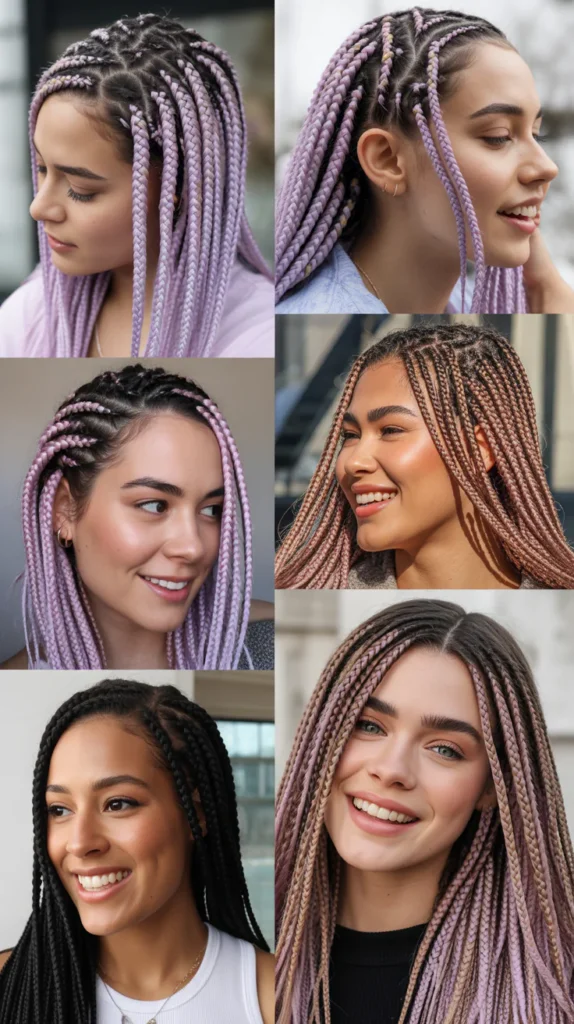
7. Knotless Box Braids in Spring Colors
Knotless Box Braids in Spring Colors are a modern evolution of traditional box braids, featuring a flat, natural-looking start at the root.
The absence of a tight knot at the base makes this style far more comfortable, scalp-friendly, and lightweight.
Choosing spring-colored extensions in shades like dusty rose, sky blue, or lavender transforms this protective style into seasonal art.
- Use a rat-tail comb to create even, clean partings in a grid-like pattern across the scalp.
- Begin braiding with your natural hair only for the first inch before gradually adding extensions.
- This knotless technique distributes tension evenly, reducing scalp stress significantly.
- Opt for spring-colored braiding hair — dusty rose, honey blonde, and seafoam green work beautifully.
- Keep braids at a medium thickness for maximum versatility and styling options.
- Dip the ends in hot water to seal and prevent unraveling without using rubber bands.
- Visit a trusted braiding professional to achieve the cleanest, most even results.
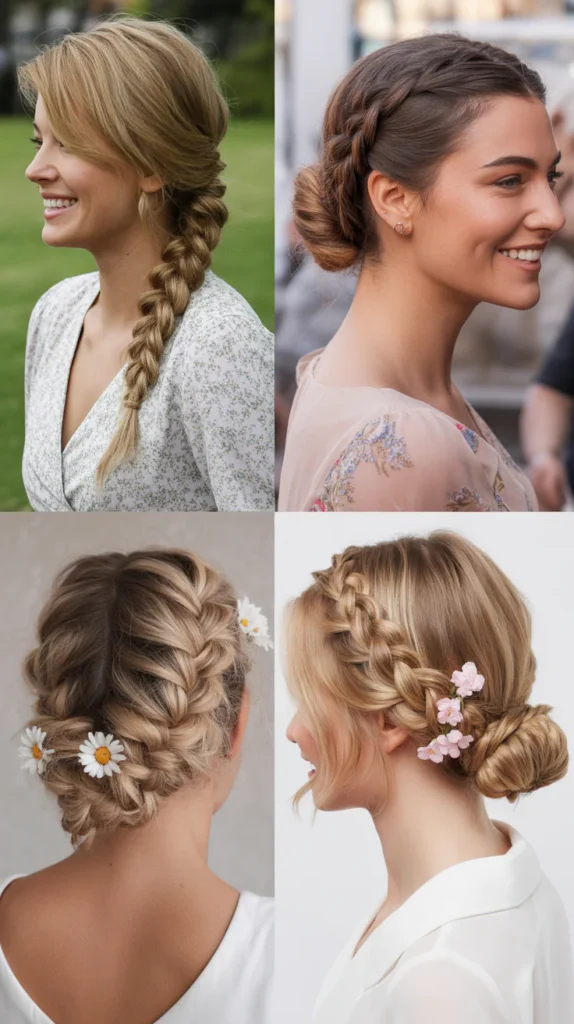
8. Half-Up Braided Bun
The Half-Up Braided Bun beautifully combines two classic styles — a bun and a braid — into one effortlessly chic spring look.
This style is ideal for those days when you want your hair both up and down, giving you the best of both worlds.
It suits almost every hair type and can be adapted from casual to formal depending on how polished you make the bun.
- Take the top half of your hair and separate it from the lower half using clips or a hair tie.
- Create a small French or Dutch braid at the crown, working backward toward the crown center.
- Gather the braid and the surrounding top-half hair into a loose, relaxed bun.
- Secure the bun with bobby pins rather than elastics for a more effortless, undone aesthetic.
- Let the bottom half of the hair flow freely, adding light curls or waves for extra texture.
- Pull a few soft strands from the front of the braid to frame the face beautifully.
- Use a medium-hold hairspray to keep the style intact without stiffness.
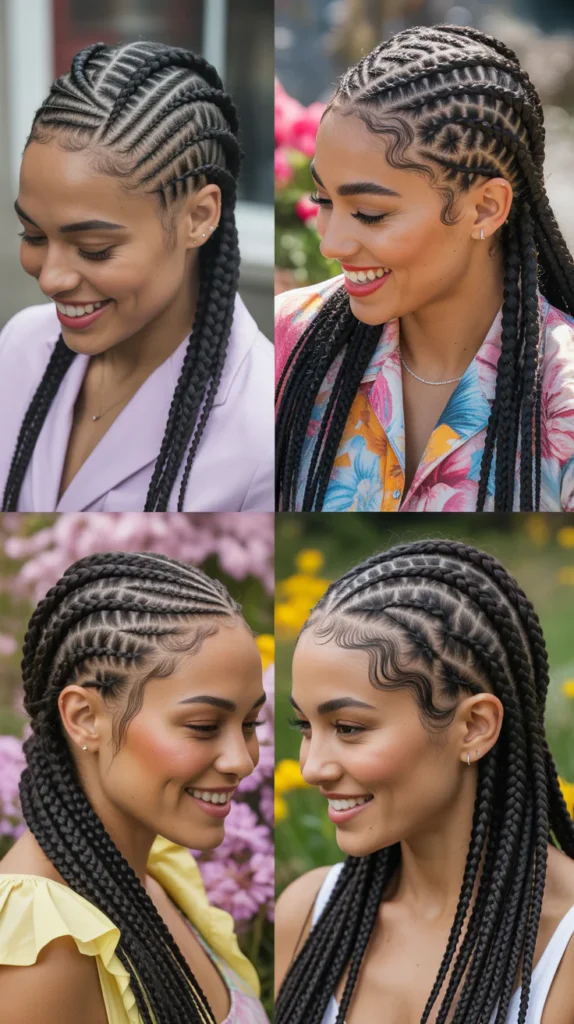
9. Feed-In Braids
Feed-In Braids are a sleek, protective cornrow-style technique where extensions are fed in gradually for a smooth, natural-looking finish.
This method avoids the bulky, tight start that traditional cornrows sometimes produce, making it much more comfortable and scalp-friendly.
For spring, styling feed-in braids in curved, swirling patterns adds an artistic, creative flair to the look.
- Part the hair into desired sections using a rat-tail comb with clean, precise lines.
- Begin braiding close to the scalp, incorporating small pieces of braiding hair gradually.
- Add more extension hair as you move down the braid to build length and thickness naturally.
- Create flowing curved patterns or geometric designs across the scalp for visual interest.
- Edge control gel can be applied along the hairline for a sleek, polished finish.
- Moisturize the scalp regularly with a lightweight braid spray to prevent dryness.
- Cover with a silk bonnet nightly to maintain neatness and extend the style’s lifespan.
10. Twisted Spring Updo
The Twisted Spring Updo takes simple two-strand twists and transforms them into a gorgeous, sculptural updo that’s perfect for warmer weather.
This style is elegant enough for formal spring events yet relaxed enough for outdoor brunches and day dates. It works beautifully on both natural and relaxed hair textures.
- Create multiple two-strand twists throughout the hair, working in small sections for definition.
- Allow the twists to set for a few hours or overnight for maximum texture and definition.
- Gather all twists upward and arrange them into a loose, flowing updo at the crown.
- Tuck and pin twist ends underneath to create a neat, voluminous shape.
- Pull a few twists loose at the front to frame the face with soft, spiraling tendrils.
- Adorn the updo with gold pins, pearl clips, or spring floral accessories for extra glamour.
- Seal with a light-hold finishing spray to smooth any frizz without weighing twists down.
11. Side Swept Braid
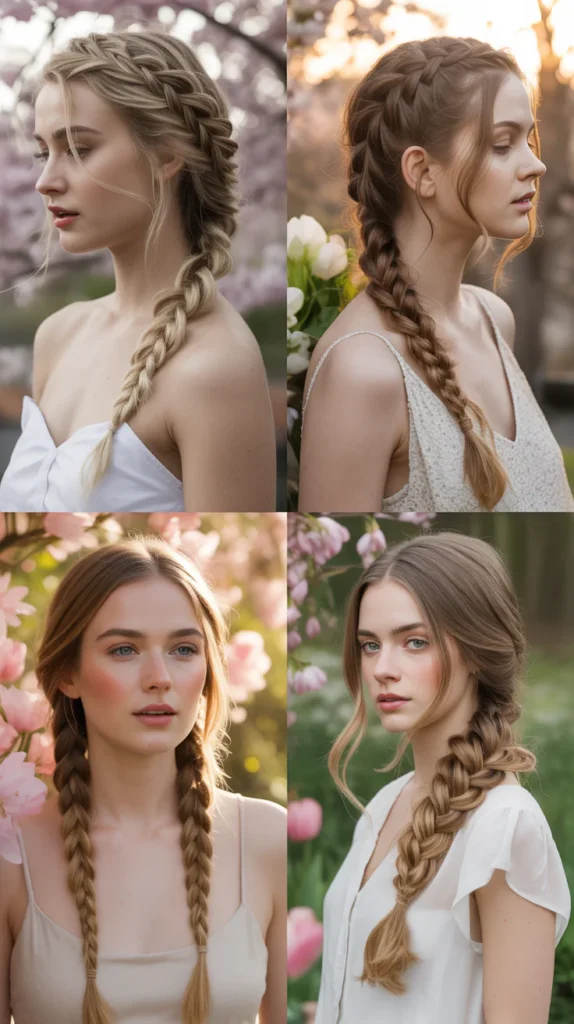
The Side Swept Braid is a dramatically romantic style where a long braid cascades over one shoulder, creating an elegant and flowing look.
This style photographs beautifully and is perfect for spring portraits, outdoor ceremonies, or casual days when you want to look effortlessly styled.
It can be created with a classic three-strand braid, fishtail, or Dutch braid for different effects.
- Begin by brushing all hair to one side — the left or right depending on your preferred part.
- Apply a volumizing mousse before braiding for extra body and grip in the style.
- Start the braid just behind the ear and work downward toward the shoulder.
- Braid all the way to the ends, securing with a small elastic or decorative hair tie.
- Gently pull the braid loops to widen and add dimension to the style.
- Curl the remaining loose ends below the braid for a soft, romantic finish.
- Tuck small spring blooms into the braid for a whimsical, ethereal aesthetic.
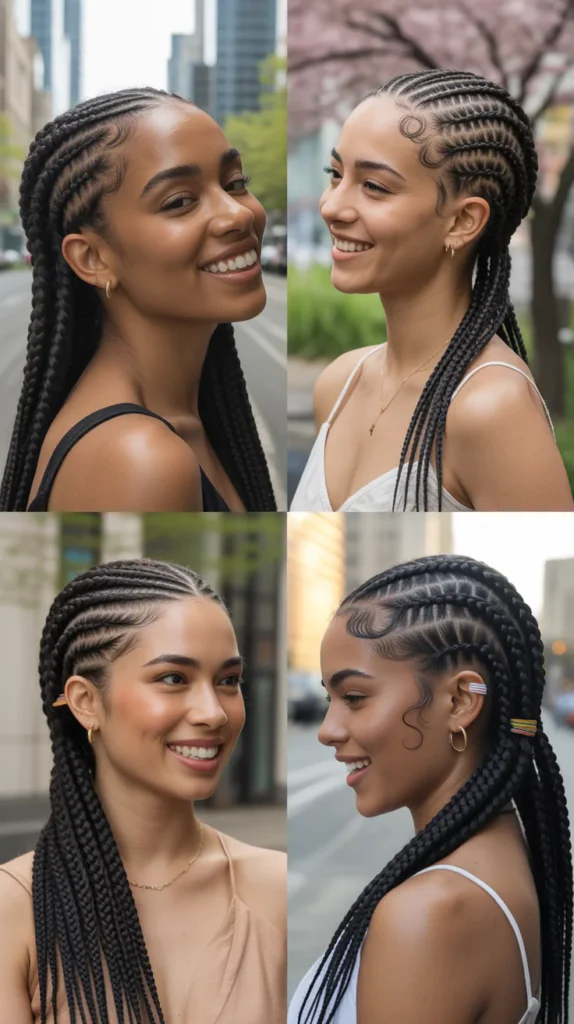
12. Lemonade Braids for Spring
Lemonade Braids — made iconic by Beyoncé — are a bold, side-swept cornrow style that radiates confidence and elegance.
For spring, opting for lighter colors, ombre extensions, or jeweled accessories transforms this signature look into a seasonally fresh masterpiece.
These braids are a powerful protective style that keeps hair healthy while making a major fashion statement.
- Part all the hair toward one side of the head, ensuring the parts are clean and even.
- Begin cornrowing in a uniform direction, all braids flowing toward the same side.
- Feed in extensions gradually for added length and thickness throughout each braid.
- Choose spring-inspired ombre extensions — think caramel to honey, or black to lavender.
- Add tiny rhinestones or metallic cuffs to select braids for extra spring glamour.
- Use edge control along the hairline and parting lines for a crisp, polished look.
- Wrap hair at night in a satin scarf to preserve the sleek finish and edge freshness.
13. Chunky Braid Ponytail
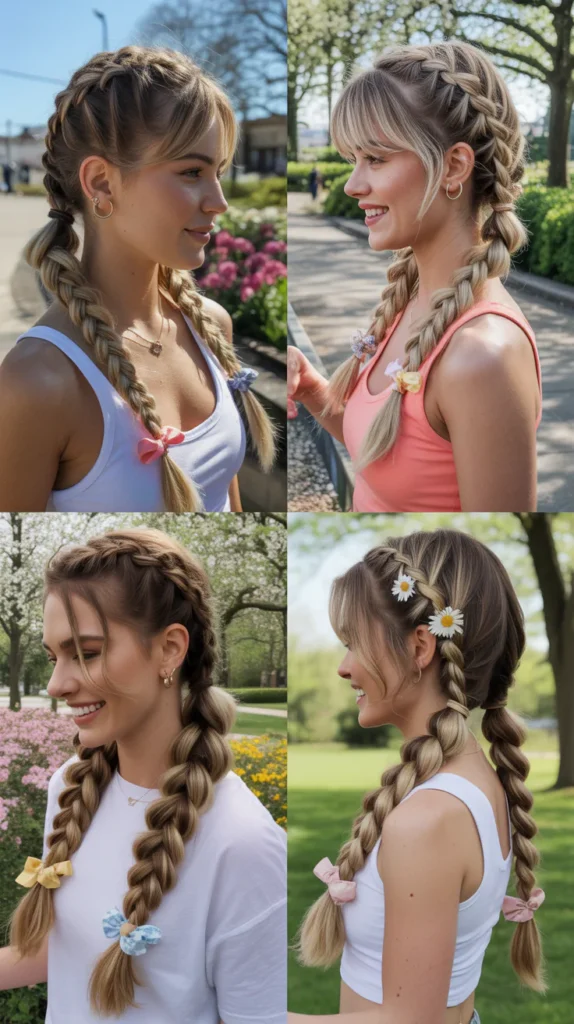
The Chunky Braid Ponytail combines the ease of a ponytail with the visual impact of a thick, bold braid for a look that’s both sporty and stylish.
This style works for everything from outdoor spring workouts to casual weekend errands with a polished flair.
The oversized scale of the braid makes it a true statement-maker.
- Gather all hair into a high or mid-level ponytail and secure with a strong elastic band.
- Divide the ponytail into three large, chunky sections rather than thin strands.
- Braid the three sections loosely and intentionally for a relaxed, oversized effect.
- Aggressively pull the braid loops outward to maximize the chunky, voluminous appearance.
- Wrap a small section of hair around the elastic at the base to give a clean, seamless finish.
- Add a large bow, scrunchie, or floral clip at the base for a playful spring accent.
- Spritz with a light texturizing spray to enhance the braid’s fullness and hold.
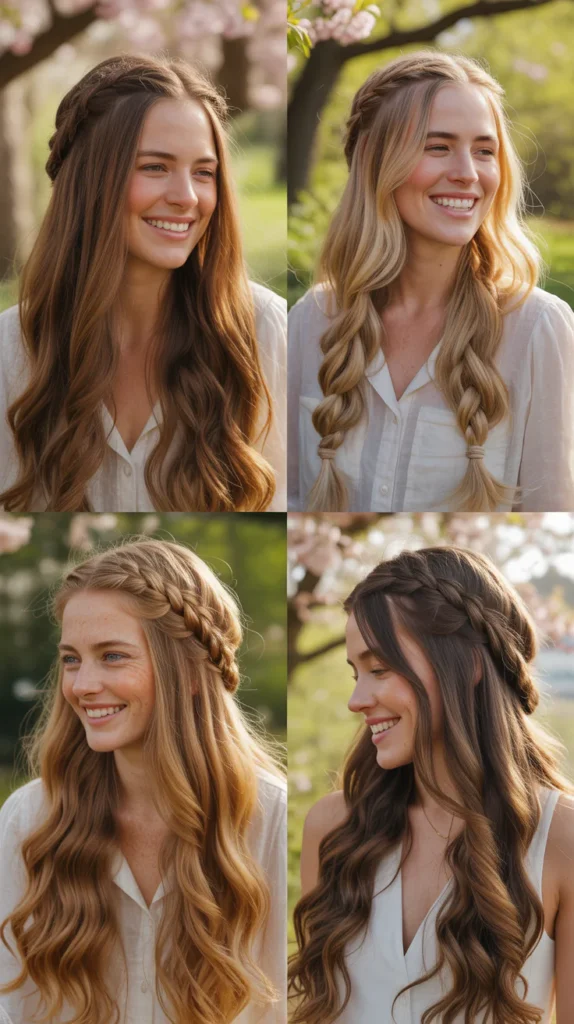
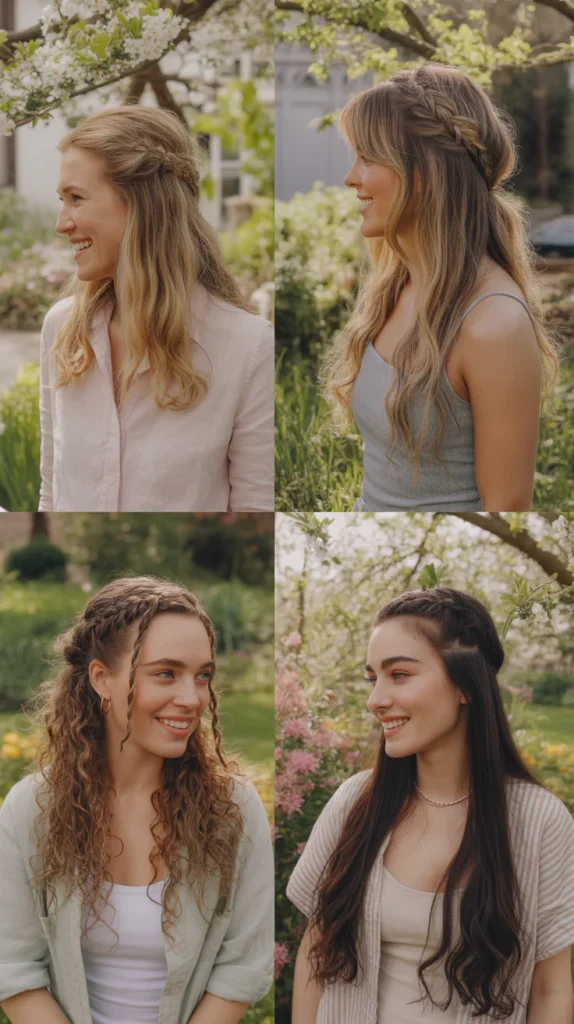
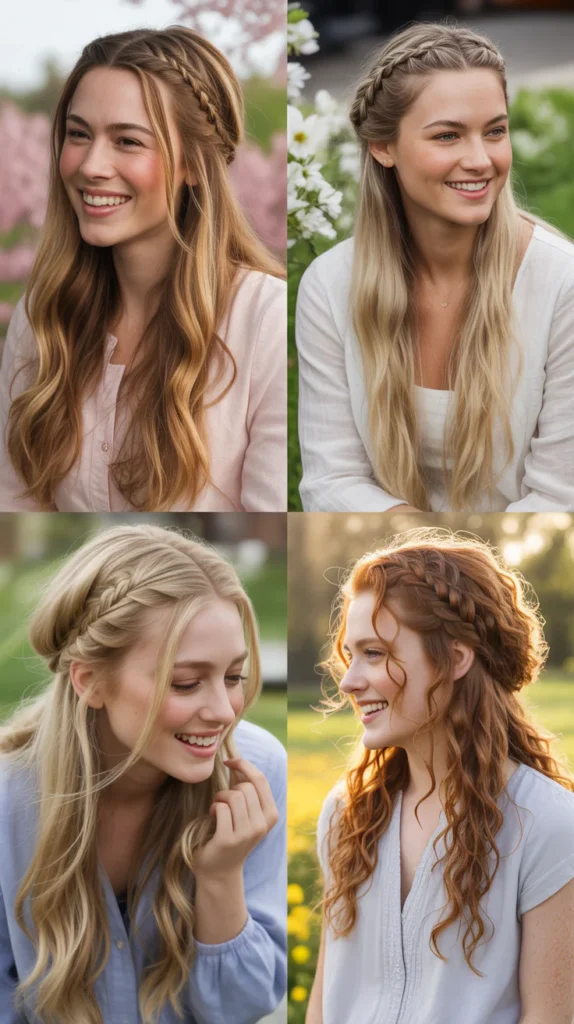
14. Braided Headband Style
The Braided Headband Style uses a thin braid running along the hairline to act as a built-in, natural headband — a perfect spring look that’s both practical and beautiful.
This style keeps hair off the face elegantly while adding delicate braid detail that enhances any natural texture worn down.
It’s incredibly versatile and can be done on nearly any hair length or type.
- Take a small section of hair from just behind one ear, approximately one inch wide.
- Braid this thin section in a simple three-strand or Dutch braid, keeping it tight and neat.
- Pull the braid across the top of the head, following the natural hairline.
- Secure the braid behind the opposite ear with bobby pins, hiding them underneath.
- Leave the rest of the hair down — curly, wavy, or straight — for a beautiful contrast.
- Repeat on the other side to create a double braided headband effect for extra impact.
- Add small spring flowers along the braid to elevate the look for special occasions.
15. Spring Goddess Braids
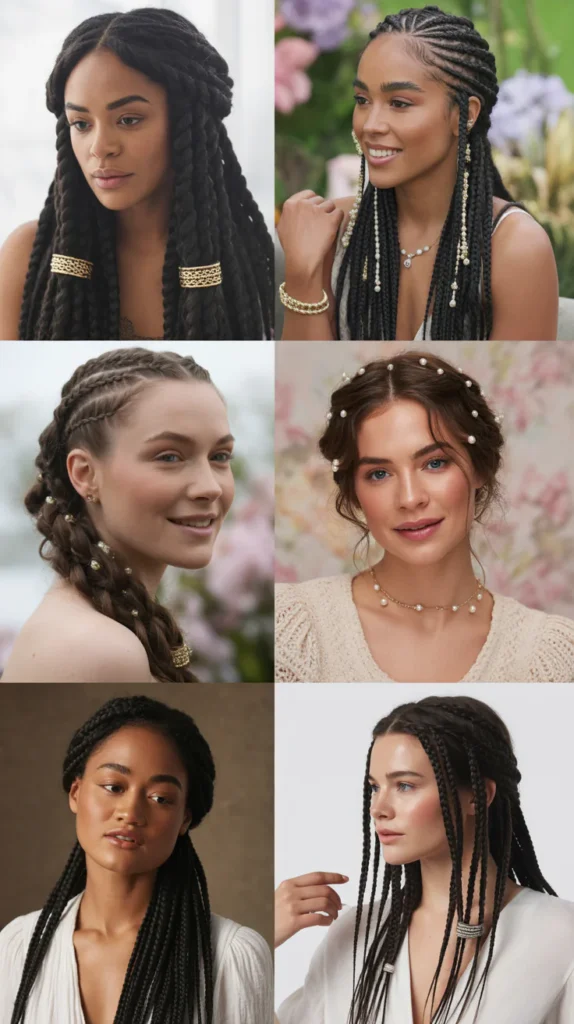
Spring Goddess Braids are large, bold, and sculptural cornrow-style braids that make a powerful and elegant statement.
Traditionally created with extensions for added size and length, these braids sit prominently on the scalp and can be styled in sweeping, flowing patterns.
For spring, styling them with metallic cuffs, pearls, or pastel beads gives the look a fresh, seasonal update.
- Part the scalp into wide, even sections, planning the desired pattern before beginning.
- Start cornrowing close to the scalp using large amounts of braiding hair added gradually.
- Work each braid in a flowing, purposeful direction — straight back, curved, or diagonal.
- Incorporate metallic hair cuffs, pearl strings, or spring-colored beads between braids.
- Wrap braid ends in a neat coil or leave them flowing long, depending on personal preference.
- Apply a scalp oil daily to keep the exposed scalp between braids nourished and healthy.
- Style the edges with a fine-toothed comb and edge control for a sharp, clean perimeter.
16. Peekaboo Braid
The Peekaboo Braid is a subtle and playful style where a hidden braid peeks out from underneath a layer of loose hair, revealing itself only when the hair moves.
This technique adds an element of surprise and sophistication to what initially appears to be a simple, flowing style.
It’s a wonderful conversation-starting look for spring brunches, classes, or casual evenings out.
- Part a thin, hidden section of hair from underneath the top layer, close to the nape.
- Braid this hidden section in your preferred style — French, Dutch, or simple three-strand.
- Leave the top layers of hair loose and flowing to conceal the braid beneath.
- As the hair moves naturally, the braid peeks through the top layer for a beautiful reveal.
- Add color to the hidden braid using colored extensions for an even more dramatic effect.
- Use a light oil on the loose layers to add shine and ensure a smooth, sleek concealment.
- This style works best on medium to long hair where the top layer can fully cover the braid.
17. Cornrow Spring Updo
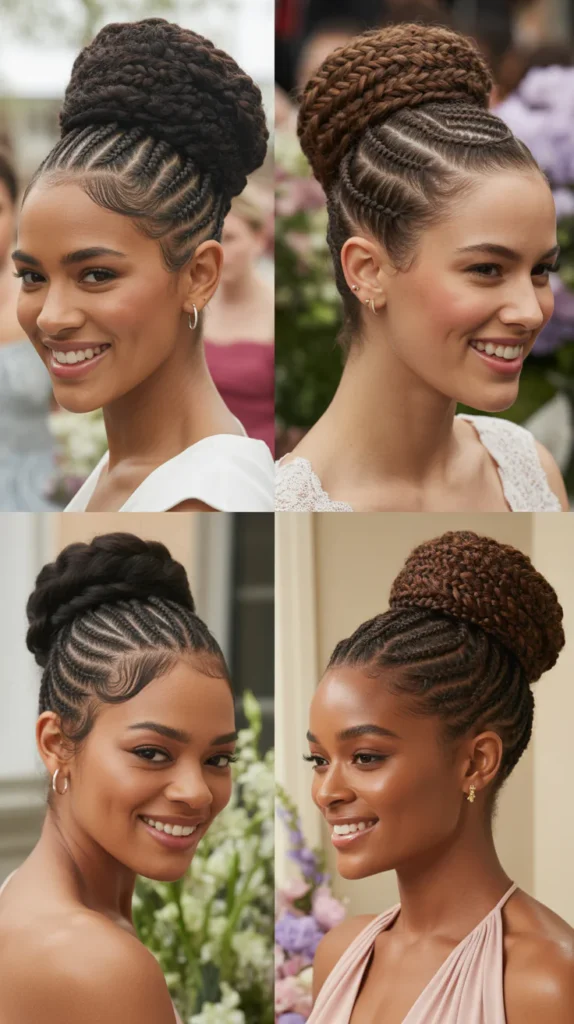
The Cornrow Spring Updo takes classic scalp braids and gathers them into a structured and stylish updo that’s sophisticated and protective.
This style is ideal for spring events where you want to keep your hair off your neck in the warming weather while still looking beautifully put together.
It’s a highly versatile style that can be sleek and formal or voluminous and creative.
- Part the scalp into defined sections, mapping out how all the cornrows will converge.
- Cornrow each section tightly toward the back or top of the head in your chosen direction.
- Gather the ends of all cornrows together at the crown or back of the head.
- Twist, loop, or fan the gathered ends into a flat bun, chignon, or circular blossom shape.
- Secure the updo shape with strong bobby pins and a small elastic if needed.
- Adorn the updo with gold pins, butterfly clips, or spring flower picks for a finishing touch.
- Apply a light-hold gel to the edges for a clean, polished hairline that completes the look.
18. Bubble Braid
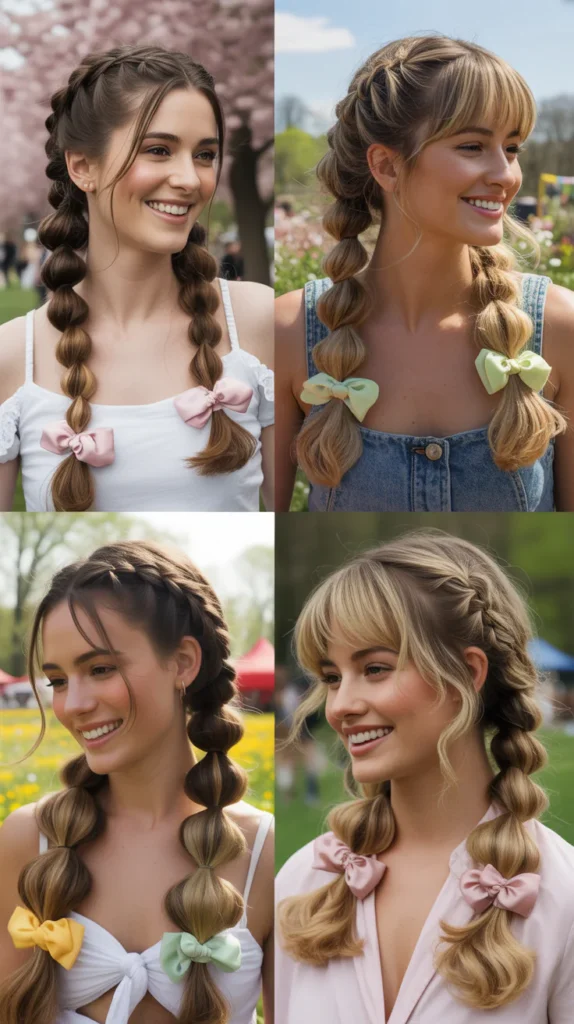
The Bubble Braid is one of the most fun and trending spring hairstyles, creating a series of puffy, rounded sections along the length of the hair that resemble floating bubbles.
Despite looking complex, this style is actually beginner-friendly and can be achieved in minutes.
It’s a fresh, youthful look that’s perfect for outdoor spring activities and festivals.
- Pull all hair into a high ponytail, or leave it loose if you prefer a half-up version.
- Tie a small elastic band a few inches below the base to create the first “bubble.”
- Gently pull the hair between the two elastics outward to puff it into a rounded bubble shape.
- Continue adding elastic bands every 2–3 inches, puffing out each section as you go.
- The more you puff out each bubble, the fuller and more dramatic the final result will be.
- Wrap a thin piece of hair around each elastic to hide the bands for a cleaner finish.
- Decorate with small spring floral pins or colorful elastics to enhance the playful vibe.
19. Spring Braided Updo With Loose Curls
The Spring Braided Updo With Loose Curls merges structured braiding with romantic, free-flowing curls for a look that’s part polished, part whimsical.
This style is especially stunning for spring weddings, engagement shoots, and garden parties.
The contrast between tight braids and soft, flowing curls creates a visually captivating texture throughout the style.
- Begin by curling all the hair loosely with a 1.5-inch curling wand for a soft, romantic base.
- Take sections from around the crown and create small, flat braids pulling back toward the center.
- Pin these braids into place at the back of the head, crossing them over each other neatly.
- Allow the remaining curled hair to cascade freely below the pinned braids.
- Add more braided detail throughout the updo to create visual depth and layering.
- Secure the overall shape with strong bobby pins hidden within the curls for invisibility.
- Spritz with a flexible hold hairspray to keep curls bouncy and braids crisp all day.
20. Rope Braid
The Rope Braid is a gorgeous spring style that creates the appearance of a twisted rope through a simple two-strand twisting technique.
It’s sleek, minimalist, and incredibly elegant — perfect for those who want a refined spring look without spending hours in front of the mirror.
This style suits all hair textures and lengths, making it a truly universal choice.
- Divide the hair into two equal sections from the base of the ponytail or from the nape.
- Twist each of the two sections individually in the same clockwise direction.
- Wrap the two twisted sections around each other in the opposite, counterclockwise direction.
- Continue twisting and wrapping all the way down to the ends, keeping tension consistent.
- The opposing twist directions are what create the classic rope-like appearance of this braid.
- Secure the end with a small elastic and gently loosen the twist for extra volume if desired.
- Run a small amount of shine serum over the finished rope braid for a smooth, glossy look.
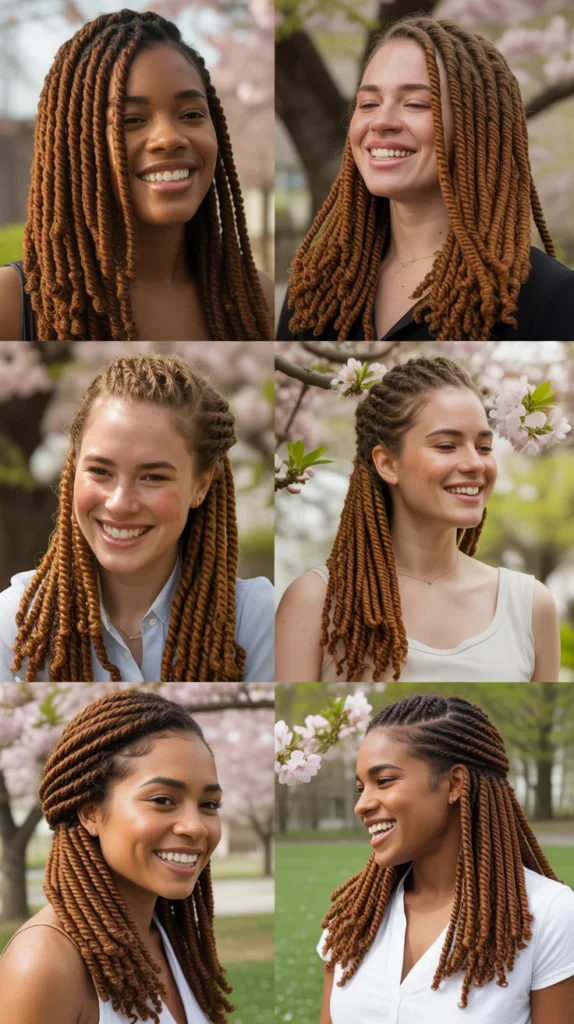
21. Passion Twists for Spring
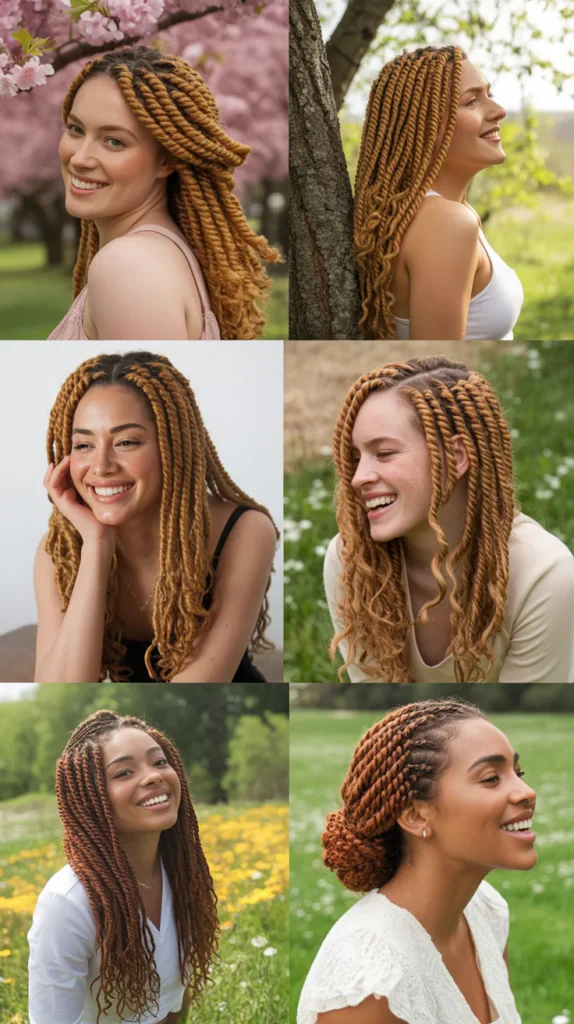
Passion Twists are a beautiful and trendy protective style that combines the look of twists with the texture of curly braiding hair for a naturally gorgeous, free-spirited result.
For spring, opting for light brown, honey blonde, or burgundy extensions adds warmth and seasonal vibrancy to the look.
These twists are lightweight, low-maintenance, and strikingly beautiful.
- Wash and thoroughly moisturize natural hair before installing passion twists.
- Section the hair into small, even squares using a rat-tail comb for neat, uniform twists.
- Attach curly water wave braiding hair to each section using the loop method.
- Twist the natural hair and extension hair together, wrapping in a consistent direction.
- Dip the ends into hot water to seal and prevent the curly hair from unraveling.
- Maintain moisture with a daily spritzing of water and a light leave-in conditioner spray.
- Style into a high puff, half-up style, or let them hang freely for different spring looks.
22. Stitch Braids
Stitch Braids are a modern and geometric take on cornrows, featuring clean horizontal feed-in lines stitched across the braid at regular intervals, creating a striking graphic effect on the scalp.
This style is incredibly precise and artistic, making it a standout protective spring hairstyle.
The clean lines and scalp designs make stitch braids both a hair and art statement.
- Create very clean, straight horizontal parts across the scalp using a fine-tooth comb.
- Begin each cornrow at the hairline, feeding in braiding hair gradually for fullness.
- The horizontal parting lines crossing the braids create the signature “stitch” effect.
- Work carefully to keep each braid the same tightness and thickness for visual consistency.
- Choose to add color only to the stitched-in sections for a striking two-tone contrast look.
- Apply edge control to the hairline and along each parting for ultra-clean, sharp lines.
- This style can last 4–6 weeks with proper nightly wrapping and scalp care.
23. Braid and Bun Combo
The Braid and Bun Combo is an incredibly versatile spring style that pairs one or two braids with a neat or messy bun for a look that transitions from gym to garden party effortlessly.
The braids add detail and visual interest to what might otherwise be a simple bun, making this style feel intentional and put-together.
You can customize the placement, braid type, and bun size to suit your personal taste.
- Begin by separating a section of hair at the front or crown to use specifically for braiding.
- Braid this section in your preferred style — French, Dutch, or fishtail all work wonderfully.
- Gather the rest of the hair along with the braid into your desired bun position.
- Twist and coil the gathered hair into a neat or intentionally messy bun shape.
- Secure with a strong elastic and reinforce with bobby pins to prevent slipping.
- Pull a few soft pieces loose around the face to soften the overall silhouette.
- Add a scrunchie, bow, or floral clip at the bun for a spring-perfect finishing touch.
24. Spring Senegalese Twists
Senegalese Twists are a stunning protective style where smooth, silky braiding hair is twisted tightly alongside natural hair to create a sleek, rope-like effect.
For spring, choosing light-catching colors like caramel brown, auburn, and warm copper adds dimension and a sun-kissed seasonal glow to the look.
These twists are long-lasting, incredibly versatile, and deeply protective for natural hair.
- Wash, deep condition, and thoroughly detangle natural hair before installation begins.
- Part the hair into small, even sections using a rat-tail comb for uniform twist sizing.
- Fold the Senegalese twist hair in half and attach it to the natural hair at the root.
- Twist the extension hair and natural hair downward tightly in a uniform direction.
- Keep twists consistent in thickness by using the same amount of hair for each section.
- Seal the ends by dipping them briefly in warm water or applying a small amount of mousse.
- Explore Senegalese twist styling ideas for updos, ponytails, and more.
25. Braided Space Buns
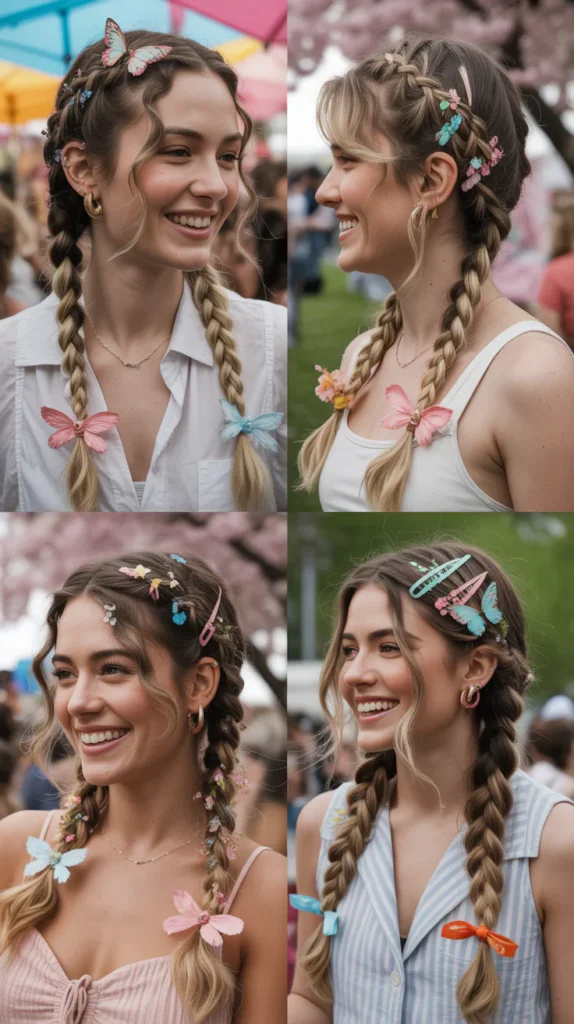
Braided Space Buns are a youthful, playful, and undeniably fun spring style that takes the popular space bun trend and adds braided detail for extra personality.
This style works for music festivals, spring picnics, themed events, or any occasion where you want to embrace a fun, carefree aesthetic.
Adding color or accessories makes this look even more whimsical and creative.
- Part the hair straight down the center from forehead to nape to create two equal sections.
- Braid each section from the root, working down in your preferred braiding style.
- Once braided, coil each braid into a bun shape and secure with bobby pins and a hair tie.
- Leave the space buns sitting high on the head, one on each side above the ears.
- Allow a few face-framing wisps to hang loose at the front for a cute, casual effect.
- Decorate each bun with butterfly clips, mini floral pins, or colorful ribbons for spring flair.
- Seal with a medium-hold spray to keep the buns perky and the braids smooth all day.
26. Micro Braids With Spring Color Highlights
Micro Braids are incredibly fine, thin braids that create a stunning full head of delicate, movement-rich texture.
Adding spring-colored highlights — woven in through strategic placement of colored extensions — gives this detailed style a bold, seasonal personality.
While time-intensive to install, micro braids are a breathtaking protective option that can last for weeks.
- Part the scalp into very tiny, uniform sections using a fine-tooth rat-tail comb.
- Attach very thin strands of extension hair to each section at the root.
- Braid each section tightly and finely all the way from the root to the very ends.
- Weave in spring highlight colors — lavender, rose gold, mint — throughout select braids.
- The overall effect should look like a richly textured, naturally dimensional head of hair.
- Be mindful that micro braids can take 8–12 hours to complete, often requiring a professional.
- Condition the hair bi-weekly and moisturize daily to keep natural hair healthy underneath.
27. Jumbo Spring Braids With Ombre Color
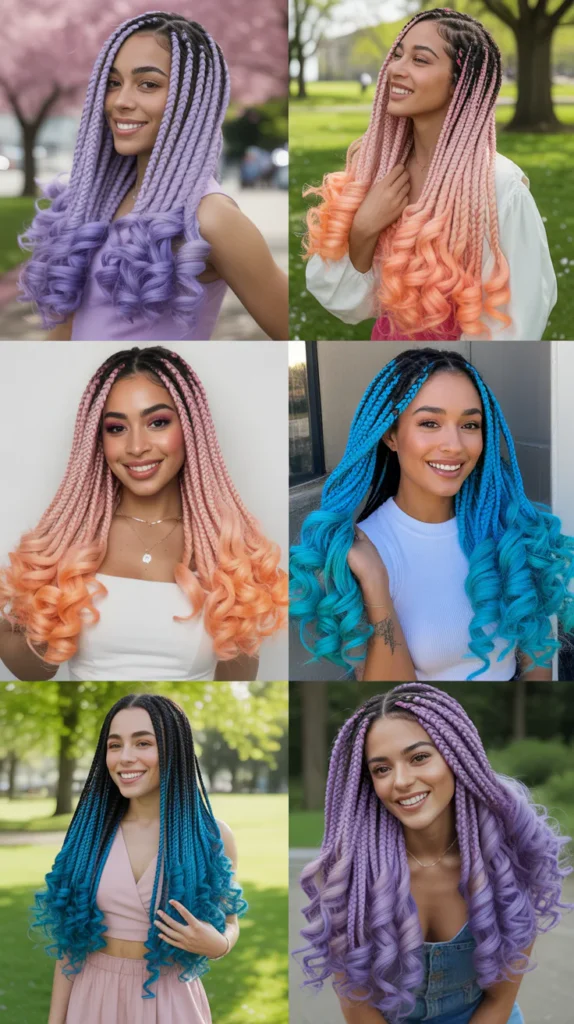
Jumbo Spring Braids with Ombre Color close out our list with the boldest and most head-turning style of all.
Large, oversized braids in a stunning spring ombre — think dark roots melting into peach, lilac, honey, or turquoise tips — make an unforgettable style statement.
This is the ultimate choice for anyone who wants maximum visual impact with a minimum of daily styling effort.
- Select a spring ombre braiding hair in your preferred color gradient before beginning.
- Part the scalp into large, wide sections — fewer sections means larger, chunkier braids.
- Attach the ombre braiding hair at the root using either the feed-in or knot method.
- Braid each section all the way to the end, letting the color gradient emerge beautifully.
- Hot-water dip the ends if using synthetic hair to seal and prevent fraying or unraveling.
- Style into different spring looks — high ponytail, half-up bun, or flowing free for versatility.
- Refresh the ombre with a light shine spray weekly to keep the color looking vivid and vibrant.
| Ombre Combination | Best Spring Occasion |
|---|---|
| Black to Lavender | Spring concerts & festivals |
| Brown to Peach | Outdoor brunch & casual outings |
| Dark Brown to Honey | Everyday wear & work events |
| Black to Turquoise | Beach days & tropical vibes |
| Auburn to Rose Gold | Weddings & garden parties |
Conclusion
From delicate floral French braids to bold ombre jumbo styles, 27 Gorgeous Spring Braid Hairstyles to Try has given you a complete seasonal hair wardrobe to draw from all spring long.
Whether you lean toward protective styles, romantic updos, or playful everyday looks, there is truly something in this collection for every hair type, texture, and personality.
Spring is your invitation to experiment, be bold, and express yourself through your hair. Try one style this week, bookmark the rest, and make this your most beautiful, braid-filled spring yet.