Prom night is one of the most memorable events in a young woman’s life, and choosing the perfect hairstyle can make all the difference in creating a stunning, unforgettable look.
If you have medium-length hair, you’re in the perfect position to explore a wide range of elegant and sophisticated hairstyles that combine versatility with timeless beauty.
This comprehensive guide to 27 Classy and Timeless Prom Hairstyles for Medium-Length Hair will walk you through classic updos, romantic waves, intricate braids, modern twists, and glamorous Hollywood-inspired styles that suit every dress style and personal preference.
Whether you’re drawn to vintage elegance, bohemian charm, or contemporary sophistication, you’ll discover detailed styling techniques, practical tips, and expert advice to help you achieve a flawless prom look.
From soft curls that frame your face to sleek chignons that exude refinement, each hairstyle has been carefully selected to enhance your natural beauty while ensuring your hair stays picture-perfect throughout the night.
Get ready to explore styling methods, accessory recommendations, and maintenance tips that will empower you to make a confident choice for your special evening.
In This Post......
- 1. Classic Hollywood Waves
- 2. Romantic Low Bun with Face-Framing Pieces
- 3. Half-Up Crown Braid
- 4. Sleek Low Ponytail with Wrap
- 5. Textured Side Braid
- 6. Vintage Pin Curls Updo
- 7. Twisted Half-Updo
- 8. Braided Low Chignon
- 9. Waterfall Braid with Curls
- 10. Sleek Side Part with Vintage Waves
- 11. Bubble Ponytail
- 12. French Twist with Modern Texture
- 13. Floral Crown with Loose Waves
- 14. Asymmetrical Updo
- 15. Rope Braid Crown
- 16. Vintage Barrel Curls
- 17. Braided Headband with Low Bun
- 18. Side-Swept Finger Waves
- 19. Messy Top Knot with Tendrils
- 20. Double Dutch Braids into Low Bun
- 21. Soft Romantic Updo with Accessories
- 22. Slicked-Back Low Ponytail with Volume
- 23. Bohemian Twisted Crown
- 24. Elegant Chignon with Side Part
- 25. Curly Half-Up with Pearl Accessories
- 26. Twisted Low Side Ponytail
- 27. Vintage Victory Rolls with Modern Twist
- Essential Styling Tools and Products
- Professional Tips for Long-Lasting Prom Hair
- Choosing the Right Hairstyle for Your Dress and Face Shape
- Color and Accessory Coordination
- Hair Health Considerations Before Prom
- Frequently Asked Questions About Prom Hairstyles
- Conclusion
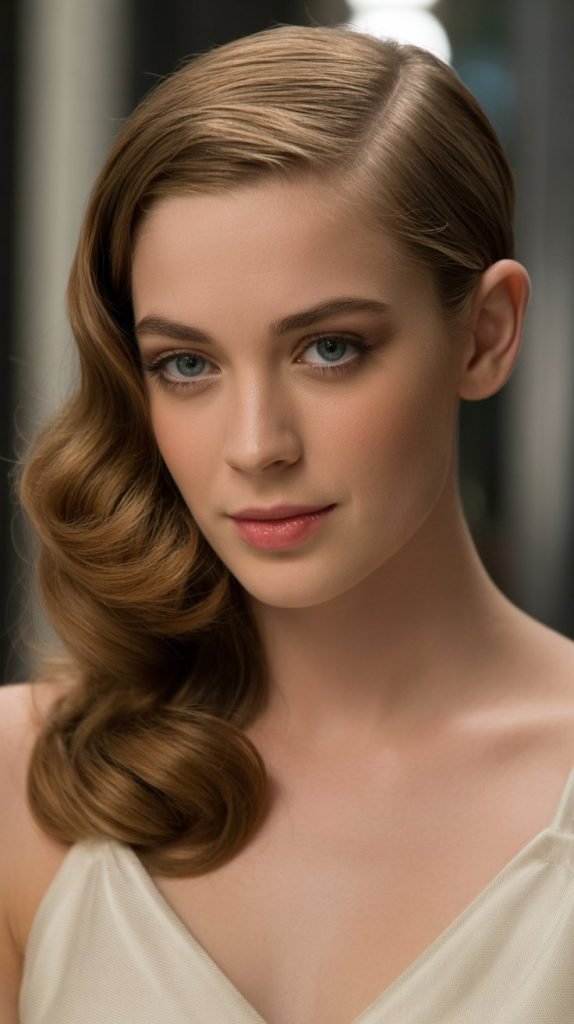
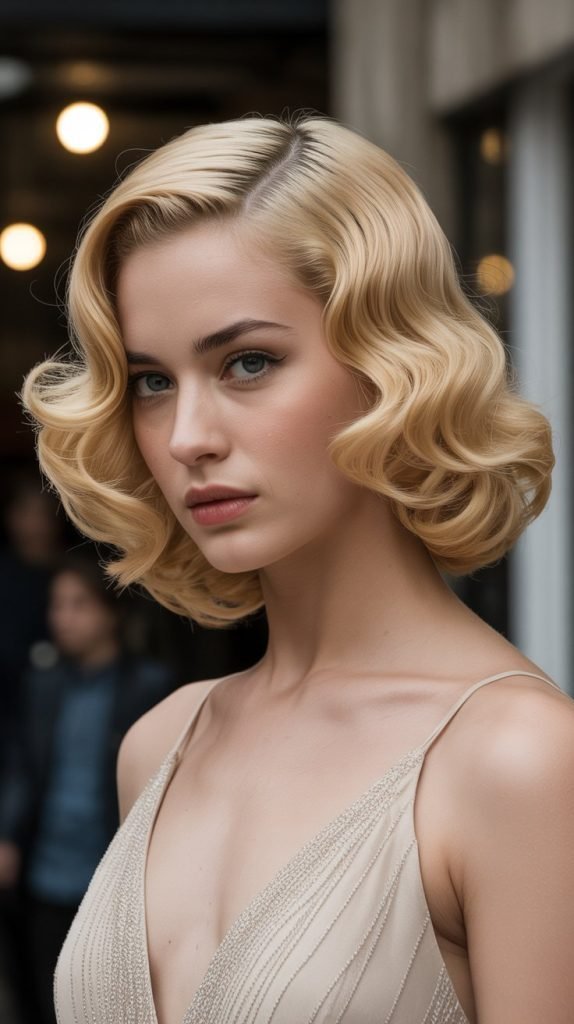
1. Classic Hollywood Waves

The classic Hollywood waves remain one of the most timeless and sophisticated hairstyles for prom, offering a vintage glamour that never goes out of style. This iconic look creates deep, structured S-shaped waves that cascade beautifully on medium-length hair, providing an air of old-world elegance and refinement.
Styling Technique:
- Start with clean, damp hair and apply a heat protectant spray evenly throughout.
- Use a large-barrel curling iron (1.5 to 2 inches) to create uniform curls, working in sections from root to tip.
- Allow the curls to cool completely while pinned against your head with metal clips to set the wave pattern.
- Once cooled, gently brush through the curls with a paddle brush to create smooth, connected waves.
- Apply a lightweight styling gel or mousse to define the S-curve pattern.
- Use your fingers or a wide-tooth comb to shape the waves and create the signature deep curves.
- Finish with a strong-hold hairspray to maintain the structure throughout the evening.
Best For:
- Formal gowns with vintage or Art Deco-inspired designs
- Those who prefer a sophisticated, red-carpet worthy appearance
- Hair types that hold curl well and have some natural body
Maintenance Tips:
- Carry a small travel-size hairspray for touch-ups during the night
- Avoid touching or running fingers through the waves to prevent frizz
- Use a silk or satin scarf when traveling to the venue to protect the style
2. Romantic Low Bun with Face-Framing Pieces
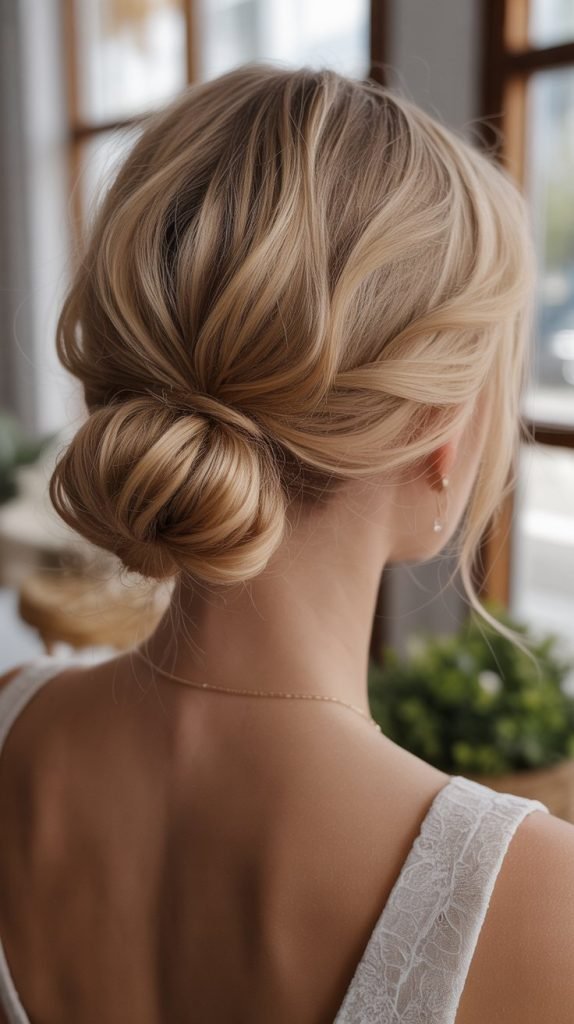
A romantic low bun combines elegance with effortless beauty, creating a soft, feminine look that works beautifully for prom night. This versatile style features a loosely gathered bun positioned at the nape of the neck, with strategically placed wispy strands that gently frame the face.
Styling Technique:
- Begin by curling random sections of hair with a curling wand to add texture and volume.
- Leave out two small sections at the front on each side to serve as face-framing pieces.
- Gather the remaining hair into a low ponytail at the nape, securing with an elastic band.
- Gently tease the ponytail to create volume and a fuller appearance.
- Twist the ponytail loosely and wrap it around the base to form a bun.
- Secure the bun with bobby pins, intentionally leaving some pieces loose for a romantic, undone effect.
- Gently pull at sections of the bun to create a softer, more voluminous appearance.
- Curl the face-framing pieces with a small curling iron and allow them to fall naturally.
- Set the style with a flexible-hold hairspray that allows movement.
Accessory Suggestions:
- Pearl-studded hairpins placed strategically around the bun
- A delicate floral hair comb positioned at the side of the bun
- Thin metallic headbands for added sparkle
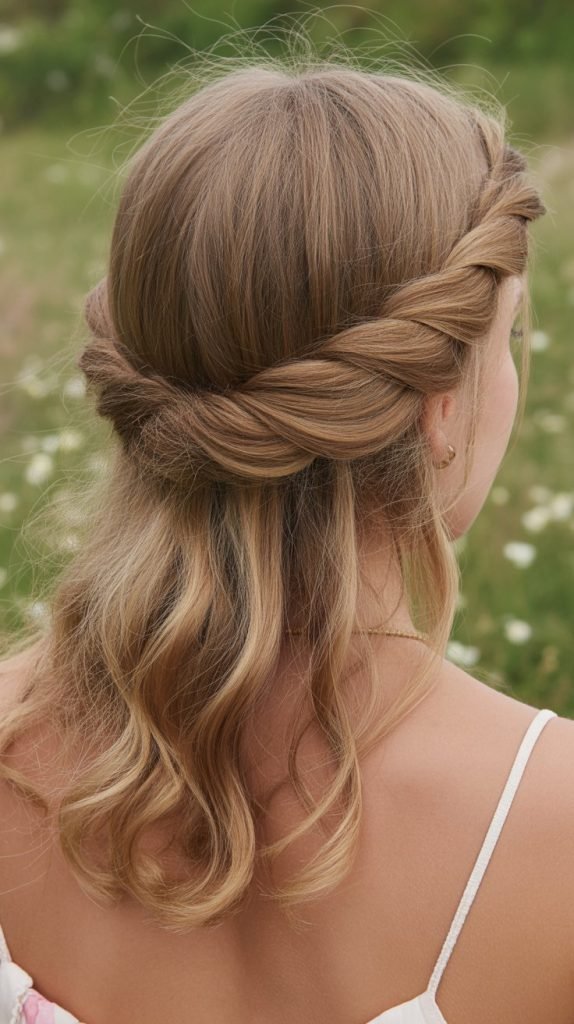
3. Half-Up Crown Braid
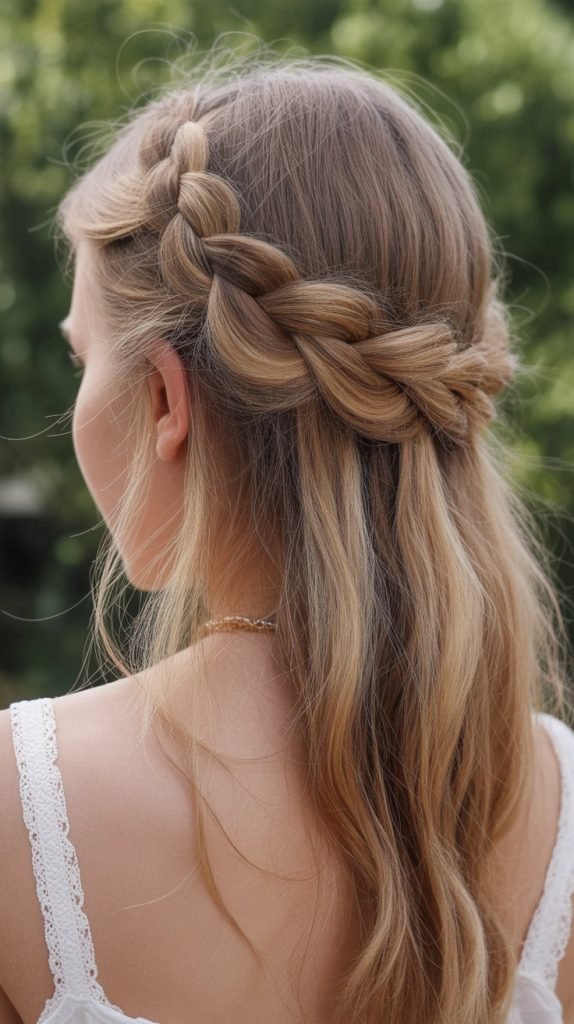
The half-up crown braid offers a beautiful balance between structured elegance and flowing romance, making it an ideal choice for prom. This hairstyle features an intricate braid that wraps around the crown of the head like a tiara, while the remaining hair flows freely below.
Styling Technique:
- Start with second-day hair or apply dry shampoo to add texture and grip.
- Create a deep side part or middle part depending on preference.
- Begin a Dutch braid (reverse French braid) starting from one side near the temple.
- Braid along the hairline toward the opposite side, keeping the braid close to the head.
- Continue braiding until you reach the other temple area.
- Secure the end with a small clear elastic band.
- Gently pull at the edges of the braid to create a fuller, more voluminous appearance.
- Use bobby pins to secure the braid firmly against the head if needed.
- Curl the loose hair below with a curling iron for added dimension.
- Apply a light finishing spray to tame flyaways while maintaining texture.
Styling Variations:
- Incorporate small flowers or greenery into the braid for a garden party aesthetic
- Add thin ribbons woven through the braid for a whimsical touch
- Create a fishtail braid instead of a Dutch braid for a different texture
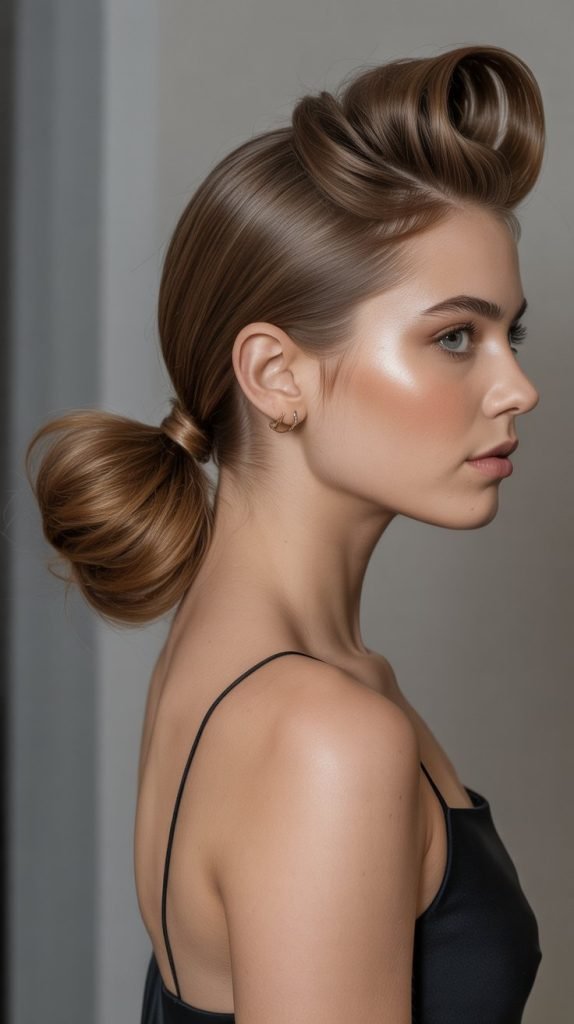
4. Sleek Low Ponytail with Wrap

The sleek low ponytail with wrap is a modern, minimalist hairstyle that exudes sophistication and contemporary elegance. This streamlined look features perfectly smooth hair gathered at the nape with a section of hair wrapped around the elastic for a polished, seamless finish.
Styling Technique:
- Wash and blow-dry hair using a paddle brush to achieve maximum smoothness.
- Apply a smoothing serum or cream to damp hair before blow-drying.
- Once dry, use a flat iron to straighten hair completely, working in small sections.
- Apply a shine-enhancing product to add gloss and reduce frizz.
- Gather all hair into a low ponytail at the nape of the neck.
- Secure with a strong elastic band that matches your hair color.
- Take a small section from the underside of the ponytail and wrap it around the elastic.
- Secure the wrapped section with a bobby pin hidden underneath.
- Use a fine-tooth comb to smooth any bumps or flyaways.
- Finish with a high-shine hairspray for a lacquered, polished appearance.
Best For:
- Sleek, modern gowns with clean lines
- Those who want to showcase statement earrings or a dramatic necklace
- Naturally straight or easily straightened hair types
5. Textured Side Braid

A textured side braid brings bohemian charm and relaxed elegance to prom night, offering a hairstyle that feels both effortless and intentional. This style features a full, voluminous braid pulled to one side with deliberately loosened sections that create a soft, romantic appearance.
Styling Technique:
- Prep hair with a volumizing mousse and blow-dry with your head flipped upside down.
- Create loose waves throughout using a curling wand for added texture.
- Sweep all hair to one side over your shoulder.
- Begin creating a fishtail braid or traditional three-strand braid starting near the ear.
- Braid loosely to maintain volume and texture throughout.
- Secure the end with a clear or decorative elastic band.
- Gently pull apart sections of the braid to create width and a fuller appearance.
- Pull out small face-framing pieces at the front for softness.
- Apply a texturizing spray to enhance the undone, lived-in look.
- Use bobby pins to secure the top portion if needed for stability.
Styling Tips:
- Leave the braid intentionally imperfect for a more romantic aesthetic
- Incorporate subtle highlights to add dimension to the braid
- Add small decorative pins or crystals throughout the braid
6. Vintage Pin Curls Updo
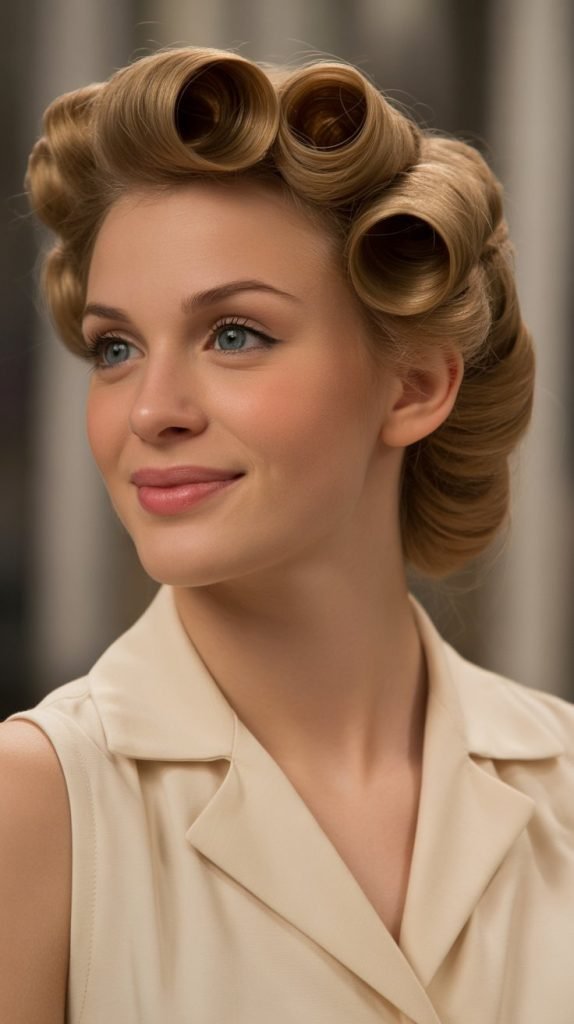
Vintage pin curls create a distinctive retro-inspired updo that pays homage to the glamorous styling of the 1940s and 1950s. This sophisticated hairstyle features individual curls that are strategically pinned and arranged close to the head, creating a sculptural, artistic appearance.
Styling Technique:
- Start with damp or slightly wet hair for best curl formation.
- Apply a strong-hold setting lotion throughout the hair.
- Divide hair into small sections, approximately one to two inches wide.
- Wrap each section around two fingers to form a flat curl circle.
- Slide the curl off your fingers and pin it flat against the head with a bobby pin or curl clip.
- Continue this process throughout the entire head, working in rows from front to back.
- Allow curls to dry completely (use a hooded dryer or allow to air-dry for several hours).
- Once fully dry, carefully remove all pins and clips.
- Gently arrange the curls with your fingers without brushing them out.
- Use bobby pins to secure curls in place and create your desired pattern.
- Apply a firm-hold hairspray to set the style.
Historical Context:
- This style was popularized during the Golden Age of Hollywood
- Often seen on icons like Rita Hayworth and Lauren Bacall
- Represents classic elegance and meticulous attention to detail
7. Twisted Half-Updo

The twisted half-updo offers a perfect combination of secured styling and free-flowing beauty, creating an elegant look that’s both practical and romantic. This hairstyle features twisted sections from each side of the head that meet at the back, while the remaining hair cascades in loose curls.
Styling Technique:
- Begin by curling all of your hair with a medium-barrel curling iron.
- Create a deep or side part according to your preference.
- Take a two-inch section of hair from one side near the temple.
- Divide this section into two parts and twist them around each other, adding small amounts of hair as you work backward.
- Secure the twist temporarily with a clip when you reach the crown area.
- Repeat the same twisting process on the opposite side.
- Bring both twists together at the back and secure them with bobby pins or a decorative clip.
- Allow the secured twists to drape naturally over the pins for a softer appearance.
- Leave the bottom half of hair flowing freely in loose curls.
- Apply a light-hold hairspray to maintain the twists without stiffness.
Advantages:
- Keeps hair away from face while dancing
- Showcases both styling effort and natural hair texture
- Works well with various dress necklines
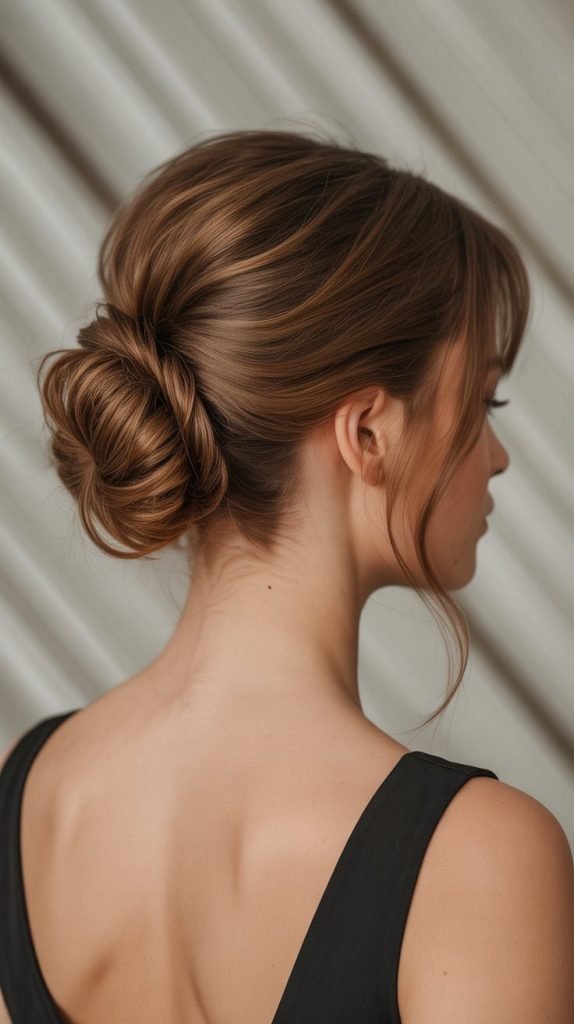
8. Braided Low Chignon

A braided low chignon combines the intricate detail of braiding with the classic elegance of a traditional chignon, resulting in a sophisticated updo perfect for formal occasions. This hairstyle showcases your styling skills while creating a polished, refined appearance.
Styling Technique:
- Part hair down the middle or create a deep side part.
- Divide hair into three equal sections: left, right, and back.
- Create a standard three-strand braid with each section.
- Secure each braid temporarily with a small elastic band.
- Take all three braids and gather them together at the nape of the neck.
- Twist the braids together loosely or arrange them in a circular pattern.
- Tuck the ends under and secure with multiple bobby pins.
- Gently pull at the braids to create a fuller, more voluminous appearance.
- Ensure all elastic bands are hidden within the chignon.
- Use a firm-hold hairspray to secure flyaways and maintain structure.
Customization Options:
- Vary the type of braids used (fishtail, Dutch, rope) for different textures
- Incorporate a decorative hairpin or comb at the base
- Leave a few strategic tendrils loose around the face
9. Waterfall Braid with Curls

The waterfall braid creates a cascading effect that appears both intricate and ethereal, making it a stunning choice for prom. This hairstyle features a unique braiding technique where strands are dropped through the braid, creating a “waterfall” effect that beautifully integrates with curled hair.
Styling Technique:
- Curl all of your hair first to create a base of voluminous waves.
- Create a deep side part for optimal visual impact.
- Begin near the temple on the heavier side of the part.
- Start with three strands as you would for a regular braid.
- As you braid toward the back, drop the bottom strand and pick up a new strand from above.
- Continue this pattern, allowing dropped strands to fall naturally through the braid.
- Work the waterfall braid around the head toward the opposite ear.
- Secure the end with a small clear elastic or bobby pins.
- The dropped strands should blend seamlessly with the curled hair below.
- Gently touch up any curls that may have lost definition during braiding.
- Apply a flexible-hold hairspray to maintain the braid without stiffness.
Skill Level: Intermediate to advanced Time Required: 30-45 minutes
10. Sleek Side Part with Vintage Waves
A sleek side part with vintage waves combines Old Hollywood glamour with modern sophistication, creating a dramatically elegant hairstyle. This look features a pronounced side part with perfectly formed waves on one side and a smoothly tucked appearance on the other.
Styling Technique:
- Create a deep side part, positioning it approximately two inches from your natural part.
- Apply heat protectant and smoothing serum to damp hair.
- Blow-dry hair smooth, directing all hair toward the heavier side.
- Use a large-barrel curling iron to create uniform curls on the heavier side.
- Allow curls to cool while pinned with sectioning clips.
- On the lighter side, slick hair back behind the ear using gel or pomade.
- Secure the tucked side with bobby pins positioned behind the ear.
- Brush out the curls on the heavier side to form connected waves.
- Use your fingers to shape distinctive S-curves in the waves.
- Apply a strong-hold hairspray with shine to set the style.
- Consider adding a decorative pin or clip at the tucked side for embellishment.
Maintenance:
- The tucked side may need periodic smoothing throughout the evening
- Avoid excessive head movement that might disrupt the wave pattern
11. Bubble Ponytail
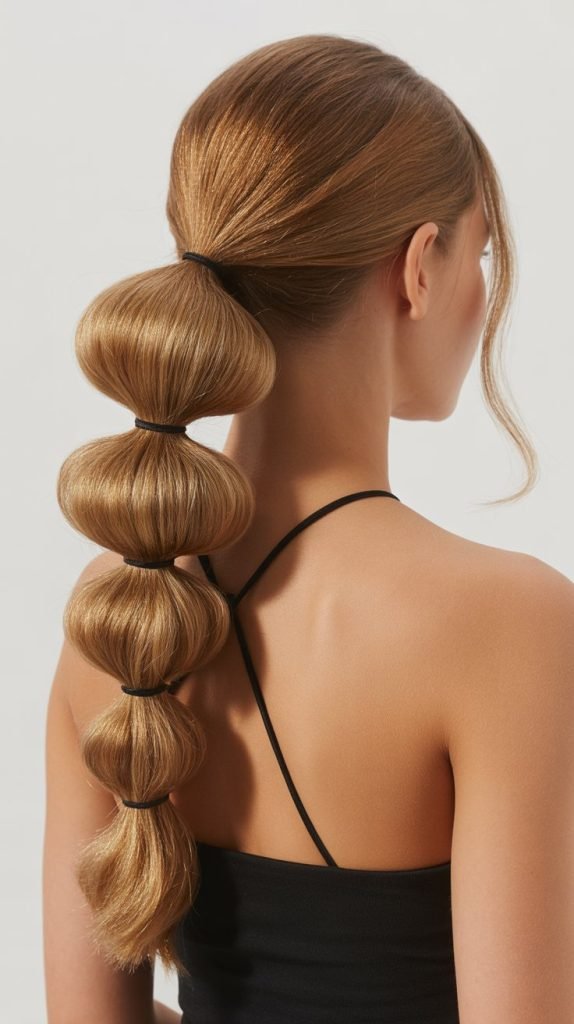
The bubble ponytail is a contemporary hairstyle that adds playful sophistication to traditional ponytail styling. This trendy look features a series of evenly spaced elastic bands that create rounded “bubbles” throughout the length of the ponytail, resulting in a voluminous, dimensional appearance.
Styling Technique:
- Begin by creating volume at the roots with backcombing or volumizing powder.
- Gather hair into a ponytail at your desired height (high, mid, or low).
- Secure the base with a strong elastic band.
- Measure approximately 2-3 inches down from the base and add another elastic band.
- Gently pull and tease the hair between the two bands to create the bubble effect.
- Continue adding elastic bands at even intervals down the length of the ponytail.
- Create bubbles between each set of bands by carefully pulling the hair outward.
- Ensure all bubbles are uniform in size and shape.
- Wrap a small section of hair around the base elastic to conceal it.
- Apply a light hairspray to maintain the bubble structure without flattening.
Modern Variations:
- Use clear elastic bands for a seamless look
- Incorporate decorative bands with pearls or crystals
- Create progressively smaller bubbles toward the end for a tapered effect
12. French Twist with Modern Texture
The French twist receives a modern update with intentionally textured and loosened sections, creating a balance between classic refinement and contemporary style. This sophisticated updo maintains the elegance of the traditional French twist while incorporating a softer, more relaxed aesthetic.
Styling Technique:
- Start with second-day hair or apply dry shampoo for better grip and texture.
- Tease the crown area to create height and volume.
- Gather all hair to one side, holding it firmly at the nape.
- Twist the gathered hair upward along the back of the head.
- As you twist, tuck the ends inward, creating the classic roll shape.
- Secure the twist with bobby pins inserted vertically along the roll.
- Rather than creating a tight, polished twist, allow some texture to show through.
- Gently pull out small sections at random points for a softer appearance.
- Leave a few wispy pieces around the hairline for a romantic touch.
- Apply a medium-hold hairspray that allows movement.
Best For:
- Those seeking timeless elegance with a contemporary edge
- Formal gowns with sophisticated silhouettes
- Showcasing the neck and shoulders
13. Floral Crown with Loose Waves

A floral crown paired with loose waves creates a whimsical, nature-inspired look that’s perfect for spring or garden-themed proms. This ethereal hairstyle combines the romantic beauty of fresh flowers with soft, flowing waves that evoke a dreamy, fairytale aesthetic.
Styling Technique:
- Curl hair in large, loose sections using a wide-barrel curling iron or wand.
- Allow curls to cool, then gently brush through with fingers for a softer wave pattern.
- Apply a texturizing spray for a lived-in, beachy appearance.
- Create a simple braid or twisted section around the crown if desired for securing the flowers.
- Select fresh flowers that complement your dress color and personal style.
- Use floral wire and tape to create a crown base that fits your head circumference.
- Attach flowers to the wire base using additional floral tape.
- Position the floral crown on your head, securing with bobby pins if necessary.
- Ensure the flowers are securely attached to withstand movement and dancing.
- Consider using a floral preservative spray to keep flowers fresh longer.
Flower Suggestions:
- Roses for classic romance
- Baby’s breath for delicate, whimsical charm
- Peonies for lush, garden-inspired beauty
- Eucalyptus leaves for greenery and texture
14. Asymmetrical Updo

An asymmetrical updo offers a modern, artistic approach to formal hairstyling, creating visual interest through intentional imbalance. This contemporary style features hair arranged predominantly to one side with various twisted, braided, or pinned sections that create sculptural dimension.
Styling Technique:
- Begin by deciding which side will feature the main styling focus.
- Create a deep side part positioned far to one side.
- On the lighter side, slick hair back smoothly using gel or pomade.
- Pin this section flat against the head, directing hair toward the focal side.
- On the heavier side, create various textures using twists, small braids, or rolled sections.
- Layer these textured pieces, pinning them at different angles and heights.
- Build dimension by stacking elements rather than creating a flat surface.
- Leave some wispy ends exposed for an intentionally undone appearance.
- Secure all sections firmly with bobby pins that match your hair color.
- Apply a strong-hold hairspray to maintain the asymmetrical structure.
Artistic Considerations:
- This style works particularly well for fashion-forward individuals
- Complements modern or avant-garde dress designs
- Creates striking visual impact in photographs
15. Rope Braid Crown

The rope braid crown creates a halo effect around the head using a simple yet elegant two-strand twisting technique. This hairstyle offers a refined alternative to traditional braiding while maintaining romantic, timeless appeal perfect for prom.
Styling Technique:
- Part hair down the center from forehead to nape.
- Begin on one side near the temple with a small section of hair.
- Divide this section into two equal strands.
- Twist the two strands around each other, adding hair from below as you work backward.
- This creates a rope braid effect that follows the hairline like a crown.
- Continue twisting along the curve of your head toward the back.
- Temporarily secure the end when you reach the center back.
- Repeat the entire process on the opposite side.
- Bring both rope braids together at the center back.
- Secure them together with bobby pins or a decorative clip.
- Allow the remaining hair to flow freely below or gather it into a low ponytail.
- Gently pull at the rope braids to create more width and texture.
Advantages:
- Easier to execute than traditional French or Dutch braids
- Creates an elegant, polished appearance
- Keeps hair away from face while maintaining femininity
16. Vintage Barrel Curls

Vintage barrel curls evoke the glamorous era of the 1950s, featuring perfectly cylindrical curls with defined structure and bounce. This retro hairstyle creates a polished, sophisticated appearance that photographs beautifully and maintains its shape throughout the evening.
Styling Technique:
- Start with clean, dry hair and apply heat protectant spray.
- Section hair into uniform pieces approximately two inches wide.
- Use a medium to large barrel curling iron (1.25 to 1.5 inches).
- Wrap each section around the barrel, holding for 8-10 seconds.
- Rather than releasing the curl immediately, slide it off the iron into your hand.
- Pin the curl against your head in its circular shape using a sectioning clip.
- Allow all curls to cool completely in their pinned position (at least 15 minutes).
- Once cooled, carefully remove all clips without pulling the curls apart.
- Use your fingers to gently arrange the curls, maintaining their barrel shape.
- Apply a light-hold hairspray to set without creating stiffness.
- For extra definition, use a small amount of smoothing serum on individual curls.
Maintenance Throughout Evening:
- These curls maintain their shape well with minimal touch-ups needed
- Avoid brushing or running fingers through to preserve structure
- Carry a mini travel-size hairspray for quick refreshing
17. Braided Headband with Low Bun

The braided headband paired with a low bun combines two classic elements into one cohesive, elegant hairstyle. This sophisticated updo features a braid that acts as a natural headband across the front, with the remaining hair formed into a refined bun at the nape.
Styling Technique:
- Create a horizontal part from ear to ear across the top of the head.
- Clip the front section aside temporarily.
- Gather the back section into a low ponytail at the nape.
- Twist or braid the ponytail and wrap it into a bun formation.
- Secure the bun with bobby pins and hairspray.
- Unclip the front section and create a side part.
- Begin braiding from the part toward one ear, incorporating all front hair.
- Continue the braid along the hairline toward the opposite ear.
- When the braid reaches the other side, tuck the end into or behind the bun.
- Secure with bobby pins, ensuring the connection is seamless.
- Gently pull at the braid to create width and a softer appearance.
- Apply finishing spray to tame flyaways and set the style.
Accessory Options:
- Small pearl pins placed along the braided headband
- A decorative clip positioned at the bun
- Delicate flowers tucked into the bun for garden party charm
18. Side-Swept Finger Waves
Side-swept finger waves create a dramatic, show-stopping look that channels the sophisticated glamour of the Art Deco era. This hairstyle features pronounced S-shaped waves that are elegantly swept to one side, creating a sculptural, artistic appearance.
Styling Technique:
- Begin with damp hair and apply a strong-hold setting lotion or gel.
- Create a deep side part positioned far to one side.
- Direct all hair toward the heavier side using a fine-tooth comb.
- Starting near the part, use your fingers and comb to create the first S-curve.
- Hold the wave in place with a finger while combing the next section in the opposite direction.
- Secure each wave with long sectioning clips parallel to the wave direction.
- Continue creating alternating S-curves down the length of the hair.
- All waves should flow toward the same side for a cohesive sweep.
- Allow hair to dry completely with clips in place (use a hooded dryer if available).
- Once fully dry, carefully remove clips without disturbing the wave pattern.
- Use minimal product to maintain definition without weighing down the waves.
- Finish with a strong-hold hairspray with shine.
Historical Inspiration:
- Popular during the 1920s and 1930s
- Associated with icons like Josephine Baker and Greta Garbo
- Represents the height of elegant, structured hairstyling
19. Messy Top Knot with Tendrils
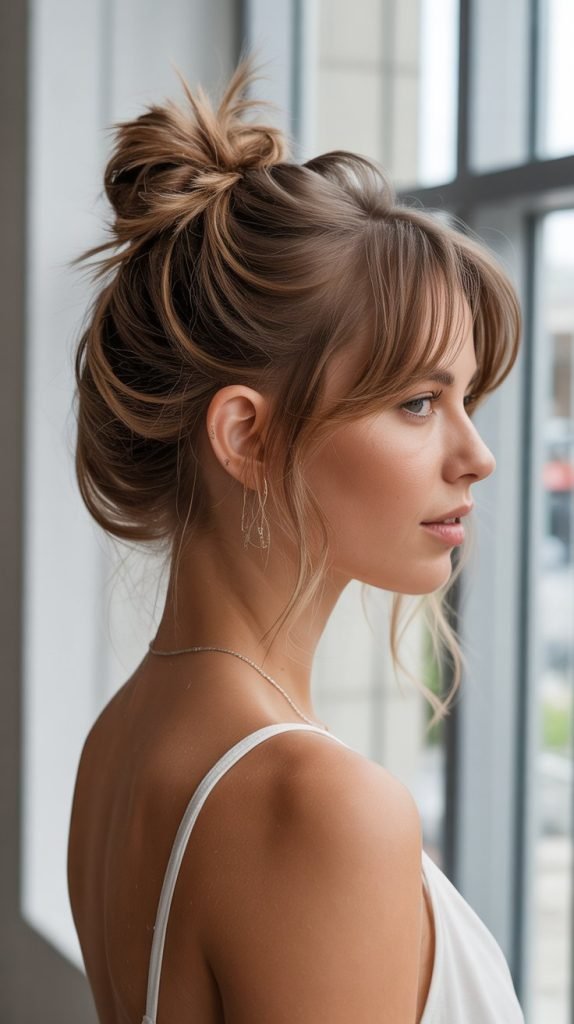
The messy top knot offers a contemporary, effortlessly chic approach to prom styling that balances casual ease with intentional sophistication. This hairstyle features a loosely gathered bun positioned high on the head with strategic pieces left out to frame the face.
Styling Technique:
- Start by creating texture throughout hair with dry shampoo or texturizing spray.
- Flip head upside down and gather hair into a high ponytail at the crown.
- Don’t worry about achieving perfect smoothness—texture is desirable for this style.
- Leave out small sections at the front and around the ears before securing the ponytail.
- Twist the ponytail loosely and wrap it around the base.
- Secure with bobby pins, allowing some pieces to fall naturally rather than tucking everything in.
- Gently pull at the bun to create more volume and a fuller appearance.
- The goal is intentional messiness, not perfection.
- Curl the face-framing tendrils with a small curling iron.
- Allow some shorter pieces to fall naturally around the hairline.
- Apply a flexible-hold hairspray that maintains texture without stiffness.
Best For:
- Contemporary, fashion-forward dress styles
- Those who prefer a relaxed, comfortable hairstyle
- Making a statement while maintaining ease of wear
20. Double Dutch Braids into Low Bun

Double Dutch braids leading into a low bun create a striking combination of intricate detail and classic elegance. This hairstyle showcases impressive braiding technique while maintaining formal sophistication perfect for prom night.
Styling Technique:
- Create a center part from forehead to crown, dividing hair into two sections.
- Begin a Dutch braid (reverse French braid) on one side near the hairline.
- The Dutch braid technique involves crossing strands under rather than over.
- Continue braiding from the hairline toward the nape, incorporating all hair from that section.
- Secure the end temporarily with an elastic band.
- Repeat the Dutch braiding process on the opposite side.
- Both braids should meet at approximately the same point at the nape.
- Remove the temporary elastic bands and gather both braids together.
- Twist the combined ends together and wrap into a bun formation.
- Secure the bun with multiple bobby pins for stability.
- Gently pull at the edges of the braids to create more width and dimension.
- Apply a firm-hold hairspray to maintain the structure.
Complexity Level: Intermediate to advanced Time Investment: 40-60 minutes
21. Soft Romantic Updo with Accessories

A soft romantic updo adorned with accessories creates a dreamy, feminine look that’s perfect for creating memorable prom photos. This hairstyle features loosely twisted sections gathered at the back with strategic placement of decorative elements like pearls, crystals, or delicate flowers.
Styling Technique:
- Begin by curling random sections throughout the hair for added texture.
- Create a loose center or side part according to preference.
- Divide hair into four to six sections around the head.
- Take each section and twist it loosely toward the back center.
- Pin each twisted section at varying heights to create dimension.
- Avoid creating a uniform, flat surface—stagger the placement for organic softness.
- Allow some curled pieces to fall naturally rather than securing everything tightly.
- Gently pull at the twisted sections to create volume and softness.
- Begin placing decorative accessories throughout the updo.
- Space accessories evenly for balanced visual appeal or cluster them for focal impact.
- Ensure all bobby pins are concealed beneath the twisted sections.
Accessory Suggestions:
- Pearl-tipped bobby pins scattered throughout
- Small fresh flowers tucked into twisted sections
- Crystal hairpins that catch light beautifully
- Delicate hair vine woven through the updo
22. Slicked-Back Low Ponytail with Volume
The slicked-back low ponytail with volume combines sleek sophistication with dramatic height, creating a modern, editorial-worthy hairstyle. This style features a perfectly smooth front section with intentional volume at the crown, leading to a full ponytail positioned at the nape.
Styling Technique:
- Apply volumizing mousse to damp hair and blow-dry with a round brush at the roots.
- Focus on creating height at the crown by lifting hair upward while drying.
- Once hair is completely dry, apply smoothing serum to the front and side sections.
- Use a fine-tooth comb and strong-hold gel to slick back the front hairline area.
- Backcomb or tease the crown section to create significant height and volume.
- Smooth the top layer over the teased section without flattening it completely.
- Gather all hair into a low ponytail at the nape, maintaining the crown volume.
- Secure with a strong elastic band, ensuring the height at the crown remains intact.
- Take a small section from the ponytail and wrap it around the elastic to conceal it.
- Apply hairspray to the slicked sections for a polished, lacquered finish.
- Gently smooth any flyaways with a small amount of gel on a brush.
Styling Variations:
- Add texture to the ponytail itself with curls or waves
- Create a bubble ponytail effect with the lengthened section
- Incorporate a decorative ribbon or velvet wrap around the base
23. Bohemian Twisted Crown
The bohemian twisted crown embodies free-spirited elegance with its effortlessly romantic appearance. This hairstyle features multiple loose twists taken from the sides and wrapped around the head like a crown, while the remaining hair flows naturally below.
Styling Technique:
- Start with textured, second-day hair or add texture with sea salt spray.
- Create waves throughout using a curling wand for dimension.
- Leave hair down and create a center or slightly off-center part.
- Take a two-inch section from one side near the temple.
- Loosely twist this section as you work toward the back of the head.
- Pin the twist temporarily at the crown area with a bobby pin.
- Repeat on the opposite side, creating another loose twist.
- Bring both twists together at the back crown area.
- Instead of securing tightly, pin them loosely with bobby pins.
- Create additional smaller twists if desired for more detail.
- Intentionally pull out small pieces around the face for softness.
- Allow the hair below the crown to remain loose and flowing.
- Apply a light texturizing spray for enhanced bohemian texture.
Ideal Prom Themes:
- Garden party or outdoor venue proms
- Bohemian or rustic-themed events
- Spring or summer evening celebrations
24. Elegant Chignon with Side Part

An elegant chignon with a side part represents timeless sophistication and refined beauty. This classic hairstyle features a neatly rolled bun positioned at the nape of the neck, enhanced by a dramatic side part that adds modern interest to the traditional style.
Styling Technique:
- Begin with smooth, straight hair achieved through blow-drying and flat ironing.
- Create a deep side part positioned approximately three inches from center.
- Apply smoothing cream or serum to control frizz and add shine.
- Gather all hair at the nape into a low ponytail, maintaining the side part.
- Divide the ponytail into two or three sections.
- Twist each section individually, then twist them together.
- Roll the twisted hair upward and under to form the chignon shape.
- Secure with multiple bobby pins inserted horizontally through the roll.
- Ensure the chignon sits neatly against the head without any loose sections.
- Use a fine-tooth comb to smooth the sides and ensure sleekness.
- On the heavier side of the part, consider tucking hair behind the ear for elegant simplicity.
- Apply a high-shine hairspray to enhance the polished, glossy appearance.
Complementary Elements:
- Statement earrings that are showcased by the updo
- Formal gowns with sophisticated necklines
- Classic, timeless jewelry choices
25. Curly Half-Up with Pearl Accessories

The curly half-up style celebrates natural texture while incorporating elegant refinement through strategic styling and accessory placement.
This hairstyle is perfect for those with naturally curly or wavy hair who want to showcase their texture while maintaining formal elegance.
Styling Technique:
- Begin with clean, conditioned curly hair and apply curl-defining cream.
- Use a diffuser attachment on your blow dryer or allow hair to air-dry naturally.
- Once hair is completely dry, separate the top half from the bottom half horizontally.
- Gather the top section at the crown, maintaining volume and curl definition.
- Rather than pulling tightly, allow the gathered section to maintain its natural fullness.
- Secure with a clear elastic band or bobby pins hidden within the curls.
- Gently arrange curls in the secured section for optimal placement and volume.
- Allow the bottom half to fall naturally, showcasing the full curl pattern.
- Begin placing pearl hairpins strategically throughout the style.
- Focus pin placement at the transition point between the secured and loose sections.
- Add additional pearl pins throughout for sparkle and elegance.
- Apply a light-hold curl-enhancing spray to reduce frizz without weighing down curls.
Curl Care Tips:
- Avoid touching curls excessively to prevent frizz
- Use anti-humidity products if attending an outdoor event
- Refresh curls during the evening with a water-based spray if needed
26. Twisted Low Side Ponytail

The twisted low side ponytail offers a refined yet relaxed approach to prom styling, combining the ease of a ponytail with the elegance of twisted detail.
This hairstyle positions the ponytail over one shoulder with a rope twist technique that adds visual interest and sophistication.
Styling Technique:
- Create loose waves or curls throughout the hair for added texture.
- Sweep all hair to one side over your shoulder.
- Gather hair into a low side ponytail positioned just below and behind the ear.
- Secure with a strong elastic band that matches your hair color.
- Divide the ponytail into two equal sections.
- Twist each section individually in the same direction (clockwise or counterclockwise).
- Then twist the two sections around each other in the opposite direction.
- This creates a rope twist effect that holds its shape throughout the evening.
- Secure the end with another elastic band or decorative hair tie.
- Gently pull at the rope twist to create more width and volume.
- Take a small section of hair and wrap it around the base elastic to conceal it.
- Apply a medium-hold hairspray to maintain the twist without stiffness.
Best For:
- One-shoulder dress designs
- Those who want hair off the neck but still visible
- Easy-to-manage styling that remains secure while dancing
27. Vintage Victory Rolls with Modern Twist

Vintage victory rolls receive a contemporary update in this fusion hairstyle that honors the past while embracing modern styling sensibilities.
This look features the iconic rolled sections at the front characteristic of 1940s styling, combined with softer, more relaxed styling at the back.
Styling Technique:
- Begin by creating a side part positioned where you want the rolls to sit.
- Section off the front portion of hair on the heavier side of the part.
- Divide this front section into two parts for creating two victory rolls.
- Take the first section, backcomb it for volume, then smooth the surface.
- Roll the section backward toward the scalp, creating a cylindrical roll.
- Secure the roll against the head with multiple bobby pins inserted from below.
- Repeat the rolling process with the second front section.
- Position the second roll beside the first, creating the classic victory roll appearance.
- Rather than styling the back into additional rolls, create soft waves or curls.
- Allow the back section to maintain more movement and texture for modern appeal.
- The contrast between structured front and flowing back creates contemporary interest.
- Apply strong-hold hairspray to the rolls while using lighter spray on the back.
Historical Context with Modern Adaptation:
- Victory rolls originated during World War II era
- Traditional styling included structured rolls throughout
- Modern interpretation maintains iconic front elements while softening overall appearance
Essential Styling Tools and Products
Heat Tools:
- Curling iron with multiple barrel sizes (1 inch, 1.5 inch, 2 inch)
- Flat iron with adjustable temperature settings
- Blow dryer with concentrator and diffuser attachments
- Hot rollers for creating lasting volume and curl
Styling Accessories:
- Bobby pins in various colors matching your hair
- Clear elastic bands in multiple sizes
- Sectioning clips for managing hair during styling
- Fine-tooth comb for precision parting and smoothing
- Wide-tooth comb for detangling without breakage
- Paddle brush for smoothing and creating sleek finishes
- Round brush for blow-drying with volume
Essential Products:
- Heat protectant spray (crucial for preventing damage)
- Volumizing mousse for creating lift and body
- Strong-hold hairspray for setting styles
- Flexible-hold hairspray for natural movement
- Smoothing serum or cream for frizz control
- Texturizing spray for creating beachy, undone texture
- Dry shampoo for adding grip and refreshing styles
- Shine spray for glossy, polished finishes
Professional Tips for Long-Lasting Prom Hair
Preparation Before Styling:
- Wash hair the day before prom rather than the day of for better texture and hold
- Use a clarifying shampoo to remove product buildup that can interfere with styling
- Deep condition hair several days before to ensure optimal health and manageability
- Avoid using heavy conditioners on the day you’ll be styling
- Consider getting a trim two weeks before prom to remove split ends
During Styling:
- Always use heat protectant before applying any hot tools to prevent damage
- Allow each curled section to cool completely before touching or arranging
- Use the appropriate amount of product—too much can weigh hair down or make it look greasy
- Work in small sections for more precise, long-lasting results
- Test your chosen hairstyle at least once before prom night to identify any challenges
Maintaining Your Style:
- Bring a small emergency kit containing bobby pins, elastic bands, and mini hairspray
- Avoid touching your hair excessively throughout the evening
- If attending an outdoor event, use anti-humidity products to prevent frizz
- Take photos early in the evening when your hair looks its freshest
- Consider scheduling a mid-event touch-up with a friend if doing an intricate style
Post-Prom Hair Care:
- Remove all bobby pins, elastics, and accessories before going to sleep
- Gently brush through hair to remove any tangles created by styling
- Use a deep conditioning treatment to restore moisture after heavy product use
- Avoid washing hair immediately if possible to allow natural oils to restore balance
Choosing the Right Hairstyle for Your Dress and Face Shape
Strapless or Sweetheart Necklines:
- Updo styles showcase the neckline beautifully
- Side-swept styles create asymmetrical elegance
- Avoid hairstyles that cover the shoulders
One-Shoulder Dresses:
- Side ponytails or side-swept styles complement the asymmetry
- Pulled-back styles on the bare shoulder side create balance
- Avoid center-parted styles that compete with the dress design
High Necklines or Halter Styles:
- Updos prevent visual clutter at the neckline
- Sleek ponytails create clean, modern lines
- Low buns maintain elegance without overwhelming the dress
V-Neck or Plunging Necklines:
- Long, flowing styles balance the neckline depth
- Soft waves create romantic appeal
- Half-up styles offer versatility
Face Shape Guidelines:
Round Faces:
- Styles with height at the crown elongate the face
- Side parts create asymmetry and slimming effects
- Avoid styles that add width at the cheeks
Oval Faces:
- Most hairstyles work well with this versatile shape
- Experiment with various styles based on personal preference
- Both updos and down styles complement oval faces
Square Faces:
- Soft, romantic styles with curves soften angular features
- Side-swept styles create diagonal lines that flatter
- Avoid severe, straight styles that emphasize angles
Heart-Shaped Faces:
- Styles with volume at the jawline balance the wider forehead
- Side-swept bangs or face-framing pieces soften the look
- Chin-length details create pleasing proportions
Long Faces:
- Styles with width and volume at the sides create balance
- Avoid excessive height at the crown that lengthens further
- Soft waves and curls add flattering dimension
Color and Accessory Coordination
Matching Accessories to Hair Color:
Blonde Hair:
- Gold, rose gold, and champagne-toned accessories
- Soft pink, white, or ivory flowers
- Pearl accessories for classic elegance
- Avoid overly dark accessories that create harsh contrast
Brunette Hair:
- Silver, platinum, and crystal accessories
- Deep red, burgundy, or purple flowers
- Tortoiseshell or amber-toned clips
- Gold accessories for warmth
Red Hair:
- Gold and bronze-toned accessories
- Emerald green or deep blue decorative elements
- Warm metallic tones
- Avoid competing red-toned accessories
Black Hair:
- Any metallic tone works beautifully
- Bright, vibrant flowers create striking contrast
- Red accessories for dramatic appeal
- White or pearl accessories for elegant contrast
Coordinating with Dress Color:
- Monochromatic approach: accessories that match dress color exactly
- Complementary approach: accessories in colors opposite on the color wheel
- Metallic neutrals: gold or silver that coordinates with dress undertones
- Natural elements: flowers and greenery that complement rather than match
Hair Health Considerations Before Prom
Timeline for Optimal Hair Health:
3 Months Before:
- Begin using weekly deep conditioning treatments
- Schedule regular trims every 6-8 weeks to maintain healthy ends
- Consider reducing heat styling frequency in daily routine
- Start taking hair vitamins if recommended by a healthcare provider
6 Weeks Before:
- If coloring hair, schedule appointments now to avoid last-minute damage
- Test any new hair products to ensure no adverse reactions
- Begin sleeping on silk or satin pillowcases to reduce friction and breakage
2 Weeks Before:
- Final trim to remove any split ends without significantly changing length
- Avoid trying any new chemical treatments or drastic color changes
- Increase protein treatments if hair feels weak or damaged
1 Week Before:
- Do a practice run of your chosen hairstyle
- Gather all necessary tools, products, and accessories
- Avoid heavy conditioning treatments that might make hair too slippery
Day Before:
- Wash hair with your regular routine (not the morning of prom)
- Avoid heavy conditioners that might prevent styles from holding
- Get plenty of sleep to ensure hair looks healthy and shiny
Frequently Asked Questions About Prom Hairstyles
How do I make my hairstyle last all night?
- Use strong-hold products appropriate for your chosen style
- Allow hot-styled hair to cool completely before arranging
- Secure updos with more bobby pins than you think necessary
- Consider a light hairspray refresh mid-evening
Should I wash my hair the day of prom?
- Generally, day-old hair holds styles better than freshly washed hair
- Washing the day before provides ideal texture and grip
- If you must wash the same day, do so early and use minimal conditioner
How far in advance should I practice my hairstyle?
- At least 2-3 weeks before prom for complex styles
- Practice multiple times if attempting an intricate technique
- Time yourself to ensure you allow enough preparation time on prom day
What if my hair doesn’t hold curl well?
- Use a volumizing mousse before heat styling
- Allow curls to cool completely while pinned
- Try hot rollers instead of curling irons for longer-lasting results
- Use stronger hold products and set with hairspray immediately
Can I incorporate hair extensions for fuller styles?
- Yes, clip-in extensions can add length and volume for elaborate styles
- Match extensions to your exact hair color for seamless blending
- Practice installing and styling with extensions before prom night
- Consider quality synthetic or human hair extensions for best results
What should I do if my hairstyle falls apart?
- Bring an emergency kit with bobby pins, elastics, and hairspray
- Have a backup simple style in mind (like a low bun or ponytail)
- Enlist a friend who can help with quick fixes
- Remember that slight imperfections often aren’t as noticeable as you think
Conclusion
Choosing from these 27 Classy and Timeless Prom Hairstyles for Medium-Length Hair empowers you to create a stunning look that reflects your personal style while maintaining elegance and sophistication for your special night.
Medium-length hair offers the perfect canvas for exploring diverse styling options, from vintage Hollywood glamour to contemporary bohemian romance, each designed to make you feel confident and beautiful as you create lasting memories.
Whether you opt for an intricate braided updo that showcases your creativity, romantic waves that frame your face beautifully, or a sleek modern ponytail that exudes confidence, the key to prom hair success lies in selecting a style that complements your dress, suits your face shape, and aligns with your comfort level for maintaining the look throughout the evening.
Remember to practice your chosen hairstyle in advance, gather all necessary tools and products, and prioritize hair health in the weeks leading up to your prom to ensure your hair looks and feels its absolute best.
With proper preparation, the right technique, and attention to detail, you’ll walk into your prom with a hairstyle that not only looks professionally styled but also stays beautiful from the first photo to the last dance, allowing you to focus on enjoying this once-in-a-lifetime celebration with confidence and grace.