When you think of braids, your mind might immediately wander to festival-ready boho looks, but the world of braided hairstyles extends far beyond that aesthetic.
Modern women are embracing braids as sophisticated, polished, and versatile styling options that work seamlessly in professional settings, elegant events, and everyday life.
This comprehensive guide to 27 Chic Braided Hairstyles for Modern Women (No Boho Styles) will transform how you view this timeless technique, proving that braids can be sleek, contemporary, and utterly refined.
From corporate boardrooms to evening galas, these carefully curated styles showcase the elegant side of braiding that complements structured wardrobes and minimalist sensibilities.
Whether you have short, medium, or long hair, you’ll discover fresh approaches to incorporating braids into your signature look without a flower crown or feather in sight.
In This Post......
- 1. Sleek Low Braided Bun
- 2. French Braid Crown with Straight Ends
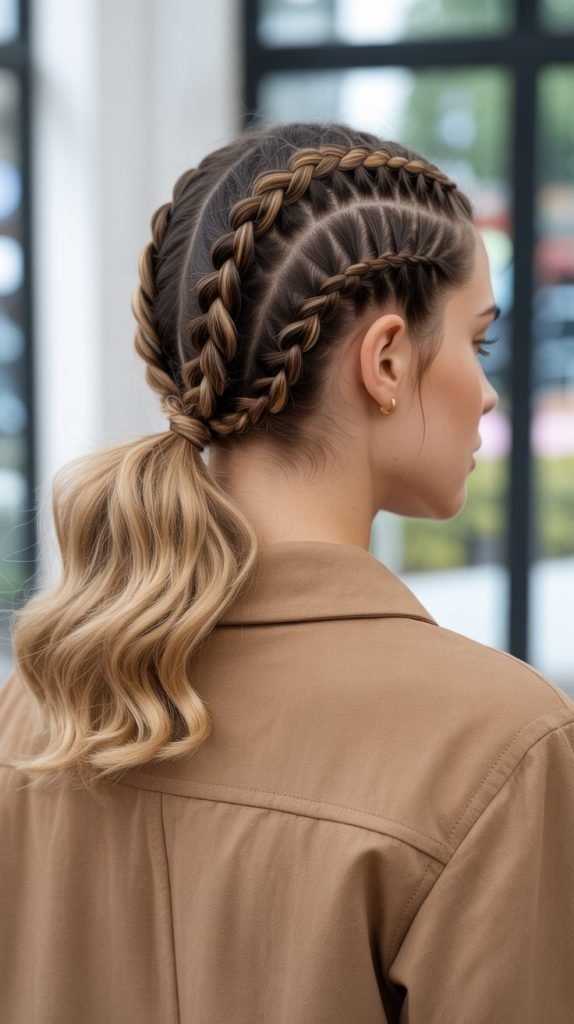
- 3. Double Dutch Braids into Low Ponytail
- 4. Side-Swept Braided Updo
- 5. Braided Ponytail Wrap
- 6. Inverted French Braid Chignon
- 7. Geometric Braided Bob
- 8. Ladder Braid Half-Up Style
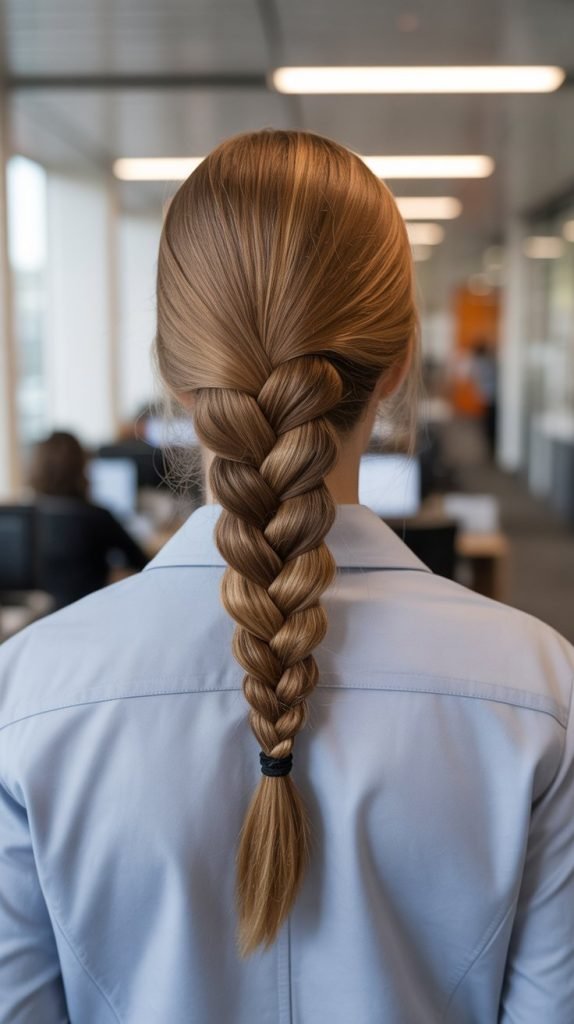
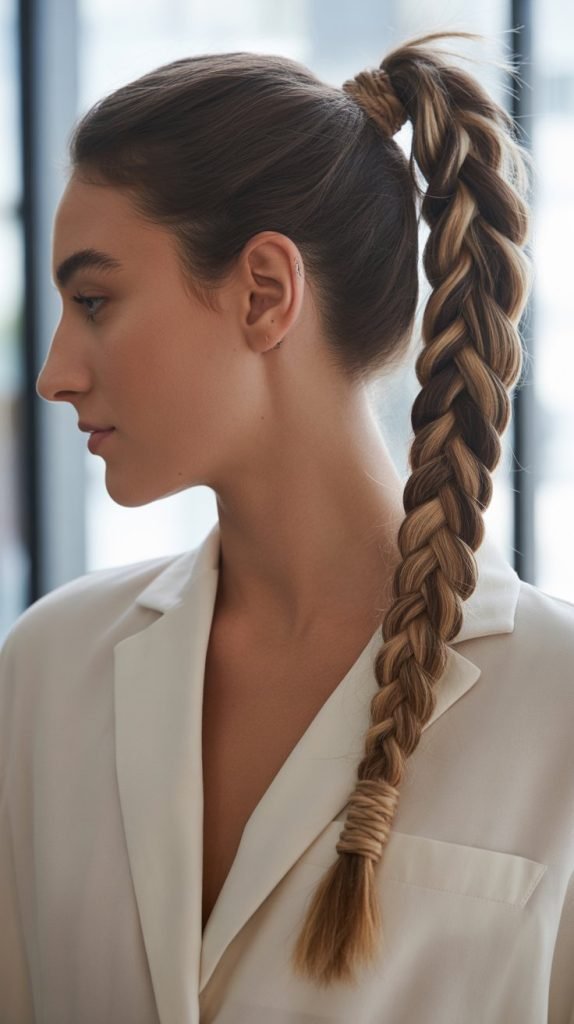
- 9. Twisted Rope Braid Ponytail
- 10. Braided Headband with Low Bun
- 11. Asymmetric Side Braid
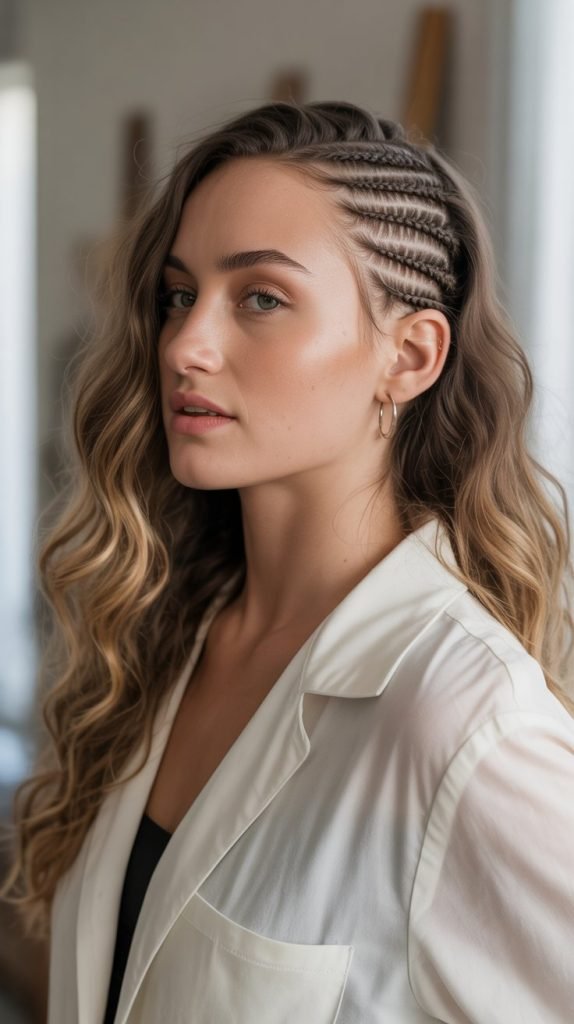
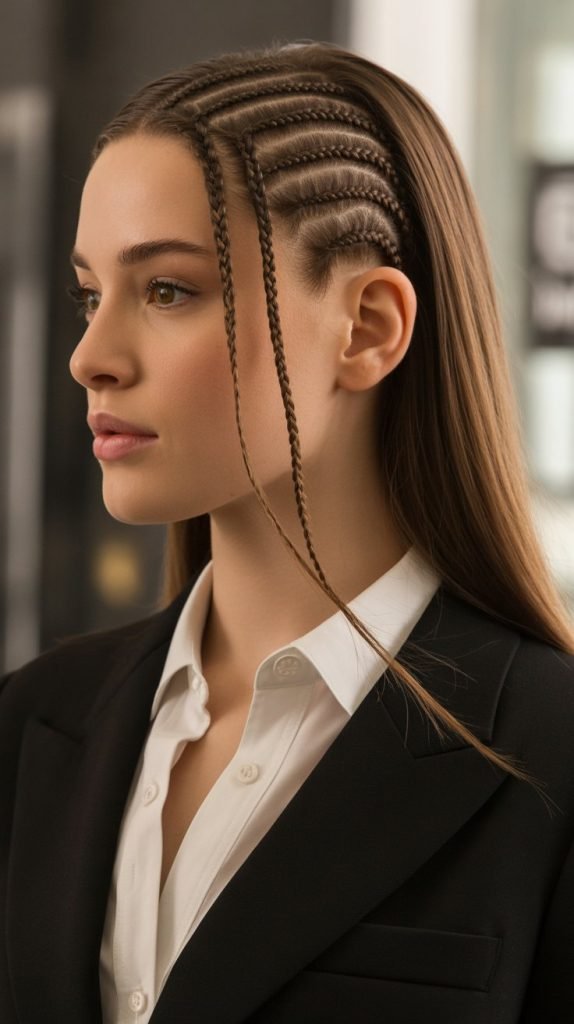
- 12. Micro Braids Accent in Straight Hair
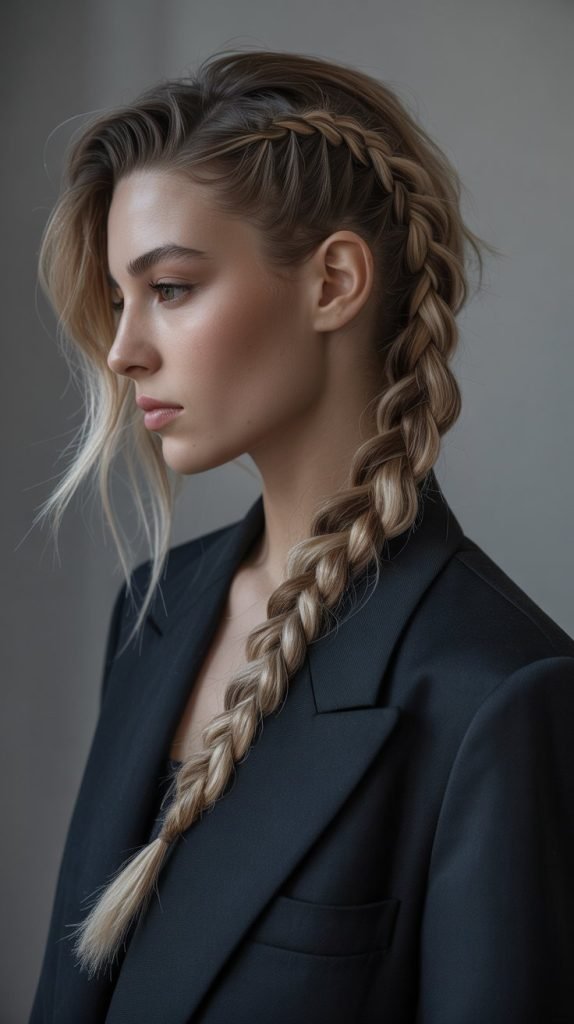
- 13. Corporate Dutch Braid
- 14. Braided Top Knot
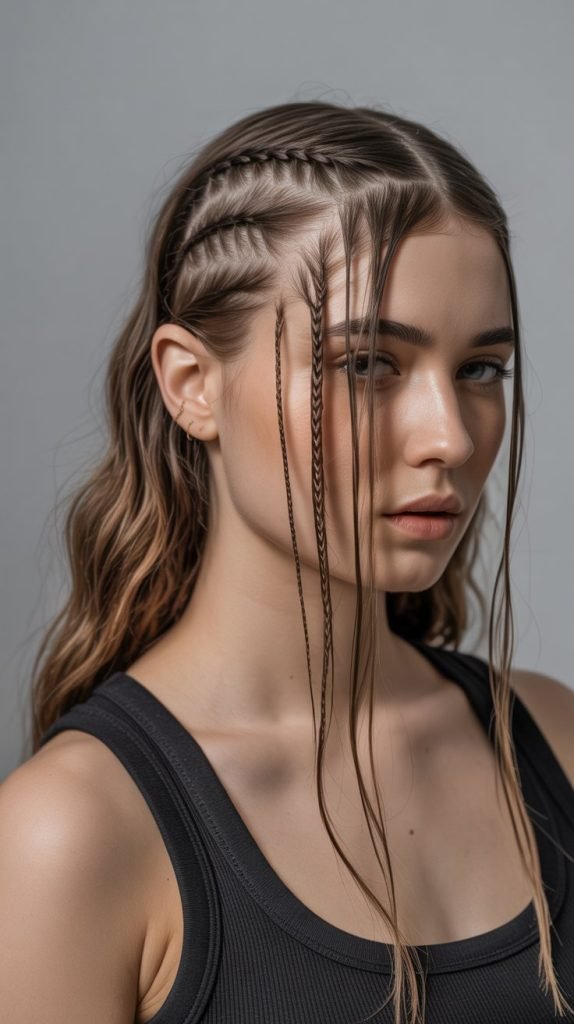
- 15. Parallel Micro Braids with Loose Waves
- 16. Hidden Braids Underneath
- 17. Zipper Braid
- 18. Sleek Side-Part with Edge Braids
- 19. Stacked Braids Low Ponytail
- 20. Angular Braided Updo
- 21. Infinity Braid Half-Up
- 22. Wrapped Braided Ponytail Base
- 23. Sleek Center-Part with Braided Nape
- 24. Diagonal Braided Half-Crown
- 25. Knotted Braid Ponytail
- 26. Minimalist Single Accent Braid
- 27. Structured Low Braided Ponytail
- Troubleshooting Common Braiding Challenges
- Hair Care Tips for Healthy Braided Styles
- Adapting Braided Styles for Different Settings
- Color and Highlight Considerations
- Time-Saving Strategies for Regular Braiding
- Face Shape Recommendations
- Transitioning from Boho to Modern Braided Aesthetics
- Seasonal Considerations for Braided Styles
- Professional Braiding Technique Tips
- Conclusion
1. Sleek Low Braided Bun
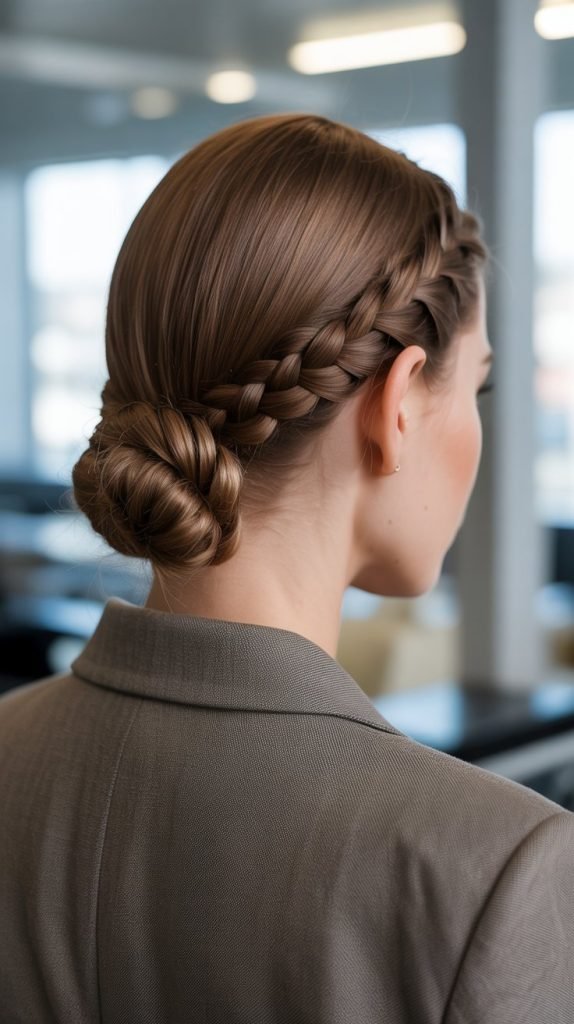
The sleek low braided bun represents the epitome of corporate elegance, combining the structure of a classic bun with the refined detail of braiding. This style works exceptionally well for professional environments where polish and sophistication are paramount.
- The foundation begins with applying a smoothing serum to damp hair to eliminate any frizz or flyaways before styling.
- Create a deep side part, then smooth all hair back toward the nape using a boar bristle brush for maximum sleekness.
- Secure the hair into a low ponytail at the nape of the neck using a hair elastic that matches your hair color.
- Divide the ponytail into three equal sections and create a traditional three-strand braid down to the ends.
- Wrap the completed braid around the base of the ponytail in a circular motion, creating a compact bun shape.
- Secure the bun with bobby pins inserted vertically through the braid and into the base for maximum hold.
- Apply a light-hold hairspray and use a fine-tooth comb to smooth any stray hairs along the hairline and sides.
- This style typically lasts 8-10 hours without requiring touch-ups, making it ideal for long workdays.
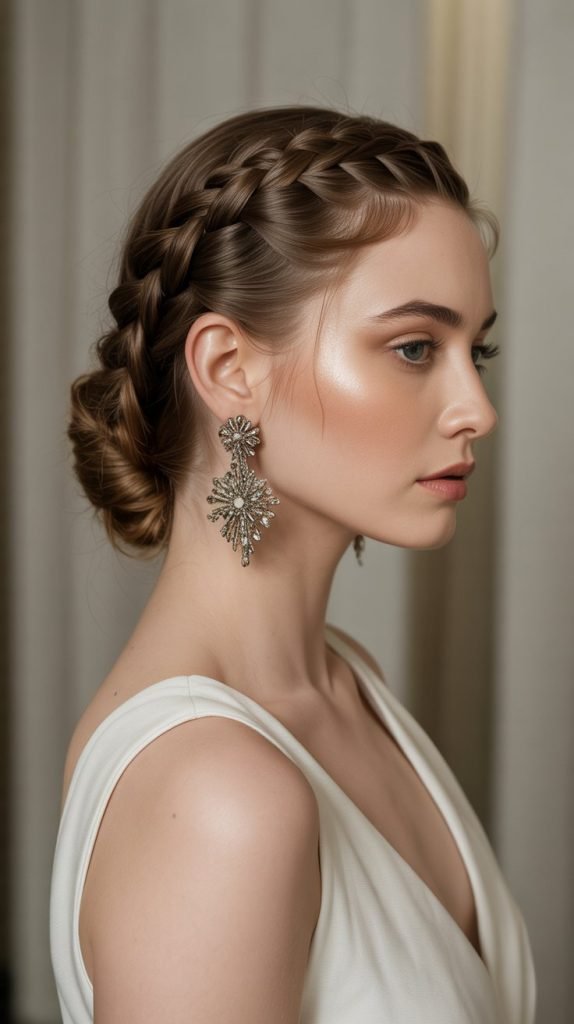
2. French Braid Crown with Straight Ends
The French braid crown with straight ends offers a modern twist on traditional crown braids by maintaining length and movement. This sophisticated style frames the face beautifully while keeping hair controlled and manageable.
- Start by sectioning off a horizontal portion of hair from temple to temple, approximately two inches back from the hairline.
- Begin a French braid on one side, incorporating small sections of hair as you work across the crown area.
- The key to achieving a modern look lies in keeping the braid relatively flat against the head rather than voluminous.
- Continue braiding across to the opposite side, then secure the end with a small clear elastic.
- Use a flat iron on the remaining loose hair to create perfectly straight, sleek ends that contrast with the textured crown.
- Tuck the braided end behind the ear or secure it with a minimalist bobby pin for a clean finish.
- Apply a shine serum to the straight sections to create a polished, contemporary appearance.
- This style works exceptionally well for medium to long hair and can transition from day to evening effortlessly.
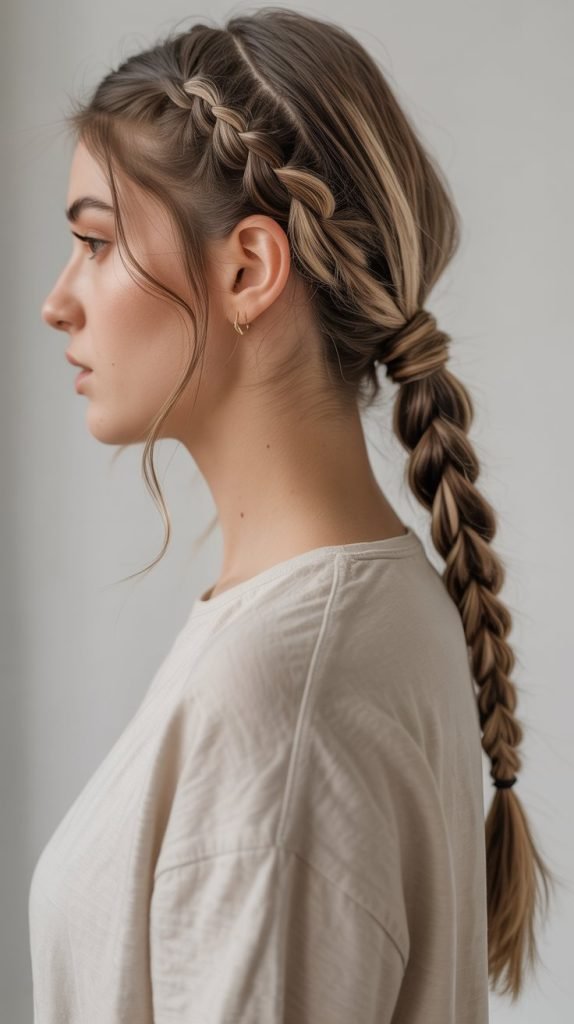
3. Double Dutch Braids into Low Ponytail
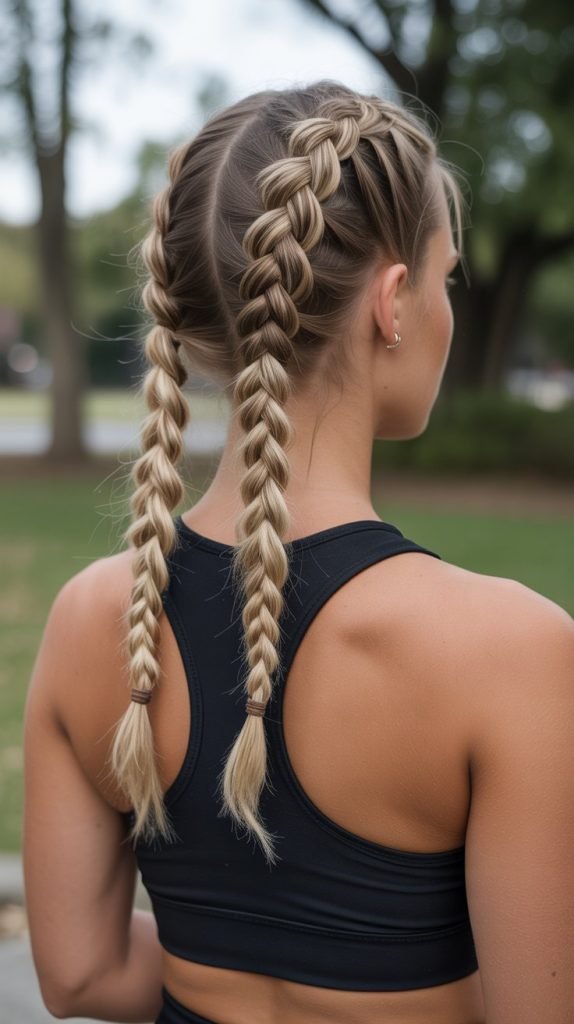
Double Dutch braids flowing into a low ponytail create a sporty yet refined aesthetic perfect for active lifestyles without sacrificing style. This combination keeps hair completely secured while maintaining an elegant silhouette.
- Create a clean center part from forehead to crown, dividing hair into two equal sections.
- Dutch braiding involves crossing sections under rather than over, creating a raised braid that sits on top of the hair.
- Begin the first Dutch braid close to the hairline, incorporating hair tightly for a secure, athletic feel.
- Work down approximately to ear level before allowing the remaining hair to hang loose.
- Repeat the process on the opposite side, ensuring both braids are symmetrical and at matching heights.
- Gather both braids and all remaining hair into a low ponytail at the nape, securing with a sturdy elastic.
- Wrap a small section of hair around the elastic to conceal it, pinning underneath for a polished finish.
- This style remains intact during workouts, busy days, or outdoor activities while maintaining sophistication.
4. Side-Swept Braided Updo
The side-swept braided updo brings asymmetry and modern elegance to formal styling, making it perfect for weddings, galas, or upscale events. The directional flow creates visual interest while maintaining a refined aesthetic.
- Apply volumizing mousse to clean, dry hair and blow-dry with a round brush to create body and texture.
- Create a deep side part that extends to the crown area, establishing the directional flow of the style.
- Begin incorporating small braids on the heavier side of the part, working from the hairline back toward the crown.
- These smaller braids can be three-strand, rope braids, or fishtail variations depending on desired texture.
- Gather all hair to the opposite side from the part, sweeping everything toward one shoulder.
- Twist and pin the gathered hair into an updo shape at the back side of the head, creating a sculptural form.
- Strategically place bobby pins to secure the style while keeping hardware invisible from the front view.
- Finish with a flexible-hold hairspray that maintains the style without creating stiffness or shine.
5. Braided Ponytail Wrap
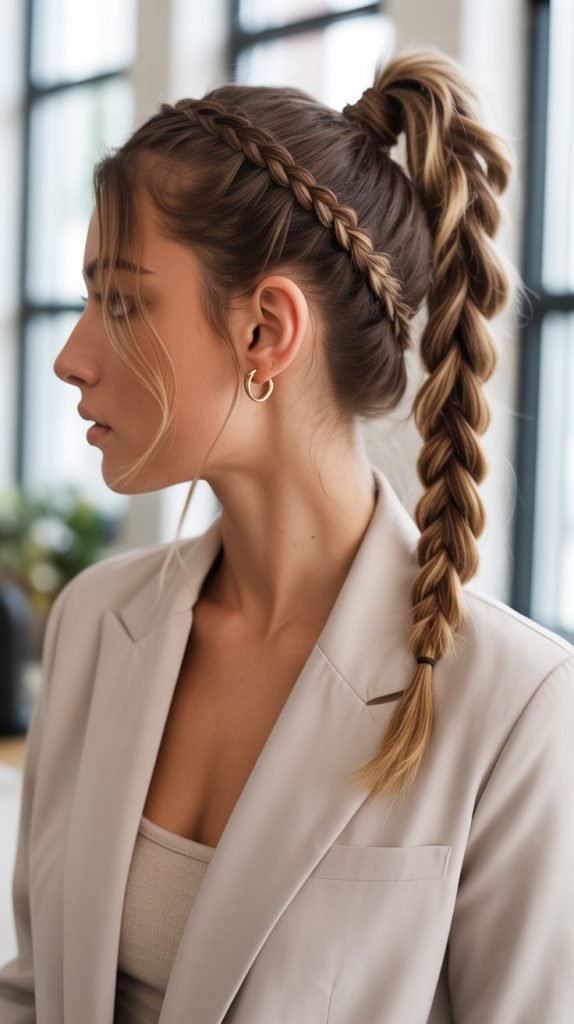
The braided ponytail wrap elevates the simple ponytail into something extraordinary by incorporating braided elements that conceal the elastic. This style bridges casual and professional settings with ease.
- Begin by creating a high, mid, or low ponytail depending on your preference and face shape.
- Use a smoothing cream to eliminate any bumps or irregularities in the hair leading to the ponytail base.
- Section out a small portion of hair from the underside of the ponytail before securing the main elastic.
- Create a three-strand or rope braid with this reserved section, braiding down several inches.
- Wrap the completed braid around the elastic base of the ponytail in a spiral motion.
- Secure the end of the braid underneath the ponytail base with bobby pins inserted horizontally.
- For added dimension, you can create multiple thin braids and wrap them together for a more textured effect.
- This technique works equally well with straight, wavy, or slightly textured ponytails for versatile styling.
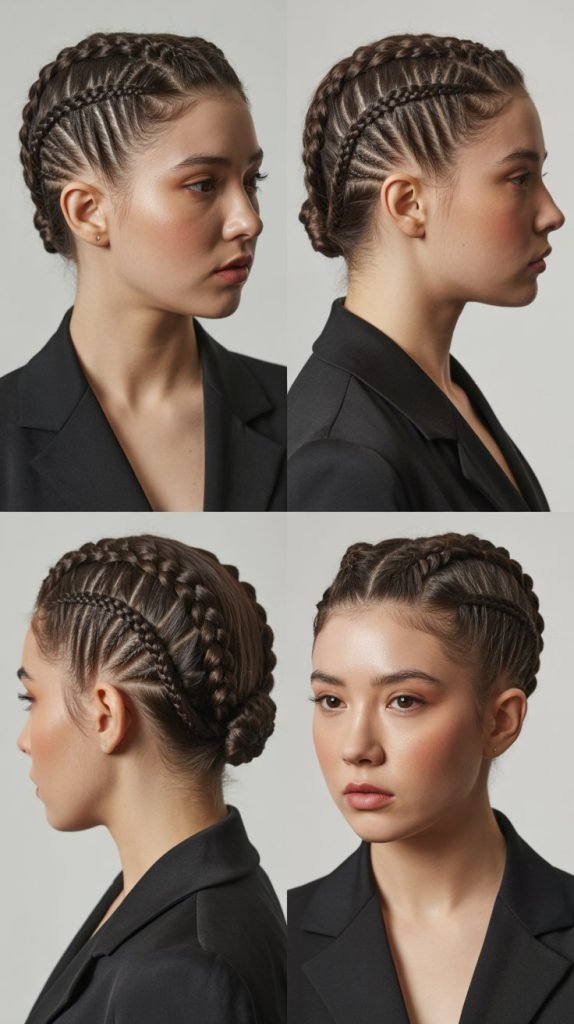
6. Inverted French Braid Chignon
The inverted French braid chignon combines upside-down braiding technique with a classic chignon silhouette for a unique and sophisticated look. This style showcases technical skill while remaining timelessly elegant.
- Begin this style by flipping your head forward, allowing all hair to hang downward toward the floor.
- Start a French braid at the nape of the neck, braiding upward toward the crown area.
- Incorporate sections of hair as you work upward, maintaining even tension throughout the braid.
- Continue braiding until you reach the crown area, then secure with an elastic at this highest point.
- Flip your head back to normal position, revealing the textured braid running up the back of the head.
- Take the remaining length from the braid and twist it into a chignon shape at the crown.
- Pin the chignon securely using bobby pins inserted in different directions for stability.
- This dramatic yet refined style works beautifully for evening events and showcases the neck and shoulders elegantly.
7. Geometric Braided Bob
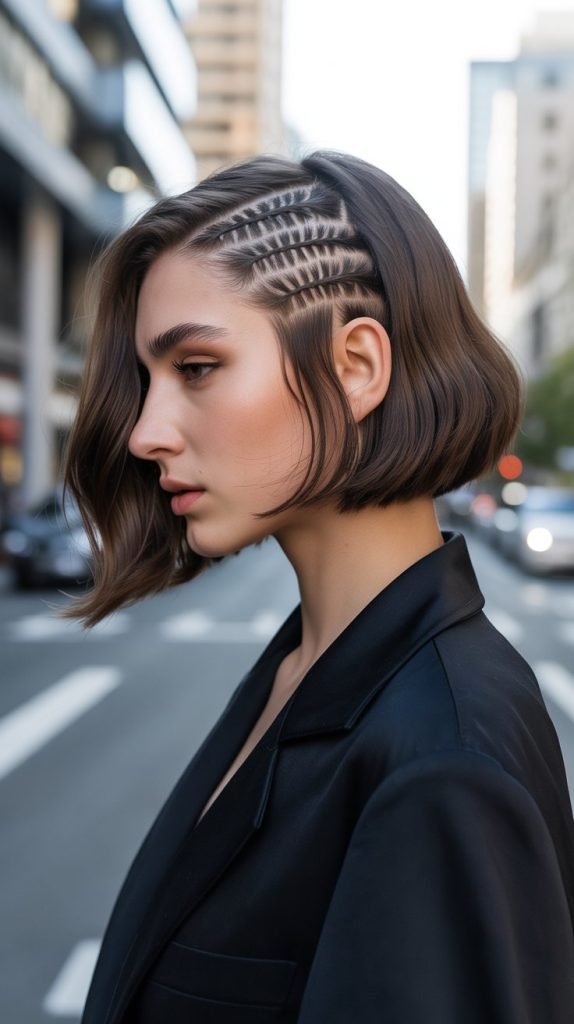
The geometric braided bob brings architectural precision to shorter hair lengths, proving that bobs can absolutely incorporate braided elements. This modern approach works for contemporary, fashion-forward individuals.
- This style works best on bob lengths ranging from chin to shoulder, either blunt or angled cuts.
- Section out a rectangular area near the temple on one or both sides, approximately one inch wide.
- Create a tight, flat three-strand or Dutch braid within this section, keeping it close to the scalp.
- The braid should run parallel to the face, creating a clean geometric line that follows the hairline.
- Secure the end of the braid behind the ear with a small clear elastic or bobby pins.
- The remaining hair stays loose and straight, creating contrast between the braided and non-braided sections.
- This style adds visual interest to simple bob cuts without requiring length or extensive styling time.
- Refresh the style daily by re-braiding for consistent geometric precision throughout the week.
8. Ladder Braid Half-Up Style

The ladder braid half-up style introduces an intricate braiding technique that creates a distinctive pattern resembling a ladder. This eye-catching yet sophisticated style suits various occasions from casual to semi-formal.
- Section out the top half of hair from temple to temple, creating a horizontal division across the crown.
- Create two thin vertical braids on either side of this section, leaving space between them.
- These vertical braids serve as the “rails” of the ladder structure.
- Take small horizontal sections between the two vertical braids and weave them through alternating sides.
- Each horizontal section threads under one vertical braid and over the other, creating the ladder rungs.
- Continue this pattern down several inches until you’ve created the desired ladder length.
- Secure all elements together and allow the remaining hair to flow freely below the braided section.
- This technique requires practice but creates a stunning visual effect that appears complex yet remains elegant.
9. Twisted Rope Braid Ponytail
The twisted rope braid ponytail offers a simpler alternative to traditional braiding while maintaining visual interest and texture. This two-strand technique creates a sleek, spiral effect perfect for modern aesthetics.
- Gather hair into a ponytail at your desired height, securing with a durable elastic.
- Divide the ponytail into two equal sections of hair.
- Twist each section clockwise (or in the same direction) multiple times until they begin to coil.
- While keeping tension on the twisted sections, wrap them around each other in a counterclockwise direction.
- The opposing directions create the rope effect that prevents the braid from unraveling.
- Continue twisting and wrapping until you reach the ends, then secure with a small elastic.
- This technique works particularly well on thick hair and creates a substantial, textured appearance.
- The rope braid remains secure throughout the day and suits both professional and casual environments.
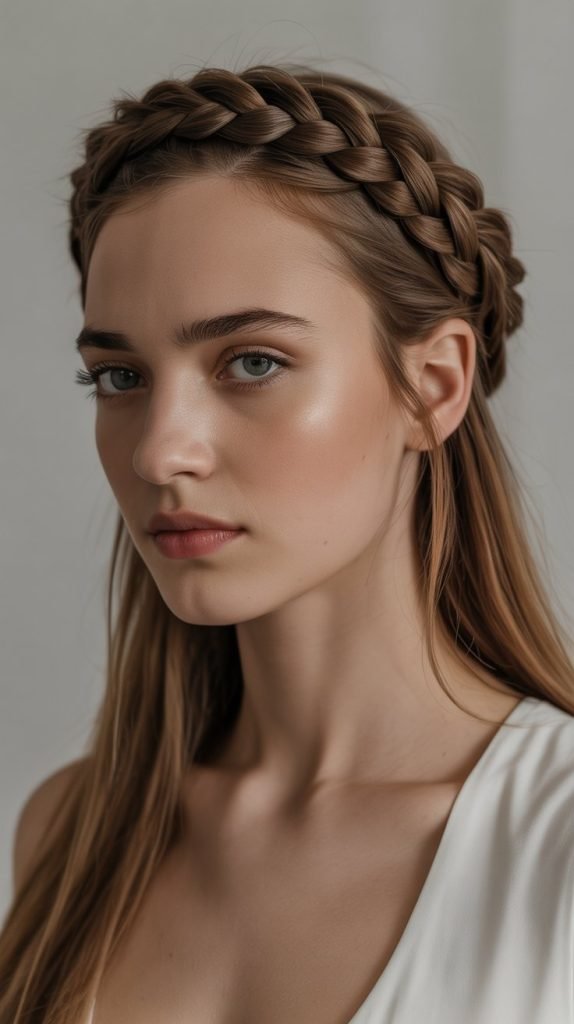
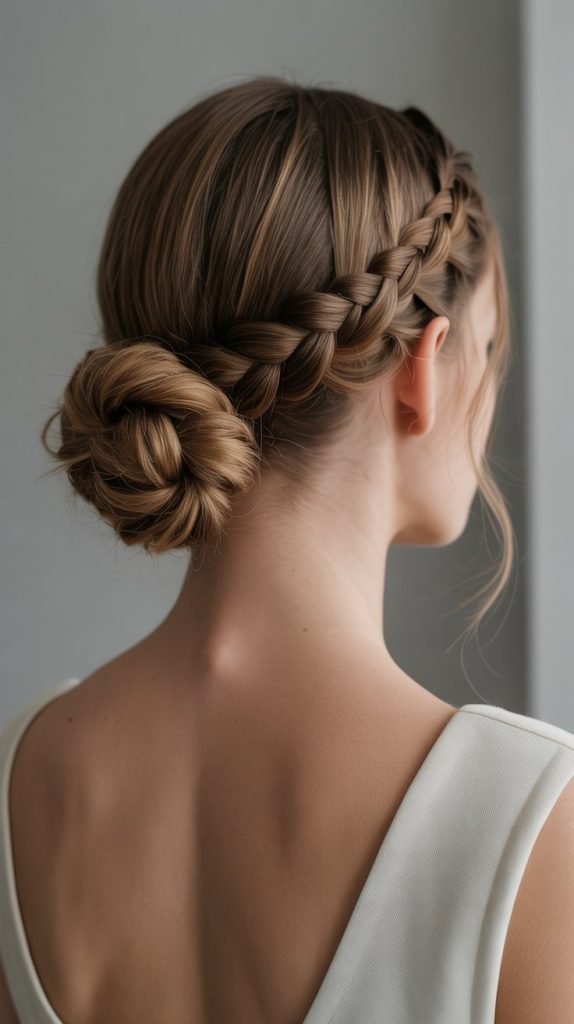
10. Braided Headband with Low Bun
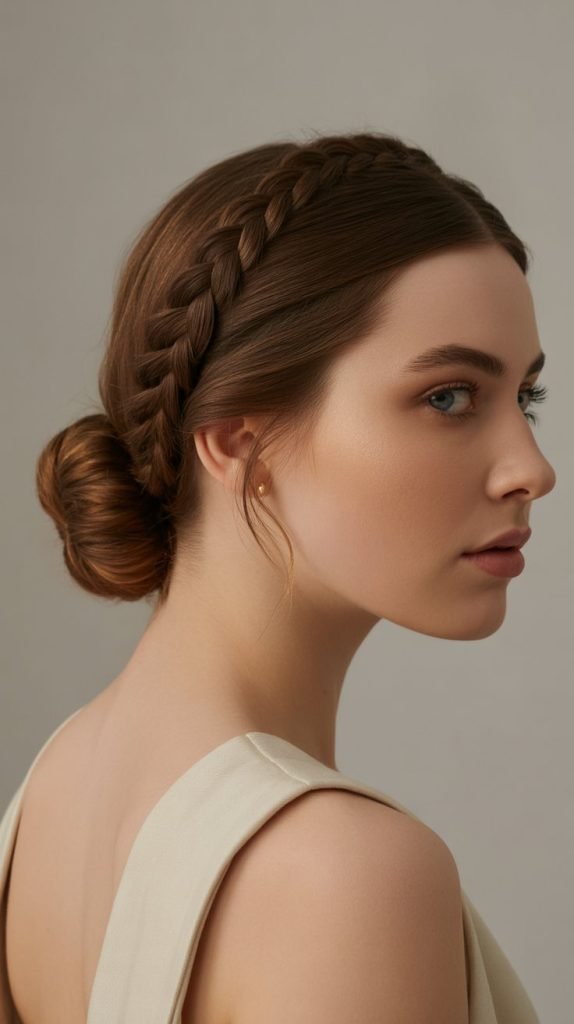
The braided headband with low bun combines two classic elements into one cohesive, elegant style. This approach keeps hair completely off the face while creating a soft, feminine silhouette.
- Section out a horizontal band of hair approximately two inches wide from temple to temple across the top of the head.
- Create a three-strand braid with this section, working from one side to the other across the crown.
- Keep the braid relatively tight and flat to ensure it stays positioned like a headband throughout the day.
- Secure the end of the braid temporarily with a small elastic or clip.
- Gather the remaining hair at the nape into a low ponytail, including the end of the braided section.
- Twist the ponytail and wrap it into a neat bun shape, securing with bobby pins.
- Ensure the braided headband section remains smooth and positioned correctly across the crown.
- This versatile style transitions beautifully from office settings to evening events with minimal adjustment.
11. Asymmetric Side Braid
The asymmetric side braid brings contemporary edge to traditional braiding by positioning everything off-center. This directional style flatters most face shapes and adds modern sophistication.
- Create a deep side part, positioning it several inches from your natural part for dramatic effect.
- Sweep all hair to one side, gathering everything over the shoulder opposite the part.
- Begin braiding just below the ear on the side with more hair, choosing your preferred braid technique.
- French, Dutch, fishtail, or traditional three-strand braids all work effectively with this asymmetric placement.
- Keep tension consistent throughout the braid to maintain a polished, intentional appearance rather than messy.
- Secure the end with an elastic, leaving a small amount of length at the bottom for movement.
- Consider wrapping a small section of hair around the elastic for a more refined finish.
- This style works exceptionally well for medium to long hair and suits both straight and wavy textures.
12. Micro Braids Accent in Straight Hair
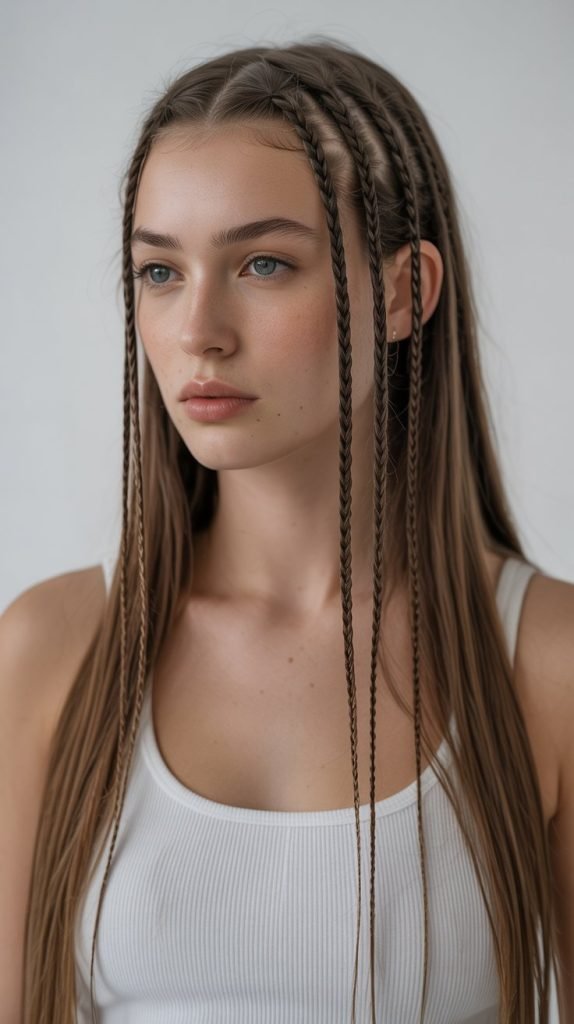
Micro braids accent in straight hair introduces subtle textural elements without overwhelming the overall sleek aesthetic. These tiny braids serve as sophisticated details rather than the main focus.
- Begin with freshly straightened hair using a flat iron for a smooth, polished base.
- Select random small sections throughout the hair, approximately the width of a pencil or smaller.
- Create tight three-strand braids with these sections, working from root to tip.
- These micro braids can be placed near the face, throughout the crown, or scattered randomly depending on preference.
- Vary the number of micro braids based on how much texture you want to introduce—three to seven braids typically provides subtle impact.
- Leave these micro braids in place while keeping the remaining hair perfectly straight for contrast.
- This technique adds dimension and interest to straight styles without requiring extensive styling time.
- The micro braids can remain in place for several days, even while restyling the remaining hair.
13. Corporate Dutch Braid
The corporate Dutch braid delivers workplace-appropriate styling with the visual interest of raised braiding technique. This single-braid approach maintains professionalism while showcasing personal style.
- Create a center part from forehead to crown, ensuring perfect symmetry for a professional appearance.
- Begin the Dutch braid at the crown, starting with three sections of hair.
- Remember that Dutch braiding crosses sections under the middle rather than over, creating the raised effect.
- Incorporate hair from both sides as you braid down the back of the head, maintaining even tension.
- Keep the braid centered and relatively tight for a polished look that lasts throughout the workday.
- Continue braiding until you reach the nape, then either secure and leave the length loose or continue braiding to the ends.
- Use a hair elastic that matches your hair color for a seamless, professional finish.
- This style keeps hair completely controlled and off the collar, making it ideal for professional environments.
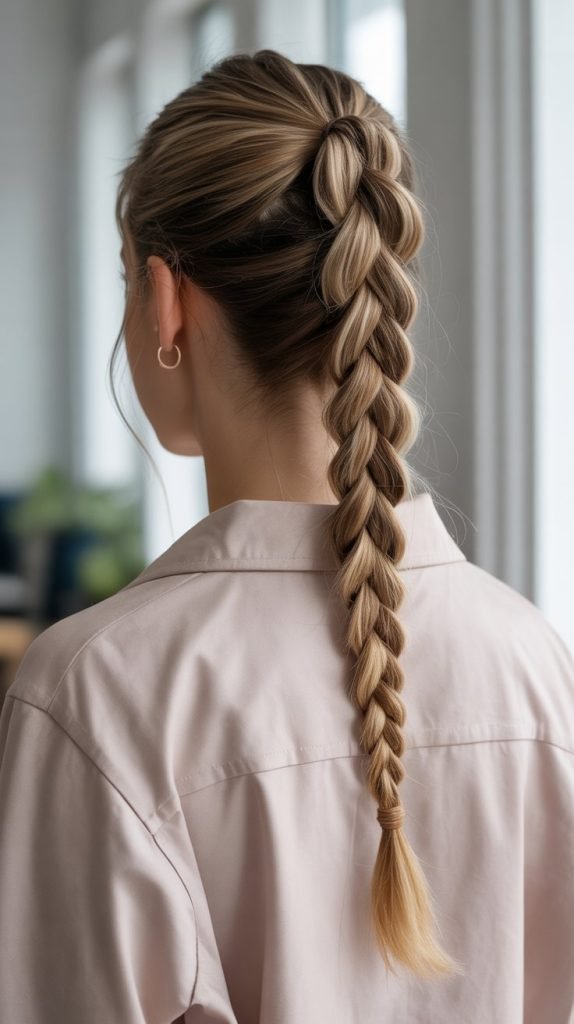
14. Braided Top Knot
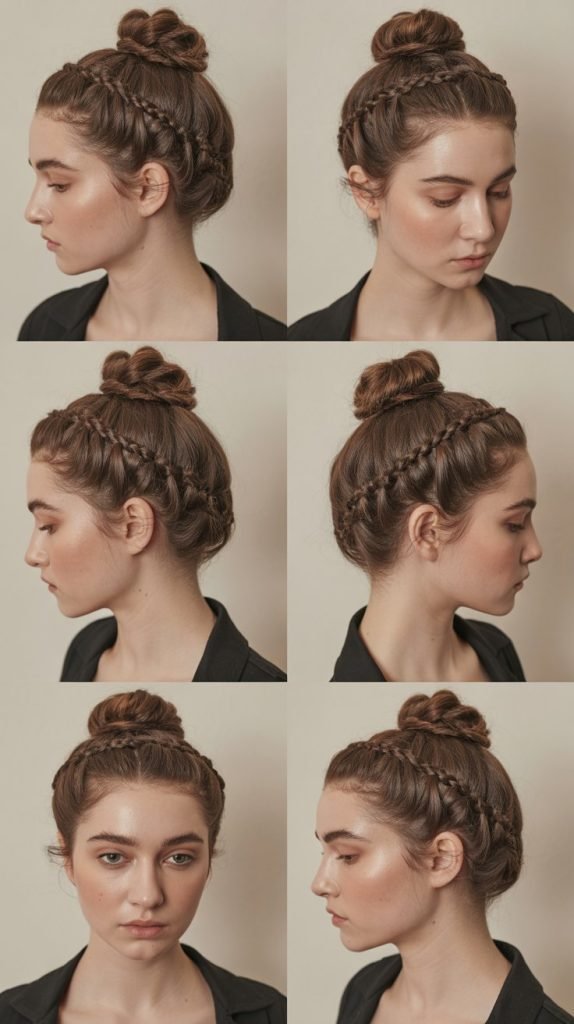
The braided top knot combines the modern popularity of top knots with the refined detail of braiding. This elevated style works for both casual weekends and dressed-up occasions.
- Flip your head forward and gather all hair into a high ponytail at the crown of the head.
- The positioning should be higher than a traditional ponytail, almost at the top of the head.
- Create a braid with the ponytail using your preferred technique—three-strand, fishtail, or rope braids all work well.
- Wrap the completed braid around the base of the ponytail in a circular pattern, building upward.
- Create a rounded knot shape rather than a flat bun by allowing the braid to stack loosely.
- Secure the knot with bobby pins inserted at different angles throughout the structure.
- Pull gently on sections of the braid to add volume and create a fuller, more substantial knot.
- This style works particularly well for second-day hair when natural texture provides better grip and hold.
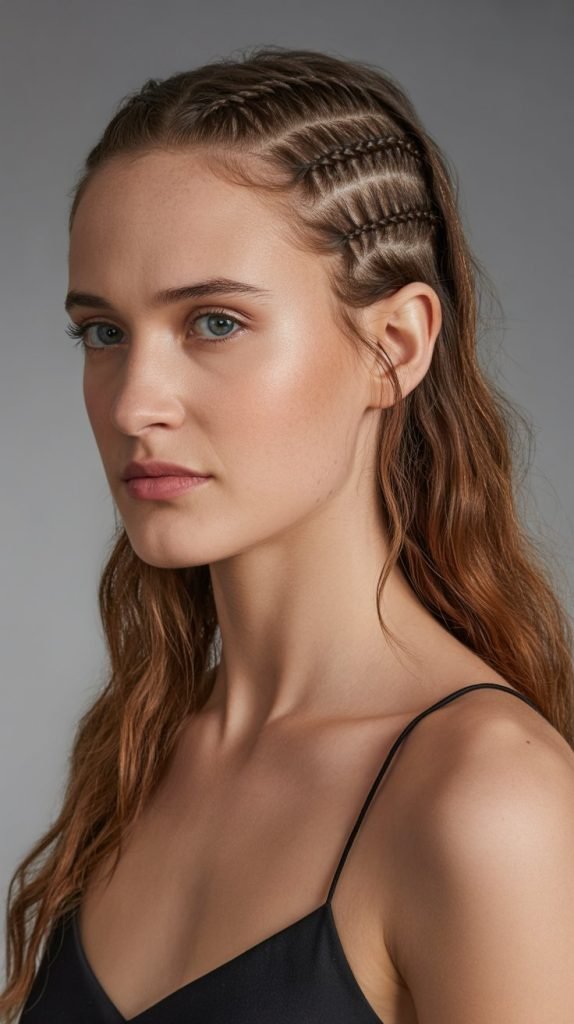
15. Parallel Micro Braids with Loose Waves
Parallel micro braids with loose waves blend structured linear elements with soft, romantic texture. This combination creates a balanced look that feels both intentional and effortless.
- Create soft waves throughout all hair using a large-barrel curling iron or heatless wave techniques.
- Section out a rectangular area near one temple, approximately two to three inches wide.
- Divide this section into two or three equal vertical strips for creating parallel braids.
- Create a thin three-strand braid with each strip, keeping them tight and running parallel to each other.
- Position these braids to run from the hairline back toward the ear, maintaining equal spacing between them.
- Secure the ends behind the ear with small bobby pins or clear elastics.
- The parallel lines create a geometric contrast against the soft, organic wave pattern in the remaining hair.
- This style offers a perfect balance between structured and relaxed aesthetics for versatile occasions.
16. Hidden Braids Underneath
Hidden braids underneath offer a secret styling element that adds dimension and interest without being immediately visible. This subtle approach appeals to minimalists who appreciate unexpected details.
- Section off the top layer of hair, leaving approximately 70% of your hair up and out of the way.
- Work with the underneath layer, creating one or several braids depending on hair thickness and desired effect.
- These hidden braids can be any technique—traditional three-strand, Dutch, or even fishtail variations.
- Once the underneath braids are complete and secured, release the top layer of hair to fall over them.
- The top layer conceals the braids, but they become visible with movement or when hair is worn up partially.
- This technique adds structural support and texture to the overall style without obvious braiding.
- Hidden braids work exceptionally well for fine hair, as they create the appearance of more volume and thickness.
- When you wear your hair half-up later, the hidden braids provide a surprising decorative element.
17. Zipper Braid
The zipper braid creates an intricate optical effect that resembles an actual zipper running through the hair. This advanced technique delivers maximum impact while maintaining sophistication.
- Create a center part from forehead to nape, dividing hair into left and right sections.
- Begin with a small section at the crown and create a tiny braid on each side of the part.
- Cross the left braid over to the right side and the right braid over to the left side.
- Incorporate these crossed braids into new braids on their respective new sides, adding additional hair.
- Continue this alternating pattern down the head, with braids crossing back and forth across the center part.
- The result resembles zipper teeth interlocking along a center line, creating a striking visual effect.
- This technique requires practice and patience but creates a truly unique and sophisticated look.
- Secure the ends together at the nape and allow any remaining length to hang freely or continue into a single braid.
18. Sleek Side-Part with Edge Braids
The sleek side-part with edge braids combines polished straight styling with delicate braided accents along the hairline. This refined look suits professional and formal occasions beautifully.
- Create a deep side part and apply smoothing serum throughout all hair for maximum sleekness.
- Flat iron hair completely, creating a polished, straight finish throughout all sections.
- Along the hairline on the heavier side of the part, section out small pieces approximately one-quarter inch wide.
- Create tiny, tight three-strand braids with each piece, keeping them flat against the head along the edge.
- These edge braids should be subtle and delicate, adding detail without overwhelming the sleek aesthetic.
- Secure each small braid with a micro-elastic or pin them discreetly behind the ear.
- Keep the overall look polished and smooth, with the edge braids serving as refined accents.
- This style works exceptionally well for fine to medium hair textures and formal events requiring sophisticated styling.
19. Stacked Braids Low Ponytail
The stacked braids low ponytail creates visual interest through layered braiding at the crown before transitioning into a classic ponytail. This approach adds dimension while maintaining a clean silhouette.
- Section the hair horizontally across the crown, creating three to four separate layers from front to back.
- Begin with the front section and create a braid running from temple to temple across the forehead area.
- Move to the next section back and create another horizontal braid, slightly overlapping the first.
- Continue this stacking pattern until you’ve created several horizontal braided layers across the crown.
- The braids should decrease in length as you work backward, creating a tapered effect.
- Gather all hair, including the ends of the braids, into a low ponytail at the nape.
- Secure with a strong elastic and optionally wrap a section of hair around the elastic for polish.
- This technique creates maximum impact at the crown while keeping the overall style controlled and elegant.
20. Angular Braided Updo
The angular braided updo uses directional braiding and strategic pinning to create a geometric, architectural style. This modern approach to formal updos suits fashion-forward individuals.
- Section hair into angular divisions rather than traditional horizontal or vertical sections.
- Create braids that run diagonally across the head, establishing strong directional lines.
- Each braid should be positioned at a deliberate angle, creating intersecting patterns across the head.
- Pin the braids in place using their angles to build a three-dimensional structure at the back of the head.
- The finished updo should have visible angular elements and clean lines rather than soft, romantic curves.
- Use strong-hold pins and products to maintain the architectural integrity of the style throughout the event.
- This technique works best for medium to long hair with enough length to create substantial braids.
- The angular approach creates a modern, editorial aesthetic perfect for contemporary formal occasions.
21. Infinity Braid Half-Up

The infinity braid half-up style incorporates a figure-eight braiding pattern that creates unique texture and dimension. This mathematical approach to braiding delivers sophisticated, eye-catching results.
- Section out the top half of hair from temple to temple across the crown area.
- The infinity braid uses a four-strand technique where strands weave in a figure-eight pattern.
- Divide the section into four equal parts and begin the infinity pattern by crossing outer strands toward the center in alternating figure-eight movements.
- This creates a wider, flatter braid with a distinctive woven appearance different from traditional braids.
- Continue the infinity braid down several inches, maintaining even tension throughout for consistency.
- Secure the end with a small elastic and allow the remaining hair below to flow naturally.
- The infinity pattern creates textural interest that appears complex while remaining sophisticated and refined.
- This technique works beautifully for both straight and slightly textured hair, showcasing the pattern clearly.
22. Wrapped Braided Ponytail Base
The wrapped braided ponytail base transforms a standard ponytail through elaborate wrapping techniques at the elastic. This detail-focused approach elevates everyday styling significantly.
- Create a ponytail at your desired height, leaving out two to three small sections at the base.
- These reserved sections should be approximately one inch wide and positioned around the ponytail perimeter.
- Create a braid with each reserved section, working all the way down to the ends.
- Wrap the first braid around the elastic base of the ponytail, circling it completely.
- Layer the second braid over the first, creating a stacked, woven effect at the base.
- If using a third section, wrap it in the opposite direction for added texture and dimension.
- Secure all braid ends underneath the wrapped base with bobby pins, keeping hardware invisible.
- This technique creates a substantial, decorative element at the ponytail base that appears intricate yet remains sophisticated.
23. Sleek Center-Part with Braided Nape
The sleek center-part with braided nape keeps the majority of hair smooth and straight while introducing braided detail at the neck. This strategic placement creates interest from behind while maintaining polish from the front.
- Create a precise center part from forehead to crown using a tail comb for accuracy.
- Flat iron all hair for a completely smooth, sleek finish throughout the top and sides.
- At the nape of the neck, section out the bottom two to three inches of hair in a horizontal division.
- Create one or multiple braids with this bottom section, keeping the braids relatively flat against the neck.
- The braids can run horizontally across the nape or vertically down the neck depending on preference.
- Pin the braids securely so they lay flat and don’t interfere with the smooth flow of the hair above.
- This creates a hidden detail that becomes visible when hair moves or is worn up partially.
- The contrast between sleek top sections and textured nape provides sophisticated, unexpected interest.
24. Diagonal Braided Half-Crown
The diagonal braided half-crown runs at an angle across the head, creating dynamic movement and contemporary asymmetry. This directional approach modernizes traditional crown braiding.
- Section out a diagonal band of hair running from one temple across the crown toward the opposite ear.
- This diagonal section should be approximately two inches wide, creating a substantial braid line.
- Begin a French or Dutch braid at the temple, working diagonally across the crown.
- Incorporate hair from both sides of the diagonal section as you work across the head.
- The diagonal angle creates visual interest and draws the eye across the head in an unexpected direction.
- Secure the end of the braid behind the opposite ear with bobby pins or a small elastic.
- Allow all remaining hair to flow naturally, creating contrast between the structured braid and loose sections.
- This style works particularly well for showcasing highlights or dimensional color through the braided section.
25. Knotted Braid Ponytail
The knotted braid ponytail replaces traditional braiding with a series of half-knots, creating a unique chain-like effect. This technique delivers visual impact while remaining surprisingly simple to execute.
- Gather hair into a ponytail at your preferred height and secure with a durable elastic.
- Divide the ponytail into two equal sections, holding one in each hand.
- Create a simple overhand knot by crossing the right section over the left and pulling through.
- Tighten the knot gently, positioning it close to the elastic base of the ponytail.
- Continue creating knots down the length of the ponytail, stacking them evenly.
- Each knot should sit directly below the previous one, creating a chain-like effect.
- Secure the final knot with a small elastic at the ends to prevent unraveling.
- This knotted technique creates a substantial, textured appearance that works beautifully for medium to thick hair.
26. Minimalist Single Accent Braid
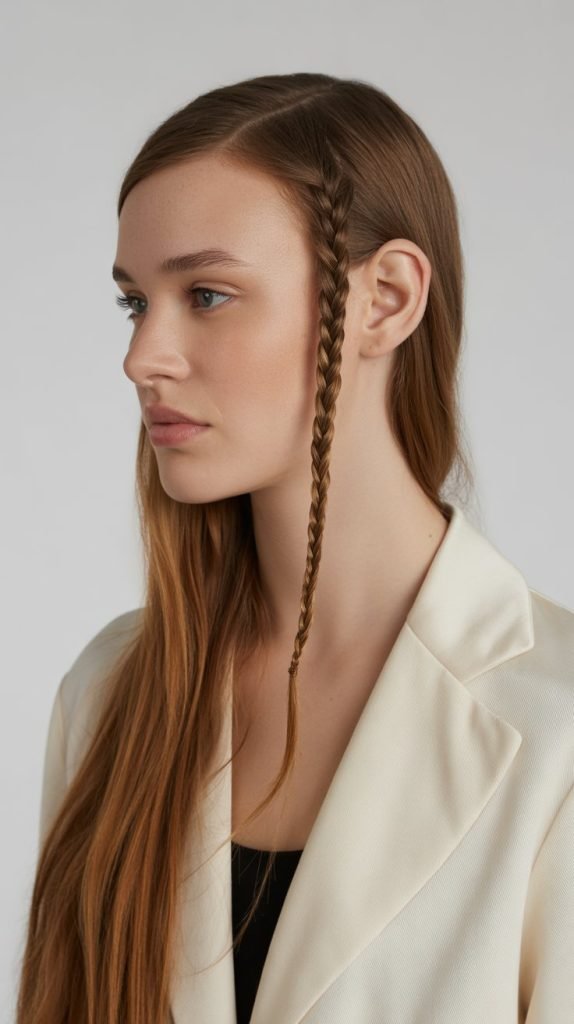
The minimalist single accent braid embraces the “less is more” philosophy with one perfectly placed braid. This understated approach suits contemporary, edited aesthetics perfectly.
- Style hair in your typical manner, whether straight, slightly waved, or in your natural texture.
- Select a single small section for braiding, choosing placement based on your face shape and styling preference.
- Common placements include one side of a center part, behind the ear, or at the temple area.
- Create a single, neat three-strand braid with this section, keeping it tight and precise.
- The braid should be subtle—approximately the width of a pencil or slightly larger.
- Secure the end with a small clear elastic or tuck and pin it discreetly behind the ear.
- This single braid serves as a signature detail without overwhelming the overall minimalist aesthetic.
- The approach works exceptionally well for professional environments where subtle personal style is appropriate.
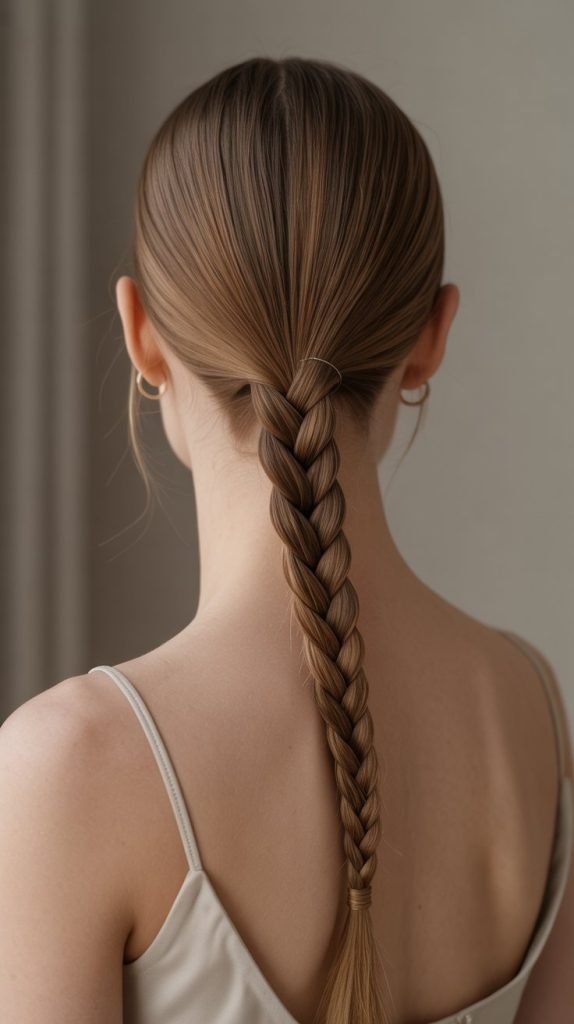
27. Structured Low Braided Ponytail
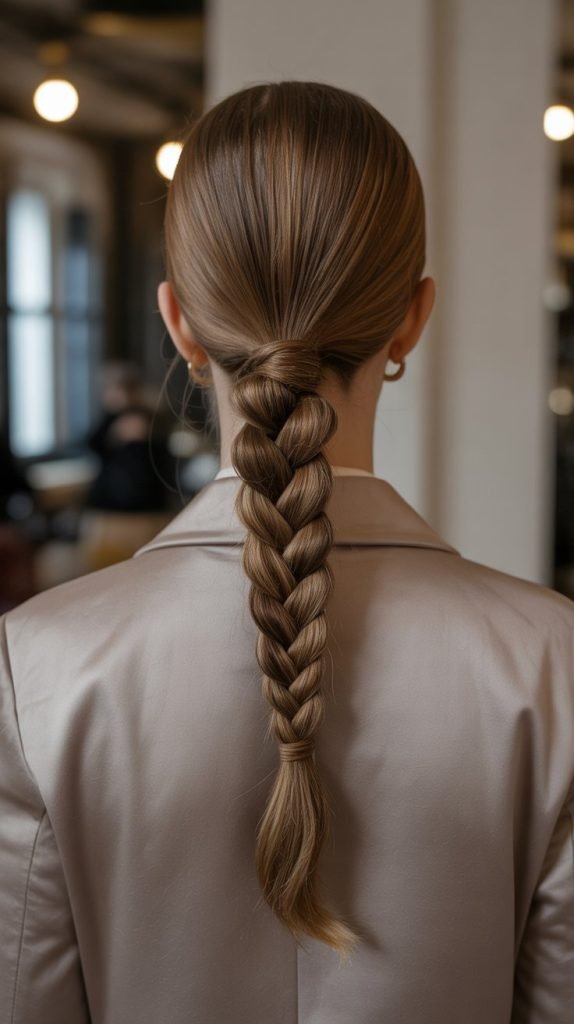
The structured low braided ponytail combines the simplicity of a low ponytail with the refinement of a braided length. This polished style bridges casual and formal occasions effortlessly.
- Apply smoothing product to hair and brush thoroughly to eliminate any texture or tangles.
- Create a low ponytail at the nape of the neck, ensuring the hair leading to the ponytail is completely smooth.
- Use a boar bristle brush and light hairspray to control any flyaways around the hairline and crown.
- Divide the ponytail into three equal sections and create a traditional three-strand braid down the entire length.
- Keep tension consistent throughout the braid to maintain uniformity and structure from top to bottom.
- Secure the end with an elastic, leaving approximately one inch of length at the bottom.
- For added polish, wrap a small section of hair around both the top elastic and bottom elastic.
- This timeless style works for professional settings, formal events, or elevated everyday wear with equal success.
Troubleshooting Common Braiding Challenges
- Challenge: Braids appear messy or uneven
- Solution: Ensure all sections are equal in size before beginning and maintain consistent tension throughout the braiding process.
- Challenge: Flyaways disrupt the polished appearance
- Solution: Apply a small amount of smoothing serum or pomade to a toothbrush and gently brush over problem areas for control without heaviness.
- Challenge: Braids fall out or loosen throughout the day
- Solution: Start with second-day hair for better texture and grip, or apply dry shampoo or texturizing spray before braiding.
- Challenge: Difficulty seeing the back while braiding
- Solution: Use a handheld mirror positioned to reflect your bathroom mirror, or practice the braiding motion without looking until muscle memory develops.
- Challenge: Arms become tired during complex braiding
- Solution: Work in sections, taking breaks between braiding phases, or practice simpler techniques until building stamina for more elaborate styles.
- Challenge: Hair is too slippery to hold braids
- Solution: Avoid conditioning the hair on braiding day, or apply a light texturizing product to create grip without visible residue.
- Challenge: Braids appear flat or lack dimension
- Solution: Gently pull on the outer edges of braid sections after completing (called pancaking) to add width and fullness.
Hair Care Tips for Healthy Braided Styles
Maintaining hair health remains paramount when regularly styling with braids, as tension and manipulation can impact hair condition over time.
- Never braid hair when soaking wet, as this causes excessive stress on strands and can lead to breakage over time.
- Alternate between braided and non-braided styles throughout the week to give hair follicles rest from directional tension.
- Apply a leave-in conditioning treatment before braiding to provide protection against friction and maintain moisture levels.
- Remove braids gently by carefully cutting elastics rather than pulling them through hair, which can cause unnecessary breakage.
- Avoid sleeping in tight braided styles unless specifically designed for overnight wear, as this can create tension headaches and strain.
- Deep condition weekly to replenish moisture and repair any damage from styling manipulation and product use.
- Pay attention to edges and hairline, where hair is most delicate, by keeping braids looser in these areas.
- Use silk or satin pillowcases when sleeping with braided styles to reduce friction and preserve the style’s integrity.
Adapting Braided Styles for Different Settings
Professional Workplace
For corporate environments, prioritize sleek execution, controlled volume, and classic placement. Styles like the Corporate Dutch Braid, Sleek Low Braided Bun, and Structured Low Braided Ponytail deliver polish without appearing too styled or attention-seeking. Keep braids tight and smooth, avoiding volume or texture that reads as casual.
Formal Events
Evening occasions allow for more elaborate techniques and dramatic placement. The Side-Swept Braided Updo, Angular Braided Updo, and Inverted French Braid Chignon showcase technical skill while maintaining elegance. Consider incorporating accessories like minimalist pins or cuffs at strategic points for added sophistication.
Casual Weekend
Relaxed settings permit slightly looser execution and more experimental placement. The Braided Top Knot, Twisted Rope Braid Ponytail, and Parallel Micro Braids with Loose Waves offer effortless style without requiring perfection. These styles can be created quickly and still look intentionally styled.
Active Lifestyle
For workouts or outdoor activities, prioritize security and longevity over aesthetic details. Double Dutch Braids into Low Ponytail, Braided Ponytail Wrap, and Stacked Braids Low Ponytail keep hair completely controlled while withstanding movement and perspiration.
Color and Highlight Considerations
Braided styles interact uniquely with hair color, creating opportunities to showcase dimensional coloring through the weaving technique.
- Highlights become more visible in braided sections as the weaving naturally separates strands and displays color variation.
- Balayage and ombre techniques look particularly striking in braids like the Structured Low Braided Ponytail, where color transition becomes more apparent.
- Single-color hair shows braid texture more clearly, making it ideal for intricate techniques like the Zipper Braid or Infinity Braid.
- Subtle lowlights add depth to braided sections without creating dramatic contrast, working well for professional settings.
- Face-framing highlights gain emphasis when incorporated into styles like the French Braid Crown or Diagonal Braided Half-Crown.
Time-Saving Strategies for Regular Braiding
When incorporating braided styles into your regular routine, efficiency becomes essential for maintaining consistency without excessive time investment.
- Practice the same style repeatedly until execution becomes second nature, reducing styling time by half or more with familiarity.
- Prepare hair the night before by applying products and rough-drying to appropriate texture, leaving only the braiding for morning.
- Keep all tools in a dedicated container at your styling station to eliminate time wasted searching for supplies.
- Choose simpler braiding techniques for busy mornings, reserving complex styles for occasions when you have adequate time.
- Learn to braid without perfect visibility of back sections by developing muscle memory for consistent hand positioning.
- Section hair the night before for complex styles, securing sections with soft scrunchies to maintain divisions overnight.
- Invest in quality tools that make the process smoother and faster rather than fighting against inadequate implements.
Face Shape Recommendations
Different face shapes benefit from strategic braid placement that creates balance and enhances natural features.
Oval Face Shape
- Nearly all braided styles work beautifully for oval faces due to balanced proportions
- Consider styles that showcase the symmetry: Corporate Dutch Braid, Sleek Center-Part with Braided Nape
- Experiment freely with crown placements and various heights
Round Face Shape
- Styles with height at the crown elongate the face visually
- Recommended: Braided Top Knot, Inverted French Braid Chignon, high placement styles
- Avoid: Heavy braiding directly at the sides which can emphasize width
Square Face Shape
- Soft asymmetry and side-swept elements soften angular features
- Recommended: Asymmetric Side Braid, Side-Swept Braided Updo, diagonal placements
- Styles that create movement around the jawline work particularly well
Heart Face Shape
- Volume at the jawline balances a wider forehead
- Recommended: Structured Low Braided Ponytail, styles with fullness at the nape
- Avoid: Excessive volume at the crown which emphasizes the upper face
Long/Oblong Face Shape
- Width and horizontal elements create balance
- Recommended: French Braid Crown with Straight Ends, styles with horizontal braiding
- Avoid: Styles that add excessive height, which further elongates proportions
Transitioning from Boho to Modern Braided Aesthetics
Understanding the distinction between boho and modern braided styles helps in achieving the sophisticated look this article emphasizes.
Boho Braiding Characteristics to Avoid
- Deliberately messy or undone appearance
- Heavy texturizing creating “lived-in” looks
- Multiple loose, flowing braids throughout
- Incorporation of accessories like feathers, flowers, or beads
- Emphasis on volume and looseness over structure
Modern Braiding Characteristics to Embrace
- Clean execution with controlled tension
- Smooth sections leading to and from braids
- Geometric or architectural placement decisions
- Minimal or no accessories, focusing on technique
- Polish and intention in every element
The fundamental difference lies in intentionality versus casualness—modern braids appear deliberate, structured, and refined, while boho styles embrace organic, relaxed imperfection.
Seasonal Considerations for Braided Styles
Different seasons present unique challenges and opportunities for maintaining braided hairstyles throughout the year.
Summer Considerations
- Humidity challenges style longevity and can create frizz around braided sections
- Use anti-humidity products before braiding to create a protective barrier
- Consider styles that keep hair completely off the neck for comfort in heat
- Chlorine and salt water can dry hair, requiring additional conditioning before braiding
Winter Considerations
- Static electricity disrupts smooth braided styles, requiring anti-static products
- Hats and scarves can disturb braiding, making low placement styles more practical
- Dry indoor heating requires extra moisture to prevent brittle hair that breaks during manipulation
- Cold weather makes intricate styling indoors preferable to outdoor rushing
Transitional Seasons
- Variable weather requires versatile styles that work across temperature ranges
- Moderate humidity levels create ideal conditions for trying new braiding techniques
- These seasons offer perfect practice opportunities before summer and winter challenges
Professional Braiding Technique Tips
Elevating your braiding from functional to exceptional requires attention to specific technical details.
- Maintain consistent section size throughout the entire braid for uniform appearance and professional finish.
- Keep tension even from beginning to end, as varying pressure creates irregular texture that appears unintentional.
- Work with appropriate hair moisture levels—slightly damp for structure, completely dry for maximum hold and longevity.
- Position your hands efficiently, keeping elbows down and working close to the head to reduce arm fatigue.
- Complete each crossing motion fully before beginning the next, rather than rushing through the sequence.
- Check your work periodically using mirrors to ensure the braid follows your intended path and maintains straightness.
- Secure ends properly with elastics sized appropriately for your hair thickness, preventing slippage throughout wear.
Conclusion
The world of braided hairstyles extends far beyond festival fashion and casual bohemian aesthetics, offering sophisticated options for every modern woman’s lifestyle.
Through this comprehensive exploration of 27 Chic Braided Hairstyles for Modern Women (No Boho Styles), you’ve discovered techniques ranging from simple accent braids to architectural updos, each designed to complement contemporary wardrobes and professional environments.
These styles prove that braiding can be sleek, polished, and perfectly suited for corporate settings, formal events, and everyday elegance.
By mastering even a few of these techniques, you’ll expand your styling repertoire significantly, always having an appropriate braided option regardless of the occasion.
The key lies in clean execution, intentional placement, and understanding that modern braided styles prioritize structure and refinement over relaxed, undone textures.
Whether you’re preparing for an important business meeting, attending an elegant evening event, or simply elevating your daily look, these braided styles offer timeless sophistication that transcends fleeting trends.
Embrace the versatility of braiding as a tool for creating polished, contemporary hairstyles that showcase your personal style while maintaining the professionalism and elegance that modern life demands.