Homecoming season brings excitement, dress shopping, and the eternal question: what to do with your hair? If you’re looking for stunning hairstyles that won’t eat up your entire morning, you’ve come to the right place.
This comprehensive guide will teach you How to Do Cute HoCo Updos in Under 10 Minutes, featuring five gorgeous styles that are both elegant and achievable.
From classic buns with modern twists to romantic braided updos, each style comes with step-by-step instructions, helpful tips, and time-saving tricks that will have you looking red-carpet ready without the stress.
Whether you have fine hair, thick locks, or something in between, these quick and beautiful updos will ensure you spend less time styling and more time enjoying your special night.
1. The Classic Twisted Low Bun
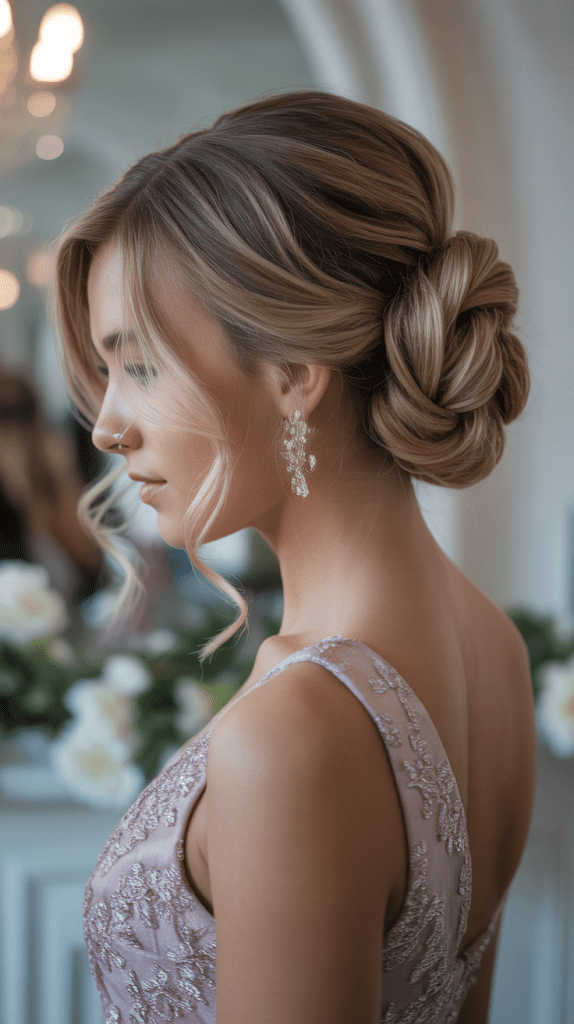
The twisted low bun combines timeless elegance with modern sophistication, making it perfect for any homecoming dress style.
This versatile updo works exceptionally well for medium to long hair lengths and can be dressed up with accessories or kept simple for a clean, polished look.
What You’ll Need:
- Hair elastics (2-3)
- Bobby pins
- Light-hold hairspray
- Texturizing spray (optional)
Step-by-Step Instructions:
- Start with day-old hair for better grip and texture, or apply texturizing spray to clean hair
- Create a deep side part and gather all hair into a low ponytail at the nape of your neck
- Secure the ponytail with a clear elastic band, leaving it slightly loose for a softer look
- Divide the ponytail into two equal sections and twist each section in opposite directions
- Wrap the twisted sections around the base of the ponytail, creating a figure-eight pattern
- Secure with bobby pins, tucking the ends under the bun and pinning them in place
- Gently pull at the bun to create volume and texture, making it appear fuller
- Finish with a light mist of hairspray to hold everything in place throughout the evening
Pro Tips:
- Leave a few face-framing pieces loose for a romantic touch
- Add pearl pins or small flowers for extra homecoming glamour
- This style works best on hair that’s at least shoulder-length
2. Messy Side Braid Crown

The messy side braid crown offers a bohemian-chic vibe that’s perfect for outdoor homecoming events or rustic themes.
This effortless-looking style actually provides excellent hold while creating beautiful texture and movement that photographs wonderfully.
What You’ll Need:
- Small clear elastics
- Bobby pins in your hair color
- Texturizing spray
- Light-hold hairspray
Step-by-Step Instructions:
- Apply texturizing spray throughout damp or dry hair for enhanced grip and volume
- Create a deep side part on your preferred side, sweeping most hair to one direction
- Begin a loose Dutch braid starting from the heavy side of your part, incorporating hair as you move along your hairline
- Continue braiding around your head like a headband, keeping the braid loose and slightly messy
- When you reach the opposite ear, secure the braid temporarily with a small elastic
- Gather the remaining loose hair into a low side ponytail on the lighter side of your part
- Twist the ponytail loosely and wrap it into a messy bun, securing with bobby pins
- Remove the temporary elastic from your braid and wrap the braid end around or over the bun
- Gently tug at the braid to create a fuller, more relaxed appearance
- Pin everything securely and finish with hairspray for long-lasting hold
Styling Variations:
- Add small flowers or greenery woven through the braid for a garden party feel
- Use colored bobby pins that match your dress for a coordinated look
- Pull out a few wispy pieces around your face for added softness
3. High Ballerina Bun with Face-Framing Pieces

The high ballerina bun brings classic dance-inspired elegance to homecoming night while keeping hair completely off the neck and shoulders.
This sophisticated updo works beautifully with strapless dresses and statement earrings, creating a clean silhouette that highlights your neckline and facial features.
What You’ll Need:
- Brush or fine-tooth comb
- Strong-hold elastic
- Bobby pins
- Hair donut or sock bun maker
- Strong-hold hairspray
- Hair gel or smoothing serum
Step-by-Step Instructions:
- Brush hair smoothly upward and gather into a high ponytail at the crown of your head
- Apply a small amount of gel or smoothing serum to tame any flyaways around the hairline
- Secure the ponytail tightly with a strong elastic, ensuring it sits exactly where you want the bun
- Slide the hair donut over the ponytail, positioning it at the base against your scalp
- Spread your hair evenly around the donut, covering it completely with smooth sections
- Pull a second elastic over the hair-covered donut to secure everything in place
- Twist the remaining hair lengths and wrap them around the base of the bun
- Secure with bobby pins, tucking all ends under and out of sight
- Leave 2-3 small sections loose around your face, curling them lightly with your fingers
- Spray the entire style with strong-hold hairspray for maximum staying power
Finishing Touches:
- Use a small brush with hairspray to smooth any bumps or imperfections
- Consider adding a decorative hair pin or small tiara for extra homecoming sparkle
- This style pairs beautifully with bold makeup looks
4. Romantic Side-Swept Chignon
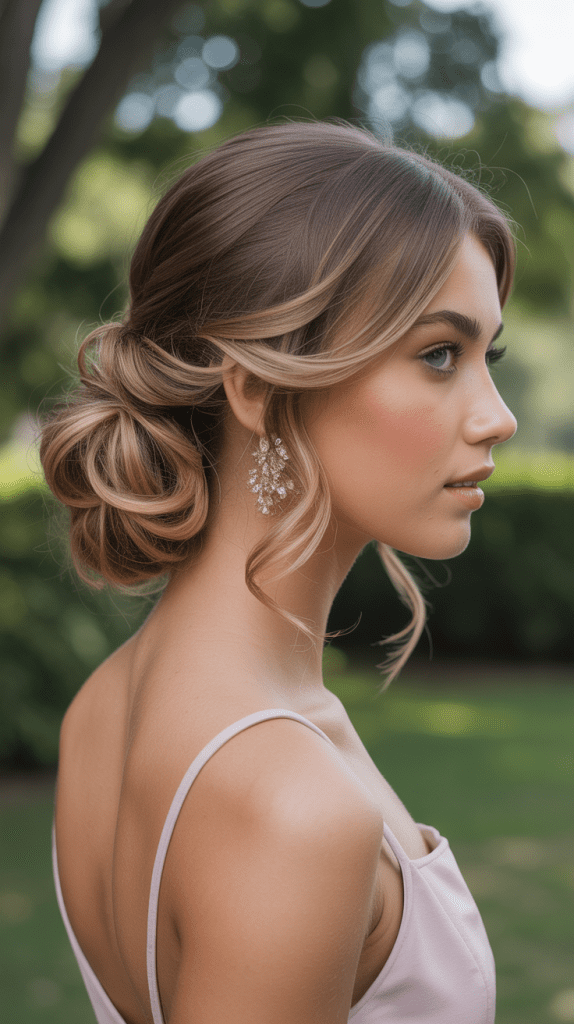
The romantic side-swept chignon embodies timeless Hollywood glamour while remaining surprisingly quick to achieve.
This asymmetrical updo creates beautiful movement and works exceptionally well for girls with layers or face-framing pieces, offering sophistication with a touch of modern flair.
What You’ll Need:
- Curling wand or hot rollers
- Hair elastics
- Bobby pins
- Texturizing spray
- Medium-hold hairspray
Step-by-Step Instructions:
- Start by creating loose curls throughout your hair using a curling wand with a 1.5-inch barrel
- Allow curls to cool completely, then gently brush through them to create soft waves
- Create a dramatic side part, sweeping the majority of hair to one side
- Gather the hair loosely at the nape of your neck, slightly off to one side
- Twist the gathered hair gently, not too tightly, to maintain the soft wave texture
- Roll the twisted hair upward and inward, creating a loose chignon shape
- Secure the chignon with bobby pins, allowing some pieces to remain slightly loose for texture
- Pull gently at the chignon to create volume and a more relaxed, romantic appearance
- Leave the front section on the heavy side of your part loose, sweeping it across your forehead
- Pin the loose front section behind one ear, creating an elegant asymmetrical look
Customization Options:
- Add vintage-inspired hair accessories like pearl combs or jeweled pins
- Incorporate small braids within the chignon for added detail
- Adjust the height of the chignon based on your dress neckline
5. Quick Dutch Braid Updo

The quick Dutch braid updo combines the intricate look of braided styles with the speed needed for busy homecoming preparation.
This versatile technique works well for all hair textures and can be adapted to match both casual and formal dress codes while providing secure hold for dancing.
What You’ll Need:
- Hair elastics (2-3 small ones)
- Bobby pins
- Texturizing spray
- Light-hold hairspray
- Rat-tail comb for parting
Step-by-Step Instructions:
- Apply texturizing spray to add grip and volume to your hair before styling
- Create a center part from your forehead to the crown, dividing the front section into two parts
- Begin a Dutch braid on one side, starting at your temple and braiding toward the back
- Continue the Dutch braid, incorporating hair from along your hairline as you move backward
- Repeat the same process on the other side, creating a mirror image Dutch braid
- Secure both braids temporarily with small elastics when you reach the nape area
- Gather all remaining loose hair, including the braid ends, into a low ponytail
- Twist the ponytail and wrap it into a bun, securing with bobby pins throughout
- Remove the temporary elastics from your braids and arrange them over and around the bun
- Tuck the braid ends into the bun and secure with additional bobby pins as needed
- Gently pull at the braids to create fuller, more textured-looking sections
Advanced Techniques:
- Create multiple smaller Dutch braids for a more intricate appearance
- Weave ribbon through the braids to match your homecoming dress
- Add small decorative pins along the braid pathways
Essential Tips for Long-Lasting Homecoming Updos
Creating updos that survive an entire homecoming celebration requires strategic preparation and the right techniques.
These professional tips will help ensure your chosen style stays beautiful from the first photo to the last dance of the evening.
- Start with properly prepped hair by washing it the day before your event for optimal texture and hold
- Invest in quality bobby pins that match your exact hair color to blend seamlessly when securing your updo
- Use the “bobby pin sandwich” technique by crossing two pins in an X-shape for maximum security
- Apply texturizing spray or dry shampoo before styling to create grip and prevent slipping
- Set your completed updo with a flexible-hold hairspray rather than heavy lacquer for natural movement
- Pack a small emergency kit with extra bobby pins, a travel-size hairspray, and a small comb
- Practice your chosen style at least once before homecoming night to identify any potential issues
- Take photos of your completed updo from multiple angles to help with touch-ups later
Mastering the art of How to Do Cute HoCo Updos in Under 10 Minutes opens up a world of styling possibilities for your special night.
These five versatile techniques prove that you don’t need hours in front of the mirror or expensive salon visits to achieve stunning homecoming hair.
With a little practice and the right approach, you can create elegant, long-lasting updos that complement your dress, enhance your natural beauty, and give you confidence to dance the night away.
Remember that the best hairstyle is one that makes you feel comfortable and beautiful, so choose the option that speaks to your personal style and makes you excited to celebrate this memorable milestone.