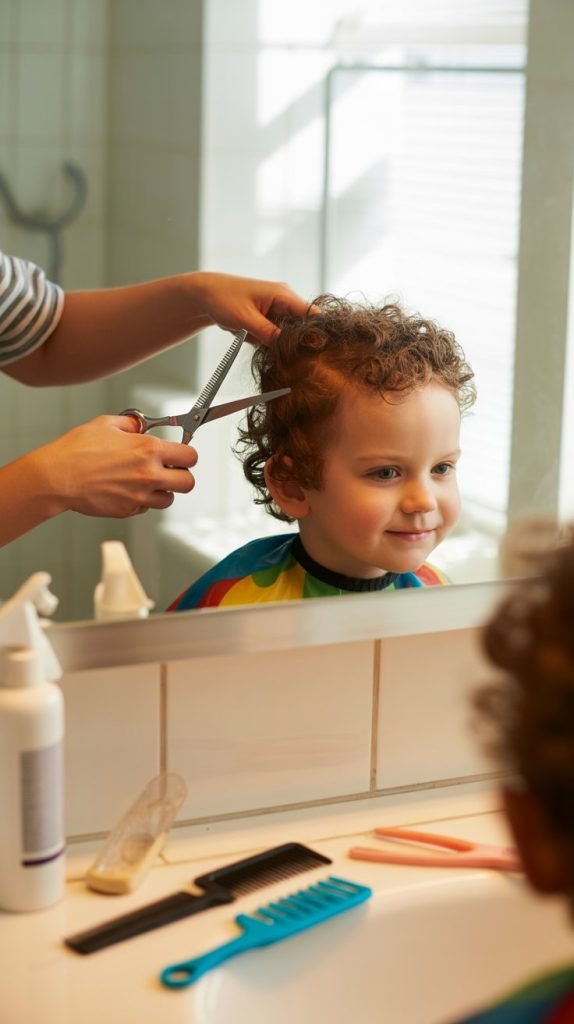
Cutting your boy’s curly hair at home might seem intimidating at first, but with the right techniques and tools, you can achieve professional-looking results while saving time and money.
How to Cut Your Boy’s Curly Hair at Home: Complete Guide will walk you through every step of the process, from understanding your child’s unique curl pattern to mastering the final styling touches.
This comprehensive guide covers essential tools you’ll need, preparation steps to ensure success, detailed cutting techniques specifically designed for curly hair, and troubleshooting tips for common challenges.
Whether you’re a parent looking to maintain your son’s haircut between salon visits or hoping to become his primary stylist, this article provides the knowledge and confidence you need to handle those beautiful curls with care and precision.
1. Understanding Your Boy’s Curl Type and Hair Texture

Before you pick up the scissors, it’s crucial to identify your son’s specific curl pattern and hair texture, as this knowledge will guide every decision you make during the cutting process.
Curly hair behaves differently than straight hair and requires specialized approaches to avoid unintended results like excessive shrinkage or uneven lengths.
Recognizing Different Curl Patterns
- Type 2 (Wavy) hair forms an S-shape and tends to be the easiest curl type to cut at home since it has less shrinkage.
- Type 3 (Curly) hair creates well-defined spiral curls or ringlets that bounce back when stretched, requiring careful attention to cutting while dry.
- Type 4 (Coily) hair features tight zigzag patterns with significant shrinkage, often up to 75% of its actual length when stretched.
- Mixed curl patterns are common, where different sections of the head display varying curl types that need individual attention.
- Understanding shrinkage is essential because curly hair can appear much shorter when dry than when wet or stretched.
Assessing Hair Density and Porosity
- Hair density refers to how many individual strands grow per square inch on the scalp, ranging from thin to thick.
- Low-density hair shows more scalp visibility and requires lighter layering techniques to maintain volume.
- High-density hair appears fuller and thicker, often benefiting from strategic thinning to reduce bulk and improve curl definition.
- Hair porosity indicates how well the hair absorbs and retains moisture, affecting how you’ll prep the hair before cutting.
- High-porosity curls tend to be drier and more fragile, requiring extra care during the cutting process to prevent breakage.
2. Essential Tools and Products for Cutting Curly Hair
Having the right equipment makes the difference between a frustrating experience and a successful home haircut. Quality tools specifically designed for cutting curly hair will give you better control and more professional results.
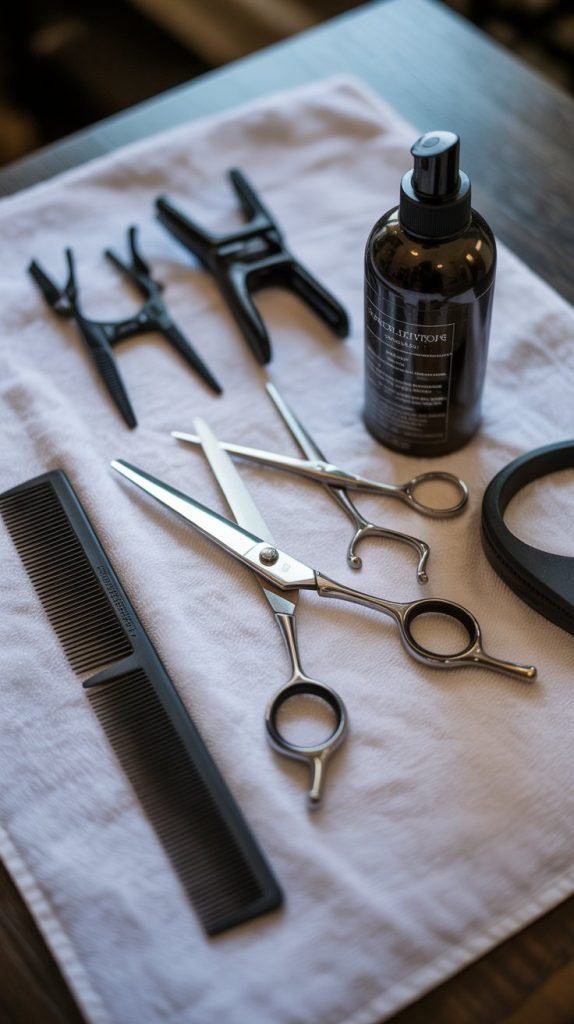
Must-Have Cutting Tools
- Professional haircutting shears with sharp blades (at least 5.5 to 6.5 inches long) are essential for clean cuts that won’t damage the curl structure.
- A wide-tooth comb or detangling brush helps separate curls without disrupting their natural pattern or causing breakage.
- Sectioning clips (at least 6-8) allow you to divide the hair into manageable sections for precise cutting.
- A spray bottle filled with water helps keep the hair slightly damp during the cutting process if you’re not cutting completely dry.
- A quality hair-cutting cape or large towel protects clothing and makes cleanup easier after the cut.
- A handheld mirror enables you to check the back and sides for evenness throughout the cutting process.
- Thinning shears can be useful for reducing bulk in thick, dense curly hair without sacrificing length.
Recommended Hair Products
- A leave-in conditioner or detangling spray makes the hair more manageable before cutting and helps define curls afterward.
- Natural oils like coconut, jojoba, or argan oil can be applied lightly to add slip and make sectioning easier.
- Curl-defining cream or gel will be needed after the cut to style and set the hair in its natural pattern.
- A sulfate-free shampoo should be used to cleanse the hair before cutting without stripping natural oils.
- Deep conditioning treatments help strengthen the hair before cutting, especially if it’s been damaged or is particularly dry.
3. Preparing Your Child and the Cutting Space
Proper preparation sets the stage for a smooth, stress-free haircutting experience for both you and your son. Creating the right environment and getting your child comfortable with the process can make all the difference.
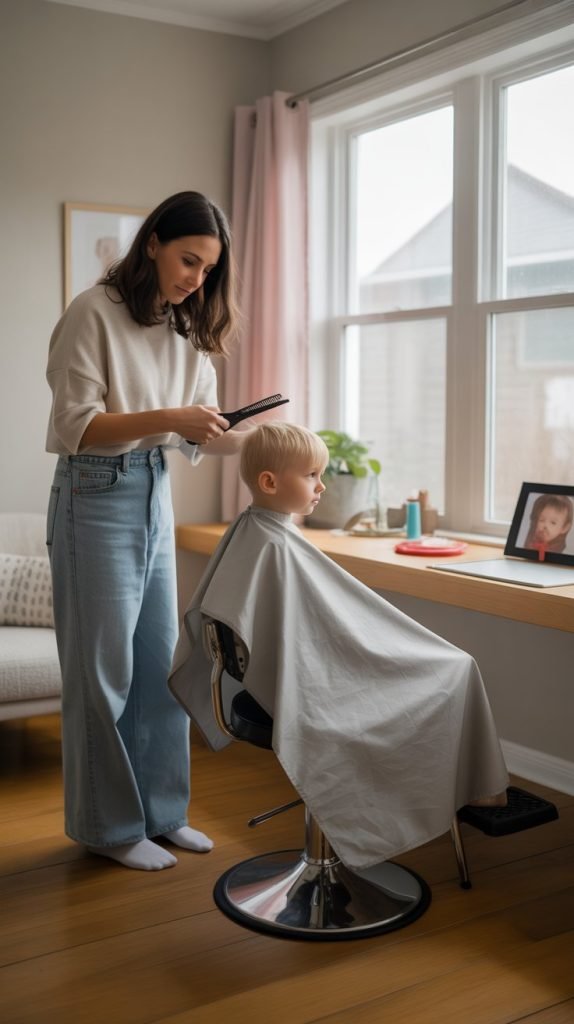
Setting Up Your Workspace
- Choose a well-lit area, preferably near a window with natural light, so you can clearly see what you’re cutting.
- Position your child in a chair that’s the right height for you to work comfortably without straining your back.
- Lay down towels or a plastic sheet to catch hair clippings and make cleanup easier afterward.
- Have all your tools within arm’s reach but safely away from your child’s grabbing distance.
- Set up entertainment like a tablet with favorite shows or music to keep your son occupied during the cut.
- Ensure the room temperature is comfortable, as the process may take 30-45 minutes for a thorough cut.
Preparing Your Child’s Hair
- Start with freshly washed hair using a sulfate-free shampoo to remove any product buildup or dirt.
- Apply a generous amount of conditioner and gently detangle the hair in the shower using your fingers or a wide-tooth comb.
- For most curly haircuts, cutting on dry, styled hair is preferred because you can see the true curl pattern and length.
- If cutting dry, apply a leave-in conditioner and curl cream, then allow the hair to air-dry completely in its natural state.
- For very tangled or matted hair, you may need to work in sections with detangling spray before attempting to cut.
- Take photos of your child’s hair from multiple angles before cutting to reference the starting point and desired outcome.
4. Basic Curly Hair Cutting Techniques
Mastering fundamental cutting techniques specifically designed for curly hair will help you achieve balanced, natural-looking results.
These methods respect the curl pattern and prevent common mistakes like creating pyramid-shaped or unevenly textured hair.
The Dry Cutting Method
- Dry cutting is the gold standard for curly hair because it allows you to see exactly how each curl will fall after cutting.
- Always cut curls in their natural, dried state rather than when wet, as wet curls stretch significantly longer than their dried length.
- Work with individual curl clumps rather than combing through the hair, which disrupts the natural pattern.
- Hold each curl at its base and trim conservatively, as you can always cut more but cannot add length back.
- Start with less and evaluate frequently, as curly hair bounces up significantly after cutting.
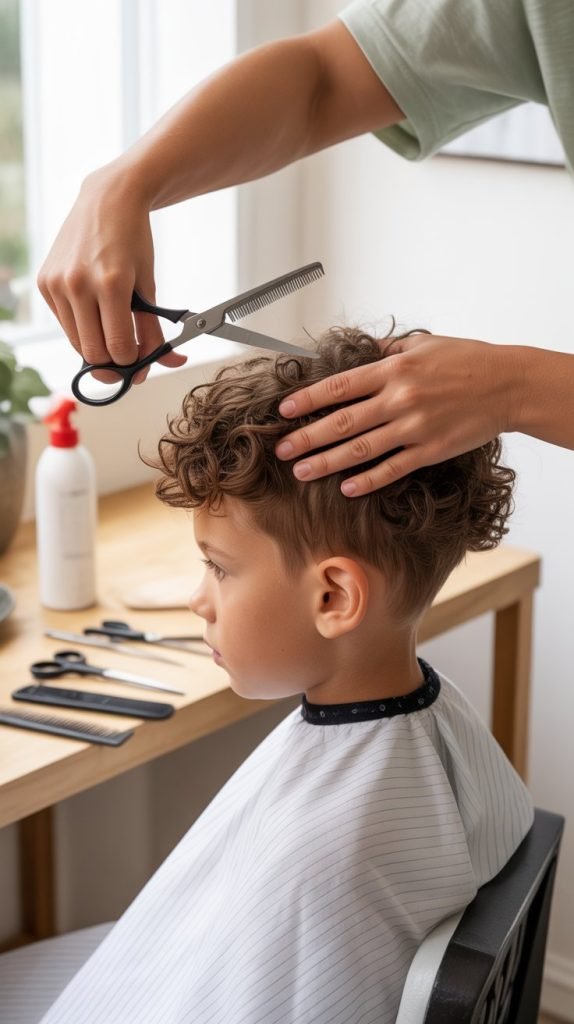
Curl-by-Curl Cutting Technique
- This method involves isolating and cutting individual curls or small curl clumps one at a time for maximum precision.
- Gently separate one curl spiral from the surrounding hair without disturbing its natural formation.
- Hold the curl at the point where you want to cut, ensuring your fingers are parallel to the floor for an even cut.
- Use point-cutting (snipping into the ends at an angle) rather than blunt cutting to create softer, more natural edges.
- Move methodically around the head, cutting similar curls to similar lengths for consistency.
- This technique works especially well for creating layers and maintaining the hair’s natural volume distribution.
Twisting and Cutting Method
- The twist-and-cut technique involves gently twisting a section of hair to see its true length before trimming.
- Take a small section of curls (about 1-2 inches wide) and twist them loosely in the direction they naturally curl.
- The twist will reveal where the section wants to naturally end, guiding your cutting decision.
- Cut conservatively across the twisted section, keeping your scissors perpendicular to the twist.
- Release the twist and observe how the curls bounce back before deciding if more trimming is needed.
- This method is excellent for creating even perimeter lengths and removing damaged ends.
5. Step-by-Step Curly Haircut Process
Following a systematic approach ensures you don’t miss any sections and achieve a balanced, proportional haircut. This methodical process takes the guesswork out of cutting curly hair at home.
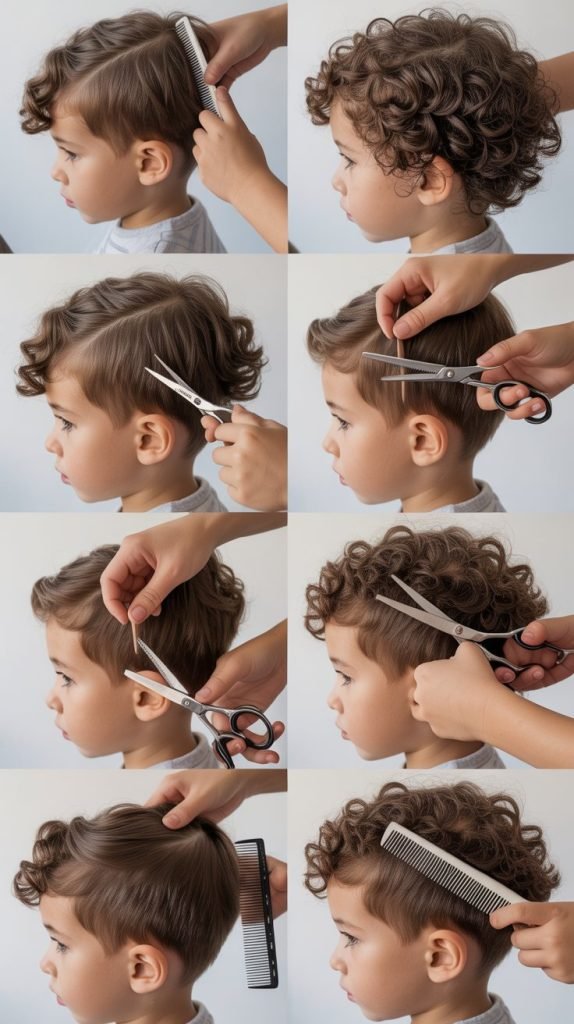
Sectioning the Hair Properly
- Begin by dividing the hair into four main quadrants: front-left, front-right, back-left, and back-right.
- Create a center part from the forehead to the nape of the neck, then a horizontal part from ear to ear across the crown.
- Secure each section with a clip, keeping the hair in its natural curl pattern as much as possible.
- Start cutting from the back sections and work your way forward, as the back is less visible and allows you to practice.
- Within each quadrant, work in horizontal subsections about 1-2 inches thick for manageability.
Cutting the Back and Sides
- Begin with the nape area, taking down one subsection of curls while keeping the rest clipped away.
- Establish your guideline length by cutting the bottom section first, as this will determine the overall length.
- Use your fingers or a comb to check that both sides of the nape are even before proceeding upward.
- Move up to the next subsection, releasing it from the clip and comparing it to your guideline.
- Cut each subsequent section slightly longer than the one below to create natural layers and volume.
- For the sides, work from the bottom up toward the temples, maintaining consistency with the back sections.
- Pay special attention to the area around the ears, being careful not to cut too close to the skin.
Shaping the Top and Front
- The top sections typically retain the most length to maintain volume and proportion in curly hairstyles.
- Release the front-left quadrant and further divide it into workable subsections if the hair is thick.
- Pull curls upward gently to their natural full extension (without stretching) to determine cutting length.
- Create layers by cutting the top sections longer than the sides, using the side sections as a guideline for blending.
- The front hairline and bangs require extra attention, as these curls frame the face and are most visible.
- For bangs, cut conservatively to fall just above the eyebrows when the curls are in their natural bounced state.
- Check symmetry frequently by comparing both sides of the head from the front view.
Blending and Refining
- After completing all sections, remove all clips and let the hair settle naturally for a few minutes.
- Look for any obvious unevenness or pieces that stick out awkwardly from the overall shape.
- Use point-cutting to soften any harsh lines or blunt edges that disrupt the natural flow.
- Check the haircut from multiple angles using a handheld mirror to see the back and sides clearly.
- Make small adjustments rather than large corrections at this stage, cutting only what’s absolutely necessary.
- Have your child shake their head or move around to see how the hair moves naturally before making final tweaks.
6. Creating Popular Curly Hairstyles for Boys

Different styles work better for different curl types, face shapes, and personal preferences. Understanding various cutting approaches helps you choose the best option for your son’s hair.
The Classic Tapered Cut
- This style features gradually shorter hair from the top toward the neckline and around the ears.
- Establish the longest point at the crown, then progressively cut shorter as you work downward.
- Use clipper guards or scissors-over-comb technique for the lower sections to create smooth transitions.
- The taper should be subtle for curly hair, as dramatic fades can emphasize shrinkage unevenly.
- This style works particularly well for active boys as it keeps hair off the neck and ears while maintaining style.
The Curly Shag
- The shag features multiple layers throughout the head, creating movement and reducing bulk in thick curly hair.
- Cut the bottom sections to the desired perimeter length, then create shorter layers moving toward the crown.
- The layers should be graduated, with each section about 0.5 to 1 inch shorter than the one below.
- This style adds dimension and prevents the triangular shape that curly hair can sometimes create.
- The shag works best for Type 2 and Type 3 curl patterns with medium to high density.
7. Dealing with Common Challenges and Mistakes
Even experienced stylists encounter difficulties when cutting curly hair, so don’t be discouraged if you face challenges. Understanding common issues and their solutions helps you troubleshoot effectively.
Fixing Uneven Lengths
- Uneven sections are the most common issue when cutting curly hair at home, especially when cutting wet hair that later shrinks.
- To identify unevenness, have your child stand with their head level and look at the overall silhouette from several feet away.
- Gently pull comparable curls from both sides of the head to their full extension and compare lengths.
- Correct unevenness by identifying the shorter side and carefully trimming the longer side to match.
- Make corrections on dry, styled hair in small increments, as curly hair amplifies cutting mistakes.
- If one area appears too short, consider adding layers throughout to blend rather than cutting everything to match the short area.
Managing Shrinkage Surprises
- Shrinkage is the natural drawing up of curls that can make hair appear much shorter after cutting than anticipated.
- Type 4 coils can shrink up to 75% of their stretched length, so always cut conservatively with these curl patterns.
- If hair shrinks more than expected after cutting, avoid the temptation to cut more immediately—style it and live with it for a few days first.
- Use styling techniques like stretching, twisting, or braiding to elongate curls if the length is shorter than desired.
- For next time, remember to cut less than you think necessary and account for your child’s specific shrinkage factor.
Avoiding the Triangle or Pyramid Shape
- Curly hair naturally grows outward, creating a triangular silhouette if not properly shaped with layers.
- The pyramid effect occurs when the sides are too long or heavy compared to the top, creating width at the bottom.
- Prevent this by keeping the crown area longer and tapering or removing weight from the sides and lower sections.
- Use thinning shears strategically on thick hair to remove internal bulk without sacrificing length.
- If the pyramid shape has already occurred, add layers to the side sections and reduce overall weight while maintaining top length.
8. Styling and Maintaining the Haircut

A great cut is only the beginning—proper styling and maintenance keep your son’s curls looking their best between haircuts. Establishing good hair care routines maximizes the longevity and appearance of each cut.
Post-Cut Styling Techniques
- Apply a leave-in conditioner to freshly cut, damp hair to provide moisture and help define the curl pattern.
- Use a curl cream or gel by scrunching it into the hair from the ends toward the roots, encouraging curl formation.
- The “scrunching” method involves gently squeezing handfuls of hair upward to encourage curls to clump and form.
- For maximum definition, use the “praying hands” method by smoothing product between your palms and running it down each curl section.
- Allow hair to air-dry whenever possible to maintain curl integrity and prevent frizz caused by heat damage.
- If using a diffuser, keep it on low heat and speed, hovering it near the hair rather than touching directly.
- Avoid touching or playing with the hair while it dries, as this disrupts curl formation and creates frizz.
Daily Maintenance Routine
- Refresh curls each morning by lightly misting with water mixed with a small amount of leave-in conditioner.
- Use a satin or silk pillowcase to reduce friction while sleeping, which prevents tangles and maintains curl definition.
- For longer curls, try pineappling at night by loosely gathering hair at the top of the head with a scrunchie.
- Only shampoo 1-2 times per week to preserve natural oils, using a sulfate-free formula when you do wash.
- Co-wash (washing with conditioner only) between shampoos to cleanse without stripping moisture from curly hair.
- Deep condition at least once per week to maintain hair health and manageability between cuts.
Trimming Schedule
- Curly hair generally needs trimming every 8-12 weeks to maintain shape and remove split ends.
- Signs that a trim is needed include increased tangling, visible split ends, loss of curl definition, or shape disruption.
- Regular dustings (removing just 1/4 inch) every 6-8 weeks can maintain health better than infrequent major cuts.
- Search for split ends by examining individual curl spirals in natural light—they’ll appear frayed or white at the tips.
- Keep notes or photos after each haircut to track what techniques worked well and what to adjust next time.
9. Safety Tips and Best Practices
Prioritizing safety protects your child from injury and ensures a positive haircutting experience they won’t fear repeating. Following proper safety protocols is non-negotiable when working with sharp tools around children.
Tool Safety and Handling
- Always point scissors downward when not actively cutting, never toward your child’s face or eyes.
- Keep scissors closed when moving between sections or adjusting your position around your child.
- Store all cutting tools in a locked drawer or high cabinet out of children’s reach when not in use.
- Never allow your child to play with haircutting scissors or clippers, even under supervision.
- Use only sharp, professional scissors designed for hair—dull scissors pull and tear hair, creating damage and discomfort.
- Check that clipper blades are properly aligned and oiled before use to prevent snagging or pinching skin.
- Keep a first aid kit nearby with antiseptic and bandages in the unlikely event of a minor nick or cut.
Working Safely with Active Children
- Set clear expectations before starting, explaining that your child needs to sit still during the cutting process.
- Take breaks every 10-15 minutes if your child becomes restless, allowing them to stand, stretch, or move briefly.
- Use distractions strategically—save favorite videos or games for moments when you need maximum stillness.
- Work quickly and efficiently to minimize the time your child must remain seated.
- If your child is particularly fidgety or young, consider cutting in multiple short sessions rather than one long one.
- Never cut hair when you’re feeling rushed, frustrated, or when your child is overly tired or upset.
- For very young children (under 4), consider having a partner help by holding the child gently or providing distraction.
10. When to Seek Professional Help
Recognizing your limitations and knowing when to consult a professional stylist is important for both hair health and realistic expectations. Some situations are better handled by experienced curly hair specialists.
Situations Requiring Professional Expertise
- Major style transformations (like going from very long to short) are best handled by professionals who can ensure proper proportions.
- If your child has severely matted or damaged hair requiring extensive correction, a professional can assess the best approach.
- Complicated styles like fades, undercuts, or designs carved into the hair require specialized clipper skills.
- When you’ve made a cutting mistake that you’re unsure how to fix, a professional can often correct the issue gracefully.
- If your child is extremely anxious or upset about home haircuts, a professional children’s salon may provide a better experience.
- Very tight curl patterns (Type 4C) often benefit from specialists trained in natural hair techniques and protective styling.
Finding a Qualified Curly Hair Specialist
- Search for stylists who specifically advertise expertise in curly or textured hair, as not all stylists are trained in these methods.
- Look for DevaCurl-certified stylists or those trained in other recognized curly hair cutting methods like Ouidad or Rezo Cut.
- Read reviews from other parents of children with similar curl types to find stylists experienced with kids.
- Schedule a consultation before committing to a full cut, allowing your child to meet the stylist and discuss desired outcomes.
- Ask the stylist about their cutting approach—quality curly hair stylists cut on dry hair and work with the natural curl pattern.
- Once you find a good stylist, maintain the relationship by scheduling regular appointments and learning techniques you can apply at home.
Conclusion
How to Cut Your Boy’s Curly Hair at Home: Complete Guide has equipped you with the knowledge, techniques, and confidence to successfully manage your son’s curly hair between professional appointments or even become his primary stylist.
Remember that cutting curly hair is as much about understanding the unique characteristics of each curl pattern as it is about technical skill with scissors. Start with conservative cuts, work on dry hair whenever possible, and respect the natural curl formation rather than fighting against it.
Be patient with yourself during the learning process, as mastering curly hair cutting techniques takes practice and experimentation.
The investment of time you make in learning these skills pays dividends in money saved, convenience gained, and the special bonding moments you’ll share with your son during these grooming sessions.
With each haircut, you’ll become more confident and efficient, developing an intuitive understanding of how your child’s specific curls behave and respond to different cutting approaches.
Keep your tools sharp, your expectations realistic, and your approach gentle, and you’ll find that cutting your boy’s curly hair at home becomes an enjoyable and rewarding experience for both of you.