Cutting your own curly hair at home might seem intimidating, but with the right techniques and tools, you can achieve salon-quality results without leaving your bathroom.
Whether you’re looking to save money, maintain your style between professional cuts, or simply enjoy the freedom of managing your curls yourself, this comprehensive guide will walk you through every step of the process.
How to Cut Short Curly Hair at Home: Complete Guide covers everything from understanding your unique curl pattern to mastering advanced cutting techniques that work specifically for textured hair.
You’ll discover the essential tools you need, learn professional methods adapted for home use, and gain the confidence to transform your curly hair care routine.
By the end of this article, you’ll have the knowledge and skills to trim, shape, and style your short curls like a pro, ensuring your hair always looks its best while celebrating its natural texture and bounce.
1. Understanding Your Curl Pattern Before Cutting

Before picking up scissors, you need to understand your specific curl type, as this determines which cutting techniques will work best for your hair.
Curly hair ranges from loose waves to tight coils, and each pattern behaves differently when cut, requiring customized approaches for optimal results.
- Curly hair is typically classified using the Andre Walker system, which ranges from Type 2 (wavy) to Type 4 (coily), with subcategories (a, b, c) indicating tightness of the curl.
- Type 2 and 3a curls (loose waves and loose curls) tend to maintain their shape when wet and dry, making them more predictable to cut.
- Type 3b and 3c curls (tight curls and corkscrew curls) shrink significantly when dry, often up to 50-70% of their wet length, which requires cutting conservatively.
- Type 4 curls (coily and kinky hair) have the most shrinkage potential and require specialized techniques like the “search and destroy” method for precision.
- Understanding shrinkage is crucial because your hair will appear much shorter once dry than it does when wet, so always cut less than you think you need to remove.
- The porosity of your hair (how well it absorbs and retains moisture) also affects how curls spring back after cutting, with high-porosity hair often showing more unpredictable results.
- Examine your curl pattern in its natural state—not stretched, blown out, or manipulated—to see the true shape you’ll be working with.
- Different sections of your head may have varying curl patterns, so assess your entire head rather than assuming uniform texture throughout.
2. Essential Tools and Products for Cutting Curly Hair

Having the right tools makes the difference between a successful home haircut and a hair disaster, especially with curly hair that requires specialized equipment.
Professional-grade tools designed for textured hair will give you better control, cleaner cuts, and longer-lasting results.
- Invest in professional haircutting shears (6-7 inches long) rather than regular scissors, as they create clean cuts that prevent split ends and frizz.
- Sharp scissors are non-negotiable—dull blades crush the hair shaft rather than cutting cleanly, leading to damage and uneven results.
- A wide-tooth comb or detangling brush designed for curly hair helps section hair without disrupting curl patterns or causing breakage.
- Sectioning clips (at least 6-8) are essential for dividing your hair into manageable parts and keeping uncut sections out of the way.
- A spray bottle filled with water or a water-conditioner mix helps keep hair damp throughout the cutting process, maintaining curl definition.
- A handheld mirror allows you to check the back of your head and ensure evenness from all angles.
- Curl-defining cream or gel applied before cutting helps you see the natural curl pattern more clearly and cut with the curl’s direction.
- A styling cape or old towel protects your clothing from cut hair, which can be difficult to remove from fabric.
- Texturizing or thinning shears can remove bulk from thick curly hair without shortening length, creating better shape and movement.
- Hair cutting clips with strong grips prevent thick, curly sections from slipping during the cutting process.
3. Preparing Your Hair for Cutting

Proper preparation is the foundation of a successful curly haircut, ensuring your curls are in their most natural state for accurate cutting.
The way you wash, condition, and detangle before cutting directly impacts how your finished style will look.
- Wash your hair with a sulfate-free shampoo that cleanses without stripping natural oils, which helps curls maintain their true pattern.
- Apply a moisturizing conditioner and detangle thoroughly with a wide-tooth comb while the conditioner is in your hair, working from ends to roots.
- Rinse with cool water to seal the cuticle and enhance curl definition, making individual curls easier to identify during cutting.
- Apply a leave-in conditioner or curl cream to damp hair, distributing evenly through all sections to maintain moisture during the cutting process.
- Allow your hair to form its natural curl pattern by scrunching or using your preferred curl-enhancing technique before you begin cutting.
- Your hair should be damp but not dripping wet when you cut—excess water weighs down curls and gives a false impression of length.
- Divide your hair into 4-6 major sections using clips, creating a bottom layer, middle layer, and top layer for systematic cutting.
- Work in a well-lit area with good mirrors positioned to see all angles of your head, including the back and sides.
- Keep your spray bottle nearby to re-dampen sections that dry out during the cutting process, as dry curls cut differently than damp ones.
- Ensure you’re sitting comfortably with good posture, as slouching changes the angle of your head and can result in uneven cutting.
4. The Dry vs. Wet Cutting Debate for Curly Hair

The debate between dry and wet cutting for curly hair has passionate advocates on both sides, each method offering distinct advantages depending on your goals and curl type.
Understanding both techniques allows you to choose the best approach for your specific needs and skill level.
- Wet cutting involves cutting hair when saturated with water, which stretches curls and makes them easier to cut in a uniform line.
- The main drawback of wet cutting for curly hair is shrinkage—hair can appear 2-4 inches shorter when it dries, making it easy to cut too much.
- Dry cutting, popularized by the DevaCut method, involves cutting completely dry, styled hair so you can see exactly how each curl behaves.
- When dry cutting, you work with individual curls, shaping each one according to its natural pattern and removing weight where needed.
- Dry cutting is particularly beneficial for curly hair because it prevents the “triangle shape” that often results from cutting all curls to the same wet length.
- Damp cutting offers a middle ground—hair is moist enough to show curl pattern clearly but not so wet that shrinkage can’t be predicted.
- For short curly hair, damp cutting or dry cutting typically produces better results than fully wet cutting, as short styles require precise shaping.
- If you’re new to cutting your own hair, start with damp cutting and remove small amounts at a time until you build confidence.
- Professional curly hair specialists often combine methods—doing an initial wet cut for length, then refining with dry cutting techniques.
- The texture and thickness of your hair also influences which method works best—fine curls may benefit more from dry cutting, while coarse curls can handle wet cutting better.
5. Basic Cutting Techniques for Short Curly Hair
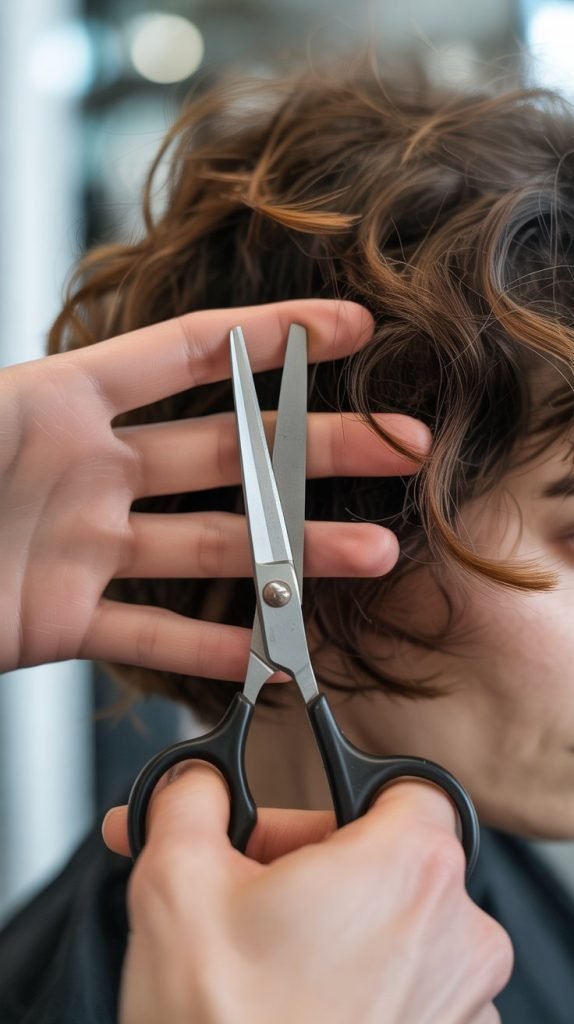
Mastering fundamental cutting techniques gives you the foundation to trim and shape your short curly hair effectively at home.
These methods are specifically adapted for curly hair textures and help maintain the natural volume and shape that makes curly hair beautiful.
- Point cutting involves holding scissors vertically and cutting into the ends of the hair at an angle, creating a softer, more textured finish rather than a blunt line.
- This technique is ideal for curly hair because it removes weight without creating harsh lines, allowing curls to maintain their natural movement.
- Slide cutting requires gliding the scissors along the hair shaft from mid-length to ends, thinning the hair and removing bulk while maintaining length.
- Only use slide cutting on damp hair with sharp scissors, as it can cause damage if done incorrectly or with dull blades.
- Twist and snip is a curly-hair-specific technique where you twist individual curls and trim just the ends that stick out, targeting split ends without losing length.
- When using the twist and snip method, work with small sections (10-15 curls at a time) to ensure you don’t miss any areas.
- Curl-by-curl cutting treats each curl as an individual piece, cutting it based on where it naturally falls rather than pulling it straight to cut.
- Hold your scissors parallel to the curl direction when doing curl-by-curl cuts to maintain the spiral shape and prevent disrupting the pattern.
- Always cut upward into curls rather than straight across when you want to maintain volume at the crown and prevent a flat appearance.
- The “search and destroy” method works well for maintenance—examine your hair in natural light and trim only visible split ends or damaged pieces.
- Never pull curls straight to cut them unless you’re specifically aiming for layers, as this results in uneven lengths when the curl springs back.
- Take breaks during cutting to shake out your hair and see how the curls are falling naturally, making adjustments as needed.
6. Creating Layers in Short Curly Hair
Layering short curly hair adds dimension, reduces bulk, and enhances the natural curl pattern, creating a more flattering and manageable style.
However, layering curly hair requires different techniques than straight hair because curls stack differently and shrink at various rates.
- Layers in curly hair should be subtle and gradual rather than dramatically different lengths, as extreme layers can create a pyramid or triangular shape.
- Start by identifying where you want the shortest layer to fall—typically at the crown for volume or around the face for framing.
- Use the “unicorn cut” method for DIY layering: flip your head upside down, gather all hair into a high ponytail at your forehead, and trim the ends.
- The unicorn cut creates automatic layers throughout the hair, with the shortest pieces at the crown and longer pieces at the nape.
- After the initial unicorn cut, flip your head back up and assess the layers, making minor adjustments to individual curls as needed.
- Another effective method is vertical sectioning—divide hair into sections from front to back and cut each section at a slight angle, creating layers that blend naturally.
- When cutting layers face-framing pieces, pull the hair forward toward your face and cut at an angle pointing toward your chin for a flattering frame.
- Avoid cutting layers when your hair is brushed out or stretched, as this doesn’t show you the true curl pattern and can result in unintended shapes.
- For very short curly styles (pixie cuts or tapered cuts), focus layers around the crown and top while keeping sides and back shorter for shape.
- Remember that the top layers of curly hair are often drier and more damaged than underneath layers, so they may need more frequent trimming.
- Test your layers by scrunching your hair and allowing it to dry naturally before making additional cuts—wet or damp hair doesn’t show the final layer effect.
- If you’re unsure about dramatic layering, start conservative and gradually add more layers over multiple cutting sessions rather than removing too much at once.
7. Maintaining Shape and Avoiding Common Mistakes

Even experienced home hair cutters can make mistakes with curly hair due to its unique characteristics and unpredictable behavior.
Knowing what to avoid and how to maintain your desired shape helps you achieve consistent, professional-looking results.
- The most common mistake is cutting too much at once—curly hair shrinks significantly, so always cut less than you think you need and assess before cutting more.
- Avoid cutting curls when they’re completely dry and unstyled, as matted or day-old curls don’t show the true pattern and can lead to uneven results.
- Never use regular household scissors or craft scissors, as these crush the hair shaft and create split ends that travel up the hair strand.
- Cutting all your hair to one length (blunt cut) often creates a triangular or pyramid shape in curly hair due to volume concentration at the ends.
- Don’t cut hair when you’re stressed, tired, or rushed—curly hair cutting requires patience, focus, and careful attention to detail.
- Avoid trimming when your hair is soaking wet, as water weight pulls curls down and gives a false impression of length.
- Over-thinning is a common error with texturizing shears—removing too much internal hair creates frizz and destroys curl definition.
- Cutting individual curls too short in an attempt to “fix” one uneven piece often creates more problems and requires cutting surrounding curls shorter to match.
- Don’t compare your curls side-to-side while cutting—due to natural curl variation, they’ll never be perfectly symmetrical, and forcing symmetry creates an unnatural look.
- Schedule your haircuts for maintenance every 6-8 weeks for short styles to prevent split ends from traveling up and maintain your desired shape.
- Keep notes or photos of your cutting process, including how much you removed and which techniques worked best for your curl pattern.
- If you make a mistake, stop cutting immediately and either style your hair to camouflage it or visit a professional curly hair specialist to fix it.
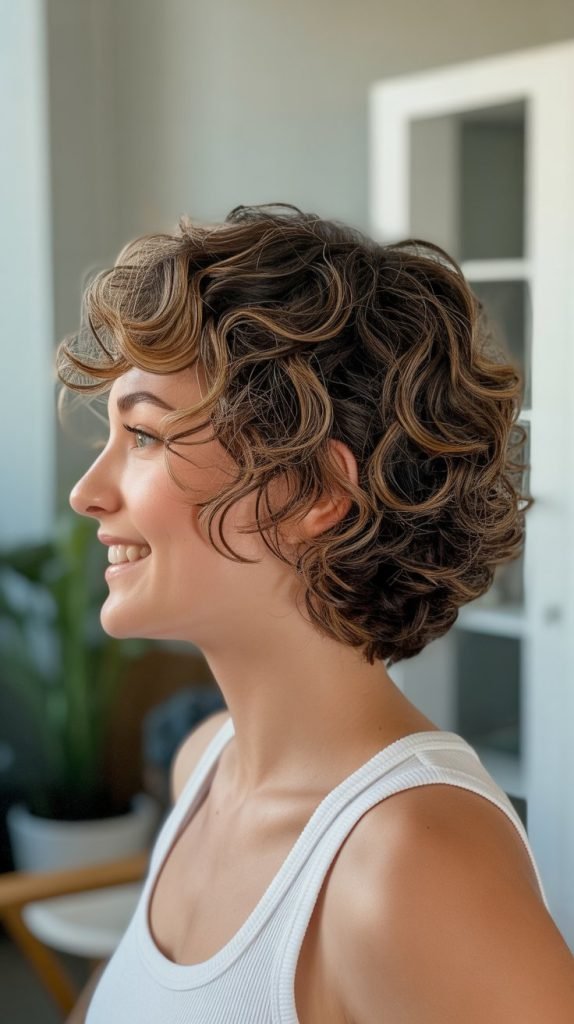
8. Styling and Finishing Your Fresh Cut

After cutting your short curly hair, proper styling techniques bring out the best in your new shape and help your curls dry with definition and bounce.
The products and methods you use immediately after cutting determine whether your haircut looks homemade or professionally done.
- Apply a leave-in conditioner to damp hair immediately after cutting to restore moisture and help curls reform properly.
- Use a curl-defining cream or gel while your hair is still wet, applying it in sections with praying hands or raking method to coat all strands evenly.
- Scrunch your curls gently upward toward your scalp to encourage curl formation and remove excess product water.
- For enhanced definition and volume, try the “bowl method”—lean over a bowl of water and dip sections of hair in, then scrunch to set curls.
- Consider using a microfiber towel or cotton t-shirt to scrunch out excess water rather than a regular towel, which creates frizz.
- Air drying is gentlest on curly hair, but if you’re short on time, use a diffuser attachment on low heat and low speed to dry without disrupting curls.
- When diffusing, hover the diffuser around your hair without touching it, or cup sections of hair in the diffuser bowl and hold until mostly dry.
- Once your hair is completely dry and has a gel cast (crunchy texture), scrunch it with a small amount of oil on your hands to break the cast and create soft, defined curls.
- Avoid touching your hair while it dries, as this creates frizz and separates curl clumps you worked hard to form.
- Sleep on a satin or silk pillowcase, or wrap your hair in a satin bonnet to protect your fresh cut and maintain curl definition overnight.
- For day two and beyond, refresh curls with a water-based spray and scrunch rather than re-wetting completely, preserving your cut’s shape.
- Take photos of your finished style from multiple angles to track your progress and identify what works best for your curl pattern.
9. When to Seek Professional Help

While cutting short curly hair at home is achievable with practice, certain situations require the expertise of a professional curly hair specialist.
Knowing when to DIY and when to book an appointment prevents costly mistakes and ensures your hair health remains a priority.
- If you’re transitioning from long to short curly hair for the first time, invest in a professional cut to establish the right shape, then maintain it at home.
- Seek professional help when you want a dramatic change in style, such as adding an undercut, shaved sides, or complex asymmetrical designs.
- Chemical services (color, highlights, relaxers, perms) should be done professionally before cutting, as these processes affect hair texture and cutting needs.
- If you’ve made a cutting mistake that’s visible or bothers you, a professional can often correct it with minimal length loss using specialized techniques.
- Very damaged hair with extensive breakage or severe split ends benefits from professional assessment and treatment plans beyond simple trimming.
- Curly hair specialists trained in methods like DevaCut, Rezo Cut, or Ouidad cutting understand curly hair physics and can teach you maintenance techniques.
- Finding a stylist who specializes in curly hair is crucial—ask to see their portfolio of curly cuts and read reviews from clients with similar curl patterns to yours.
- Some situations benefit from a hybrid approach—get professional cuts 2-3 times yearly for shape maintenance, and do simple trims at home between appointments.
- If your curl pattern has changed due to hormones, medications, or health conditions, a professional consultation helps you understand your new texture.
- When you’re investing in learning curly hair cutting, consider booking a lesson-style appointment where the stylist teaches you techniques while cutting your hair.
- Red flags for stylists include wanting to straighten curly hair before cutting, using thinning shears excessively, or not specializing in textured hair.
- Building a relationship with a curly hair specialist provides you with ongoing support and advice as your hair and style evolve over time.
Conclusion
Mastering How to Cut Short Curly Hair at Home: Complete Guide empowers you with the skills, knowledge, and confidence to take control of your curl care journey.
Throughout this comprehensive guide, you’ve learned to identify your unique curl pattern, select the right tools, prepare your hair properly, and execute professional cutting techniques adapted for home use.
You now understand the critical differences between wet, damp, and dry cutting methods, how to create flattering layers, and which common mistakes to avoid.
Remember that cutting curly hair is both an art and a science that improves with practice, so be patient with yourself as you develop your skills.
Start conservatively by removing small amounts, embrace your hair’s natural texture, and don’t be afraid to seek professional help when needed.
With regular maintenance every 6-8 weeks and the techniques you’ve learned here, you can keep your short curly hair looking fresh, healthy, and beautifully shaped between salon visits.
Your curls are unique, and now you have the tools to celebrate and enhance their natural beauty right from the comfort of your home.