Cutting men’s curly hair at home might seem intimidating at first, but with the right techniques and tools, you can achieve professional-looking results without stepping foot in a barbershop.
This complete guide on How to Cut Men’s Curly Hair at Home walks you through everything from understanding curl patterns and gathering essential tools to mastering cutting techniques and styling your finished look.
Whether you’re trimming your own curls or cutting someone else’s hair, you’ll discover practical strategies for working with curly hair’s unique texture, maintaining shape, and avoiding common mistakes that can lead to uneven cuts or frizz.
By the end of this article, you’ll have the confidence and knowledge to create clean, well-shaped haircuts that celebrate natural curls while saving time and money.
1. Understanding Curly Hair Types Before Cutting

Before you pick up scissors, understanding the specific curl pattern you’re working with makes the difference between a successful haircut and a frustrating experience. Men’s curly hair ranges from loose waves to tight coils, and each type requires different cutting approaches, tools, and techniques.
Curl Pattern Classification
- The hair typing system categorizes curls from Type 2 (wavy) through Type 4 (coily), with subcategories A, B, and C indicating tightness of the curl pattern.
- Type 2 curls have loose S-shaped waves that lie relatively flat against the head and are the easiest for beginners to cut.
- Type 3 curls form well-defined spirals and loops that spring back when stretched, requiring careful attention to shrinkage during cutting.
- Type 4 curls create tight coils or zig-zag patterns with significant shrinkage, sometimes up to 75% of the hair’s actual length when stretched.
Hair Density and Porosity Considerations
- Hair density refers to how many individual strands grow from your scalp, ranging from thin to thick, which affects how much hair you’ll need to remove.
- High-density curly hair can handle more aggressive layering and thinning without looking sparse or damaged.
- Low-porosity hair resists moisture absorption and tends to sit on top of the hair shaft, while high-porosity hair absorbs moisture quickly but loses it just as fast.
- Understanding porosity helps you time your haircut correctly, as some curl types cut better when slightly damp while others need to be completely dry.
How Curl Pattern Affects Cutting Strategy
- Looser curls (Type 2-3A) can tolerate traditional cutting methods with scissors or clippers and show cutting mistakes less obviously.
- Tighter curls (Type 3B-4C) magnify every uneven cut due to shrinkage and require cutting hair in its natural dry state to see the true shape.
- Mixed curl patterns on the same head require zone-specific techniques, with different sections potentially needing different cutting approaches.
- The nape and sides often have tighter curl patterns than the crown, requiring you to adjust your cutting length and technique as you move around the head.
2. Essential Tools and Equipment Needed

Having the right tools transforms a challenging home haircut into a manageable project with professional results. Investing in quality equipment specifically designed for curly hair prevents damage, reduces cutting time, and helps you achieve cleaner lines and shapes.
Cutting Tools
- Professional haircutting shears with blades between 5.5 to 7 inches long provide the control and precision necessary for detailed curl work.
- Thinning shears or texturizing scissors with teeth on one or both blades help reduce bulk without creating harsh lines in thick curly hair.
- Hair clippers with multiple guard attachments allow you to create clean fades, tapers, and uniform lengths on the sides and back.
- A quality trimmer for detailing edges around the ears, neckline, and sideburns gives your home haircut a polished, professional finish.
Preparation and Sectioning Tools
- Wide-tooth combs or seamless plastic combs glide through curly hair without snagging or creating unnecessary frizz during the cutting process.
- A spray bottle filled with water helps reactivate curls and maintain consistent moisture levels throughout longer cutting sessions.
- Sectioning clips or hair ties divide the hair into manageable zones, ensuring you cut evenly and don’t miss any sections.
- A handheld mirror combined with a wall mirror lets you view the back and sides of the head to check your work from all angles.
Safety and Comfort Equipment
- A waterproof cutting cape or large towel protects clothing from hair clippings and makes cleanup significantly easier after you finish.
- A comfortable cutting chair at the right height prevents back strain during longer haircuts and allows you to move around the person easily.
- Sharp scissors guards or caps protect your tool investment and prevent accidental cuts when storing your equipment between uses.
- A small brush or vacuum attachment specifically for hair removal helps you clean up stray clippings from skin, clothing, and surfaces.
3. Preparing Hair Before the Cut

Proper preparation sets the foundation for a successful curly haircut by ensuring the hair is in optimal condition and positioned correctly. Skipping preparation steps often leads to uneven results, excessive frizz, or cuts that look completely different once the hair dries and settles naturally.
Washing and Conditioning Guidelines
- Wash curly hair with a sulfate-free shampoo that cleanses without stripping natural oils, which helps maintain curl definition and prevents dryness.
- Apply a moisturizing conditioner from mid-shaft to ends, leaving it on for 3-5 minutes to soften the hair and make cutting easier.
- Detangle gently while the conditioner is still in the hair using your fingers or a wide-tooth comb, starting from the ends and working toward the roots.
- Rinse with cool water to close the hair cuticle and enhance shine, which helps you see the natural curl pattern more clearly during cutting.
Drying Methods for Different Cutting Approaches
- Air-drying or diffusing hair completely dry works best for cutting curly hair in its natural state, which prevents surprises from shrinkage after the cut.
- Leaving hair slightly damp (about 70% dry) can work for looser curl patterns when you want to create length and use traditional cutting techniques.
- Avoid rubbing curly hair with a towel, instead gently squeeze excess water out with a microfiber towel or old t-shirt to minimize frizz.
- Never cut soaking wet curly hair, as the weight of water stretches curls significantly and gives you a false indication of the final length.
Stretching and Sectioning the Hair
- Gently stretch curls to assess their true length without water weight, which helps you determine how much length you can safely remove.
- Section hair into four to six zones using horizontal and vertical parts, securing each section with clips to keep them separated during cutting.
- The standard sectioning pattern includes dividing hair from ear to ear across the crown, then creating a center part from forehead to nape.
- Additional sections may be necessary for very thick or long curly hair to ensure you can reach every area comfortably and cut evenly.
4. Basic Cutting Techniques for Curly Hair
Mastering fundamental cutting techniques specifically designed for curly hair helps you avoid common pitfalls like pyramid shapes, uneven lengths, and damaged curl patterns. These methods respect the hair’s natural texture while giving you the control needed to create intentional, attractive shapes.
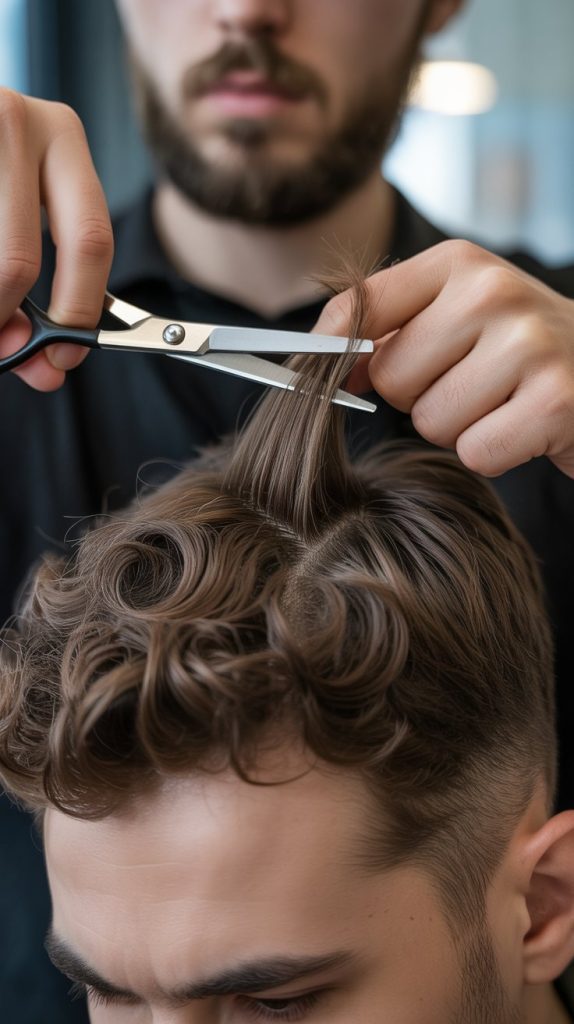
The Dry Cutting Method
- Dry cutting allows you to see exactly how curls fall naturally and how much they shrink, preventing the shock of unexpectedly short hair after it dries.
- Work with individual curl clumps rather than combing through the hair, which preserves the natural curl pattern and prevents frizz throughout the cutting process.
- Hold each section away from the head at the angle it naturally grows, then cut perpendicular to the curl direction for even results.
- Continuously step back to assess the overall shape from different angles, making small adjustments rather than removing large amounts of hair at once.
Point Cutting and Slide Cutting
- Point cutting involves holding scissors vertically and cutting into the hair ends at an angle, creating soft, textured edges that blend naturally with curly hair.
- This technique removes weight from the ends without creating blunt lines that look harsh or unnatural on curly textures.
- Slide cutting means opening and closing scissors while gliding them down the hair shaft, reducing bulk throughout the length while maintaining movement.
- Both techniques work best with sharp professional shears and require a gentle hand to avoid over-thinning or creating gaps in the hair.
The Twist and Cut Technique
- Take a small section of curly hair and twist it gently in the direction it naturally curls, which reveals the true length and shape of that curl grouping.
- Cut the twisted section at your desired length, which creates a natural, tapered edge that blends seamlessly when the curl is released.
- This method works exceptionally well for type 3 and type 4 curls where individual curl definition is important to the overall style.
- Repeat this process throughout the entire head, ensuring each twisted section is cut to a consistent length relative to how the curl sits on the head.
Curl-by-Curl Cutting
- This precision technique involves cutting individual curls or small curl groups one at a time to create maximum definition and customized shape.
- Hold each curl between your fingers at the point where you want to cut, ensuring the hair is in its natural position without stretching or pulling.
- Cut each curl slightly longer than your desired finished length to account for the curl bouncing up after you release it.
- This time-intensive method delivers the most polished results for special occasions or when you want perfect curl shaping and definition.
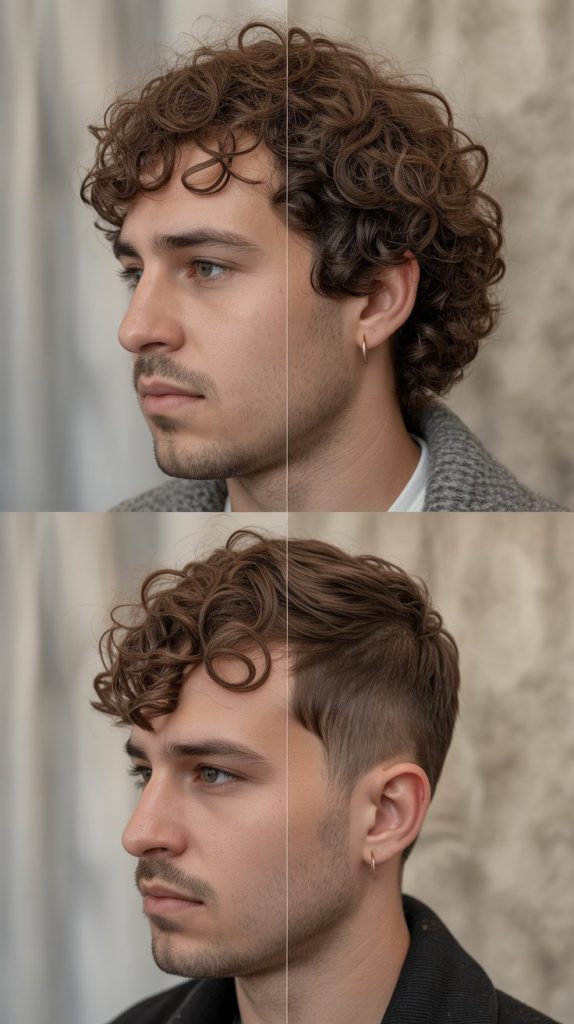
5. Creating Fades and Tapers on Curly Hair

Fades and tapers add structure and modern style to curly haircuts by creating gradual transitions from longer hair on top to shorter hair on the sides and back. These techniques require patience and precision on curly hair due to texture variations and the way curls can hide clipper mistakes.
Understanding Fade Types and Placement
- A low fade begins the transition just above the ears and around the nape, creating a subtle, conservative look that works well in professional settings.
- A mid fade starts the gradient around the middle of the sides, approximately at temple height, balancing casual and formal aesthetics.
- A high fade begins near the top of the head above the temples, creating dramatic contrast and emphasizing the curly hair on top.
- A taper differs from a fade by keeping some hair length at the shortest point rather than blending to skin, offering a softer, more traditional appearance.
Clipper Techniques for Curly Hair
- Start with a longer guard (like #3 or #4) and work in upward motions against the direction of hair growth, using smooth, overlapping strokes.
- Gradually switch to shorter guards as you move down toward the hairline, creating smooth transitions by flicking the clipper away from the head at the blend point.
- Work in small sections around the entire head, maintaining consistent guard changes at the same height on both sides for symmetrical results.
- Curly hair’s texture naturally helps blend clipper lines, but you still need to be careful and methodical to avoid visible lines or patches.
Blending the Transition Zone
- The transition zone where longer curls meet the shorter clipped area requires special attention to avoid an obvious line or shelf.
- Use half-guard positions or clipper-over-comb techniques to create intermediate lengths that bridge the gap between guards.
- Scissors-over-comb works excellently for blending the very top of the fade into the longer curly hair, giving you precise control over the graduation.
- Check your blend from multiple angles using two mirrors, and work under good lighting to catch any inconsistencies before they become obvious mistakes.
Detailing and Edge Work
- Use a trimmer without a guard to clean up the hairline around the ears, creating sharp, defined lines that give the haircut a finished appearance.
- The neckline can be squared, rounded, or tapered depending on personal preference and head shape, with rounded necklines generally looking most natural.
- Clean up stray hairs along the sideburn area and behind the ears, creating crisp edges that showcase the quality of your fade work.
- Apply a small amount of clipper oil to your blades periodically during the cut to maintain smooth operation and prevent pulling or snagging curly hair.
6. Layering and Adding Texture
Strategic layering removes bulk, creates movement, and enhances curl definition without sacrificing the fullness that makes curly hair attractive. Understanding how to add texture properly prevents the mushroom or triangle shape that commonly plagues poorly cut curly hair.
Why Layering Matters for Curly Hair
- Layers reduce weight from thick curly hair, allowing curls to spring up and form their natural pattern instead of being pulled down by excessive bulk.
- Different curl types throughout the head require varied lengths to create an even appearance, with tighter curls often needing more length than looser ones.
- Proper layering prevents the pyramid or triangle effect where sides expand outward while the top remains flat and undefined.
- Well-executed layers create internal texture that makes styling easier and helps curls maintain their shape throughout the day without products.
Creating Layers on Curly Hair
- Begin layering at the crown and work outward, taking small sections and cutting each slightly shorter than the layer below it.
- The elevation angle at which you hold hair determines the layer intensity, with 90 degrees creating subtle layers and 180 degrees (straight up) creating more dramatic ones.
- Cut layers while hair is dry and in its natural curl state, allowing you to see exactly how each layer will sit and interact with surrounding curls.
- Avoid over-layering the sides unless intentionally creating a specific style, as this can lead to excessive width and the dreaded triangle shape.
Removing Bulk Without Losing Length
- Interior thinning with texturizing shears removes weight from inside the hair shaft while maintaining the overall length and shape of the haircut.
- Work on small sections at a time, closing the thinning shears 2-3 times per section in the mid-shaft area, never at the roots or very ends.
- Concentrate bulk removal in the densest areas, which typically occur around the crown, sides, and where different curl patterns meet.
- Remove no more than 20-30% of the hair’s bulk in a single cutting session to avoid creating an overly thin or stringy appearance.
Creating Natural Movement and Flow
- Cut layers that follow the natural growth patterns and curl direction, which ensures hair flows harmoniously rather than fighting against its texture.
- Use a combination of scissors and texturizing techniques rather than relying on just one method, which creates more organic, natural-looking results.
- Leave the perimeter slightly heavier than interior layers to create a frame that contains and shapes the curls without looking boxy.
- Check your layering work by shaking the head gently and watching how the curls bounce and settle, adjusting any sections that look disconnected or awkward.
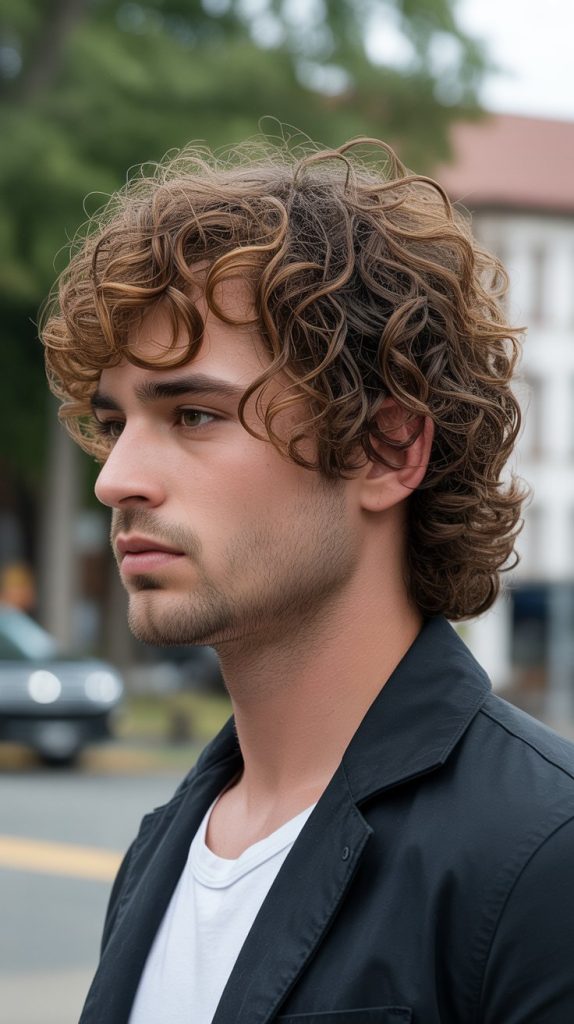
7. Cutting Specific Curly Hairstyles

Different curly hairstyles require specialized cutting approaches that respect curl patterns while achieving distinct shapes and silhouettes. Understanding how to execute popular styles gives you versatility in creating looks that match personal preferences and face shapes.
The Curly Undercut
- The curly undercut features significant length on top with very short or shaved sides and back, creating dramatic contrast that emphasizes the curls.
- Use clippers with a #1 or #2 guard on the sides and back, maintaining this short length up to a defined line approximately 2-3 inches above the ears.
- Leave the top section at 3-6 inches depending on curl tightness and desired style, cutting it using the curl-by-curl or twist method for definition.
- The disconnected line between short sides and long top requires minimal blending, making this style more forgiving for home haircuts than graduated fades.
The Curly Quiff or Pompadour
- This style features shorter sides with substantial volume and height at the front, requiring strategic cutting to support upward styling.
- Create a low to mid fade or taper on the sides while leaving 4-6 inches of length at the front, gradually decreasing to 2-3 inches at the crown.
- Cut the front section with elevation and point cutting to remove weight while maintaining enough density to stand up when styled.
- The key is creating enough length differential between front and back to achieve the swept-up shape while keeping proportions balanced for the face.
The Even-Length Curly Cut
- This classic approach maintains similar length throughout the head, relying on natural curl variation to create shape rather than dramatic length differences.
- Start by establishing your desired length at the longest point, typically 2-4 inches depending on curl type and personal preference.
- Work around the entire head cutting each curl to match this length, adjusting slightly for curl tightness to ensure an even appearance when finished.
- Light layering and texturizing prevent bulk while maintaining the uniform silhouette that defines this timeless, low-maintenance style.
The Textured Crop
- The textured crop features short length overall (1-3 inches) with slightly more length on top and texture throughout for a modern, clean appearance.
- Use clippers with a #3 or #4 guard on the sides and back, creating a short taper that gradually increases in length toward the top.
- Cut the top section with point cutting and texturizing techniques to create piece-y definition while removing bulk that would make curls lay flat.
- This style works excellently for professional settings and requires minimal styling while showcasing curl texture in a refined way.
8. Common Mistakes and How to Avoid Them
Even experienced home cutters make mistakes when working with curly hair due to its unpredictable nature and the way it responds differently than straight hair. Learning to recognize and avoid these pitfalls saves you from awkward growing-out periods and unsatisfying results.
Cutting Hair While Wet
- Wet curly hair stretches significantly beyond its natural length, often by 30-50% or more depending on curl type, leading to unexpectedly short results after drying.
- Water weight pulls curls straight and masks their true pattern, preventing you from seeing how they’ll actually sit and interact with each other when dry.
- If you must cut damp hair, keep it only slightly moist and cut conservatively, taking less length than you think you need to account for shrinkage.
- Always do a final dry assessment and make adjustments after hair is completely dry and styled to catch any issues before considering the haircut finished.
Cutting Too Much Length at Once
- Curly hair bounces up significantly after cutting, so removing 2 inches of stretched curl might result in 3-4 inches of visual length loss when it springs back.
- The “cut less, assess, cut more if needed” approach prevents irreversible mistakes and gives you opportunities to adjust your plan as you work.
- Take no more than half an inch to an inch per cutting pass, especially when learning or working with a new curl pattern you’re unfamiliar with.
- Remember that you can always cut more hair off, but you cannot put it back, making conservation the wisest strategy for home haircuts.
Creating Uneven Sides
- Curly hair’s volume and texture can hide asymmetry during the cutting process, making it appear even when it’s actually lopsided or unbalanced.
- Constantly compare both sides throughout the cutting process using mirrors, measuring similar sections to ensure length consistency.
- Use anatomical landmarks like the ears, temples, and occipital bone as reference points to maintain symmetry around the head.
- Step back regularly to view the haircut from a distance and from multiple angles, which reveals balance issues that aren’t obvious when working up close.
Over-Thinning or Over-Texturizing
- Excessive use of thinning shears creates stringy, sparse sections that lose curl definition and can make hair look damaged or unhealthy.
- Over-texturizing removes too much hair from individual curls, breaking up their natural clumping pattern and creating frizz instead of definition.
- Use thinning shears conservatively, working on only the bulkiest areas and removing no more than 25-30% of the hair’s total volume.
- If you’re unsure whether more thinning is needed, stop and wait a few days to see how the hair settles and behaves before removing additional bulk.
Ignoring Growth Patterns
- Hair grows in different directions across the scalp, with cowlicks, whorls, and natural parts that influence how hair sits regardless of how it’s cut.
- Fighting against natural growth patterns creates styles that require excessive product and styling time to maintain, often looking unnatural despite the effort.
- Observe how hair naturally falls and grows before cutting, then work with these patterns rather than against them to create sustainable, attractive results.
- Pay special attention to the crown area where multiple growth patterns converge, often requiring slightly different cutting approaches than the rest of the head.
9. Styling and Maintaining Your Cut
A great haircut is only the foundation—proper styling and maintenance techniques keep curls looking defined, healthy, and intentional between cuts. Understanding how to care for curly hair post-cut extends the life of your haircut and minimizes daily styling frustration.
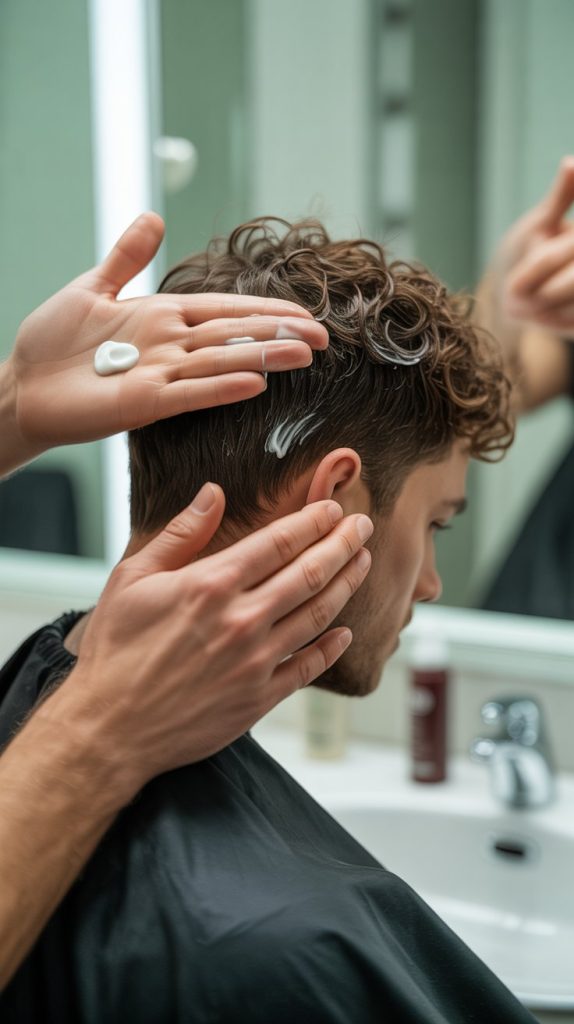
Post-Cut Styling Products
- Leave-in conditioners provide moisture and slip that helps curls form their natural pattern while reducing frizz throughout the day.
- Curl creams or curl enhancing gels define individual curls and hold them in place without creating the crunchy or stiff texture associated with traditional styling gels.
- Light oils like argan or jojoba applied to ends seal moisture and add shine while preventing the dry, frizzy appearance that plagues many curly hairstyles.
- Avoid heavy pomades or waxes that weigh curls down and create buildup, instead opting for water-based products specifically formulated for curly hair.
Styling Techniques for Defined Curls
- The “praying hands” method involves rubbing product between palms then smoothing hands down each section of hair, coating curls evenly without disrupting their pattern.
- Scrunching product into curls from ends to roots encourages curl formation and adds volume while distributing product throughout the hair shaft.
- The “rake and shake” technique uses fingers to distribute product through hair like a wide-tooth comb, then gently shaking the head to encourage curls to form.
- Diffusing hair on low heat and low speed helps set curls in place while adding volume, though air-drying works equally well if you have time.
Daily Maintenance Between Cuts
- Refresh curls on non-wash days by lightly misting with water and applying a small amount of leave-in conditioner to reactivate yesterday’s products.
- Sleep on a satin or silk pillowcase to reduce friction that creates frizz and disrupts curl patterns overnight.
- Pineappling—gathering curls loosely on top of the head before bed—preserves curl definition and prevents flattening during sleep.
- Avoid touching, playing with, or running fingers through curls throughout the day, as this breaks up curl clumps and creates unwanted frizz.
Extending Time Between Haircuts
- Regular trims every 6-8 weeks maintain shape and remove damaged ends, but you can extend this to 10-12 weeks with proper care and styling.
- Focus on maintaining the style’s overall shape rather than letting hair grow wild, occasionally trimming any pieces that grow significantly faster than others.
- Deep conditioning treatments every 2-3 weeks keep hair healthy and manageable, making it easier to style and less likely to require frequent cutting.
- Address minor shape issues with small self-trims between full haircuts, carefully cutting individual rogue curls that stick out or disrupt the silhouette.
10. Troubleshooting Post-Cut Issues

Even with careful cutting and styling, curly hair sometimes behaves unexpectedly after a haircut, requiring quick problem-solving to achieve satisfactory results. Knowing how to fix common post-cut problems saves you from panic and potential overcorrection that makes issues worse.
Dealing with Uneven Length or Shape
- If one side appears longer than the other, remeasure carefully in dry hair before cutting, as curl patterns can create optical illusions of unevenness.
- Take small sections from the longer side and trim conservatively, removing no more than 1/4 inch at a time until both sides match.
- Sometimes apparent length differences result from styling rather than cutting errors, so restyle hair completely before making corrective cuts.
- For persistent asymmetry issues, focus on cutting to the shortest acceptable length rather than trying to precisely match the shorter side, which often leads to over-cutting.
Fixing Over-Cut Sections
- Unfortunately, you cannot restore length to hair that’s been cut too short, so focus on blending the too-short area into surrounding sections.
- Use texturizing and point-cutting techniques on nearby sections to create gradual transitions that minimize the appearance of the short spot.
- Strategic styling with products and blow-drying can sometimes camouflage short sections by encouraging surrounding hair to blend over them.
- Consider incorporating the short section into the overall style design, perhaps creating an intentional undercut or fade if it’s on the sides or back.
Managing Excessive Volume or Puffiness
- Too much volume usually indicates insufficient layering or bulk removal, requiring additional interior thinning with texturizing shears.
- Work on the areas with the most volume first, taking small sections and thinning the interior without touching the perimeter or surface layer.
- Sometimes excessive volume results from product buildup or residue rather than the haircut itself, so clarify hair with a cleansing shampoo before making corrective cuts.
- Adjust your styling routine to include stronger hold products or techniques that compress curls slightly, reducing the overall silhouette without additional cutting.
Addressing Frizz and Lack of Definition
- Frizz often stems from over-manipulation during cutting or from cutting with dull scissors that damage the hair cuticle rather than cleanly severing it.
- Apply a moisturizing hair mask or deep conditioning treatment to repair minor damage caused by the cutting process and restore smoothness.
- Review your styling technique and products, ensuring you’re using enough moisture and not touching hair excessively while curls form and dry.
- If frizz persists despite proper care, the issue likely stems from damaged hair rather than cutting technique, requiring patience as healthy hair grows in.
11. Safety and Hygiene Considerations

Maintaining proper safety protocols and hygiene practices during home haircuts protects both the person cutting and the person receiving the haircut. These considerations become especially important when using sharp tools and working around sensitive areas like the face and ears.
Tool Maintenance and Sanitation
- Clean scissors, clippers, and combs with warm soapy water after each use to remove hair clippings, product residue, and natural oils that can dull blades.
- Disinfect tools regularly with barbicide solution, rubbing alcohol, or specialized tool cleaning spray to eliminate bacteria and maintain hygienic conditions.
- Dry metal tools thoroughly after cleaning to prevent rust formation that damages cutting edges and shortens tool lifespan.
- Oil clipper blades before and after each use according to manufacturer instructions to maintain smooth operation and prevent pulling or snagging hair.
Safe Cutting Practices
- Always keep scissors pointed downward and away from the face, maintaining awareness of blade position especially when working around the ears and eyes.
- Use proper hand positioning with fingers acting as a guide and buffer between scissors and scalp, preventing accidental cuts to the skin.
- Keep clipper guards securely attached during use and check them periodically to ensure they haven’t loosened or shifted during cutting.
- Work slowly and deliberately rather than rushing, especially when using sharp tools near sensitive areas or when fatigue might affect your coordination.
Setting Up a Safe Cutting Environment
- Choose a well-lit space with good visibility from all angles, preferably with natural light supplemented by overhead or task lighting.
- Ensure the cutting area has adequate ventilation, especially if using any aerosol products or clipper sprays during the haircut.
- Keep the floor clear of obstacles and hair clippings to prevent slipping hazards, cleaning up periodically during longer cutting sessions.
- Have a first aid kit nearby with bandages, antiseptic, and styptic powder or alum stick in case of minor nicks or cuts during the process.
Protecting Skin and Clothing
- Apply a barrier cream or powder to the neck area before cutting to prevent irritation from hair clippings that can cause itching and discomfort.
- Use a proper cutting cape with a secure closure rather than makeshift towels that shift during cutting and allow hair to fall onto clothing.
- Place a towel roll or neck strip inside the cape collar to catch clippings and prevent them from falling down the back, which causes prolonged irritation.
- Recommend showering or thoroughly washing immediately after the haircut to remove all stray hairs from skin, which prevents irritation and potential ingrown hairs.
12. When to Seek Professional Help

Understanding your limitations as a home barber is crucial for maintaining healthy hair and avoiding disasters that require expensive professional correction. Recognizing when to consult a professional saves time, money, and the potential emotional distress of a seriously botched haircut.
Complex Cuts Beyond Home Skill Level
- Intricate fade patterns with multiple transitions, skin fades, or complex designs require professional-level clipper skills and specialized tools not typically found in home settings.
- Dramatic length changes of more than 3-4 inches or complete style overhauls benefit from professional expertise in shaping and ensuring even results throughout.
- Color correction, chemical treatments, or any processes involving changing hair texture should always be performed by licensed professionals with proper training.
- If attempting a cut and becoming overwhelmed or realizing it’s beyond your skill level, stop immediately and schedule a professional appointment rather than trying to push through.
Fixing Serious Cutting Mistakes
- Severe asymmetry, obvious bald patches, or large sections of drastically different lengths typically require professional assessment to determine the best correction strategy.
- Professionals have the skills and tools to blend mistakes, create transitional styles, or recommend growing-out strategies that minimize the appearance of cutting errors.
- Attempting to fix major mistakes yourself often makes them worse by compounding errors, potentially requiring more dramatic corrective cuts or longer growing-out periods.
- Be honest with your barber or stylist about what happened during the home haircut so they can properly assess the damage and create an effective repair plan.
Building Skills Through Professional Consultation
- Schedule occasional professional haircuts even when cutting at home regularly to learn new techniques, get shape refinement, and ensure you’re maintaining healthy hair.
- Many barbers offer consultations or tutorials where they can teach you proper techniques specific to your or your client’s curl pattern and preferred styles.
- Observe professionals during your haircuts, asking questions about their techniques, tool choices, and approaches to working with curly hair textures.
- Consider taking a basic haircutting class or workshop to build foundational skills that make home cutting more successful and less stressful.
Recognizing Hair Health Issues
- Excessive breakage, thinning, or hair loss that appears during or after home haircuts may indicate underlying health issues requiring medical or dermatological evaluation.
- Scalp conditions, persistent dandruff, or unusual changes in curl pattern warrant professional assessment by a dermatologist or trichologist rather than continued home treatment.
- If curls consistently look damaged, dull, or lifeless despite proper cutting and styling techniques, professional analysis can identify whether product buildup, damage, or health issues are the cause.
- Regular check-ins with hair professionals help you maintain awareness of your hair’s condition and catch potential problems before they become serious or require extensive treatment.
Conclusion
Learning How to Cut Men’s Curly Hair at Home transforms what initially seems like an impossible task into an empowering skill that saves money and gives you control over your appearance.
This complete guide has equipped you with essential knowledge about curl types, proper tools, cutting techniques, styling methods, and troubleshooting strategies that enable confident home haircuts.
By understanding curl patterns, respecting the unique characteristics of curly hair, and practicing patience with each cut, you’ll develop the expertise needed to create professional-quality results without leaving your bathroom.
Remember that skill develops through practice, so start conservatively with your first few cuts and gradually build confidence as you become familiar with how curly hair responds to different techniques.
Whether you’re maintaining a favorite style or experimenting with new looks, the techniques and insights shared in this guide provide a solid foundation for successful curly hair cutting at home.