Tired of spending money on expensive curling tools when you have everything you need right at home? Learning how to curl your hair with a pencil and straightener opens up a world of creative styling possibilities using simple household items.
This innovative technique has gained popularity among beauty enthusiasts who want to achieve beautiful, defined curls without investing in specialized equipment.
Whether you’re dealing with a hair emergency, traveling light, or simply wanting to try something new, this method delivers impressive results that rival professional styling tools.
This comprehensive guide will walk you through every step of the pencil and straightener curling method, from preparation to finishing touches.
You’ll discover the science behind why this technique works, learn proper safety measures, and master various curl patterns to suit your style preferences.
We’ll also troubleshoot common issues and provide expert tips to help you achieve salon-quality results at home.
1. Understanding the Science Behind Pencil Curling
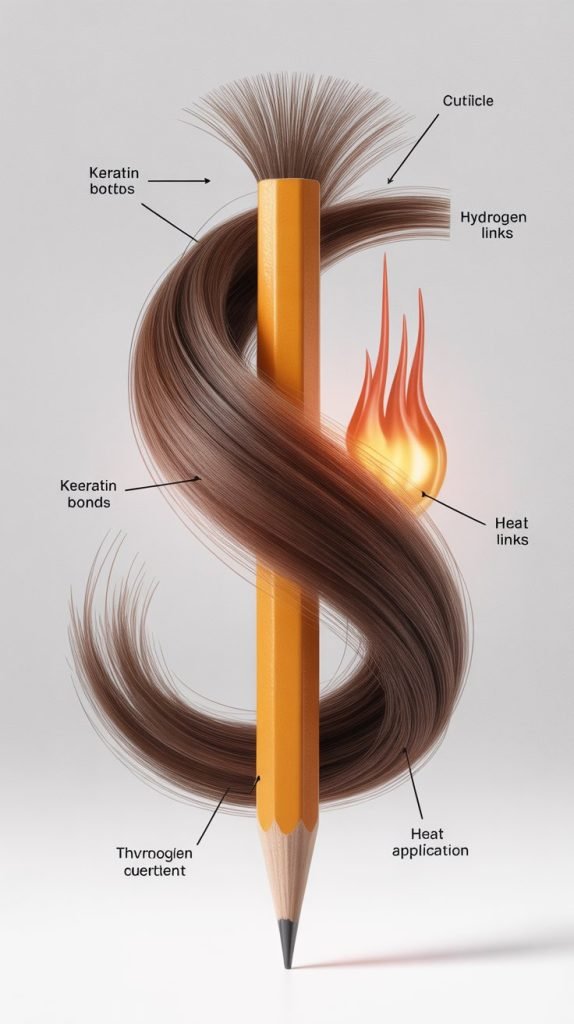
The pencil curling method works on the fundamental principle of heat molding, where the hair’s protein structure temporarily changes when exposed to controlled heat.
When you wrap hair around a pencil and apply heat with a straightener, the hydrogen bonds in your hair shaft break and reform in the new curved shape.
This process is similar to how traditional curling irons work, but using a pencil as the base creates tighter, more uniform curls.
- The pencil acts as a cylindrical former that determines the curl’s diameter and shape
- Heat from the straightener penetrates the hair cuticle and reaches the cortex where reshaping occurs
- The cooling process locks in the new curl pattern as hydrogen bonds reform
- Different pencil sizes create varying curl tightnesses, from tight spirals to loose waves
- The technique works best on hair with some natural texture or thickness
- Straight, fine hair may require additional preparation products for better hold
2. Essential Tools and Materials You’ll Need

Before starting your pencil curling journey, gathering the right tools ensures smooth execution and professional-looking results.
The beauty of this method lies in its simplicity, requiring only basic items that most people already have at home.
Quality tools make a significant difference in both safety and final outcome.
- Hair straightener with adjustable temperature settings (ceramic or titanium plates preferred)
- Regular wooden pencils (new, unsharpened work best for hygiene)
- Heat protectant spray or serum to prevent damage
- Hair clips or sectioning clips for organization
- Wide-tooth comb for detangling
- Lightweight styling mousse for hold enhancement
- Hair spray for setting the finished look
- Heat-resistant gloves (optional but recommended for beginners)
3. Preparing Your Hair for the Curling Process

Proper hair preparation is crucial for achieving long-lasting curls and maintaining hair health during the styling process.
Clean, properly conditioned hair responds better to heat styling and holds curls longer than dirty or damaged hair.
The preparation phase also involves applying protective products that create a barrier between your hair and the heat.
- Start with freshly washed hair using a volumizing shampoo and lightweight conditioner
- Towel dry hair gently to remove excess moisture without causing friction damage
- Apply heat protectant product evenly from mid-length to ends, avoiding the roots
- Use a wide-tooth comb to distribute products and detangle any knots
- Allow hair to air dry until it reaches about 80% dryness for optimal results
- Apply a small amount of volumizing mousse to roots for extra lift and hold
- Section hair into manageable portions using clips, starting from the bottom layer
4. Step-by-Step Pencil Curling Technique
Mastering the pencil curling technique requires patience and practice, but the results are worth the effort.
This method allows for precise control over curl formation and creates consistent results across all sections of your hair.
The key is maintaining steady tension and even heat distribution throughout the process.
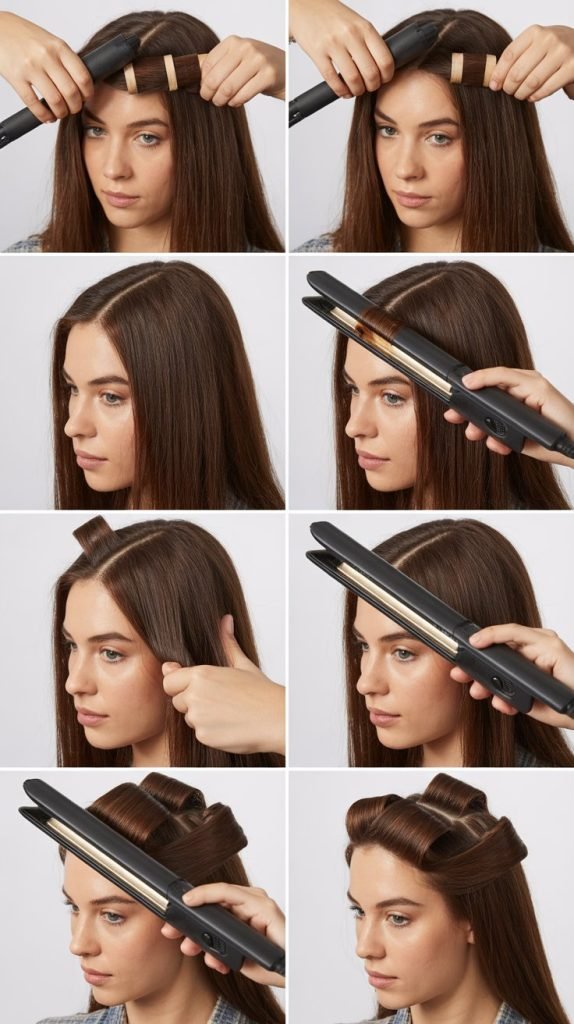
- Step 1: Take a one-inch section of hair and comb it straight
- Step 2: Place the pencil horizontally at the hair’s mid-length point
- Step 3: Wrap the hair section around the pencil, working toward the ends
- Step 4: Ensure even tension without pulling too tightly on the scalp
- Step 5: Position the straightener over the wrapped hair section
- Step 6: Clamp down gently and hold for 8-10 seconds depending on hair thickness
- Step 7: Release the straightener and allow the hair to cool while still wrapped
- Step 8: Carefully slide the pencil out of the cooled curl
- Step 9: Repeat the process on all sections, working systematically through your hair
5. Different Curl Patterns and Techniques

Experimenting with various wrapping methods and pencil sizes creates diverse curl patterns to suit different occasions and personal preferences.
Understanding how to manipulate the basic technique opens up endless styling possibilities.
Each variation requires slight adjustments to timing and tension for optimal results.
- Spiral curls: Wrap hair vertically around the pencil for springy, defined curls
- Beach waves: Alternate wrapping directions and vary section sizes for natural movement
- Pin curls: Create flat curls by wrapping hair horizontally against the scalp
- Ribbon curls: Wrap loosely for soft, flowing curls with gentle movement
- Mixed textures: Combine different techniques throughout your hair for dimensional looks
6. Safety Precautions and Heat Settings
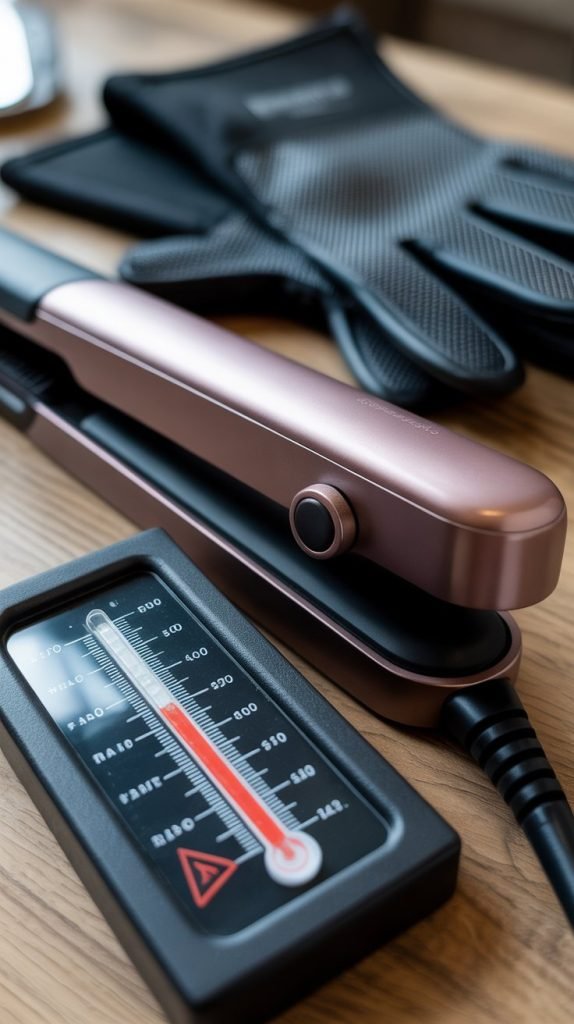
Safety should always be the top priority when using heat styling tools, especially with unconventional methods like pencil curling.
Understanding proper heat settings and safety measures prevents hair damage and reduces the risk of burns or accidents.
Different hair types require different temperature settings for optimal results without damage.
- Fine hair: Use temperatures between 250-300°F to prevent damage
- Medium hair: Optimal range is 300-350°F for effective styling
- Thick/coarse hair: Can handle 350-400°F but monitor closely
- Previously damaged hair: Stay below 300°F and use extra protection
- Always test the straightener temperature on a small, hidden section first
- Keep the pencil moving slightly to prevent hot spots and burning
- Never leave the straightener clamped in one position for more than 15 seconds
- Use heat-resistant gloves if you’re prone to accidentally touching hot plates
- Ensure your straightener has an automatic shut-off feature for safety
7. Troubleshooting Common Issues

Even experienced stylists encounter challenges when trying new techniques, and pencil curling is no exception.
Understanding common problems and their solutions helps you achieve better results and avoid frustration.
Most issues stem from improper preparation, incorrect heat settings, or rushing through the process.
- Problem: Curls fall out quickly
- Solution: Ensure hair is completely dry before starting and use setting spray
- Problem: Uneven curl pattern
- Solution: Maintain consistent section sizes and wrapping tension
- Problem: Hair gets tangled around the pencil
- Solution: Use a detangling spray and wrap more loosely
- Problem: Burns or hot spots on hair
- Solution: Lower temperature setting and keep the straightener moving
- Problem: Frizzy or damaged-looking curls
- Solution: Apply more heat protectant and reduce styling frequency
- Problem: Curls are too tight or too loose
- Solution: Adjust pencil size and wrapping technique accordingly
8. Finishing Touches and Styling Tips

The final steps of the pencil curling process are just as important as the curling itself, determining how long your style will last and how polished it appears.
Professional finishing techniques can transform good curls into great ones.
These final touches also help blend different curl sections for a cohesive, natural-looking result.
- Gently finger-comb curls to soften harsh lines and create natural movement
- Apply a light mist of flexible-hold hairspray to set the style without stiffness
- Use a small amount of hair oil or serum on ends for added shine and frizz control
- Scrunch curls gently with your hands to enhance texture and volume
- For looser waves, brush through curls lightly with a wide-tooth comb
- Tease roots slightly with a fine-tooth comb for extra volume and lift
- Consider using a diffuser on cool setting to lock in the curl pattern
- Apply dry shampoo to roots if needed to absorb excess oil and add texture
How to Curl Your Hair with a Pencil and Straightener offers an innovative, budget-friendly solution for achieving beautiful curls at home.
This technique proves that creativity and resourcefulness can produce professional-quality results without expensive equipment.
With practice and patience, you’ll master this unique method and discover the satisfaction of creating stunning hairstyles using simple household items.
Remember that hair styling is an art form that improves with experience, so don’t be discouraged if your first attempts aren’t perfect.
The versatility of pencil curling allows for endless experimentation with different curl patterns and styles, making it a valuable addition to your hair styling repertoire.