Your wedding day deserves a hairstyle that perfectly balances elegance and romance, and half-up, half-down styles offer exactly that magical combination.
This timeless approach to bridal hair has captured the hearts of brides worldwide because it showcases the best of both worlds—the sophistication of an updo with the softness of flowing locks.
Whether you’re planning a garden ceremony, a beachside celebration, or a grand ballroom affair, 33 Half-Up, Half-Down Wedding Hairstyles That Will Take Your Wedding Look to the Next Level presents a comprehensive collection of stunning options tailored to every hair type, length, and wedding theme.
Throughout this article, you’ll discover classic twists, bohemian braids, modern minimalist styles, and glamorous Hollywood-inspired looks, each accompanied by styling tips and practical advice to help you achieve your dream bridal hairstyle.
From understanding which style complements your face shape to learning how to incorporate accessories and ensure your hairstyle lasts throughout your special day, this guide covers everything you need to make an informed and confident choice for your wedding hair.
In This Post......
- 1. Classic Twisted Half-Up Style
- 2. Bohemian Braided Crown
- 3. Sleek and Polished Modern Twist
- 4. Romantic Loose Curls with Volume
- 5. Waterfall Braid Elegance
- 6. Vintage-Inspired Victory Rolls
- 7. Floral Crown Integration
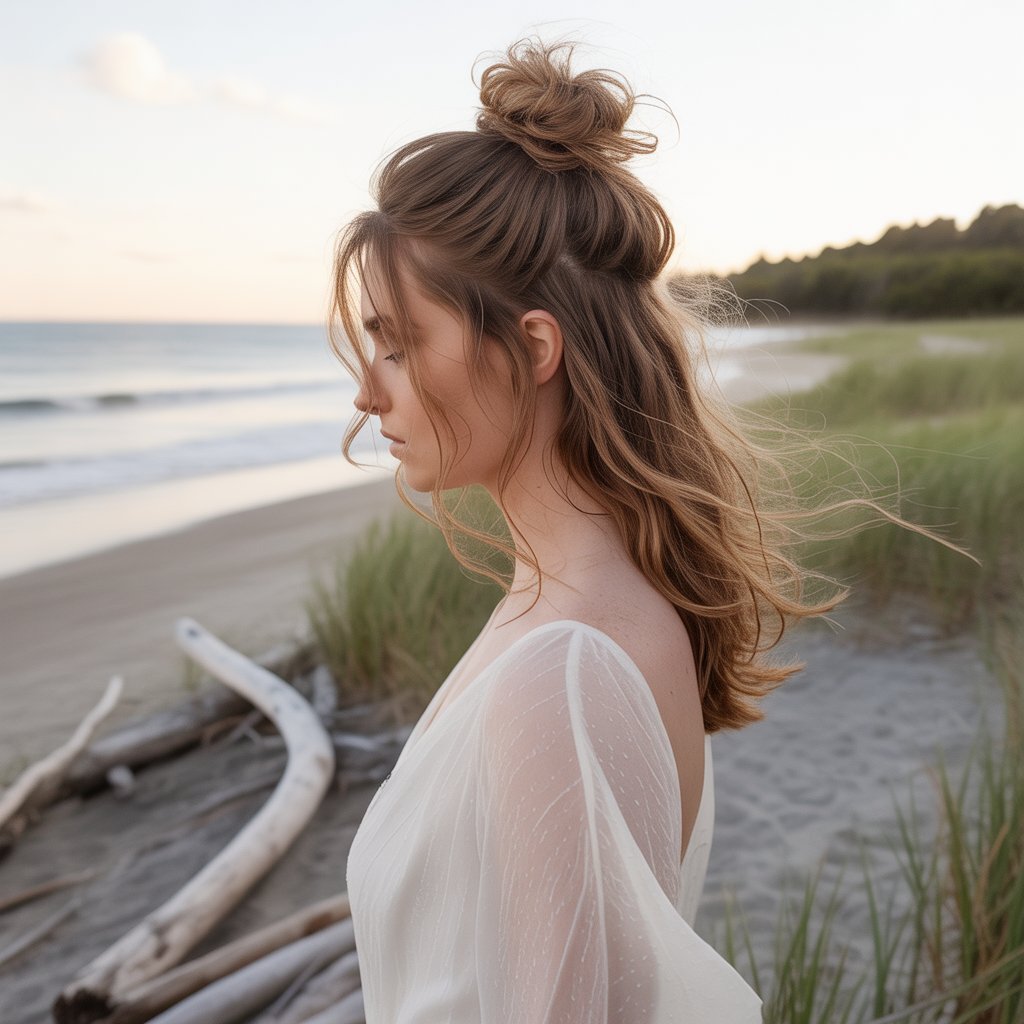
- 8. Textured Messy Bun Top Knot
- 9. Elegant Low Knot with Cascading Hair
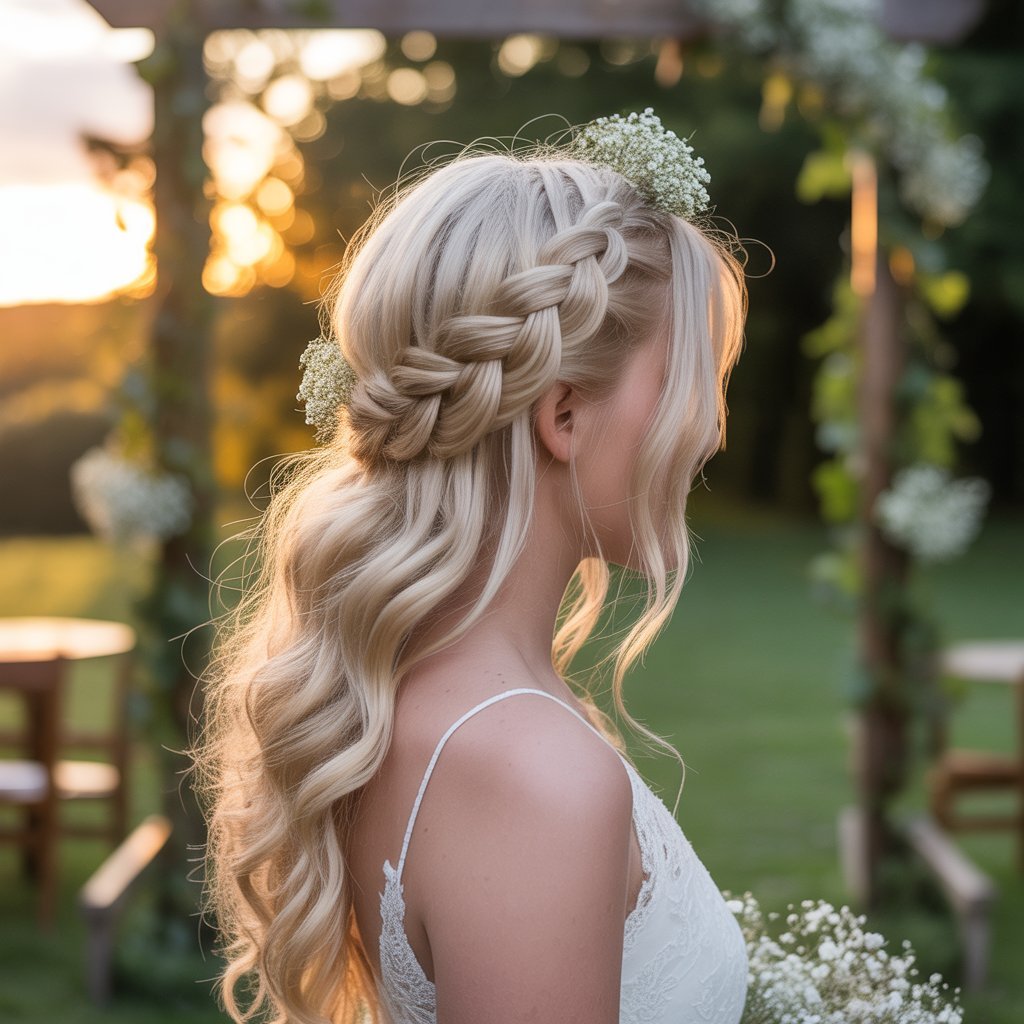
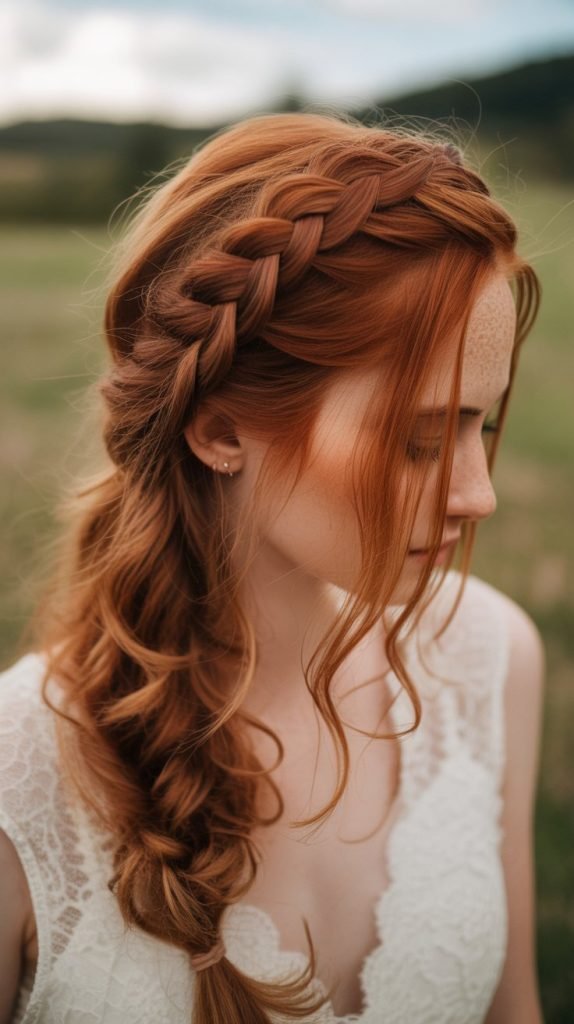
- 10. Braided Halo with Flowing Locks
- 11. Side-Swept Romantic Waves
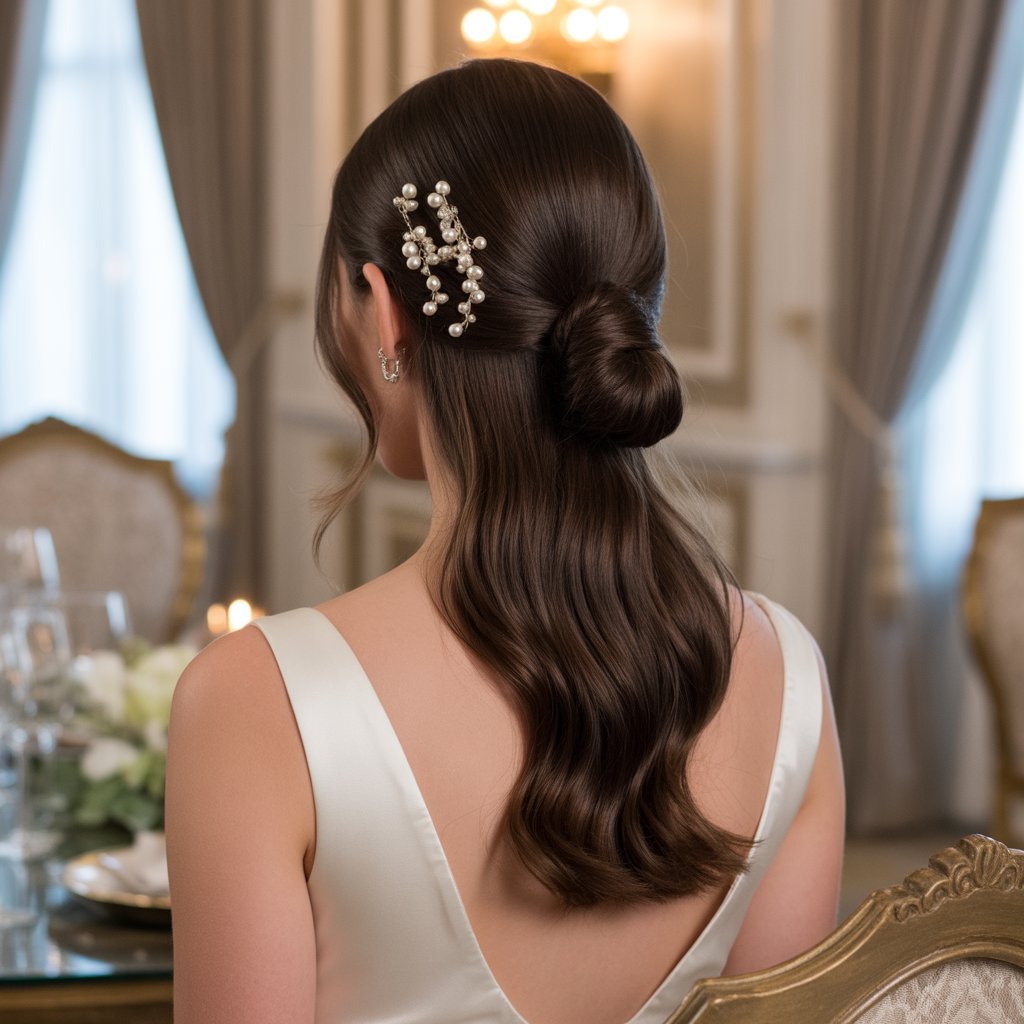
- 12. Pearl and Crystal Embellished Style
- 13. Twisted Rope Braid Detail
- 14. Volume-Boosted Crown Tease
- 15. Loose Low Ponytail with Wrap
- 16. Fishtail Braid Accent
- 17. Retro Bouffant with Modern Twist
- 18. Pinned Back with Statement Clip
- 19. Bubble Ponytail Variation
- 20. Twisted Chignon Half-Style
- 21. Side Braid Sweep
- 22. Crown Twist with Loose Tendrils
- 23. Voluminous Curled Half-Updo
- 24. Braided Band Across Crown
- 25. Sleek Pulled-Back Ponytail
- 26. Romantic Rose Bun Detail
- 27. Textured French Twist Half-Style
- 28. Knotted Detail with Flowing Hair
- 29. Cascading Curls with Top Knot
- 30. Pulled-Back with Decorative Comb
- 31. Soft Braided Twist Combination
- 32. Modern High Half-Ponytail
- 33. Ethereal Loosely Gathered Style
- Conclusion
1. Classic Twisted Half-Up Style
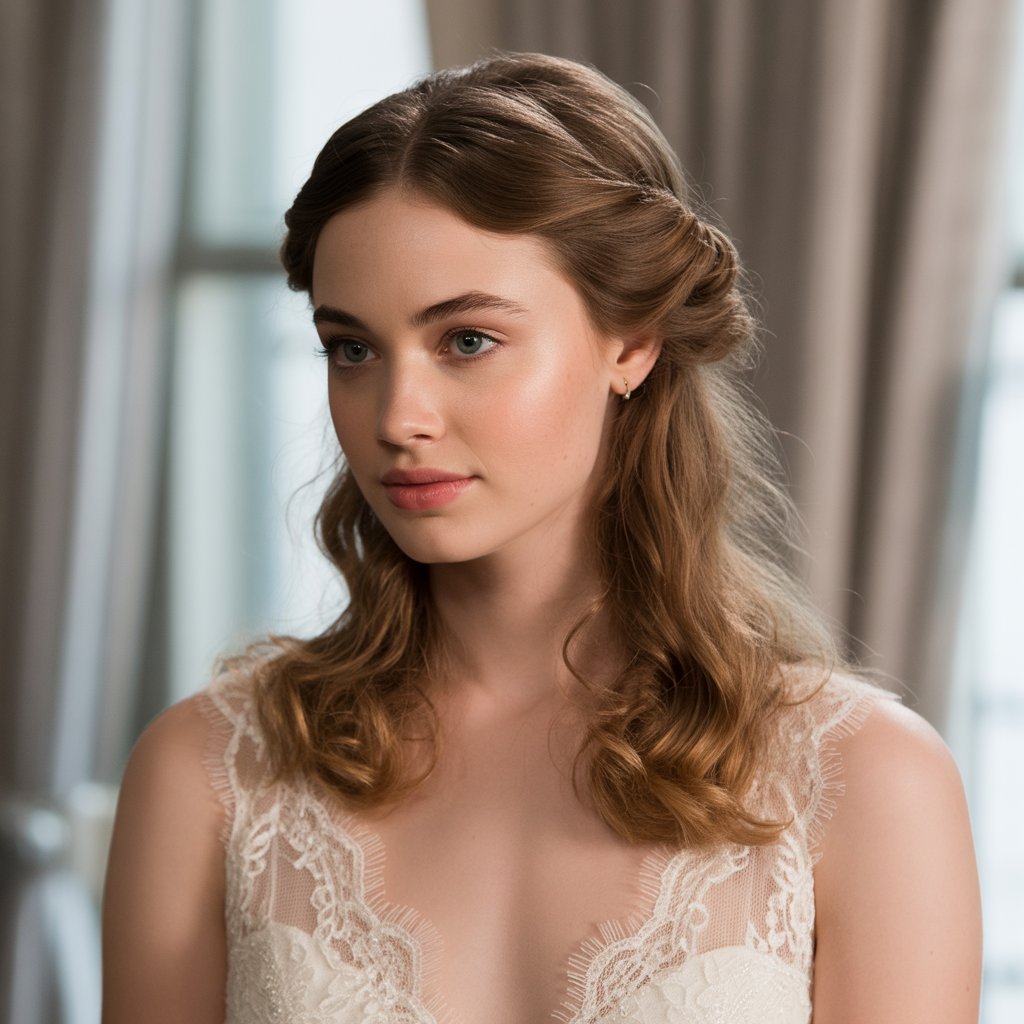
The classic twisted half-up style represents timeless elegance at its finest, offering brides a sophisticated yet effortlessly beautiful look that has remained popular across decades.
This versatile option works beautifully for formal ceremonies while maintaining an approachable, romantic quality that photographs exceptionally well from every angle.
Why This Style Works
- This hairstyle frames the face perfectly while keeping hair away from the eyes during emotional moments and windy outdoor ceremonies.
- The twisted sections add textural interest without requiring intricate braiding skills, making it accessible for DIY brides or hair stylists of varying experience levels.
- It complements virtually every face shape, from oval to heart-shaped, by creating balanced proportions and highlighting your best features.
- The style works seamlessly with veils, tiaras, or floral accessories, allowing you to customize your look according to your wedding theme.
Styling Technique
- Begin with clean, dry hair that has been lightly curled or waved to create texture and volume throughout the length.
- Take a section of hair from above each temple, approximately two inches wide, ensuring both sections are symmetrical.
- Twist each section tightly toward the back of your head, securing them together at the crown with bobby pins or a decorative clip.
- Gently pull and loosen the twists slightly to create a softer, more romantic appearance that doesn’t look too rigid or formal.
- Finish with a flexible-hold hairspray to maintain the style throughout your wedding day without creating stiffness or crunchiness.
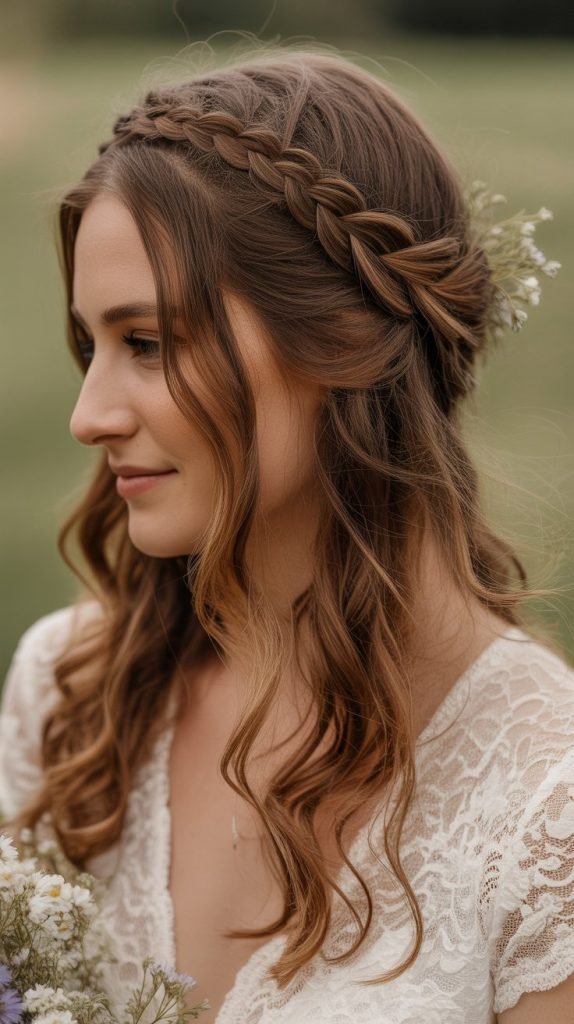
2. Bohemian Braided Crown
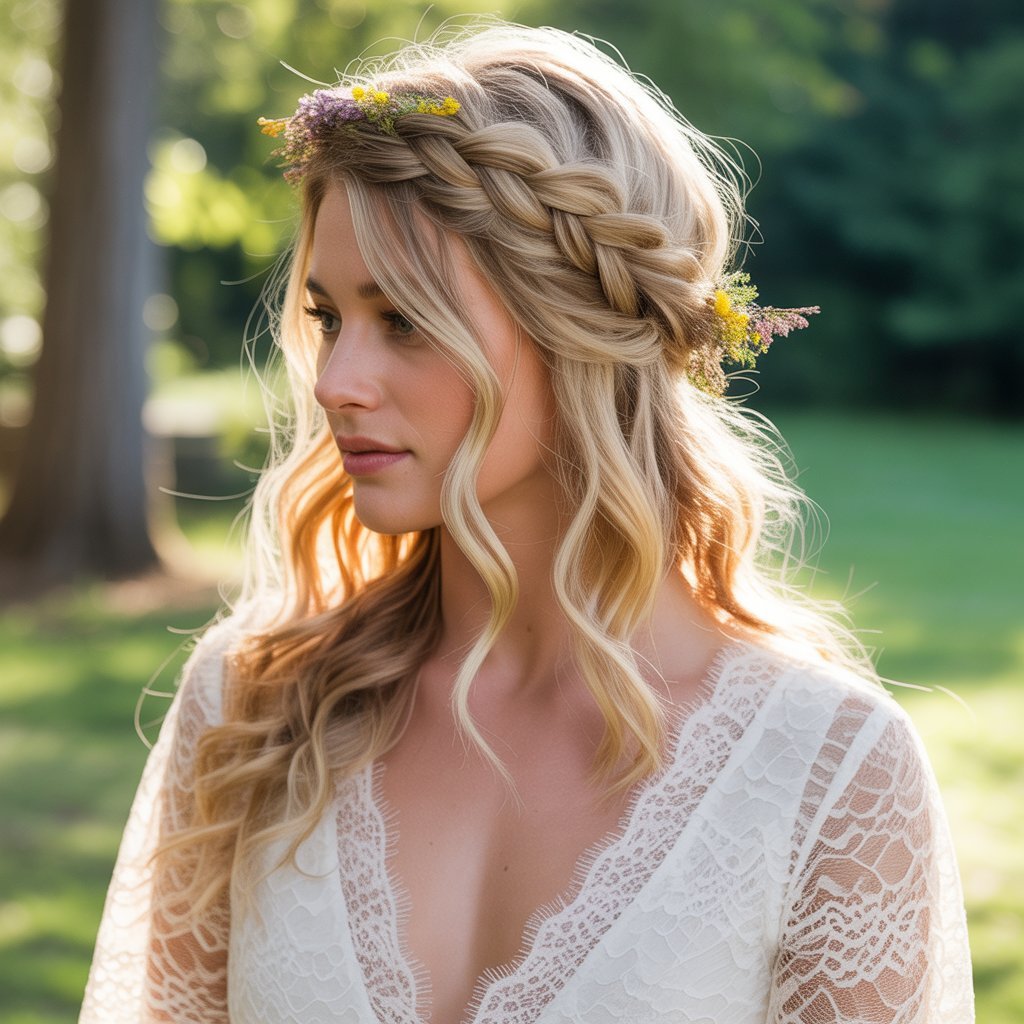
The bohemian braided crown brings a whimsical, free-spirited essence to bridal styling, perfect for outdoor weddings, rustic venues, or brides who embrace a more relaxed, nature-inspired aesthetic.
This ethereal style combines the structure of braiding with the softness of loose, flowing hair to create a look that’s both romantic and effortlessly chic.
Design Elements
- The crown braid creates a halo effect that adds a touch of fairy-tale magic to your overall bridal appearance.
- Small flowers, greenery, or delicate accessories can be woven throughout the braid to enhance the natural, garden-inspired theme.
- The combination of structured braiding at the crown and loose waves below creates beautiful contrast and visual interest.
- This style works particularly well for brides with longer hair, though extensions can easily be incorporated for those with shorter lengths.
Creating the Look
- Start by creating loose waves or curls throughout your hair using a large-barrel curling iron for a soft, natural texture.
- Part your hair in the center or slightly off-center, depending on your preference and face shape.
- Take a section of hair from one side near your temple and begin creating a Dutch or French braid that curves along your hairline.
- Continue braiding across the back of your head, incorporating small sections of hair as you move toward the opposite side.
- Secure the braid with clear elastic bands and gently pancake the braid by pulling sections apart to create fuller, more dimensional appearance.
- Tuck the end of the braid under and secure with bobby pins, then arrange the remaining loose hair to cascade naturally over your shoulders.
3. Sleek and Polished Modern Twist

For brides seeking contemporary elegance with clean lines and sophisticated simplicity, the sleek and polished modern twist delivers a refined aesthetic that exudes confidence and style.
This minimalist approach to the half-up, half-down style emphasizes smooth texture and precise execution, creating a look that feels both current and timeless.
Modern Aesthetic Appeal
- The ultra-smooth finish creates a sophisticated, fashion-forward appearance perfect for contemporary wedding venues and modern brides.
- This style photographs beautifully from all angles, with clean lines that look particularly striking in professional wedding photography.
- The minimalist approach allows statement earrings or a dramatic neckline to take center stage without competing visual elements.
- It works exceptionally well for straight or slightly wavy hair types that can achieve a sleek finish with minimal styling effort.
Achievement Process
- Begin with freshly washed hair, applying a smoothing serum or cream to damp strands before blow-drying with a paddle brush.
- Use a flat iron to create perfectly straight, glossy hair from roots to ends, working in small sections for maximum smoothness.
- Take sections from each side of your head at ear level, pulling them straight back without teasing or adding volume.
- Twist the sections together at the back of your head or secure them with a sleek barrette or minimalist hair accessory.
- Apply a small amount of shine serum to the finished style and use strong-hold hairspray to maintain the polished appearance throughout your celebration.
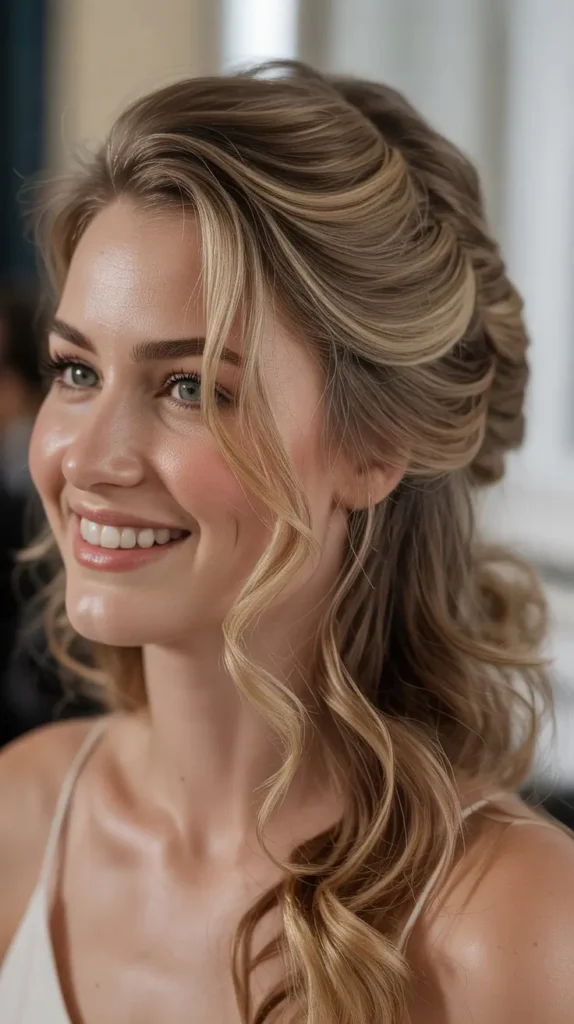
4. Romantic Loose Curls with Volume
Romantic loose curls with volume create a dreamy, feminine look that channels old Hollywood glamour while maintaining a fresh, contemporary appeal.
This style is perfect for brides who want to showcase their hair’s natural beauty with enhanced texture and movement that catches light beautifully in photographs.
Volume and Texture Benefits
- The additional volume at the crown creates a flattering silhouette that elongates the face and adds height to your overall appearance.
- Loose, touchable curls provide movement and dimension that looks stunning in both still photographs and wedding videos.
- This style works beautifully with various hair lengths, from shoulder-length to very long hair, adapting to your natural texture.
- The romantic quality complements lace wedding dresses, vintage-inspired gowns, and classic cathedral settings perfectly.
Styling Steps
- Prep hair with a volumizing mousse applied to damp roots, then blow-dry upside down to maximize lift and fullness.
- Use a large-barrel curling iron or hot rollers to create loose, bouncy curls throughout all sections of your hair.
- Tease the crown section gently with a fine-tooth comb to create height, then smooth the top layer for a polished finish.
- Take sections from the sides and secure them at the back with bobby pins, leaving some face-framing pieces loose for softness.
- Finish by gently separating the curls with your fingers and setting everything with a flexible-hold hairspray that maintains movement.
5. Waterfall Braid Elegance
The waterfall braid brings an intricate, cascading effect to the half-up style, creating a stunning visual element that appears far more complicated than it actually is to create.
This technique allows strands of hair to fall through the braid like a waterfall, resulting in a romantic and eye-catching design that works beautifully for formal wedding ceremonies.
Intricate Detail Appeal
- The waterfall technique creates mesmerizing visual interest that guests will admire from both close up and across the ceremony venue.
- This braid style photographs exceptionally well, creating dimension and texture that translates beautifully in wedding photos and videos.
- The cascading strands integrate seamlessly with the loose hair below, creating a cohesive and flowing overall appearance.
- Despite its complex appearance, the waterfall braid can be mastered with practice, making it achievable for skilled DIY brides.
Braiding Technique
- Start with slightly textured hair that has been lightly waved or curled to help the braid hold its shape throughout the day.
- Begin the waterfall braid at one temple by taking a three-strand section and starting a standard braid pattern.
- After the first stitch, drop the bottom strand and allow it to fall naturally, then pick up a new section from the top to replace it.
- Continue this pattern across the head, dropping strands and picking up new sections, creating the signature waterfall effect.
- Secure the braid at the opposite side with bobby pins that match your hair color for invisible hold.
- Gently pull at the braid sections to create fuller, more dimensional appearance, and set with hairspray for longevity.
6. Vintage-Inspired Victory Rolls

Vintage-inspired victory rolls transport brides back to the glamorous 1940s era, offering a distinctive retro aesthetic that stands out from contemporary wedding hairstyles. This bold choice works wonderfully for themed weddings, vintage-loving brides, or anyone seeking a hairstyle with personality and historical charm that makes a memorable statement.
Retro Charm Elements
- Victory rolls create instant vintage glamour that pairs perfectly with tea-length wedding dresses, retro accessories, and classic venues.
- The structured rolls frame the face beautifully while adding height and drama to your overall bridal presentation.
- This style works particularly well with bold makeup choices like classic red lips and winged eyeliner for a complete vintage look.
- The uniqueness of victory rolls ensures your wedding photos will have a distinctive, memorable quality that stands apart from typical bridal styles.
Rolling Technique
- Begin with smooth, dry hair that has been brushed thoroughly to remove any tangles or texture that could interfere with clean rolls.
- Section off the front portions of hair on each side, from temple to the top of your ear, and clip the remaining hair away.
- Backcomb each front section thoroughly at the roots to create the foundation and volume needed for proper roll formation.
- Roll each section forward and upward toward your face, then twist it back over itself to create the signature tubular roll shape.
- Secure each victory roll with crossed bobby pins, ensuring they’re anchored firmly to withstand an entire day of celebration.
- Smooth any flyaways with pomade or gel, and set the rolls with strong-hold hairspray for vintage perfection that lasts.
7. Floral Crown Integration

Integrating a floral crown with your half-up, half-down hairstyle creates an enchanting, garden-inspired look that celebrates natural beauty and romantic femininity.
This combination is ideal for outdoor weddings, spring or summer ceremonies, and brides who want to incorporate fresh flowers into their overall bridal aesthetic in a meaningful and beautiful way.
Floral Enhancement Benefits
- Fresh or silk flowers add natural color and texture that complements your hair while tying into your wedding bouquet and overall floral design.
- The crown draws the eye upward, creating a balanced composition that elongates your silhouette and frames your face beautifully.
- This style works seamlessly with bohemian, rustic, garden, or woodland wedding themes, enhancing the natural atmosphere.
- Flowers can be selected to match your wedding colors, season, or personal preferences, making the style truly customized to your vision.
Integration Method
- Start by creating loose waves or curls throughout your hair to provide a soft, romantic base for the floral crown placement.
- Gather sections from the sides or top of your head and secure them gently at the back, creating a subtle half-up foundation.
- Place the floral crown on your head, positioning it where the half-up section is secured for seamless integration of hair and flowers.
- Adjust the crown so it sits comfortably and securely, using bobby pins to anchor it to the pinned hair sections if needed.
- Allow some face-framing pieces to fall naturally around the crown, creating a soft, effortless appearance rather than rigidly structured perfection.
- Add individual flowers throughout the loose hair if desired, and use light hairspray to set the style without disturbing the delicate blooms.
8. Textured Messy Bun Top Knot
The textured messy bun top knot variation brings casual elegance to the half-up style, creating an effortlessly chic look that feels relaxed yet intentional.
This approach is perfect for laid-back brides, beach weddings, or anyone seeking a hairstyle that looks naturally beautiful without appearing overly styled or formal.
Casual Sophistication Advantages
- The intentionally imperfect finish creates a modern, approachable aesthetic that feels current and fashion-forward rather than traditional.
- This style works wonderfully for brides with naturally textured or wavy hair who want to embrace their hair’s organic movement.
- The relaxed bun adds interest to the crown without requiring precise symmetry or structured placement, making it forgiving and easy to create.
- It’s an excellent choice for destination weddings or outdoor ceremonies where weather conditions might affect more structured hairstyles.
Creating Textured Perfection
- Begin with second-day hair or add dry shampoo to clean hair to create the gritty texture that helps messy styles hold their shape.
- Gather the top section of hair loosely at the crown, allowing some shorter pieces to escape naturally for that undone appearance.
- Twist the gathered section loosely and wrap it around itself to form a bun, securing it with a hair elastic and several bobby pins.
- Pull gently at different sections of the bun to create volume and texture, intentionally creating an imperfect, organic shape.
- Leave face-framing pieces loose around your hairline, and allow some strands to fall naturally from the bun for added dimension.
- Use texturizing spray or sea salt spray to enhance the tousled quality, and finish with light hairspray that maintains movement.
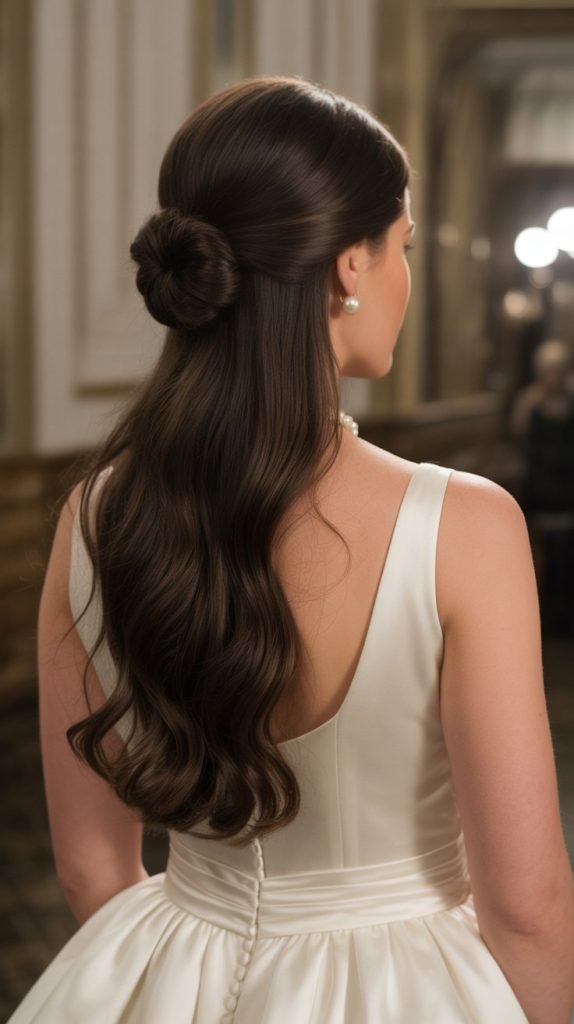
9. Elegant Low Knot with Cascading Hair
The elegant low knot with cascading hair offers sophisticated refinement positioned at the nape of the neck, creating a graceful focal point while allowing the majority of hair to flow freely.
This style strikes a perfect balance between structured elegance and romantic softness, making it suitable for both formal and semi-formal wedding celebrations.
Low Position Benefits
- The lower placement creates an elongated neck appearance and draws attention to beautiful necklines, back details, or statement necklaces.
- This style works exceptionally well with strapless or off-shoulder wedding dresses by keeping the focus on the shoulders and collarbone.
- The knot provides structure and polish at the back while maintaining the romantic quality of loose hair flowing down the back.
- It’s particularly practical for brides who want hair away from their face and neck but don’t want a completely updo hairstyle.
Knot Formation Process
- Prep hair with smoothing products and blow-dry straight or with gentle waves, depending on your desired final texture.
- Section off the top and side portions of hair from temple to temple, leaving the bottom layers completely loose and flowing.
- Gather the sectioned hair at the nape of your neck and twist it into a neat, compact knot rather than a voluminous bun.
- Secure the knot with bobby pins inserted from multiple angles to ensure it stays in place throughout hours of celebration.
- Arrange the loose hair below the knot, adding gentle curls or waves if desired for added romance and movement.
- Finish with shine spray on the knot area and holding spray on the overall style for all-day perfection.
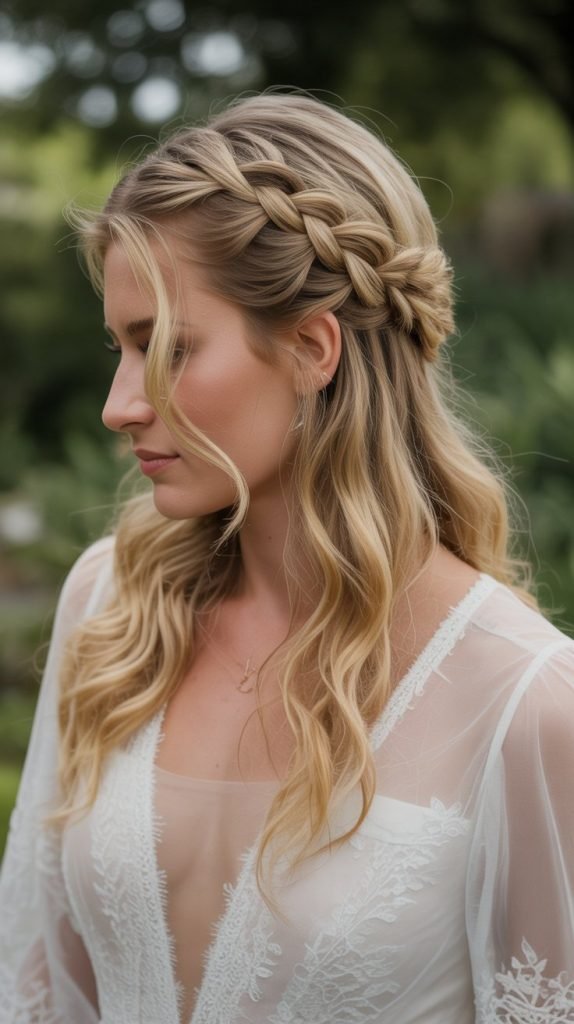
10. Braided Halo with Flowing Locks
The braided halo with flowing locks creates an angelic, ethereal appearance that has become increasingly popular among modern brides seeking romantic, feminine styling.
This design features braids that wrap around the head like a crown or halo, with the remaining hair cascading freely for a look that’s both structured and carefree.
Angelic Aesthetic Appeal
- The halo effect creates an innocent, angelic quality that photographs beautifully and complements romantic wedding themes perfectly.
- This style keeps hair securely away from the face while maintaining a soft, approachable appearance that guests will love.
- The braided crown provides an excellent anchor point for veils, combs, or delicate accessories without compromising the overall design.
- It works wonderfully for various hair lengths and can be adjusted to suit different face shapes and personal preferences.
Halo Creation Technique
- Start with hair that has been lightly textured with waves or curls to help the braids grip and maintain their shape.
- Create a part from ear to ear across the top of your head, clipping the front section away temporarily.
- Divide the front section into two parts and create a Dutch braid on each side, braiding along your hairline toward the back.
- Meet both braids at the back center and either connect them or continue braiding around the head until they form a complete circle.
- Secure the ends with bobby pins tucked underneath the braids for invisible hold and a seamless finished appearance.
- Gently pull at the braid sections to create fuller, softer braids, then arrange the loose hair below for perfect flow.
11. Side-Swept Romantic Waves

Side-swept romantic waves bring old Hollywood glamour to the modern bride, creating an asymmetrical design that’s both sophisticated and alluring.
This style works beautifully for brides who want to showcase one side of their face while creating movement and drama with flowing waves cascading over one shoulder.
Asymmetrical Elegance Benefits
- The side-swept design creates natural asymmetry that’s visually interesting and photographs beautifully from multiple angles.
- This style highlights statement earrings on the exposed side while creating romantic softness on the opposite side with flowing waves.
- It works particularly well for brides with side parts who want to enhance their natural hair direction and flow.
- The dramatic sweep over one shoulder creates an elegant silhouette that complements form-fitting or one-shoulder wedding gowns.
Sweeping Technique
- Create deep, voluminous waves throughout your hair using a large-barrel curling iron, curling away from your face for maximum movement.
- Create a deep side part on your preferred side, determining which direction you want the majority of hair to fall.
- Take sections from the lighter side of the part and sweep them across the back of your head toward the heavier side.
- Secure these swept sections with bobby pins behind the ear on the heavier side, creating the foundation for the side-swept look.
- Arrange all the waves to cascade over one shoulder, using your fingers to create separation and movement within the curls.
- Apply shine spray and flexible-hold hairspray to maintain the waves and keep them positioned throughout your wedding celebration.
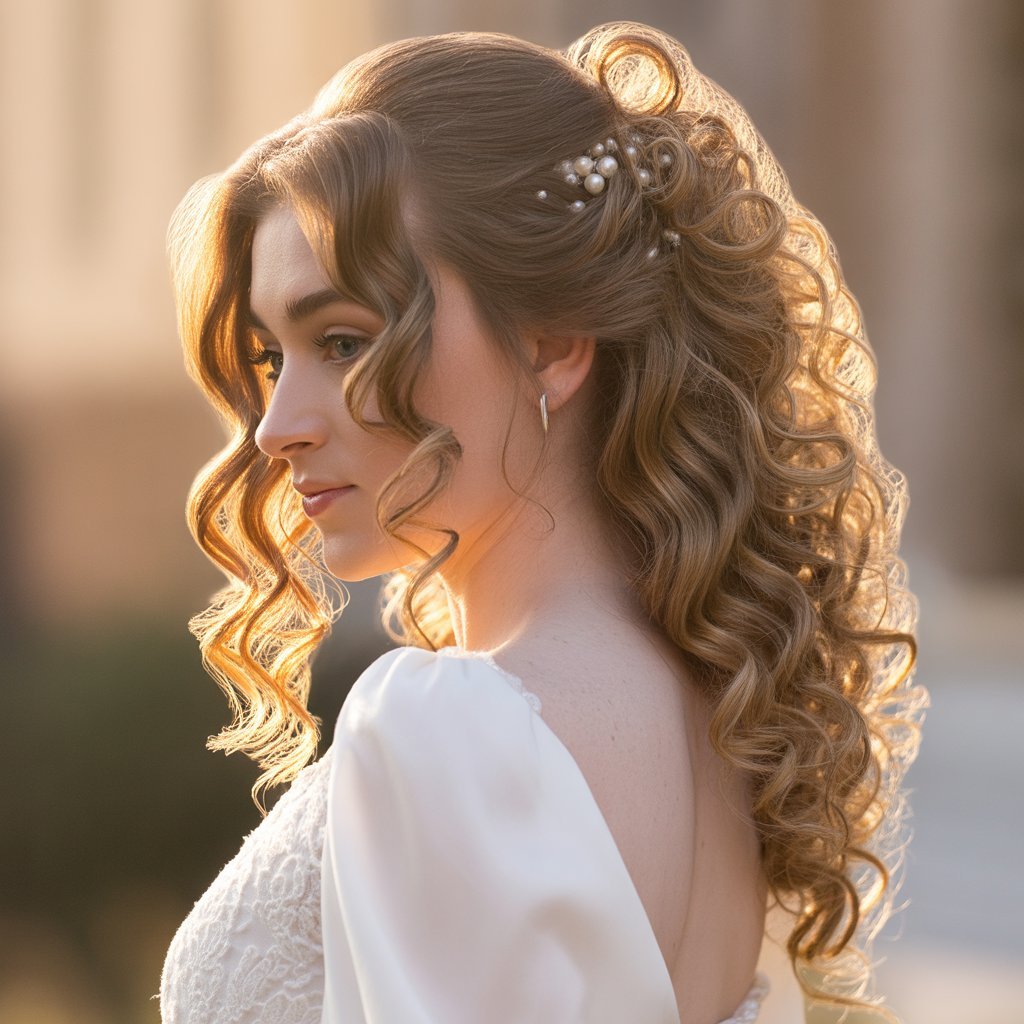
12. Pearl and Crystal Embellished Style

Incorporating pearls and crystals into your half-up, half-down hairstyle adds luxurious sparkle and elegance that elevates the entire bridal look.
This embellished approach transforms a simple hairstyle into a glamorous statement that catches light beautifully and complements formal wedding gowns and upscale venues.
Luxury Enhancement Elements
- Pearls add classic, timeless elegance that never goes out of style and complements vintage or traditional wedding themes perfectly.
- Crystals catch light from every angle, creating sparkle in photographs and adding dimension to your hairstyle throughout the day.
- Strategic placement of embellishments can draw attention to the most flattering angles and create visual interest in the styled portions.
- These accessories can coordinate with your jewelry, dress details, or bouquet embellishments for a cohesive bridal aesthetic.
Embellishment Integration
- Begin with your chosen half-up base style, whether it’s twisted, braided, or gathered into a knot configuration.
- Select pearl or crystal bobby pins, hair vines, or decorative combs that complement your wedding jewelry and dress details.
- Place larger statement pieces at the focal point where the half-up section is secured for maximum visual impact.
- Scatter smaller pearl or crystal pins throughout the styled area and into the loose hair below for subtle sparkle throughout.
- Ensure all embellishments are securely attached with proper pins or combs that won’t shift or fall during your celebration.
- Balance the embellishments carefully to avoid overwhelming the hairstyle—sometimes less is more for elegant sophistication.
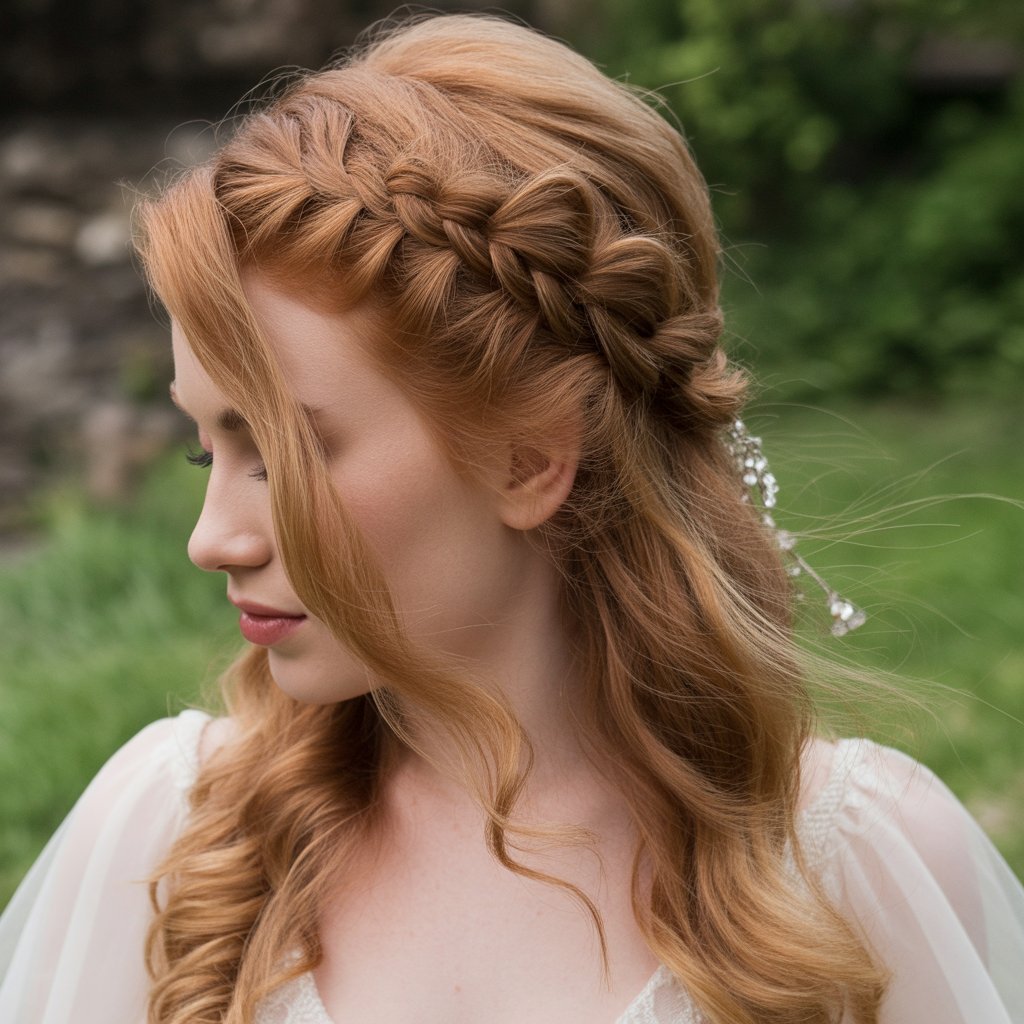
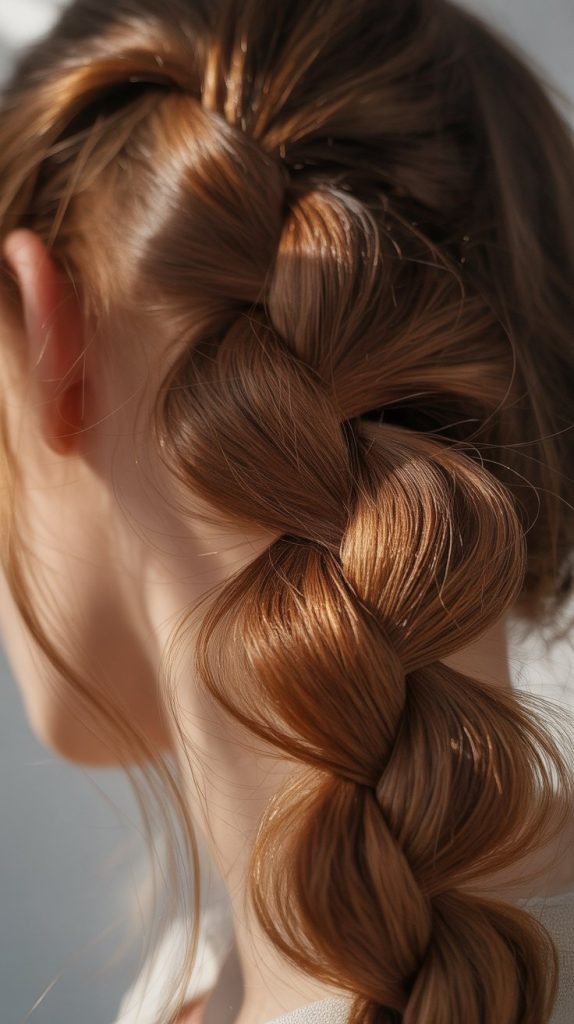
13. Twisted Rope Braid Detail

The twisted rope braid detail brings textural interest through a simpler braiding technique that creates beautiful dimension without requiring advanced braiding skills.
This rope-like effect adds visual appeal to the half-up style while remaining achievable for brides who want to create their own wedding hairstyle.
Rope Braid Advantages
- The rope braid technique is simpler to execute than traditional three-strand or Dutch braids, making it perfect for DIY styling.
- The twisted texture creates dimension and catches light beautifully, adding interest without overwhelming the overall hairstyle design.
- This technique works well for various hair textures and lengths, adapting easily to different styling preferences.
- The clean lines of rope braids complement modern wedding aesthetics while maintaining romantic softness through the loose hair.
Rope Braiding Method
- Divide the top section of hair that you want to style into two equal portions at the crown of your head.
- Twist each section tightly in the same direction—either both clockwise or both counterclockwise—until they begin to coil.
- Cross the twisted sections over each other in the opposite direction, wrapping them around each other to form the rope appearance.
- Continue twisting and wrapping the sections together, working down to the desired length before securing with a hair elastic.
- Gently pancake the rope braid by pulling slightly at the edges to create fuller, more dimensional texture throughout.
- Secure the rope braid into your half-up style and finish with hairspray to maintain the twisted definition throughout the day.
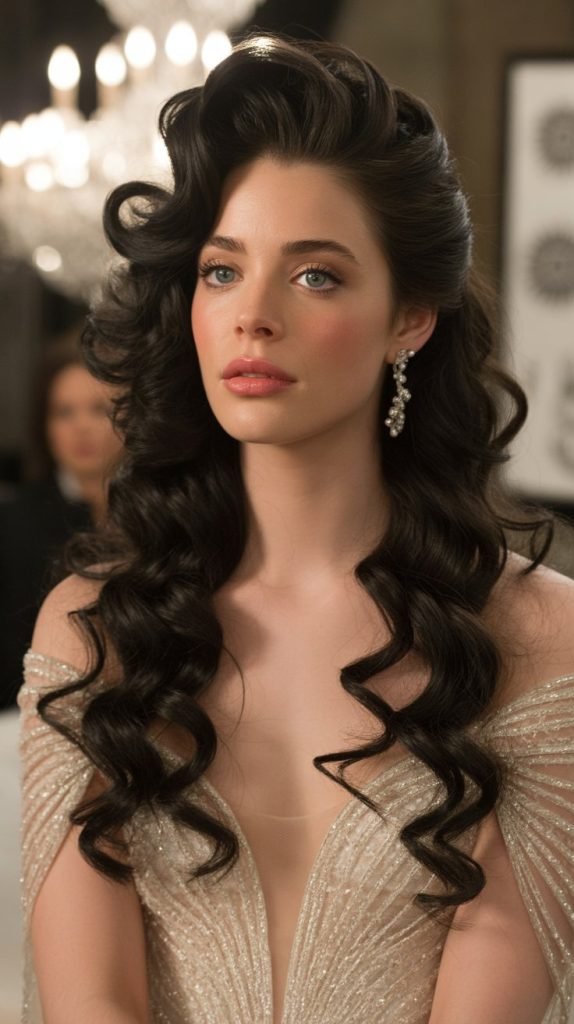
14. Volume-Boosted Crown Tease
The volume-boosted crown tease creates dramatic height and presence at the top of the head, perfect for brides who want to make a bold statement with their wedding hairstyle.
This classic technique has been refined over decades and continues to deliver stunning results that photograph beautifully and create a regal appearance.
Height and Drama Benefits
- Added volume at the crown creates the illusion of longer face proportions and adds regal presence to your overall bridal appearance.
- The height works beautifully with tiaras, crowns, or veils, providing a stable foundation for heavier accessories.
- This technique flatters most face shapes, particularly round or square faces that benefit from vertical elongation.
- The dramatic volume creates unforgettable visual impact in both photographs and in-person viewing during your ceremony.
Teasing Technique
- Start with dry, clean hair that has been prepped with volumizing products for maximum lift potential.
- Section off the crown area from front hairline to the crown point, clipping surrounding hair away temporarily.
- Backcomb the crown section in layers, teasing from mid-length toward the roots using a fine-tooth comb for maximum volume.
- Smooth the top layer gently over the teased section using a brush, maintaining the volume underneath while creating a polished surface.
- Gather the side sections and secure them behind the teased crown, pinning firmly to support the lifted structure.
- Set the entire style with strong-hold hairspray applied from multiple angles to ensure the volume lasts throughout your celebration.
15. Loose Low Ponytail with Wrap

The loose low ponytail with wrap offers understated elegance with a relaxed, sophisticated finish that works beautifully for modern brides seeking effortless style.
This variation uses a section of hair wrapped around the elastic to conceal the hair tie, creating a polished detail that elevates a simple ponytail into wedding-worthy sophistication.
Wrapped Detail Appeal
- The wrapped section conceals the hair elastic completely, creating a seamless, professional finish that looks intentional and refined.
- This style keeps hair away from the face and neck while maintaining a romantic, flowing quality through the loose ponytail.
- The low positioning is comfortable for hours of wear and works well with various necklines and dress styles.
- It’s versatile enough for both casual outdoor weddings and more formal indoor celebrations depending on how it’s styled.
Wrapping Process
- Gather the top half or two-thirds of your hair at the nape of the neck, leaving some hair loose beneath for the flowing effect.
- Secure the gathered section with a hair elastic, positioning it at your desired height on the neck.
- Take a small section of hair from the ponytail itself, about half an inch to one inch wide.
- Wrap this section around the elastic, covering it completely while wrapping downward in a spiral motion.
- Secure the end of the wrapped section underneath the ponytail with a bobby pin, tucking it invisibly for clean finish.
- Add waves or curls to both the ponytail and the loose hair beneath, then finish with light hairspray for hold.
16. Fishtail Braid Accent
The fishtail braid accent incorporates this intricate, detailed braiding technique as a beautiful focal point within the half-up style. Fishtail braids create a delicate, woven appearance that adds texture and visual interest while maintaining the romantic quality of loose, flowing hair below.
Fishtail Texture Benefits
- The intricate woven pattern creates stunning visual detail that photographs exceptionally well from close-up and distance views.
- Fishtail braids appear more complex than traditional three-strand braids, giving your hairstyle an elevated, special-occasion quality.
- The technique creates flatter braids that lay smoothly against the head, working well for brides who want detailed styling without excessive bulk.
- This braid style works beautifully with highlights or dimensional color, showcasing the different tones through the woven sections.
Fishtail Braiding Technique
- Divide the section of hair you want to fishtail braid into two equal parts rather than three as in traditional braiding.
- Take a small piece from the outer edge of the left section and cross it over to join the right section.
- Then take a small piece from the outer edge of the right section and cross it over to join the left section.
- Continue this alternating pattern, keeping the sections tight for defined texture or loose for a softer, more relaxed appearance.
- Work the fishtail braid across the crown or along one side, depending on your desired design and placement preference.
- Secure the end with a clear elastic and gently pull at the woven sections to create fuller, more dimensional braid texture.
17. Retro Bouffant with Modern Twist

The retro bouffant with modern twist combines vintage styling techniques with contemporary refinement, creating a unique hairstyle that honors classic beauty while feeling current and fresh.
This dramatic style adds serious volume and height at the crown, perfect for brides who want to make a memorable style statement on their wedding day.
Vintage-Modern Fusion
- The bouffant height creates immediate visual impact and drama that sets this style apart from more conventional bridal hairstyles.
- Modern smoothing techniques and products create a refined finish that updates the classic bouffant for today’s aesthetic preferences.
- This style pairs beautifully with vintage-inspired wedding dresses while also working with contemporary gown designs for interesting contrast.
- The volume at the crown provides excellent support for veils and allows for creative accessory placement at various angles.
Bouffant Building
- Begin with thoroughly dry hair that has been treated with volumizing products from roots to mid-lengths for maximum lift.
- Section off the crown area generously, from hairline to the crown point, creating enough space for substantial volume.
- Backcomb this section intensively in layers, building height gradually from bottom layers to top layers for stable structure.
- Smooth the top layer carefully over the teased foundation, using a natural bristle brush to create a polished, rounded shape.
- Secure the bouffant by pinning the sides back, using crossed bobby pins for firm hold that won’t collapse under the volume.
- Apply strong-hold hairspray generously to set the height, and add shine spray to the smoothed top layer for glossy perfection.
18. Pinned Back with Statement Clip

Using a statement hair clip to secure your half-up style creates an instant focal point that adds personality and glamour to your wedding hairstyle.
This approach allows you to showcase a beautiful accessory while keeping the styling relatively simple and letting the clip do much of the decorative work.
Statement Accessory Impact
- A beautiful clip becomes jewelry for your hair, adding sparkle, color, or metallic shine that complements your overall bridal look.
- This styling option is quick to create yet looks polished and intentional, perfect for brides who want elegant simplicity.
- Statement clips come in countless designs from vintage-inspired to ultra-modern, allowing perfect customization to your wedding theme.
- The clip provides strong hold while being easy to adjust throughout the day without disrupting the entire hairstyle structure.
Clip Placement Strategy
- Choose a statement clip that complements your dress details, jewelry, and overall wedding aesthetic rather than competing with them.
- Create your desired half-up base by gathering sections from the sides or top, smoothing them back to your chosen placement point.
- Position the clip at the gathering point, ensuring it catches enough hair to hold securely without pulling or causing discomfort.
- Arrange the hair above and below the clip to showcase the accessory properly while maintaining the overall hairstyle flow.
- Test the hold by moving your head gently in different directions, adding bobby pins beneath the clip if additional security is needed.
- Balance the clip placement with your face shape—center back placement works universally, while side placement creates asymmetrical interest.
19. Bubble Ponytail Variation

The bubble ponytail variation brings playful sophistication to the half-up style by creating dimensional “bubbles” along a gathered section of hair.
This trendy technique has gained popularity for its unique visual appeal and Instagram-worthy appearance that photographs beautifully from every angle.
Dimensional Bubble Appeal
- The bubbles create three-dimensional interest that stands out from traditional flat or smooth hairstyles with unique visual texture.
- This modern technique feels young, fresh, and current while maintaining enough sophistication for formal wedding ceremonies.
- The bubbles can be sized and spaced according to your preferences, allowing customization to suit your hair length and style vision.
- It works beautifully for medium to long hair and can be enhanced with extensions for even more dramatic effect.
Bubble Creation Method
- Gather the top section of hair and secure it with a clear or matching elastic at your desired starting point.
- Measure down approximately two to three inches and add another elastic, creating the first segment that will become a bubble.
- Gently pull at the hair between the elastics, tugging outward on all sides to create volume and the signature bubble shape.
- Continue adding elastics at regular intervals down the length of the ponytail, creating multiple bubbles in succession.
- Pancake each bubble individually by pulling the hair outward from the center, creating uniform fullness throughout all sections.
- Secure any flyaways with light hairspray and ensure each elastic is tight enough to maintain the bubble definition throughout your celebration.
20. Twisted Chignon Half-Style
The twisted chignon half-style combines the elegance of a classic chignon with the romance of loose, flowing hair, creating a sophisticated look that works beautifully for formal weddings.
This style features twisted sections formed into a low bun or knot while leaving substantial length cascading freely below.
Chignon Sophistication Elements
- The chignon shape brings classical elegance and refinement that has been favored by brides for generations across cultures.
- The twisted texture within the chignon adds dimensional interest while maintaining the smooth, polished aesthetic of traditional styling.
- This style positions the focal point at the nape, making it perfect for gowns with detailed backs or dramatic necklines.
- It provides secure, long-lasting hold while feeling comfortable throughout hours of wedding festivities and celebrations.
Chignon Construction
- Section the top half to two-thirds of your hair, leaving the bottom layer loose and flowing for the half-down effect.
- Divide the gathered section into two or three parts, twisting each section individually until it begins to coil naturally.
- Wrap the twisted sections around each other or around a central point at the nape to form the chignon shape.
- Secure the chignon with bobby pins inserted at multiple angles, creating a firm foundation that won’t shift during movement.
- Smooth any loose pieces around the chignon with gel or pomade for a polished, refined finish without flyaway.
- Add waves or curls to the loose hair below the chignon, creating beautiful contrast between the structured and flowing elements.
21. Side Braid Sweep
The side braid sweep creates an asymmetrical design by incorporating a braid that travels from one side of the head to the other, adding movement and directional flow to your hairstyle.
This technique works wonderfully for brides who want to showcase one side of their face while creating visual interest through braiding detail.
Asymmetrical Flow Benefits
- The diagonal line created by the side braid leads the eye across the head, creating dynamic movement and visual interest.
- This style naturally showcases one shoulder and side of the neck, perfect for off-shoulder or asymmetrical dress designs.
- The braid keeps hair away from one side of the face while maintaining fullness and romance on the opposite side.
- It photographs beautifully from various angles, offering different perspectives that all look intentional and well-designed.
Side Sweeping Process
- Create a deep side part on your preferred side, establishing which direction the braid will travel across your head.
- Begin braiding at the temple on the heavier side of the part, using French or Dutch braiding technique to incorporate hair as you move.
- Braid diagonally across the back of your head toward the opposite ear, following the natural curve of your skull.
- Secure the braid behind the opposite ear with bobby pins, tucking the end underneath for seamless integration with loose hair.
- Gently pull at the braid sections to create fuller, softer texture that doesn’t appear too tight or severe.
- Arrange the loose hair to cascade over the opposite shoulder from where the braid originates, enhancing the asymmetrical effect.
22. Crown Twist with Loose Tendrils

The crown twist with loose tendrils offers romantic softness through intentionally placed face-framing pieces that add femininity and movement to the overall style.
This approach combines structured twisting at the crown with deliberately loose pieces around the hairline for a look that feels both polished and naturally effortless.
Tendril Softening Effect
- Face-framing tendrils soften the overall appearance and prevent the hairstyle from looking too severe or pulled-back.
- The loose pieces move naturally with air and motion, creating romantic movement in photographs and videos.
- Strategic placement of tendrils can flatter specific face shapes by softening angles or adding width where needed.
- This styling approach feels current and fashion-forward while maintaining the timeless quality appropriate for wedding ceremonies.
Tendril Placement Technique
- Before creating your crown twist, intentionally pull out small sections near the temples and around the hairline.
- Create your twisted crown section as desired, leaving these selected pieces completely free from the styling.
- Once the main style is complete, curl the loose tendrils with a small-barrel curling iron for defined, bouncy pieces.
- Arrange the tendrils to frame your face naturally, allowing some to fall forward while others curve gently around your jawline.
- Use minimal product on the tendrils to maintain their soft, touchable texture without making them stiff or sticky.
- Adjust the tendrils throughout the day as needed, knowing they’re meant to look naturally loose rather than perfectly positioned.
23. Voluminous Curled Half-Updo
The voluminous curled half-updo maximizes fullness and texture through big, bouncy curls that create a glamorous, show-stopping effect.
This style is perfect for brides who want maximum impact and drama, with curls that photograph beautifully and create movement throughout your celebration.
Maximum Volume Impact
- Big, voluminous curls create immediate drama and presence that commands attention in large venues and ceremony spaces.
- The substantial texture catches light from multiple angles, creating dimensional interest in both natural and artificial lighting.
- This style works beautifully in professional photography, with the volume creating striking silhouettes and flattering proportions.
- The fullness can help balance larger dress silhouettes or dramatic accessories without appearing overwhelmed by other elements.
Volume Building Method
- Start with volumizing products applied to damp hair, then blow-dry with a round brush to build foundation fullness.
- Use large-barrel curling iron or hot rollers throughout all sections, allowing each curl to cool completely before touching.
- Tease the roots at the crown section thoroughly to create height that will support the upper portion of the style.
- Gather the half-up section and secure it with volume-preserving techniques like loose pinning rather than tight elastic bands.
- Gently break apart the curls with your fingers, creating fuller, more volumized texture rather than defined spiral curls.
- Apply volumizing spray and flexible-hold hairspray to maintain the fullness throughout the day without collapsing under its own weight.
24. Braided Band Across Crown
The braided band across the crown creates a headband effect using your own hair, offering a bohemian, nature-inspired detail that works beautifully for outdoor or rustic wedding themes.
This technique keeps hair away from the face while adding textural interest and a handcrafted, artisanal quality to your bridal look.
Headband Effect Advantages
- The braided band keeps hair off the forehead and away from the face without requiring actual accessories or headbands.
- This style works perfectly for bohemian, rustic, garden, or outdoor wedding themes with its natural, organic appearance.
- The band creates a clear anchor point for adding flowers, small accessories, or decorative pins throughout the braid.
- It flatters various face shapes by creating a horizontal line that balances proportions and frames the face beautifully.
Band Braiding Process
- Take a section of hair from one side of your head, just above the ear and near the hairline.
- Create a tight braid using this section, working across toward the opposite side while keeping the braid close to the hairline.
- As you braid across, you can incorporate small amounts of hair from along the hairline for a more integrated look.
- Secure the braid behind the opposite ear with bobby pins, tucking the end underneath the loose hair for invisible finishing.
- Adjust the band positioning on your forehead, moving it slightly forward or back depending on your face shape and preference.
- Add small flowers, crystals, or pearls along the braided band if desired, creating additional decorative detail and personalization.
25. Sleek Pulled-Back Ponytail

The sleek pulled-back ponytail offers modern minimalism with ultra-smooth texture and clean lines that create a sophisticated, contemporary bridal aesthetic.
This streamlined approach works beautifully for fashion-forward brides, modern venues, and weddings with a minimalist or architectural design theme.
Modern Minimalist Appeal
- The ultra-sleek finish creates a refined, high-fashion appearance that feels current and on-trend for contemporary weddings.
- Clean lines and smooth texture allow statement earrings, dramatic makeup, or architectural dress details to take center stage.
- This style photographs exceptionally well with modern photography techniques and looks striking in black and white images.
- The simplicity of the design makes it timeless and unlikely to appear dated when you look back at wedding photos years later.
Sleek Styling Method
- Begin with freshly washed hair, applying smoothing serum or cream throughout damp hair before blow-drying.
- Use a paddle brush while blow-drying to pull hair straight and smooth from roots to ends with tension.
- Follow with a flat iron on small sections, creating perfectly straight, glossy hair with maximum shine and smoothness.
- Apply gel or pomade to the roots and hairline, smoothing every strand back toward your desired ponytail placement point.
- Secure the ponytail with a hair elastic, then wrap a small section of hair around the elastic to conceal it completely.
- Use edge control product on a small brush to smooth any baby hairs or flyaways around the hairline for absolute perfection.
26. Romantic Rose Bun Detail

The romantic rose bun detail incorporates hair twisted and arranged into a rose-like shape, creating a unique focal point that adds artistic beauty to your wedding hairstyle.
This intricate detail demonstrates craftsmanship and creativity while maintaining romantic femininity perfect for special occasions.
Artistic Rose Element
- The rose shape creates unexpected artistic interest that transforms a simple half-up style into something truly special and memorable.
- This technique showcases hairstyling skill and craftsmanship, making your wedding photos stand out with unique details.
- The rose can be sized according to your preferences, from subtle and small to large and dramatic as a statement piece.
- It pairs beautifully with floral wedding themes, garden venues, or romantic aesthetic preferences throughout your celebration.
Rose Formation Technique
- Take a section of hair from the crown area and divide it into several smaller subsections for rose petal creation.
- Twist one subsection tightly and coil it around itself at the base to form the center bud of the rose.
- Secure this center with bobby pins, creating a stable foundation for the additional petals to wrap around.
- Take additional subsections and twist them loosely, wrapping each around the center in a spiral pattern to mimic rose petals.
- Pin each “petal” section carefully, adjusting the loops to create realistic petal shapes that layer naturally.
- Gently pull and adjust the twisted sections to create dimension and realistic rose texture, finishing with hairspray for hold.
27. Textured French Twist Half-Style
The textured French twist half-style brings classic elegance with a modern, texturized update that prevents the look from feeling too formal or dated.
This sophisticated technique creates a vertical roll of hair at the back while incorporating intentional texture and looseness for contemporary appeal.
French Twist Sophistication
- The French twist shape has been a classic bridal style for decades, offering proven elegance and timeless appeal.
- Adding texture updates the traditional technique for modern preferences, creating a softer, more approachable appearance.
- This style works beautifully for formal ceremonies while the textured approach keeps it from feeling too stiff or conservative.
- The vertical line of the twist creates length and elegance in your overall silhouette and profile views.
Twist Construction Method
- Gather the top half of your hair and twist it loosely toward one side of your head rather than creating tight tension.
- Fold the twisted section upward and inward, creating the signature roll shape of a French twist along the back center.
- Instead of smoothing everything perfectly, allow some texture and looseness to show through the twist structure.
- Secure the twist with bobby pins inserted vertically into the roll from multiple points for stable, lasting hold.
- Pull gently at sections of the twist to create intentional texture and volume rather than a slicked-down appearance.
- Leave the lower half of your hair loose and flowing, adding waves or curls for contrast with the structured twist above.
28. Knotted Detail with Flowing Hair
The knotted detail with flowing hair creates visual interest through hair literally tied into decorative knots, offering a unique styling element that’s both artistic and surprisingly simple to achieve. This technique adds dimension and conversation-worthy detail to your wedding hairstyle.
Knotted Design Interest
- The actual knots create three-dimensional sculpture-like elements that stand out from traditional braiding or twisting techniques.
- This approach feels modern and artistic, perfect for brides who want unique details that guests will remember and admire.
- Knots can be arranged in various patterns or quantities, allowing customization to create your preferred level of detail.
- The technique works well for hair with some texture or hold, as smooth hair may slip from the knots without proper products.
Knotting Process
- Take two small sections of hair from either side of the crown area, each approximately half an inch to one inch wide.
- Cross the sections over each other as if tying your shoes, creating an actual overhand knot with the hair strands.
- Pull the knot snug but not overly tight, allowing it to sit naturally at your desired position on the crown.
- Take another section from below the first knot and create a second knot, repeating the process to create a vertical line of knots.
- Secure the ends of the knotted sections with small clear elastics or bobby pins tucked discreetly underneath.
- Apply light hairspray or texture spray to help the knots maintain their definition and prevent them from loosening throughout the day.
29. Cascading Curls with Top Knot

Cascading curls with a top knot combines structured styling at the crown with maximum romance through flowing curls below, creating a balanced look that offers both polish and softness. This style works beautifully for brides who want height and presence without a full updo.
Balanced Design Elements
- The top knot adds height and visual interest at the crown while keeping the bulk of your hair flowing freely and romantically.
- This combination creates beautiful proportions that photograph well from all angles, offering variety in your wedding images.
- The structured knot provides an excellent anchor point for veils, combs, or decorative accessories without complicated placement.
- The cascading curls maintain movement and femininity while the knot prevents the style from appearing too loose or unstructured.
Combined Styling Approach
- Create curls throughout all of your hair first, establishing the texture and volume for the finished style foundation.
- Section off the top portion of hair at the crown, gathering it into a small, neat bun or twisted knot.
- Secure the top knot firmly with bobby pins and elastic, ensuring it sits prominently at the crown without sagging.
- Arrange the remaining curls to cascade down your back and over your shoulders, creating full, voluminous flow.
- Separate some curls for additional volume and texture, creating dimensional layers throughout the cascading sections.
- Balance the proportions between the knot size and curl volume, adjusting both elements to create harmonious overall appearance.
30. Pulled-Back with Decorative Comb

Using a decorative comb to secure your half-up style adds vintage charm and elegant detailing while providing functional hold.
This approach has been favored across generations and continues to offer timeless beauty with the added benefit of showcasing a treasured accessory or family heirloom.
Decorative Comb Benefits
- Vintage combs carry sentimental value and can serve as your “something old” or borrowed item for wedding tradition.
- The comb becomes a visible part of your hairstyle design, adding sparkle, color, or metallic accents to complement your look.
- This styling method is practical and secure, with comb teeth gripping hair effectively throughout hours of celebration.
- Combs work particularly well for thick or heavy hair that needs strong hold beyond what pins alone might provide.
Comb Placement Method
- Gather the sections of hair you want to pull back, smoothing them gently toward your chosen placement point.
- Create a small base of crossed bobby pins at the placement point to give the comb teeth something additional to grip.
- Slide the decorative comb into the hair from underneath, angling the teeth toward your scalp for maximum grip and security.
- Press the comb firmly into place, ensuring the teeth penetrate through to the base layer of hair for proper anchoring.
- Adjust the visible portion of the comb, tilting it to catch light beautifully and showcase any decorative elements properly.
- Test the security by gently moving your head, adding additional pins beneath the comb if needed for larger or heavier combs.
31. Soft Braided Twist Combination

The soft braided twist combination incorporates both braiding and twisting techniques within one hairstyle, creating varied texture and visual interest through the interplay of different styling methods.
This approach offers complexity and dimension while maintaining romantic softness throughout.
Mixed Technique Appeal
- Combining different techniques creates more visual interest than using a single method throughout the entire styled section.
- The varied textures catch light differently, adding dimensional quality that enhances photography and in-person viewing.
- This approach allows you to incorporate multiple trending techniques into one cohesive, personalized wedding hairstyle.
- The soft execution prevents the combination from feeling too busy or overwhelming despite the multiple elements involved.
Combination Creation Process
- Divide the hair you’re styling into several sections, planning which sections will be braided versus twisted in advance.
- Create loose braids in some sections using French, Dutch, or simple three-strand techniques depending on your preference.
- Twist other sections loosely, allowing them to coil naturally without pulling too tight or creating rigid definition.
- Bring all the braided and twisted sections together at the back, securing them at a central point with pins.
- Gently pull at both the braids and twists to create softer, fuller texture that blends the techniques harmoniously.
- Allow some pieces to escape naturally from both braids and twists, enhancing the soft, romantic quality of the overall design.
32. Modern High Half-Ponytail

The modern high half-ponytail positions the gathered section higher on the head than traditional half-up styles, creating contemporary edge and youthful energy.
This elevated placement adds height to your overall appearance and works beautifully for casual-chic or fashion-forward wedding aesthetics.
High Placement Advantages
- The elevated position creates maximum height and vertical line that elongates your entire silhouette and face proportions.
- This placement feels young, fresh, and modern compared to traditional low or mid-level half-up positioning.
- The high ponytail showcases neck and shoulder details beautifully, perfect for dresses with interesting back designs or jewelry.
- It works particularly well for brides with very long hair, as the high placement allows the length to be displayed fully.
High Positioning Method
- Determine your desired ponytail height, typically at or near the crown point for true “high” placement effect.
- Gather the top half to two-thirds of your hair, smoothing it upward toward your chosen placement point with a brush.
- Secure the ponytail with a strong elastic band, ensuring it’s tight enough to stay elevated throughout the day without sagging.
- Wrap a section of hair around the elastic to conceal it, creating a polished finish that elevates the casual ponytail element.
- Add volume to the ponytail itself by teasing it slightly or using volumizing products for fuller appearance.
- Style the loose hair beneath the ponytail with waves, curls, or sleek straightness depending on your overall aesthetic preference.
33. Ethereal Loosely Gathered Style

The ethereal loosely gathered style embraces maximum softness and natural beauty through minimal manipulation and intentionally imperfect placement.
This approach creates an almost undone quality that feels effortlessly beautiful, perfect for brides seeking organic, romantic styling without rigid structure.
Ethereal Softness Quality
- The minimal manipulation allows your hair’s natural texture and movement to shine through as the focal point.
- This ultra-soft approach feels romantic and dreamy, perfect for garden weddings, intimate ceremonies, or bohemian themes.
- The loosely gathered quality prevents any feeling of restriction or tightness, ensuring comfort throughout your entire wedding day.
- This style works beautifully for brides with naturally wavy or textured hair who want to enhance rather than fight their natural texture.
Gentle Gathering Technique
- Begin with hair that has natural texture or add loose waves using a large-barrel curling iron with minimal structure.
- Take very loose sections from the sides or top, gathering them gently without pulling tight or creating tension.
- Secure these sections at the back with minimal pins, using just enough hold to keep hair in place without rigid structure.
- Allow many pieces to escape naturally around the face and throughout the gathered section for soft, romantic imperfection.
- Avoid smoothing or controlling flyaways excessively—the slightly messy quality is essential to the ethereal aesthetic.
- Use minimal product, perhaps just a light texture spray, maintaining the hair’s natural movement and touchable softness throughout.
Conclusion
Choosing from these 33 Half-Up, Half-Down Wedding Hairstyles That Will Take Your Wedding Look to the Next Level ensures you’ll find the perfect balance between elegance and romance for your special day.
Whether you’ve been drawn to the classic twisted styles, intricate braided designs, modern minimalist approaches, or bohemian flowing looks, each option offers unique beauty that can be customized to reflect your personal style and complement your wedding theme.
Remember that the best wedding hairstyle is one that makes you feel confident, beautiful, and authentically yourself while remaining comfortable throughout your celebration.
Consider factors like your dress style, venue setting, face shape, hair texture, and the overall atmosphere you want to create when making your final decision.
Practice your chosen style or work with a professional stylist to ensure perfect execution on your wedding day, and don’t forget to schedule a trial run well before the big day to make any necessary adjustments.
With proper preparation, the right products, and careful planning, your half-up, half-down wedding hairstyle will be everything you’ve dreamed of and more, creating memories and photographs you’ll treasure for a lifetime.