Prom night is one of those magical evenings where every detail matters, and your hairstyle can make or break your entire look.
If you have medium-length hair, you’re in the perfect sweet spot where updos are not only achievable but can look absolutely stunning without requiring extensions or excessive styling products.
Finding the right updo for medium-length prom hair can transform your appearance from simple to sophisticated, complementing your dress and enhancing your natural beauty.
This comprehensive guide explores 25 elegant updo hairstyles specifically designed for medium-length hair, offering you a diverse range of options from classic chignons to modern twisted styles, romantic braided updos to sleek buns, ensuring you’ll find the perfect hairstyle that matches your personality and prom dress.
Whether you prefer timeless elegance, bohemian charm, or contemporary glamour, these carefully curated hairstyles will help you achieve that red-carpet-ready look you’ve been dreaming about for your special night.
1. Classic Low Chignon

The classic low chignon represents timeless elegance and has been a favorite for formal events for decades. This sophisticated style works beautifully with medium-length hair because it doesn’t require excessive length to create a polished, refined look. The low chignon sits gracefully at the nape of your neck, offering a balance between elegance and comfort that lasts throughout the night.
How to Create the Look:
- Start with second-day hair or apply dry shampoo to add texture and grip to freshly washed hair.
- Create a low ponytail at the nape of your neck, leaving out a few face-framing pieces for a softer appearance.
- Twist the ponytail loosely and wrap it around the base to form a bun shape.
- Secure the chignon with bobby pins, tucking the ends underneath to hide them completely.
- Finish with a light-hold hairspray to maintain the style while keeping it touchable and natural-looking.
Best For: Strapless gowns, V-neck dresses, and anyone seeking a sophisticated, understated elegance.
2. Romantic Messy Bun

The romantic messy bun brings effortless charm and a touch of bohemian elegance to your prom look. This style embraces texture and deliberately imperfect placement, creating a soft, approachable aesthetic that still feels special and formal.
Styling Steps:
- Apply texturizing spray throughout your hair to create the foundation for a fuller, more dimensional bun.
- Gather your hair into a high or mid-level ponytail, intentionally leaving some pieces loose around your face.
- Loosely twist sections of the ponytail and pin them around the base in a circular pattern without smoothing them down.
- Gently pull apart sections of the bun to create volume and that perfectly imperfect texture.
- Allow a few wispy tendrils to frame your face naturally, and secure everything with flexible-hold hairspray.
Perfect Pairing: Flowy, romantic dresses, floral patterns, and bohemian-inspired prom attire.
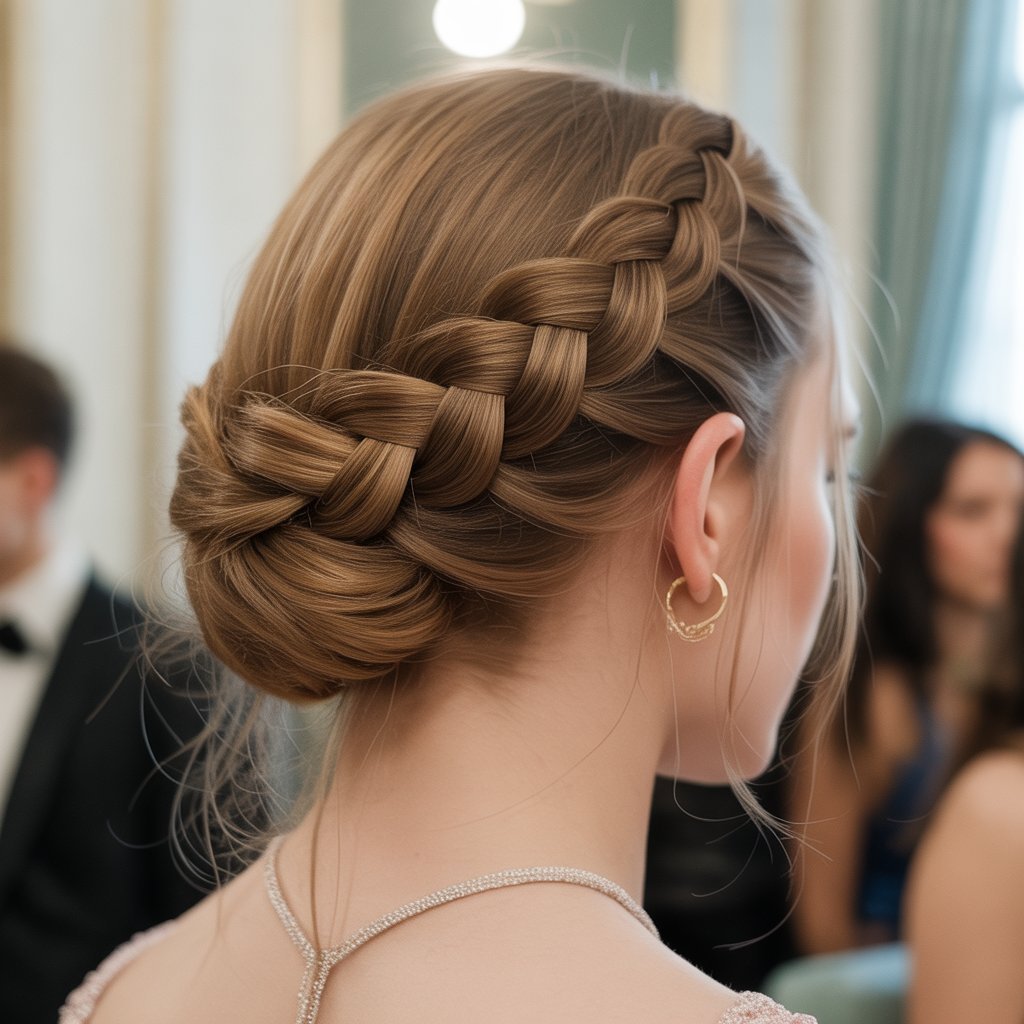
3. Braided Crown Updo

The braided crown updo combines the beauty of intricate braiding with the sophistication of an updo, creating a hairstyle that looks far more complicated than it actually is. This style showcases your hair’s texture while keeping everything securely in place for hours of dancing.
Creation Process:
- Part your hair down the middle and divide it into two equal sections from front to back.
- Create a Dutch braid or French braid on each side, starting at the hairline and working toward the back.
- When you reach the nape of your neck, continue braiding the remaining hair in regular three-strand braids.
- Cross the braids over the top of your head like a crown, pinning them securely on the opposite sides.
- Tuck any remaining ends underneath the braids and secure with bobby pins that match your hair color.
Ideal For: Princess-style ball gowns, garden party themes, and those who love intricate, detailed hairstyles.
4. Twisted Low Bun with Side Part

The twisted low bun with side part offers a modern take on classic elegance, featuring clean lines and sophisticated twists that add visual interest. The deep side part creates asymmetry that flatters most face shapes and adds contemporary appeal.
Step-by-Step Guide:
- Create a deep side part, sweeping the majority of your hair to one side for dramatic effect.
- Divide the hair into two or three sections depending on thickness and desired twist definition.
- Twist each section individually from roots to ends, keeping the twists tight and controlled.
- Gather all twisted sections at the nape and wrap them together to form a compact bun.
- Pin securely with bobby pins in an X-pattern for maximum hold, and smooth any flyaways with a small amount of hair gel or pomade.
Complementary Styles: One-shoulder dresses, asymmetrical necklines, statement earrings that won’t compete with the hairstyle.
5. Half-Up Twisted Crown

The half-up twisted crown delivers the best of both worlds—keeping hair away from your face while allowing the length to cascade beautifully down your back. This versatile style works exceptionally well for medium-length hair because it doesn’t require extensive length to create impact.
How to Achieve:
- Section off the top half of your hair from temple to temple, leaving the bottom section down.
- Divide the top section into two parts and twist each section away from the face toward the back.
- Cross the twists at the crown and secure them with bobby pins, creating a crisscross or crown effect.
- Curl the remaining down section with a curling iron or wand for added texture and movement.
- Set the style with medium-hold hairspray, focusing on the twisted section for security.
Works Best With: A-line dresses, high necklines, and anyone wanting to show off their hair length while keeping it styled.
6. Elegant French Twist

The elegant French twist epitomizes classic Hollywood glamour and remains one of the most sophisticated updo options for formal events. This vertical roll of hair creates a sleek, polished look that draws attention to your dress and accessories.
Styling Instructions:
- Brush your hair thoroughly to remove all tangles and create a smooth foundation for the twist.
- Gather all hair to one side (typically the left) and hold it vertically against your head.
- Twist the hair inward while lifting it up, creating a vertical roll that runs up the back of your head.
- As you twist, tuck the ends inside the roll and secure the entire twist with bobby pins placed vertically along the seam.
- Smooth the front and sides with a boar bristle brush and finish with strong-hold hairspray for longevity.
Recommended For: Column dresses, vintage-inspired gowns, and those who appreciate Old Hollywood elegance.
7. Boho Fishtail Braid Updo
The boho fishtail braid updo combines the intricate beauty of fishtail braiding with relaxed, textured styling that feels both formal and approachable. This style celebrates hair’s natural movement while keeping everything elegantly contained.
Creating the Style:
- Apply texturizing spray or sea salt spray to add grip and enhance your hair’s natural texture.
- Create a loose fishtail braid starting at the crown, dividing hair into two sections instead of three.
- Take small pieces from the outer edge of one section and cross them over to the other section, alternating sides.
- Once the braid is complete, gently pancake it by pulling apart the sections to create width and dimension.
- Wrap the braided section into a low bun at the nape and secure with pins, leaving some pieces slightly loose for that bohemian feel.
Perfect Match: Lace dresses, outdoor or garden proms, rustic or vintage-themed events.
8. Sleek High Bun

The sleek high bun makes a bold, confident statement with its polished finish and elevated placement. This modern updo elongates the neck and showcases facial features while maintaining sophisticated elegance throughout the evening.
How to Style:
- Start with clean, dry hair and apply smoothing serum from roots to ends to eliminate frizz.
- Brush hair into a high ponytail at the crown, using a fine-tooth comb to ensure every strand is smooth and in place.
- Twist the ponytail tightly and wrap it around the base in a circular motion, creating a neat, compact bun.
- Secure with elastic bands and bobby pins, then apply edge control or gel to smooth down baby hairs and flyaways.
- Finish with shine spray for a glossy, red-carpet-ready appearance that photographs beautifully.
Best Suited For: High-fashion dresses, modern silhouettes, geometric necklines, and statement necklaces.
9. Waterfall Braid into Low Bun

The waterfall braid into low bun creates a stunning cascade effect where strands appear to fall through the braid like water, then gather into an elegant bun. This romantic style adds dimension and visual interest while remaining secure for dancing.
Step-by-Step Process:
- Begin a waterfall braid at one temple, taking a three-strand section near your hairline.
- As you braid, drop the bottom strand and pick up a new section to replace it, creating the waterfall effect.
- Continue the braid around the back of your head, allowing dropped strands to hang freely.
- Gather all hair including the dropped strands at the nape and twist into a low bun.
- Secure the bun with bobby pins and hairspray, ensuring the waterfall braid remains visible and defined.
Ideal For: Romantic ball gowns, outdoor proms, and anyone wanting a fairy-tale-inspired look.
10. Twisted Halo Updo

The twisted halo updo wraps twisted sections of hair around your head like a crown, creating an angelic, ethereal appearance. This style is particularly flattering because it frames the face beautifully while keeping hair completely off the neck and shoulders.
Creation Method:
- Part your hair down the center and divide into two equal sections from front to back.
- Take one section and twist it tightly from the nape upward toward the temple on the opposite side.
- Pin the twisted section across the top of your head, securing it with bobby pins every few inches.
- Repeat with the second section, twisting it and pinning it to meet the first twist, creating a complete halo.
- Tuck all ends underneath the twists and secure, then finish with hairspray and optional decorative pins.
Perfect For: Strapless dresses, Greek-inspired gowns, and those seeking an ethereal, goddess-like appearance.
11. Side-Swept Curled Updo

The side-swept curled updo brings Old Hollywood glamour with modern sophistication, featuring voluminous curls swept dramatically to one side. This asymmetrical style creates movement and dimension while maintaining formal elegance.
Styling Steps:
- Curl all sections of your hair with a medium-barrel curling iron, curling away from your face for uniformity.
- Create a deep side part and sweep all hair to one side, pinning it at the nape behind the opposite ear.
- Arrange the curls into a cascading pattern, pinning each curl individually for security and shape control.
- Leave some curls to drape over your shoulder for a romantic, vintage-inspired effect.
- Set the style with medium-hold hairspray, avoiding crushing the curl definition with too much product.
Recommended For: Vintage dresses, mermaid silhouettes, art deco themes, and anyone channeling Old Hollywood starlets.
12. Braided Bun with Loose Pieces

The braided bun with loose pieces combines structure with softness, featuring intricate braiding wrapped into a bun while face-framing pieces soften the overall look. This balanced style offers both sophistication and approachability.
How to Create:
- Leave out two small sections at the front temples for face-framing, then gather remaining hair into a ponytail.
- Braid the ponytail using your preferred braiding technique—three-strand, fishtail, or Dutch braids all work beautifully.
- Wrap the completed braid around the base of the ponytail, forming a circular bun shape.
- Secure the braided bun with bobby pins placed throughout to distribute weight and ensure stability.
- Curl the face-framing pieces with a small curling iron and apply light-hold hairspray to maintain the style.
Works Well With: Tea-length dresses, modern ball gowns, and those wanting a balance between formal and relaxed styling.
13. Double Twist Low Bun

The double twist low bun features two distinct twisted sections that wrap together, creating texture and visual depth. This style is sophisticated yet modern, offering an interesting alternative to simple smooth buns.
Styling Guide:
- Part your hair down the middle and separate into two equal sections divided from front to back.
- Twist each section tightly from the top down to the ends, maintaining tension for definition.
- Bring both twisted sections together at the nape and wrap them around each other to form a rope-like bun.
- Pin the bun securely by inserting bobby pins through both twists to hold them together.
- Smooth any flyaways with a light pomade and finish with flexible-hold hairspray for touchable texture.
Best For: Minimalist dresses, clean lines, and those who appreciate structured yet interesting hairstyles.
14. Pinned Curl Updo

The pinned curl updo brings vintage glamour with individually pinned curls arranged artfully at the back of the head. This sculptural style showcases hair’s movement and shine while creating a unique, eye-catching design.
Creating the Look:
- Curl entire head with a medium curling iron, letting curls cool completely before touching them.
- Brush out the curls gently to soften them into waves while maintaining their shape and volume.
- Starting at one side, take small sections and pin them in place against the head, creating a curved, sculptural pattern.
- Continue pinning curls across and down, arranging them to create dimension and coverage.
- Use decorative bobby pins or jeweled pins to add sparkle while securing the style, and finish with shine spray.
Ideal For: Art deco themes, vintage-inspired proms, and those who love retro Hollywood styling.
15. Rope Braid Bun

The rope braid bun combines the simplicity of a two-strand twist with the elegance of a formal updo, creating a distinctive rope-like texture. This style is surprisingly easy to create while delivering impressive visual impact.
Step-by-Step Instructions:
- Gather all hair into a ponytail at your desired height—low, mid, or high placement all work beautifully.
- Divide the ponytail into two equal sections and twist each section individually in the same direction.
- Wrap the two twisted sections around each other in the opposite direction, creating a rope braid effect.
- Wrap the completed rope braid around the ponytail base to form a textured bun.
- Secure with bobby pins placed strategically through the rope sections, and set with medium-hold hairspray.
Perfect For: Structured dresses, athletic body types, and anyone wanting a unique twist on traditional buns.
16. Braided Chignon

The braided chignon elevates the classic chignon with intricate braiding, combining two timeless techniques into one stunning style. This sophisticated updo works perfectly for medium-length hair, adding texture and interest to a formal look.
How to Achieve:
- Create one or multiple braids starting from different sections of your head—crown, sides, or back all work well.
- Leave some hair unbraided or braid all sections depending on your desired level of texture.
- Gather all braided and unbraided sections at the nape and twist them together loosely.
- Roll the twisted sections into a chignon shape, tucking ends underneath and pinning securely.
- Pull gently on the braids to create dimension before setting everything with hairspray.
Recommended For: Traditional ball gowns, formal themes, and those who appreciate intricate, detailed styling.
17. Top Knot with Loose Ends

The top knot with loose ends brings contemporary edge to formal styling, featuring a high bun with intentionally loose, flowing ends. This modern style balances structure with movement, creating an effortlessly chic appearance.
Styling Process:
- Gather hair into a high ponytail at the crown, leaving the ponytail slightly loose rather than pulling it taut.
- Wrap the ponytail around its base only partway, leaving several inches of ends loose and flowing.
- Secure the wrapped portion with bobby pins while allowing the loose ends to cascade freely from the top.
- Apply texturizing spray to the loose ends for piece-y, intentional texture.
- Smooth the base and sides with a boar bristle brush, then finish with flexible-hold hairspray.
Works Best With: Contemporary dresses, fashion-forward styles, and those wanting a modern, editorial look.
18. Criss-Cross Braided Updo

The criss-cross braided updo features multiple braids that intersect and overlap, creating a complex-looking style that’s surprisingly wearable. This intricate design showcases braiding skills while keeping hair secure and elegant.
Creation Method:
- Divide hair into four or more sections depending on thickness and desired complexity.
- Braid each section individually using three-strand, Dutch, or French braiding techniques.
- Cross the braids over each other at various angles, creating an interwoven pattern across the back of your head.
- Pin each braid securely where it crosses another braid, building a stable structure.
- Tuck all braid ends underneath the criss-crossed sections and secure with additional bobby pins, finishing with strong-hold hairspray.
Best For: Detailed gowns, those who love intricate hairstyles, and anyone wanting a truly unique prom look.
19. Side Bun with Volume

The side bun with volume creates dramatic asymmetry while delivering serious height and fullness. This glamorous style draws attention and photographs beautifully from every angle.
Styling Steps:
- Apply volumizing mousse to damp hair and blow dry with a round brush for maximum lift at the roots.
- Create a side ponytail positioned behind one ear at mid-head height.
- Tease the ponytail in sections to create substantial volume and fullness throughout.
- Smooth the outer layer of teased hair lightly to conceal the teasing while maintaining volume.
- Wrap the volumized ponytail into a large, fluffy bun and secure with multiple bobby pins, finishing with strong-hold hairspray.
Perfect For: Dramatic dresses, side-swept necklines, statement earrings on the opposite side.
20. Rolled Updo with Accessories

The rolled updo with accessories features elegant rolls of hair pinned vertically or horizontally, enhanced with decorative elements like jeweled pins, flowers, or combs. This customizable style can be adapted to match any prom theme or dress color.
How to Create:
- Section hair into horizontal or vertical divisions depending on your preferred roll direction.
- Take each section and roll it under toward the scalp, creating smooth cylinder shapes.
- Pin each roll securely with bobby pins inserted through the roll into the hair beneath.
- Arrange rolls in a pattern—parallel lines, circular arrangements, or asymmetrical designs all work beautifully.
- Add your chosen accessories by inserting them strategically between rolls or pinning them on top for sparkle and personalization.
Ideal For: Themed proms, anyone wanting to coordinate hair with dress colors, and those who love accessories.
21. Pulled-Back Ponytail Updo

The pulled-back ponytail updo transforms a simple ponytail into formal styling by tucking the ends under and creating the illusion of a sophisticated bun. This quick yet elegant style is perfect for last-minute changes.
Step-by-Step Guide:
- Create a sleek, smooth ponytail at your desired height—mid or low placement works best for this style.
- Divide the ponytail into two or three sections for easier manipulation.
- Fold the ponytail under itself, bringing the ends up toward the ponytail base and pinning them underneath.
- Arrange the folded ponytail to create fullness and coverage, concealing the ponytail holder completely.
- Secure everything with multiple bobby pins placed vertically for maximum hold, and finish with strong-hold hairspray.
Works Well With: Classic A-line dresses, time-constrained situations, and those preferring simpler styling techniques.
22. Infinity Braid Bun

The infinity braid bun features the distinctive figure-eight pattern of infinity braiding wrapped into a beautiful bun. This unique style stands out with its mathematical precision and eye-catching design.
Creating the Style:
- Gather hair into a ponytail and divide into two equal sections for the infinity braid.
- Create the figure-eight pattern by alternating which section goes over and under in a continuous loop.
- Continue the infinity braid pattern throughout the entire ponytail length.
- Wrap the completed infinity braid around the ponytail base, maintaining the visible figure-eight pattern.
- Pin the braid securely at multiple points to ensure the distinctive pattern remains visible and intact.
Perfect Match: Geometric dresses, modern themes, and those who appreciate unique, conversation-starting hairstyles.
23. Basket Weave Updo
The basket weave updo creates an intricate woven appearance through strategic placement and pinning of hair sections. This advanced style looks complex but becomes manageable with patience and proper sectioning.
Styling Instructions:
- Divide hair into multiple small sections horizontally across the back of your head.
- Take sections and weave them over and under each other, mimicking actual basket weaving patterns.
- Pin each woven section as you go to maintain the pattern and prevent unraveling.
- Build the woven pattern from the nape upward or from one side across, depending on your preferred design.
- Secure all ends by tucking them into the woven sections and pinning invisibly, finishing with strong-hold hairspray.
Best For: Artistic individuals, unique prom themes, and those wanting a truly one-of-a-kind hairstyle.
24. Low Twisted Ponytail Tuck

The low twisted ponytail tuck offers understated elegance through simple twisting and tucking techniques. This refined style maintains a polished appearance while being comfortable enough to wear all night.
How to Achieve:
- Create a low ponytail at the nape, securing it with a hair elastic that matches your hair color.
- Loosen the hair above the elastic slightly and create an opening by separating the hair into two sections.
- Flip the ponytail up through the opening, inverting it to create a twisted effect above the elastic.
- Take the remaining ponytail length and tuck it up into the twisted section, pinning it securely.
- Adjust the tuck to ensure proper coverage and fullness, then set with medium-hold hairspray.
Recommended For: Sophisticated minimalists, office-appropriate prom alternatives, and those with very fine medium-length hair.
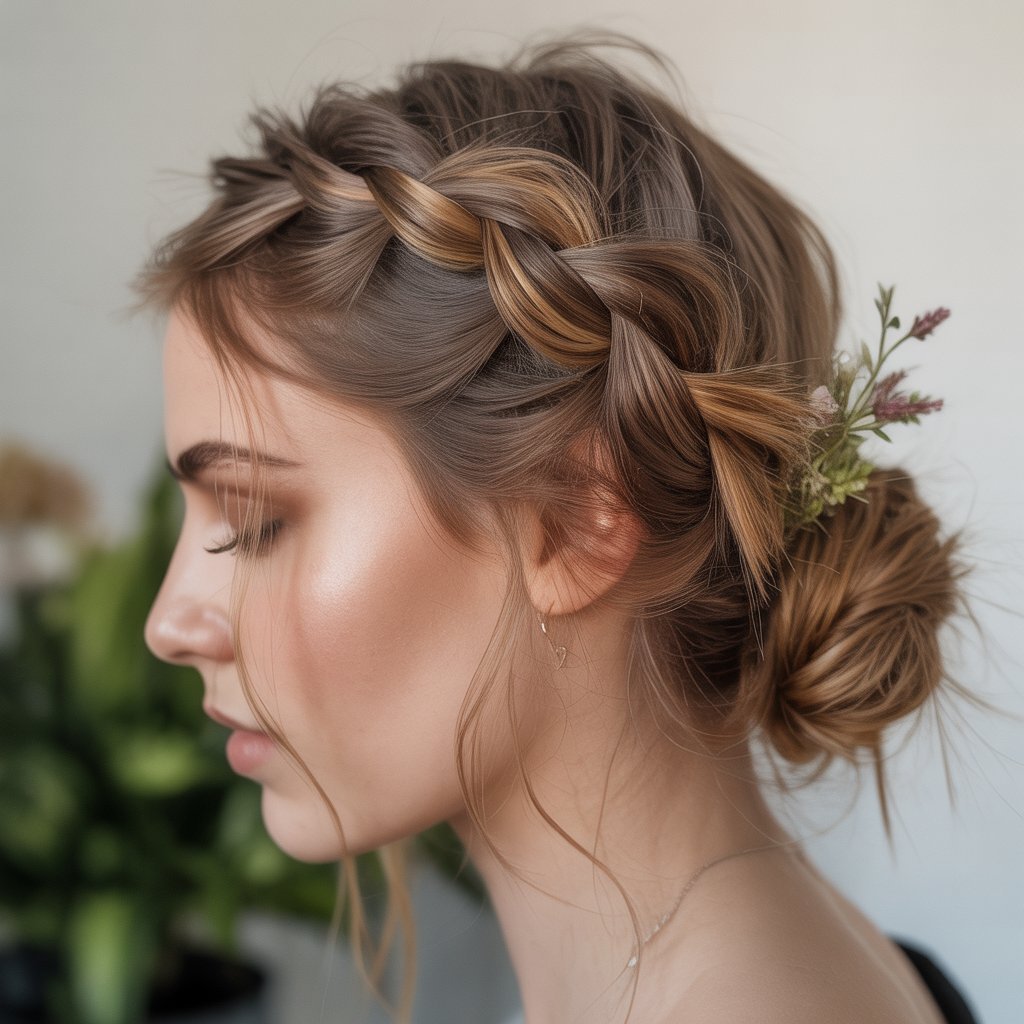
25. Floral Adorned Bun

The floral adorned bun combines any basic bun technique with fresh or artificial flowers, creating a romantic, garden-party aesthetic. This customizable style allows you to match flowers to your dress, theme, or personal preferences.
Creation Process:
- Create your preferred bun style—messy, sleek, braided, or twisted—as the foundation for floral additions.
- Choose flowers that complement your dress color and theme, ensuring they’re properly prepared with floral wire if using fresh blooms.
- Insert individual flowers around the bun using bobby pins or floral pins, creating your desired coverage level.
- Arrange flowers to appear naturally placed rather than too structured or symmetrical for the most organic look.
- Secure everything with hairspray and check that flowers won’t wilt during your event if using fresh varieties.
Perfect For: Garden parties, spring proms, bohemian themes, outdoor venues, and romantic dress styles.
Essential Tips for Long-Lasting Updos
Preparation is Key:
- Wash your hair the day before prom rather than the day of, as second-day hair has better texture and grip for styling.
- Apply dry shampoo to roots before creating your updo to add volume and absorb oils that might cause slippage.
- Use bobby pins that match your hair color exactly so they blend seamlessly and remain invisible in photos.
- Invest in quality elastic bands without metal connectors that can snag and damage hair.
During Styling:
- Work with properly sized sections to avoid overwhelming yourself and ensure each piece is secured adequately.
- Cross bobby pins in an X-pattern when securing heavy sections for maximum hold and stability.
- Apply hairspray in light layers throughout the styling process rather than one heavy application at the end.
- Test your updo by gently shaking your head side to side to identify any loose sections before leaving home.
For All-Night Wear:
- Carry extra bobby pins and a travel-size hairspray in your bag for quick touch-ups throughout the night.
- Avoid constantly touching or adjusting your updo as this loosens pins and causes frizz.
- Take photos early in the evening while your hair looks its absolute best, before dancing and activities.
Useful External Resources
For additional guidance on mastering these updo techniques, visiting established beauty education platforms can provide video tutorials and step-by-step visual guides. StyleCraze offers comprehensive hair tutorials with detailed images that complement written instructions, helping you visualize each styling step more clearly.
Those seeking professional product recommendations and styling tool reviews can explore Byrdie, which features expert-tested hair care products specifically designed for updos and formal hairstyling. Their reviews help you select the right products for your hair type and desired finish.
Understanding face shapes and how they relate to hairstyle selection becomes easier when consulting resources like Good Housekeeping’s beauty section, which provides guidance on determining your face shape and choosing flattering hairstyles accordingly.
Conclusion
Selecting from these 25 Elegant Updo Hairstyles for Medium-Length Prom Hair ensures you’ll find the perfect look that expresses your personal style while complementing your dress and overall prom aesthetic. Medium-length hair offers incredible versatility for updos, providing enough length to create sophisticated styles without requiring extensions or excessive products that can weigh hair down.
Whether you gravitate toward classic elegance like the French twist and low chignon, romantic bohemian styles such as the waterfall braid and messy bun, or contemporary looks like the sleek high bun and top knot with loose ends, each of these hairstyles has been selected specifically because it works beautifully with medium-length hair.
Remember that the key to a successful prom updo lies not just in the styling technique itself but in proper preparation, using quality products and tools, and ensuring your hairstyle complements your face shape and dress neckline.
Don’t be afraid to practice your chosen style several times before prom night, adjusting techniques and pin placement until you achieve the look you envision.
With the right preparation and these detailed instructions for 25 Elegant Updo Hairstyles for Medium-Length Prom Hair, you’re equipped to create a stunning hairstyle that will make you feel confident, beautiful, and camera-ready throughout your entire magical evening.
Your prom night deserves a hairstyle as special as the occasion itself, and with medium-length hair, the possibilities are truly endless for creating that perfect, unforgettable look.