Braided hairstyles have transcended time and culture, offering endless possibilities for those seeking elegant, practical, and stunning looks without the need for heat styling or curls.
Whether you’re preparing for a casual day out, a professional meeting, or a special occasion, braids provide a versatile solution that works beautifully on straight hair.
This comprehensive guide explores 25 stylish braided hairstyles without curls, each designed to enhance your natural texture while keeping your hair healthy and protected.
From classic three-strand braids to intricate Dutch and fishtail variations, you’ll discover step-by-step techniques, styling tips, and creative combinations that prove you don’t need curls to achieve breathtaking braided looks.
These hairstyles cater to different hair lengths, textures, and skill levels, ensuring that everyone can find their perfect braided style.
Get ready to transform your hair routine with these timeless, curl-free braided masterpieces that will have you looking polished and put-together effortlessly.
In This Post......
- 1. Classic Three-Strand Braid
- 2. Dutch Braid (Reverse French Braid)
- 3. Fishtail Braid
- 4. French Braid
- 5. Side Braid
- 6. Rope Braid (Twist Braid)
- 7. Crown Braid (Halo Braid)
- 8. Boxer Braids (Double Dutch Braids)
- 9. Waterfall Braid
- 10. Pull-Through Braid
- 11. Four-Strand Braid
- 12. Braided Ponytail
- 13. Milkmaid Braid
- 14. Snake Braid
- 15. Ladder Braid
- 16. Infinity Braid (Figure-Eight Braid)
- 17. Braided Bun
- 18. Zipper Braid
- 19. Braided Headband
- 20. Double Braid Ponytail
- 21. Half-Up Braided Crown
- 22. Braided Pigtails
- 23. Accent Braid with Straight Hair
- 24. Stacked Braids
- 25. Twisted Side Braid
- Essential Tips for Braiding Straight Hair Without Curls
- Conclusion
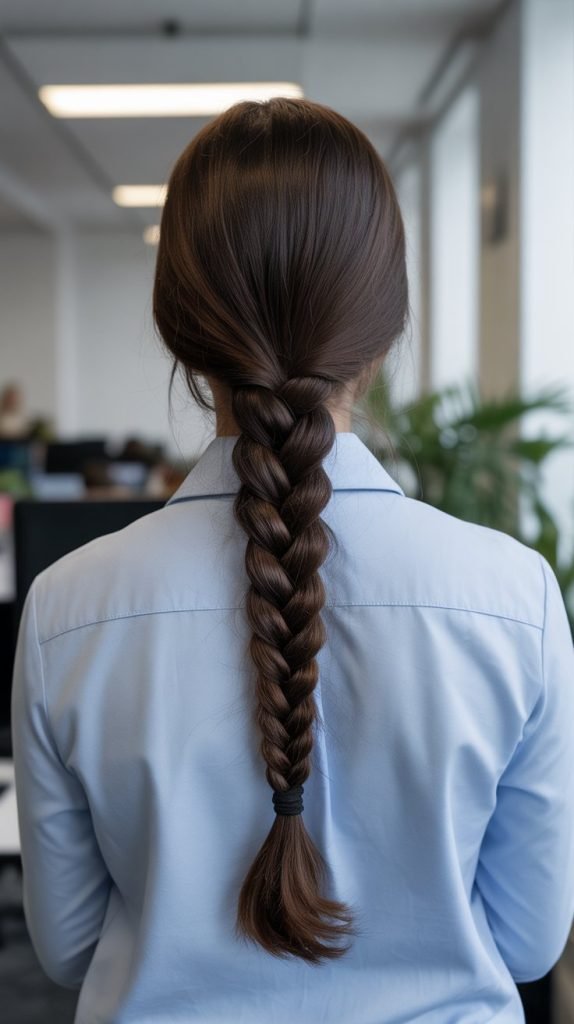
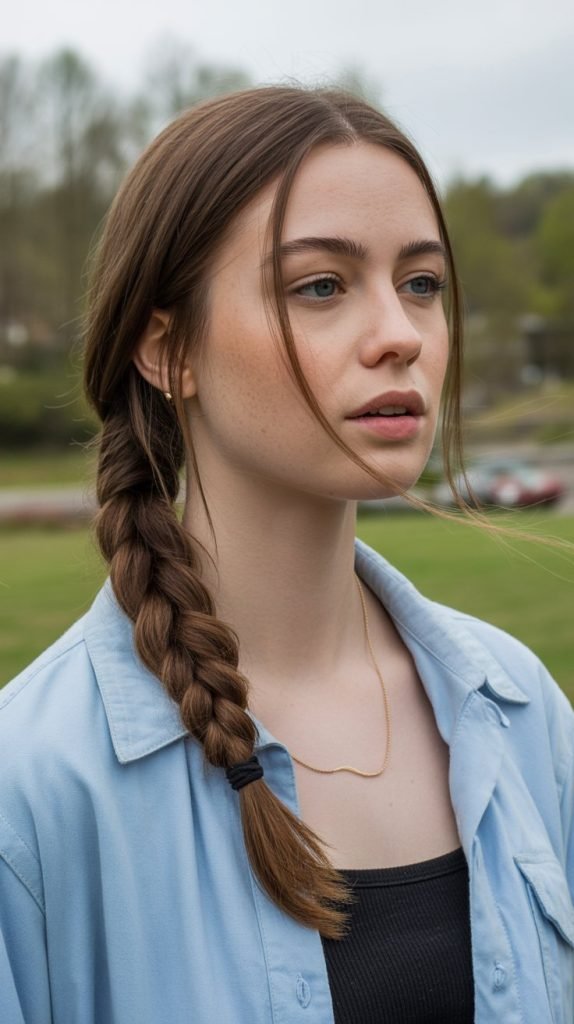
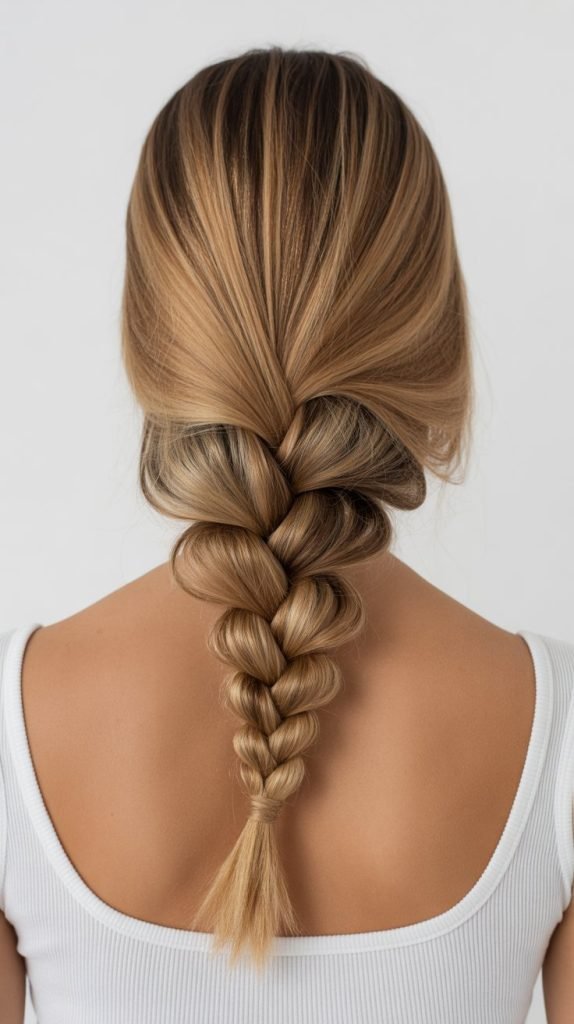
1. Classic Three-Strand Braid
The three-strand braid is the foundation of all braiding techniques and remains one of the most elegant hairstyles without requiring any curls.
This timeless style works perfectly on straight hair, creating clean lines and a sophisticated appearance. It’s ideal for beginners and serves as the building block for more complex braiding patterns.
How to Create:
- Brush your hair thoroughly to remove all tangles and create a smooth base for braiding.
- Divide your hair into three equal sections at the nape of your neck or wherever you want the braid to begin.
- Cross the right section over the middle section, making it the new middle strand.
- Cross the left section over the new middle section, alternating this pattern consistently.
- Continue braiding down to the ends, maintaining even tension throughout for a uniform appearance.
- Secure the end with a hair elastic that matches your hair color for a seamless finish.
Styling Tips:
- Pull gently on the outer edges of the braid to create a fuller, more relaxed look.
- Use a lightweight hair oil or serum before braiding to add shine and control flyaways.
- Position the braid at different angles—center back, side, or over the shoulder—for varied looks.
- This style works excellently for second-day hair when natural oils provide better grip and texture.
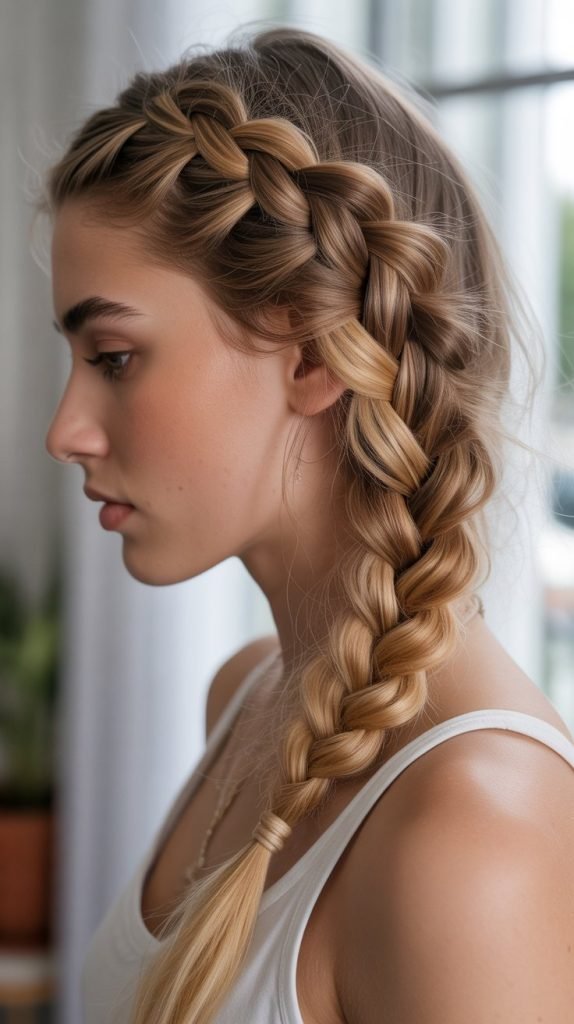
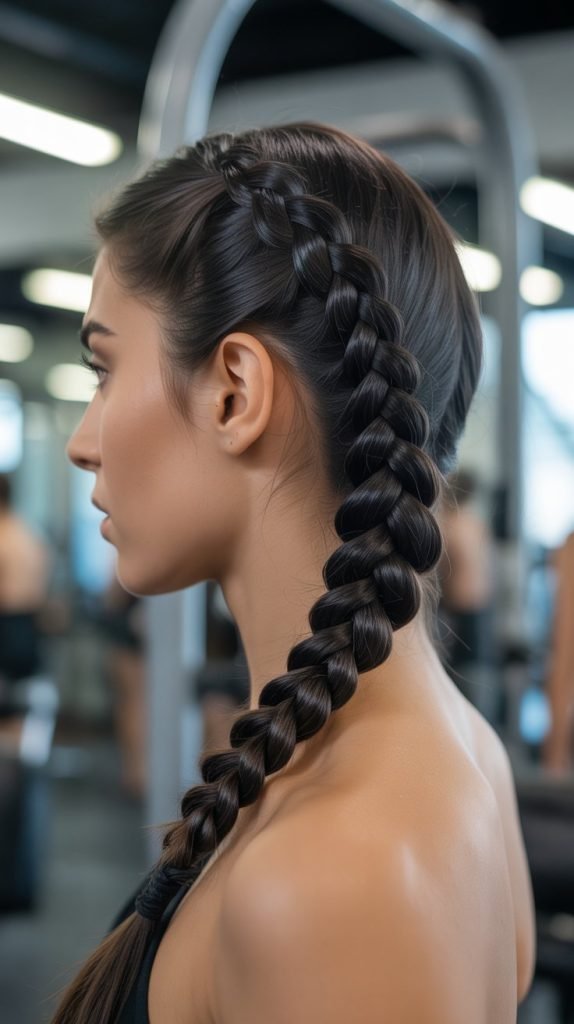
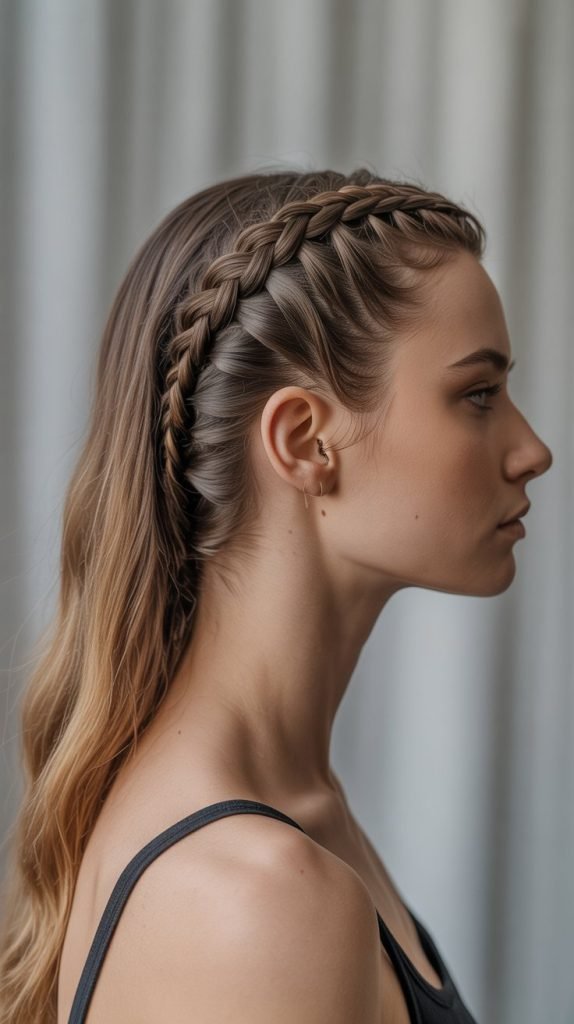
2. Dutch Braid (Reverse French Braid)

The Dutch braid creates a raised, three-dimensional effect that sits on top of the hair rather than blending into it, making it a standout choice for straight hair without curls.
This inverted braiding technique adds visual interest and works beautifully for athletic activities or formal events. The braid appears more prominent and textured compared to traditional French braids.
Braiding Technique:
- Start with clean, detangled hair and section off a triangle of hair at the crown of your head.
- Divide this section into three equal strands to begin the Dutch braiding process.
- Cross the right strand under the middle strand instead of over it, which creates the reverse effect.
- Cross the left strand under the new middle strand, establishing the Dutch braid pattern.
- Add small sections of hair from each side as you continue braiding down, crossing each new section under rather than over.
- Maintain consistent tension and keep the braid tight against the scalp for maximum definition.
- Continue until you’ve incorporated all hair, then finish with a regular three-strand braid to the ends.
Best Occasions:
- Sports activities and workouts where hair needs to stay securely in place throughout movement.
- Professional settings where a polished, put-together appearance is essential.
- Casual weekend outings that require low-maintenance yet stylish hair.
- Special events when paired with accessories like ribbons or decorative pins.
3. Fishtail Braid
The fishtail braid offers an intricate, woven appearance that looks complex but requires only two sections of hair, making it surprisingly simple to master on straight hair.
This style creates a beautiful herringbone pattern that adds texture and visual interest without any curls. The fishtail works exceptionally well on medium to long straight hair, showcasing the detailed weaving pattern.
Step-by-Step Instructions:
- Divide your hair into two large, equal sections instead of the traditional three sections.
- Take a thin strand from the outer edge of the right section and cross it over to join the left section.
- Take a thin strand from the outer edge of the left section and cross it over to join the right section.
- Continue alternating sides, always taking small pieces from the outer edges and crossing them to the opposite side.
- Keep the strands thin and consistent in size for a more defined, intricate pattern.
- Work your way down to the ends, maintaining even tension throughout the braiding process.
- Secure with an elastic and gently pancake the braid by pulling on the edges for added volume and texture.
Maintenance Tips:
- Apply a texturizing spray before braiding to give straight hair more grip and prevent slipping.
- Avoid braiding too tightly, as this can create tension headaches and make the pattern less visible.
- Sleep with the braid in a loose bun to preserve the style for multiple days.
- Use a small amount of dry shampoo at the roots to refresh the style between washes.
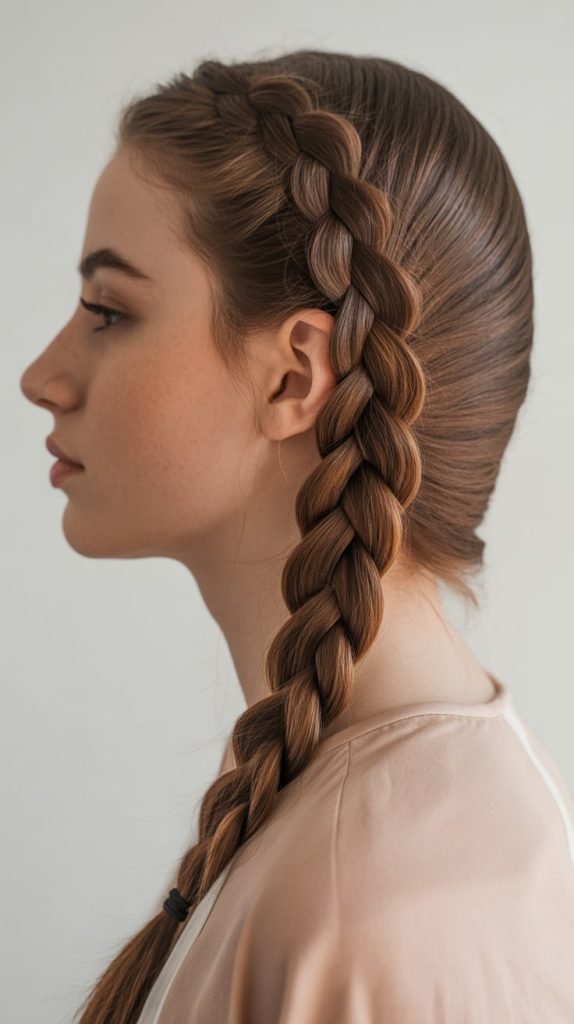
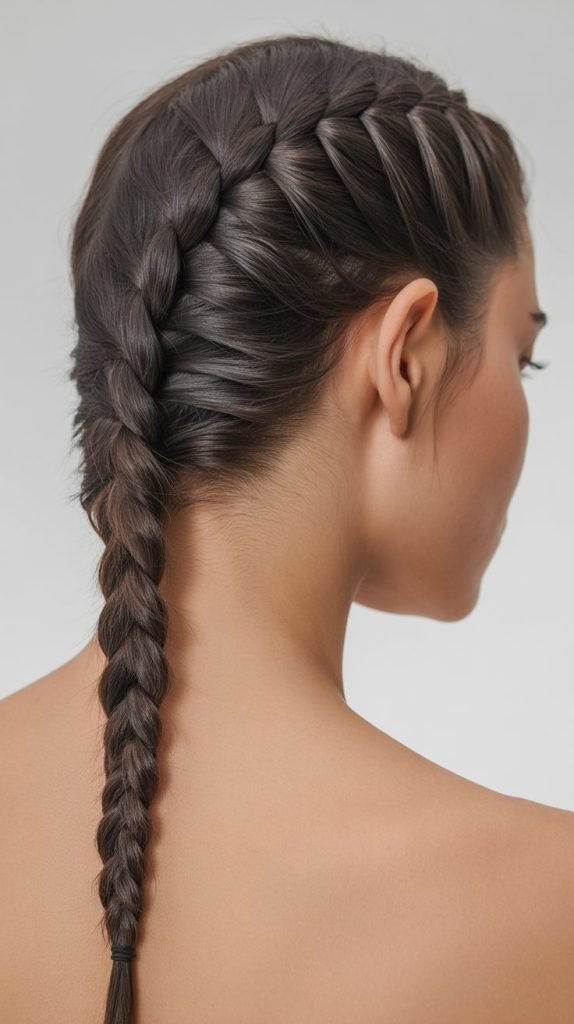
4. French Braid
The French braid is a classic, elegant style that weaves hair seamlessly from the crown down, creating a sophisticated look perfect for straight hair without curls.
This technique keeps hair secure while looking polished and professional. The French braid works for virtually any occasion and can be adapted to various positions and styles.
Creating the Perfect French Braid:
- Begin with brushed, tangle-free hair and take a section from the crown area, dividing it into three strands.
- Start with one regular three-strand braid stitch to establish the pattern and foundation.
- Before crossing the right section over the middle, add a small amount of hair from the right side of the head.
- Cross this combined section over the middle, incorporating the new hair seamlessly.
- Before crossing the left section over the middle, add a small amount of hair from the left side.
- Continue this pattern of adding hair from alternating sides with each crossover until all hair is incorporated.
- Finish with a regular three-strand braid once you’ve collected all available hair.
Variations to Try:
- Create two French braids instead of one for a sporty, athletic look that’s perfect for active lifestyles.
- French braid along the hairline to create a crown effect that keeps hair off the face elegantly.
- Combine a French braid with a low bun for a sophisticated updo suitable for formal events.
- Try a diagonal French braid that travels from one side of the head to the opposite shoulder for asymmetrical interest.
5. Side Braid
A side braid brings an effortlessly romantic and casual vibe to straight hair, draping elegantly over one shoulder without requiring any curls or waves.
This versatile style can be dressed up or down depending on how tight or loose you make the braid. The side placement creates an asymmetrical look that’s both modern and timeless.
Styling Guide:
- Sweep all your hair to one side of your neck, deciding whether you prefer the left or right side.
- Secure the hair temporarily with one hand while you prepare to braid with the other.
- Choose your preferred braiding technique—three-strand, fishtail, or rope braid all work beautifully for side braids.
- Begin braiding just below the ear level to create a relaxed, bohemian appearance.
- Keep the braid loose rather than tight for a softer, more romantic aesthetic.
- Allow a few face-framing pieces to fall naturally around your face for a less structured look.
- Secure the end and pull gently on the braid sections to create additional volume and texture.
Accessorizing Options:
- Weave a thin ribbon throughout the braid for a pop of color and added visual interest.
- Add small flower clips or decorative pins at strategic points along the braid for special occasions.
- Wrap the elastic with a small section of hair for a more polished, professional finish.
- Incorporate metallic hair cuffs or beads at intervals down the braid for an edgy, modern twist.
6. Rope Braid (Twist Braid)
The rope braid creates a twisted, spiral effect using only two sections of hair, making it one of the easiest braided styles for straight hair without curls.
This technique produces a clean, defined twist that holds well throughout the day. The rope braid offers a unique alternative to traditional three-strand braids with minimal effort required.
How to Achieve the Look:
- Gather your hair into a ponytail at your desired height and secure it with an elastic band.
- Divide the ponytail into two equal sections that will form the rope braid.
- Twist the right section clockwise several times until it begins to coil slightly on itself.
- Twist the left section clockwise the same number of times, ensuring both sections are twisted in the same direction.
- Wrap the two twisted sections around each other in a counterclockwise direction, which creates the rope effect.
- Continue twisting the sections individually clockwise while wrapping them counterclockwise around each other down to the ends.
- Secure with an elastic and hold the braid briefly to set the twist before releasing.
Pro Tips:
- The key to a successful rope braid is twisting both sections in the same direction while wrapping them in the opposite direction.
- Use a strong-hold elastic at the base to prevent the ponytail from loosening during the twisting process.
- This style works best on second or third-day hair when natural oils provide better grip and control.
- Mist with hairspray before beginning to help the twists hold their shape throughout the day.
7. Crown Braid (Halo Braid)
The crown braid encircles the head like a halo, creating an ethereal, regal appearance that works beautifully on straight hair without any curls needed.
This elegant updo keeps hair completely off the face and neck while looking sophisticated and romantic. The crown braid is perfect for weddings, formal events, or any occasion requiring an elevated hairstyle.
Detailed Instructions:
- Part your hair down the middle from forehead to nape, creating two equal sections for balanced braiding.
- Begin French or Dutch braiding on one side, starting just above the ear and working toward the back.
- Curve the braid around the back of the head, following the natural hairline contour.
- Continue braiding along the opposite side, working toward the starting point to complete the circle.
- Tuck the ends of the braids under each other, securing with bobby pins that match your hair color.
- Pin any loose sections along the crown to ensure the braid sits flat and secure against the head.
- Set the style with a light to medium-hold hairspray to maintain the shape throughout your event.
Finishing Touches:
- Pull gently on the outer edges of the braid to create a fuller, more voluminous crown effect.
- Smooth any flyaways with a small amount of pomade or edge control product for a polished finish.
- Insert decorative pins, small flowers, or pearls along the braid for added elegance during special occasions.
- Leave a few wispy pieces around the face to soften the overall look and prevent it from appearing too severe.
8. Boxer Braids (Double Dutch Braids)
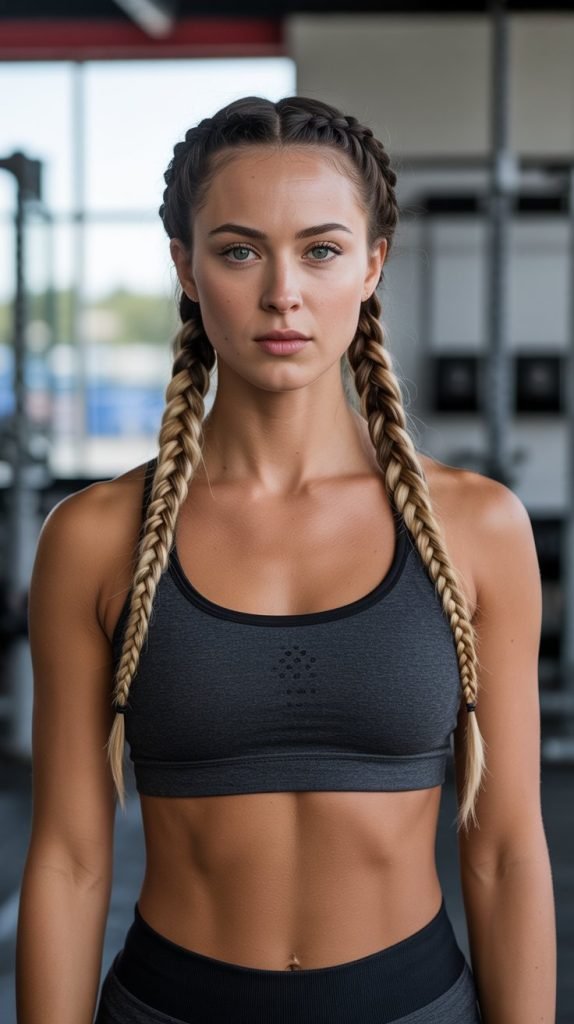
Boxer braids, also known as double Dutch braids, have become a trendy athletic and street-style look that works exceptionally well on straight hair without curls.
These two tight braids sit raised on the scalp, offering both style and practicality. The symmetrical appearance creates a bold, confident aesthetic that’s perfect for active lifestyles.
Creating Boxer Braids:
- Part your hair straight down the middle from your forehead to the nape of your neck, creating two perfectly equal sections.
- Clip one section away to keep it separate while you work on the first braid.
- Take a small triangle section at the front hairline of the first side and divide it into three strands.
- Begin Dutch braiding by crossing strands under rather than over, adding hair from each side as you progress down.
- Keep the braid as close to the part line as possible for symmetry and a clean appearance.
- Continue braiding all the way down to the ends, maintaining consistent tension throughout for uniform thickness.
- Repeat the exact process on the opposite side, ensuring both braids are positioned at the same angle and tightness.
Maintenance and Longevity:
- These braids can last 2-3 days when done properly, making them excellent for busy schedules and travel.
- Sleep with a silk or satin bonnet to preserve the braids and minimize frizz overnight.
- Apply edge control along the part and hairline before braiding to keep baby hairs smooth and sleek.
- Use a small amount of oil on the braids each morning to maintain shine and reduce any dryness.
9. Waterfall Braid
The waterfall braid creates a cascading effect where sections of hair “fall” through the braid like a waterfall, resulting in a romantic, intricate design on straight hair.
This semi-updo keeps the top portion styled while allowing the rest of the hair to flow freely. The waterfall braid works beautifully for special occasions and adds visual interest without requiring curls.
Technique Breakdown:
- Take a section of hair near your temple and divide it into three strands to begin the waterfall effect.
- Start with a regular braid stitch by crossing the back strand over the middle strand once.
- Cross the front strand over the middle strand, then drop this front strand completely and let it fall.
- Pick up a new section of hair from just above where you dropped the previous strand to replace it.
- Continue this pattern of braiding, dropping the front strand, and picking up a new replacement strand as you work across.
- The dropped strands create the “waterfall” effect as they cascade down through the braid beautifully.
- Secure the end behind your ear with bobby pins, tucking them discretely to hide the termination point.
Styling Suggestions:
- This style looks stunning when done on one side or can be mirrored on both sides for symmetry.
- The waterfall braid works as a headband alternative, keeping hair off the face while maintaining flow and movement.
- Pair with loose, straight hair for an effortlessly elegant look that requires no additional curling.
- Add small flowers or decorative pins at the drop points for enhanced visual appeal during special events.
10. Pull-Through Braid
The pull-through braid creates the illusion of a complex, voluminous braid without actually braiding at all, making it perfect for straight hair that lacks natural texture.
This technique uses ponytails stacked and pulled through each other to create a dramatic, statement-making style. The result looks impressively intricate while being surprisingly simple to execute.
Step-by-Step Process:
- Create a half-up ponytail at the crown and secure it with a clear or matching elastic band.
- Make another ponytail directly below the first one, using hair from the sides of the head.
- Split the top ponytail in half and bring both sections around and over the second ponytail.
- Create a third ponytail below the second, incorporating the split sections from the first ponytail.
- Continue this pattern of splitting the previous ponytail and incorporating it into a new one below.
- Work your way down the length of your hair until you’ve created the full pull-through effect.
- Gently pull on each section to create maximum volume and the signature dimensional appearance.
Enhancement Tips:
- Use clear elastics throughout to maintain the illusion of one continuous braid rather than stacked ponytails.
- Tease each ponytail section slightly before securing to create even more volume and fullness.
- This style works particularly well on long, straight hair where the layered effect can be fully appreciated.
- Set with medium-hold hairspray after pulling apart the sections to maintain the voluminous shape all day.
11. Four-Strand Braid
The four-strand braid produces a complex, woven pattern that appears more intricate than traditional three-strand braids, showcasing beautifully on straight hair without curls.
This advanced technique creates a unique texture that stands out and demonstrates braiding skill. While more challenging initially, the four-strand braid becomes easier with practice and delivers impressive results.
Braiding Instructions:
- Divide your hair into four equal sections, mentally numbering them 1, 2, 3, and 4 from left to right.
- Cross section 1 under section 2, positioning it between sections 2 and 3.
- Cross section 4 under section 3, positioning it between sections 3 and the former section 1.
- Cross the current leftmost section under the section next to it, continuing the under-over pattern.
- Repeat this sequence consistently, always crossing under then over as you work down the length.
- Maintain even tension throughout all four strands to create a uniform, balanced appearance.
- Secure the end with an elastic and gently adjust the braid to enhance the woven pattern visibility.
Practice Tips:
- Start by practicing with four different colored ribbons to clearly see the pattern before working with your hair.
- This braid requires patience initially but becomes intuitive after several attempts and practice sessions.
- Ask someone to help hold sections while you’re learning the pattern for easier manipulation.
- The four-strand braid creates a flatter, wider appearance compared to three-strand braids, making it distinctive and eye-catching.
12. Braided Ponytail
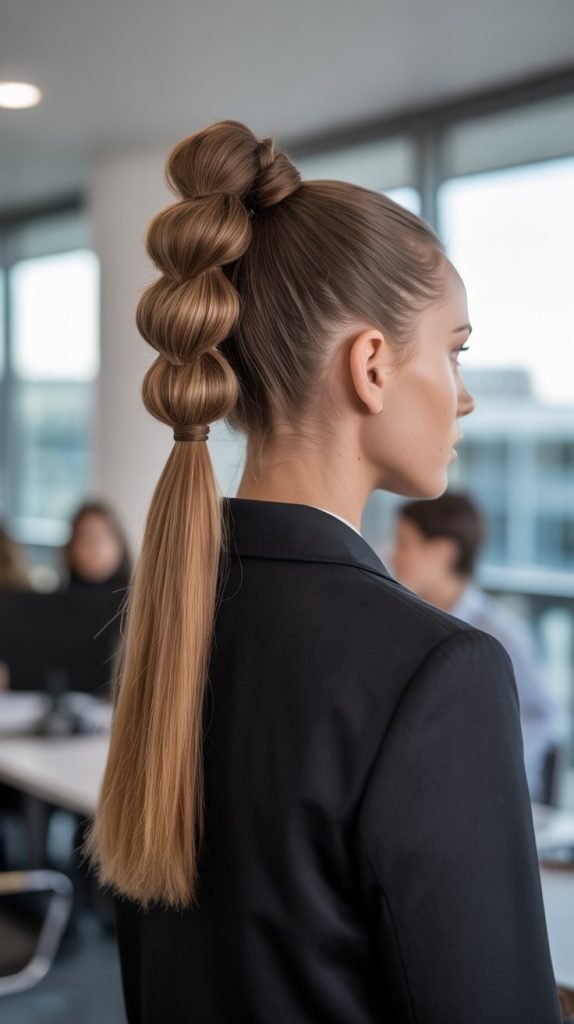
A braided ponytail combines the sleekness of a ponytail with the texture of braids, creating a polished yet interesting style for straight hair.
This versatile look works for both casual and professional settings without requiring curls. The braided element adds dimension to an otherwise simple ponytail, elevating the overall appearance.
Creating the Style:
- Brush your hair thoroughly to create a smooth base and gather it into a ponytail at your desired height.
- Secure the ponytail with a strong elastic that will hold throughout the day without slipping.
- Braid the entire length of the ponytail using your preferred braiding technique—three-strand, fishtail, or rope.
- Maintain consistent tension as you braid down to the ends to ensure a uniform appearance.
- Secure the bottom of the braid with another elastic that matches your hair color.
- Take a small section of hair from the braid and wrap it around the base elastic to conceal it for a polished finish.
- Secure the wrapped section with a bobby pin tucked discretely underneath the ponytail.
Height Variations:
- High ponytails with braids create an energetic, youthful appearance perfect for workouts and casual outings.
- Mid-level ponytails offer a balanced, versatile look suitable for most occasions and face shapes.
- Low ponytails with braids provide an elegant, sophisticated aesthetic ideal for professional or formal settings.
- Side ponytails braided create an asymmetrical, playful style that adds personality and flair.
13. Milkmaid Braid
The milkmaid braid wraps braids across the top of the head like a crown, creating a sweet, vintage-inspired look on straight hair without curls.
This charming updo keeps all hair secured while maintaining a soft, romantic aesthetic. The milkmaid braid works wonderfully for warm weather, special events, or anytime you want a feminine, delicate hairstyle.
Construction Method:
- Part your hair down the center from forehead to nape, creating two symmetrical sections for balanced braiding.
- Braid each section into a simple three-strand braid, securing the ends with small elastics.
- Take the right braid and lift it up and over the top of your head, positioning it like a headband.
- Secure the end of the right braid behind your left ear using bobby pins matched to your hair color.
- Take the left braid and bring it over the top of your head, crossing over where the first braid was pinned.
- Tuck the end of the left braid behind your right ear and secure firmly with several bobby pins.
- Adjust both braids to ensure they sit flat and comfortable against your head without pulling.
Styling Enhancements:
- Gently pull on the edges of both braids before positioning them to create a fuller, more romantic appearance.
- Weave fresh or artificial flowers into the braids for a whimsical, garden-party aesthetic perfect for outdoor events.
- This style works beautifully for bridesmaids or outdoor weddings with a rustic or vintage theme.
- Use decorative pins at the crossing point for added visual interest and secure hold throughout your event.
14. Snake Braid
The snake braid creates an undulating, serpentine pattern that adds dimension and visual intrigue to straight hair without requiring curls.
This unique style combines braiding with strategic pulling to create waves and curves within the braid itself. The snake braid offers a modern, artistic take on traditional braiding techniques.
Creating the Pattern:
- Begin with a standard three-strand braid, working down several inches before starting the snake effect.
- After braiding 2-3 inches, pause and pull exclusively on one edge of the braid to create a curve.
- Continue braiding another 2-3 inches in the standard manner without pulling on any sections.
- Pause again and pull on the opposite edge of the braid to create a curve in the other direction.
- Alternate which side you pull on every few inches to create the signature snake-like zigzag pattern.
- The unpulled side remains tight while the pulled side expands, creating the dimensional wave effect.
- Secure the end and adjust the curves to ensure they’re evenly spaced and symmetrically positioned.
Design Considerations:
- This technique works best on longer hair where multiple curves can be created down the length.
- The snake braid can be positioned anywhere—center back, side, or even incorporated into updos for added texture.
- Experiment with the spacing between curves to create different effects from subtle waves to dramatic zigzags.
- This style holds particularly well on straight hair where the intentional pattern contrasts beautifully with the sleek texture.
15. Ladder Braid
The ladder braid creates a stunning, intricate appearance where horizontal “rungs” appear to connect vertical braided strands, resembling an actual ladder.
This advanced technique produces a show-stopping result on straight hair without curls. The ladder braid requires patience and practice but delivers a truly unique hairstyle that draws attention and admiration.
Complex Technique:
- Section off a vertical strip of hair about 2 inches wide from crown to nape where the ladder will be positioned.
- Divide this section into two equal strands that will form the vertical sides of the ladder.
- Take a thin horizontal section of hair from just outside the left strand and weave it under the left strand, over to the right strand, and then under the right strand.
- This creates the first “rung” connecting the two vertical strands like a ladder step.
- Continue taking horizontal sections alternately from left and right, weaving each through both vertical strands.
- Space the rungs evenly down the length of the hair for a uniform, balanced ladder appearance.
- The surrounding loose hair frames the ladder braid beautifully, emphasizing the intricate pattern.
Important Notes:
- This style requires significant time and dexterity, making it ideal for special occasions rather than everyday wear.
- Working with straight hair actually makes the ladder pattern more visible and defined compared to textured hair.
- Consider having someone help you with this style, especially for the sections at the back of your head.
- The ladder braid can be positioned down the center back or off to one side for different aesthetic effects.
16. Infinity Braid (Figure-Eight Braid)

The infinity braid creates a continuous figure-eight pattern that appears to loop endlessly, producing a mesmerizing effect on straight hair.
This mathematical-inspired braid uses a unique crossing pattern that differs from traditional braiding techniques. The infinity braid showcases beautifully on sleek, straight hair where the distinctive pattern is clearly visible.
Braiding Method:
- Divide your hair into two equal sections that will form the continuous figure-eight pattern.
- Take a small strand from the outer edge of the right section and cross it over to the left section in a figure-eight motion.
- Bring that same strand back under and around the left section, creating the bottom loop of the eight.
- Take a small strand from the outer edge of the left section and repeat the figure-eight pattern in the opposite direction.
- Continue alternating sides, always creating the complete figure-eight motion with each strand before switching sides.
- Maintain consistent strand thickness throughout for a uniform, recognizable pattern that reads as intentional.
- Secure the end and adjust the loops gently to enhance the infinity symbol appearance throughout the braid.
Visual Appeal:
- This braid creates a three-dimensional effect that catches light beautifully, especially on shiny straight hair.
- The infinity pattern symbolizes eternity and wholeness, making it popular for weddings and romantic occasions.
- While complex-looking, the infinity braid becomes manageable once you understand the figure-eight motion sequence.
- This style works best on medium to long straight hair where the pattern has adequate length to repeat and become recognizable.
17. Braided Bun
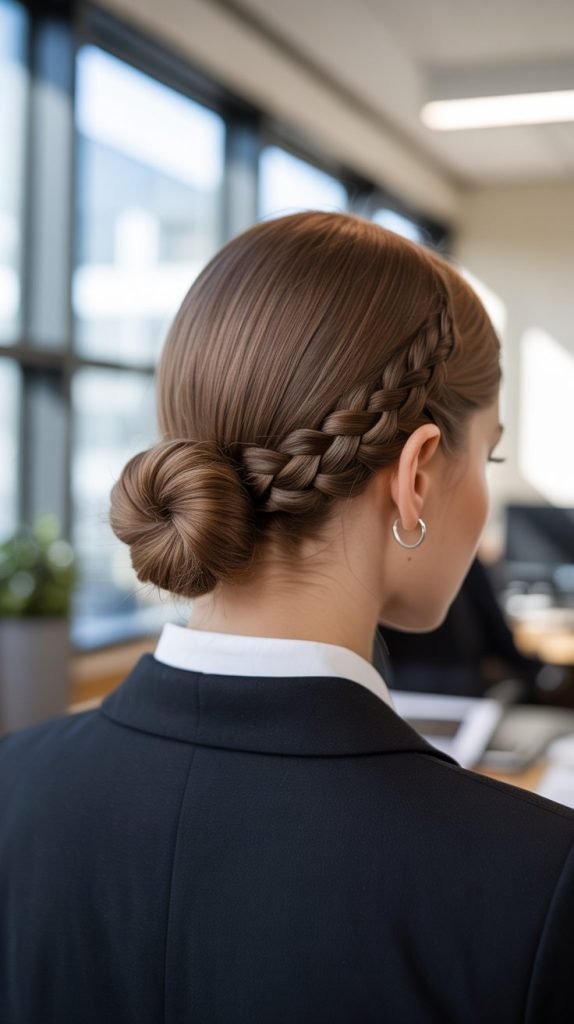
The braided bun combines the elegance of an updo with the texture of braids, creating a sophisticated style perfect for straight hair without curls.
This versatile look works for professional settings, formal events, or everyday elegance. The braided element adds interest to a classic bun, making it more distinctive and visually appealing.
Construction Steps:
- Decide on bun placement—low at the nape for elegance, mid-level for versatility, or high for drama.
- Gather your hair and braid it completely using your preferred technique before forming the bun.
- Coil the braid around its base in a circular motion, creating a spiral bun shape.
- Secure the bun with bobby pins inserted strategically through the braid to anchor it against the head.
- Tuck the end of the braid discretely into the bun, hiding it completely for a polished finish.
- Pin any loose sections and ensure the bun feels secure and comfortable without excessive pulling.
- Mist with hairspray to set the style and control any flyaways around the bun perimeter.
Bun Variations:
- A side braided bun creates an asymmetrical, romantic look perfect for weddings or special occasions.
- Multiple small braids can be combined into one bun for added texture and visual complexity.
- Leave some braided sections wrapped around the bun base rather than incorporated into it for dimensional detail.
- Pancake the braid before forming the bun to create a fuller, more voluminous finished style.
18. Zipper Braid
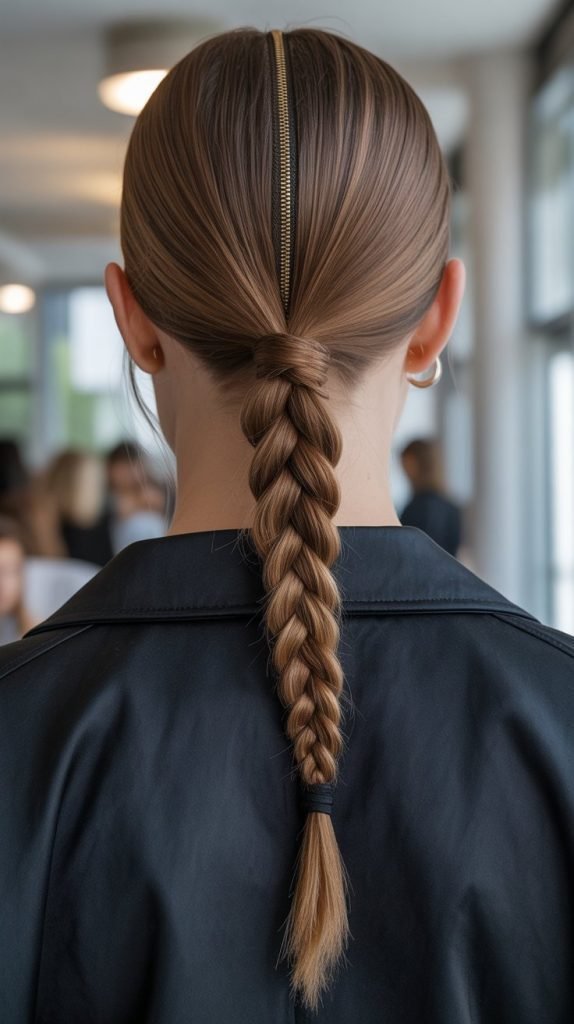
The zipper braid creates a striking, structural appearance where the braid appears to “zip” together like a garment closure.
This innovative technique produces a bold, modern look on straight hair without requiring curls. The zipper effect results from a specific lacing pattern that interlocks sections in a distinctive way.
Technical Execution:
- Take a vertical section of hair down the center back about 2-3 inches wide from crown to nape.
- Divide this section into two equal strands that will form the zipper teeth on either side.
- From the left side, take a thin horizontal section and weave it over the left strand, under the right strand, then back over the right strand.
- From the right side, take a thin horizontal section and weave it over the right strand, under the left strand, then back over the left strand.
- Continue alternating sides, always following the over-under-over weaving pattern consistently.
- The interlocking sections create the characteristic zipper teeth appearance down the center of the style.
- Keep tension even and sections small for a tight, defined zipper effect that reads clearly.
Styling Context:
- This avant-garde braid works beautifully for fashion-forward events, photo shoots, or artistic occasions.
- The zipper braid makes a bold statement and works particularly well on straight, solid-colored hair where the pattern shows clearly.
- This technique requires significant practice and patience but delivers an undeniably impressive final result.
- Consider positioning the zipper braid off-center or diagonally for alternative, equally striking placements.
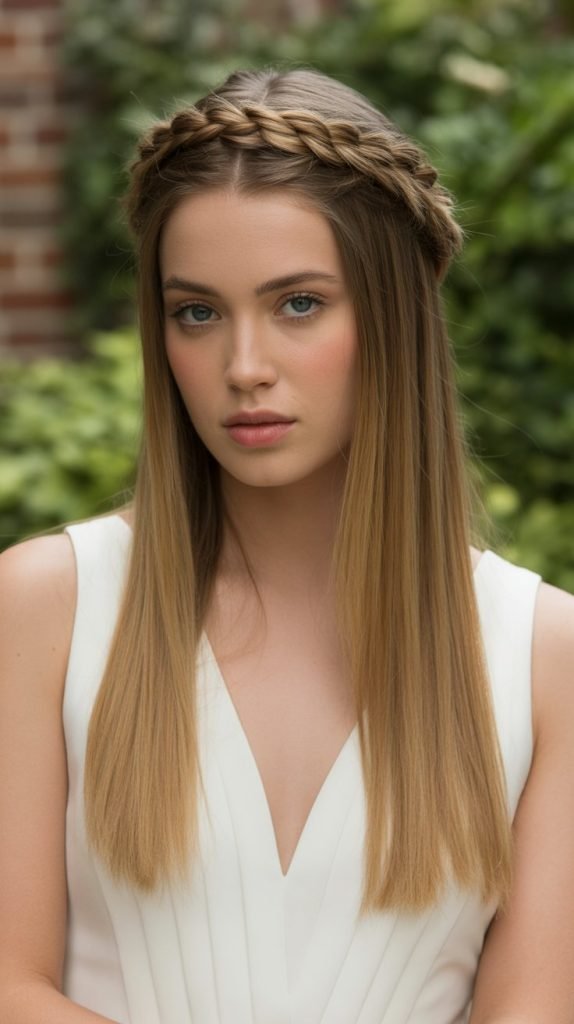
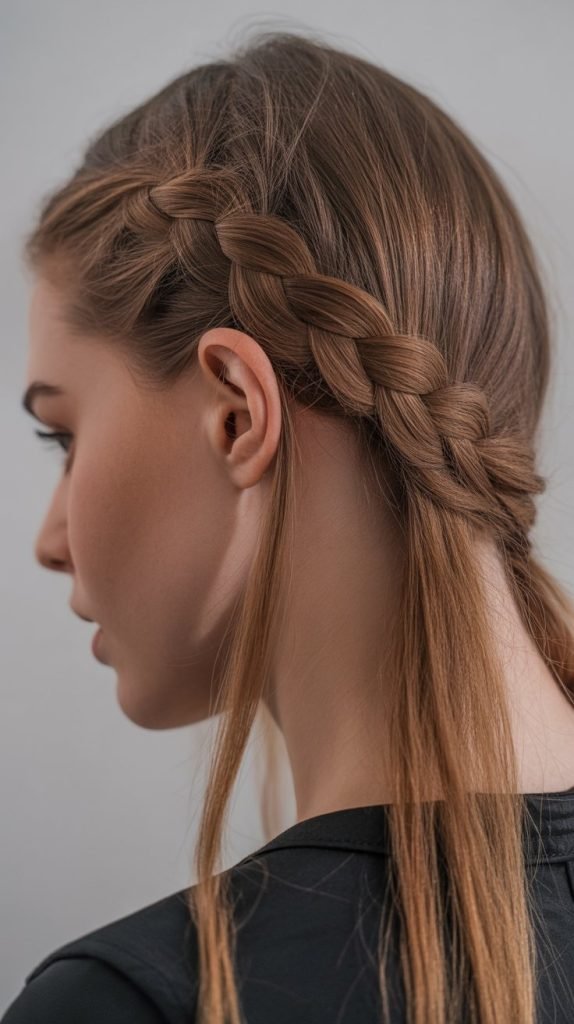
19. Braided Headband
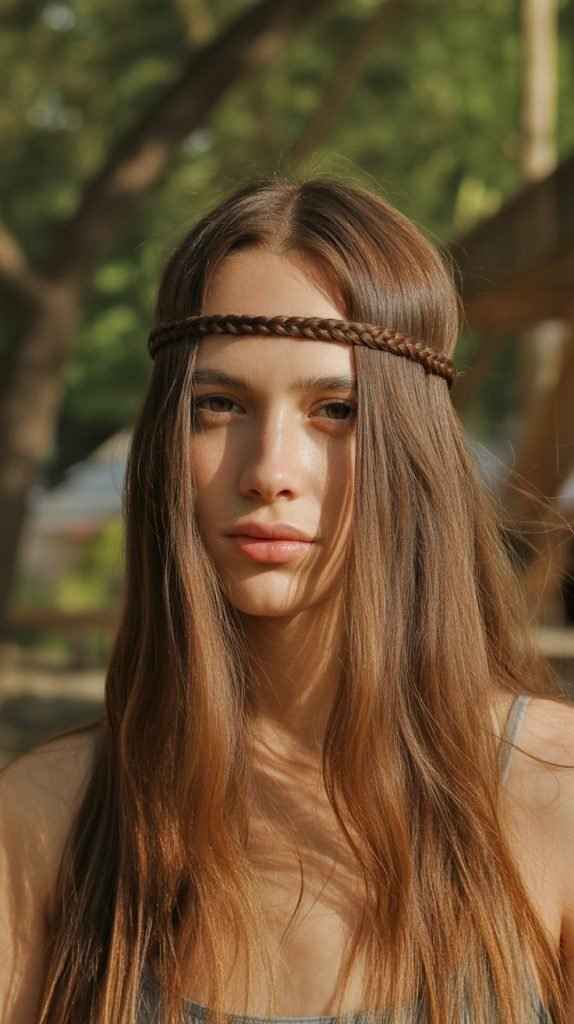
A braided headband uses your own hair to create a crown-like accent across the front of your head, keeping hair off your face without actual accessories.
This style works beautifully on straight hair, providing both functionality and style without curls. The braided headband can be subtle or bold depending on thickness and positioning.
Creating Your Hair Headband:
- Section off hair from behind one ear, taking a strip about 1-2 inches wide along the hairline.
- Braid this section using a standard three-strand technique, keeping it relatively tight and close to the head.
- Alternatively, use a Dutch braid technique so the braid sits raised on the scalp like an actual headband.
- Continue braiding across the front of your head, following your natural hairline from one ear to the other.
- Secure the end of the braid behind the opposite ear with bobby pins that match your hair color.
- Tuck the end discretely into the surrounding hair or under the braid itself for a seamless finish.
- Allow the remaining hair to hang loose and straight, framing your face beautifully.
Functional Benefits:
- This style keeps face-framing pieces secured and away from your face without hardware or accessories.
- The braided headband prevents hair from falling forward during activities while maintaining a feminine, styled appearance.
- This technique works excellently for growing out bangs or managing awkward hair lengths during transition periods.
- Pair with loose, straight hair for a casual boho look, or incorporate into updos for added detail and texture.
20. Double Braid Ponytail
The double braid ponytail features two braids incorporated into or wrapping around a ponytail, adding texture and visual interest to straight hair.
This combination style offers more dimension than a simple ponytail or single braid alone. The double braids can be positioned in various ways to create different aesthetic effects.
Assembly Instructions:
- Before creating the ponytail, braid two small sections from the front or sides of your head.
- Gather all hair including the braids into a ponytail at your desired height and secure with an elastic.
- Wrap both braids around the elastic base in opposite directions to completely conceal the hair tie.
- Secure the ends of the wrapping braids with bobby pins tucked underneath the ponytail.
- Alternatively, braid the entire ponytail into two separate braids for a different doubled effect.
- The dual braids add dimension and prevent the ponytail from looking flat or one-dimensional.
- This style works particularly well for athletic activities as the braids keep additional sections secure.
Creative Variations:
- Create thin accent braids on either side of a high ponytail for a sleek, editorial appearance.
- Braid the ponytail into two separate braids and twist them together for a rope-like combined effect.
- Position the two braids asymmetrically around the ponytail base for a more organic, less structured look.
- Use different braiding techniques for each of the two braids to create textural contrast and visual interest.
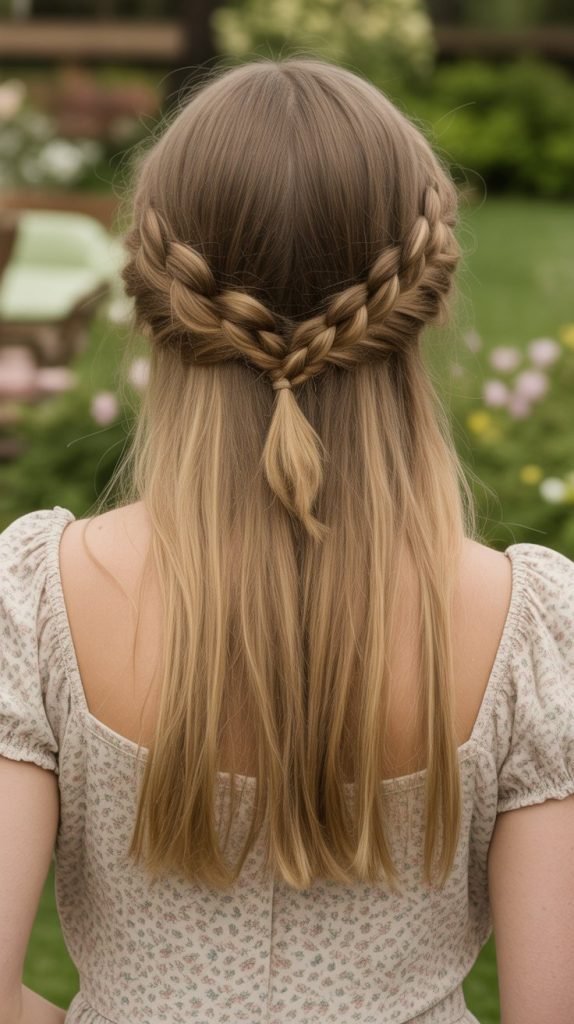
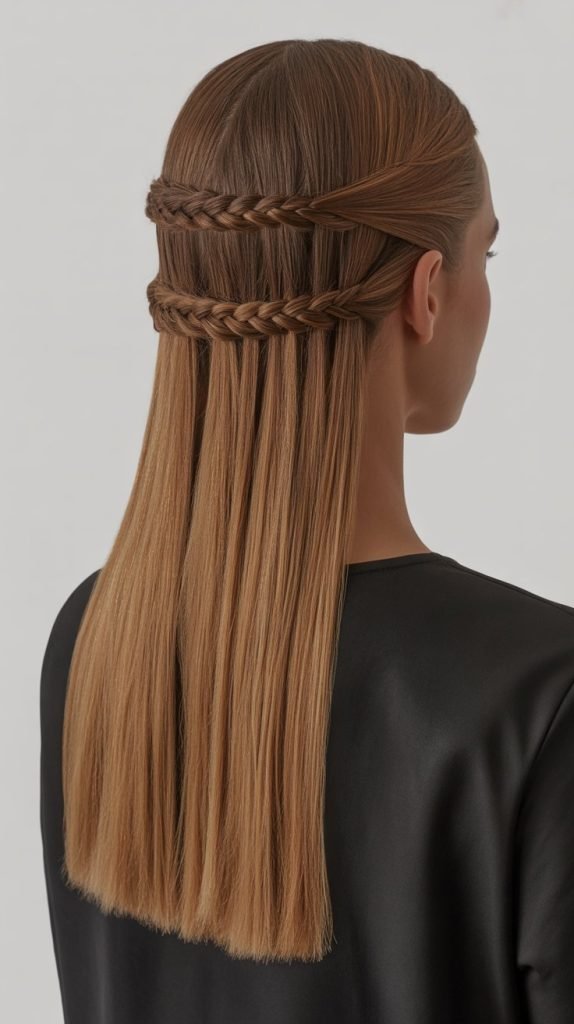
21. Half-Up Braided Crown
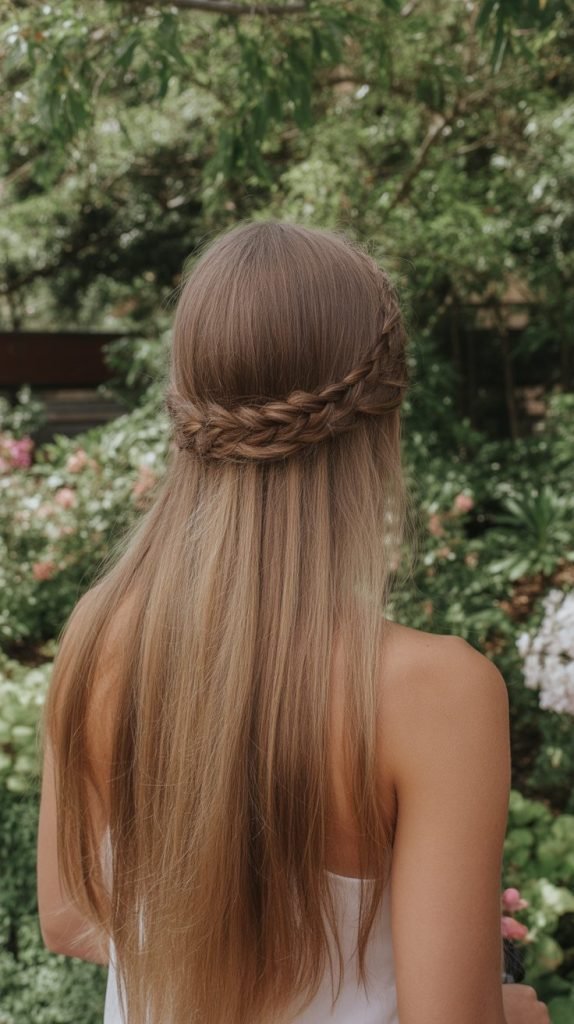
The half-up braided crown secures the top section of hair in a braided crown while leaving the bottom half flowing freely, creating a romantic style for straight hair without curls.
This semi-updo offers the best of both worlds—elegant detail at the crown with movement and flow below. The half-up braided crown works beautifully for all occasions from casual to formal.
Step-by-Step Creation:
- Section the top half of your hair from temple to temple, creating a horizontal division across the back of your head.
- Clip the bottom section away temporarily to keep it separate while working on the crown portion.
- Divide the top section into two parts and create a Dutch or French braid on each side, working from the front toward the back.
- Bring both braids to meet at the center back of your head, creating the crown effect across the top.
- Cross the braids over each other or pin them side by side, securing with bobby pins matched to your hair color.
- Tuck the ends of the braids into the remaining loose hair or braid them together for a continuous look.
- Release the bottom section and brush it smooth, allowing it to flow naturally over the braided crown base.
Styling Advantages:
- This style keeps hair off your face while showcasing the length and sleekness of straight hair below.
- The braided crown adds elegance without requiring the commitment of a full updo hairstyle.
- Works exceptionally well for graduation ceremonies, garden parties, or daytime special events.
- The style stays secure throughout long events while remaining comfortable and causing no tension headaches.
22. Braided Pigtails
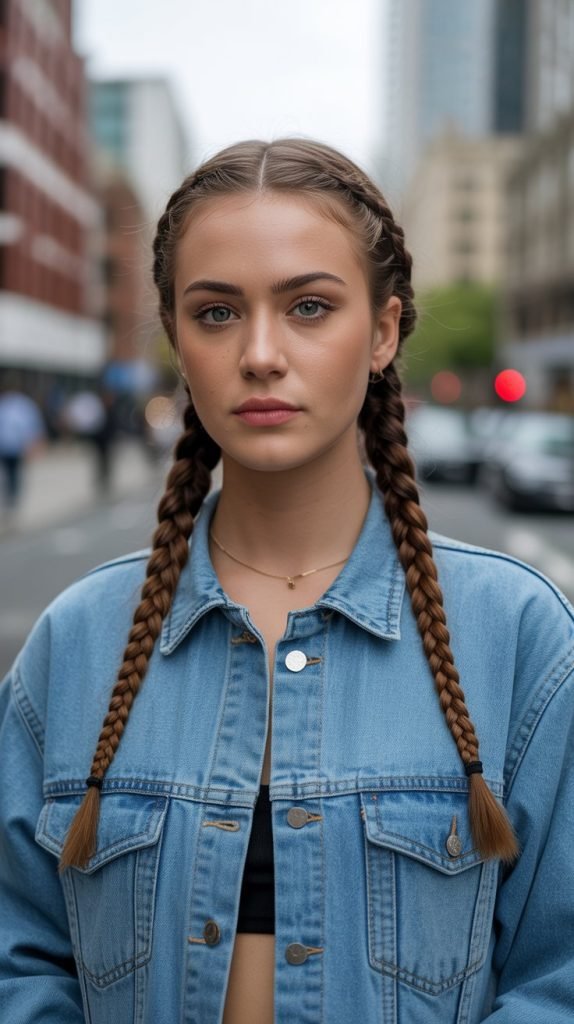
Braided pigtails offer a youthful, playful look that works surprisingly well on adults when styled correctly on straight hair.
This classic childhood style has been elevated in modern fashion, appearing on runways and in street style. Braided pigtails provide symmetry, security, and a fresh take on traditional braiding without requiring curls.
Creating Polished Pigtails:
- Part your hair straight down the middle from forehead to nape, creating two perfectly equal sections for symmetrical pigtails.
- Secure one section temporarily with a clip while you work on the first pigtail.
- Position the pigtails at your desired height—low pigtails appear more sophisticated while high ones are more playful.
- Braid each section completely using your preferred technique, maintaining consistent tension throughout for uniform thickness.
- Keep the braids tight and neat for a polished appearance, or looser and pancaked for a relaxed, bohemian vibe.
- Secure each braid end with an elastic that complements your hair color or makes a statement with colorful bands.
- Ensure both braids are positioned at matching heights and angles for a balanced, intentional appearance.
Modern Adaptations:
- Low, sleek braided pigtails create an editorial, high-fashion look appropriate for adults in contemporary settings.
- Wrap small sections of hair around the elastic bases to elevate the style and make it more sophisticated.
- Experiment with different braiding techniques on each side for an intentionally mismatched, artistic approach.
- Braided pigtails work excellently under hats, beanies, or helmets, making them practical for various activities.
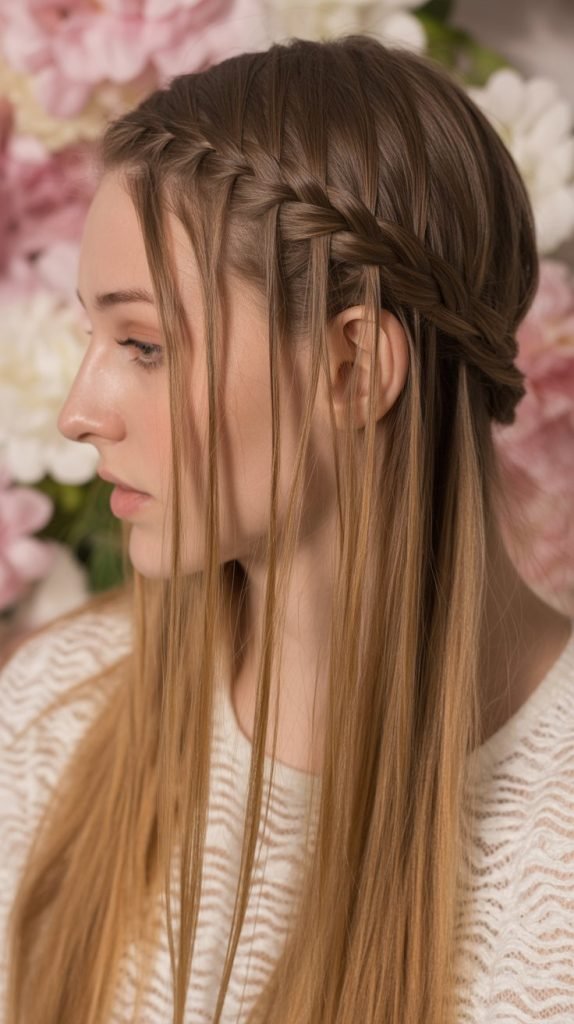
23. Accent Braid with Straight Hair
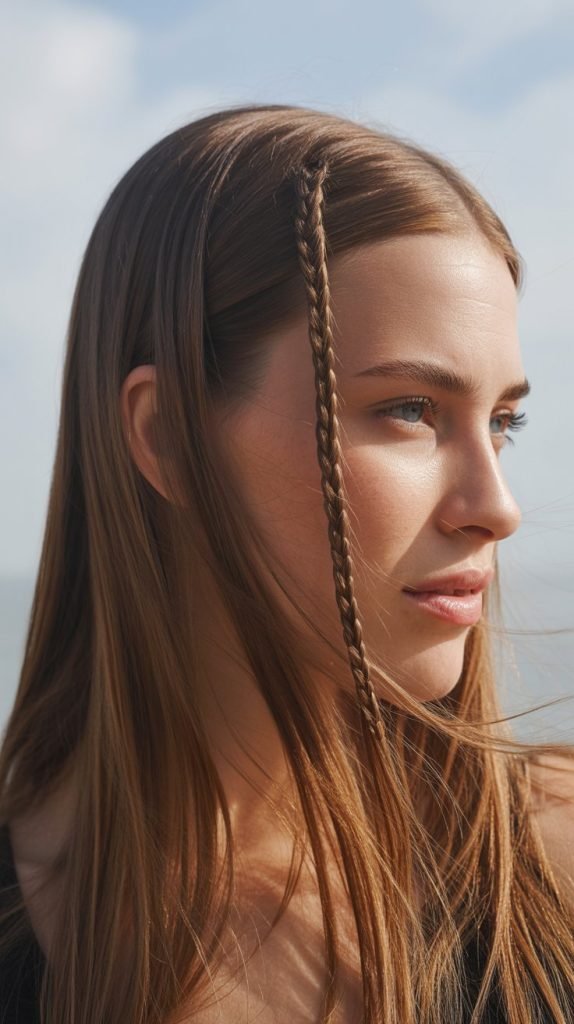
An accent braid involves creating one or more small braids within predominantly loose, straight hair, adding subtle texture without overwhelming the natural flow.
This minimalist approach to braiding offers just enough detail to make straight hair more interesting. Accent braids can be positioned strategically for maximum impact with minimal effort.
Placement and Technique:
- Select strategic locations for accent braids such as near the temples, behind the ears, or throughout the crown area.
- Keep accent braids thin—about the width of a pencil or thinner—so they read as delicate details rather than dominant features.
- Use three-strand, rope, or micro-braid techniques to create these small accent pieces throughout straight hair.
- Leave the majority of hair loose and flowing to maintain the emphasis on your straight hair’s natural texture and shine.
- Secure accent braids with tiny clear elastics that disappear into the hair for a seamless, organic appearance.
- Position multiple accent braids asymmetrically for a bohemian look, or symmetrically for a more structured, intentional design.
- These small braids can be left in for several days, adding interest to your straight hair without daily styling effort.
Styling Flexibility:
- Accent braids can be incorporated into half-up styles by gathering just the braided sections into a small ponytail.
- This approach works perfectly for those who want to experiment with braids without committing to a fully braided style.
- Add beads or small clips to the ends of accent braids for additional personality and bohemian flair.
- Accent braids help break up the monotony of all-straight hair while celebrating your natural texture simultaneously.
24. Stacked Braids
Stacked braids involve creating multiple braids positioned one above another down the back of the head, producing a layered, architectural effect on straight hair.
This technique offers impressive visual impact without requiring curls or waves. Stacked braids demonstrate advanced braiding skills while keeping hair completely secured and controlled.
Construction Process:
- Begin by sectioning the top portion of hair from temple to temple, creating the first horizontal division.
- Create a French or Dutch braid across this top section, working horizontally from one side to the other.
- Secure the end of the first braid and allow it to hang while you create a new horizontal section immediately below.
- Braid the second section in the same horizontal manner, incorporating the hanging end of the first braid if desired.
- Continue creating horizontal sections and braiding them across, stacking each braid below the previous one.
- The result is multiple braids layered down the back of the head in a stair-step or stacked formation.
- Secure all braid ends together at the nape or leave them separate for different aesthetic effects.
Design Considerations:
- This style works best on medium to long straight hair where multiple sections can be created and clearly distinguished.
- Stacked braids create a geometric, modern appearance that works well for fashion-forward events and artistic photoshoots.
- The technique keeps all hair incredibly secure, making it excellent for sports, dance performances, or active occasions.
- Vary the tightness and size of each stacked braid to create dimension and prevent a too-uniform appearance.
25. Twisted Side Braid
The twisted side braid combines rope twists and traditional braiding techniques to create a hybrid style with unique texture on straight hair.
This combination approach offers the best qualities of both techniques without requiring curls. The twisted side braid provides an interesting alternative to standard side braids with added dimension.
Creating the Hybrid Style:
- Sweep all hair to one side of your neck, choosing your preferred side based on comfort and aesthetic preference.
- Divide the hair into two main sections to begin the twisted rope braid technique at the top.
- Twist both sections individually in the same direction (clockwise) several times, then wrap them around each other counterclockwise.
- After creating 4-5 inches of rope twist, transition into a traditional three-strand braid for contrasting texture.
- Continue with the three-strand braid for several inches, then switch back to the rope twist technique.
- Alternate between the two techniques down the length, creating a striped effect of different textures.
- Secure the end and adjust both the twisted and braided sections to enhance their distinct appearances.
Textural Benefits:
- The combination of techniques creates visual interest that single-technique braids cannot achieve on their own.
- Straight hair showcases the distinction between twisted and braided sections particularly well due to its smoothness.
- This hybrid approach allows you to enjoy the benefits of both braiding styles in one cohesive hairstyle.
- The alternating textures catch light differently, adding dimension and movement to straight hair naturally.
Essential Tips for Braiding Straight Hair Without Curls
Preparation Techniques:
- Apply texturizing spray or dry shampoo to freshly washed straight hair to provide grip and prevent slipping during braiding.
- Straight hair often works better for braiding on the second or third day when natural oils provide additional hold and texture.
- Brush hair thoroughly before braiding to eliminate all tangles and create smooth sections that braid evenly.
- Use a fine-toothed comb to create clean, precise parts when sectioning hair for multiple braids or complex styles.
Products That Help:
- Lightweight hair oils or serums add shine and manageability without weighing down straight hair during braiding.
- Pomades or edge control products smooth flyaways along the hairline and part lines for polished results.
- Medium-hold hairspray sets completed braids without making them stiff, crunchy, or unnatural-looking.
- Clear elastics disappear into hair and maintain an invisible finish, while colored elastics make intentional fashion statements.
Common Challenges and Solutions:
- If braids slip out easily, increase tension slightly and use more product for grip on slippery straight hair.
- For braids that appear too thin or flat, pancake them by gently pulling on the outer edges after completion.
- When braids cause headaches, you’re braiding too tightly—reduce tension and position braids slightly looser for comfort.
- To make braids last longer, sleep with a silk or satin pillowcase or bonnet to reduce friction and frizz overnight.
Conclusion
The world of braided hairstyles offers endless possibilities for those with straight hair, proving that curls are never a prerequisite for stunning, intricate looks.
Throughout this comprehensive guide on 25 Stylish Braided Hairstyles Without Curls, we’ve explored techniques ranging from beginner-friendly classics to advanced, show-stopping designs that celebrate the natural beauty of straight hair.
Each braiding method provides unique benefits, whether you’re seeking a practical style for daily activities, an elegant updo for special occasions, or artistic expression through complex weaving patterns.
The versatility of braids on straight hair lies in their crisp, clean lines and clearly defined patterns that showcase technical skill beautifully.
By mastering these diverse braiding techniques, you’ve gained a valuable toolkit of hairstyles that require no heat styling, protect your hair from damage, and work seamlessly with your natural straight texture.
Remember that practice makes perfect—even the most complex braids become intuitive with repetition and patience.
Embrace your straight hair’s natural qualities and experiment with these 25 stylish options to discover which braided looks resonate with your personal style, lifestyle needs, and aesthetic preferences.
With these techniques at your fingertips, you’ll never run out of creative ways to style your straight hair beautifully, confidently, and without a single curl in sight.