Homecoming is one of those special nights where you want everything to be perfect, and your hairstyle plays a crucial role in completing your overall look.
If you’re searching for the perfect balance between elegance and effortlessness, “25 Easy Half Up Half Down Hoco Hairstyles” offers exactly what you need.
These versatile styles work beautifully with any dress style, face shape, or hair texture, making them the go-to choice for countless students each year.
This comprehensive guide will walk you through 25 stunning half up half down hairstyles that range from simple and quick to slightly more elaborate, ensuring you’ll find the perfect match for your homecoming celebration.
Whether you prefer romantic curls, sleek and straight looks, braided details, or accessorized glamour, each style in this collection is designed to be achievable at home while still delivering that wow factor you’re after.
In This Post......
- 1. Classic Half Up Top Knot
- 2. Twisted Half Up Style
- 3. Braided Crown Half Up
- 4. Half Up with Bubble Ponytail
- 5. Sleek Half Up with Hair Clip
- 6. Romantic Curled Half Up
- 7. Half Up with Dutch Braid
- 8. Half Up Space Buns
- 9. Fishtail Braid Half Up
- 10. Half Up with Twisted Low Bun
- 11. Half Up with Waterfall Braid
- 12. Half Up with Crisscross Sections
- 13. Boho Half Up with Loose Waves
- 14. Half Up with Pull-Through Braid
- 15. Half Up with Twisted Rope Braid
- 16. Half Up with Pinned Curls
- 17. Half Up with Braided Ponytail
- 18. Half Up with Teased Crown
- 19. Half Up with Headband Braid
- 20. Half Up with Messy Bun
- 21. Half Up with Accent Braids
- 22. Half Up with Low Twisted Side
- 23. Half Up with Knotted Detail
- 24. Half Up with Wrapped Ponytail
- 25. Half Up with Cascading Twists
- Conclusion
1. Classic Half Up Top Knot
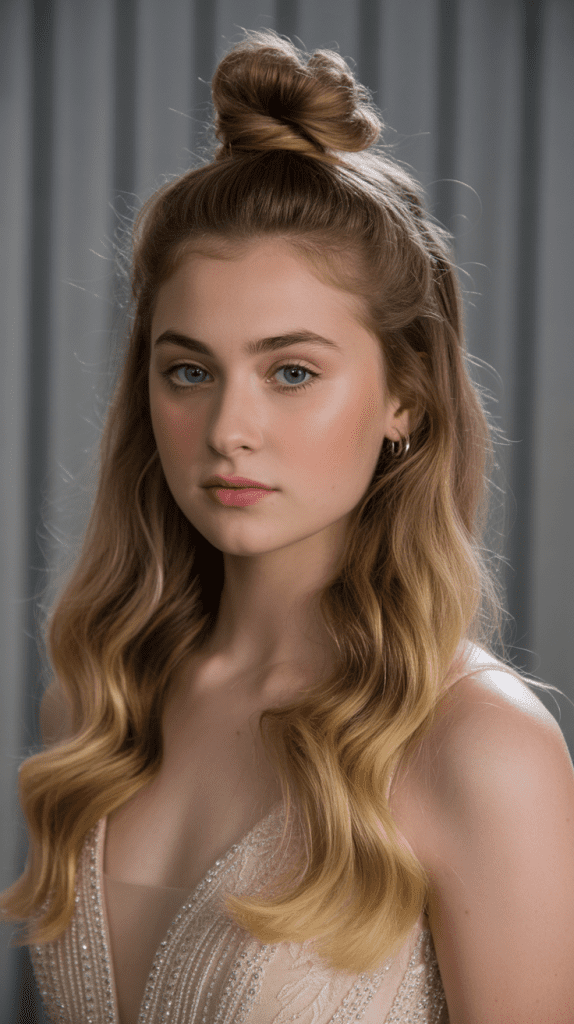
The classic half up top knot combines casual chic with formal elegance, making it an ideal choice for homecoming when you want to look polished without trying too hard.
This style works exceptionally well for those with medium to long hair and can be dressed up or down depending on your accessories.
How to Create This Look:
- Start by separating the top section of your hair from ear to ear, gathering all the hair above this line
- Smooth the top section back using a brush to eliminate any bumps or flyaways
- Twist the gathered hair into a tight rope and wrap it around itself to form a bun
- Secure the knot with bobby pins, making sure it feels tight and won’t slip throughout the night
- Leave the bottom half of your hair flowing naturally, or add loose curls for extra dimension
- Finish with a light hairspray to keep everything in place while maintaining movement
Why This Style Works for Hoco:
- It keeps hair away from your face while dancing and socializing
- The style looks sophisticated in photos from every angle
- You can easily adjust the height and tightness of the knot to match your dress style
- It works beautifully with statement earrings that won’t get hidden in your hair
2. Twisted Half Up Style
The twisted half up style offers an effortlessly romantic look that appears more complicated than it actually is, making it perfect for those who want elegance without spending hours in front of the mirror.
This technique adds texture and visual interest to your homecoming look while remaining comfortable throughout the evening.
Step-by-Step Instructions:
- Part your hair down the middle or on your preferred side
- Take a two-inch section of hair from one side of your part, starting near your temple
- Twist this section tightly as you move backward toward the center of your head
- Secure the twist temporarily with a clip while you repeat on the other side
- Bring both twisted sections together at the back center of your head
- Pin them together using bobby pins in an X formation for maximum security
- Gently pull at the twists to loosen them slightly for a softer, more romantic appearance
- Let the remaining hair fall naturally or style with waves
Styling Variations:
- Create multiple smaller twists on each side for a more intricate look
- Add small decorative pins along the twists for sparkle
- Incorporate thin ribbons into the twists for a whimsical touch
- Combine with a low ponytail for a different silhouette
3. Braided Crown Half Up
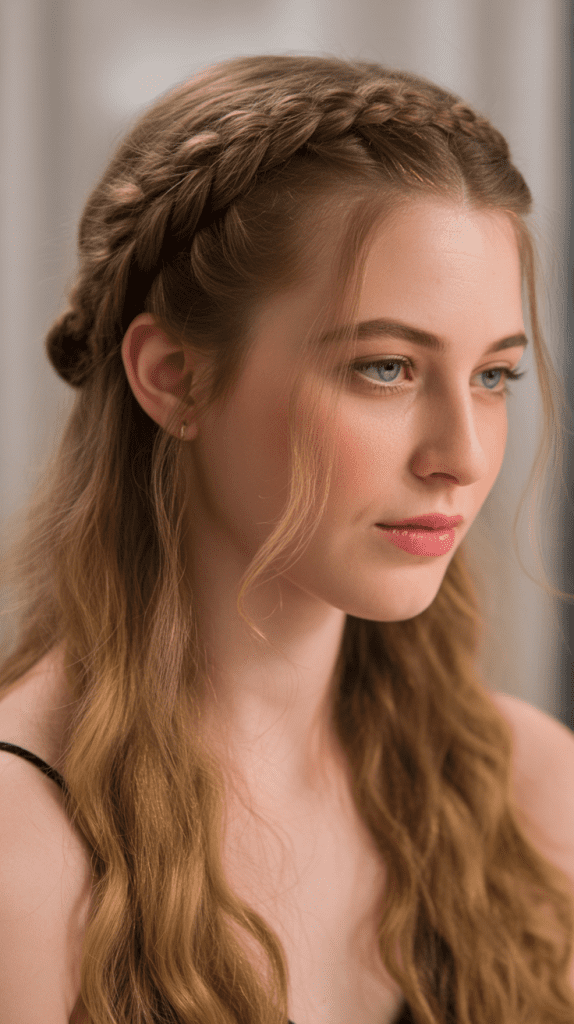
The braided crown half up hairstyle brings a fairytale quality to your homecoming look, combining the romance of braids with the practical appeal of having your hair partially secured.
This style is particularly stunning for outdoor or garden-themed homecoming venues.
Creating the Braided Crown:
- Begin by creating a deep side part to add asymmetry and interest
- Take a three-inch section of hair from the heavy side of your part
- Divide this section into three equal strands to begin a traditional three-strand braid
- Braid along your hairline, curving the braid like a headband toward your ear
- Continue braiding past your ear toward the back of your head
- Repeat the process on the opposite side, creating a second braid
- Bring both braids together at the back and secure with an elastic band
- Wrap a small section of hair around the elastic to hide it
- Pancake the braids by gently pulling them apart for a fuller, more voluminous appearance
Pro Tips:
- Practice this braid a few days before homecoming to perfect your technique
- Use texturizing spray before braiding to help the style hold better
- Don’t worry about making the braids perfectly neat—slightly messy braids look more romantic
- This style works beautifully with both straight and wavy hair textures
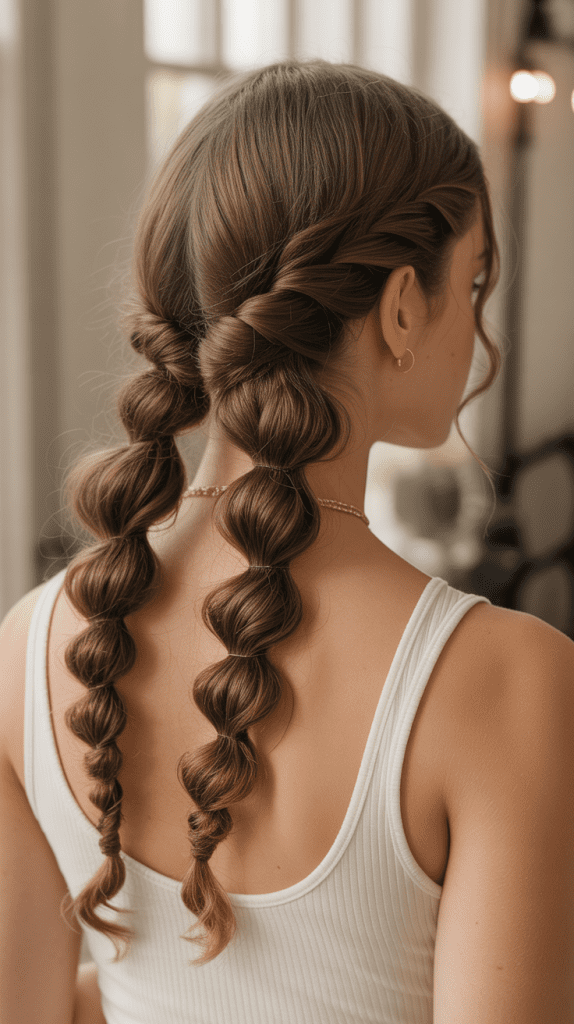
4. Half Up with Bubble Ponytail
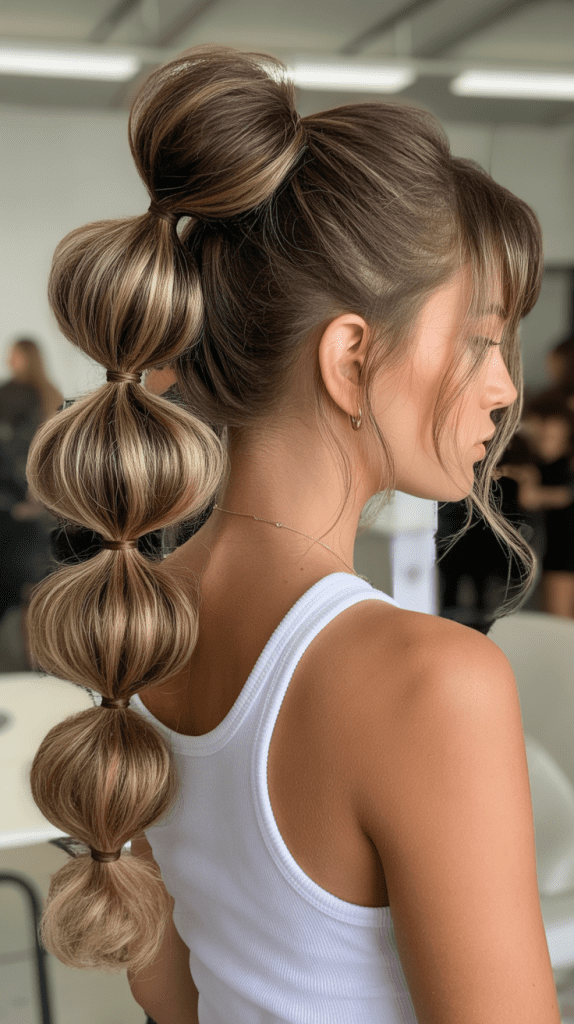
The bubble ponytail adds a playful, modern twist to the traditional half up style, creating dimension and visual interest that photographs beautifully.
This trendy look has taken social media by storm and works perfectly for homecoming when you want to stand out.
Building the Bubbles:
- Gather the top half of your hair and secure it with a clear elastic band
- Move down approximately two inches and add another clear elastic
- Gently pull and tease the hair between the two elastics to create the first bubble
- Continue adding elastics every two inches down the length of the ponytail
- Create bubbles between each set of elastics by carefully pulling the hair outward
- Ensure all bubbles are roughly the same size for a cohesive look
- Secure the end with a final elastic and leave a small tail
- Lightly spray each bubble with hairspray to maintain the shape throughout the night
Customization Options:
- Vary the size of the bubbles for a more organic appearance
- Wrap thin ribbons around each elastic for added color
- Use decorative elastics that complement your dress
- Create smaller, more numerous bubbles for a different effect
5. Sleek Half Up with Hair Clip
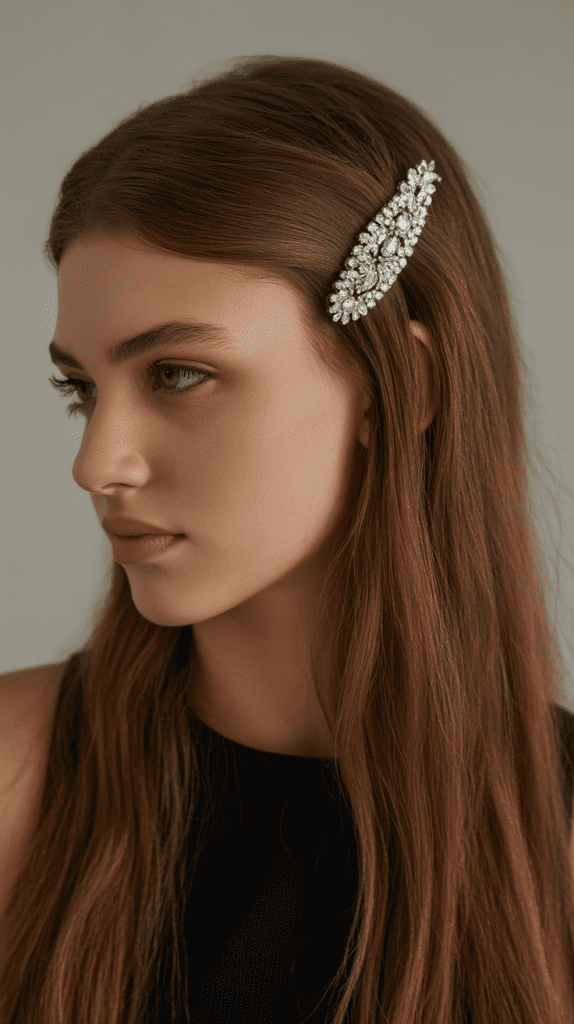
Sometimes simplicity speaks volumes, and the sleek half up with a statement hair clip proves that less can truly be more when executed perfectly.
This minimalist approach is ideal for those who prefer clean lines and modern aesthetics.
Achieving Sleek Perfection:
- Straighten all of your hair thoroughly using a flat iron for a smooth canvas
- Apply a smoothing serum from roots to ends to eliminate any frizz
- Brush your hair back carefully to ensure there are no bumps or irregularities
- Gather the top section of hair from your temples backward
- Hold this section taut while smoothing any stray hairs
- Clip the section with a large decorative hair clip, positioning it where you want the focal point
- Make sure the clip is secured properly by testing its grip
- Finish with a shine spray to enhance the sleek, polished appearance
Choosing the Right Clip:
- Select a clip that complements your dress color or metallic accents
- Larger clips work better for thicker hair
- Pearl or crystal-embellished clips add formal elegance
- Geometric or modern clips suit contemporary dress styles
6. Romantic Curled Half Up
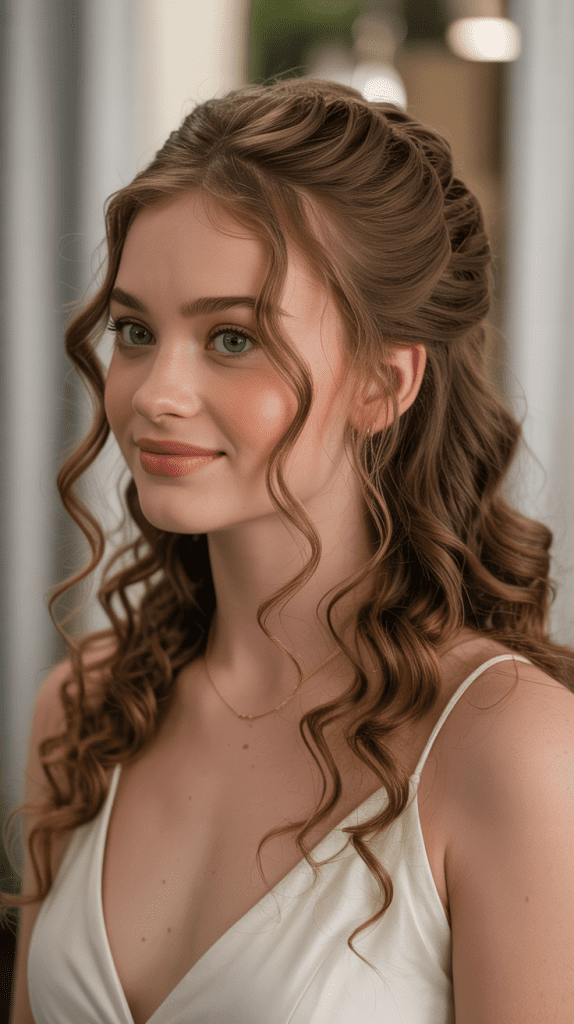
The romantic curled half up style epitomizes classic homecoming glamour, offering soft, touchable curls that frame your face while keeping hair manageable.
This timeless look works with virtually any dress style and has remained popular for decades.
Creating Romantic Curls:
- Start with completely dry hair and apply a heat protectant spray
- Section your hair into manageable pieces, starting from the bottom layer
- Use a 1.5-inch curling iron to create loose curls throughout all of your hair
- Curl away from your face in the front sections for a face-framing effect
- Allow the curls to cool completely before touching them
- Once all curls are set, gather the top section from temple to temple
- Secure this section at the crown with bobby pins or a small elastic
- Gently separate and loosen the curls with your fingers for a softer appearance
- Apply a flexible hold hairspray to maintain the curls without making them stiff
Curl Maintenance Tips:
- Use a curling iron with adjustable heat settings to prevent damage
- Don’t hold the iron on your hair for more than 10-12 seconds
- Alternate the direction of your curls for a more natural, voluminous look
- Set curls with a cool shot from your blow dryer to make them last longer
7. Half Up with Dutch Braid
The Dutch braid (also known as an inverted or reverse braid) creates a raised, three-dimensional effect that adds incredible texture and sophistication to a half up style.
This technique works beautifully for homecoming because it stays secure while looking intricate and special.
Dutch Braiding Technique:
- Part your hair down the center or slightly to one side
- Take a section of hair from the front, about three inches wide
- Divide this section into three equal strands
- Cross the strands under each other instead of over (this creates the raised effect)
- Add small sections of hair from the sides as you continue braiding backward
- Keep the braid tight and close to your scalp for definition
- Continue the Dutch braid until you reach the crown of your head
- Secure the braid temporarily while you decide on the finishing style
- Either create a second Dutch braid on the other side or gather loose hair from that side
- Join all the gathered sections together at the back and secure with pins or an elastic
Enhancing Your Dutch Braid:
- Pull gently at the edges of the braid to make it appear fuller and wider
- Add small flowers or decorative pins along the braid’s length
- Combine with loose waves in the bottom section for contrast
- Use edge control or gel to smooth baby hairs along your hairline
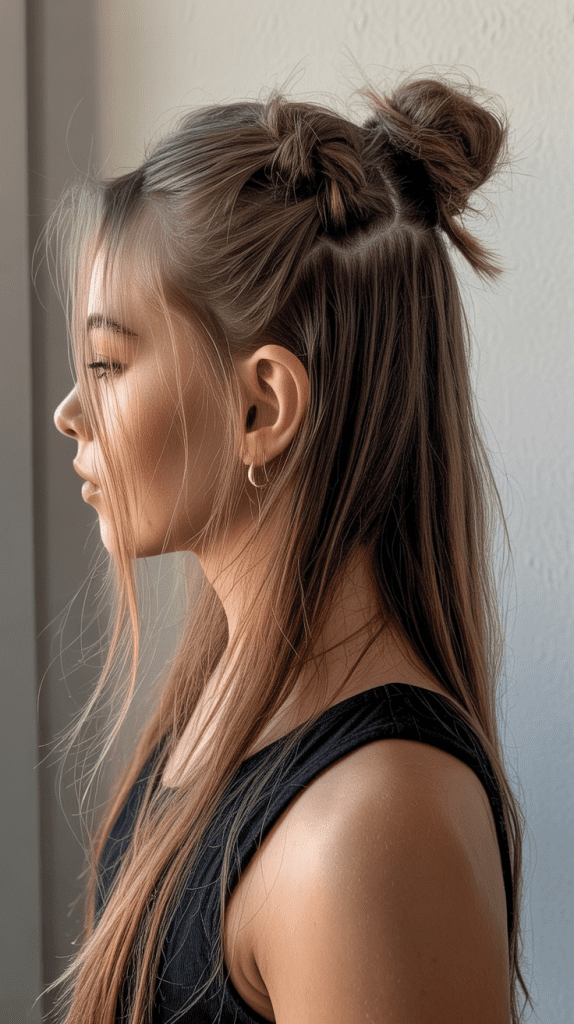
8. Half Up Space Buns
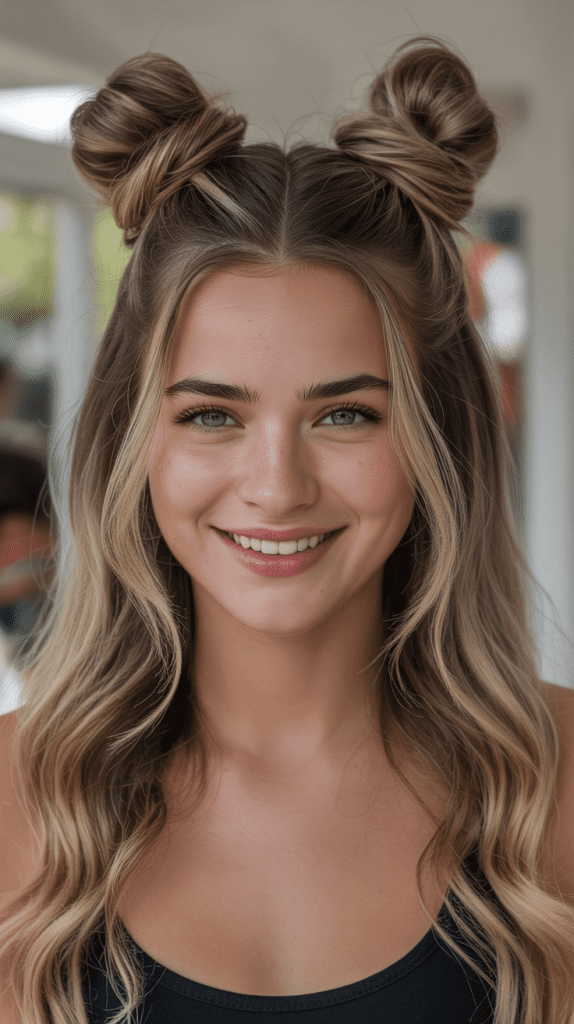
Half up space buns bring a fun, youthful energy to homecoming while still maintaining enough sophistication for a formal event.
This style has experienced a major resurgence and works particularly well for those who want to showcase their playful personality.
Creating Perfect Space Buns:
- Part your hair straight down the middle for symmetry
- Section off the top portion of hair on each side, from your part to just above your ears
- Secure each top section into a high ponytail on either side of your head
- Twist one ponytail tightly and wrap it around its base to form a bun
- Secure the bun with bobby pins, making sure it feels stable
- Repeat the process with the other ponytail, ensuring both buns are the same height
- Leave the bottom half of your hair down, straight or curled based on preference
- Use hairspray to tame any flyaways and set the style
Space Bun Variations:
- Make the buns sleek and tight for a more polished appearance
- Create messy, textured buns for a relaxed, effortless vibe
- Add glitter or hair gems to the buns for extra sparkle
- Wrap small sections of hair around the base of each bun to hide elastics
9. Fishtail Braid Half Up
The fishtail braid offers an intricate, woven appearance that looks far more complicated than it actually is, making it an excellent choice for impressing at homecoming.
This style adds beautiful texture and works wonderfully with highlights or balayage.
Fishtail Braiding Method:
- Gather the top section of your hair as if creating a regular half up style
- Divide this gathered section into two equal parts (not three like traditional braids)
- Take a thin strand from the outer edge of the left section
- Cross this thin strand over to join the right section
- Now take a thin strand from the outer edge of the right section
- Cross this strand over to join the left section
- Continue this alternating pattern, taking thin strands from the outer edges
- Keep consistent tension throughout to maintain an even braid
- Secure the end with a small clear elastic
- Gently pull at the edges of the braid to make it appear wider and more relaxed
Fishtail Styling Secrets:
- Thinner strands create a more intricate, detailed look
- Thicker strands result in a chunkier, more casual appearance
- Add hair oil to your palms before braiding to reduce frizz
- This braid looks especially beautiful when slightly messy rather than perfectly neat
10. Half Up with Twisted Low Bun

The twisted low bun brings sophisticated elegance to the half up style, creating a look that feels refined and mature while still being age-appropriate for homecoming.
This style works exceptionally well for formal dress codes and classic beauty aesthetics.
Constructing the Twisted Bun:
- Create a half up section by gathering hair from your temples back to the crown
- Divide this gathered section into two equal parts
- Twist each part individually in the same direction (both clockwise or both counterclockwise)
- Then twist the two twisted sections around each other in the opposite direction
- This creates a rope-twist effect that’s visually interesting
- Coil this rope twist into a low bun at the nape of your neck
- Secure the bun with bobby pins, inserting them in different directions for stability
- Leave the bottom section of your hair down or tuck it into the bun for a fuller appearance
- Pull out a few face-framing pieces for a softer, more romantic finish
Bun Placement Options:
- Position the bun at the nape for a classic, balletic look
- Place it slightly off-center for a more contemporary asymmetrical style
- Create the bun higher up for a different silhouette
- Make the bun tight and neat or loose and textured based on your preference
11. Half Up with Waterfall Braid

The waterfall braid creates a cascading effect that mimics a waterfall flowing through your hair, offering one of the most romantic and eye-catching half up styles available.
This technique requires practice but delivers stunning results perfect for homecoming photos.
Waterfall Braid Instructions:
- Begin with a small section of hair near your part at the front
- Divide this section into three strands as you would for a regular braid
- Start braiding by crossing the top strand over the middle, then the bottom strand over the middle
- On the next stitch, instead of crossing the top strand into the braid, let it drop down
- Pick up a new section of hair from the top to replace the dropped strand
- Continue this pattern: braid once, drop the top strand, pick up new hair
- Work the waterfall braid from one side of your head around to the other
- The dropped strands will cascade down like a waterfall
- Secure the end of the braid with bobby pins when you reach the opposite side
- Style the cascading strands with curls for maximum impact
Waterfall Braid Tips:
- This style looks best with curled or wavy hair
- Keep the braid loose for a more romantic, bohemian appearance
- Practice several times before homecoming to build muscle memory
- Watch the braid from different angles in a mirror to ensure it’s positioned correctly
12. Half Up with Crisscross Sections

The crisscross technique adds geometric interest and modern style to your homecoming look, creating clean lines and visual intrigue that photographs beautifully.
This contemporary approach works well for those who appreciate structured, architectural hairstyles.
Creating the Crisscross Pattern:
- Section the top portion of your hair into a clean, horizontal line from ear to ear
- Divide this top section into multiple smaller vertical sections (typically 4-6 sections)
- Starting from one side, take the first section and cross it over the second section
- Secure it temporarily with a clip
- Take the section it crossed over and cross it back in the opposite direction
- Continue this alternating crisscross pattern across your head
- Each section should create an X pattern with its neighbor
- Secure all crossed sections together at the back center with bobby pins or an elastic
- Ensure the crisscross pattern is visible and well-defined
- Smooth any bumps and finish with hairspray for hold
Design Variations:
- Create larger, more dramatic crosses with fewer sections
- Make smaller, more numerous crosses for intricate detail
- Add small jeweled pins at each intersection point
- Combine with a sleek straight style below or romantic curls for contrast
13. Boho Half Up with Loose Waves

The boho half up style with loose waves channels effortless, free-spirited beauty that feels relaxed yet special enough for homecoming.
This look works particularly well for outdoor or casual homecoming events and suits those with a more laid-back personal style.
Achieving Boho Waves:
- Apply sea salt spray to damp hair and scrunch it repeatedly
- Allow your hair to air dry or use a diffuser attachment on your blow dryer
- Once completely dry, take random sections and wrap them loosely around a curling wand
- Hold each section for only 5-7 seconds for loose, undone waves
- Don’t worry about uniformity—varied waves look more natural and bohemian
- Gather a small section from each temple area
- Bring these sections back and secure them loosely with an elastic or pins
- Pull out a few pieces around your face for a soft, romantic frame
- Finish by gently tousling the waves with your fingers
- Use a texturizing spray for added definition and beachy texture
Boho Styling Elements:
- Add small flowers or greenery to the secured section
- Incorporate thin braids within the loose waves for variety
- Use natural, matte-finish hair products rather than shiny ones
- Embrace texture and movement rather than trying to achieve perfection
14. Half Up with Pull-Through Braid

The pull-through braid creates the illusion of an incredibly intricate braid without requiring any actual braiding skills, making it perfect for those who struggle with traditional braiding techniques.
This volumous style looks impressive at homecoming while being surprisingly simple to execute.
Pull-Through Braid Steps:
- Gather the top section of your hair and secure it with a clear elastic
- Create a second ponytail directly below the first one using another section of hair
- Split the first ponytail in half vertically
- Bring these two halves around the sides of the second ponytail
- Hold them temporarily while you create a third ponytail below the second
- Secure the split halves from the first ponytail together with the third ponytail section
- Split this newly combined section in half
- Continue this pattern down the length of the ponytail
- Gently pull at each “link” of the braid to create volume and width
- The result looks like a thick, elaborate braid
Pull-Through Perfection:
- Use clear elastics to keep the focus on the braid pattern rather than the elastics
- Pull each section evenly to maintain symmetry
- This technique works best with medium to thick hair
- Add texture spray before starting for better grip and hold
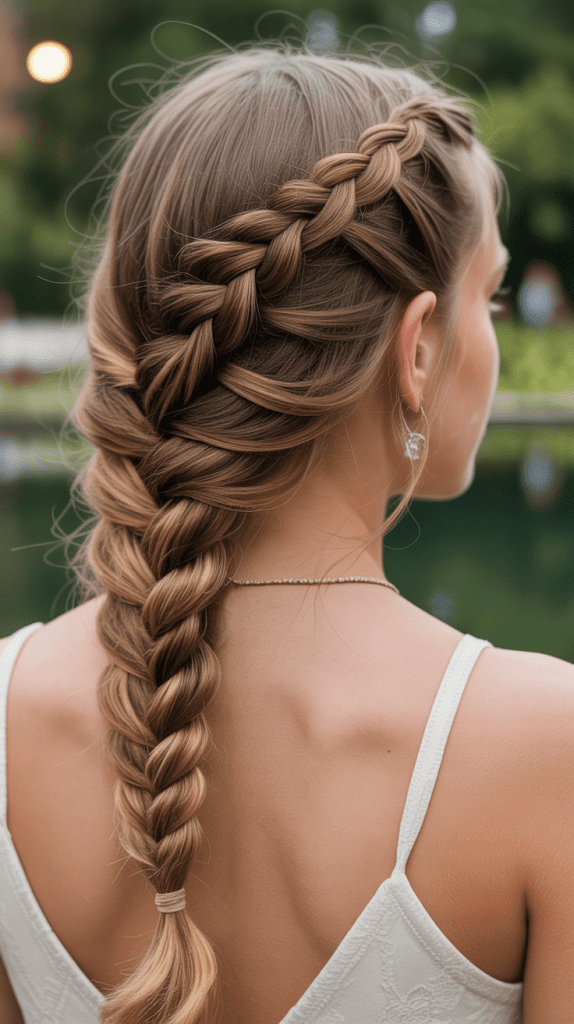
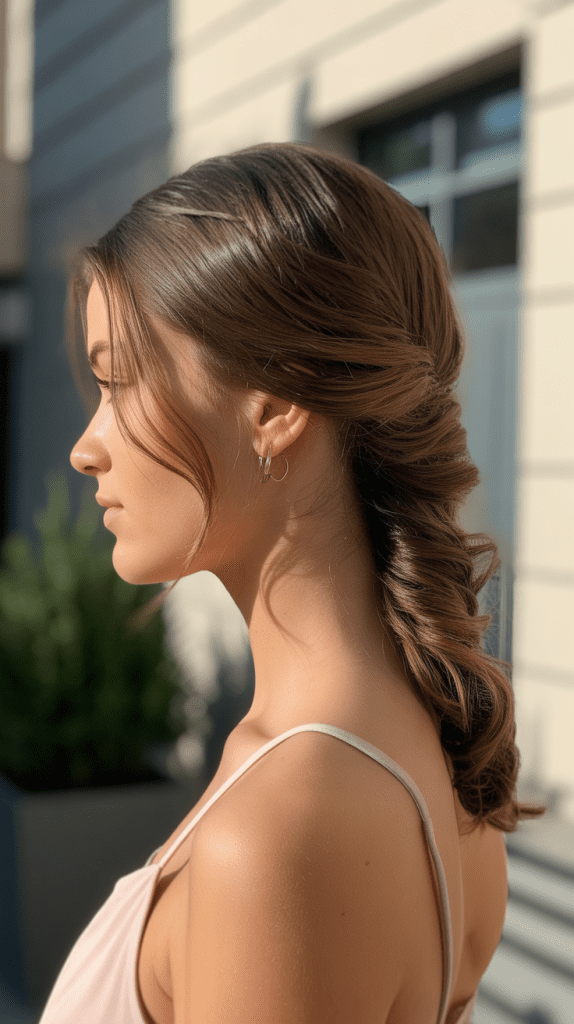
15. Half Up with Twisted Rope Braid

The twisted rope braid offers a simple yet elegant solution that combines the visual interest of a braid with the simplicity of twisting, making it an excellent choice for those short on time before homecoming.
This style appears polished and intentional while being quick to create.
Rope Braid Technique:
- Gather a half up section from temple to temple
- Divide this gathered section into two equal parts
- Twist the right section clockwise (to the right) several times
- Twist the left section clockwise as well, keeping it separate
- Now wrap the right twisted section over the left in a counterclockwise direction
- Continue twisting each section individually in one direction
- Then wrap them around each other in the opposite direction
- This opposing twist direction is what keeps the rope braid from unraveling
- Secure the end with an elastic band
- Gently pull at the rope to create more volume and texture
Rope Braid Enhancements:
- Create multiple smaller rope braids for a more intricate appearance
- Combine with a traditional three-strand braid for contrast
- Wrap the rope braid into a bun for a different finish
- Add ribbon or decorative cord twisted into the rope for color
16. Half Up with Pinned Curls
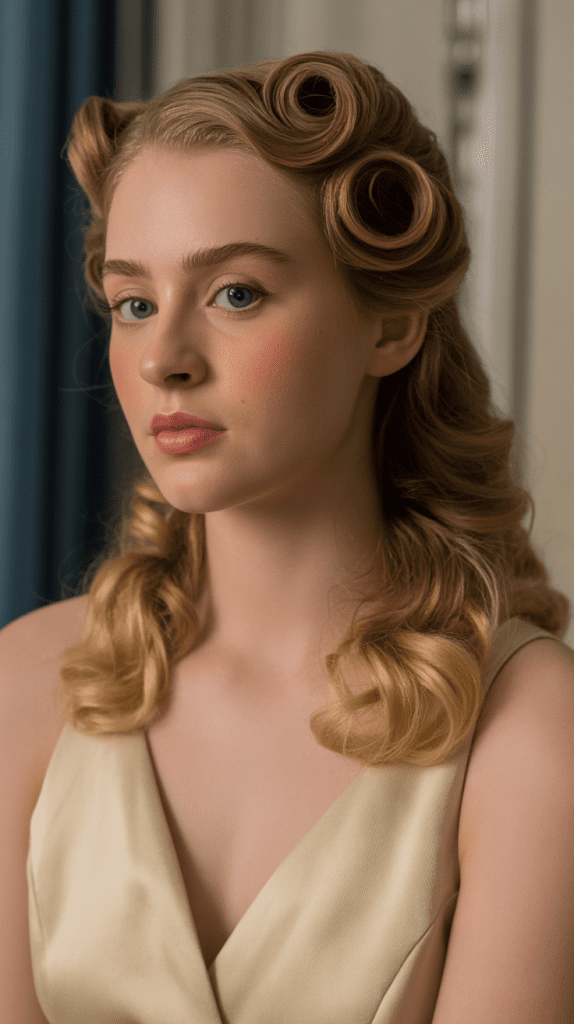
Pinned curls create a vintage-inspired look that brings Old Hollywood glamour to your homecoming night, offering sophisticated elegance with a retro twist.
This style works beautifully for those who appreciate classic beauty and timeless fashion.
Creating Pinned Curls:
- Curl your hair in large sections using a 2-inch curling iron or hot rollers
- Allow the curls to cool completely without touching them
- Gather the top section of hair from your temples back toward the crown
- Instead of securing this section with an elastic, pin individual curls in place
- Take one curl at a time and position it where you want it
- Use bobby pins in an X formation to secure each curl flat against your head
- Create a pattern with the pinned curls—symmetrical or asymmetrical based on preference
- Leave the bottom curls flowing freely for contrast
- Use a medium-hold hairspray to maintain the structure without making it stiff
- Add shine spray for that classic Hollywood finish
Vintage Styling Tips:
- Pin curls work best with smooth, shiny hair
- Use duckbill clips while setting the curls for better definition
- Consider a deep side part for authentic 1940s glamour
- Pair with red lipstick and cat-eye makeup for full vintage effect
17. Half Up with Braided Ponytail

The braided ponytail combination adds dimension and interest to a standard half up style, creating multiple focal points that keep your homecoming look from appearing too simple.
This versatile style bridges the gap between casual and formal beautifully.
Braided Ponytail Construction:
- Section off the top portion of your hair from ear to ear
- Secure this top section into a ponytail at your desired height
- Take the ponytail and divide it into three equal sections
- Braid the ponytail using a traditional three-strand technique
- Continue braiding down the entire length of the ponytail
- Secure the end of the braid with a small elastic
- Gently pancake the braid by pulling it apart slightly for fullness
- The bottom section of loose hair creates a beautiful contrast with the braided top
- Add a decorative elastic or wrap hair around the base to hide the ponytail holder
- Curl or straighten the loose bottom section based on your preference
Ponytail Variations:
- Create a fishtail braid instead of a traditional braid for different texture
- Make two smaller ponytails and braids instead of one central braid
- Add ribbon woven through the braid for color
- Position the ponytail high for a sporty look or low for more elegance
18. Half Up with Teased Crown

The teased crown adds dramatic height and volume to your homecoming look, creating a statement style that photographs beautifully and works particularly well for those with fine or flat hair.
This technique delivers instant glamour and confidence.
Teasing Technique:
- Section off the hair at your crown, roughly a 3×3 inch square
- Lift this section straight up and hold it taut
- Using a fine-tooth comb or teasing brush, backcomb from mid-length toward the roots
- Work in short, gentle strokes rather than aggressive movements
- Continue teasing until you’ve built sufficient volume
- Gently smooth the top layer of the teased section without flattening it entirely
- Gather hair from your temples back toward the teased crown section
- Secure these side sections behind the teased area with bobby pins
- The teased crown should remain visible and voluminous
- Spray liberally with strong-hold hairspray to maintain the height
Maintaining Volume:
- Don’t over-brush the teased section or it will flatten
- Use hairspray between teasing layers for better staying power
- Consider using a volumizing powder at the roots for extra lift
- The teasing should create a rounded, elevated shape rather than a pointed one
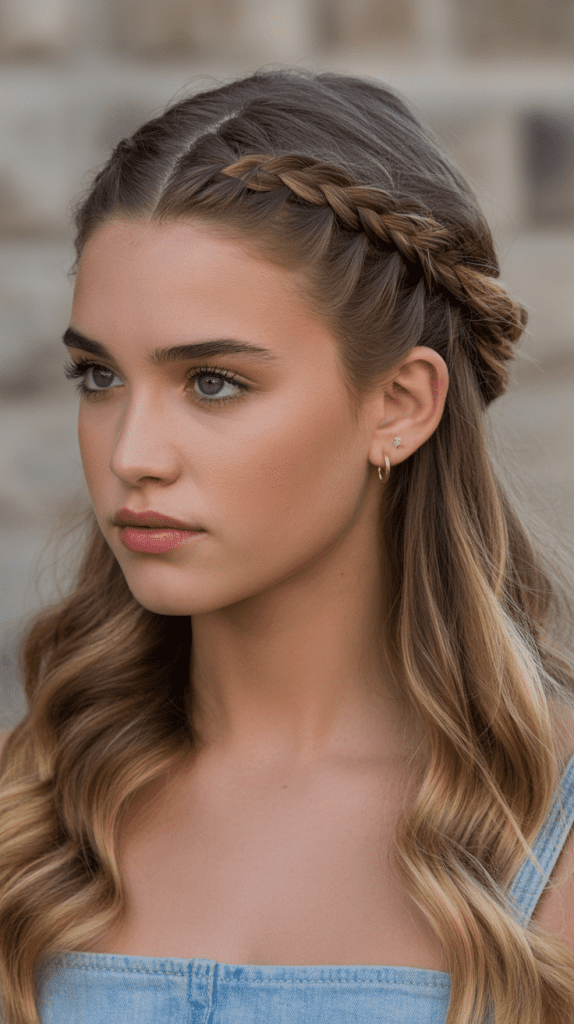
19. Half Up with Headband Braid
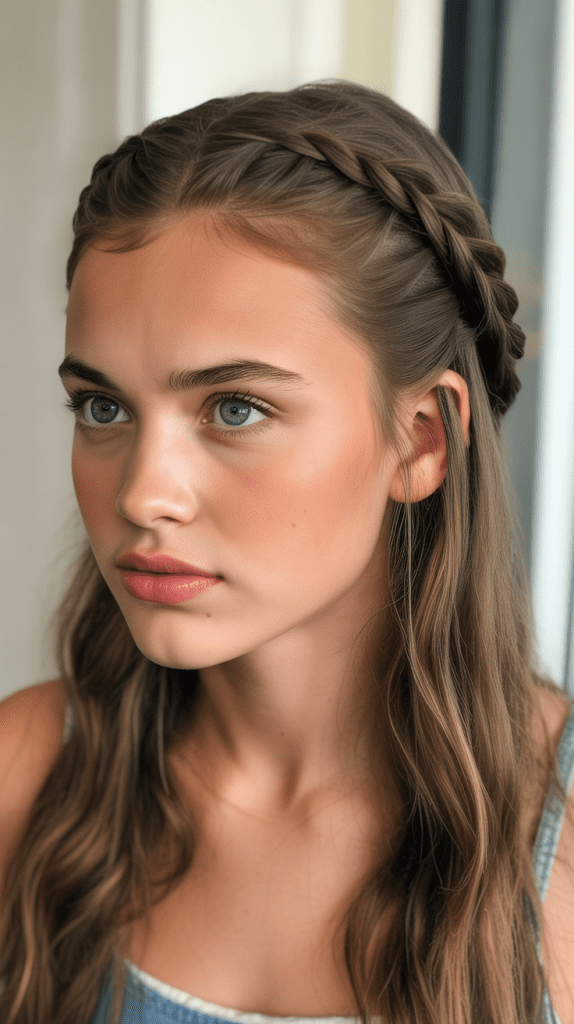
The headband braid creates the illusion of wearing an elegant headband made entirely from your own hair, offering a unique take on the half up style that feels special and creative.
This technique showcases your hairstyling skills while keeping hair manageable for dancing.
Headband Braid Method:
- Start with a deep side part on your preferred side
- Take a small section of hair from behind your ear on the lighter side of the part
- Begin a traditional three-strand braid with this section
- Braid along your hairline, curving the braid like a headband
- Keep the braid close to your hairline for the headband effect
- Continue braiding across your forehead and past your opposite temple
- Once you’ve passed the temple, secure the braid temporarily
- Tuck the end of the braid behind your ear and pin it securely
- Take the rest of your hair from the heavy side of your part
- Gather it loosely and pin it back, allowing the braid headband to remain the focal point
- Pull a few face-framing pieces loose for softness
Headband Braid Styling:
- Make the braid thin for a delicate, subtle headband effect
- Create a thicker braid for a more bohemian, statement look
- Add small flowers or pins along the braid
- Combine with curls or waves in the loose section below
20. Half Up with Messy Bun
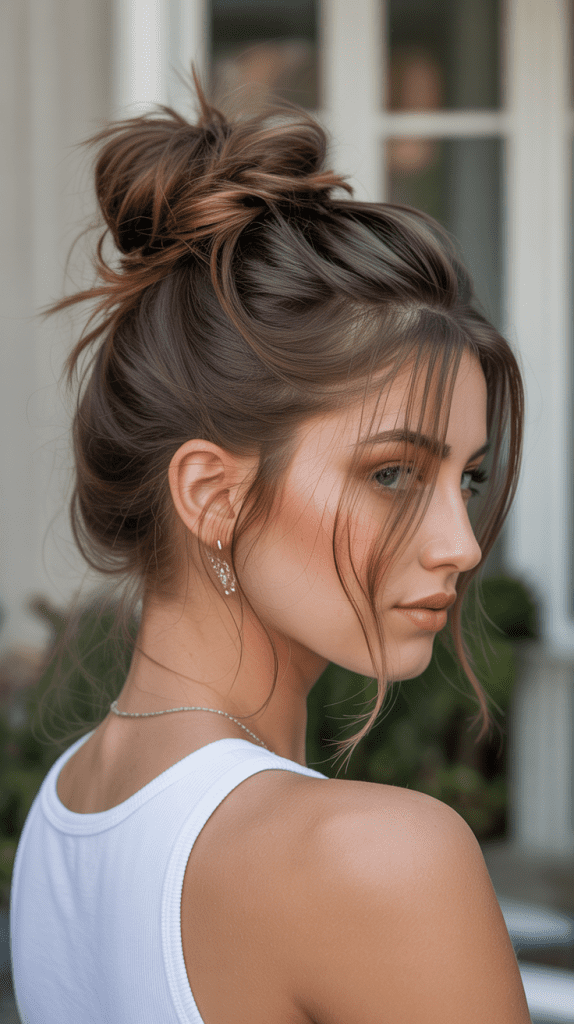
The messy bun brings an intentionally undone, effortless vibe to homecoming that feels current and fashion-forward while remaining appropriate for a formal event.
This style celebrates texture and imperfection in the most beautiful way.
Creating the Perfect Messy Bun:
- Gather the top half of your hair into a high ponytail
- Don’t worry about smoothing every bump—texture adds to the messy aesthetic
- Secure the ponytail with an elastic, but on the last wrap, don’t pull the hair all the way through
- This creates a loop of hair with the ends sticking out
- Wrap the loose ends around the base of the loop
- Pull and separate the loop to create a fuller, messier bun shape
- Secure with bobby pins where needed, but don’t over-pin
- Pull out a few small pieces around the bun to enhance the undone look
- Let a few tendrils fall around your face naturally
- Spray lightly with flexible hold hairspray—you want movement, not stiffness
Messy Bun Guidelines:
- The messier it looks, often the better—don’t aim for perfection
- This style actually works better on second-day hair with more texture
- Use dry shampoo or texturizing spray for better grip
- Balance the intentionally messy top with polished makeup
21. Half Up with Accent Braids
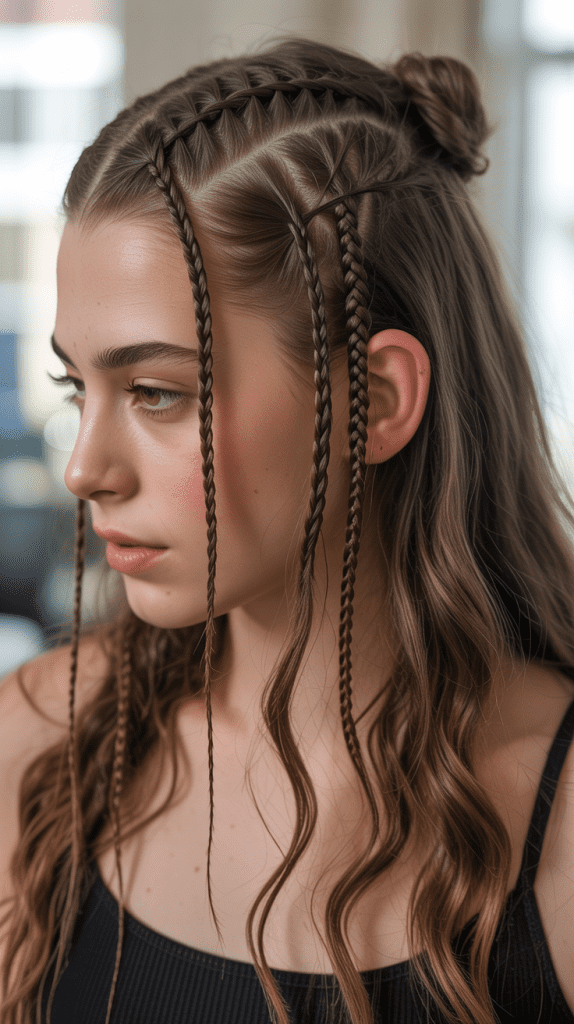
Accent braids add small pops of detail and interest throughout your half up style without overwhelming the overall look, creating subtle sophistication that elevates a simple style.
These tiny braids work beautifully with any hair texture and length.
Incorporating Accent Braids:
- Start by curling or waving all of your hair for texture
- Take a small, thin section of hair near your temple (about pencil-width)
- Braid this tiny section tightly using a traditional three-strand technique
- Secure the mini braid with a small clear elastic
- Repeat on the other side, creating a matching accent braid
- You can also add one or two small braids near the crown or at different angles
- Gather all the accent braids along with loose hair from the top section
- Bring everything together at the back of your head
- Secure with bobby pins or an elastic, allowing the accent braids to be visible
- Let the bottom section remain loose with curls or waves
Accent Braid Ideas:
- Create multiple thin braids of varying lengths for an eclectic boho look
- Make one thicker accent braid as a statement piece
- Braid small sections with different techniques—some fishtail, some rope twist
- Add tiny beads or rings to the accent braids for extra detail
22. Half Up with Low Twisted Side
The low twisted side style brings asymmetrical elegance to homecoming, creating visual interest through its off-center placement and sophisticated twisting technique.
This look works particularly well for those who want to showcase statement earrings on one side.
Low Twisted Side Instructions:
- Create a deep side part, positioning it approximately two inches from your natural center part
- Take a large section of hair from the heavy side of your part
- Begin at the front and twist this section back toward your ear
- As you twist, incorporate more hair from below, similar to a French twist
- Continue twisting along the side of your head, moving toward the nape
- Once you reach the back, secure the twisted section with several bobby pins
- The twist should sit low, near the nape rather than up high
- Leave the opposite side mostly loose, perhaps pulling just a small section back
- Allow the lighter side to fall forward, showcasing one side of your face
- Style the loose hair with soft curls or sleek straightness
Asymmetrical Styling Benefits:
- This style is perfect for photos—it looks beautiful from every angle
- The asymmetry creates natural face-framing on one side
- It’s ideal for showcasing one special earring or hair accessory
- The low placement feels elegant and mature
23. Half Up with Knotted Detail
The knotted detail transforms a simple half up style into something special by incorporating actual knots made from hair sections, creating unexpected visual texture that stands out.
This contemporary technique feels modern and artistic.
Creating Hair Knots:
- Section the top portion of your hair into a horizontal line from ear to ear
- Divide this top section into two equal parts
- Take the right section and cross it over the left section
- Bring the right section under and through, creating an actual knot (like tying shoelaces)
- Tighten the knot gently but firmly
- You can create one large knot or multiple smaller knots
- For multiple knots, divide the hair into more sections and knot adjacent sections together
- Once you’ve created your desired number of knots, gather all the knotted hair
- Secure everything together at the back with bobby pins or an elastic
- Leave the bottom section flowing
- Knot Styling Variations:
- Create a single statement knot in the center for minimalist elegance
- Make several small knots across the top for intricate detail
- Combine knots with twists or braids for mixed texture
- Pull gently at the knots to loosen them for a softer appearance
24. Half Up with Wrapped Ponytail

The wrapped ponytail elevates a basic half up style by concealing the elastic with a sleek section of hair, creating a polished, salon-quality finish that looks intentional and refined.
This sophisticated detail makes all the difference in achieving an elevated homecoming look.
Wrapping Technique:
- Gather the top section of your hair and secure it with an elastic band
- Take a small section of hair from underneath the ponytail (about one inch wide)
- Wrap this section around the elastic, covering it completely
- Continue wrapping until the elastic is no longer visible
- Tuck the end of the wrapping section under the ponytail base
- Secure the tucked end with a bobby pin, making sure the pin is hidden
- The wrapped section should look smooth and seamless
- Apply a small amount of gel or pomade to the wrapping section for sleekness
- Style the ponytail itself with curls, waves, or keep it straight
- Leave the bottom section of hair down in your preferred style
Wrap Enhancements:
- Use a contrasting hair color extension for the wrap to create visual interest
- Wrap with a thin ribbon or decorative cord instead of hair
- Create multiple wraps stacked on top of each other for dimension
- Ensure the wrap is tight enough to stay secure but not so tight it looks strained
25. Half Up with Cascading Twists

Cascading twists create a waterfall effect using twisted sections instead of braids, offering a unique take on flowing hair that combines structure with movement.
This romantic style works beautifully for homecoming and creates dimension that looks stunning in photographs.
Cascading Twist Method:
- Begin with a small section of hair near your temple on one side
- Divide this section into two parts and twist them around each other once
- Drop one of the twisted sections and let it cascade down
- Pick up a new section of hair from just below where you started
- Add this new section to the remaining twisted piece
- Twist again with the new addition, then drop one section
- Continue this pattern of twisting, dropping, and picking up new hair
- Work your way across the back of your head toward the opposite side
- Each dropped section will cascade down beautifully
- Secure the final twist with bobby pins when you reach the other side
- Style all the cascading sections with loose curls for maximum effect
Cascading Styling Tips:
- This technique works best with hair that has some texture or wave
- Keep consistent tension throughout to maintain an even appearance
- The dropped sections should all be roughly the same size
- Practice the dropping and picking up motion before your big night
Conclusion
Finding the perfect hairstyle for your special night doesn’t have to be stressful or complicated when you have the right guidance and options to choose from.
“25 Easy Half Up Half Down Hoco Hairstyles” has provided you with a comprehensive collection of beautiful, achievable styles that range from elegantly simple to impressively detailed, ensuring there’s something for every skill level, hair type, and personal aesthetic.
These versatile half up half down looks offer the best of both worlds—the elegance of an updo with the romantic flow of down hair—making them ideal for dancing, photos, and feeling confident throughout your entire homecoming celebration.
Whether you choose a classic twisted style, embrace trendy space buns, incorporate intricate braiding, or keep things sleek and simple, the most important element is that you feel beautiful and comfortable in your chosen look.
Remember that practice makes perfect, so don’t hesitate to try several of these styles before your big night to find which one makes you feel most like yourself.
With the detailed instructions, styling tips, and customization ideas provided throughout this article, you now have all the tools necessary to create a stunning homecoming hairstyle that will have you looking and feeling absolutely amazing as you make unforgettable memories with friends.