Transforming flat, lifeless hair into gorgeous, bouncy curls is an art form that separates amateur styling from professional-level results.
Learning “How to Curl Your Hair with a Curl Iron Like a Pro” unlocks the secret to achieving red-carpet worthy curls from the comfort of your own home.
Whether you’re preparing for a special occasion or simply want to elevate your everyday look, mastering professional curling techniques will revolutionize your hair game and boost your confidence exponentially.
This comprehensive guide reveals insider secrets used by top hairstylists worldwide, covering everything from selecting the perfect curling iron to maintaining salon-quality curls for days.
You’ll discover advanced techniques for different hair types, learn how to troubleshoot common curling disasters, and master the timing and temperature settings that make the difference between amateur attempts and professional perfection.
By following these expert methods, you’ll develop the skills and confidence to create stunning curls that rival any high-end salon treatment.
In This Post......
- 1. Choosing the Right Curling Iron for Professional Results
- 2. Professional Hair Preparation Techniques
- 3. Mastering Professional Sectioning Methods
- 4. Advanced Curling Techniques and Methods
- 5. Professional Timing and Temperature Control
- 6. Finishing Techniques for Salon-Quality Results
- 7. Troubleshooting Common Curling Problems
- 8. Maintaining Professional Curls for Maximum Longevity
1. Choosing the Right Curling Iron for Professional Results
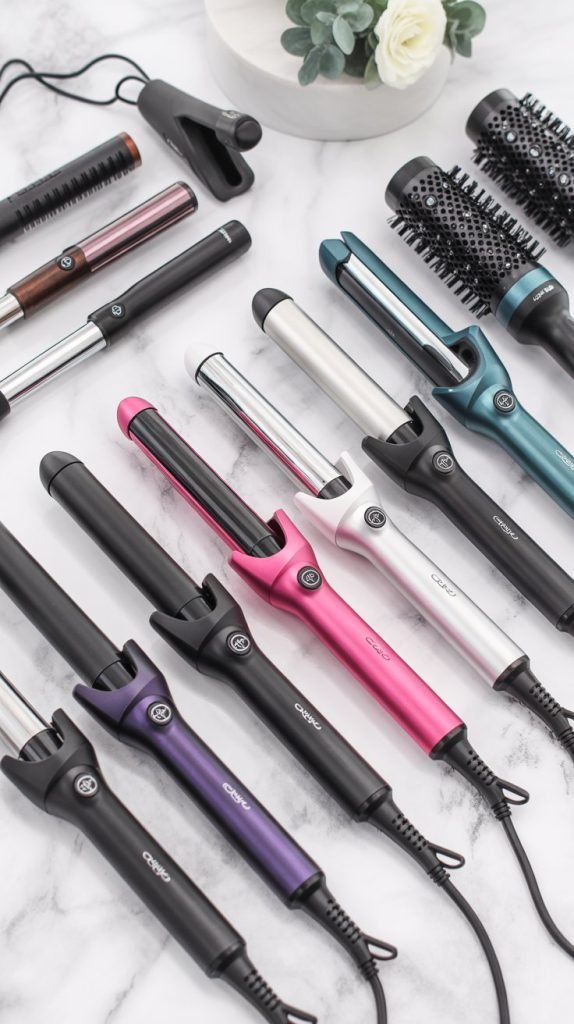
The foundation of professional curling lies in selecting the appropriate curling iron that matches your hair type, desired curl style, and skill level.
Understanding the technical specifications and features of different curling irons ensures you invest in a tool that delivers consistent, salon-quality results every time you style your hair.
- Barrel size determines curl tightness – 0.75 to 1 inch creates tight curls, 1.25 to 1.5 inches produces medium curls, and 1.75 to 2 inches generates loose waves
- Ceramic barrels provide even heat distribution and reduce frizz, making them ideal for fine to medium hair textures
- Titanium barrels heat up faster and maintain consistent high temperatures, perfect for thick, coarse, or resistant hair types
- Tourmaline-infused barrels emit negative ions that seal the hair cuticle, creating shinier and smoother curl results
- Variable temperature controls allow you to customize heat settings between 200°F to 450°F based on your hair’s specific needs
- Spring-loaded clamps ensure consistent pressure and prevent hair slippage during the curling process
- Swivel cords prevent tangling and provide greater maneuverability during styling sessions
2. Professional Hair Preparation Techniques
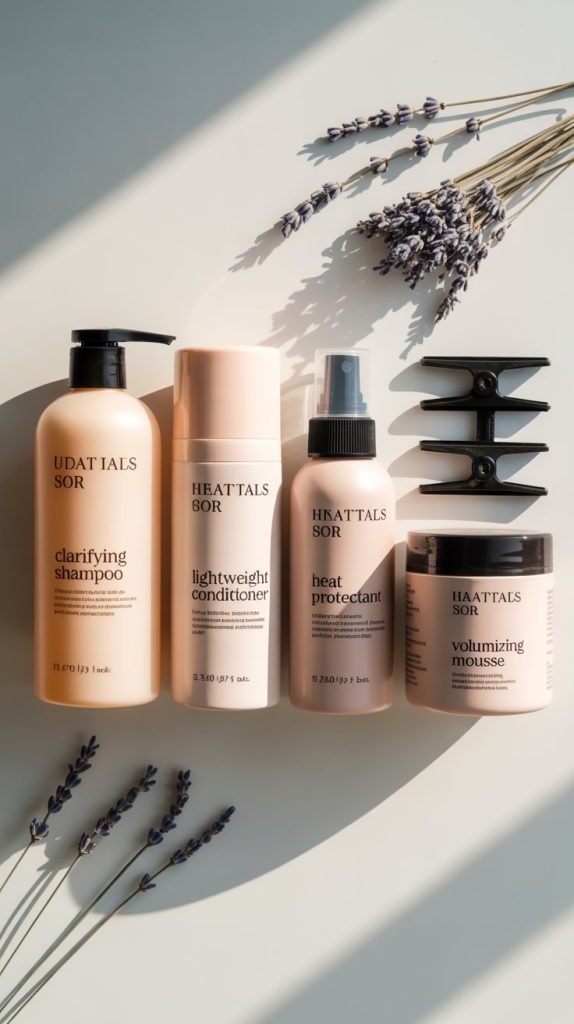
Proper hair preparation separates professional results from amateur attempts, creating the perfect foundation for long-lasting, healthy-looking curls.
This critical step involves multiple layers of protection and preparation that ensure your curls maintain their shape while preserving hair integrity.
- Begin with freshly washed hair using a clarifying shampoo to remove product buildup that can weigh down curls
- Apply a lightweight, moisture-rich conditioner only to mid-lengths and ends to avoid root heaviness
- Towel-dry hair gently using a microfiber towel or cotton t-shirt to minimize frizz and breakage
- Apply heat protectant spray from roots to ends, ensuring complete coverage with special attention to previously damaged areas
- Use a wide-tooth comb to distribute products evenly and detangle hair without causing stress or breakage
- Apply volumizing mousse to roots for extra lift and body, focusing on areas where hair tends to fall flat
- Blow-dry hair completely using a round brush to create smooth, tangle-free sections that curl more uniformly
3. Mastering Professional Sectioning Methods
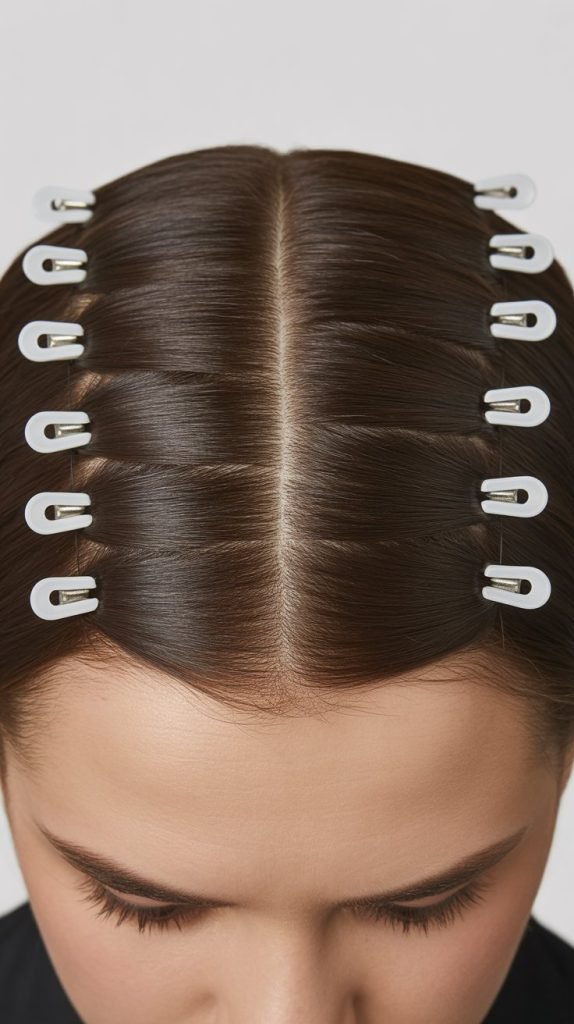
Strategic sectioning is the cornerstone of professional curling that ensures every strand receives proper attention and creates uniform, long-lasting curls.
Professional stylists use specific sectioning patterns that maximize efficiency while delivering consistent results across all hair lengths and textures.
- Divide hair horizontally into three main sections: bottom (nape to ears), middle (ears to temples), and top (temples to crown)
- Create vertical subsections within each horizontal layer, working with 1-2 inch sections depending on hair thickness and desired curl intensity
- Use professional sectioning clips to secure upper layers while working on lower sections systematically
- Start curling from the bottom layer and work upward to prevent upper sections from falling onto freshly curled hair
- Maintain consistent section sizes throughout the curling process to ensure uniform curl patterns and professional-looking results
- Leave face-framing sections for last to maintain maximum curl longevity in the most visible areas
- Pin completed curls immediately after curling to allow them to set properly while working on remaining sections
4. Advanced Curling Techniques and Methods
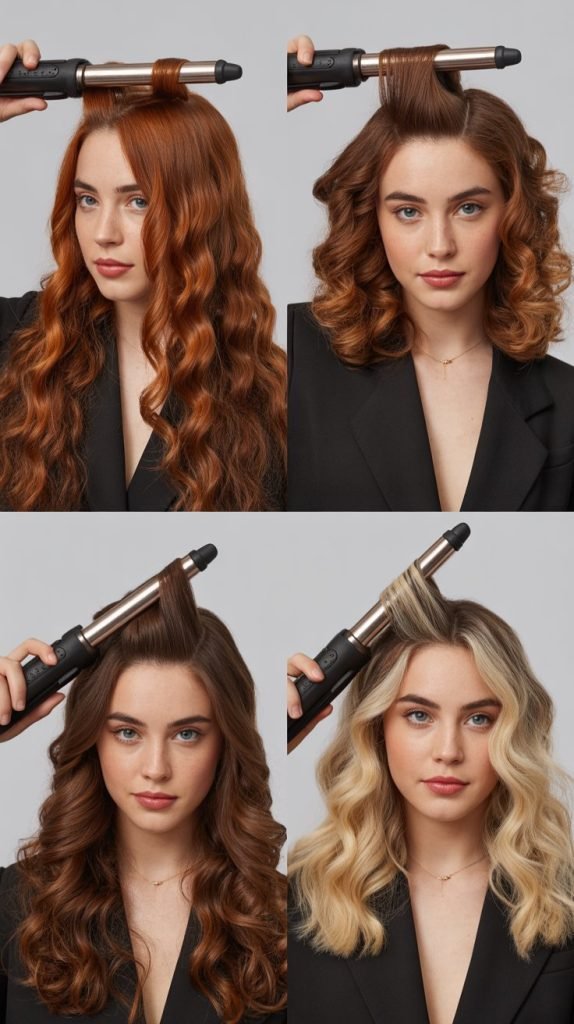
Professional curling involves mastering multiple techniques that create different curl styles, textures, and volumes depending on the desired final look.
These advanced methods require practice but produce superior results compared to basic curling approaches.
- The spiral method involves wrapping hair around the barrel in overlapping layers, creating tight, defined curls with maximum longevity
- Pin curl technique requires curling hair normally, then immediately coiling the warm curl and securing with a bobby pin until completely cool
- Marcel waving creates vintage-inspired S-shaped waves by alternating curl directions and using the iron’s clamp strategically
- The twist-and-curl method involves twisting each section before wrapping around the barrel for added texture and natural-looking movement
- Ribbon curling technique wraps hair flat against the barrel like a ribbon, creating smooth, uniform curls without gaps or irregularities
- The stacking method layers multiple small sections on the barrel simultaneously for voluminous, full-bodied curl results
- Temperature variation involves using different heat settings for different sections based on hair porosity and desired curl longevity
5. Professional Timing and Temperature Control
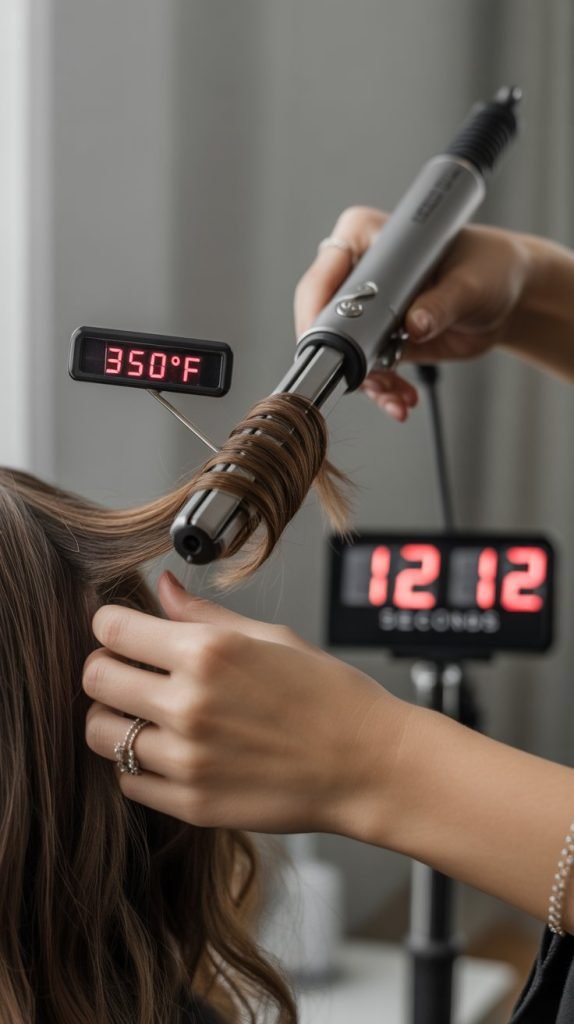
Understanding precise timing and temperature control separates amateur curling from professional results, ensuring optimal curl formation while minimizing heat damage.
Professional stylists use specific time intervals and temperature ranges that maximize curl longevity while preserving hair health.
- Fine or damaged hair requires lower temperatures (250-300°F) with shorter contact times of 6-8 seconds per section
- Medium-textured hair performs best at moderate temperatures (300-350°F) with 8-12 seconds of contact time
- Thick, coarse, or resistant hair needs higher temperatures (350-400°F) with 12-15 seconds for proper curl formation
- Virgin, healthy hair can tolerate maximum temperatures (400-450°F) but should never exceed 15 seconds of contact time
- Use a professional timer or count consistently to ensure uniform curl formation across all sections
- Allow the iron to maintain steady temperature between sections rather than constantly adjusting settings
- Test temperature on a small, hidden section first to determine optimal heat level for your specific hair type
6. Finishing Techniques for Salon-Quality Results
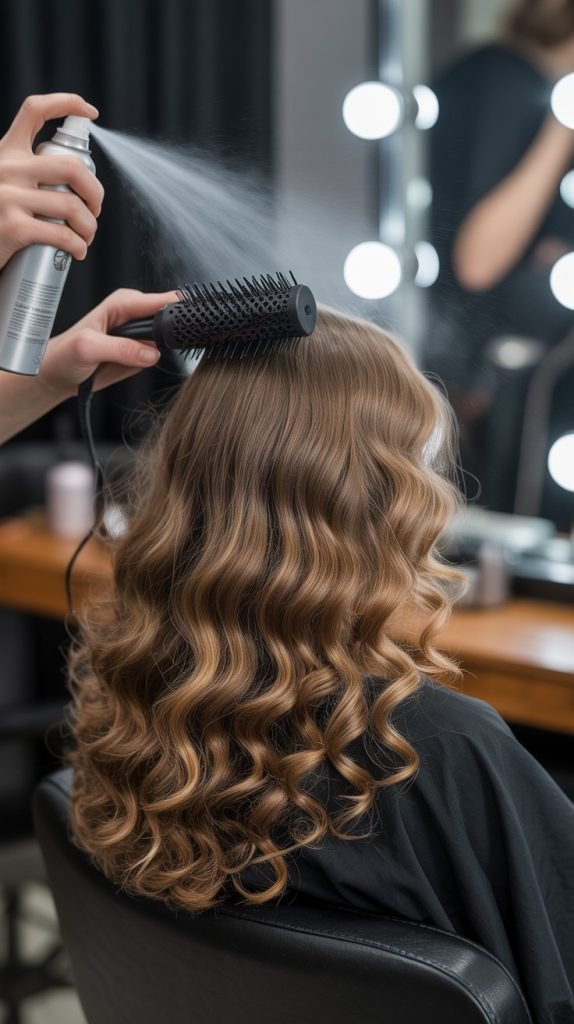
The finishing phase transforms good curls into exceptional, professional-looking results that maintain their shape and shine throughout the day.
These final steps require specific products and techniques that lock in curl patterns while adding professional polish.
- Allow all curls to cool completely in their coiled shape before any manipulation to ensure maximum curl memory
- Gently finger-comb or brush through curls with a wide-bristle brush to create soft, natural-looking waves
- Apply texturizing spray while curls are still slightly warm for enhanced definition and separation
- Use flexible-hold hairspray in light, even layers rather than heavy application that can weigh down curls
- Scrunch curls gently with your palms while hairspray is still damp to encourage natural movement and bounce
- Apply shine serum sparingly to mid-lengths and ends for professional-level glossy finish
- Set the final style with a cool shot from your blow dryer to lock in the curl pattern and add extra shine
7. Troubleshooting Common Curling Problems
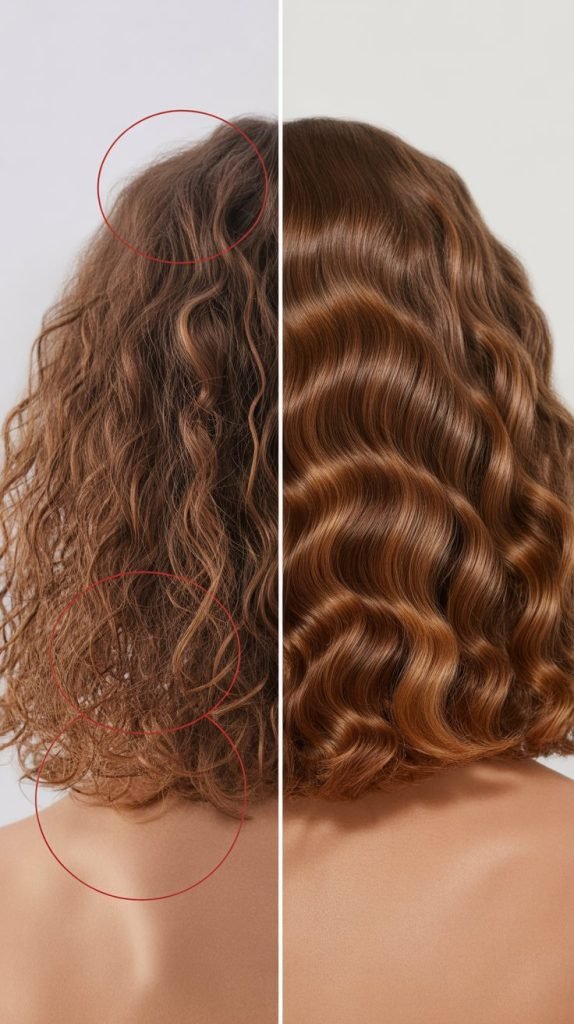
Even experienced stylists encounter curling challenges, but understanding how to quickly identify and correct common problems ensures consistently professional results.
These troubleshooting techniques address the most frequent curling issues that can derail an otherwise perfect styling session.
- Curls that fall flat immediately indicate insufficient heat, too much product, or inadequate cooling time between sections
- Uneven curl patterns result from inconsistent sectioning, varying contact times, or irregular iron placement along the hair shaft
- Frizzy or rough-textured curls suggest excessive heat, lack of heat protection, or manipulation while hair is still warm
- Kinked or crimped sections occur when the iron clamp creates pressure marks – adjust clamp pressure and hand positioning
- Curls that won’t hold typically need stronger styling products applied to damp hair before blow-drying
- Stringy or separated curls indicate too much styling product or failure to distribute products evenly through hair
- Heat damage signs include excessive brittleness, unusual shine loss, or color changes requiring immediate temperature reduction
8. Maintaining Professional Curls for Maximum Longevity
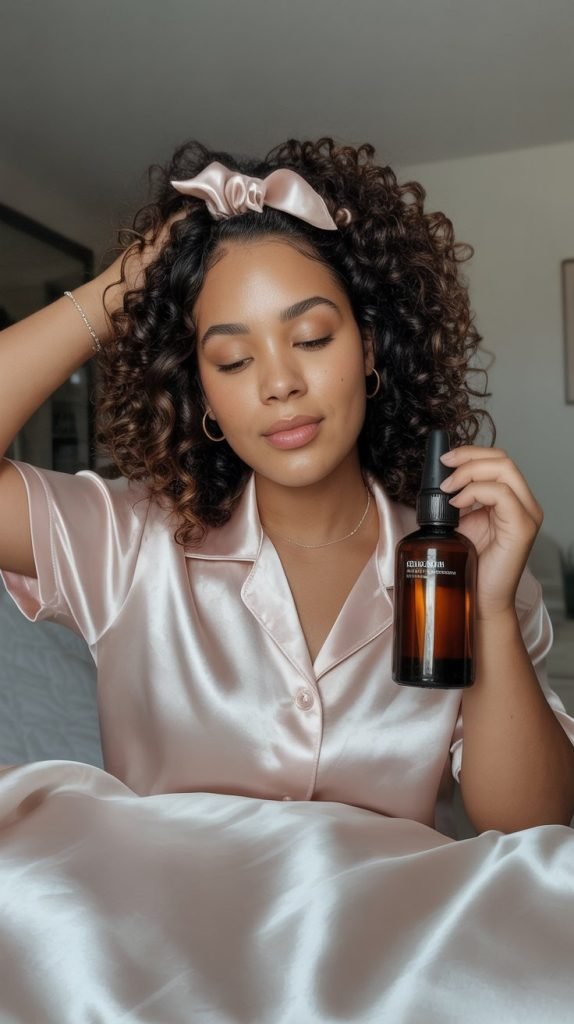
Professional curl maintenance extends the life of your styling efforts while preserving curl integrity and hair health.
These advanced maintenance techniques help curls maintain their shape, bounce, and shine for multiple days without daily restyling.
- Sleep with hair in a loose, high ponytail using a silk scrunchie to prevent crushing curls while maintaining volume
- Use a silk or satin pillowcase to reduce friction and prevent frizz formation during sleep
- Apply a small amount of lightweight hair oil to ends before bed to maintain moisture and prevent brittle curl formation
- Refresh curls in the morning using a spray bottle with diluted leave-in conditioner mixed with water
- Avoid brushing or combing curls when dry – instead use fingers to gently separate and reshape curl patterns
- Protect curls from humidity using anti-humidity products and avoid touching hair throughout the day
- Store curling tools properly with heat-resistant mats and covers to maintain their professional performance and longevity
Mastering the art of professional curling transforms your hair styling capabilities from basic to extraordinary, giving you the confidence to create salon-worthy results at home.
This comprehensive guide to “How to Curl Your Hair with a Curl Iron Like a Pro” provides you with insider knowledge and techniques that professional stylists use to achieve consistently beautiful results.
With practice, patience, and attention to detail, you’ll develop the expertise to create stunning curls that enhance your natural beauty and elevate your personal style to new heights.
Remember that professional-level results require dedication to proper preparation, technique refinement, and quality tool investment, but the payoff in terms of gorgeous, long-lasting curls makes every effort worthwhile.