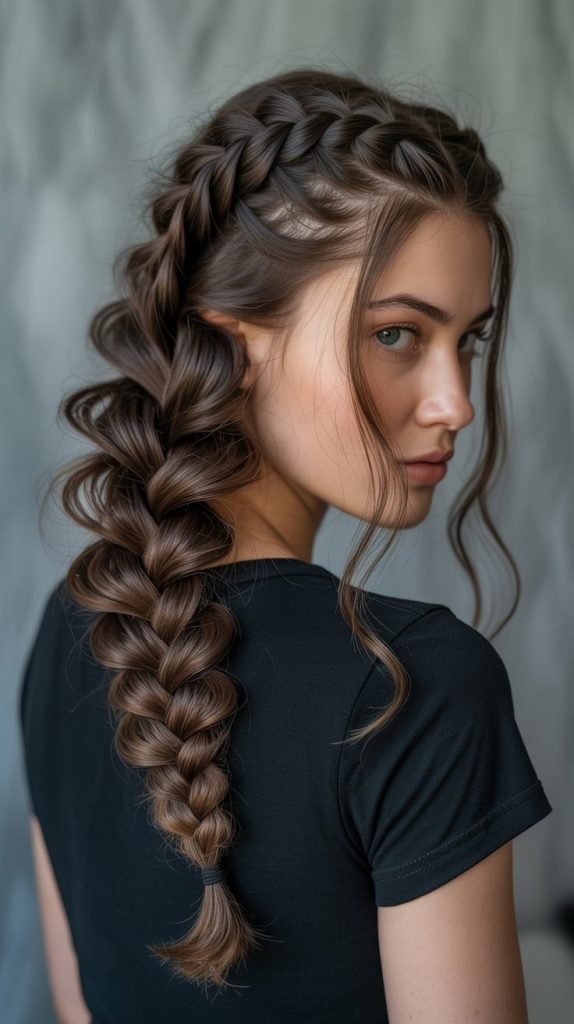
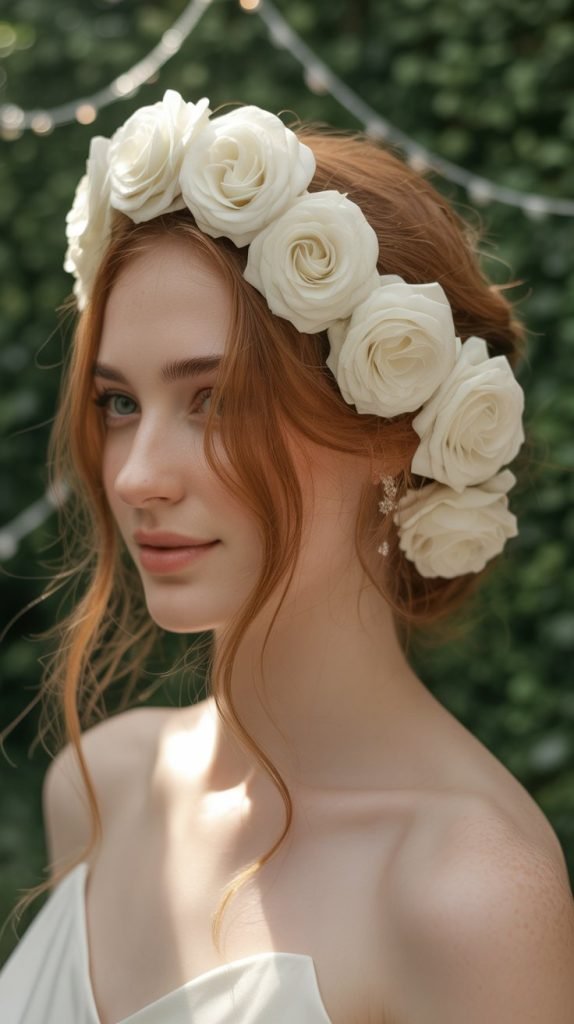
Natural hair deserves gentle care that promotes growth while maintaining its beautiful texture and strength.
The journey to healthy natural hair often involves finding the perfect balance between styling creativity and hair protection.
33 Gorgeous Low-Manipulation Natural Hairstyles to Reduce Breakage offers you a comprehensive guide to achieving stunning looks while minimizing damage to your precious strands.
These carefully selected styles will transform your hair routine, giving you the confidence to embrace your natural texture while keeping breakage at bay.
Whether you’re a natural hair beginner or a seasoned pro looking for fresh inspiration, this collection will revolutionize how you approach protective styling.
In This Post......
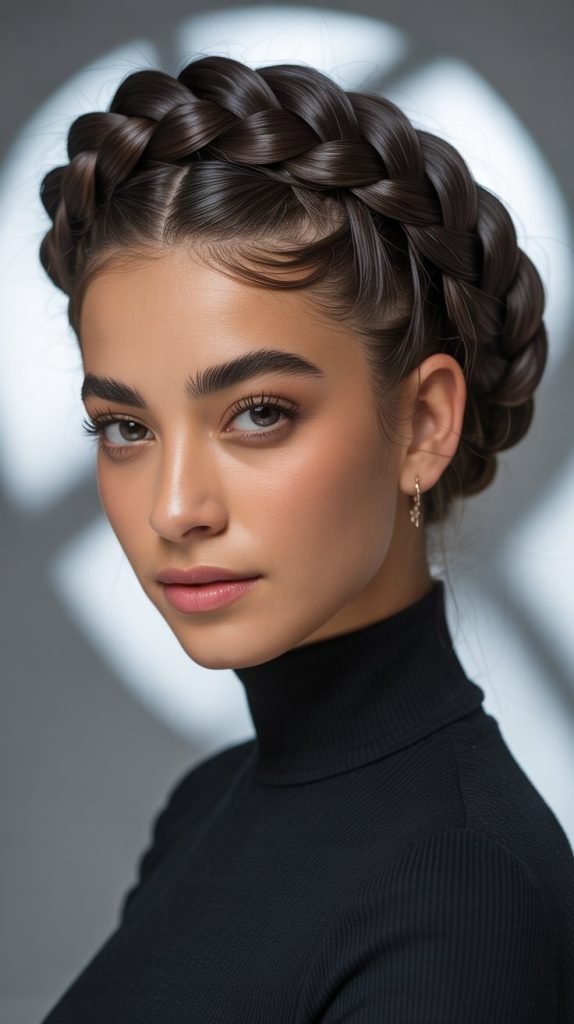
- 1. Twisted Crown Protective Style
- 2. Bantu Knot Elegance
- 3. Protective Flat Twist Out
- 4. Low Manipulation Wash and Go
- 5. Chunky Twist Protective Style
- 6. Pineapple Updo Technique
- 7. Halo Braid Protection
- 8. Twisted Bantu Knot Out
- 9. Protective Pin Curls
- 10. Low Tension Goddess Braids
- 11. Twist and Tuck Updo
- 12. Stretched Braid Out Technique
- 13. Protective Space Buns
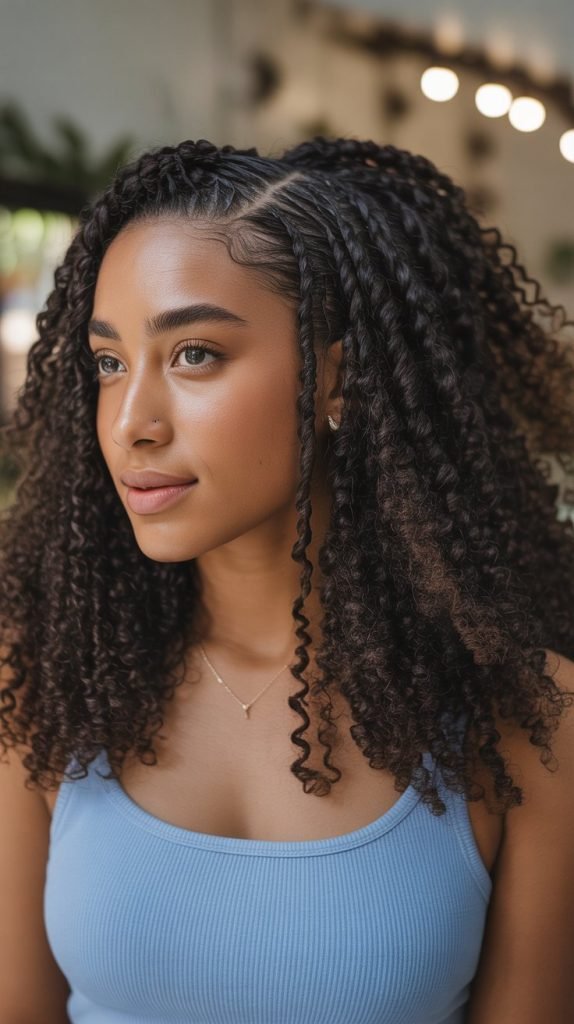
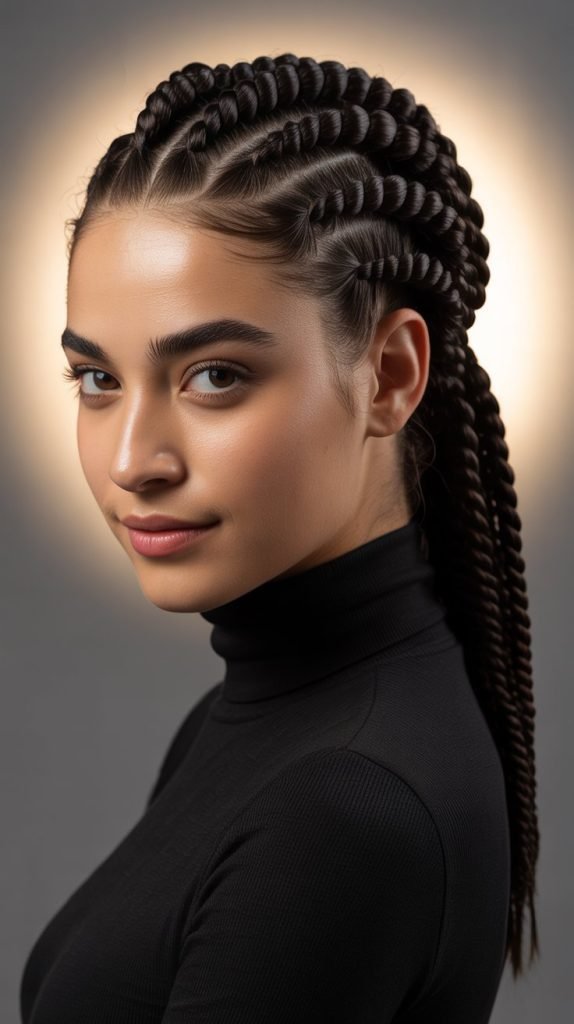
- 14. Low Manipulation Cornrow Base
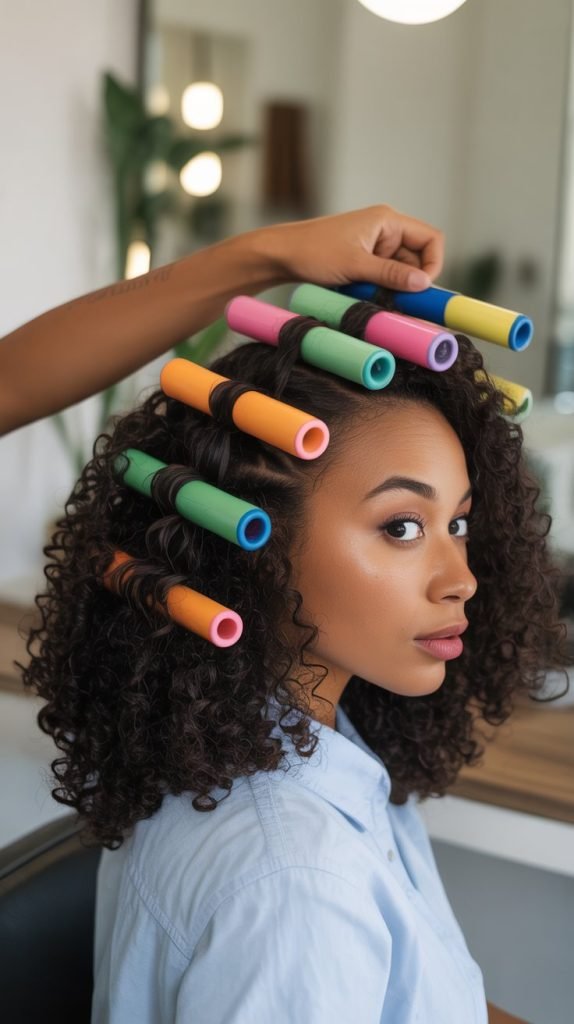
- 15. Gentle Roller Set Technique
- 16. Protective French Braid Crown
- 17. Twisted Protective Ponytail
- 18. Low Manipulation Flexi-Rod Set
- 19. Protective Flat Twist Updo
- 20. Gentle Twist and Pin Style
- 21. Low Tension Dutch Braids
- 22. Protective Puff Variations
- 23. Twisted Crown with Low Bun
- 24. Gentle Curlformer Set
- 25. Low Manipulation Wash and Twist
- 26. Protective Rope Twist Style
- 27. Flat Twist Pin-Up Style
- 28. Protective Medusa Clipping
- 29. Low Tension Fishbone Braids
- 30. Twisted Rosette Updo
- 31. Protective Zig-Zag Parting Style
- 32. Gentle Steam Roller Set
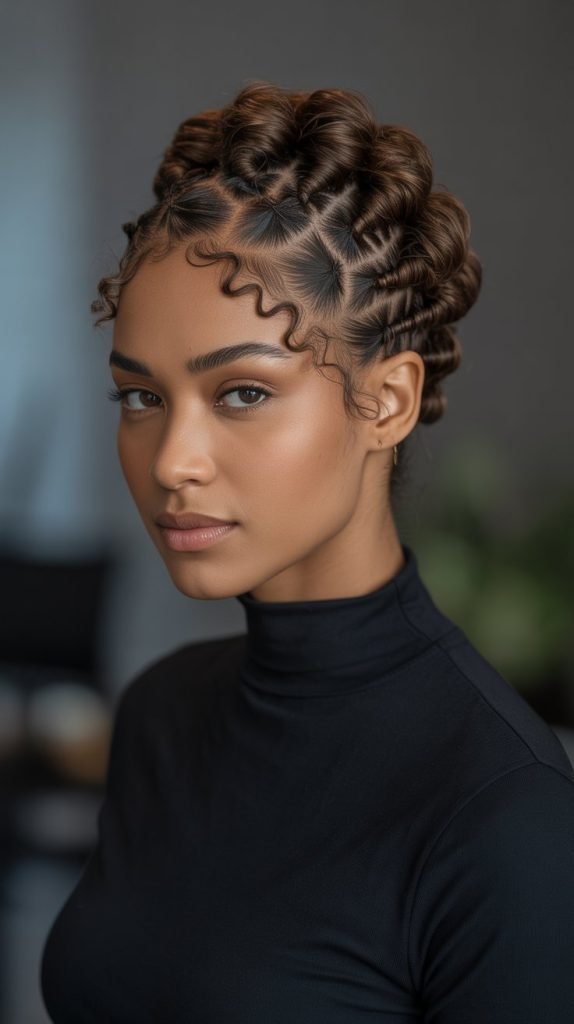
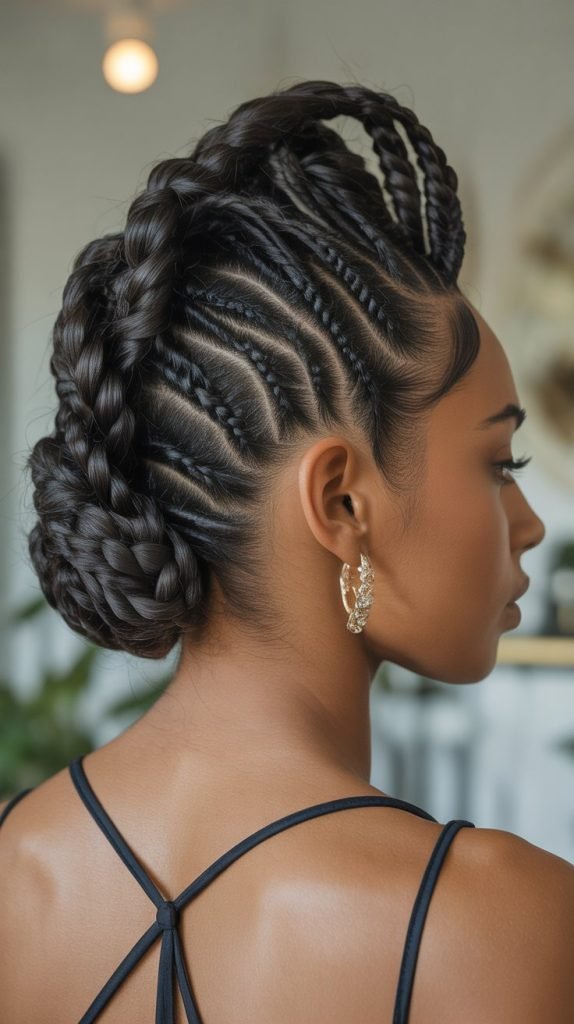
- 33. Multi-Directional Twist Crown
- Conclusion
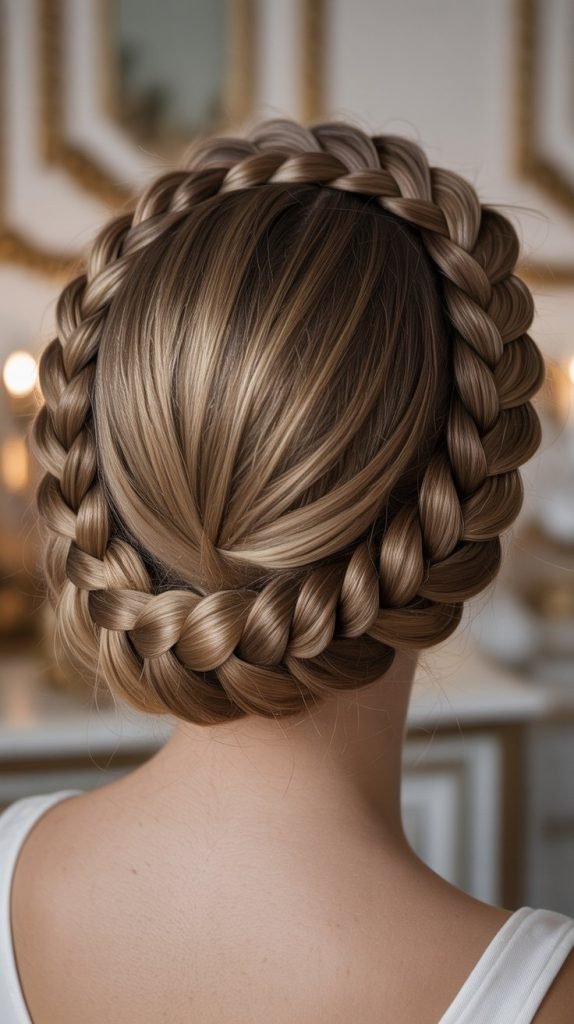
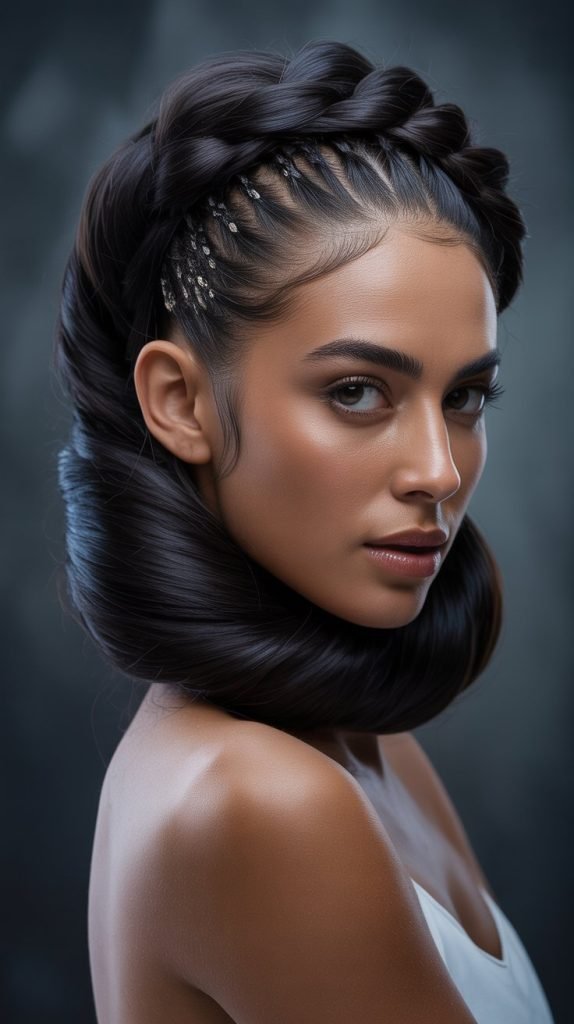
1. Twisted Crown Protective Style
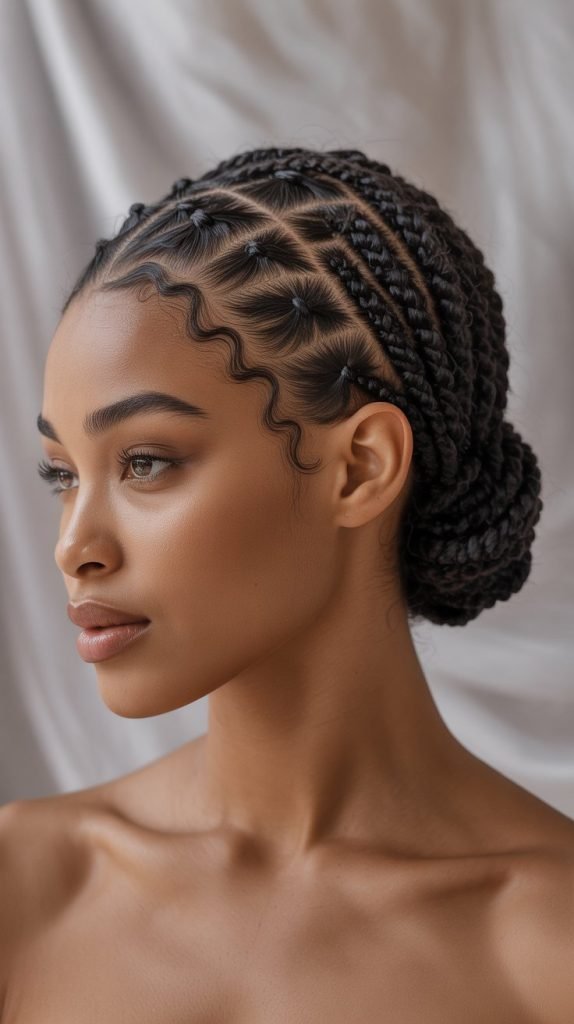
The twisted crown protective style combines elegance with functionality, creating a regal appearance while keeping your hair safely tucked away from environmental damage.
This versatile look works beautifully for both professional settings and casual outings.
The technique involves creating strategic twists around the hairline that form a crown-like pattern, protecting the most fragile areas of your hair.
- Begin with freshly washed and conditioned hair that’s been detangled with a wide-tooth comb
- Apply a lightweight leave-in conditioner and natural oil blend to damp hair for moisture retention
- Section the front portion of your hair from ear to ear, creating a horseshoe-shaped parting
- Take small sections along the hairline and create loose two-strand twists, working from one ear to the other
- Secure the twisted crown with bobby pins that match your hair color for a seamless look
- Gather the remaining hair into a low bun or protective updo to complete the style
- Sleep with a satin scarf or pillowcase to maintain the style for up to one week
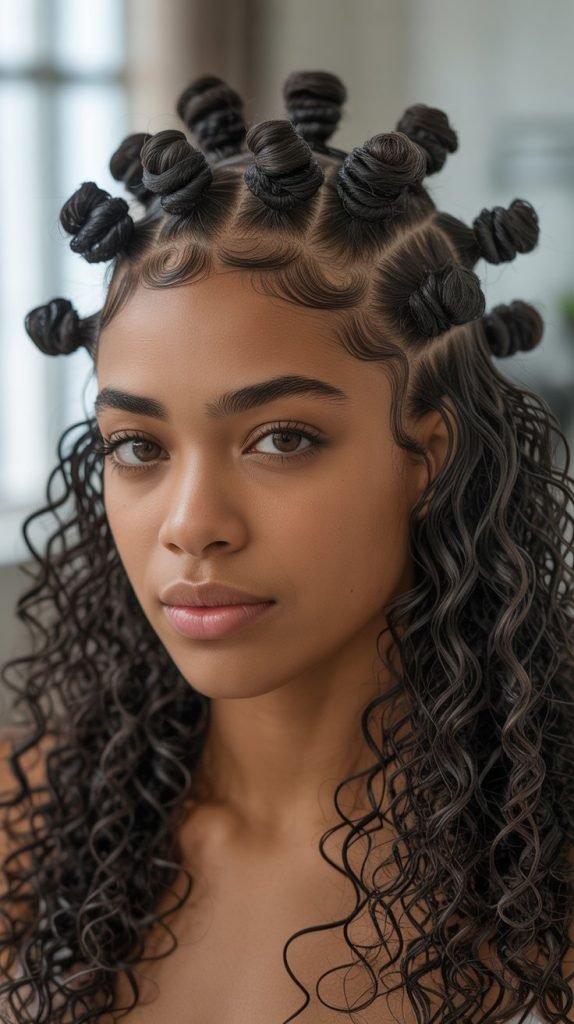
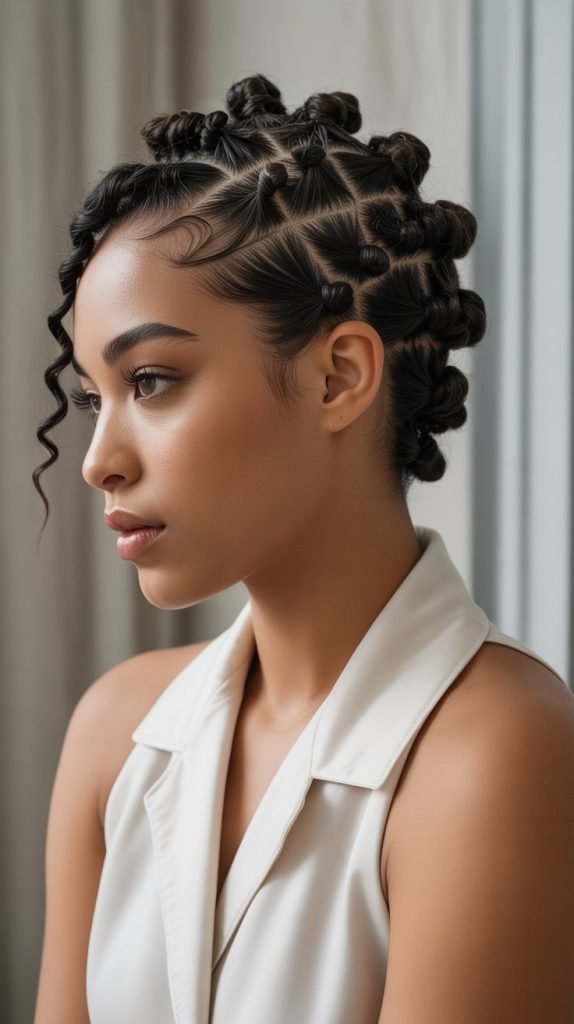
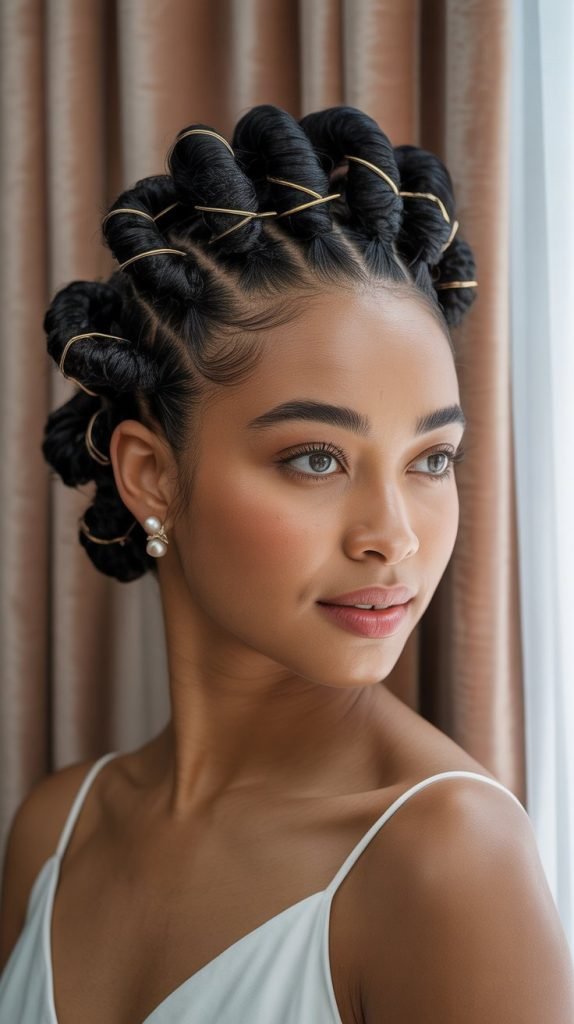
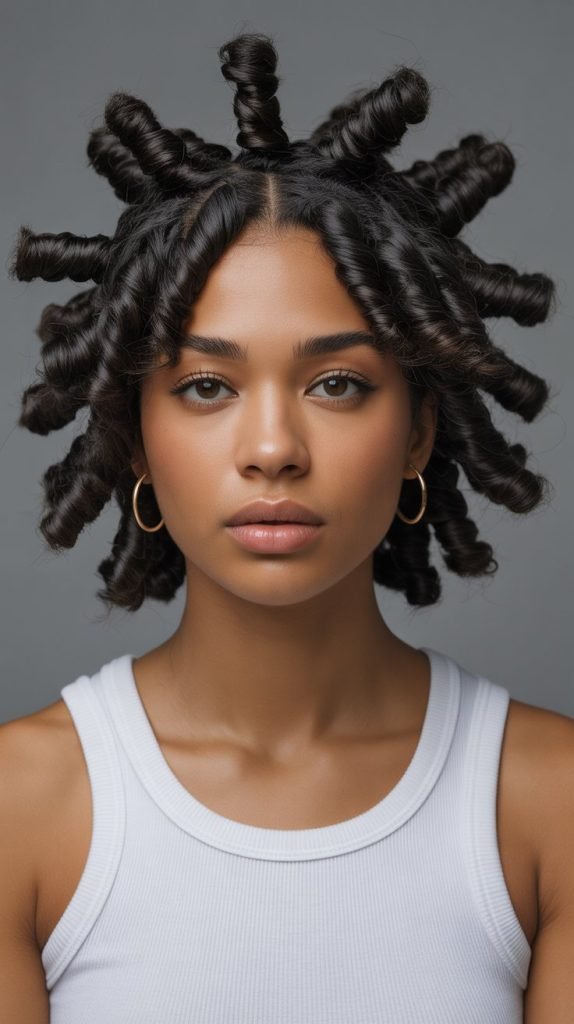
2. Bantu Knot Elegance

Bantu knots represent one of the most effective low-manipulation styles for natural hair, offering both protection and versatility in styling options.
This traditional African hairstyle creates beautiful definition while allowing your hair to rest and recover from daily manipulation.
The technique provides excellent curl definition when unraveled and serves as an elegant protective style when left intact.
- Start with clean, moisturized hair that’s been properly detangled using your preferred method
- Apply a curl-defining cream or moisturizing styling product throughout your hair for hold and definition
- Create systematic parts throughout your hair, forming squares or triangles depending on your preference
- Take each section and twist it tightly from root to tip, building tension as you work down the strand
- Wrap the twisted section around itself to form a tight knot against the scalp
- Secure each knot with a small elastic band or bobby pin to prevent unraveling
- Allow the style to set overnight or for several hours before unraveling for beautiful curl definition
- Maintain the style for 3-5 days by refreshing with a light mist of water and leave-in conditioner
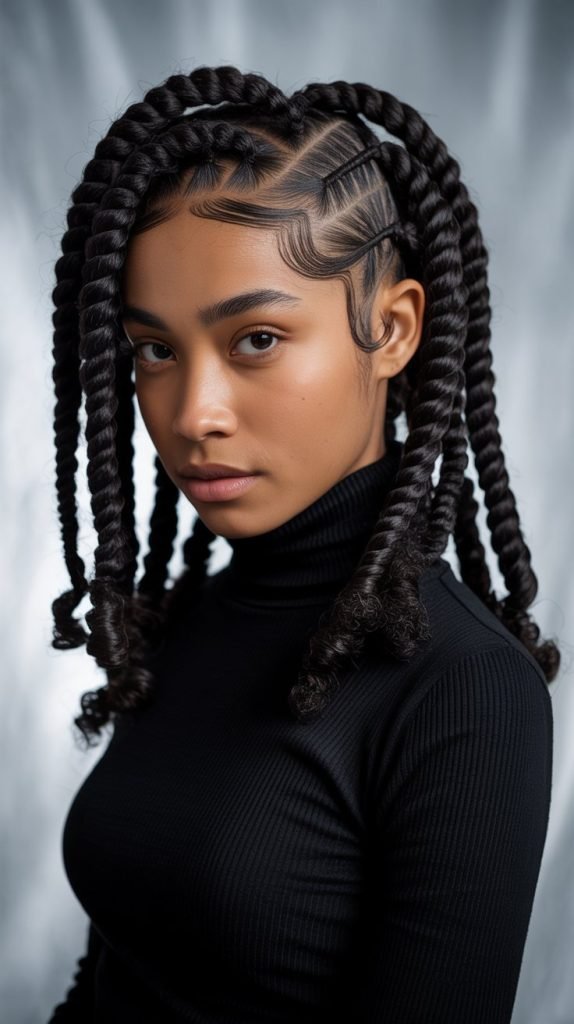
3. Protective Flat Twist Out
The protective flat twist out combines the benefits of a protective style with the beauty of defined, stretched curls.
This technique reduces shrinkage while maintaining your hair’s natural curl pattern.
The flat twist method lies close to the scalp, providing excellent protection for your hairline and crown area while creating gorgeous texture throughout your hair.
- Begin with freshly washed hair that’s been deep conditioned and thoroughly detangled
- Apply a moisturizing leave-in conditioner followed by a natural styling gel for hold
- Create clean parts throughout your hair using a rat-tail comb for precision
- Take two small sections of hair and begin flat twisting close to the scalp, adding hair as you progress
- Continue the flat twist technique until you reach the ends, securing with a small elastic
- Repeat this process throughout your entire head, creating symmetrical patterns
- Allow the twists to dry completely, either air drying overnight or using a hooded dryer
- Carefully unravel each twist from the bottom up, gently separating the curls for volume
- Seal the style with a light natural oil to enhance shine and reduce frizz
4. Low Manipulation Wash and Go
The low manipulation wash and go technique focuses on enhancing your hair’s natural curl pattern with minimal daily styling.
This approach emphasizes proper product application and techniques that work with your hair’s natural tendencies.
The key lies in finding the right product combination and application method for your specific curl type and porosity level.
- Start with a clarifying shampoo to remove product buildup and environmental impurities
- Follow with a deep conditioning treatment to ensure optimal moisture levels
- Apply leave-in conditioner to soaking wet hair using the praying hands method
- Distribute a curl-defining gel or cream through your hair using scrunching motions
- Avoid touching or manipulating your hair while it dries to prevent frizz formation
- Use a microfiber towel or cotton t-shirt to gently remove excess water
- Allow your hair to air dry completely or use a diffuser on low heat and speed
- Refresh daily with a light mist of water and leave-in conditioner mixture
- Sleep on a satin pillowcase or with a satin bonnet to maintain curl definition
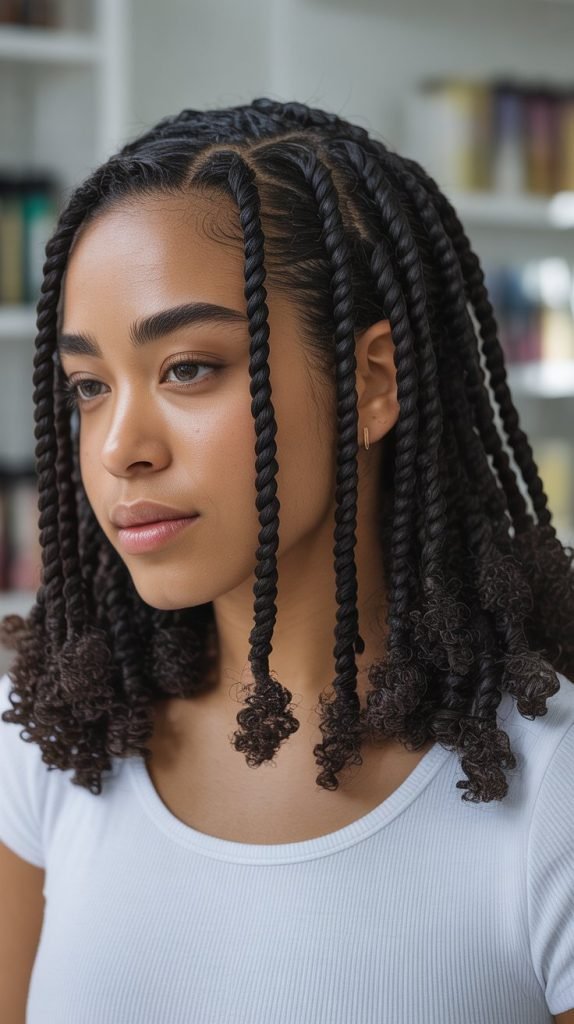
5. Chunky Twist Protective Style

Chunky twists offer an excellent protective styling option that requires minimal daily maintenance while promoting hair growth.
This technique uses larger sections of hair to create substantial twists that can last for weeks with proper care.
The style provides excellent length retention while giving your hair a break from daily manipulation and styling stress.
- Begin with clean, deep-conditioned hair that’s been thoroughly detangled with a wide-tooth comb
- Apply a moisturizing leave-in conditioner and natural oil blend for slip and moisture retention
- Section your hair into medium to large squares using a rat-tail comb for clean parts
- Take each section and divide it into two equal parts for the twisting process
- Twist the two sections around each other from root to tip, maintaining consistent tension
- Seal the ends with a small amount of natural butter or oil to prevent unraveling
- Sleep with a satin scarf or bonnet to reduce friction and maintain the style’s longevity
- Refresh weekly by applying a light oil blend to your scalp and the length of the twists
- Remove twists gently after 2-4 weeks by carefully unraveling from the bottom up
6. Pineapple Updo Technique
The pineapple updo technique serves as both a protective daytime style and an overnight preservation method for curly hair.
This approach gathers your hair at the very top of your head, resembling a pineapple, which maintains curl definition while preventing flattening.
The technique works exceptionally well for medium to long natural hair lengths.
- Start with hair that has been styled in your preferred wash and go or twist out
- Gently gather all your hair at the highest point of your head using your hands only
- Secure with a silk or satin scrunchie to prevent breakage and maintain moisture
- Avoid pulling the hair too tightly to prevent tension on the hairline and crown
- For sleeping, use a satin pillowcase or bonnet to reduce friction throughout the night
- In the morning, gently release the pineapple and fluff your curls with your fingers
- Refresh any flattened areas with a light mist of water and leave-in conditioner
- Reapply the pineapple technique each night to maintain your style’s longevity
7. Halo Braid Protection
The halo braid creates a stunning crown-like appearance while providing excellent protection for your natural hair.
This technique involves braiding around the perimeter of your head, creating a beautiful frame for your face.
The style keeps your hair secure and protected while maintaining an elegant, polished appearance suitable for any occasion.
- Begin with slightly damp, detangled hair that’s been treated with leave-in conditioner
- Create a deep side part and begin braiding from the heavier side of the part
- Start with a small section at the hairline and begin a Dutch or French braid technique
- Continue braiding around the perimeter of your head, incorporating hair as you progress
- Maintain consistent tension to ensure the braid lies flat and secure against your scalp
- When you reach the starting point, continue braiding the remaining length without adding hair
- Tuck the end of the braid under the beginning section and secure with bobby pins
- Mist lightly with a water and oil mixture to maintain moisture and add shine
- This style can last 5-7 days with proper nighttime protection using a satin scarf
8. Twisted Bantu Knot Out
The twisted Bantu knot out combines two protective styling techniques to create maximum curl definition and volume.
This method involves creating twists first, then forming them into Bantu knots, resulting in beautifully defined spirals when unraveled.
The double manipulation creates long-lasting curl definition with minimal daily maintenance requirements.
- Start with freshly washed and deep-conditioned hair that’s been properly detangled
- Apply a leave-in conditioner and curl-defining product for hold and moisture
- Section your hair into medium-sized squares using a rat-tail comb for precision
- Create a two-strand twist with each section, twisting from root to tip with consistent tension
- Once the twist is complete, wrap it around itself to form a Bantu knot against the scalp
- Secure each knot with a small elastic band or bobby pin to prevent loosening
- Allow the style to set completely, preferably overnight or for several hours
- Carefully unravel each knot and twist, working from the ends toward the roots
- Gently separate the curls with your fingers or a wide-tooth comb for added volume
- Seal with a light natural oil to enhance shine and reduce frizz throughout the day
9. Protective Pin Curls
Protective pin curls offer a vintage-inspired approach to low-manipulation styling that creates beautiful curl definition while protecting your hair ends.
This technique involves curling small sections of hair around your finger and pinning them close to the scalp.
The method provides excellent curl formation with minimal heat or manipulation damage.
- Begin with clean, conditioned hair that’s about 70-80% dry for optimal curl formation
- Apply a lightweight mousse or curl-defining cream throughout your hair for hold
- Section your hair into small, uniform squares using a fine-tooth comb
- Take each section and wrap it around your index finger from tip to root
- Carefully slide the curl off your finger and pin it flat against your scalp
- Use bobby pins or clip pins to secure each curl in place without disturbing the shape
- Cover with a silk scarf and allow the curls to set for several hours or overnight
- Remove the pins carefully, starting from the back and working toward the front
- Gently finger-style the curls to blend them together and create your desired look
- This technique can create curls that last 3-5 days with minimal refreshing needed
10. Low Tension Goddess Braids
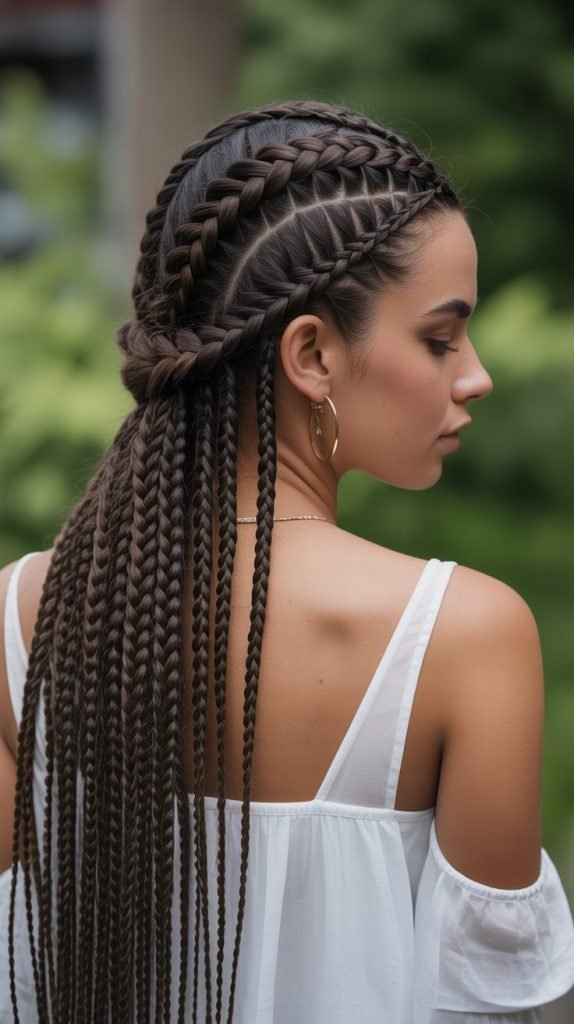
Low tension goddess braids provide an elegant protective style that minimizes stress on your hairline and scalp.
This technique uses larger sections of hair and looser braiding tension to create beautiful, flowing braids.
The style offers excellent length retention while maintaining a sophisticated appearance suitable for professional and social settings.
- Start with clean, detangled hair that’s been moisturized with leave-in conditioner
- Section your hair into 4-8 large sections depending on your desired number of braids
- Begin each braid with minimal tension at the roots to prevent hairline stress
- Use the traditional three-strand braiding technique, maintaining loose, comfortable tension
- Add small amounts of natural oil or butter to your palms while braiding for slip
- Braid each section down to the ends, securing with silk or satin hair ties
- Focus on keeping the braids neat but not overly tight to prevent breakage
- Sleep with a satin scarf or pillowcase to maintain the style and reduce friction
- Refresh weekly by applying a light oil mixture to your scalp and the length of the braids
- This style can be maintained for 2-4 weeks with proper care and maintenance
11. Twist and Tuck Updo
The twist and tuck updo combines the protection of twisted hair with the elegance of an updo style.
This technique involves creating multiple twists throughout your hair and artfully tucking them into a sophisticated updo shape.
The style keeps your ends protected while creating a polished look perfect for professional settings or special occasions.
- Begin with moisturized, detangled hair that’s been treated with leave-in conditioner
- Section your hair into 6-8 medium sections using clean, precise parts
- Create loose two-strand twists with each section, maintaining minimal tension
- Start tucking and pinning the twists into an updo shape, beginning with the back sections
- Use bobby pins that match your hair color to secure each twist in place
- Tuck the ends of each twist under and pin them securely to prevent exposure
- Smooth any flyaways with a small amount of natural gel or edge control product
- Mist lightly with water and oil mixture to add shine and maintain moisture
- This style can last 3-5 days with minimal touch-ups and proper nighttime protection
12. Stretched Braid Out Technique
The stretched braid out technique focuses on elongating your natural curl pattern while maintaining moisture and definition.
This method uses loose braiding on damp hair to create gentle stretching without heat damage.
The technique reduces shrinkage while preserving your hair’s natural texture and promoting length retention.
- Start with freshly washed hair that’s been deep conditioned and detangled thoroughly
- Apply a generous amount of leave-in conditioner and natural oil for moisture retention
- Section your hair into 6-10 large sections depending on your hair density and length
- Create loose three-strand braids with each section, avoiding tight tension at the roots
- Braid down to about 2 inches from the ends, leaving some length unbraided
- Allow your hair to air dry completely, which may take 6-8 hours or overnight
- Carefully unbraid each section from the bottom up, using gentle finger movements
- Gently separate and fluff the waves with your fingers or a wide-tooth comb
- Apply a light natural oil to seal the cuticles and add shine to the finished style
- This technique can create a style that lasts 3-4 days with minimal daily manipulation
13. Protective Space Buns
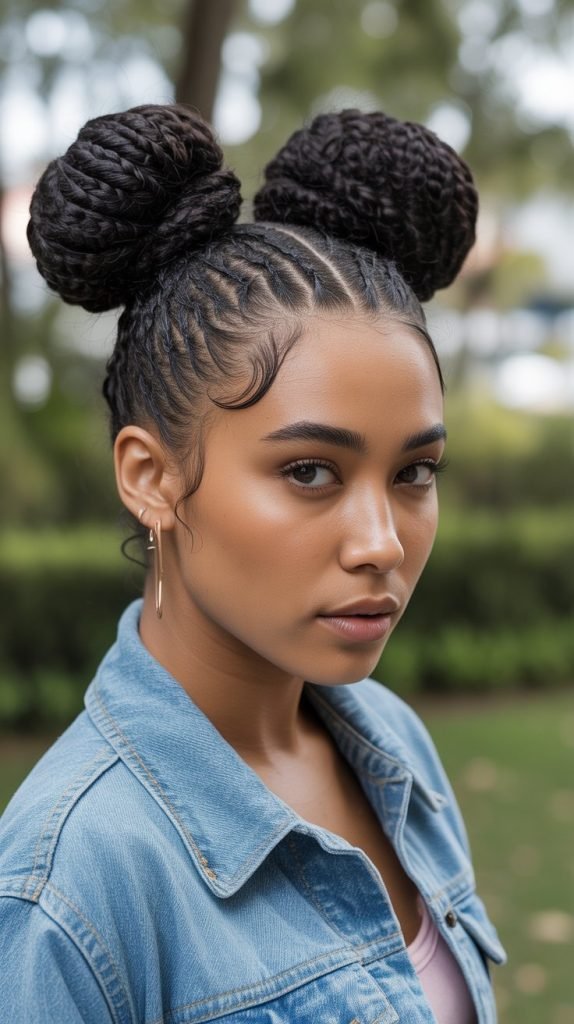
Protective space buns offer a playful yet practical approach to natural hair care, keeping your hair secured in two high buns.
This style distributes the weight of your hair evenly and keeps your ends tucked away safely.
The technique works well for medium to long natural hair and can be adapted for both casual and dressy occasions.
- Begin with detangled hair that’s been moisturized with your preferred leave-in conditioner
- Create a clean center part from your forehead to the nape of your neck
- Section each side of your head from the ear up, creating two high ponytails
- Secure each ponytail with a silk or satin scrunchie to prevent breakage
- Twist each ponytail loosely and wrap it around the base to form a bun
- Secure each bun with bobby pins, ensuring the ends are tucked safely inside
- Use a small amount of edge control product to smooth any flyaways around the hairline
- Sleep with a satin scarf or bonnet to maintain the style overnight
- Refresh daily by misting lightly with water and reapplying edge control as needed
- This style can be maintained for 2-3 days before requiring a complete restyle
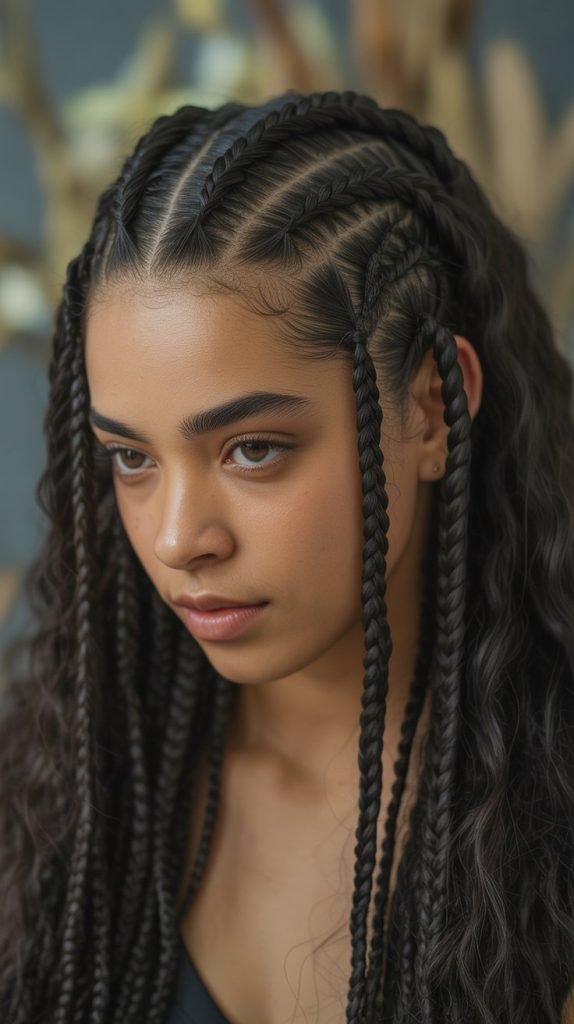
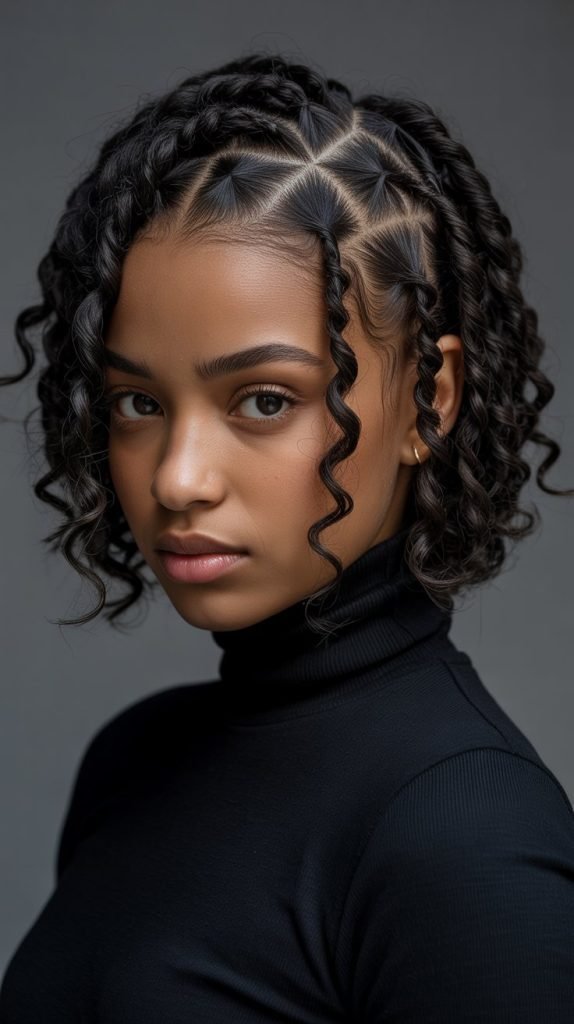
14. Low Manipulation Cornrow Base
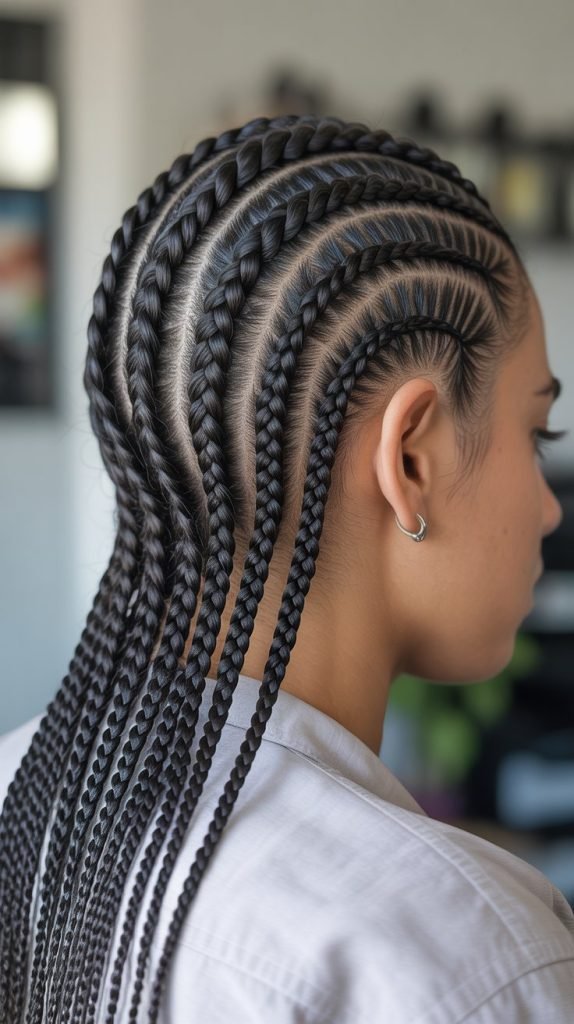
The low manipulation cornrow base creates a foundation for protective styling while keeping your natural hair growth pattern intact.
This technique involves creating loose cornrows that serve as a base for extensions or can be worn alone.
The method provides excellent scalp access for moisturizing while protecting your hair from environmental damage.
- Start with freshly washed and deep conditioned hair that’s been completely detangled
- Apply a moisturizing leave-in conditioner and natural oil blend throughout your hair
- Create systematic parts using a rat-tail comb, planning your cornrow pattern in advance
- Begin braiding each cornrow with minimal tension, focusing on neatness rather than tightness
- Braid close to the scalp, incorporating hair as you move along each part
- Secure the ends of each cornrow with small elastic bands or bobby pins
- Apply a light oil to your scalp and the length of the cornrows for moisture
- Sleep with a satin scarf or pillowcase to maintain the style and reduce friction
- Refresh weekly by applying oil to your scalp and misting the braids lightly with water
- This base can be maintained for 2-4 weeks depending on your hair growth rate
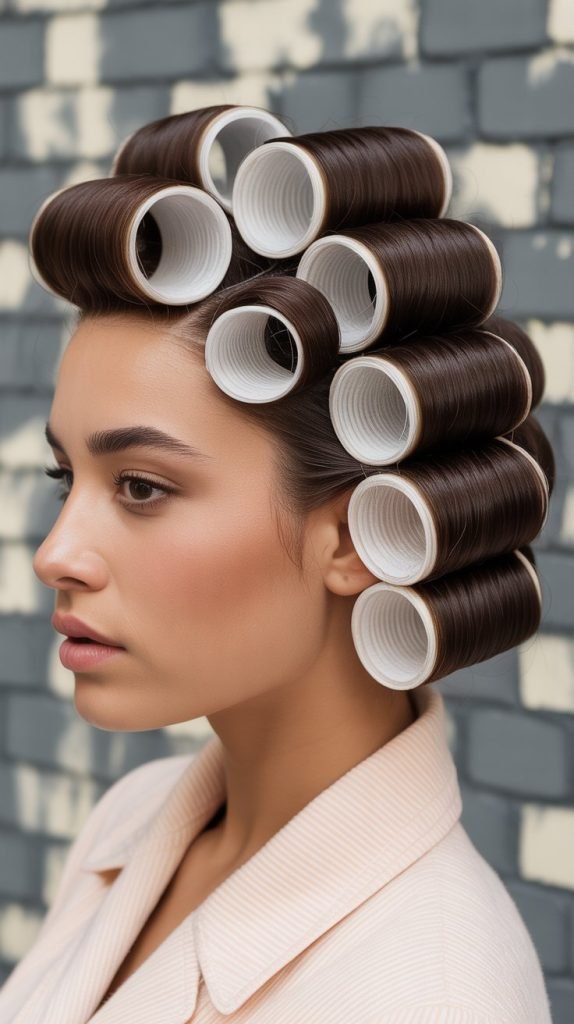
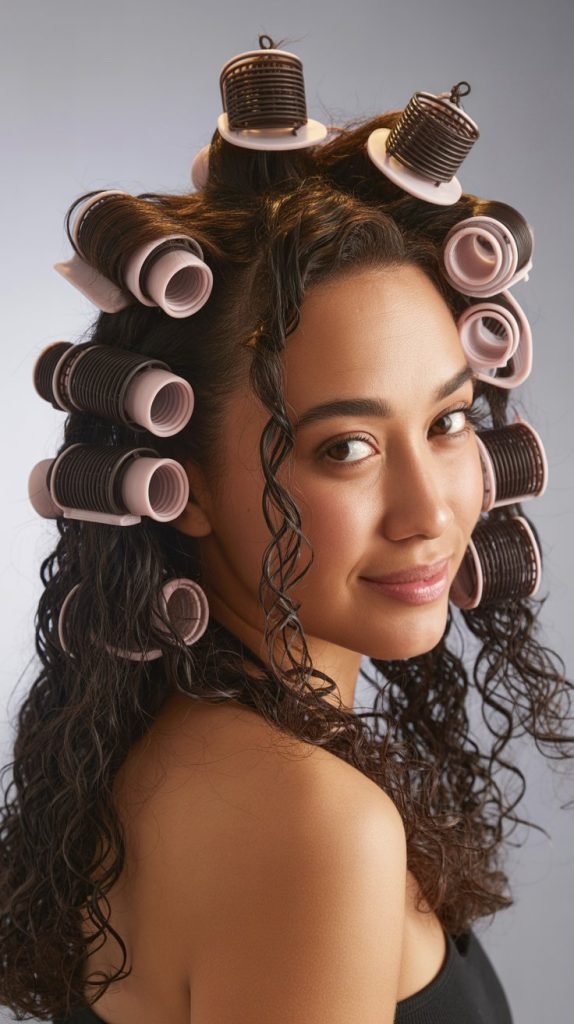
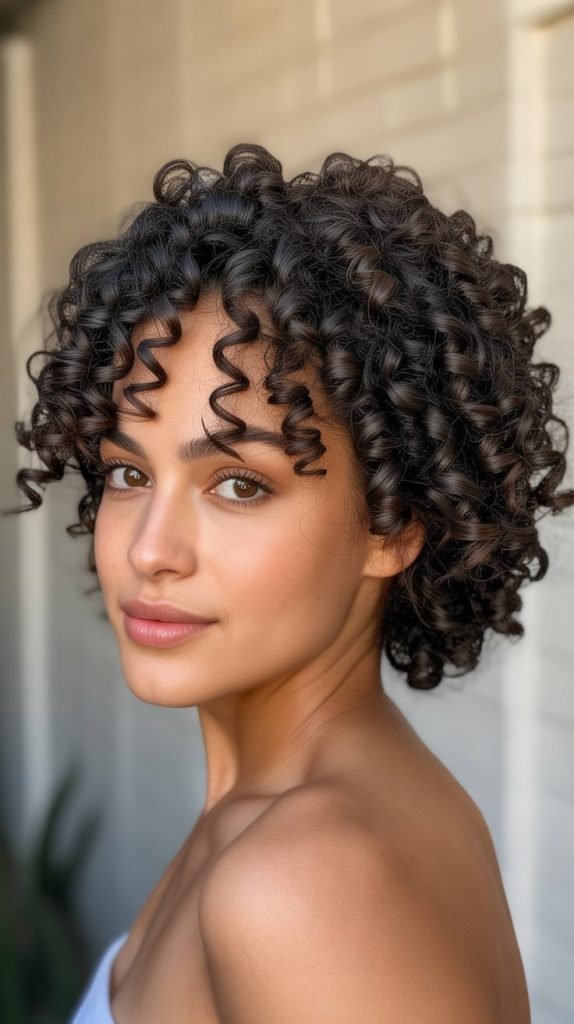
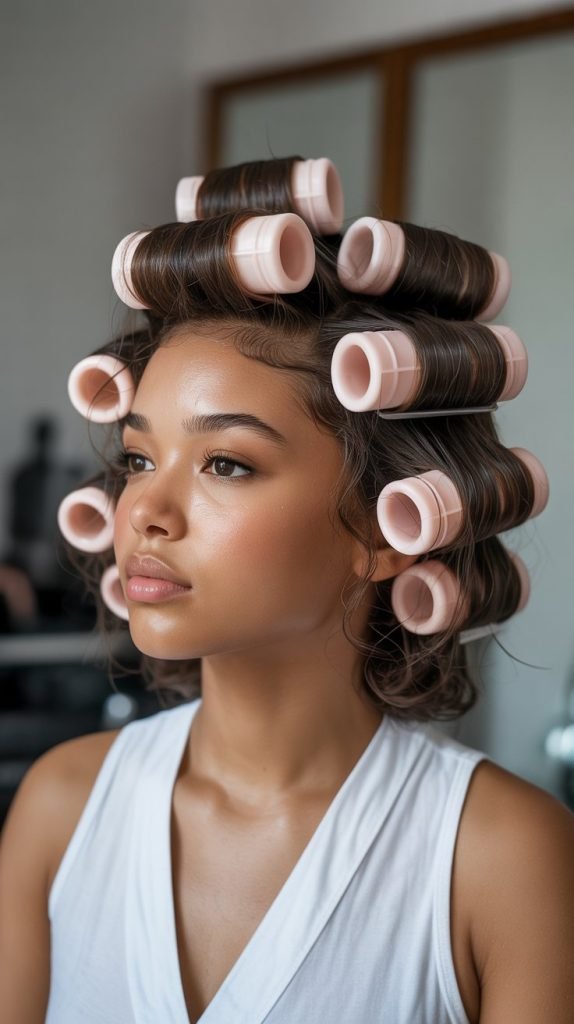
15. Gentle Roller Set Technique

The gentle roller set technique uses foam rollers or flexi-rods to create beautiful curls without heat damage.
This method allows you to achieve salon-quality results while maintaining your hair’s moisture and integrity.
The technique works exceptionally well on natural hair that’s been properly moisturized and prepared.
- Begin with clean, deep-conditioned hair that’s about 80% dry for optimal curl formation
- Apply a volumizing mousse or curl-defining cream throughout your hair for hold
- Section your hair into uniform squares that match the size of your chosen rollers
- Take each section and comb it smooth before wrapping it around the roller
- Roll each section from ends to roots, ensuring even tension and smooth wrapping
- Secure each roller according to the manufacturer’s instructions
- Allow your hair to dry completely, either air drying or using a hooded dryer on low heat
- Remove the rollers carefully, starting from the bottom and working upward
- Gently finger-style the curls or use a wide-tooth comb to create your desired look
- This technique can create curls that last 4-7 days with proper nighttime maintenance
16. Protective French Braid Crown
The protective French braid crown creates an elegant, regal appearance while keeping your hair safely contained.
This technique involves French braiding around the perimeter of your head, creating a beautiful crown effect.
The style provides excellent protection for your hairline and ends while maintaining a sophisticated look.
- Start with slightly damp, detangled hair that’s been treated with leave-in conditioner
- Create a deep side part and begin the French braid from the heavier side
- Take a small section at the hairline and divide it into three parts for braiding
- Begin braiding while gradually incorporating small sections of hair from along the hairline
- Continue braiding around the perimeter of your head, maintaining consistent tension
- Focus on keeping the braid close to the scalp for a neat, polished appearance
- When you complete the circle, continue braiding the remaining length without adding hair
- Tuck the end of the braid under the beginning section and secure with bobby pins
- Apply a light mist of water and oil mixture to maintain moisture and add shine
- This style can last 5-7 days with proper care and nighttime protection
17. Twisted Protective Ponytail
The twisted protective ponytail combines the elegance of twists with the convenience of a ponytail style.
This technique involves creating multiple twists throughout your hair and gathering them into a single ponytail.
The method provides excellent length retention while keeping your ends protected and your style looking polished.
- Begin with clean, moisturized hair that’s been detangled with a wide-tooth comb
- Section your hair into 8-12 medium sections using systematic parting
- Create loose two-strand twists with each section, maintaining minimal root tension
- Allow the twists to air dry completely if your hair was damp during styling
- Gather all the twists at your desired ponytail height using gentle hands-only gathering
- Secure the ponytail with a silk or satin scrunchie to prevent breakage
- Wrap a small section of hair around the elastic to hide it and create a polished look
- Apply a light natural oil to the twists for shine and moisture retention
- Sleep with a satin scarf or pillowcase to maintain the style’s integrity
- This style can be maintained for 3-5 days with minimal daily manipulation required
18. Low Manipulation Flexi-Rod Set
The low manipulation flexi-rod set creates beautiful, bouncy curls with minimal heat and chemical damage.
This technique uses flexible foam rods to set your hair in perfect curl formations.
The method allows for customizable curl sizes and provides long-lasting results with proper application and care.
- Start with clean, deep-conditioned hair that’s been properly detangled
- Apply a curl-defining cream or mousse throughout damp hair for hold and definition
- Section your hair into uniform squares that correspond to your desired curl size
- Take each section and comb it smooth, ensuring even product distribution
- Wrap each section around a flexi-rod from ends to roots, maintaining consistent tension
- Bend the flexi-rod to secure it in place without additional clips or pins
- Allow your hair to dry completely, preferably overnight or under a hooded dryer
- Remove the flexi-rods carefully by unbending them and sliding them out gently
- Separate and fluff the curls with your fingers to create volume and movement
- Seal with a light natural oil to enhance shine and reduce frizz throughout the wear
19. Protective Flat Twist Updo
The protective flat twist updo combines the benefits of flat twisting with the elegance of an updo style.
This technique creates twists that lie flat against the scalp before being gathered into a sophisticated updo formation.
The style provides maximum protection while maintaining a polished, professional appearance.
- Begin with freshly washed hair that’s been deep conditioned and completely detangled
- Apply a moisturizing leave-in conditioner and styling gel for hold and shine
- Create systematic parts throughout your hair, planning your flat twist pattern
- Begin each flat twist at the hairline, keeping the twists close to the scalp
- Continue flat twisting until you reach the crown area, then transition to regular twisting
- Gather all the twisted sections at the crown and begin forming your updo shape
- Pin each twist securely in place, tucking the ends under to protect them
- Use bobby pins that match your hair color for a seamless, professional appearance
- Apply a light mist of water and oil to maintain moisture and add shine
- This style can last 4-6 days with proper nighttime protection and minimal manipulation
20. Gentle Twist and Pin Style
The gentle twist and pin style offers a versatile approach to protective styling that can be adapted for various occasions.
This technique involves creating loose twists throughout your hair and pinning them in artistic arrangements.
The method provides excellent protection while allowing for creative expression in your styling choices.
- Start with moisturized, detangled hair that’s been treated with leave-in conditioner
- Section your hair into 6-10 medium sections depending on your hair density
- Create loose two-strand twists with each section, focusing on minimal tension
- Begin pinning the twists in your desired arrangement, starting with the back sections
- Use bobby pins strategically to create shape and dimension in your style
- Tuck the ends of each twist under and secure them to prevent exposure to elements
- Apply a small amount of natural gel or edge control to smooth any flyaways
- Mist lightly with a water and oil mixture to maintain moisture levels
- Sleep with a satin scarf or bonnet to preserve the style overnight
- Refresh daily by adjusting pins and applying light moisture as needed
21. Low Tension Dutch Braids
Low tension Dutch braids provide a stunning protective style that creates dimension and visual interest while maintaining hair health.
This technique involves braiding hair under rather than over, creating a raised braid effect.
The method emphasizes gentle tension to prevent hairline stress while achieving beautiful, long-lasting results.
- Begin with clean, detangled hair that’s been moisturized with leave-in conditioner
- Create clean parts to section your hair into your desired number of Dutch braids
- Start each braid with a small section at the hairline, dividing it into three parts
- Begin braiding by crossing the outer sections under the middle section instead of over
- Gradually incorporate hair from each side as you continue braiding down
- Maintain gentle, consistent tension to prevent stress on your hairline and scalp
- Braid each section completely down to the ends and secure with silk hair ties
- Apply a light natural oil to the braids and scalp for moisture retention
- Sleep with a satin scarf or pillowcase to maintain the style and reduce friction
- This style can be maintained for 1-2 weeks with proper care and weekly oil treatments
22. Protective Puff Variations
Protective puff variations offer quick, versatile styling options that keep your hair gathered safely while showcasing your natural texture.
These techniques involve creating different puff styles that protect your ends while allowing your hair’s natural beauty to shine.
The methods can be adapted for various hair lengths and densities.
- Start with hair that’s been refreshed with a water and leave-in conditioner mixture
- Gently detangle your hair using your fingers or a wide-tooth comb
- Choose your puff placement – high, low, side, or multiple puffs depending on preference
- Use a silk or satin scrunchie to gather your hair at the desired location
- Avoid pulling too tightly to prevent tension on your hairline and crown
- Fluff and shape your puff with your fingers to achieve your desired volume
- Apply a small amount of natural oil or butter to add shine and moisture
- Use edge control product to smooth your hairline if desired
- Sleep with a satin scarf or bonnet to maintain the puff’s shape overnight
- Refresh daily by misting with water and reshaping as needed
23. Twisted Crown with Low Bun
The twisted crown with low bun combines two protective techniques to create an elegant, sophisticated style.
This method involves creating twists around the crown area while gathering the remaining hair into a low, protective bun.
The technique provides excellent protection for your hairline while maintaining a polished appearance.
- Begin with clean, conditioned hair that’s been properly detangled throughout
- Section the crown area of your hair from ear to ear, creating a horseshoe shape
- Create loose two-strand twists with the crown section, working from one ear to the other
- Secure the twisted crown with bobby pins that match your hair color
- Gather the remaining hair at the nape of your neck using gentle hand movements
- Twist the gathered hair loosely and wrap it into a low bun formation
- Secure the bun with bobby pins, ensuring all ends are tucked safely inside
- Apply a light natural oil to add shine and maintain moisture levels
- Sleep with a satin scarf to protect both the twisted crown and the low bun
- This style can last 3-5 days with minimal daily manipulation and proper care
24. Gentle Curlformer Set
The gentle curlformer set uses specialized spiral tools to create beautiful, defined curls without heat damage.
This technique allows you to achieve consistent curl patterns throughout your hair while maintaining moisture and minimizing manipulation.
The method works exceptionally well for creating special occasion styles that last for several days.
- Start with clean hair that’s been deep conditioned and is about 70% dry
- Apply a curl-defining product throughout your hair for hold and definition
- Section your hair into uniform squares that match the size of your curlformers
- Thread each section through a curlformer using the provided hook tool
- Ensure each section is smooth and evenly distributed within the curlformer
- Allow your hair to dry completely, either air drying or using a hooded dryer on low
- Remove the curlformers carefully by gently sliding them out of each curl
- Separate the curls gently with your fingers to create volume and movement
- Apply a light natural oil to seal the cuticles and enhance shine
- This technique creates curls that can last 5-7 days with proper maintenance
25. Low Manipulation Wash and Twist
The low manipulation wash and twist technique combines the benefits of a wash and go with the added definition of twisting.
This method enhances your natural curl pattern while providing structure through strategic twisting.
The technique minimizes daily manipulation while maximizing moisture retention and curl definition.
- Begin with freshly cleansed hair using a sulfate-free shampoo and deep conditioner
- Apply leave-in conditioner to soaking wet hair using the prayer hands method
- Distribute a curl-defining gel or cream throughout your hair with scrunching motions
- Section your hair into 6-8 large sections while it’s still very wet
- Twist each section loosely from root to tip, maintaining the curl clumps
- Allow your hair to air dry completely without touching or manipulating it further
- Once dry, gently separate the twists to create volume while maintaining definition
- Apply a light natural oil to reduce frizz and add shine to the finished style
- Sleep on a satin pillowcase or with a satin bonnet to preserve the curl pattern
- Refresh daily with a light mist of water and leave-in conditioner as needed
26. Protective Rope Twist Style
The protective rope twist style creates beautiful texture and visual interest while keeping your hair safely contained.
This technique involves twisting two sections of hair around each other in the same direction, creating a rope-like appearance.
The method provides excellent length retention while offering a unique alternative to traditional two-strand twists.
- Start with clean, moisturized hair that’s been detangled with a wide-tooth comb
- Apply a leave-in conditioner and natural oil blend for slip and moisture retention
- Section your hair into medium-sized squares using clean, precise parting
- Take each section and divide it into two equal parts for the rope twisting process
- Twist both sections in the same direction (clockwise), then wrap them around each other
- Continue the rope twisting motion down to the ends, maintaining consistent tension
- Secure each rope twist with a small elastic band or natural butter on the ends
- Sleep with a satin scarf or bonnet to maintain the style and reduce friction
- Refresh weekly by applying a light oil mixture to your scalp and twist lengths
- This style can be maintained for 2-4 weeks with proper care and maintenance routines
27. Flat Twist Pin-Up Style
The flat twist pin-up style combines vintage elegance with modern protective styling techniques.
This method involves creating flat twists that are then pinned up into sophisticated formations.
The technique keeps your ends protected while creating a polished look suitable for professional settings or special occasions.
- Begin with freshly washed and deep conditioned hair that’s been completely detangled
- Apply a moisturizing leave-in conditioner and styling gel for hold and definition
- Create systematic flat twists throughout your hair, keeping them close to the scalp
- Once you reach the crown area, begin pinning the flat twists into updo formations
- Use bobby pins that match your hair color to secure each twist in place
- Create height and dimension by pinning some twists higher than others
- Tuck all ends securely under the pinned sections to protect them from damage
- Apply a light mist of water and oil mixture to maintain moisture and add shine
- Sleep with a satin scarf to protect the intricate pin-up formation
- This style can last 4-6 days with careful maintenance and proper nighttime protection
28. Protective Medusa Clipping
The protective Medusa clipping technique uses small clips to section and protect your hair while creating an artistic, sculptural appearance.
This method involves clipping small sections of twisted or braided hair throughout your head.
The technique provides excellent protection while allowing for creative expression and easy maintenance.
- Start with clean, detangled hair that’s been moisturized with leave-in conditioner
- Section your hair into small to medium squares throughout your entire head
- Create loose two-strand twists or small braids with each sectioned area
- Use small, colorful clips to secure each twisted or braided section upward
- Vary the heights and directions of the clipped sections for artistic effect
- Ensure all ends are clipped securely to prevent exposure to environmental damage
- Apply a light natural oil to the exposed hair sections for moisture and shine
- Sleep with a satin scarf, being careful not to disturb the clipped sections
- Refresh by adjusting clips and applying light moisture as needed daily
- This creative style can be maintained for 3-5 days with proper care
29. Low Tension Fishbone Braids
Low tension fishbone braids create a stunning protective style with intricate visual appeal while maintaining hair health.
This technique uses a four-strand braiding method that creates a distinctive fishbone pattern.
The method emphasizes gentle tension to prevent breakage while achieving beautiful, professional-looking results.
- Begin with clean, well-conditioned hair that’s been thoroughly detangled
- Apply a moisturizing leave-in conditioner and light styling gel for hold
- Section your hair into the desired number of fishbone braids using clean parts
- Divide each section into four equal strands for the fishbone braiding technique
- Cross the outer strands over the inner strands alternately to create the fishbone pattern
- Maintain gentle, consistent tension throughout the braiding process
- Continue the pattern down to the ends and secure with silk hair ties
- Apply a light natural oil to the braids and scalp for moisture retention
- Sleep with a satin scarf or pillowcase to protect the intricate braid pattern
- This style can be maintained for 1-3 weeks with proper care and weekly oil treatments
30. Twisted Rosette Updo
The twisted rosette updo creates an elegant, floral-inspired protective style perfect for special occasions.
This technique involves creating twists that are then wound into rosette shapes and pinned strategically around the head.
The method provides excellent protection while creating a sophisticated, romantic appearance.
- Start with moisturized, detangled hair that’s been treated with leave-in conditioner
- Section your hair into 6-8 medium sections using systematic parting
- Create loose two-strand twists with each section, maintaining minimal root tension
- Take each completed twist and wind it into a rosette shape against your scalp
- Secure each rosette with bobby pins, ensuring the shape is maintained
- Arrange the rosettes artistically around your head for visual balance
- Tuck all twist ends securely under the rosettes to protect them from damage
- Apply a light natural oil or shine serum to enhance the overall appearance
- Sleep with a silk scarf to protect the delicate rosette formations
- This elegant style can last 3-5 days with careful maintenance and protection
31. Protective Zig-Zag Parting Style
The protective zig-zag parting style adds visual interest to traditional protective styles while maintaining hair health.
This technique involves creating zig-zag parts throughout your hair before styling into twists or braids.
The method helps prevent part line thinning while creating unique geometric patterns in your protective style.
- Begin with clean, detangled hair that’s been properly moisturized throughout
- Use a rat-tail comb to create zig-zag parts instead of straight lines
- Vary the size and angle of your zig-zag patterns for visual interest
- Create protective twists or braids following each zig-zag sectioned area
- Maintain gentle tension to prevent stress on the scalp and hairline
- Secure each twist or braid with appropriate hair ties or pins
- Apply a light natural oil to enhance shine and maintain moisture levels
- Sleep with a satin scarf to preserve the unique parting patterns
- Refresh weekly by applying oil to the scalp and adjusting any loose sections
- This creative styling approach can be maintained for 2-4 weeks with proper care
32. Gentle Steam Roller Set
The gentle steam roller set uses the power of steam to create beautiful curls without excessive heat damage.
This technique involves using steam rollers on damp hair to achieve salon-quality curl formation.
The method provides long-lasting results while maintaining your hair’s moisture balance and overall health.
- Start with clean hair that’s been deep conditioned and is about 80% dry
- Apply a heat protectant and curl-defining product throughout your hair
- Section your hair into uniform squares that match your roller sizes
- Set each section on a steam roller according to the manufacturer’s instructions
- Allow the steam rollers to work for the recommended time without rushing the process
- Remove the rollers carefully once your hair is completely dry and set
- Gently finger-style the curls or use a wide-tooth comb for your desired look
- Apply a light natural oil to seal the cuticles and enhance shine
- Sleep with a satin scarf or bonnet to maintain the curl formation overnight
- This technique creates long-lasting curls that can be maintained for 5-7 days
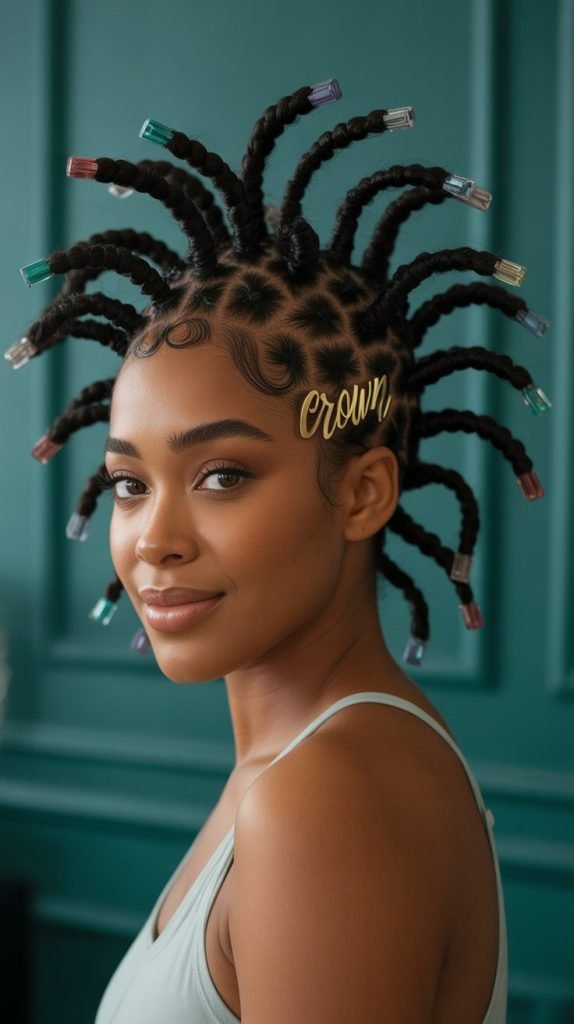
33. Multi-Directional Twist Crown
The multi-directional twist crown creates a stunning protective style that incorporates twists going in various directions around the crown area.
This technique adds dimension and visual interest while providing excellent protection for your most fragile hair areas.
The method combines artistry with practicality for a truly unique protective style.
- Begin with freshly washed and conditioned hair that’s been thoroughly detangled
- Apply a moisturizing leave-in conditioner and light styling gel for hold
- Section the crown area of your hair into various triangular and curved shapes
- Create two-strand twists with each section, directing them in different angles
- Vary the direction of each twist to create a dynamic, flowing crown pattern
- Secure each twist with bobby pins, allowing some to cross over others artistically
- Focus on creating height and dimension while maintaining gentle tension
- Apply a light natural oil to enhance shine and maintain moisture balance
- Sleep with a satin scarf to protect the intricate multi-directional pattern
- This artistic style can be maintained for 4-6 days with proper care and protection
Conclusion
Embracing 33 Gorgeous Low-Manipulation Natural Hairstyles to Reduce Breakage opens up a world of protective styling possibilities that prioritize your hair’s health without sacrificing beauty.
These carefully curated techniques offer solutions for every hair type, length, and lifestyle, ensuring that you can maintain stunning looks while promoting optimal hair growth.
The journey to healthy natural hair requires patience, consistency, and the right techniques, all of which are provided in this comprehensive guide.
By incorporating these low-manipulation methods into your routine, you’ll experience reduced breakage, improved moisture retention, and the confidence that comes with beautifully maintained natural hair.
Remember that protective styling is not just about the immediate aesthetic appeal, but about creating a sustainable approach to hair care that supports your long-term hair health goals.