34 Small DIY Wood Projects for Beginners is your ideal starting point for exploring woodworking without overwhelming complexity.
Each project is designed to be manageable, requiring minimal tools and materials—perfect for weekend makers and hobbyists.
You’ll find a variety of practical, stylish, and fun builds, ranging from home décor to useful gadgets, all crafted to build your confidence and skills step by step.
Let’s dive into these 34 Small DIY Wood Projects for Beginners and begin creating beautiful, handmade pieces right from your scrap wood pile or basic toolkit.
1. Simple Wooden Phone Stand
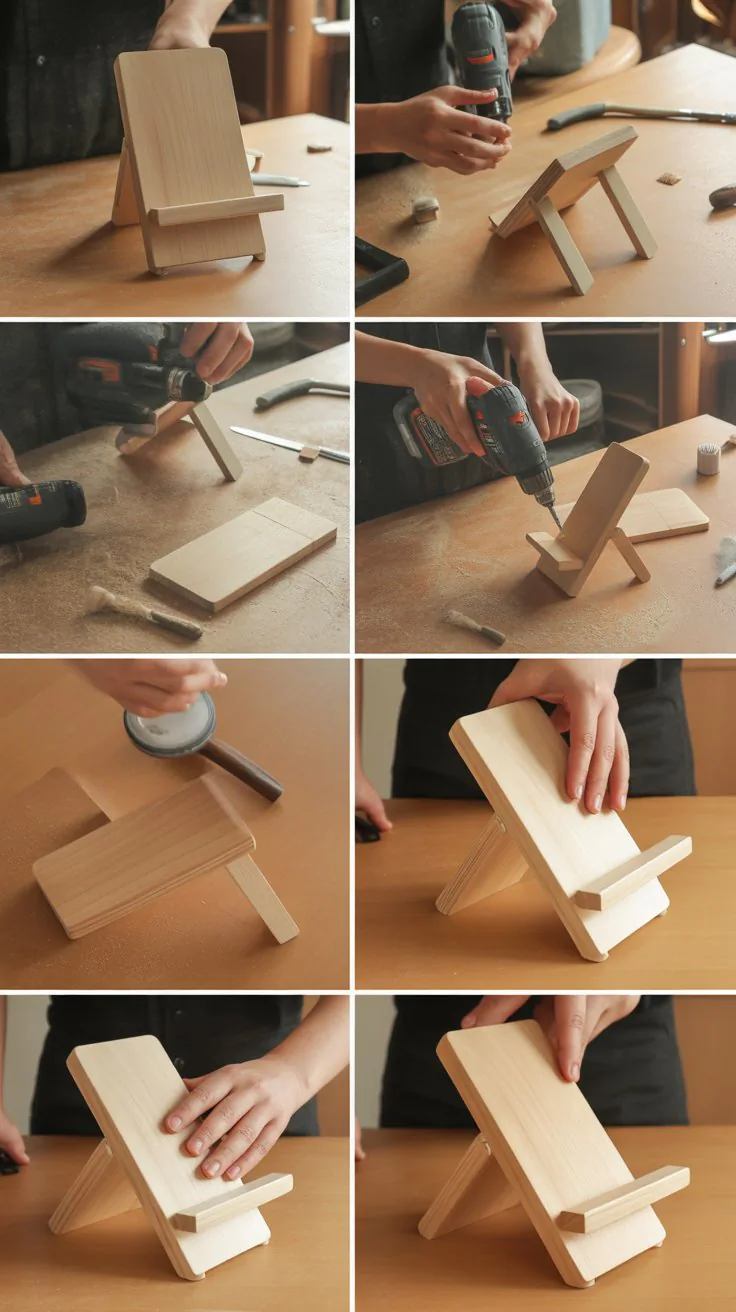
A compact and highly practical accessory for holding a phone upright—this quick project is perfect for mastering angled grooves.
- Choose a 3″ × 5″ hardwood scrap, about 3/4″ thick, for a sturdy base.
- Mark a groove across the width at a 15° angle, about 1/2″ deep and 1/4″ wide.
- Cut the groove using a table saw or router and sand all edges smooth.
- Apply a clear or tinted finish and attach rubber or felt pads underneath.
- Optional: Personalize with initials using woodburning or paint for a custom touch.
2. Rustic Tea-Light Holder
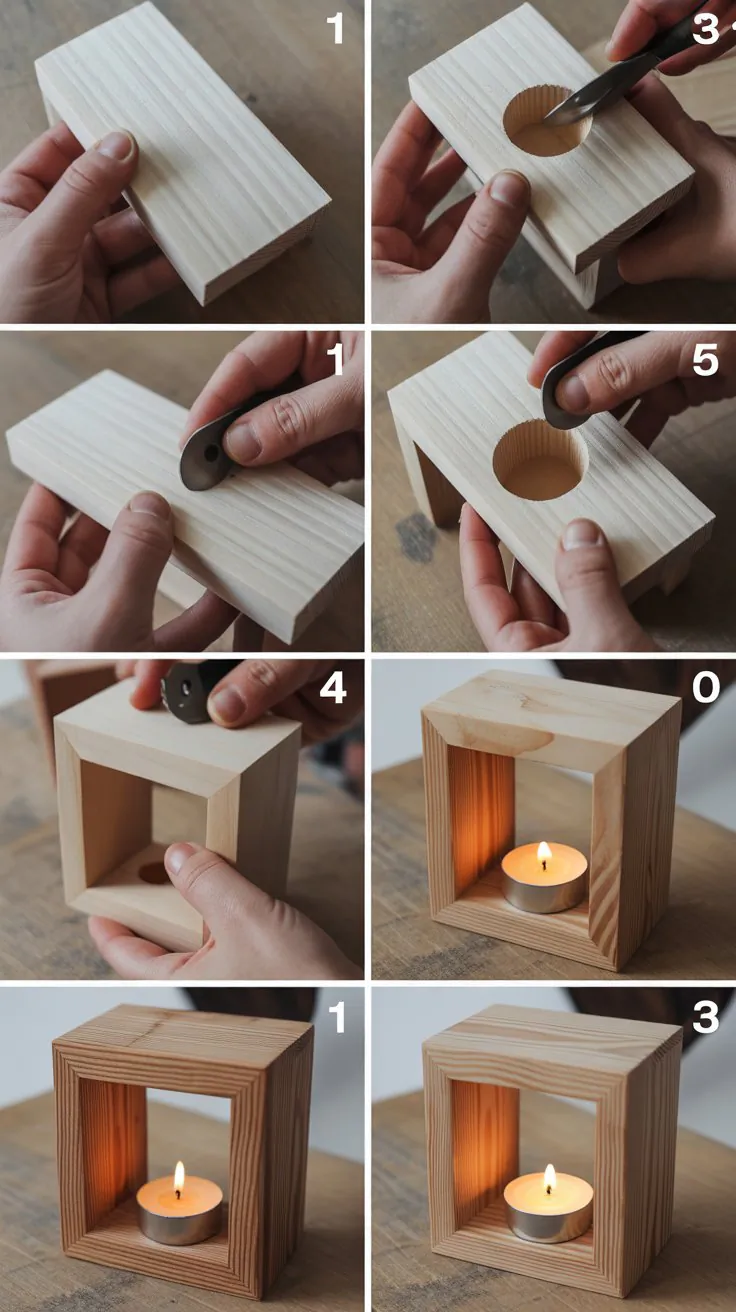
Add warm ambiance to any space with this charming tea-light holder, perfect for farmhouse, rustic, or cozy aesthetics.
- Cut scrap wood into 2″–3″ blocks, approximately 4″ tall.
- Drill a 1½″ recess, ½″ deep, centrally on top for tea-lights.
- Lightly sand edges for safety while preserving rustic texture.
- Stain the wood lightly or brush on matte sealant for low sheen.
- Optional: Group holders in varied heights for set-style appeal.
3. Easy Wooden Coasters
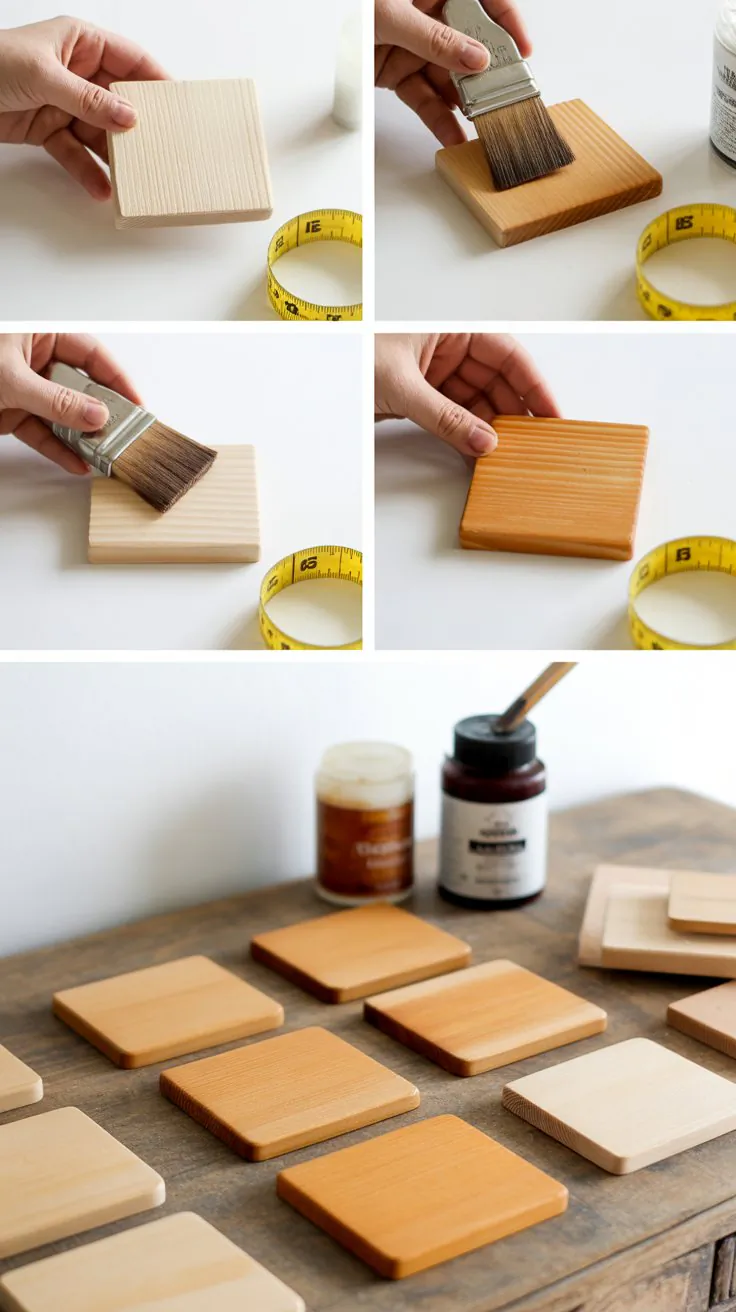
Stylish and functional, these personalized coasters are ideal for batch production and make lovely gift sets.
- Cut 4″ square pieces from ½″ hardwood (oak, cherry, walnut).
- Round the corners using a router or sander and smooth edges thoroughly.
- Customize with woodburning, paint, or resin inlay designs.
- Finish with food-safe mineral oil or polyurethane for protection.
- Bundle in sets of four and tie with twine or versatile coaster holders.
4. Mini Pallet Key Holder
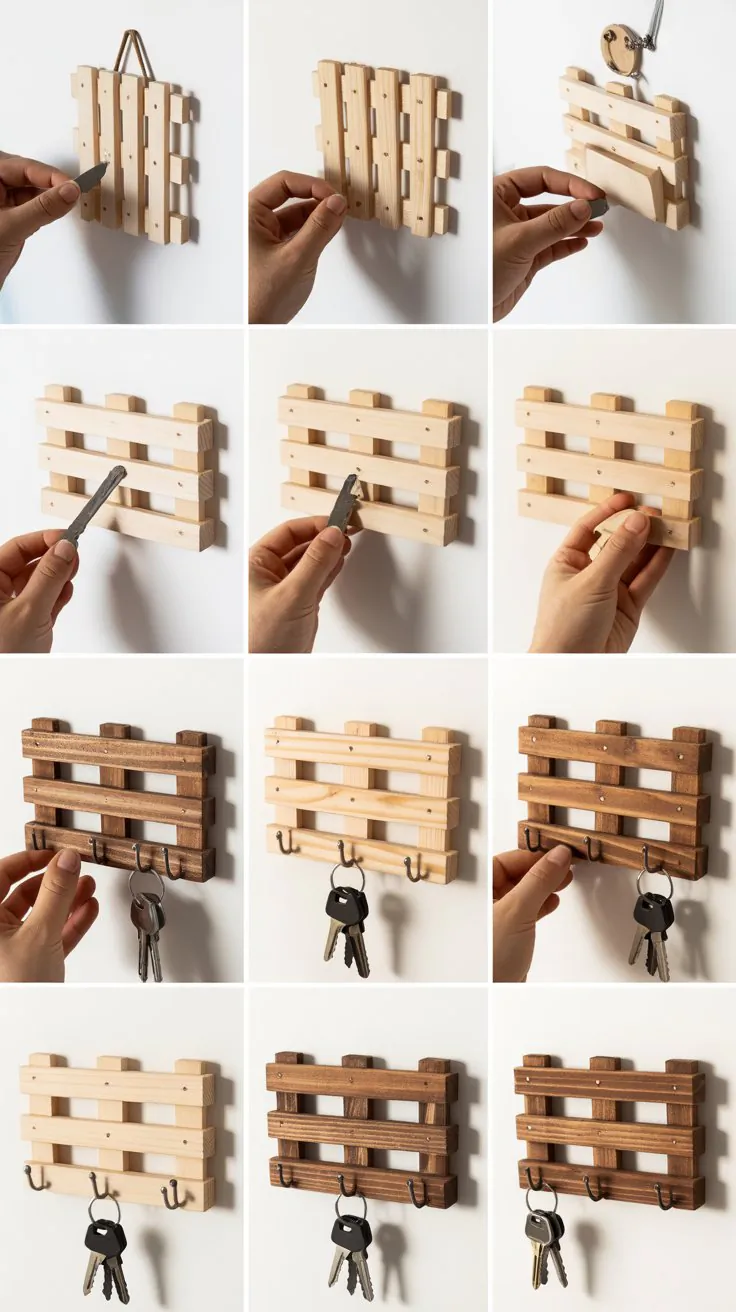
Upcycling rustic scrap into a trendy key rack, this piece combines aesthetic appeal with daily utility.
- Cut a small pallet-like board approximately 8″ × 5″ using narrow slats.
- Sand lightly to remove splinters but retain character.
- Add 4–5 hooks spaced along the bottom for keys.
- Attach hanging brackets on the back.
- Optional: Customize with vinyl lettering or hand-painted accents.
🧰 Tools & Materials Table
| Project | Scrap Size/Type | Basic Tools | Suggested Finish or Add-Ons |
|---|---|---|---|
| Phone Stand | 3″×5″ hardwood | Saw, router/sander | Polyurethane, felt pads, personalization |
| Rustic Tea-Light Holder | 2″–3″ wood blocks | Drill, sander | Matte sealant, varied-height sets |
| Wooden Coasters | 4″×4″ hardwood | Saw, router, sandpaper | Mineral oil, resin or burn designs |
| Mini Pallet Key Holder | 8″×5″ slat assembly | Saw, drill, sander | Hooks, paint, vinyl decals |
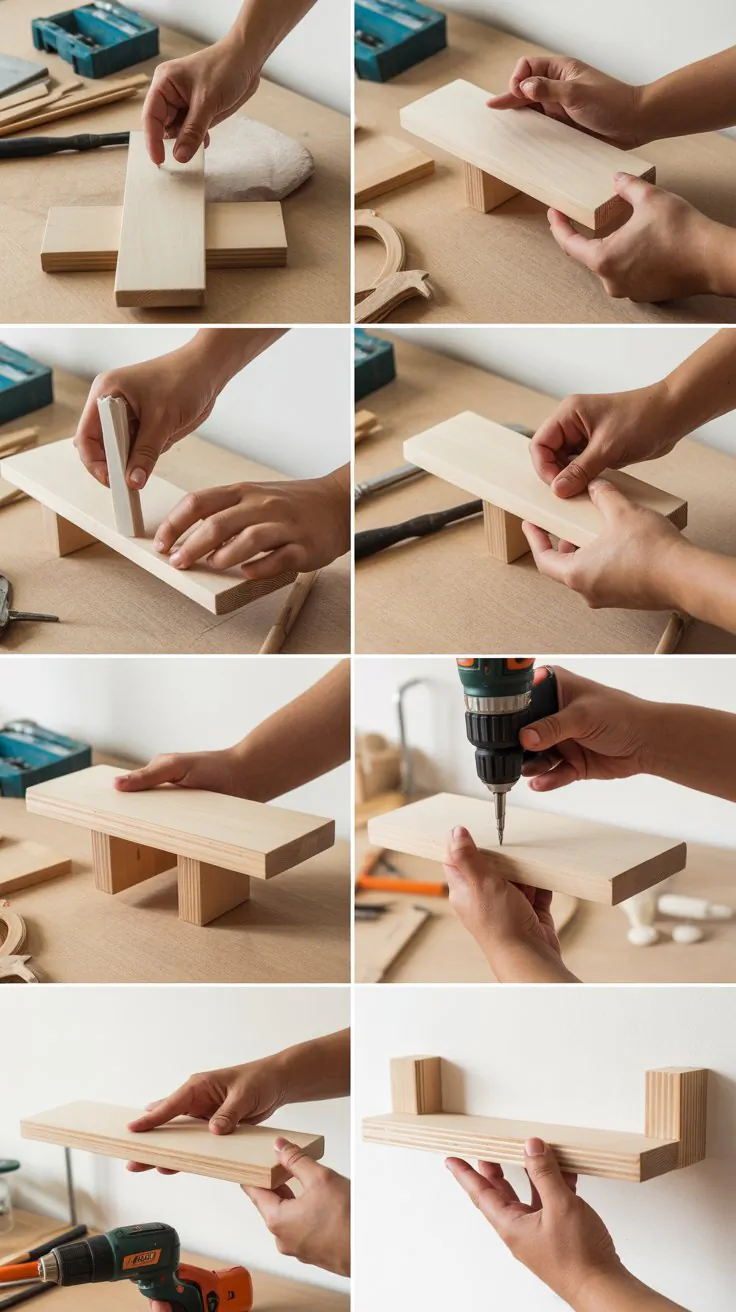
5. Floating Wall Shelf

This minimalist shelf enhances any room and offers a simple introduction to hidden bracket installations.
- Choose a flat scrap board around 12″ long and 4″ wide.
- Sand smooth and route or drill to install concealed floating hardware.
- Stain or paint to match décor.
- Mount securely on a wall using anchors and check for level.
- Tip: Offer paired shelves at different lengths for scalable bundles.
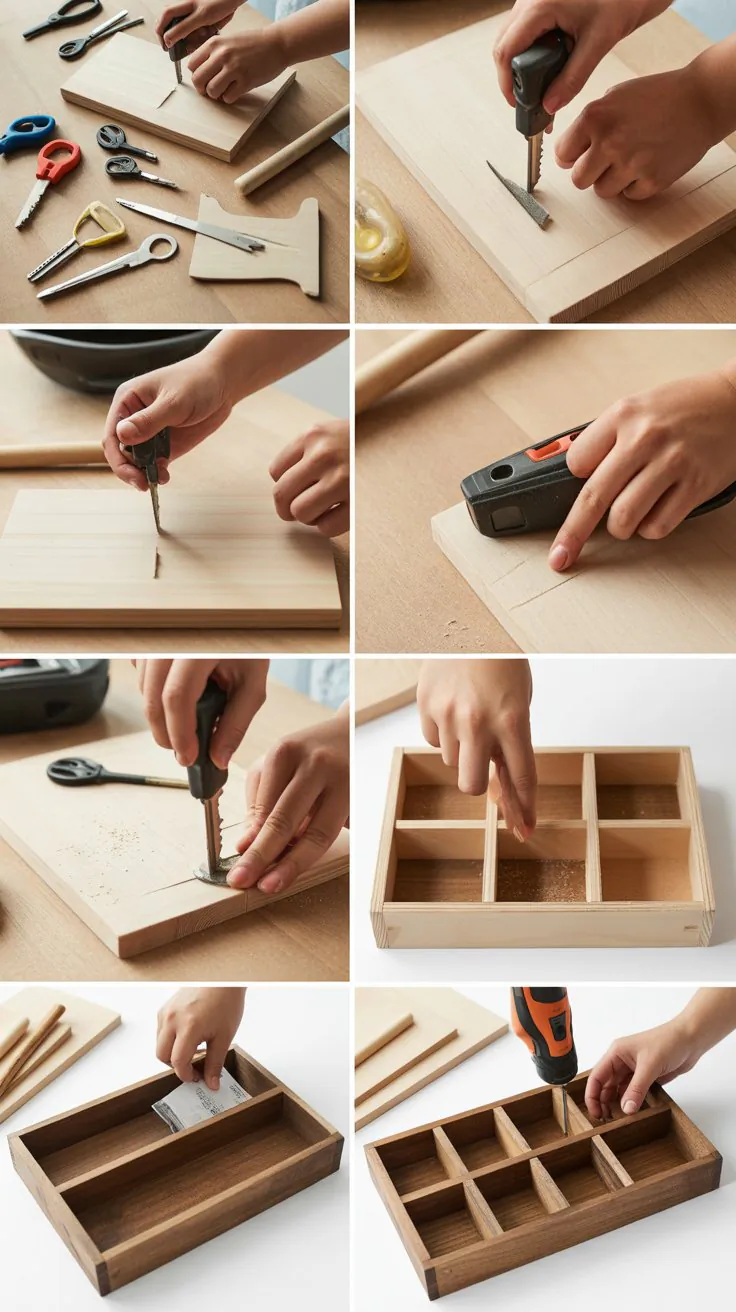
6. Wooden Desk Organizer Tray
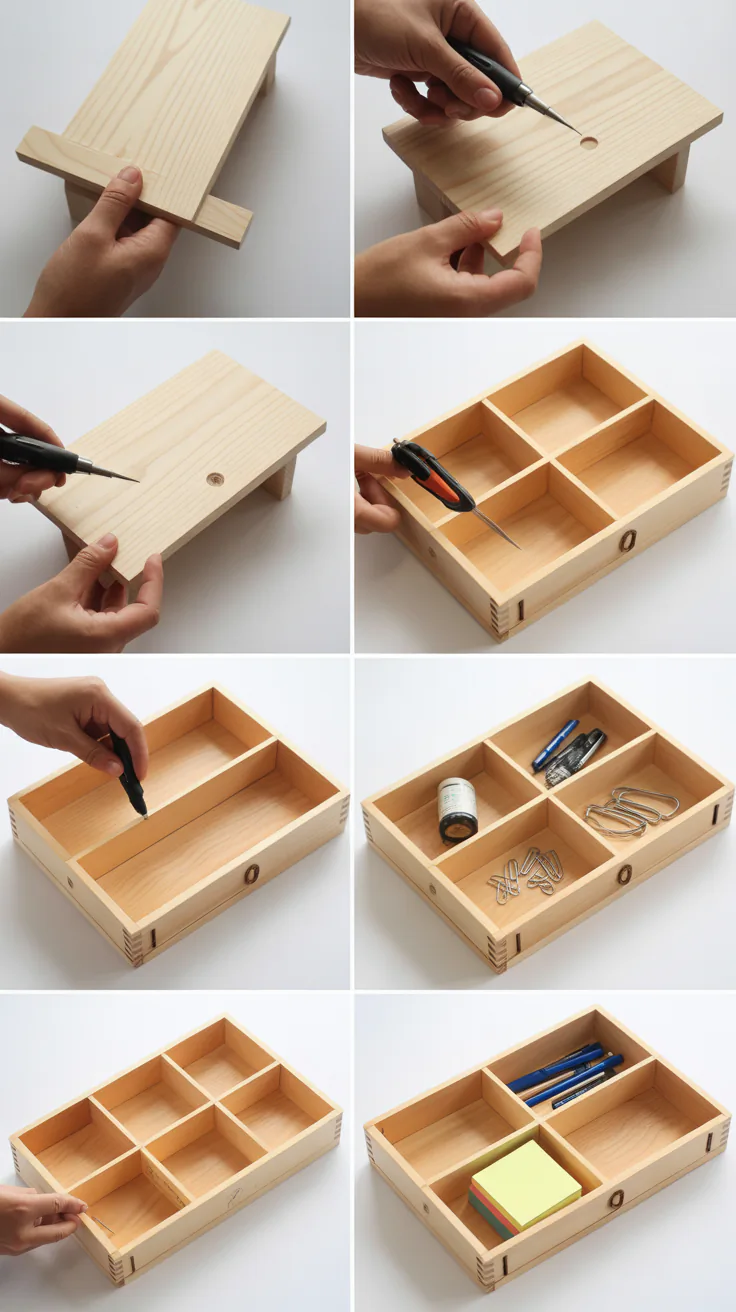
Maximize desktop tidiness with compartments crafted from scrap—ideal for holding pens, notes, and cables.
- Cut a base (10″×6″) and thinner dividers (1″–2″ wide).
- Arrange divider configuration, glue into place, and clamp firmly.
- Sand inside and outside to a uniform finish.
- Apply stain or clear coat and attach felt pads on the bottom.
7. Picture Frame with Easel Back

A versatile frames that can stand or hang on the wall—great for gifting and décor.
- Cut four mitered pieces for a 4″×6″ frame using a scrap board.
- Glue, clamp, and let dry; then sand joints smooth.
- Attach backing and install an easel or sawtooth hanger.
- Finish with stain, paint, or distressing; optionally personalize corners.
8. Wooden Tablet Stand

A helpful stand for kitchen reading or video calls, made using angled cuts for general stability.
- Cut a backboard (~10″×6″) and base (~10″×2″).
- Angle the base to around 15° and glue securely to the backing.
- Add a front lip (⅝″ tall) to hold the tablet.
- Sand smooth, finish with paint or varnish, and test angle stability.
9. Rustic Serving Tray
Perfect for breakfast in bed or decorative collections, this tray combines reclaimed charm with function.

- Use a 12″×8″ scrap board and cut matching side rails.
- Glue rails around the edges, clamp, and sand smooth.
- Add handles on lengths and seal with food-safe oil or varnish.
- Tip: Offer personalized etched initials for customers.
10. Jewelry Display Stand
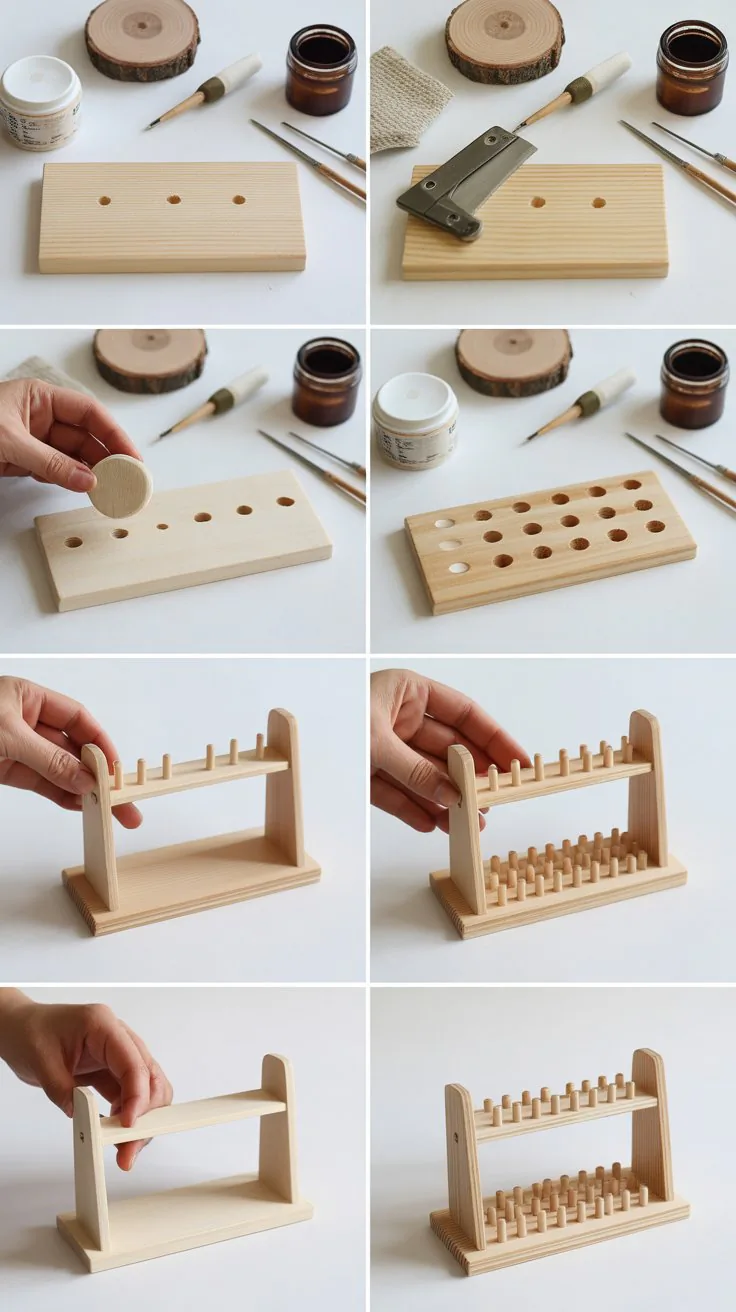
Display necklaces and earrings effectively with a sleek stand—easy to build with scrap wood.
- Cut a vertical board (~8″×2″) and a base (~4″×6″).
- Drill holes (⅛″–¼″) for earrings and add pegs/dowels for necklaces.
- Sand thoroughly; finish with clear coat or light stain.
- Secure vertical board into the base using wood glue and screws.
11. Key & Mail Tray
Combining two essential daily tools, this hybrid tray organizes keys and mail by the door.
- Cut a tray base (~8″×6″) with shallow walls (½″ tall).
- Install a row of small hooks on the front edge.
- Sand well and finish to match home décor.
- Add felt or cork lining to the tray for added interior protection.
12. Napkin Holder
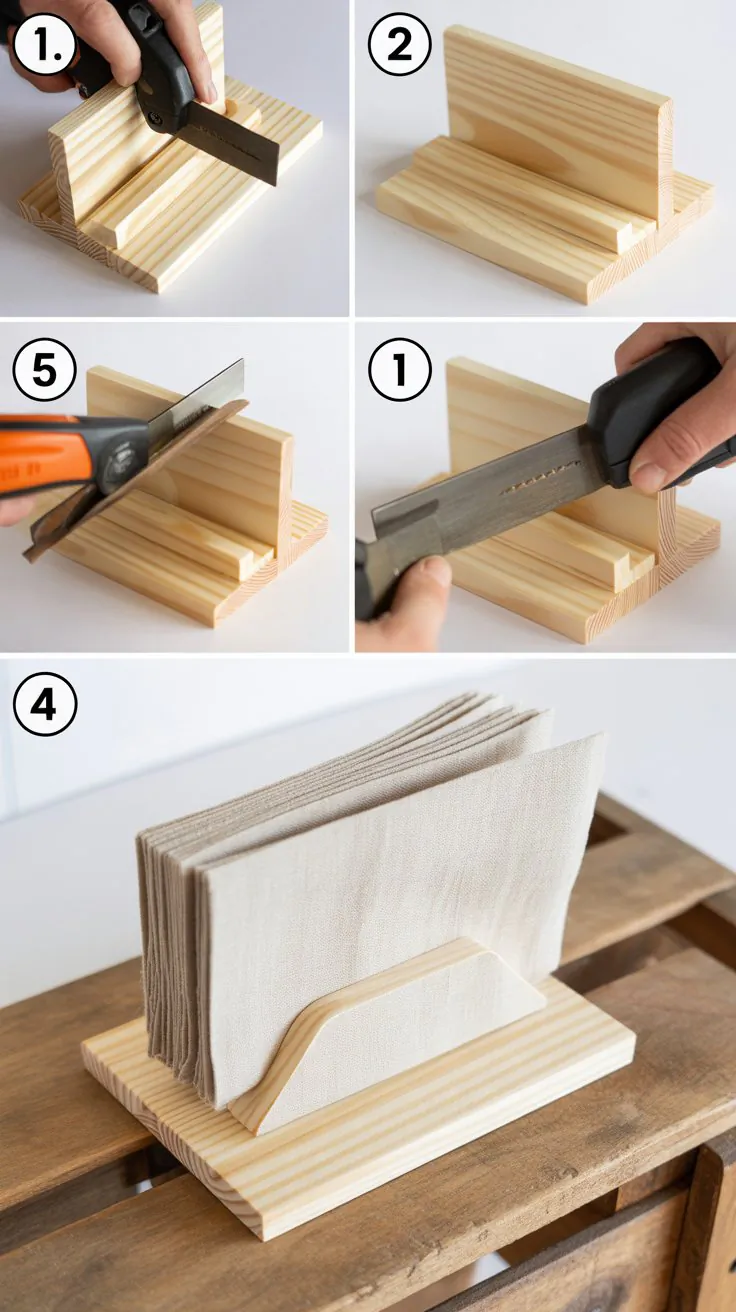
Simple design meets everyday function in this space-saving tabletop accessory.
- Cut two semi-circle side panels and a rectangular base.
- Glue sides to the base and clamp until dry.
- Sand edges, finish with stain or paint, and personalize with stencil details.
13. Floating Corner Shelf
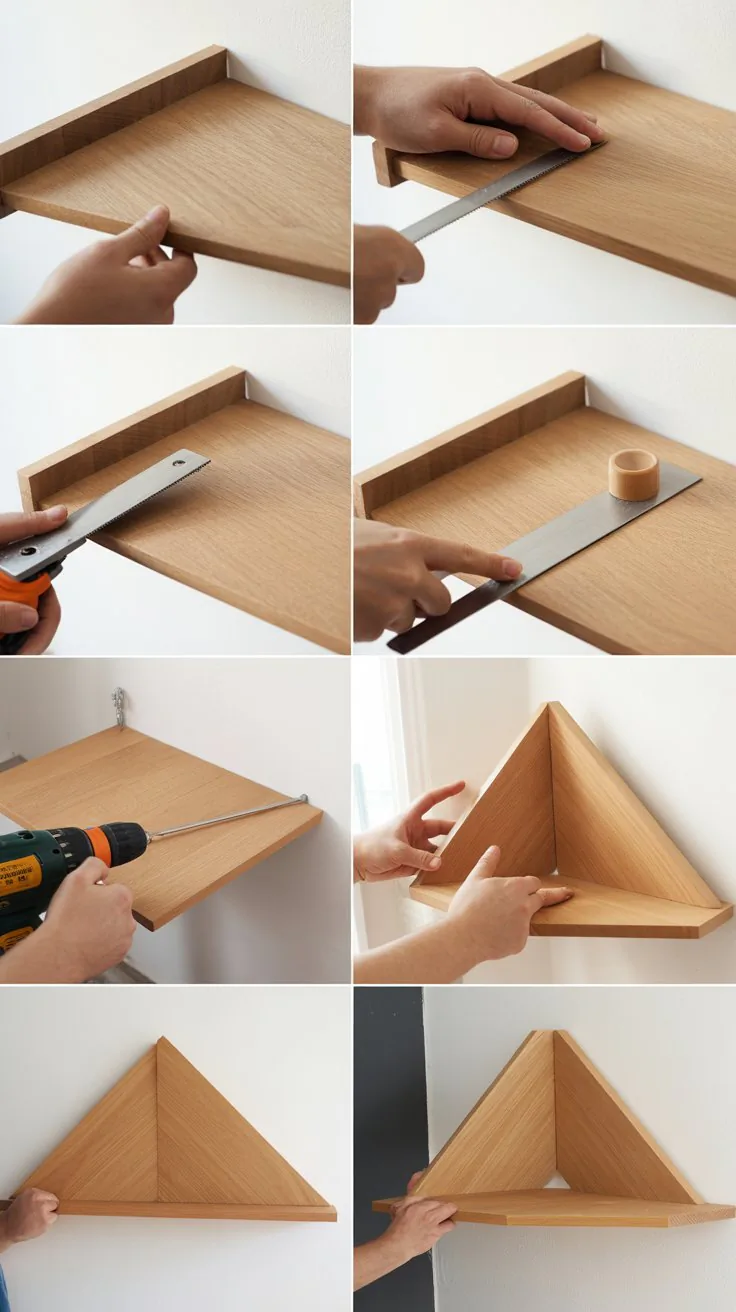
Optimize unused wall space using an L-shaped shelf with hidden brackets.
- Cut boards into a 90° angle, typically 8″ lengths.
- Sand edges clean and smooth; seal with stain or paint.
- Mount using hidden floating shelf brackets to create a clean, wall-hugging display.
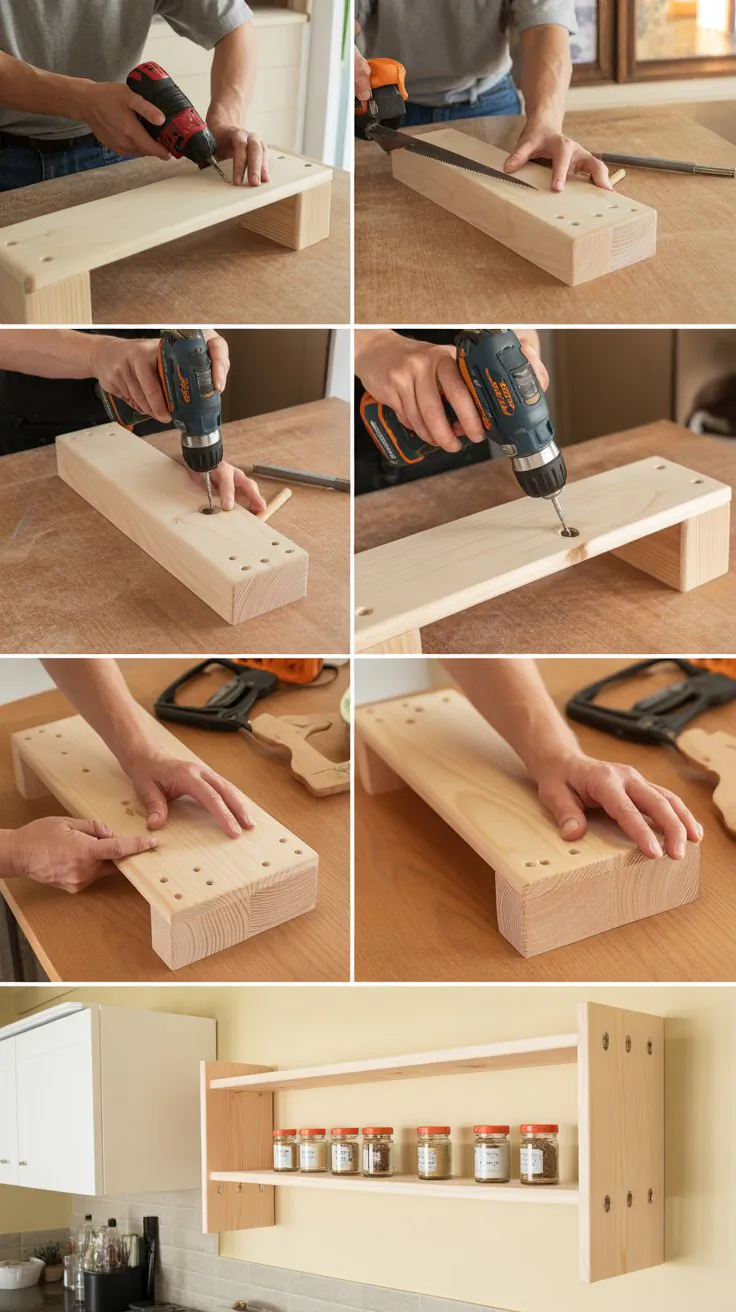
14. Spice Jar Display Rack
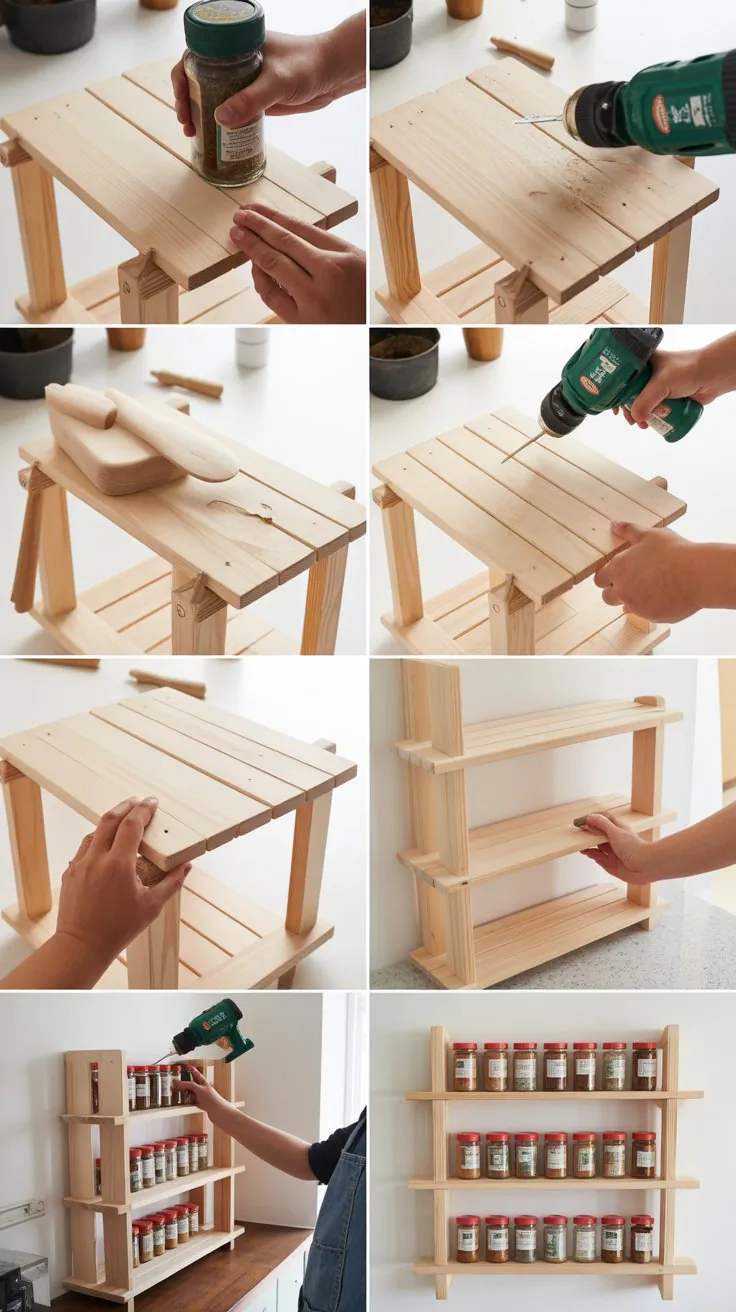
Stylish solution for kitchen countertops—easy to build with small shelves and spice jars.
- Cut a backboard (~10″×4″) and attach small horizontal ledges.
- Sand and finish; personalize with stenciled labels.
- Secure jars and optionally add magnetic backing for lids.
15. Wooden Bookmark Set

Lightweight and customizable, these bookmarks are a quick batch product for booklovers.
- Cut 2″×6″ slender boards; round corners neatly.
- Sand thoroughly; personalize each with woodburned designs.
- Tie ribbon or leather strips through a drilled top hole for charm.
16. Mini Chalkboard Sign

Ideal for menus, weddings, or kids’ rooms—simple to build and customize.
- Frame a small chalkboard-painted board with scrap molding.
- Attach easel back or hanging hardware.
- Sand, finish frame, and add decorative touches.
17. Small Jewelry Box
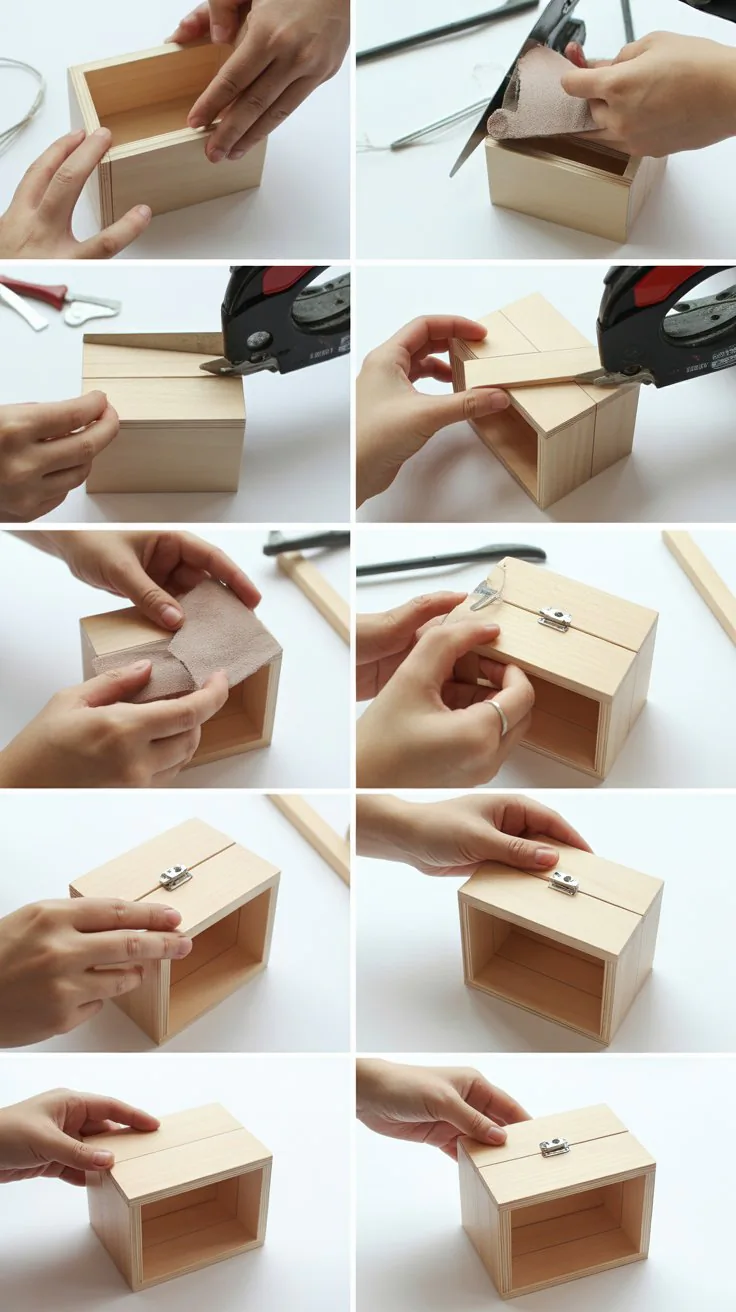
Add craftsmanship and functionality in a compact hinged box—great as keepsakes or gifts.
- Cut panels for base and lid; assemble using box joints or butt joints.
- Sand inside and out; add small hinge.
- Finish with stain or lacquer and optionally line interior with fabric.
18. Floating Picture Ledge
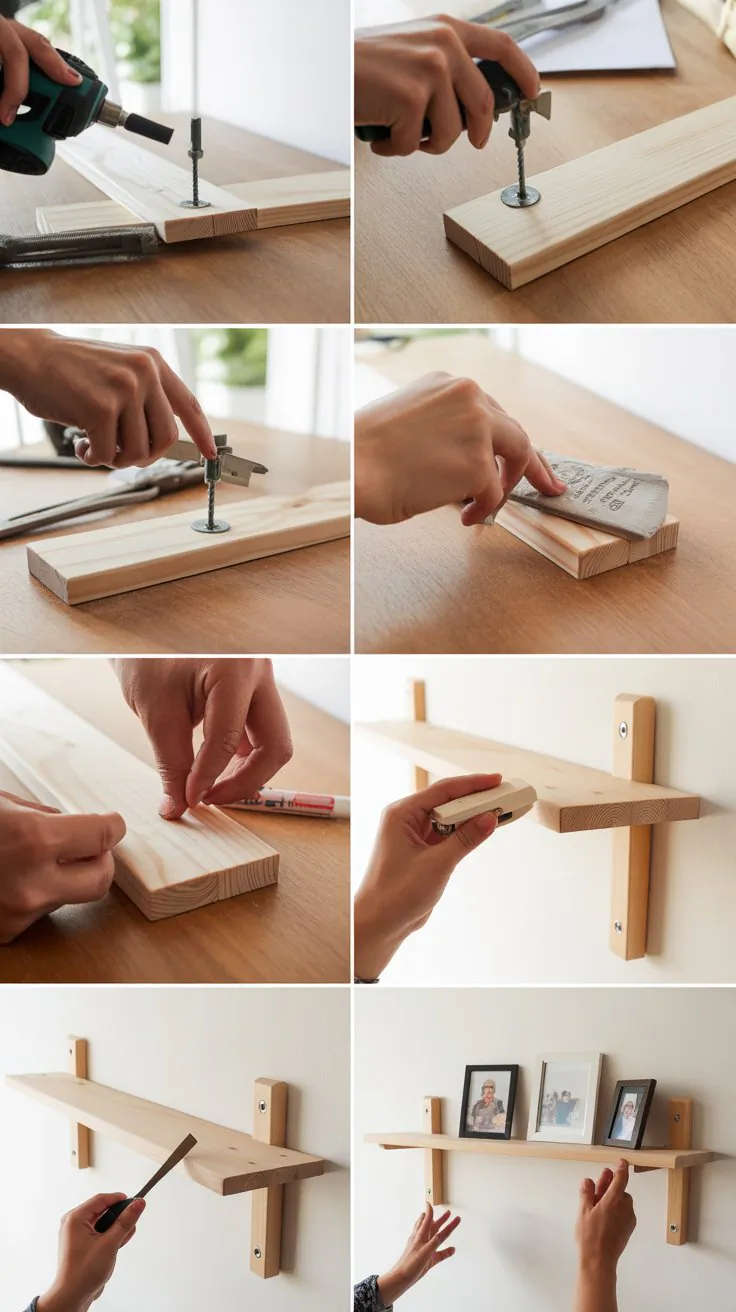
Versatile shelf that displays framed photos or small décor with minimal drill work.
- Cut a board (~20″×3″) and route a shallow front shelf groove.
- Sand edges, finish, and install using concealed ledge brackets.
- Arrange photos for visual appeal.
19. Wooden Pen/Pencil Holder
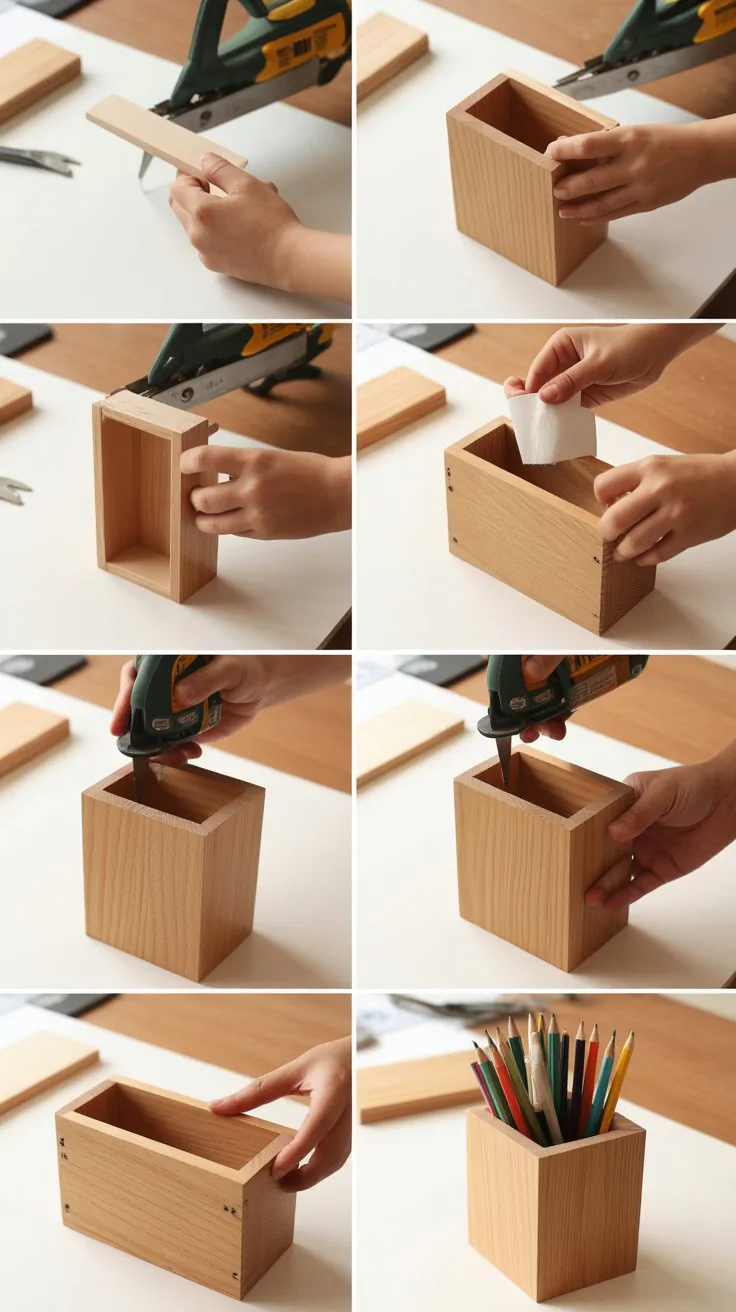
A must-have for desks, this holder can be made from scrap dowels or boards.
- Construct a square box (~3.5″) using dowels or plywood.
- Sand inside compartments smooth.
- Finish exterior; include optional personalized engraving or burned art.
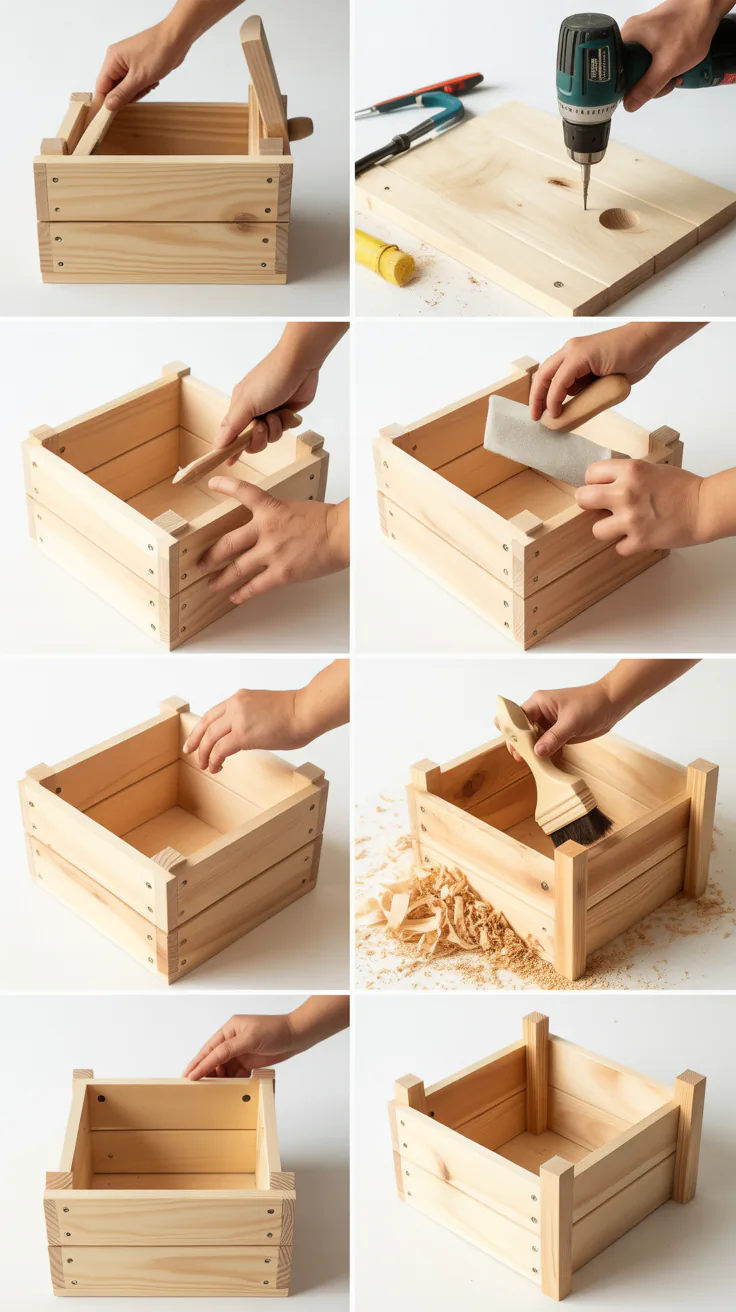
20. Small Toolbox Organizer
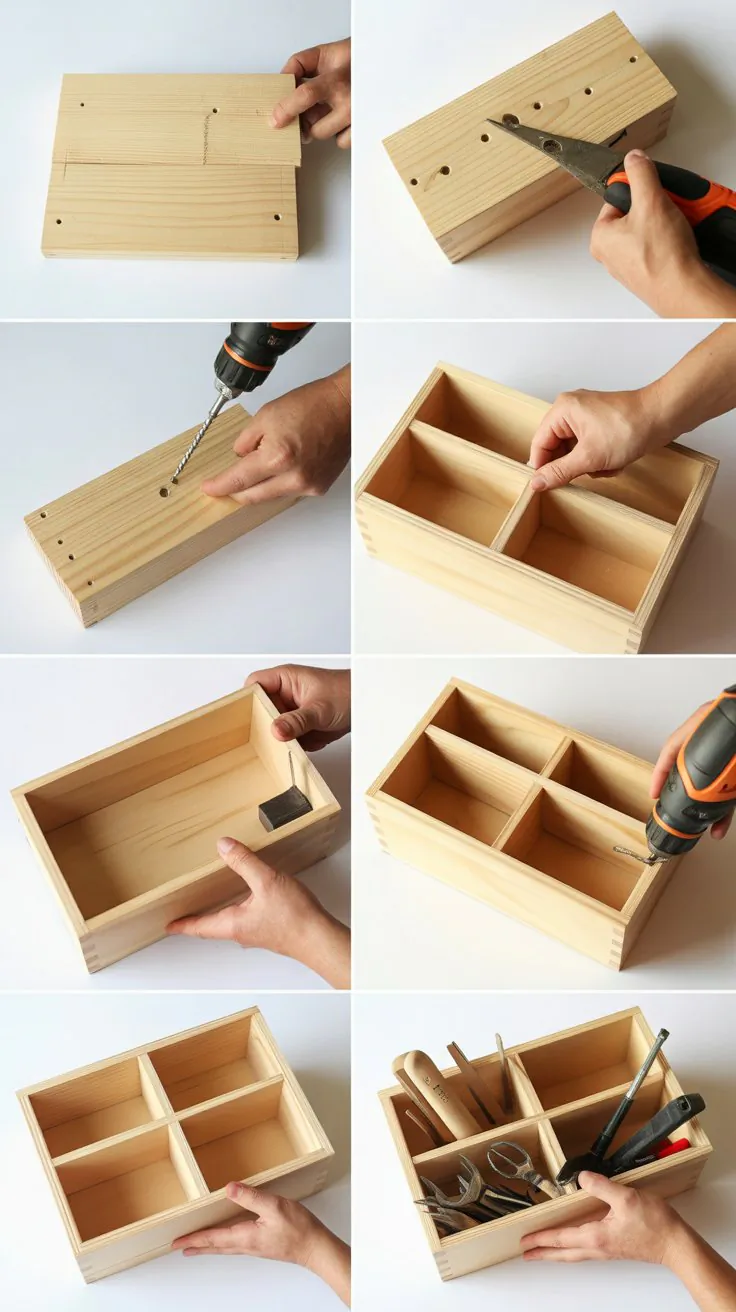
Handy for artists, gardeners, or kids, this little box is both practical and cute.
- Cut panels for sides and base; assemble using nails or screws.
- Add a dowel or strip handle across the top.
- Sand and finish—natural stain or paint both sell well.
21. Wooden Coaster Holder
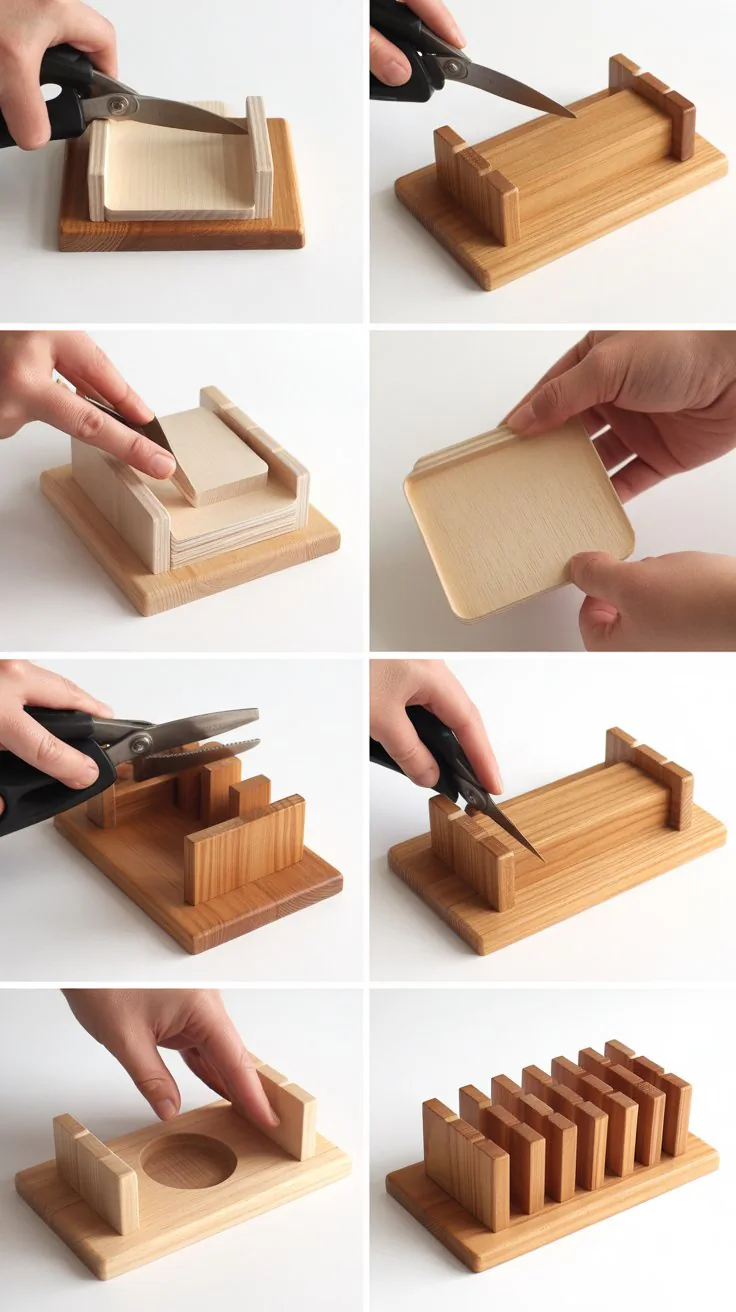
Pair this with coaster sets to increase value and presentation appeal.
- Cut a base (~5″×4″) and two side walls with coaster-width slots.
- Sand edges; glue sides to base.
- Finish with clear lacquer or stain and label fronts.
22. Floating Spice Shelf
Make kitchen storage functional and stylish with space-saving design.
- Cut shelf board (10″×4″).
- Sand thoroughly; finish with food-safe coating.
- Install using floating shelf brackets; optionally add spice jar labels.
23. Cute Plant Stand
Perfect for small potted plants—easy to assemble from low scrap with open slats.
- Cut circular or square top and attach small legs.
- Sand all surfaces; seal with exterior-grade finish.
- Optional: Paint accents to match plant pots.
24. Rustic Wood Slice Coasters

Bring natural charm into homes with organic wood slice coasters.
- Cut thin (~½″–¾″) wood rounds; remove bark if desired.
- Sand flat surfaces; apply waterproof sealant.
- Bundle and label with ribbon or craft cord.
25. DIY Hairpin-Leg Side Table
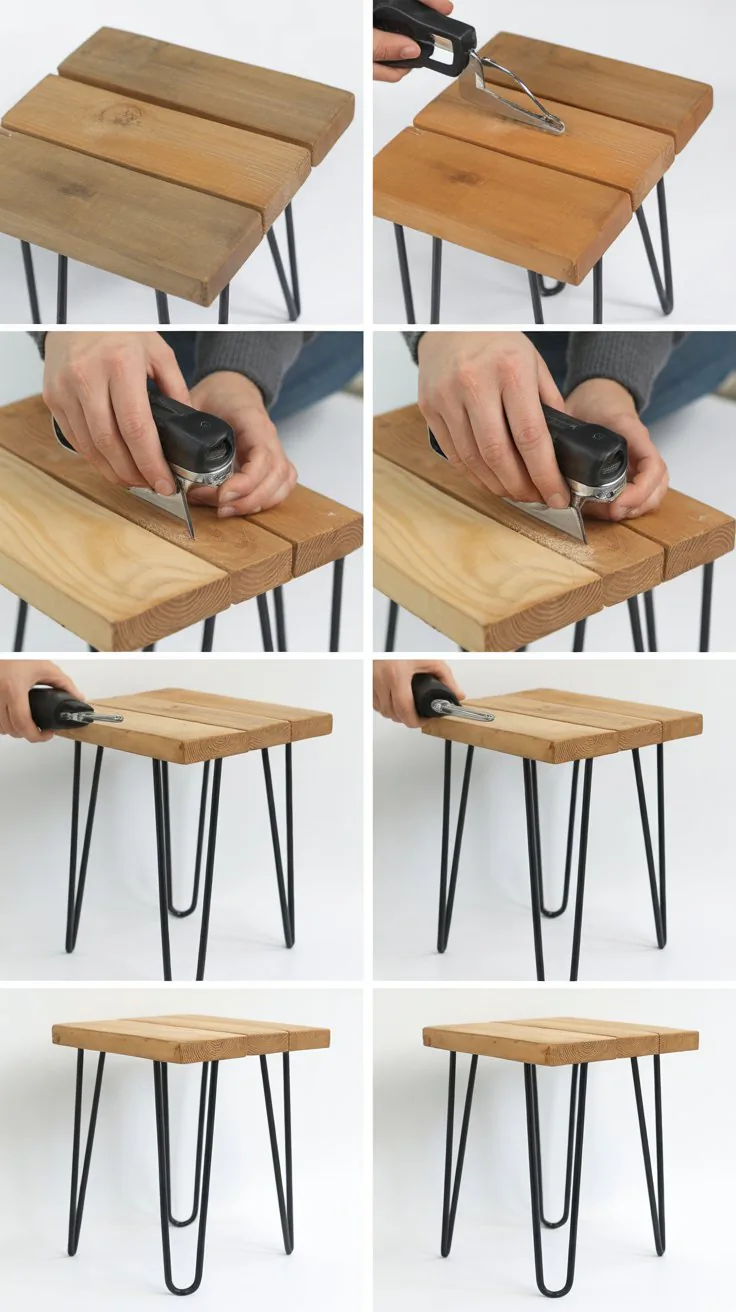
Combine scrap wood and metal legs for a stylish accent piece customers love.
- Cut tabletop (~12″×12″); sand and finish with stain or paint.
- Attach hairpin legs firmly with screws and washers.
- Add felt pads to protect floors.
26. Jewelry Earring Board
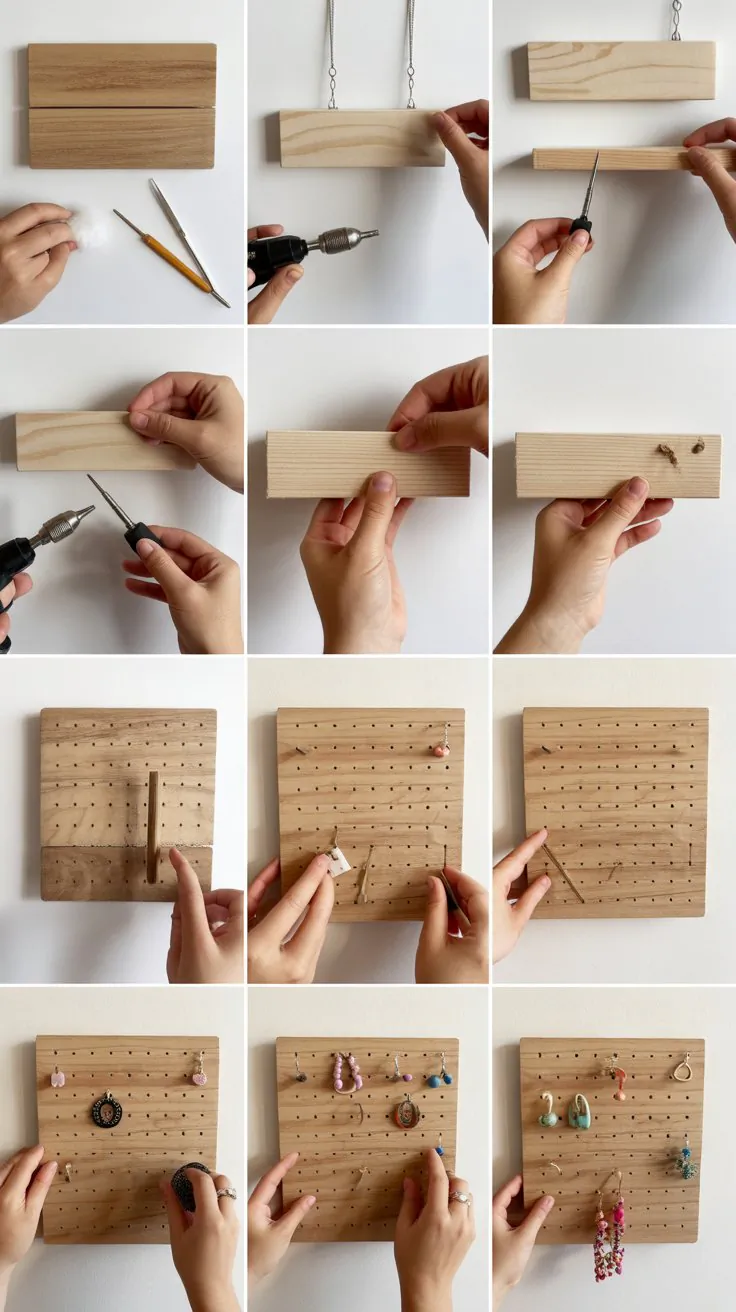
Showcase earrings elegantly on a stylish wooden display board.
- Cut board (~8″×10″); drill small holes or insert display hooks.
- Sand and finish surface; add decorative border or personalization.
- Install hanging hardware or easel support.
27. Candle Photo Box
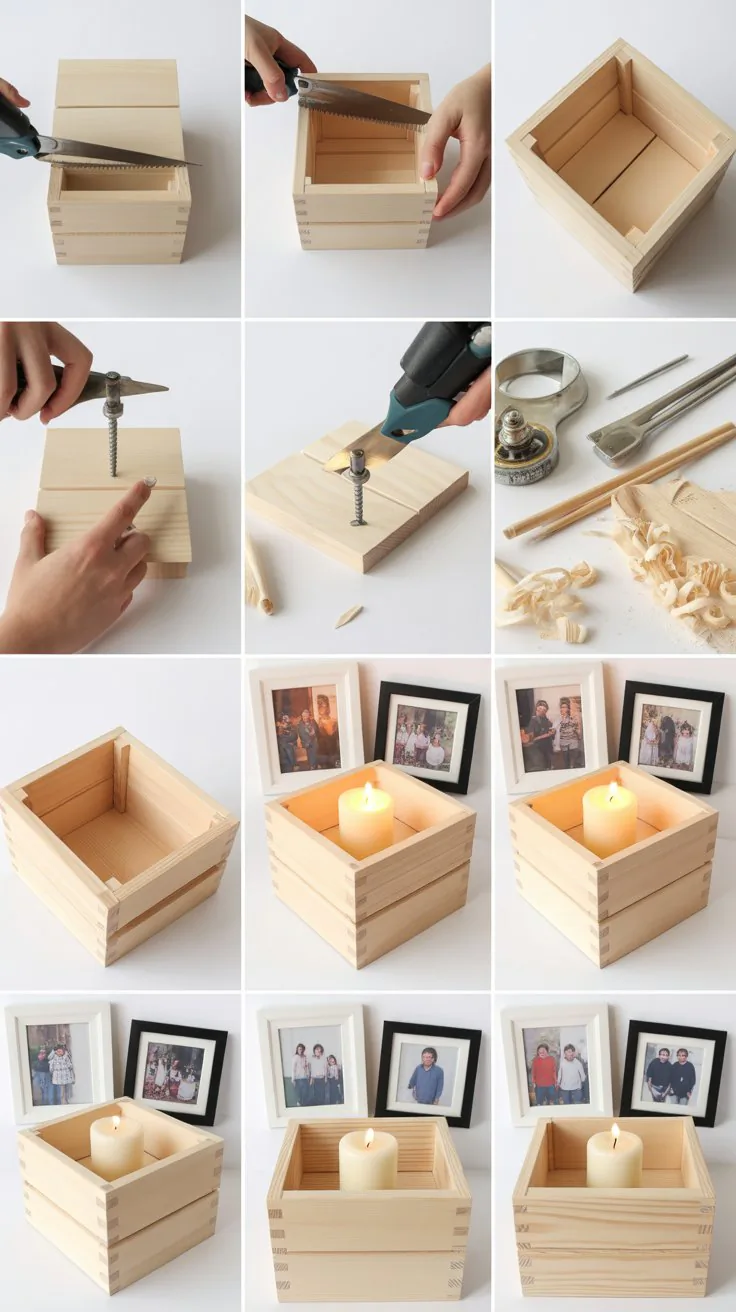
A themed box combining candle and picture—great as thoughtful gifts.
- Build a small box (~6″×4″×4″) with a slotted cast-in top.
- Install top groove for a photo and space for a candle.
- Sand, finish, and optionally burn decorative text.
28. Small Bird Feeder
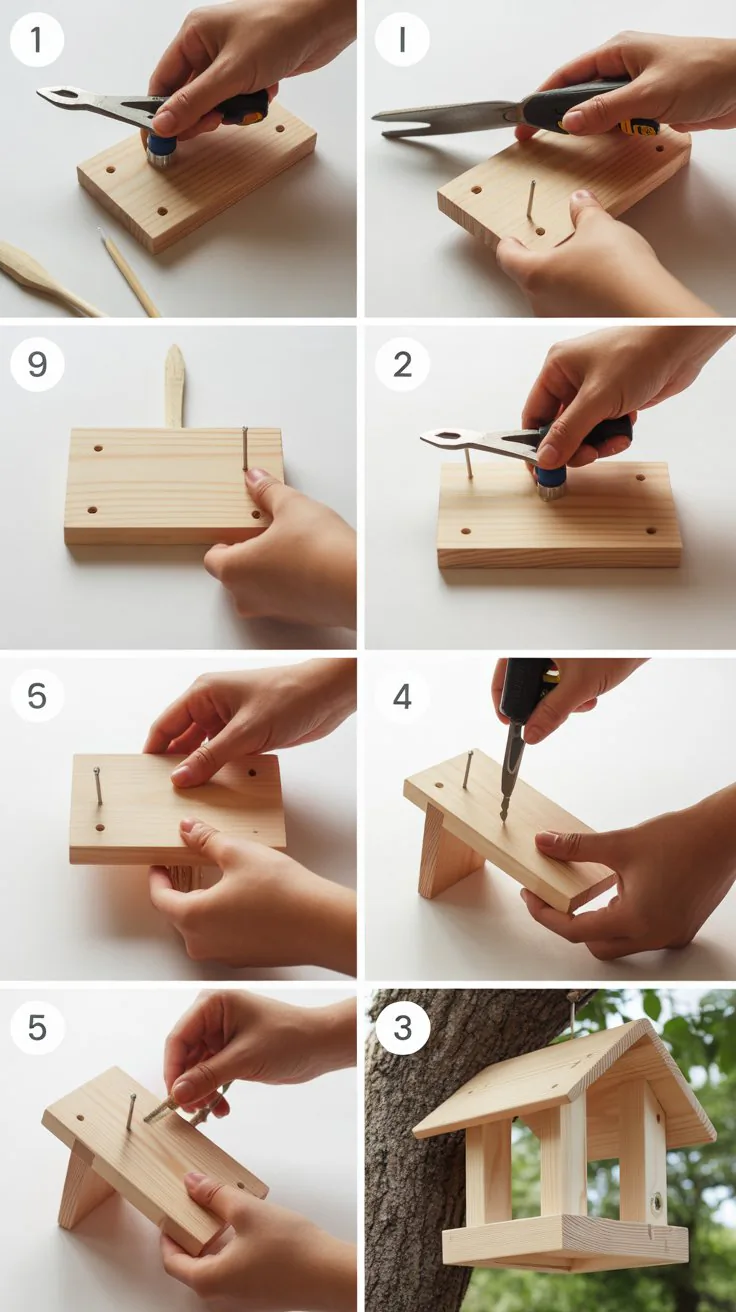
Easy weekend project that doubles as functional décor.
- Cut a shallow tray and roof slats; assemble with nails or glue.
- Sand all parts; seal with weatherproof finish.
- Drill small drainage holes in the base.
29. Wooden Toy Car Ramp
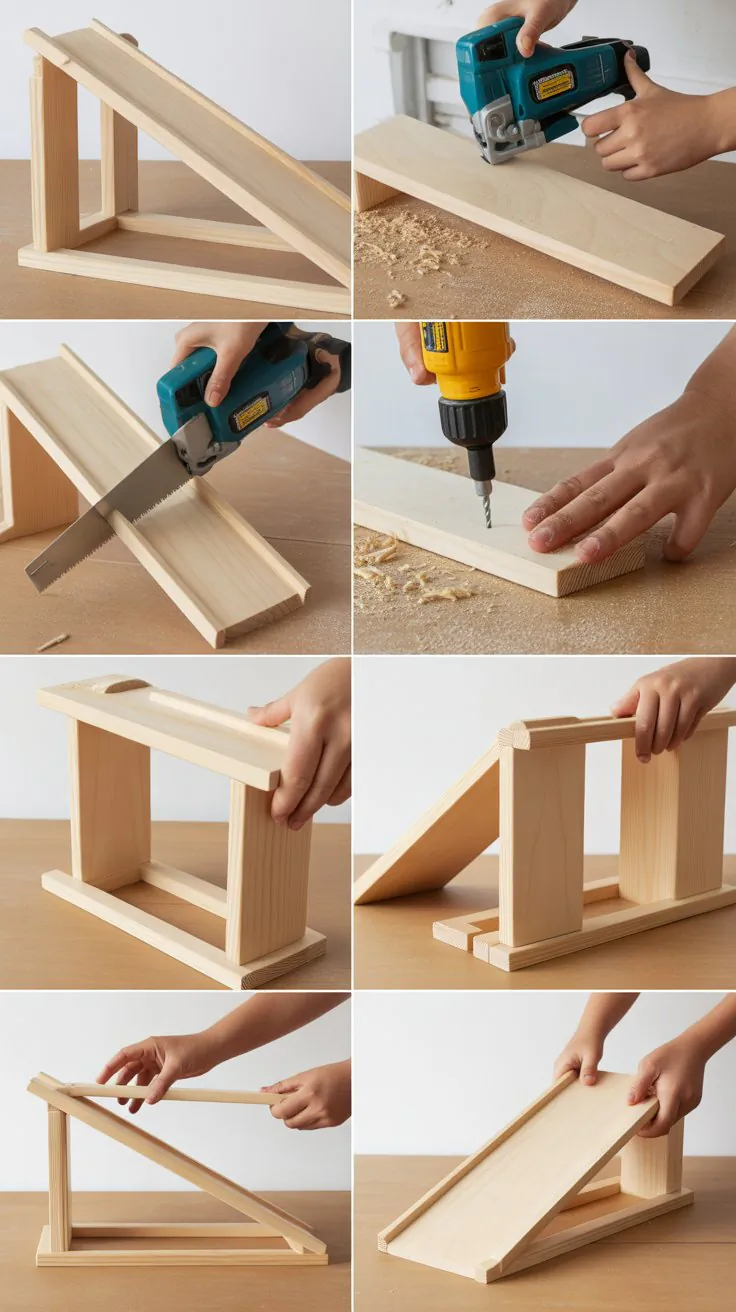
Encourage imaginative play with a DIY ramp for toy cars.
- Cut ramp sides (~12″ long) and smooth edges thoroughly.
- Sand entire piece; paint racing stripes or leave natural.
- Offer bundled with toy car for added value.
30. DIY Candle Snuffer
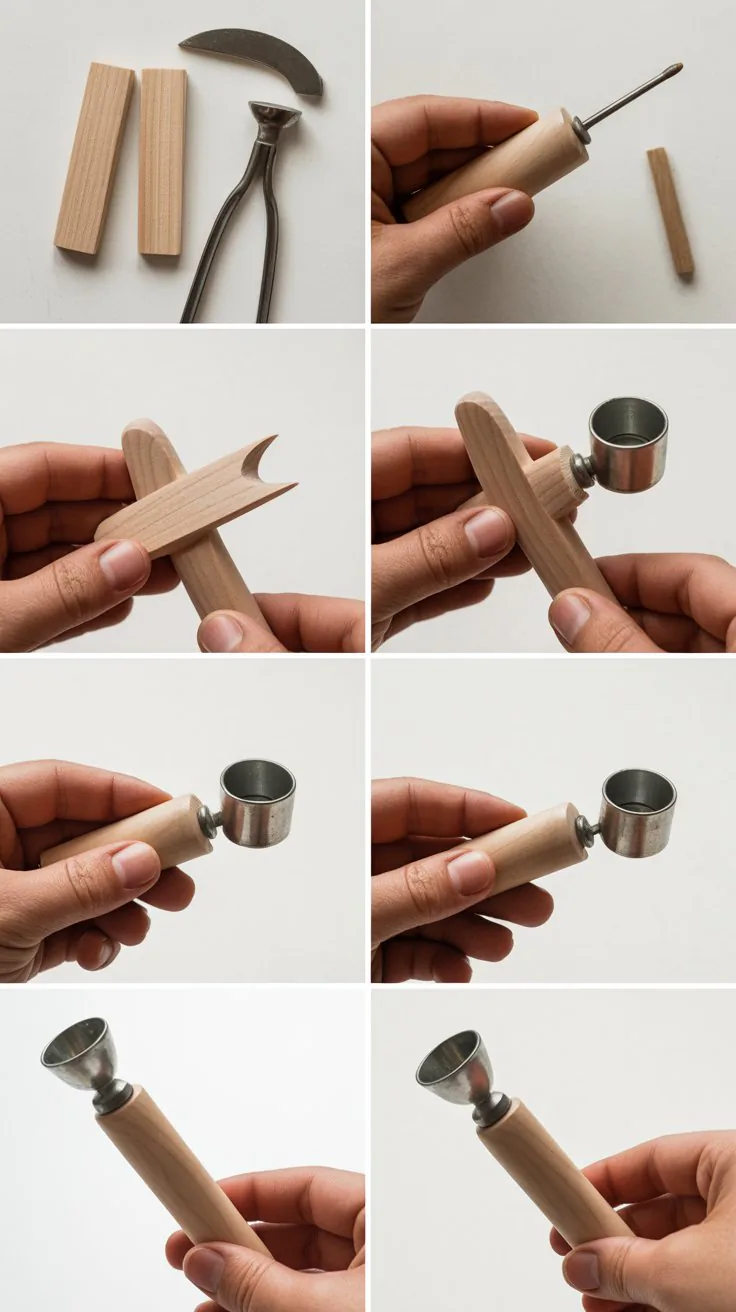
Elegant accessory for candle users, most often found in gift sets.
- Turn a goblet shape (~7″ height) on a lathe.
- Sand to satin-smooth finish; apply optional stain or clear lacquer.
- Add a long handle for easy use.
31. Wood & Resin Jewelry Dish
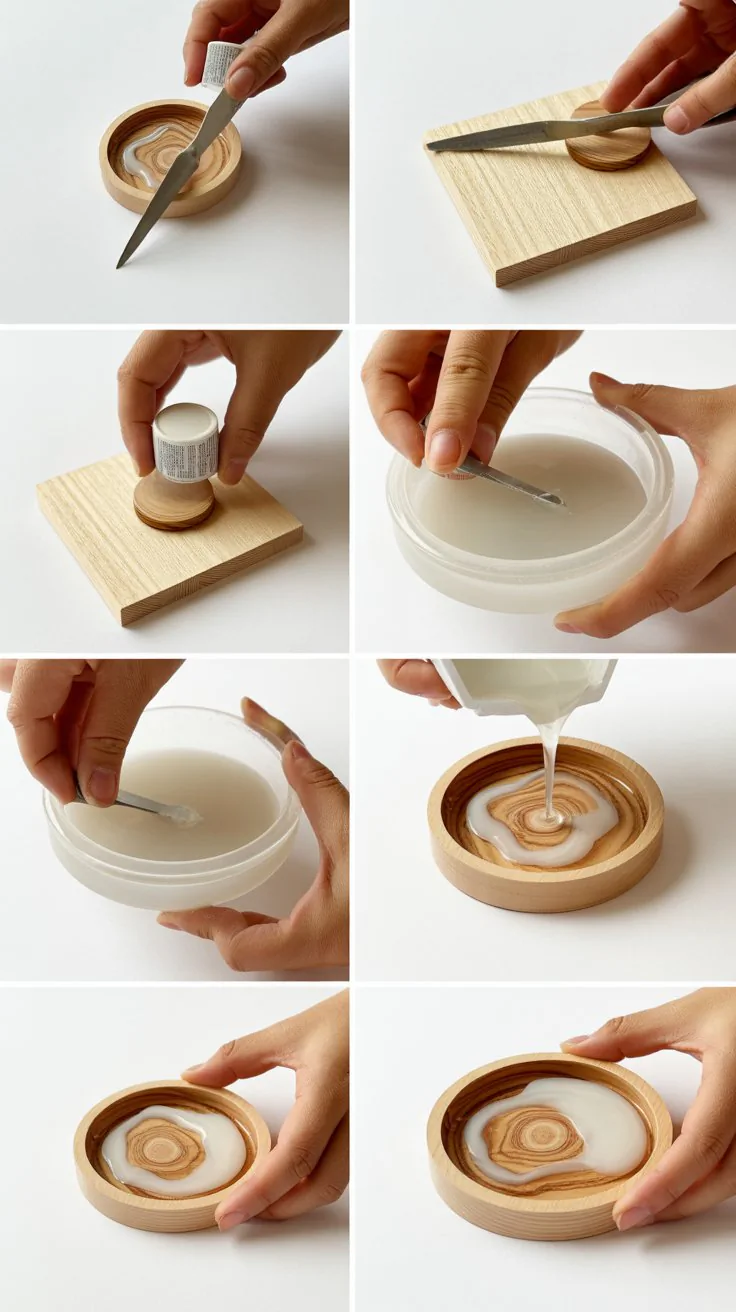
A luxe accent piece combining wood and vibrant resin.
- Cut small circular or dish-shaped blanks.
- Carve a shallow bowl; fill with colored resin.
- Sand and polish surface to a glossy finish.
32. Floating Desktop Shelf
Small shelf that sits on anyone’s desk—perfect for photos or air plants.
- Cut narrow board (~12″×3″).
- Sand and finish; add small bracket underneath to sit on edge.
- Place phone or décor on top and monitor bottom.
33. Toy Memory Game

A wooden version of memory match—fun and educational for kids.
- Cut small square tiles (~2″) from scrap.
- Decorate tile tops with painted shapes or woodburning.
- Sand edges and package as a set in a mini box.
34. Rustic Serving Utensils (Spoon & Spatula)
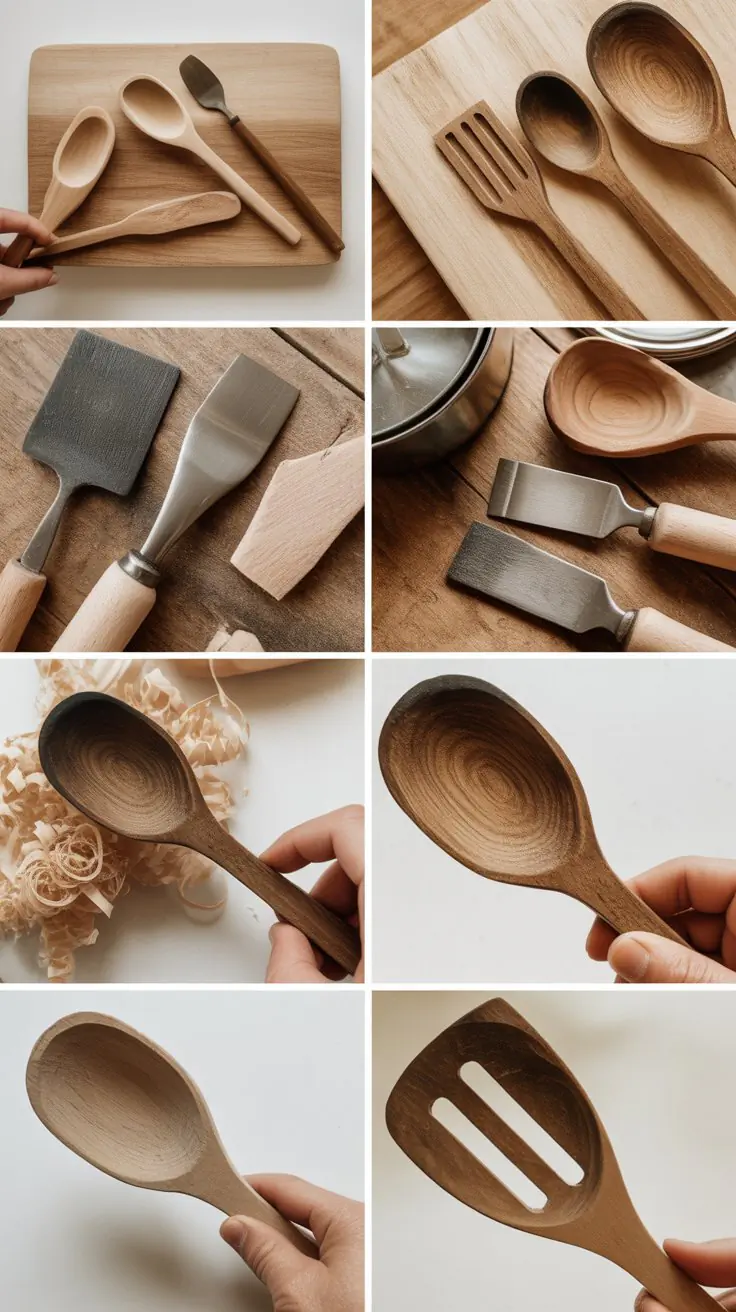
Handcrafted kitchen helpers that blend function and charm.
- Carve spoon and spatula from hardwood using whittling tools.
- Sand curves and handles thoroughly.
- Treat with food-safe oil and optionally burn decorative patterns.
Conclusion
Now that you’ve explored 34 Small DIY Wood Projects for Beginners, you have a wide array of creative, practical, and sellable projects to try.
From desktops and décor to toys and organizers, these builds are crafted to help beginners level up skills while producing attractive, market-ready items.
Select a few favorites or tackle them all—you’ll grow your craftsmanship and build a collection of handmade products with great appeal.
Start crafting and selling with confidence knowing you have a solid toolkit of creative ideas from 34 Small DIY Wood Projects for Beginners!