When you have medium-length hair, you’re sitting in the sweet spot of styling possibilities where your locks are long enough to create gorgeous looks but short enough to manage quickly.
Many people with this hair length struggle to move beyond basic ponytails or simple down styles, leaving a world of beautiful options unexplored.
This comprehensive guide on 30 Easy Medium-Length Hairstyles You Can Do in Minutes will transform your morning routine and give you fresh styling ideas for every occasion.
Whether you’re rushing to work, preparing for a date night, or simply want to feel more put-together during your daily activities, these hairstyles combine simplicity with elegance.
You’ll discover classic styles reimagined for modern sensibilities, trendy looks that require minimal effort, and creative techniques that make you look like you spent hours in front of the mirror when you really spent just minutes.
Each hairstyle has been selected specifically for its ease of execution, time efficiency, and stunning results that work for various hair textures and face shapes.
In This Post......
- 1. The Classic Half-Up Ponytail
- 2. Messy Low Bun
- 3. Simple Side Braid
- 4. Twisted Crown
- 5. Sleek Low Ponytail
- 6. Textured Waves with Middle Part
- 7. Double Dutch Braids
- 8. Twisted Low Ponytail
- 9. Half-Up Top Knot
- 10. Side-Swept Waves
- 11. Braided Headband
- 12. Bubble Ponytail
- 13. Tousled Half-Up Space Buns
- 14. Low Twisted Updo
- 15. Messy French Twist
- 16. Waterfall Braid
- 17. Sleek Side Part with Tuck
- 18. Voluminous Blowout
- 19. Boho Fishtail Side Braid
- 20. Pinned Back Waves
- 21. Textured Low Ponytail with Volume
- 22. Knotted Half-Up Style
- 23. Side Rope Braid
- 24. Low Braided Bun
- 25. Tousled Side Ponytail
- 26. Criss-Cross Half-Up
- 27. Half-Up Twist with Accessory
- 28. Pulled-Through Braid
- 29. Sleek Straight with Deep Part
- 30. Vintage Victory Rolls
- Conclusion
1. The Classic Half-Up Ponytail

The half-up ponytail remains one of the most versatile and timeless hairstyles for medium-length hair, offering the perfect balance between casual and polished.
This style works beautifully whether you’re heading to the office or meeting friends for brunch, and it takes less than two minutes to create.
Steps to Create:
- Gather the top section of your hair from temple to temple, creating a horizontal part about two inches back from your hairline.
- Smooth the gathered section backward using your fingers or a brush to eliminate bumps and create a sleek appearance.
- Secure the section with a hair elastic at the crown of your head, positioning it where you want the ponytail to sit.
- Gently tug at the crown area to add volume and create a slightly relaxed, modern look.
- Optional: wrap a small section of hair around the elastic to conceal it for a more polished finish.
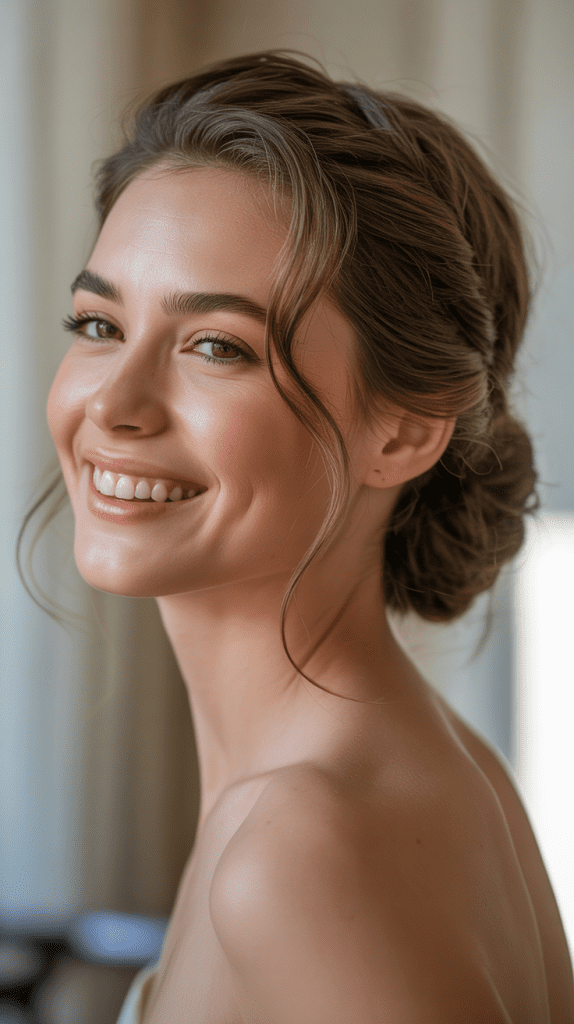
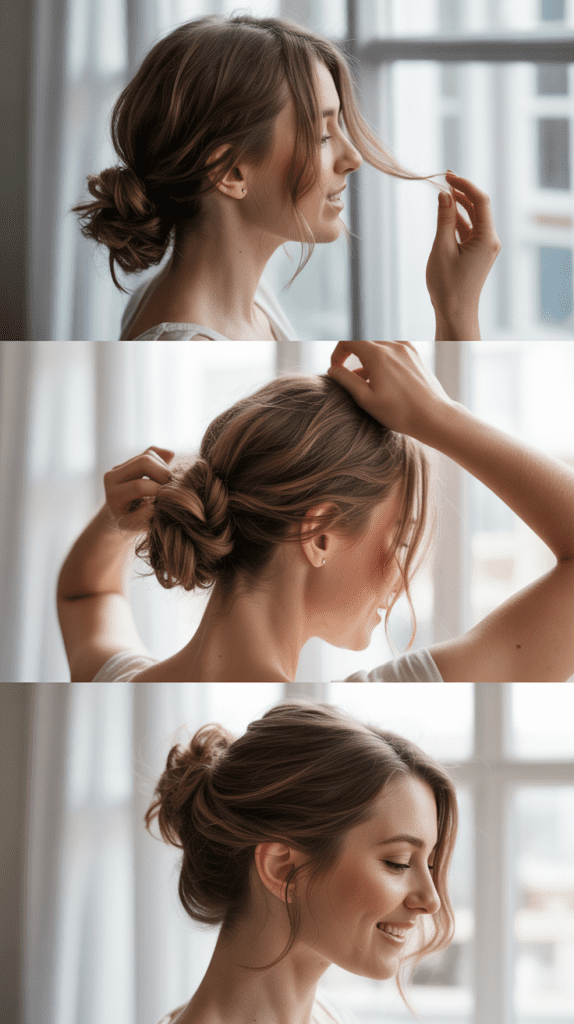
2. Messy Low Bun
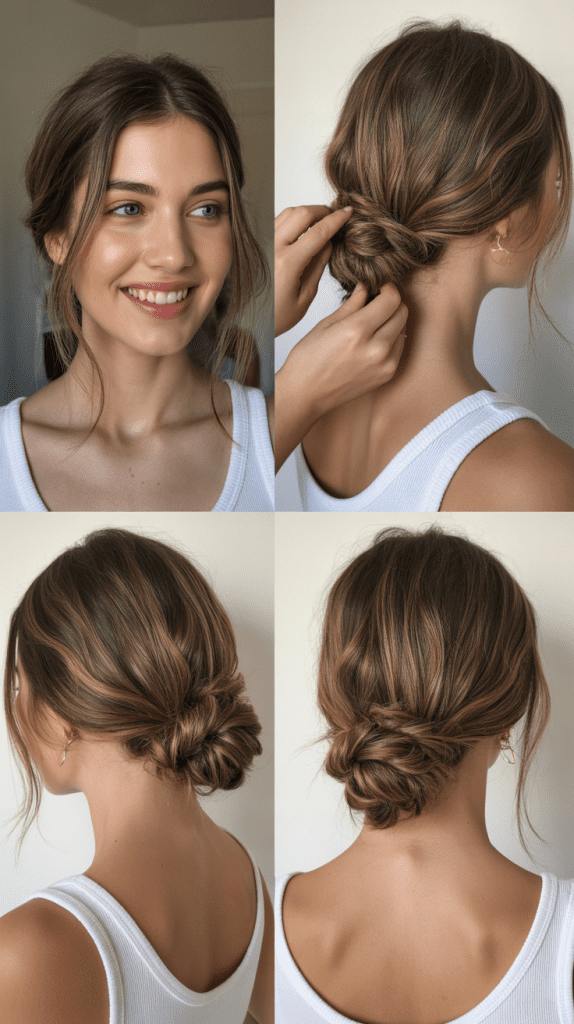
The messy low bun epitomizes effortless chic and works perfectly for medium-length hair that might be too short for more elaborate updos.
This intentionally undone style looks sophisticated while being forgiving of imperfections, making it ideal for those mornings when you’re running late.
Creating Your Messy Bun:
- Pull all your hair back into a low ponytail at the nape of your neck without worrying about perfect smoothness.
- Twist the ponytail loosely and wrap it around the base of the elastic, allowing pieces to fall naturally rather than tucking everything in.
- Secure the bun with bobby pins, inserting them at different angles to ensure the style holds throughout the day.
- Gently pull out a few face-framing pieces and slightly loosen the bun for that perfectly imperfect aesthetic.
- Finish with a light mist of texturizing spray to enhance the messy texture and provide hold.
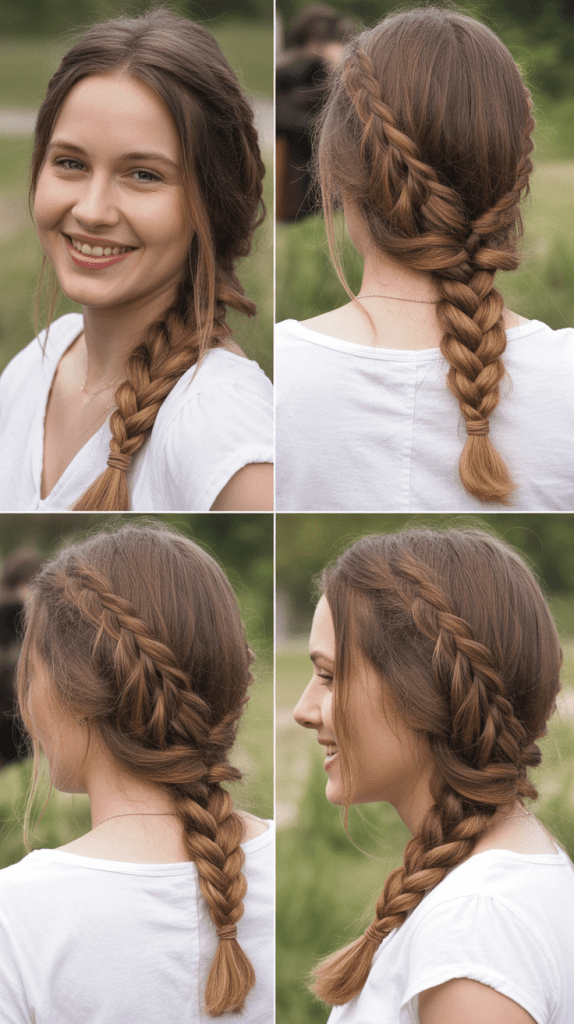
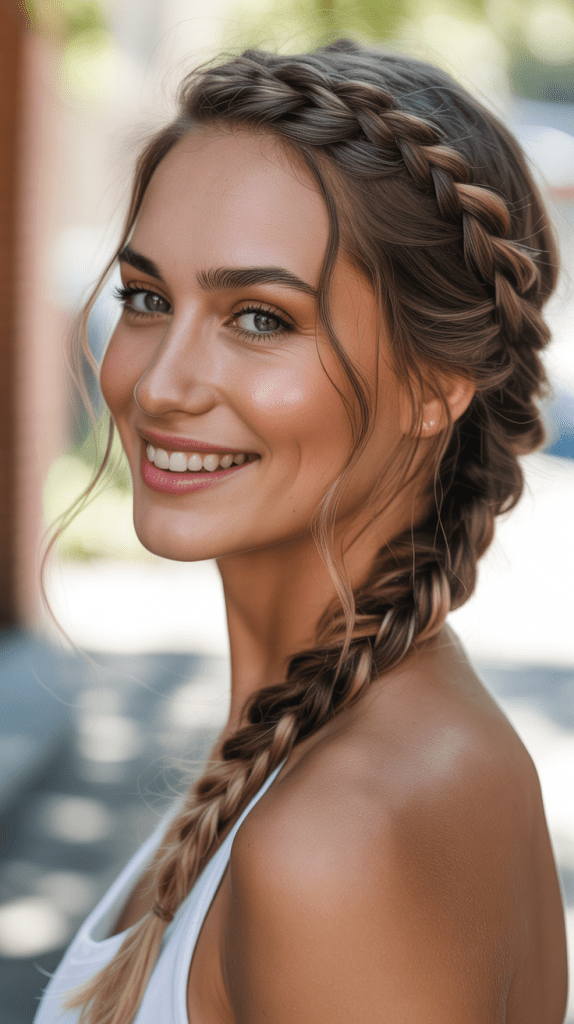
3. Simple Side Braid
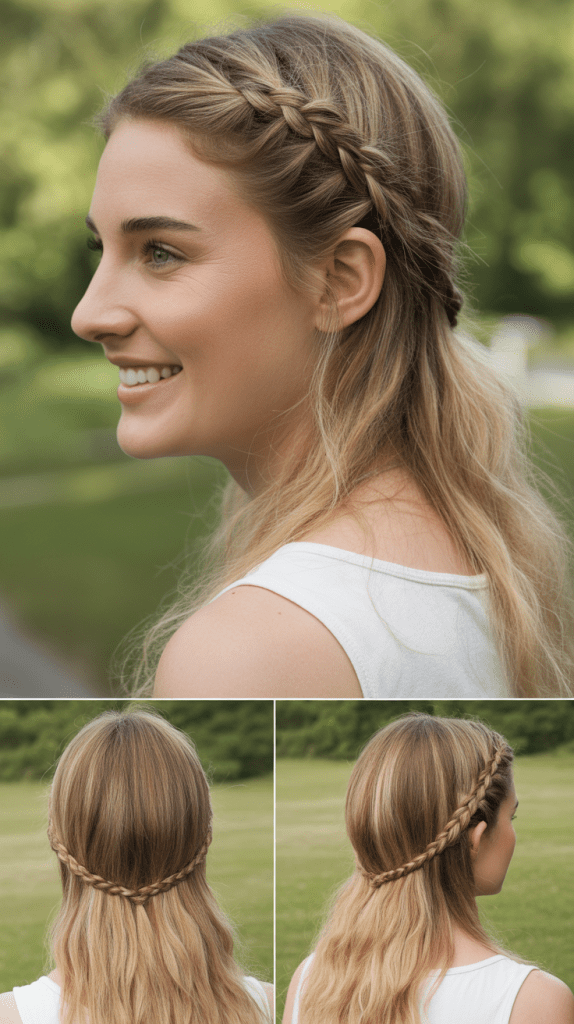
A simple side braid offers a romantic, bohemian vibe that’s incredibly easy to achieve and works wonderfully for medium-length hair of all textures.
This style keeps hair off your face while adding visual interest and can transition seamlessly from day to evening.
Braiding Instructions:
- Sweep all your hair over one shoulder, choosing whichever side you prefer or that complements your outfit or face shape.
- Divide the hair into three equal sections and begin a classic three-strand braid, keeping the tension moderate for a relaxed look.
- Continue braiding down the length of your hair, maintaining consistent tension to prevent the braid from becoming too tight or too loose.
- Secure the end with a clear or decorative elastic, leaving about an inch of hair at the bottom.
- Gently pancake the braid by pulling on the outer edges of each section to create width and a fuller appearance.
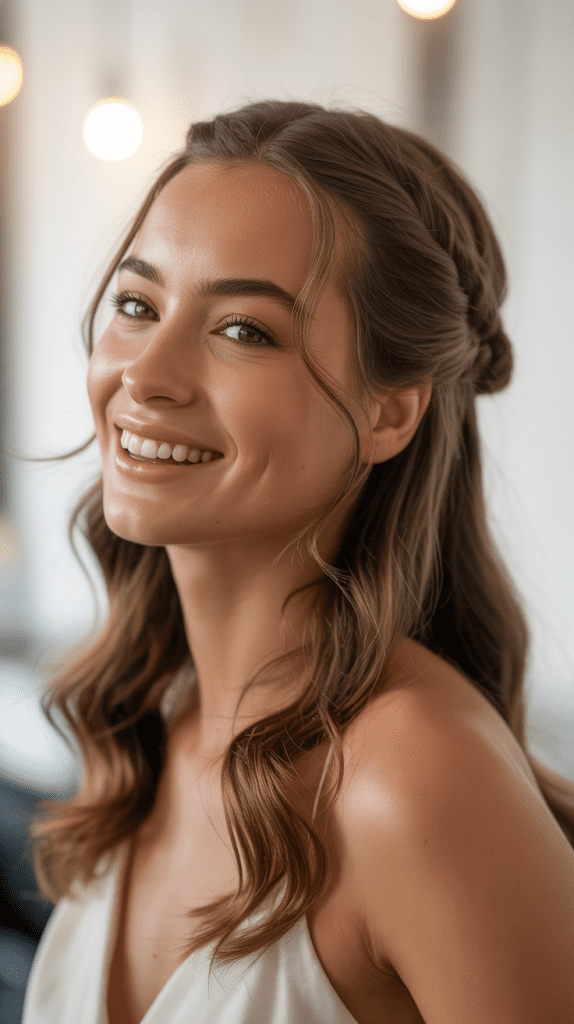
4. Twisted Crown
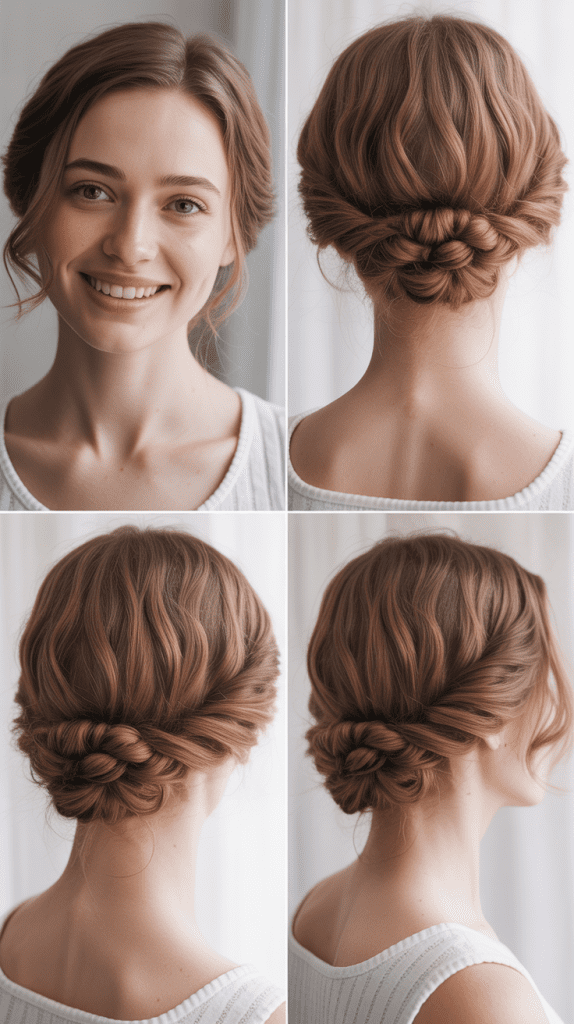
The twisted crown creates an elegant, feminine look that appears far more complicated than it actually is, making it perfect for special occasions or when you want to feel extra polished.
This style works beautifully with medium-length hair and can be adapted for both straight and wavy textures.
Crown Creation Process:
- Part your hair down the middle or slightly off-center, depending on your preference and natural part.
- Take a two-inch section of hair from near your temple on one side and divide it into two equal strands.
- Twist the two strands around each other, adding small sections of hair from below as you work backward toward the back of your head.
- Pin the twisted section at the back center of your head with bobby pins, crossing them for extra security.
- Repeat the same twisting process on the opposite side, bringing it to meet the first section and pinning where they connect.
5. Sleek Low Ponytail
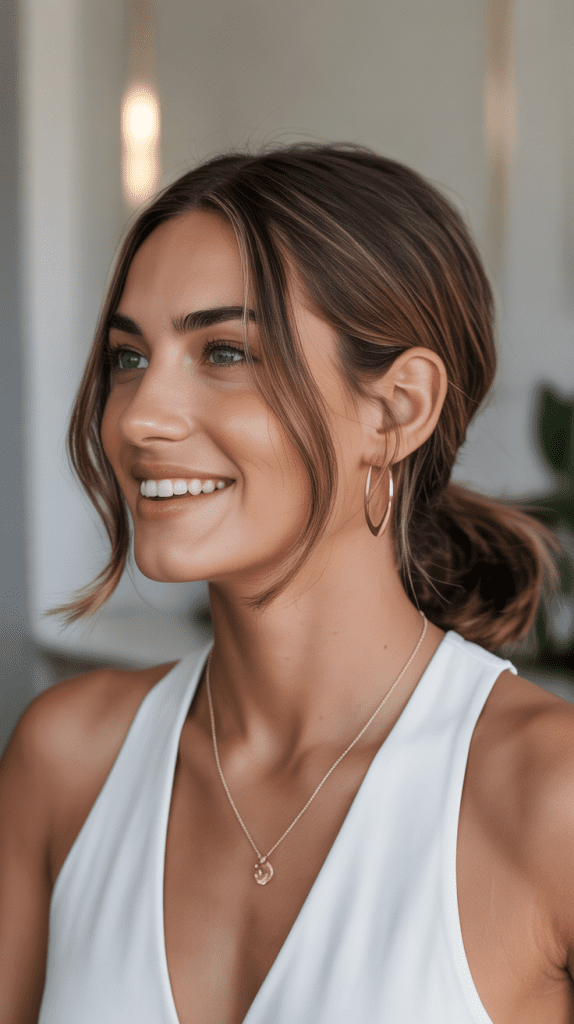
The sleek low ponytail represents sophisticated minimalism and works perfectly for professional settings or elegant evening events.
This polished style showcases healthy, shiny hair and creates a refined silhouette that complements any face shape.
Achieving Sleekness:
- Apply a smoothing serum or cream to damp hair and blow-dry using a paddle brush to create maximum smoothness.
- Brush all your hair straight back using a boar bristle brush, which helps distribute natural oils and eliminates flyaways.
- Gather hair at the nape of your neck and secure tightly with a hair elastic, ensuring no bumps or loose sections.
- Take a small section of hair from underneath the ponytail and wrap it around the elastic, securing the end with a bobby pin underneath.
- Apply a light shine spray or run a small amount of oil over the surface to enhance gloss and tame any remaining frizz.
6. Textured Waves with Middle Part
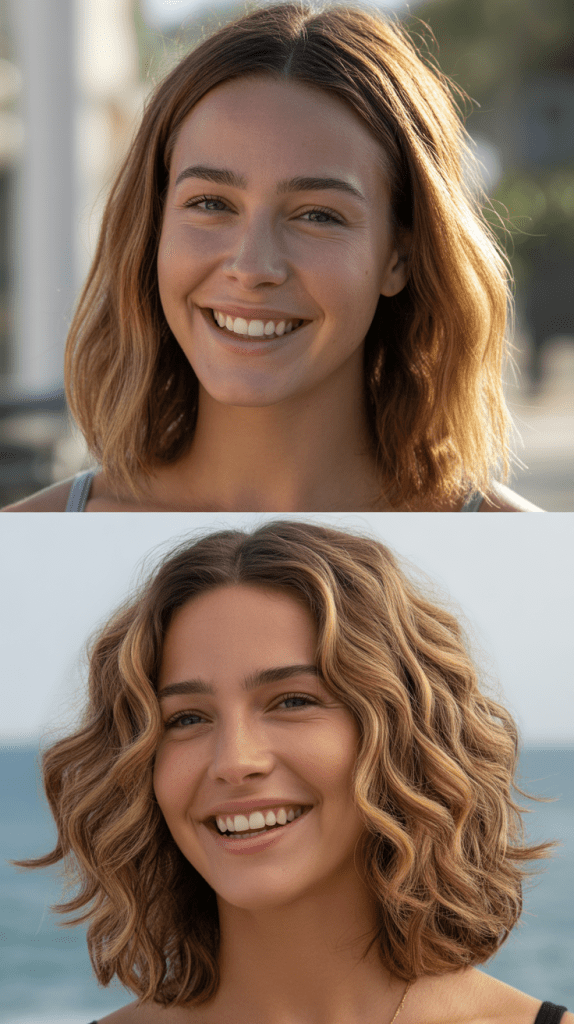
Textured waves with a middle part create an effortlessly cool, beachy vibe that works for virtually any occasion and flatters most face shapes.
This style is particularly forgiving and actually looks better with a slightly undone finish.
Wave Creation Method:
- Start with day-old hair or apply dry shampoo to clean hair for better texture and grip.
- Create a clean middle part using a fine-tooth comb, ensuring it’s straight and even from front to back.
- Use a flat iron or curling wand to create loose waves throughout your hair, alternating the direction of curls for a more natural appearance.
- Run your fingers through the waves to break them up and create that lived-in, textured look.
- Finish with sea salt spray, scrunching as you apply to enhance the beachy texture and provide light hold.
7. Double Dutch Braids
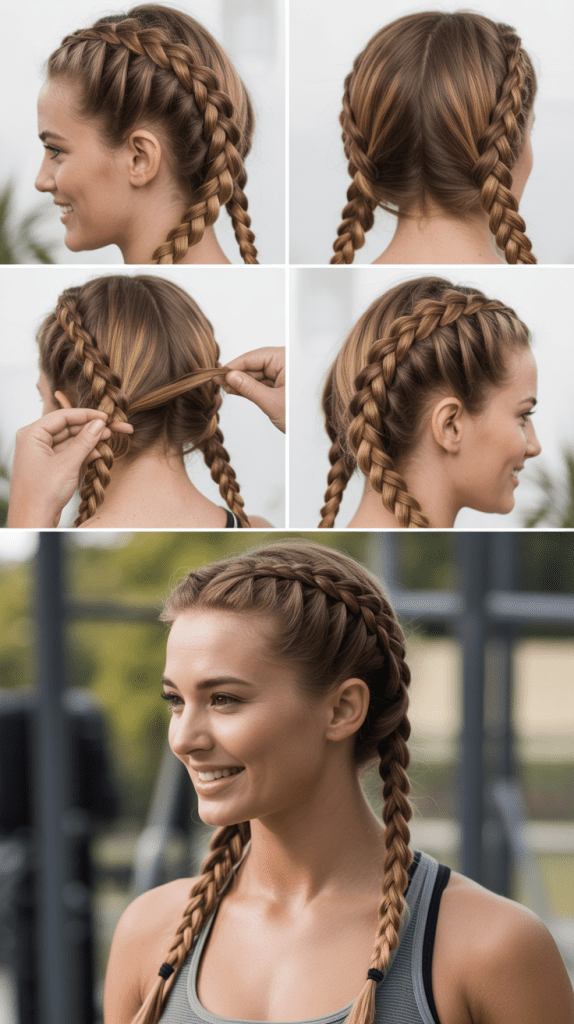
Double Dutch braids offer a sporty yet stylish option that keeps hair completely secured while looking intentional and fashionable.
This style works exceptionally well for active days, workouts, or when you need your hair to stay put for extended periods.
Dutch Braiding Steps:
- Part your hair straight down the middle from forehead to nape, creating two equal sections.
- Working with one section at a time, take a small section at the hairline and divide it into three strands.
- Begin a Dutch braid by crossing the outer strands under the middle strand instead of over, adding small sections as you work down.
- Continue braiding tightly down the length of your hair, keeping the braid close to your scalp for that raised, three-dimensional effect.
- Secure both braids with elastics and repeat the process on the opposite side, ensuring both braids are symmetrical in placement and tightness.
8. Twisted Low Ponytail
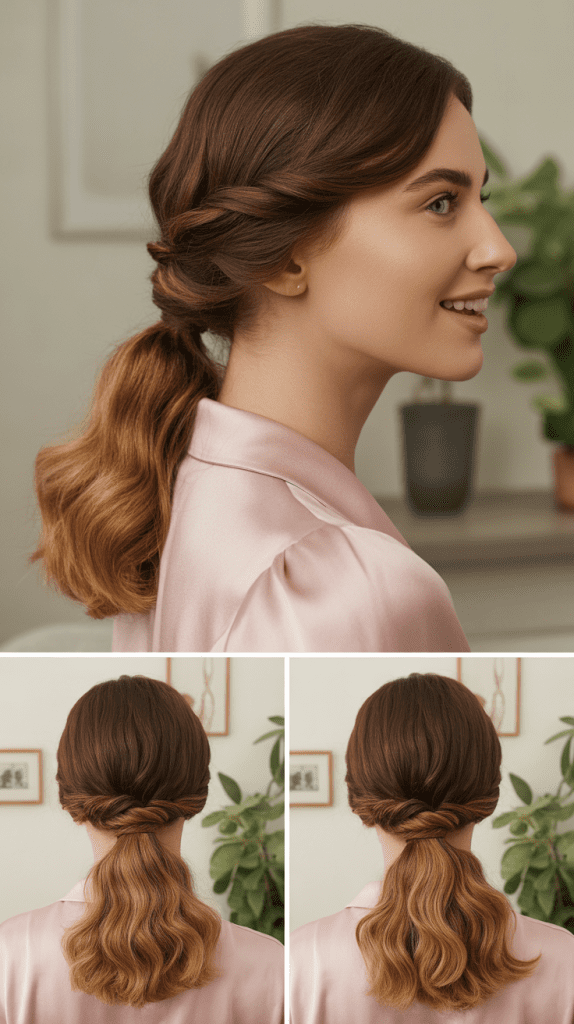
The twisted low ponytail adds an elegant detail to a basic style, transforming a simple ponytail into something special with just one extra step.
This sophisticated variation takes less than three minutes but makes a significant visual impact.
Twisting Technique:
- Create a low ponytail at the nape of your neck, securing it with a hair elastic at your desired tightness.
- Split the ponytail into two equal sections from top to bottom, holding each section separately.
- Twist each section clockwise several times until they’re tightly coiled, maintaining tension throughout.
- Wrap the two twisted sections around each other counterclockwise, creating a rope-like effect that naturally stays together.
- Secure the end with another elastic and gently pull on the twist to add fullness and dimension.
9. Half-Up Top Knot
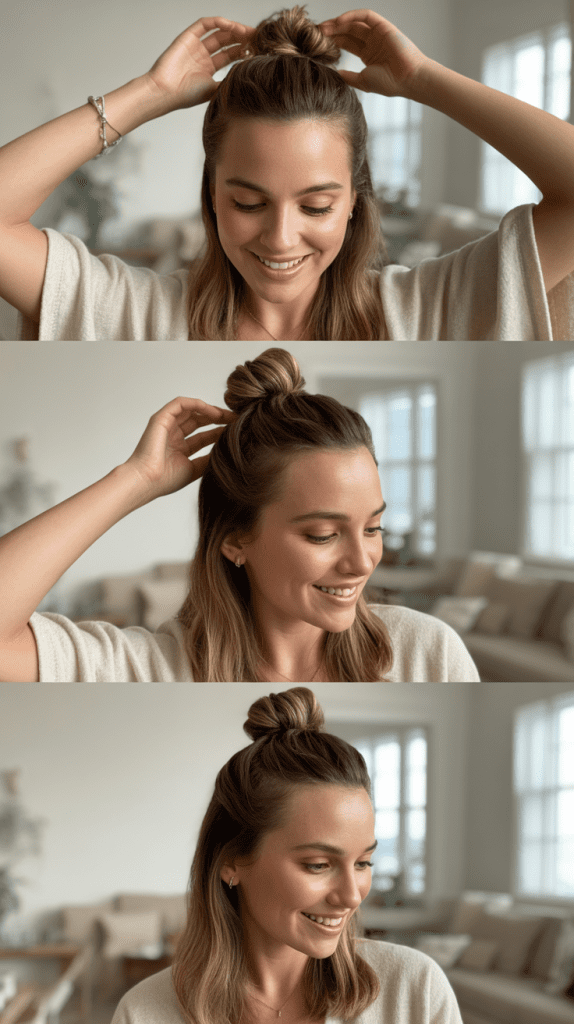
The half-up top knot combines the practicality of keeping hair off your face with a trendy, youthful aesthetic that works for casual settings.
This style became popular in recent years and remains a go-to for its simplicity and cool-girl appeal.
Top Knot Instructions:
- Section off the top portion of your hair from ear to ear, gathering everything above this line.
- Pull this section up toward the crown of your head and secure with an elastic, creating a small ponytail.
- Twist the ponytail and wrap it around itself to form a compact bun or knot shape.
- Secure the bun with bobby pins or wrap the elastic around it one more time to hold it in place.
- Allow the rest of your hair to hang naturally, and pull out a few face-framing pieces for a softer, more relaxed appearance.
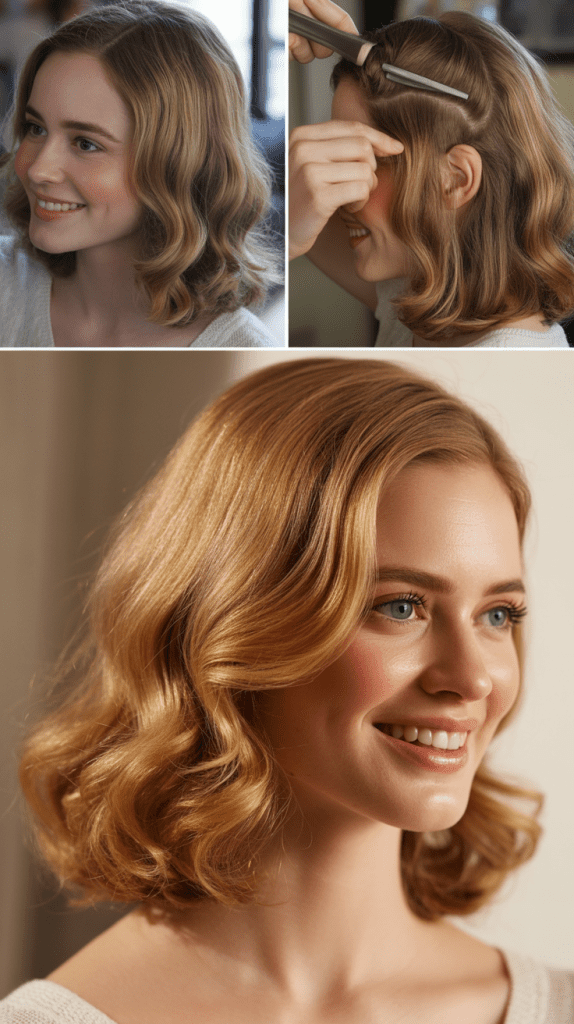
10. Side-Swept Waves
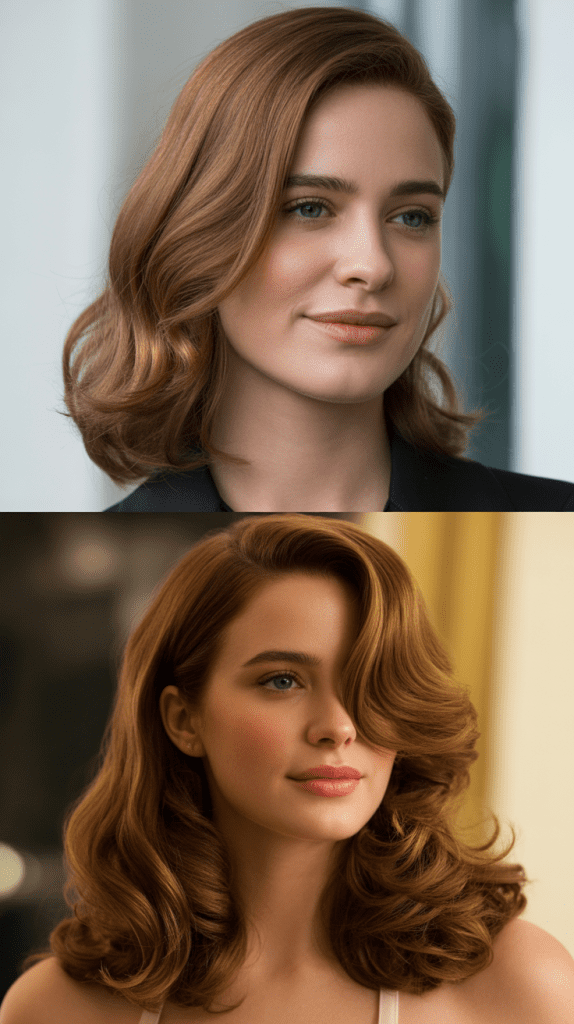
Side-swept waves create a glamorous, red-carpet-worthy look that’s surprisingly achievable for everyday styling.
This asymmetrical style adds drama and sophistication while flattering virtually every face shape, particularly highlighting cheekbones and jawlines.
Sweeping and Styling:
- Create a deep side part, positioning it approximately two inches from your natural part line for maximum drama.
- Curl your hair using a medium-barrel curling iron, focusing on creating uniform waves throughout.
- Brush through the curls gently with a paddle brush to transform them into soft, flowing waves.
- Sweep the majority of your hair to one side and secure behind your ear with decorative bobby pins or small clips.
- Apply hairspray to the secured side to keep the style in place, and leave the opposite side to cascade freely over your shoulder.
11. Braided Headband
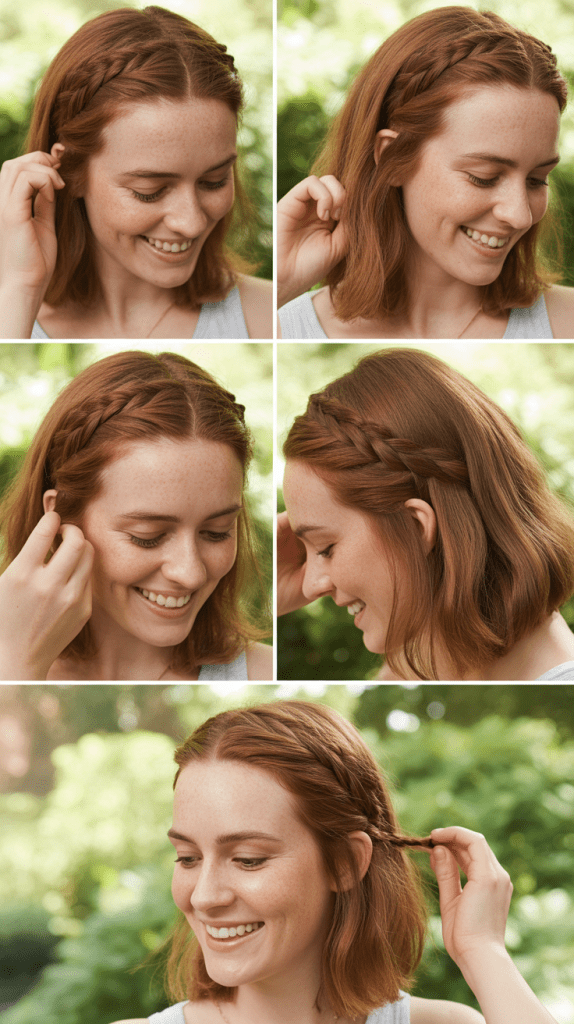
The braided headband style incorporates a braid as an accessory element, creating a bohemian-inspired look that’s both practical and beautiful.
This style works wonderfully for medium-length hair and keeps strands off your face without requiring any actual headband.
Headband Braid Process:
- Take a section of hair about an inch wide from behind one ear, isolating it from the rest of your hair.
- Braid this section tightly in a traditional three-strand braid, securing the end with a small clear elastic.
- Bring the braid across your hairline like a headband, positioning it where you’d normally wear an accessory headband.
- Pin the braid behind your opposite ear using bobby pins that match your hair color for seamless concealment.
- Style the remaining hair as desired, whether leaving it down, curling it, or creating additional braided elements.
12. Bubble Ponytail
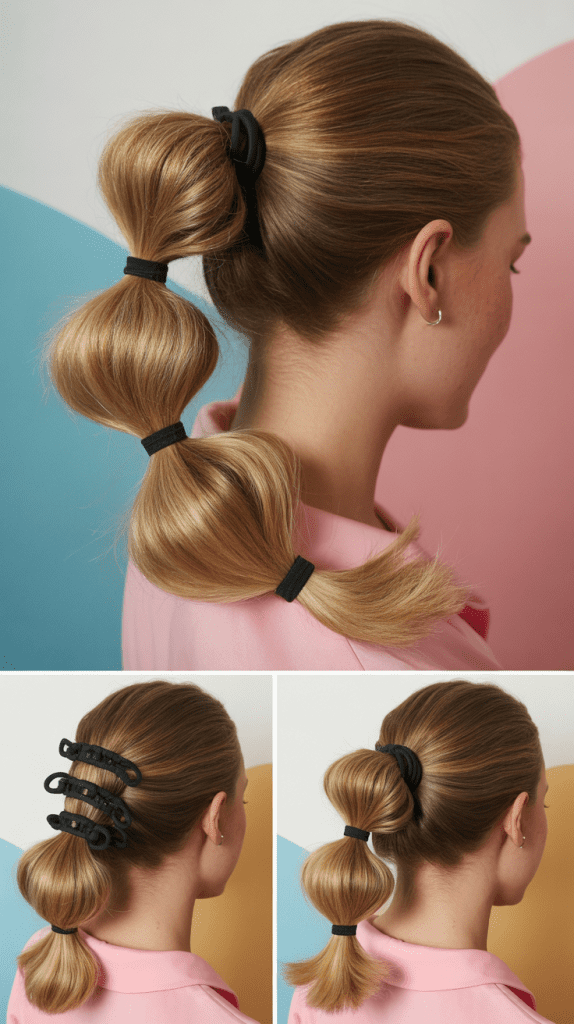
The bubble ponytail transforms a standard ponytail into a playful, dimensional style that adds visual interest and appears more complex than it actually is.
This trendy look gained popularity on social media and works beautifully for medium-length hair.
Bubble Creation:
- Create a high, medium, or low ponytail depending on your preference, securing it tightly with an elastic.
- Place additional elastics down the length of the ponytail at even intervals, approximately two to three inches apart.
- Between each elastic, gently pull on the hair to create rounded, bubble-like sections that add volume and dimension.
- Continue this process down the entire length of your ponytail, adjusting the fullness of each bubble for consistency.
- Secure the final section with an elastic and apply hairspray to maintain the bubble shape throughout the day.
13. Tousled Half-Up Space Buns
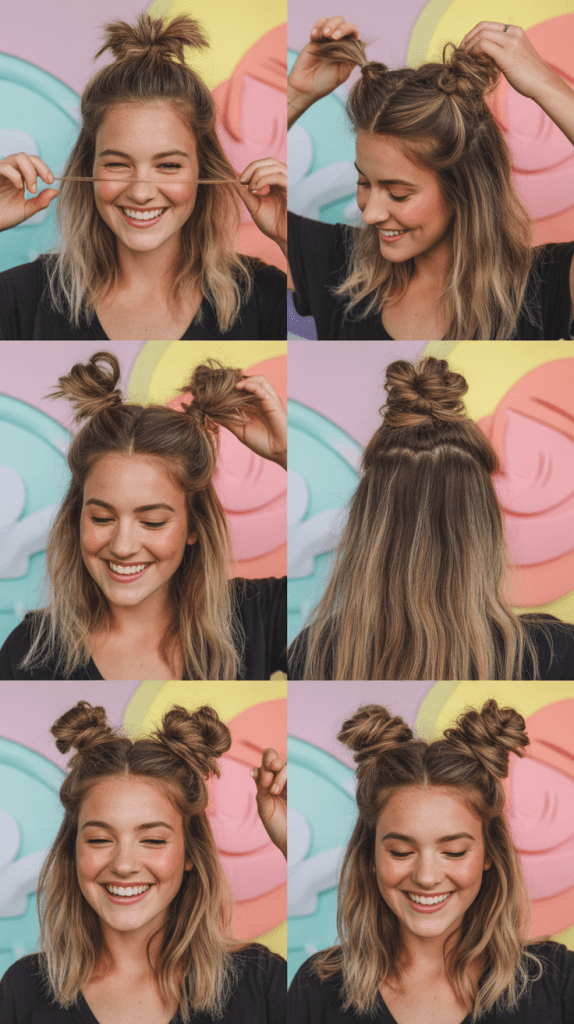
Tousled half-up space buns bring a fun, festival-ready vibe to medium-length hair while keeping it manageable and off your face.
This playful style works particularly well for casual outings, concerts, or any time you want to showcase your personality through your hair.
Space Bun Instructions:
- Part your hair down the middle and section off the top half from ear to ear, creating two equal sections.
- Create two small ponytails on each side of the part, positioning them symmetrically at your preferred height.
- Twist each ponytail and wrap it around itself to create small bun shapes, allowing them to be somewhat loose and messy.
- Secure each bun with bobby pins and gently pull on them to add fullness and create that intentionally tousled appearance.
- Leave the bottom section of your hair down, either straight or with loose waves for contrast.
14. Low Twisted Updo
The low twisted updo provides an elegant solution for medium-length hair that achieves an sophisticated look without requiring excessive length.
This style works beautifully for weddings, formal events, or professional settings where you want to appear polished and put-together.
Updo Assembly:
- Divide your hair into three sections: one on each side and one at the back, creating equal portions.
- Twist the right section toward the back of your head and pin it at the center of the nape with bobby pins.
- Repeat with the left section, twisting it and pinning it to meet the first section, creating a layered effect.
- Take the back section and twist it upward, tucking the ends under and pinning securely to conceal them completely.
- Gently pull and adjust the twists to add volume and ensure complete coverage with no elastic bands showing.
15. Messy French Twist
The messy French twist offers a modern take on a classic updo, perfect for medium-length hair that might not quite reach the traditional French twist length.
This deliberately undone version embraces texture and imperfection while still looking sophisticated and intentional.
French Twist Method:
- Gather all your hair to one side of your head, holding it firmly at the nape of your neck.
- Twist the hair vertically while moving it toward the center back of your head, creating a coiled column.
- Continue twisting and folding the hair inward, tucking shorter pieces as you go and securing with bobby pins along the twist.
- Allow some pieces to fall out naturally, embracing the messy aesthetic rather than trying to perfect every strand.
- Finish by gently pulling on the twist to add width and dimension, and spritz with flexible-hold hairspray.
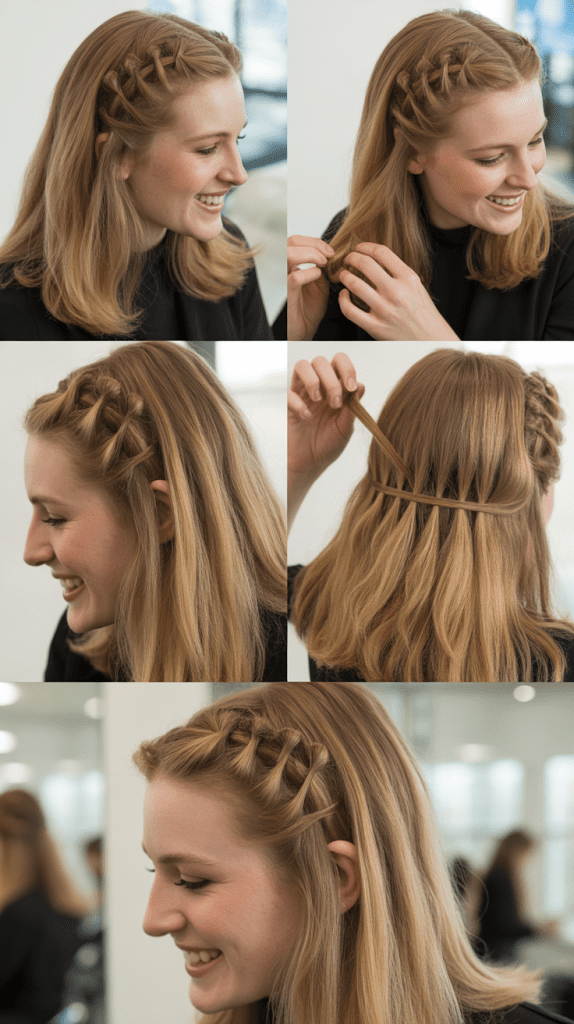
16. Waterfall Braid
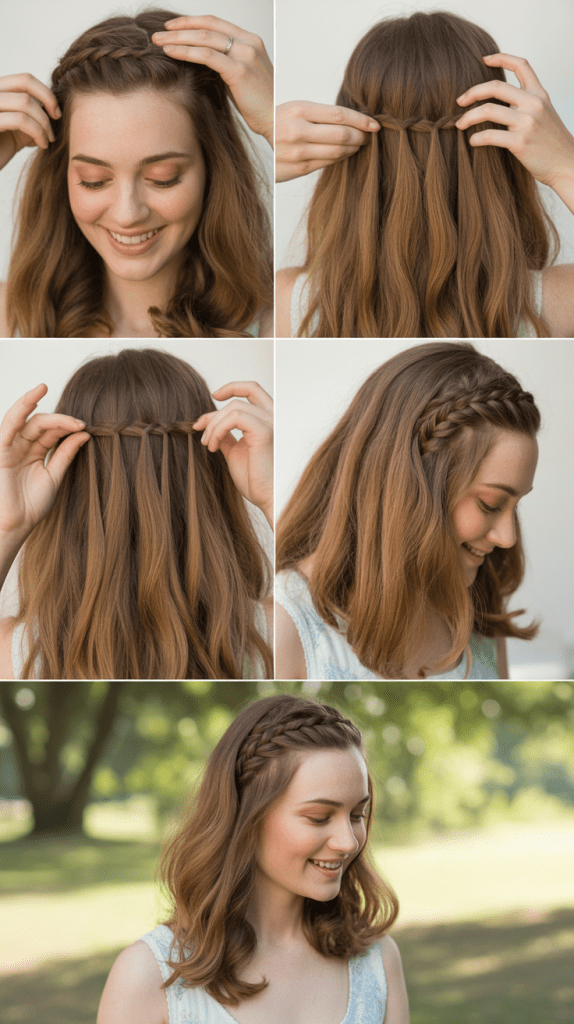
The waterfall braid creates a cascading, romantic effect that looks intricate but becomes quite simple once you understand the technique.
This style works exceptionally well on medium-length hair and adds a delicate, feminine touch to any look.
Waterfall Technique:
- Take a section of hair near your temple and divide it into three strands to begin a regular braid.
- Create one stitch of a standard braid, then drop the bottom strand and let it fall, replacing it with a new section from above.
- Continue this pattern across your head, always dropping the bottom strand and picking up a new section from the top.
- Work the braid around your head from one side to the other, following your natural hairline curve.
- Secure the braid with a small elastic behind your opposite ear and leave the remaining hair down to showcase the waterfall effect.
17. Sleek Side Part with Tuck
The sleek side part with tuck creates a sophisticated, vintage-inspired look that’s incredibly simple yet striking in its elegance.
This style works wonderfully for medium-length hair and requires only minutes to achieve while delivering maximum impact.
Tucking Process:
- Create a deep side part, positioning it dramatically far from center for the most striking effect.
- Apply smoothing serum to the heavier side and brush it sleek and flat against your head.
- On the lighter side, tuck the hair smoothly behind your ear and secure it with decorative bobby pins or small jeweled clips.
- Use a fine-tooth comb to ensure the tucked section is completely smooth without any bumps or loose pieces.
- Finish with strong-hold hairspray on the tucked side to maintain the sleek appearance throughout the day.
18. Voluminous Blowout
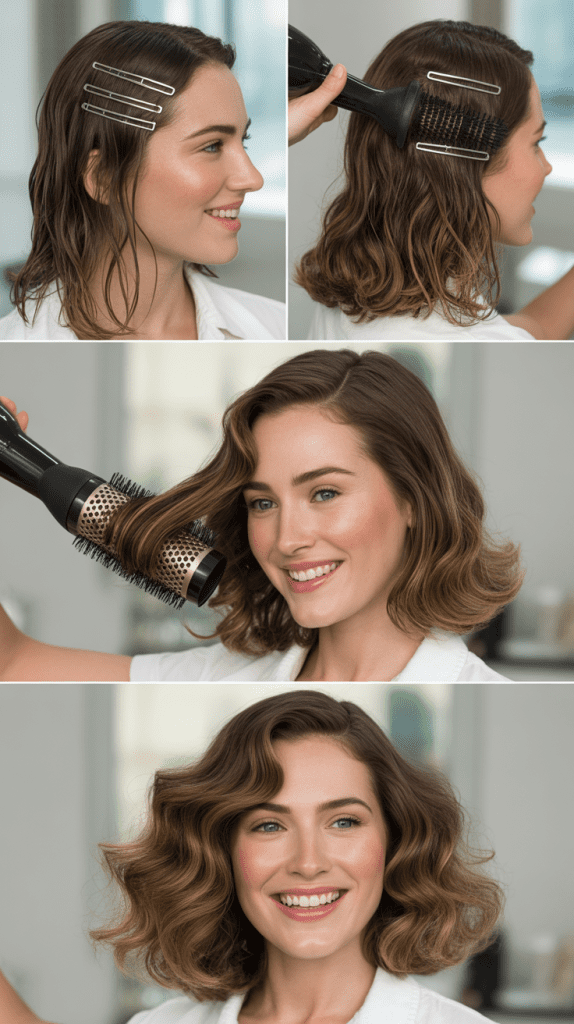
A voluminous blowout transforms medium-length hair into a bouncy, salon-quality style that exudes confidence and polish.
This classic technique creates lift at the roots and movement throughout, making hair appear thicker and healthier while maintaining a touchable finish.
Blowout Method:
- Start with damp hair and apply a volumizing mousse or spray from roots to ends, focusing on the root area.
- Section your hair into manageable portions using clips, working with one section at a time for best results.
- Use a large round brush to lift each section at the root while directing heat from the blow dryer down the hair shaft.
- Roll the ends of each section around the brush and apply heat, then allow to cool before releasing for lasting curl.
- Flip your head upside down and run your fingers through your hair, then flip back up and apply a light finishing spray.
19. Boho Fishtail Side Braid
The boho fishtail side braid offers a relaxed, textured alternative to traditional braids and perfectly embodies casual sophistication.
This intricate-looking style is surprisingly manageable for medium-length hair and creates beautiful visual interest with its woven pattern.
Fishtail Instructions:
- Sweep all your hair over one shoulder and divide it into two equal sections instead of the traditional three.
- Take a small piece from the outer edge of the left section and cross it over to join the right section.
- Repeat on the opposite side, taking a small piece from the outer edge of the right section and crossing it to the left.
- Continue this alternating pattern down the length of your hair, keeping the sections relatively small for a more defined fishtail pattern.
- Secure the end with an elastic and gently pull on the outer edges of the braid to loosen it and create that coveted boho texture.
20. Pinned Back Waves
Pinned back waves combine the romance of soft curls with the practicality of keeping hair off your face, creating a look that’s both beautiful and functional.
This style flatters medium-length hair particularly well and transitions seamlessly from day to evening.
Wave and Pin Process:
- Curl your entire head using a curling wand or iron, creating uniform waves throughout for a cohesive look.
- Allow the curls to cool completely, then gently brush through them to soften into waves.
- Take a section from each side of your face, approximately two inches wide from your temple area.
- Bring both sections to the back of your head and secure them together with bobby pins, creating a half-up effect.
- Leave the rest of your hair down in waves and apply a light-hold hairspray to maintain the style.
21. Textured Low Ponytail with Volume

A textured low ponytail with added volume elevates the simplest of styles into something special and modern.
This approach takes the basic ponytail and transforms it through strategic teasing and texturizing, creating a look that’s effortlessly chic.
Volume Building:
- Before creating your ponytail, tease the hair at your crown using a fine-tooth comb to create lift and volume.
- Smooth the top layer over the teased section to conceal the backcombing while maintaining the height underneath.
- Gather your hair into a low ponytail, positioning it at the nape while preserving the volume you created at the crown.
- Wrap a small section of hair from the ponytail around the elastic to create a polished finish.
- Apply texturizing spray to the ponytail length itself, scrunching as you spray to enhance piece-y texture.
22. Knotted Half-Up Style
The knotted half-up style creates an unexpected detail that makes a simple half-up look far more interesting and intentional.
This technique uses your hair itself as the “elastic,” creating a knot that’s both functional and decorative.
Knotting Instructions:
- Section off the top portion of your hair from temple to temple, gathering it as you would for a standard half-up style.
- Divide this section into two equal parts, holding one in each hand at the back of your head.
- Tie these two sections together in a single overhand knot, pulling it tight enough to hold but not so tight it creates discomfort.
- Secure the knot with bobby pins inserted vertically through the center of the knot to prevent it from loosening.
- Arrange the ends of the knotted sections to blend with your remaining hair, and gently pull on the knot to add fullness.
23. Side Rope Braid
The side rope braid offers a quick and easy alternative to traditional braiding that creates a beautiful twisted effect with minimal effort.
This two-strand technique is perfect for those who struggle with three-strand braiding and works wonderfully on medium-length hair.
Rope Braid Creation:
- Sweep your hair over one shoulder and divide it into two equal sections instead of three.
- Twist the right section clockwise several times until it’s tightly coiled, maintaining tension throughout.
- Cross the twisted right section over the left section, then twist the left section clockwise as well.
- Continue this pattern of twisting each section individually clockwise, then crossing them over each other counterclockwise.
- Secure the end with an elastic when you’ve reached your desired length, and gently pull on the rope to add width.
24. Low Braided Bun
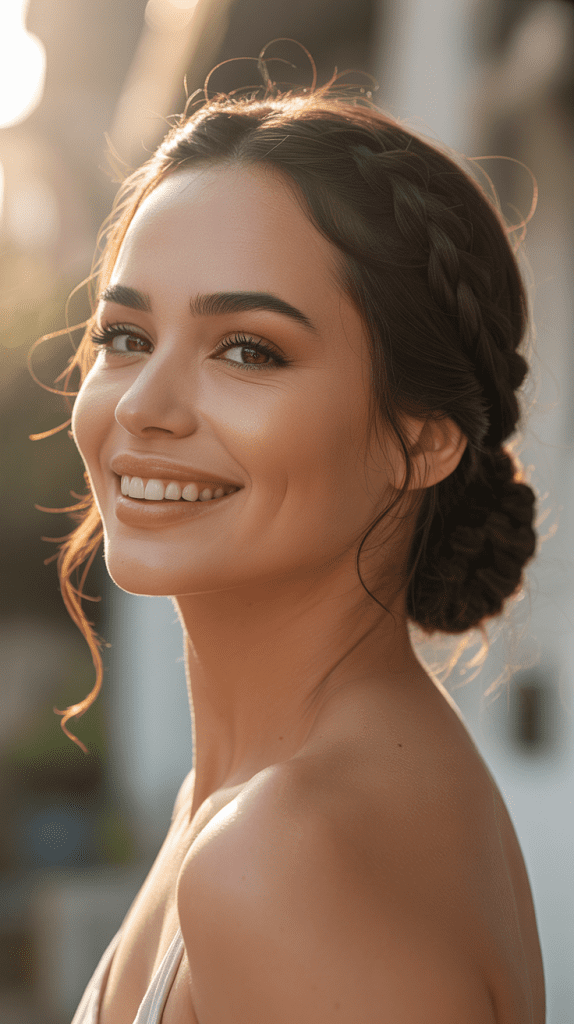
The low braided bun combines two classic elements into one sophisticated style that’s perfect for professional settings or special occasions.
This look works beautifully for medium-length hair and creates the illusion of more length through the braiding technique.
Bun Construction:
- Create a low ponytail at the nape of your neck and secure it with a hair elastic.
- Braid the entire ponytail using your preferred braiding technique, whether traditional three-strand, fishtail, or rope braid.
- Wrap the braided ponytail around the base of the elastic, creating a circular bun shape with the braid visible.
- Secure the bun with bobby pins, inserting them at various angles through the braid to ensure stability.
- Tuck the tail end of the braid under the bun and pin it securely, then apply hairspray for all-day hold.
25. Tousled Side Ponytail

A tousled side ponytail brings a playful, romantic element to a casual style and works perfectly for medium-length hair that benefits from asymmetrical styling.
This off-center look adds visual interest while remaining practical and easy to achieve.
Side Ponytail Styling:
- Apply texturizing spray or dry shampoo throughout your hair to create grip and piecey texture before styling.
- Sweep all your hair over to one side, gathering it just behind your ear at whatever height you prefer.
- Secure with an elastic, intentionally leaving the ponytail slightly loose rather than pulling it tight for a more relaxed appearance.
- Pull out a few face-framing pieces on both sides and allow some shorter layers to fall naturally around your face.
- Gently tease the ponytail itself to add volume and create that deliberately tousled, undone texture.
26. Criss-Cross Half-Up
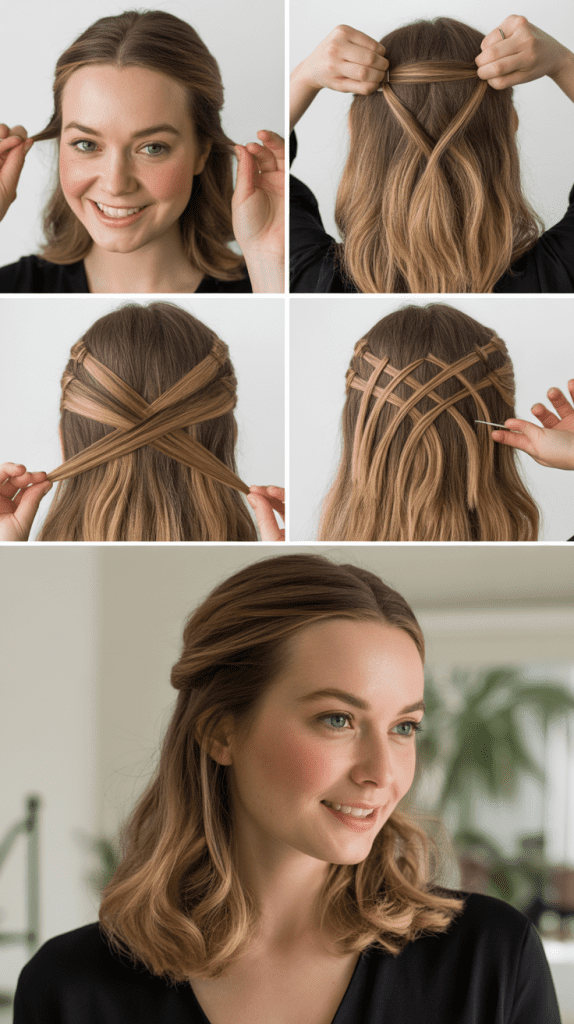
The criss-cross half-up style adds an intricate-looking detail to a simple half-up look through strategic sectioning and crossing.
This technique creates visual interest across the crown area and takes only minutes more than a standard half-up style.
Criss-Cross Technique:
- Take a section of hair from the right side of your head, about two inches wide from your temple area.
- Take an equal section from the left side, maintaining symmetry in size and positioning.
- Cross the right section over to the left side and the left section over to the right side, creating an X pattern at the back.
- Secure both sections together where they meet at the center back using a hair elastic or bobby pins.
- Adjust the crossed sections by gently pulling to ensure they’re visible and create the desired pattern prominence.
27. Half-Up Twist with Accessory
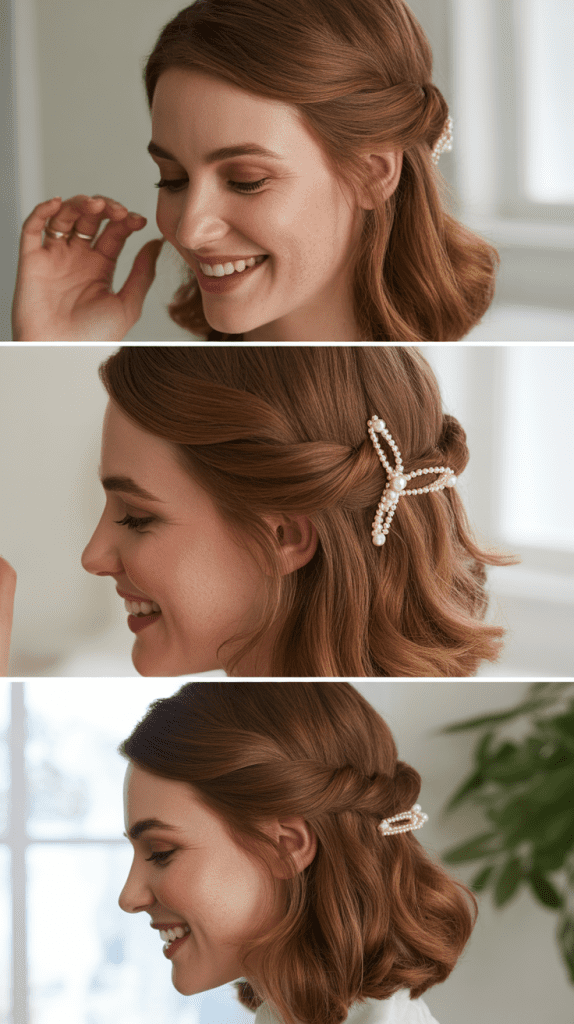
A half-up twist with accessory elevates a simple style through both technique and embellishment, creating a look that’s perfect for special occasions or when you want to feel extra polished.
This combination showcases both your hair and beautiful hair jewelry.
Twist and Accessory Placement:
- Section the top portion of your hair from temple to temple and smooth it backward toward your crown.
- Twist this section as you pull it back, creating a rope-like twist that adds dimension and texture.
- Secure the twist temporarily with a small elastic or bobby pins at the desired location.
- Add your chosen accessory, whether a decorative clip, comb, or barrette, positioning it to cover the elastic and enhance the style.
- Arrange the remaining hair as desired and ensure the accessory is securely fastened to prevent slipping throughout the day.
28. Pulled-Through Braid
The pulled-through braid creates the illusion of an intricate braid without actually braiding, making it perfect for those who struggle with traditional braiding techniques.
This style works exceptionally well on medium-length hair and creates impressive volume and dimension.
Pulled-Through Technique:
- Create a half-up ponytail at the crown of your head and secure it with a small clear elastic.
- Create another ponytail directly below the first, gathering hair from the sides and securing it with another elastic.
- Split the first ponytail in half and bring both sections around the second ponytail, then clip them out of the way temporarily.
- Continue creating ponytails down the length of your hair, always pulling the previous ponytail sections around the new one.
- Once complete, gently pull on each section to add fullness and create that dimensional, braided appearance.
29. Sleek Straight with Deep Part
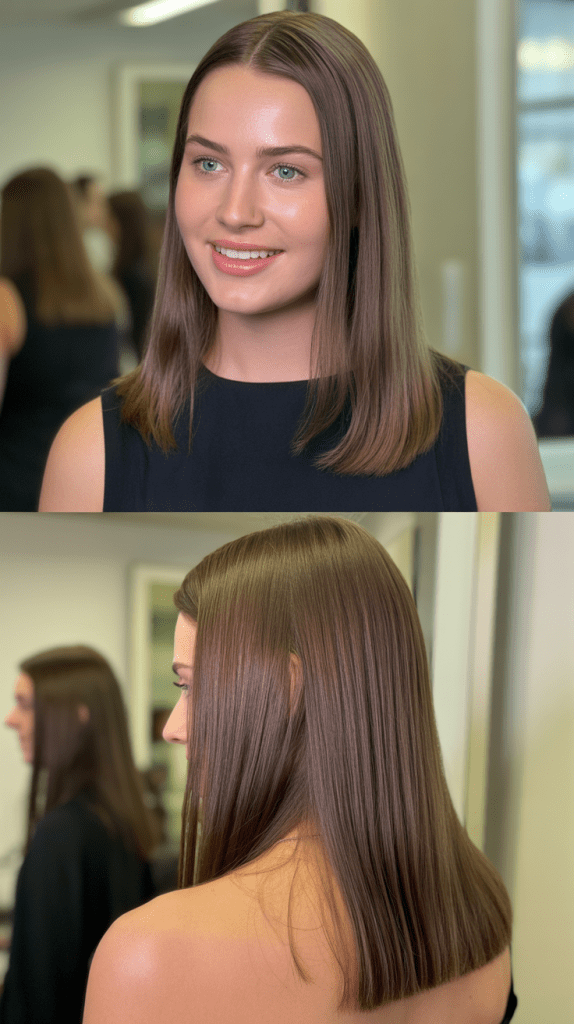
Sleek straight hair with a deep part creates a sophisticated, modern look that showcases healthy hair while providing an elegant frame for your face.
This minimalist style lets the quality and condition of your hair take center stage.
Straightening Process:
- Apply heat protectant spray throughout damp hair before beginning any heat styling to prevent damage.
- Blow-dry your hair straight using a paddle brush, pulling the hair taut as you direct heat down the hair shaft.
- Create a deep side part using a fine-tooth comb, positioning it dramatically to one side for maximum impact.
- Use a flat iron on small sections, gliding from root to tip in one smooth motion for ultimate sleekness.
- Finish with a shine serum applied sparingly to the mid-lengths and ends, avoiding the roots to prevent greasiness.
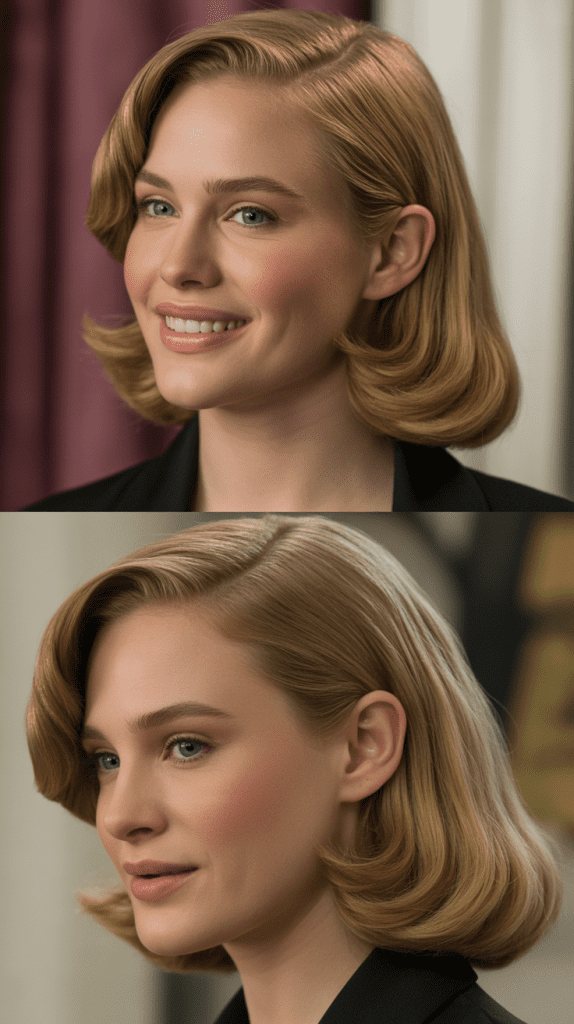
30. Vintage Victory Rolls
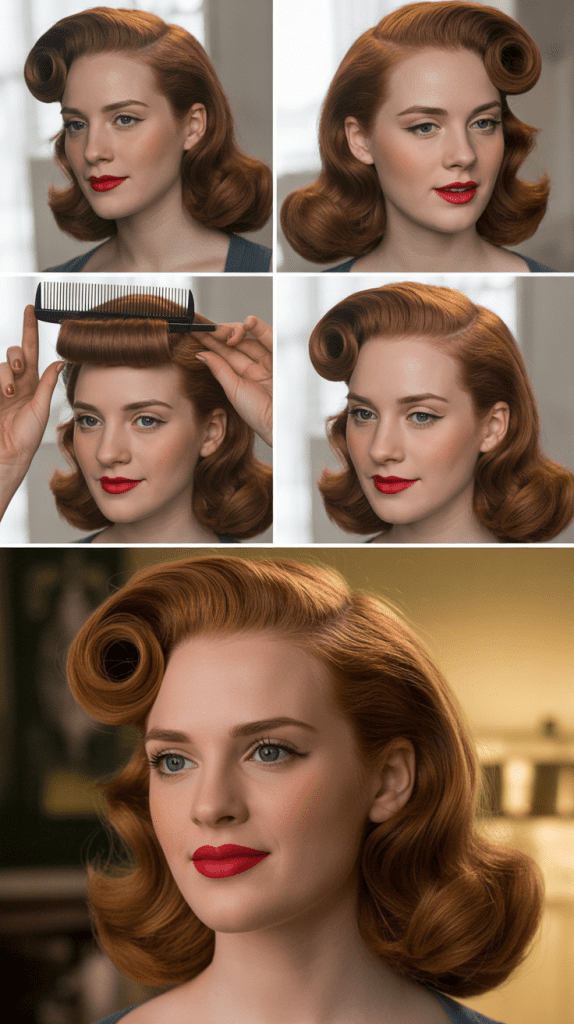
Vintage victory rolls bring retro glamour to medium-length hair and create a statement look that’s surprisingly achievable with practice.
This classic 1940s style works wonderfully for themed events, photoshoots, or anytime you want to channel old Hollywood elegance.
Victory Roll Creation:
- Section off the front portions of your hair on both sides, creating sections about three inches wide from your part to your temple.
- Working with one section, smooth it backward and roll it forward toward your face, creating a cylindrical roll.
- Pin the roll securely against your head using bobby pins, inserting them horizontally through the roll.
- Repeat the rolling and pinning process on the opposite side, ensuring both rolls are symmetrical in size and positioning.
- Style the remaining hair as desired, whether curled, waved, or swept to one side, and finish with strong-hold hairspray to maintain the vintage aesthetic.
Conclusion
Throughout this guide on 30 Easy Medium-Length Hairstyles You Can Do in Minutes, you’ve discovered a diverse collection of styles that prove medium-length hair offers endless possibilities for quick and beautiful looks.
From classic ponytails reimagined with modern twists to romantic braids and sophisticated updos, each hairstyle has been selected for its achievability and stunning results that belie the minimal time investment required.
You now have the knowledge and techniques to transform your daily hair routine, ensuring you never feel stuck in a styling rut again.
These hairstyles work for various occasions, from casual weekends to professional settings, from active days to elegant evenings, giving you options that suit your lifestyle and personal aesthetic.
Remember that the key to mastering these styles lies in practice, experimentation, and adapting each technique to work with your unique hair texture and personal preferences.
With these thirty options at your fingertips, you’ll always have a fresh, polished look ready in just minutes, allowing you to step out confidently knowing your hair looks intentional and beautiful.