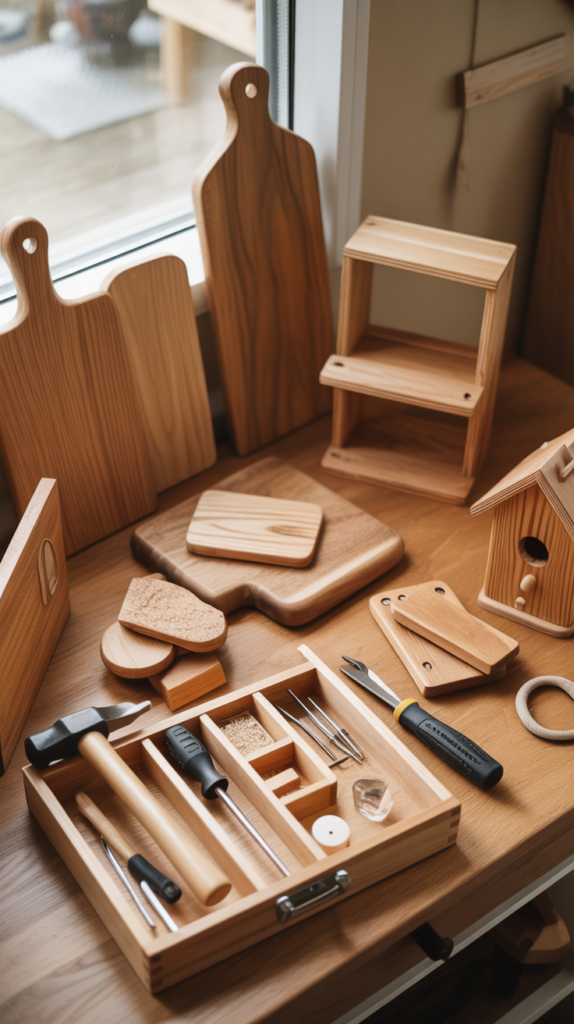
Starting your woodworking journey doesn’t have to be intimidating or time-consuming.
Whether you’re looking to create functional pieces for your home, meaningful gifts for loved ones, or simply want to experience the satisfaction of building something with your own hands, these 37 easy wood projects for beginners you can finish this weekend are perfect for getting started.
This comprehensive guide covers everything from basic tool requirements and wood selection to step-by-step project instructions that require minimal experience and equipment.
You’ll discover simple storage solutions, decorative items, outdoor furniture, kitchen accessories, and organizational tools that can all be completed using basic woodworking techniques.
Each project is designed to build your confidence while teaching fundamental skills like measuring, cutting, drilling, and finishing that will serve as the foundation for more advanced woodworking endeavors.
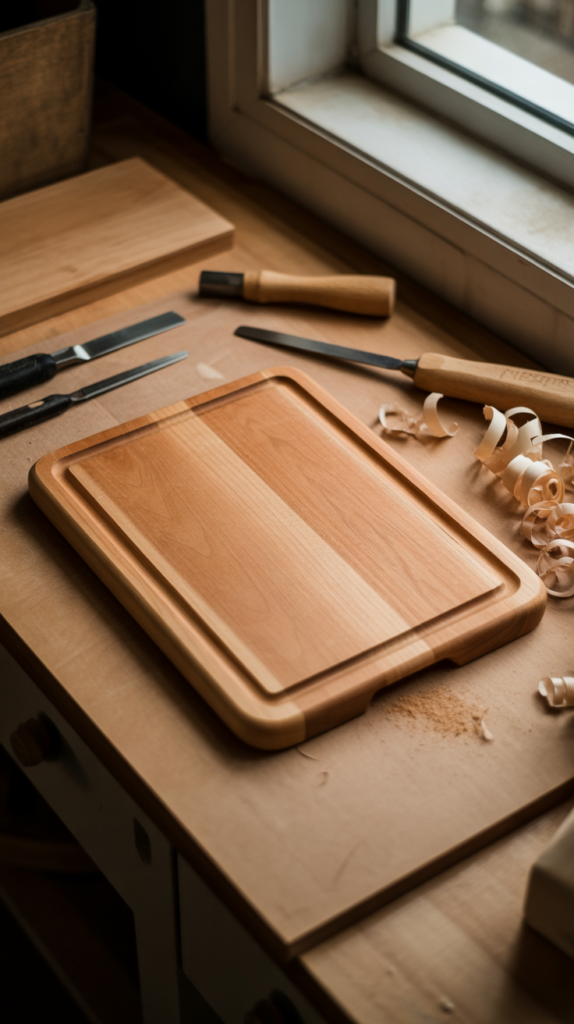
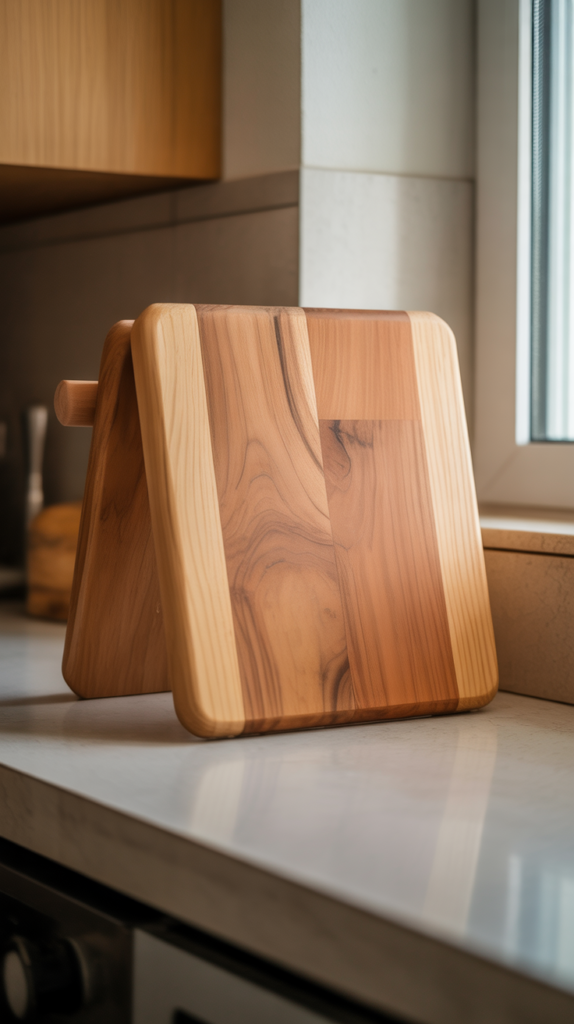
1. Simple Wooden Cutting Board

Creating a wooden cutting board is one of the most rewarding first projects for any woodworking beginner.
This project teaches basic measuring, cutting, and sanding techniques while producing a functional kitchen essential. You’ll learn about wood grain direction and food-safe finishes that make this project both practical and beautiful.
Materials Needed:
- Hardwood board (maple, walnut, or cherry recommended)
- Food-safe mineral oil
- 120 and 220 grit sandpaper
- Router or sandpaper for edge rounding
Step-by-Step Instructions:
- Cut your wood to desired dimensions (typically 12″ x 8″ x 1″)
- Sand the entire surface starting with 120 grit, then 220 grit
- Round the edges slightly using a router or hand sanding
- Apply multiple coats of food-safe mineral oil, allowing each coat to penetrate
- Buff with a clean cloth between applications
Tips for Success:
- Always sand with the grain direction to avoid scratches
- Allow 24 hours between oil applications for best results
- Choose hardwoods that won’t dull knives quickly
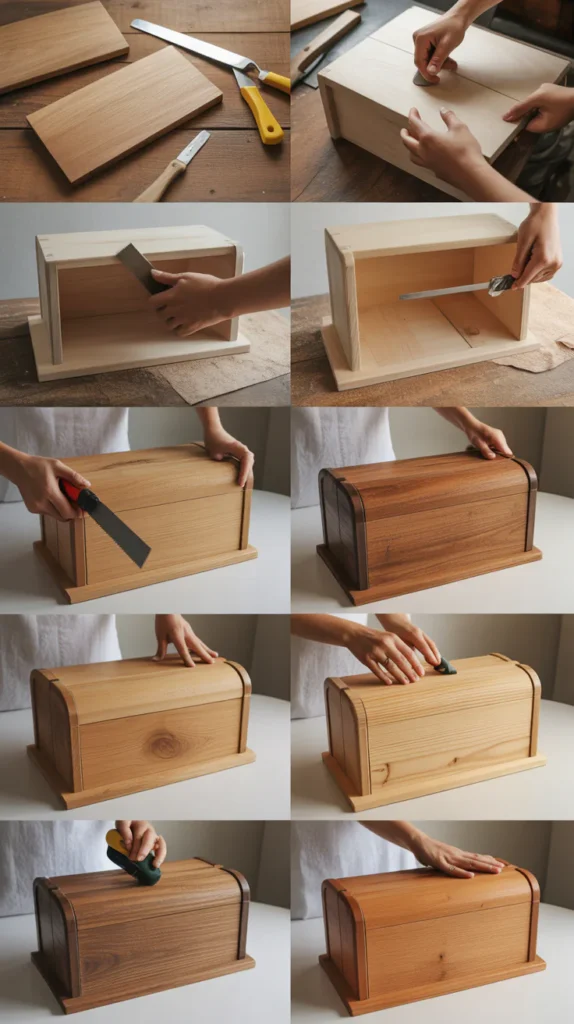
2. Basic Storage Box
A simple storage box teaches fundamental joinery techniques and provides excellent practice for measuring and cutting accurately.
This versatile project can be customized for any room in your house and serves as an introduction to working with multiple pieces of wood. The basic box construction method you’ll learn here forms the foundation for countless other woodworking projects.
Required Tools:
- Circular saw or miter saw
- Drill with bits
- Wood screws
- Wood glue
- Hinges for lid
Construction Process:
- Cut six pieces: bottom, four sides, and top lid
- Pre-drill holes to prevent wood splitting
- Apply wood glue to joints before screwing together
- Sand all surfaces smooth
- Attach hinges for the removable or hinged lid
- Apply your choice of stain or paint finish
Customization Options:
- Add dividers inside for organization
- Include rope handles on the sides
- Create different sizes for various storage needs
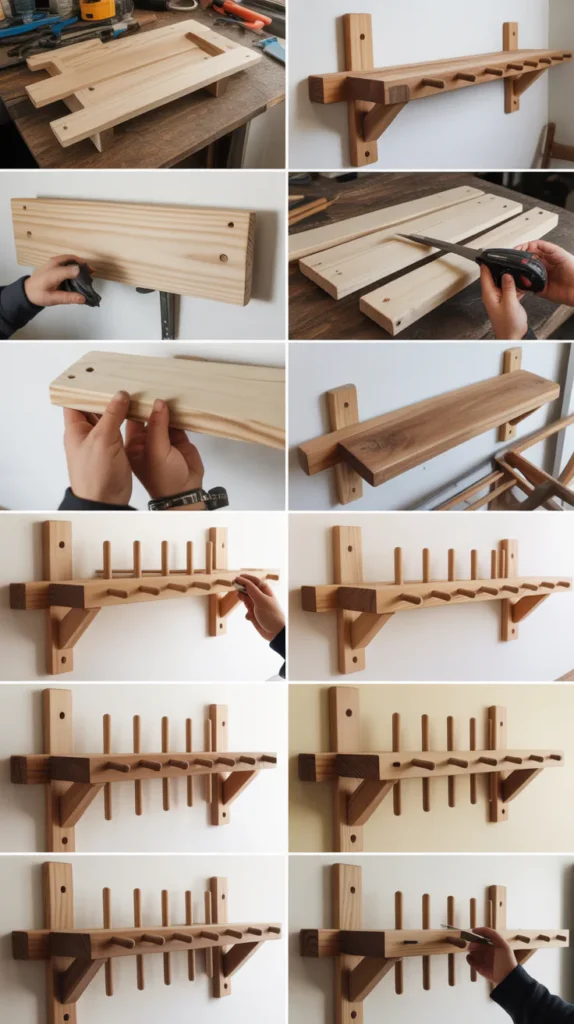
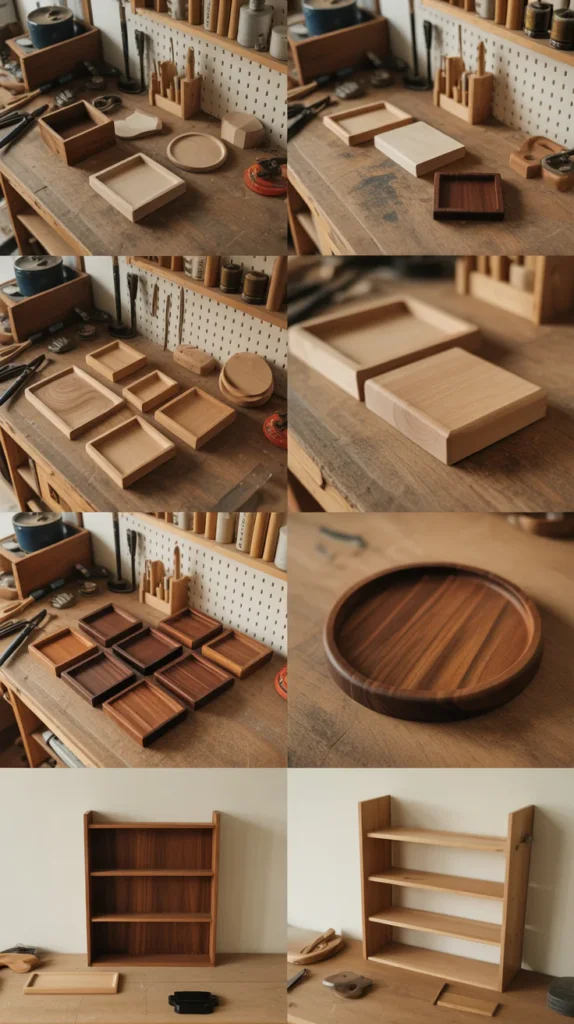
3. Floating Wall Shelves
Floating shelves offer both functionality and modern aesthetic appeal while teaching precise measurement and mounting techniques.
This project introduces concepts of wall anchoring and load distribution that are valuable for many home improvement tasks. You’ll gain experience with both the woodworking and installation aspects of furniture making.
Materials Required:
- Wood boards (1×6 or 1×8 pine or hardwood)
- Heavy-duty wall anchors or walaal studs
- Wood screws
- Level
- Stain or paint
Installation Steps:
- Cut boards to desired shelf lengths
- Sand and finish boards completely
- Locate wall studs using a stud finder
- Mark level lines for shelf placement
- Install brackets or cleats securely into studs
- Mount shelves and test for stability
Design Variations:
- Create stepped arrangements for visual interest
- Use different wood species for contrast
- Add LED strip lighting underneath for accent lighting
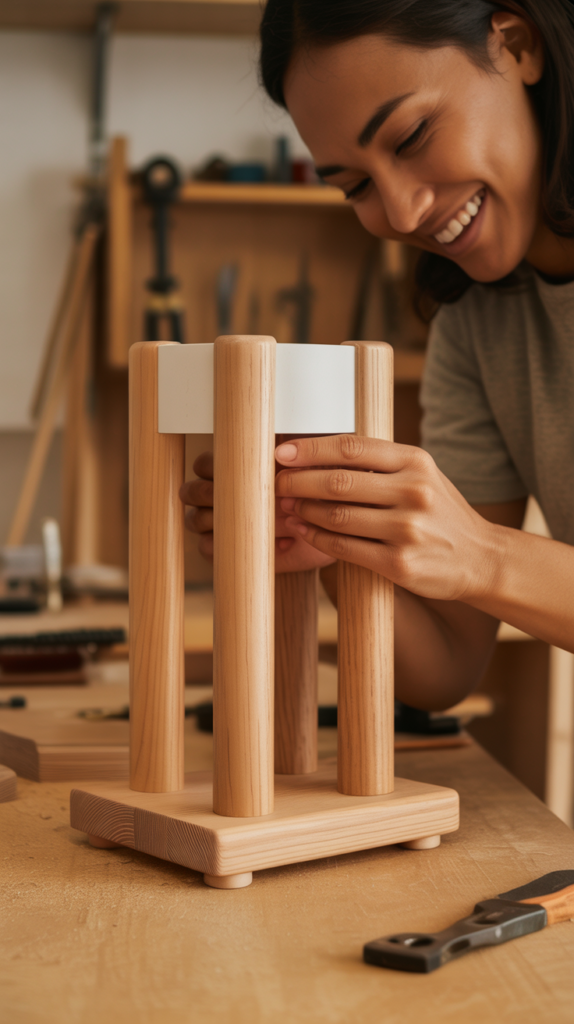
4. Wooden Plant Stand
A plant stand combines simple construction techniques with elegant design possibilities. This project teaches basic leg attachment methods and introduces concepts of stability and proportion in furniture design.
The elevated platform showcases your plants while protecting floors from water damage.
Component List:
- Top platform (12″ x 12″ recommeanded)
- Four legs (cut to desired height)
- Wood screws or dowels for attachment
- Waterproof finish
Assembly Method:
- Cut the top platform and four identical legs
- Mark leg attachment points at corners
- Pre-drill holes to prevent splitting
- Attach legs using screws or dowel joints
- Sand entire assembly smooth
- Apply waterproof finish to protect against moisture
Height Considerations:
- Standard height: 12-18 inches for floor plants
- Counter height: 24-30 inches for elevated display
- Consider plant size and room proportions
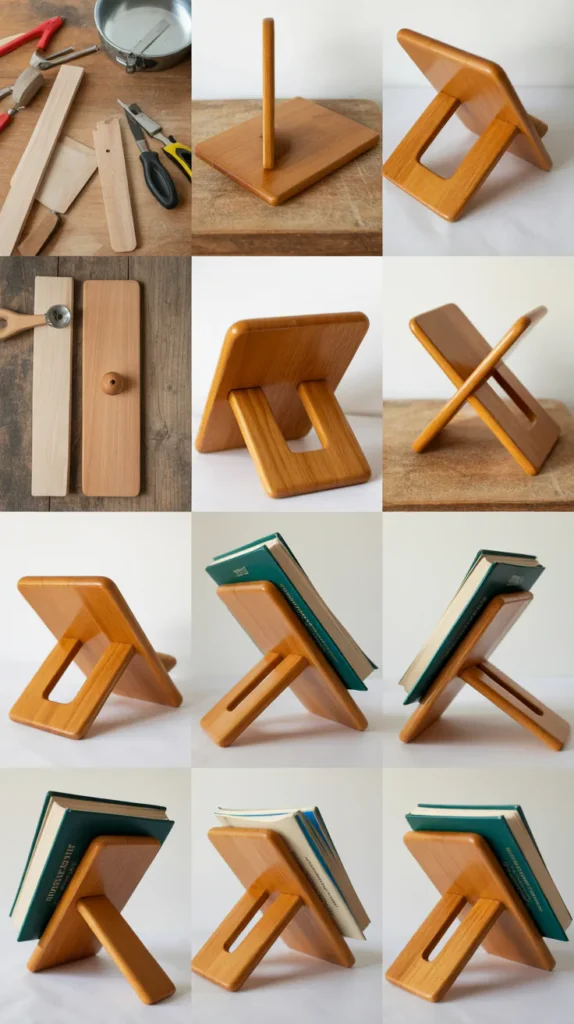
5. Simple Picture Frames
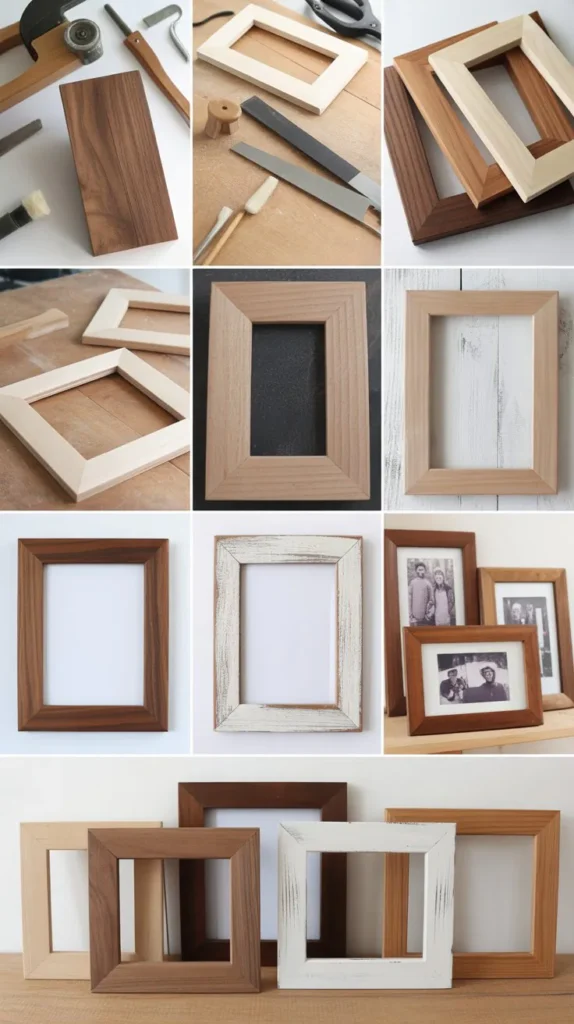
Making wooden picture frames teaches precise miter cutting and introduces basic joinery concepts.
This project develops measuring accuracy and provides practice with corner joints that appear in many furniture pieces. Custom frames allow you to create perfect sizes for your artwork and photographs.
Essential Tools:
- Miter box or miter saw
- Wood glue
- Corner clamps
- Small finish nails
- Frame backing and glass
Frame Construction:
- Calculate frame dimensions based on picture size plus border
- Cut four pieces with 45-degree angles at each end
- Test fit before gluing joints together
- Apply glue and clamp corners until dry
- Add small nails for extra strength
- Route groove for glass and backing if desired
Finishing Options:
- Natural wood stain to highlight grain
- Paint in colors that complement your decor
- Distressed finish for rustic appearance
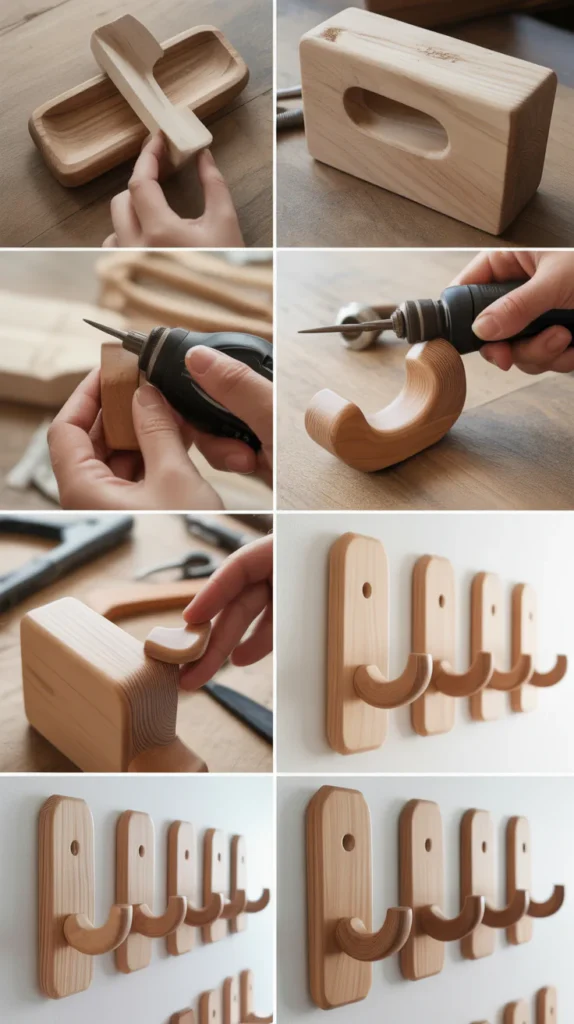
6. Key Holder Rack
A wall-mounted key rack combines practical organization with simple woodworking techniques. This project teaches basic mounting methods and provides an opportunity to practice decorative elements like routing or wood burning.
The finished piece keeps keys organized while adding character to your entryway.
Materials Needed:
- Wood board (6-8 inches wide, 12-16 inches long)
- Metal hooks or wooden pegs
- Wall mounting hardware
- Decorative elements (optional)
Construction Steps:
- Cut board to desired size and sand smooth
- Mark positions for hooks or pegs evenly spaced
- Drill pilot holes for hook installation
- Add decorative text or designs if desired
- Apply finish of choice
- Install mounting hardware on back
Personalization Ideas:
- Wood burn family name or decorative patterns
- Add small shelf above hooks for mail or sunglasses
- Use reclaimed wood for rustic appearance
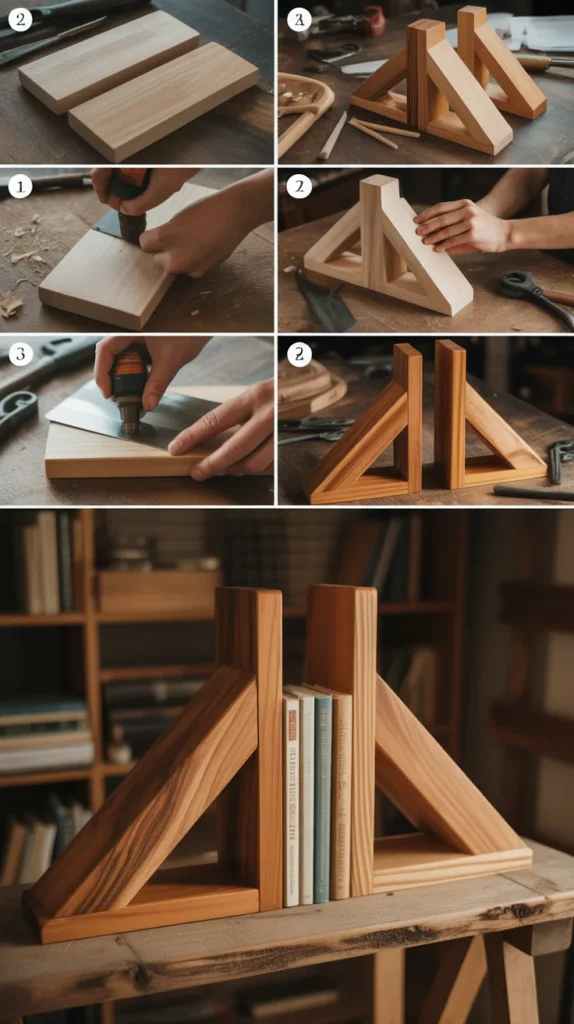
7. Simple Bookends
Wooden bookends provide both function and visual appeal while teaching basic shaping and finishing techniques.
This project allows for creative design expression and gives practice working with angles and stability principles. Heavy, well-made bookends become lifetime accessories for any book lover.
Design Options:
- Simple triangular shape
- L-shaped for maximum stability
- Decorative cutouts or carved elements
- Weighted base for extra holding power
Construction Process:
- Choose design and create template
- Transfer pattern to wood and cut shape
- Sand all surfaces and edges smooth
- Test stability with actual books
- Apply protective finish
- Add felt pads to bottom to protect surfaces
Weight Considerations:
- Use dense hardwoods for natural weight
- Consider adding metal weight inserts
- Size appropriately for book collection
8. Wooden Coasters
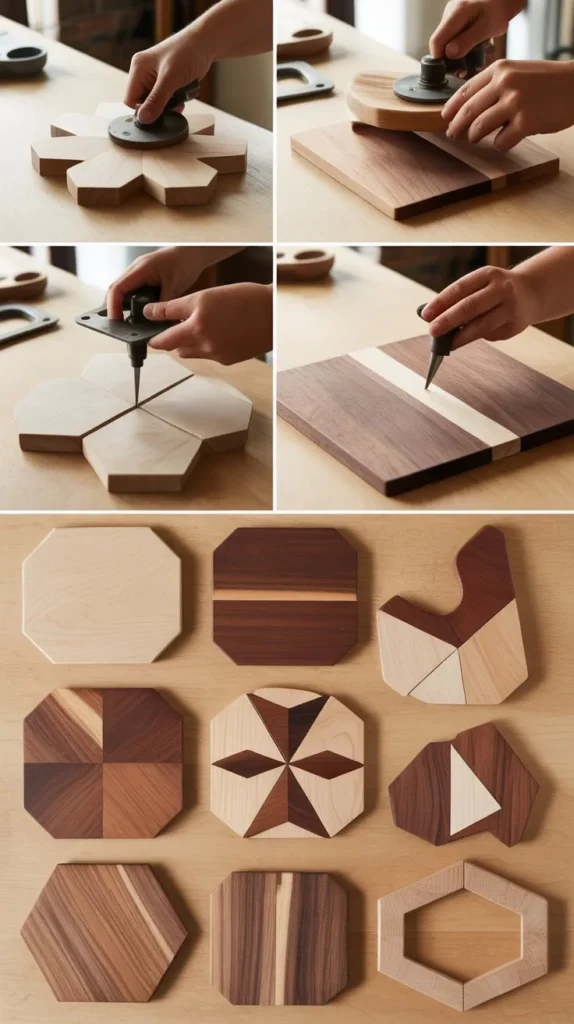
Coaster making introduces precision cutting and finishing techniques while creating useful household items.
This project teaches batch production methods and provides excellent practice for achieving consistent results across multiple pieces. The small size makes coasters perfect for experimenting with different wood species and finishes.
Production Method:
- Choose wood species and cut to coaster dimensions
- Create template for consistent sizing
- Cut multiple pieces using template
- Sand each piece through progressive grits
- Round edges slightly for comfort
- Apply multiple coats of protective finish
Size and Shape Options:
- Round: 4-inch diameter standard
- Square: 4×4 inches with rounded corners
- Hexagonal or other geometric shapes
- Consider glass or cup size when planning
Finish Considerations:
- Water-resistant finish essential
- Multiple thin coats better than single thick coat
- Allow proper curing time between uses
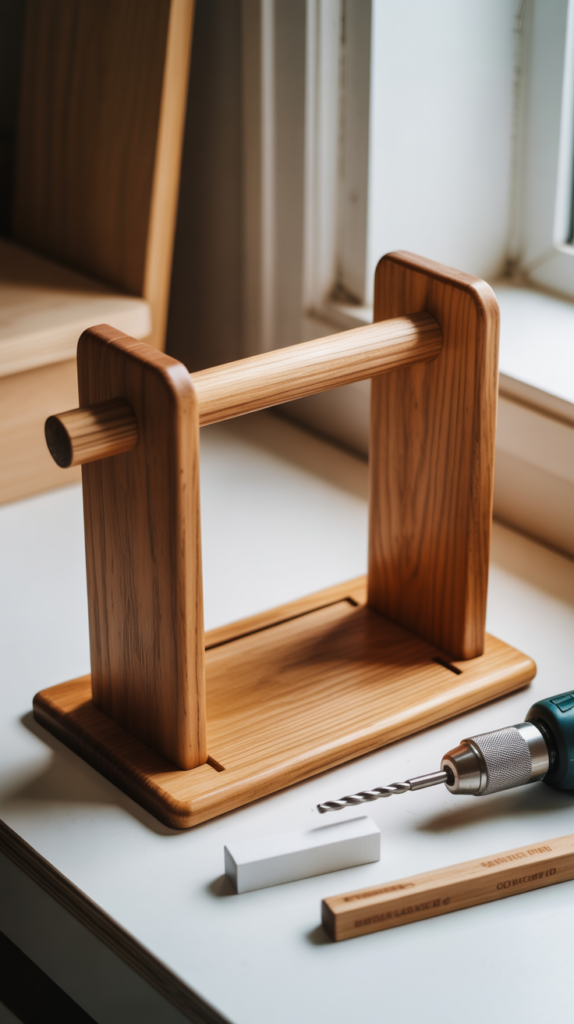
9. Wall-Mounted Coat Rack
A coat rack teaches basic mounting principles and provides practice with spacing multiple elements evenly.
This functional project combines simple construction with practical home organization needs. The wall-mounted design saves floor space while providing convenient storage for coats, hats, and bags.
Planning Considerations:
- Determine mounting height based on users
- Calculate spacing between hooks for typical coats
- Consider wall type and appropriate anchors
- Plan hook style (wooden pegs vs metal hooks)
Assembly Process:
- Cut backing board to desired length
- Mark hook positions evenly spaced
- Drill holes for wooden pegs or mount metal hooks
- Sand and finish backing board
- Install secure wall mounting system
- Test with actual coats for spacing adequacy
Style Variations:
- Rustic barn wood appearance
- Modern minimalist design
- Painted to match room decor
- Add shelf above for hats or accessories
10. Simple Jewelry Box
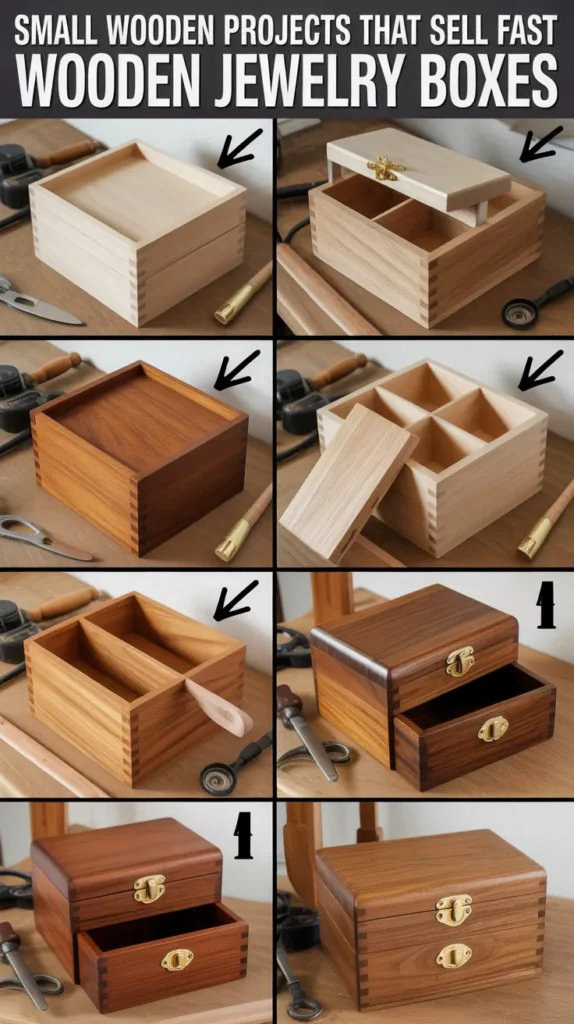
Creating a jewelry box introduces compartment construction and teaches basic hinge installation.
This project combines multiple woodworking skills while creating a meaningful gift or personal storage solution. The intimate scale requires precision and attention to detail that improves overall craftsmanship.
Interior Design:
- Plan compartment sizes for specific jewelry types
- Consider velvet or felt lining for protection
- Design lift-out trays for multiple levels
- Include mirror in lid if desired
Construction Details:
- Use thin wood for dividers to maximize space
- Install quality hinges for smooth operation
- Add soft-close mechanisms if budget allows
- Create finger pulls or small knobs for compartments
Finishing Touches:
- Choose interior fabric colors carefully
- Apply extra coats of finish for durability
- Consider lock mechanism for security
- Add felt feet to protect furniture surfaces
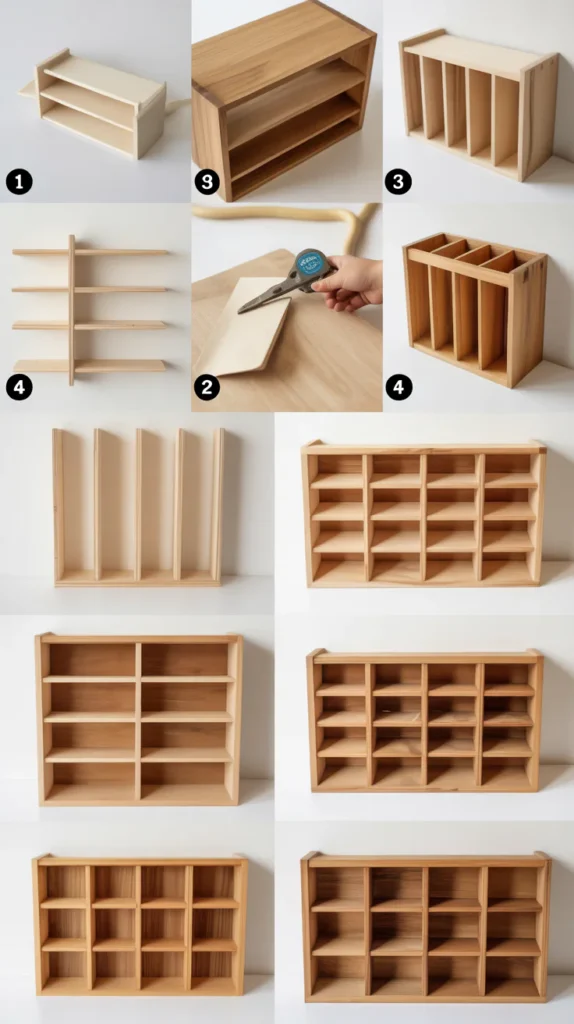
11. Basic Tool Organizer
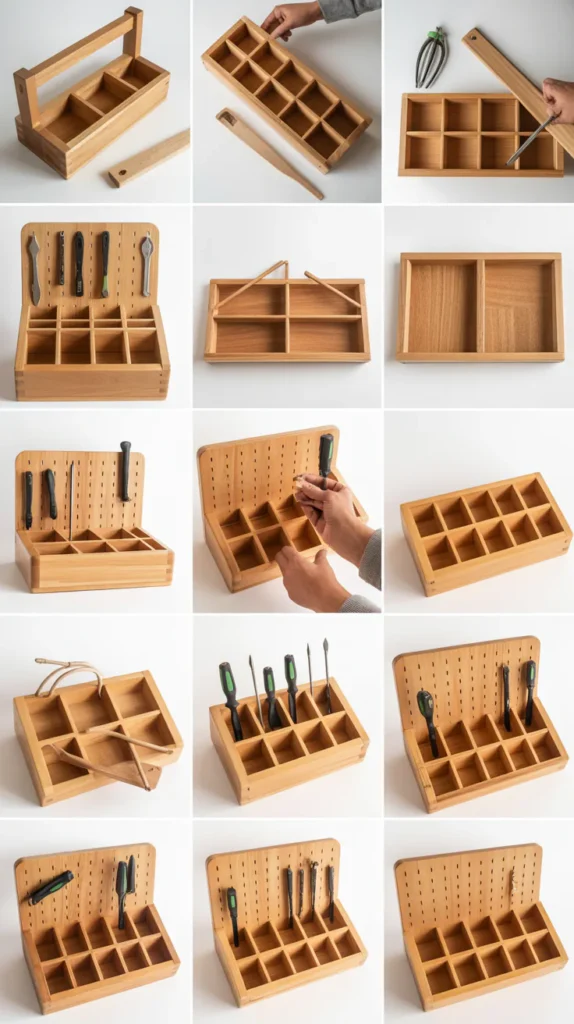
A workshop tool organizer teaches practical storage design while providing essential organization for your growing tool collection.
This project introduces concepts of tool-specific spacing and efficient workshop layout. Building your own organizer allows customization for your exact tool inventory.
Design Planning:
- Inventory current tools and plan for future additions
- Consider both hanging and shelf storage options
- Plan for different tool sizes and shapes
- Include small parts storage solutions
Construction Approach:
- Build modular sections for flexibility
- Use dados and grooves for clean tool slots
- Install on pegboard or directly to wall studs
- Include labels for easy tool return
Organization Features:
- Dedicated slots prevent tool damage
- Easy visibility encourages tool maintenance
- Mobile options for bringing tools to projects
- Separate sections for different tool categories
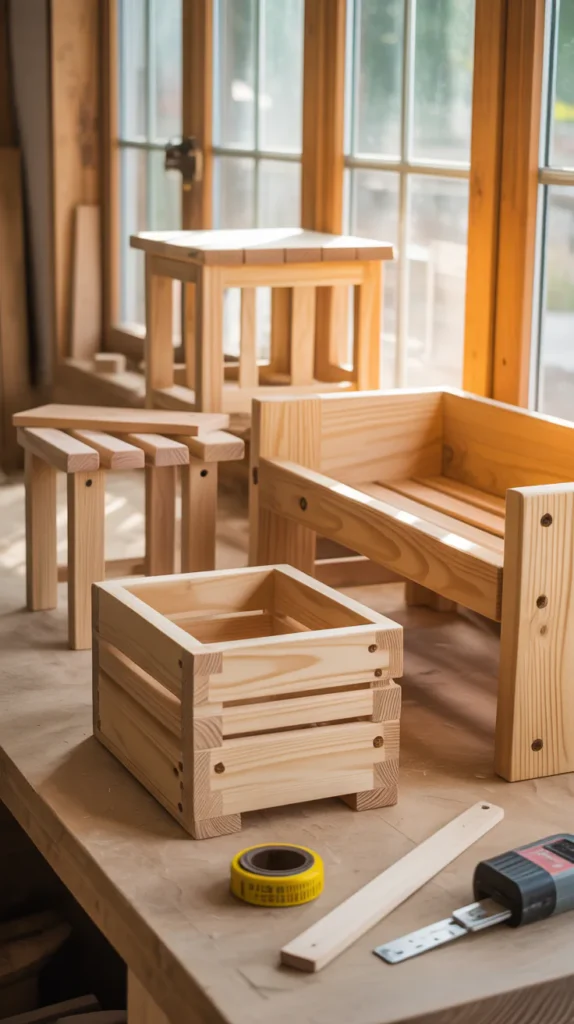
12. Garden Planter Box
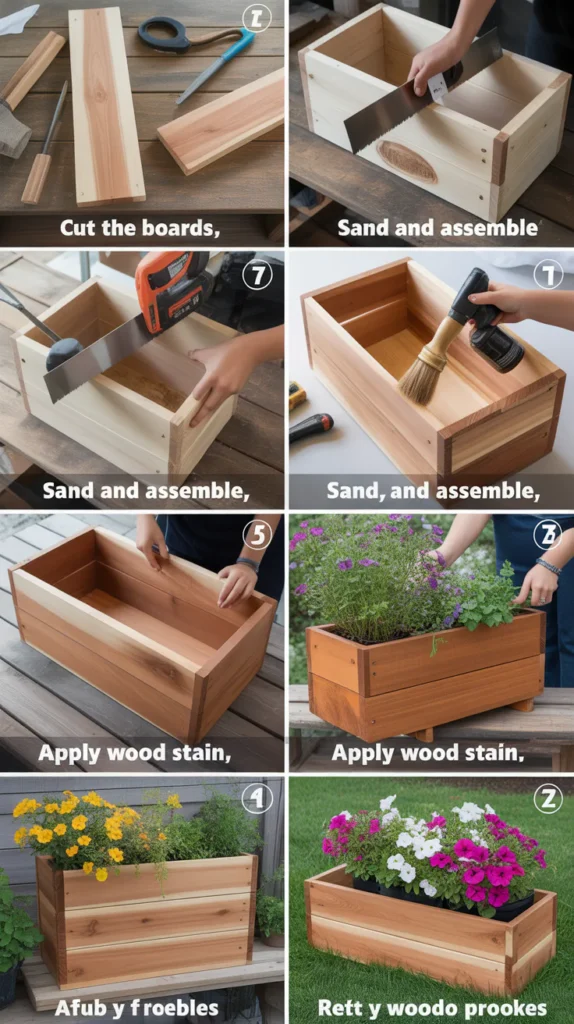
Building a planter box teaches outdoor construction principles and introduces weather-resistant finishing techniques.
This project combines woodworking skills with gardening knowledge to create functional outdoor furniture. Proper drainage and wood selection ensure longevity in outdoor conditions.
Weather Considerations:
- Choose naturally rot-resistant wood species
- Plan for proper drainage holes
- Consider seasonal expansion and contraction
- Apply appropriate outdoor finishes
Construction Details:
- Build with slight slope for water drainage
- Install drainage holes every 6-8 inches
- Line with landscape fabric if desired
- Include legs or feet to elevate off ground
Sizing Guidelines:
- Minimum depth: 8-12 inches for most plants
- Width: 12-24 inches for easy maintenance
- Length: Based on available space and plant needs
- Consider weight when filled with soil
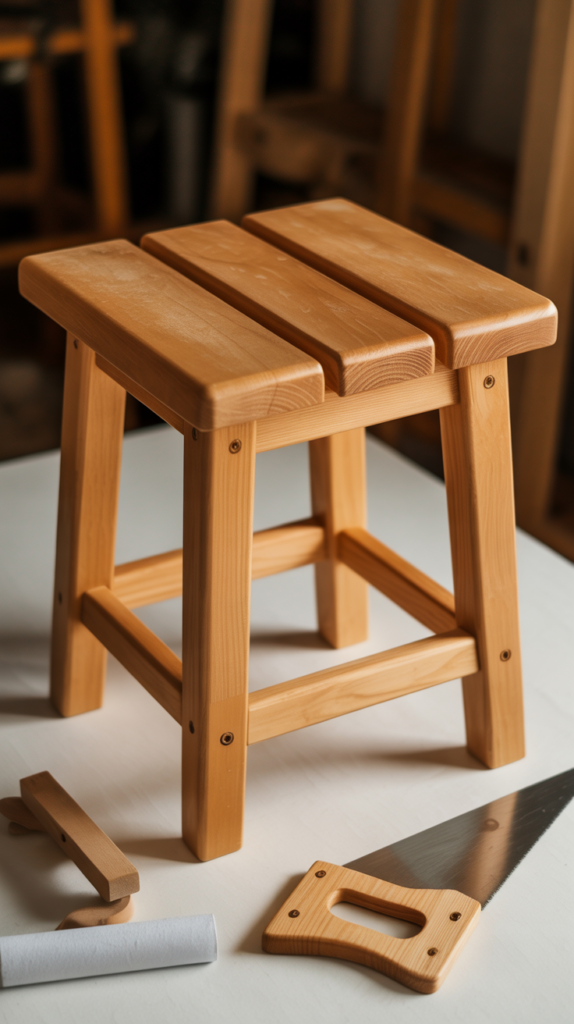
13. Simple Step Stool
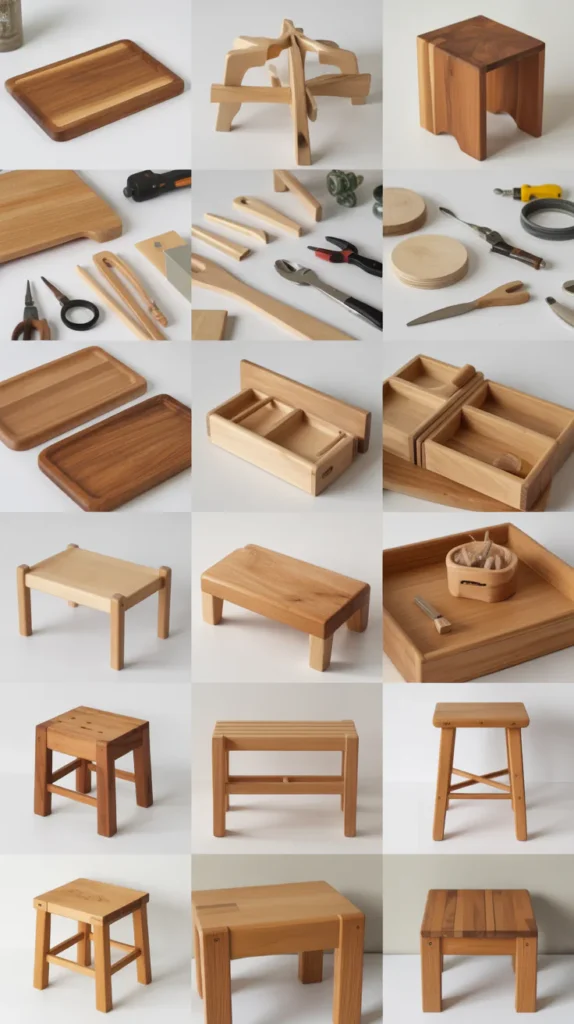
A step stool project teaches load-bearing construction and introduces safety considerations in furniture building.
This practical piece requires careful attention to joint strength and stability testing. The compact size makes it manageable for beginners while teaching principles used in larger furniture pieces.
Safety Requirements:
- Design for appropriate weight capacity
- Test all joints for stability under load
- Sand all surfaces smooth to prevent splinters
- Apply non-slip strips to step surfaces
Construction Method:
- Cut all pieces according to plan dimensions
- Pre-drill all screw holes to prevent splitting
- Use wood glue in addition to mechanical fasteners
- Assemble base first, then attach steps
- Test thoroughly before finishing
Height Options:
- Single step: 8-10 inches for children
- Two step: 16-18 inches for standard counter access
- Folding design for storage convenience
- Add handle cutouts for easy carrying
14. Wooden Napkin Holder
A napkin holder teaches curve cutting techniques and provides practice with smaller-scale precision work.
This table accessory project introduces template use and repetitive production methods. The finished piece adds handmade charm to dining experiences while protecting napkins from spills.
Design Elements:
- Plan curve shapes for visual appeal and function
- Consider napkin size when determining dimensions
- Include base weight for stability
- Design for easy napkin insertion and removal
Cutting Techniques:
- Create templates for consistent curves
- Use jigsaw or band saw for curved cuts
- Sand curves smooth with appropriate grits
- Test fit with actual napkins during construction
Finish Selection:
- Food-safe finishes for dining use
- Multiple thin coats for durability
- Consider maintenance requirements
- Match other wooden dining accessories
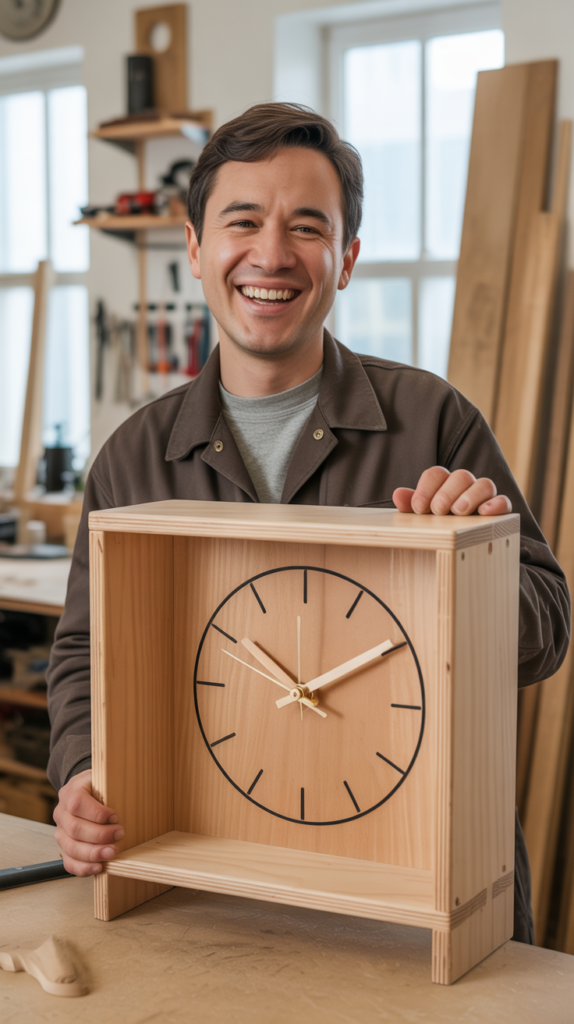
15. Wall Clock

Creating a wall clock combines basic woodworking with simple mechanism installation. This project teaches center-point drilling accuracy and introduces working with purchased clock components.
The personalized timepiece becomes a focal point while demonstrating your growing woodworking skills.
Component Requirements:
- Clock mechanism (battery operated)
- Clock hands appropriate for face size
- Numbers or hour markers
- Hanging hardware
Construction Process:
- Cut clock face to desired size and shape
- Sand and finish face completely
- Mark center point accurately
- Drill precise hole for clock mechanism shaft
- Install mechanism and hands according to instructions
- Add numbers or markers for time indication
Design Variations:
- Round, square, or custom shapes
- Natural wood edge or shaped borders
- Roman numerals or modern number styles
- Add decorative elements around face
16. Simple Magazine Rack
A magazine rack teaches angled construction and provides practice with compound cuts.
This living room accessory combines function with visual design while introducing concepts of proportion and balance. The slanted design requires careful planning and precise execution for proper function.
Angle Considerations:
- Plan appropriate slope for magazine display
- Calculate compound angles for professional appearance
- Consider magazine sizes when spacing compartments
- Test prototype with actual publications
Construction Sequence:
- Cut all pieces including angled ends
- Pre-fit assembly before final gluing
- Use jigs for consistent angle cuts
- Sand interior surfaces before assembly
- Apply finish after complete assembly
Capacity Planning:
- Standard magazines: 1-inch spacing
- Newspapers: 2-inch minimum spacing
- Mixed publications: adjustable dividers
- Consider seasonal publication variations
17. Kitchen Spice Rack
Building a spice rack teaches small-scale precision construction and introduces organization system design.
This kitchen project combines multiple compartments with easy access requirements. Proper sizing and spacing ensure compatibility with standard spice containers while maximizing storage efficiency.
Sizing Standards:
- Standard spice jars: 1.5-inch diameter
- Shelf depth: 2-3 inches for single row
- Height clearance: 4-5 inches between shelves
- Overall width: based on available space
mounting Options:
- Wall-mounted for easy access
- Cabinet door installation
- Counter-top rotating design
- Drawer insert configuration
Organization Features:
- Alphabetical arrangement capability
- Visibility of all labels
- Easy removal and replacement
- Secure retention during door movement
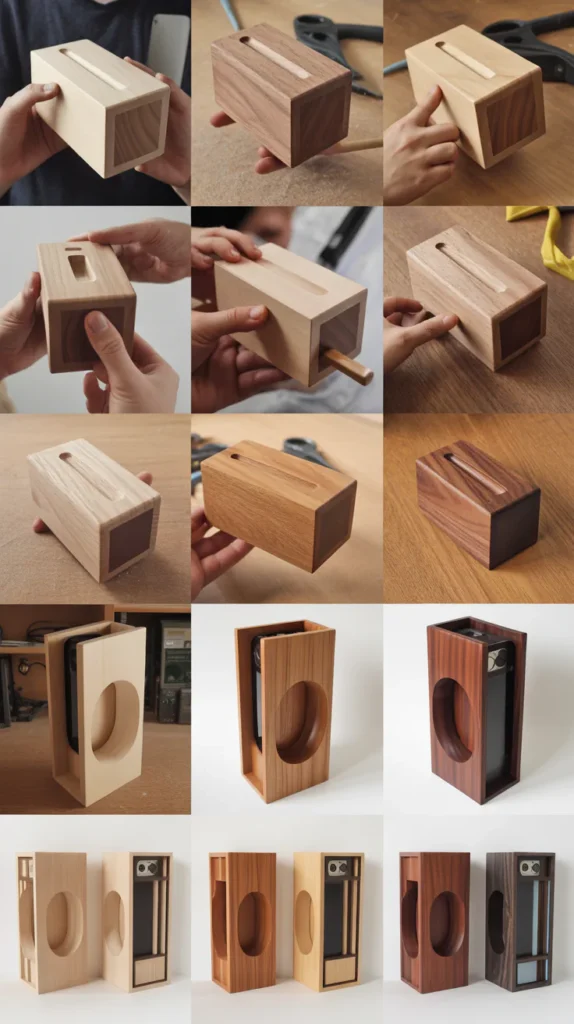
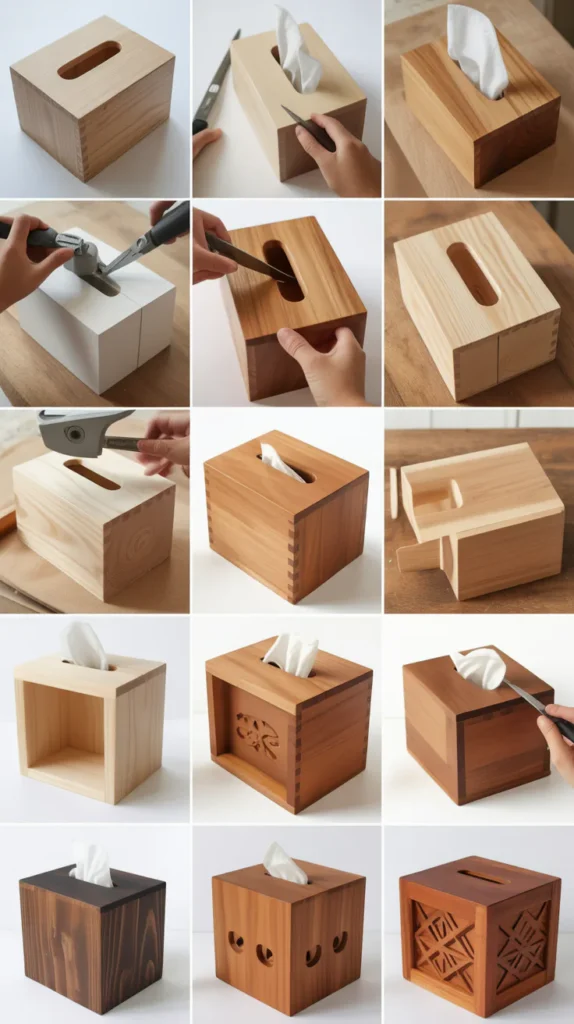
18. Wooden Tissue Box Cover
A tissue box cover project introduces precise inside dimension measuring and teaches box construction with access openings.
This decorative accessory allows customization of standard tissue boxes to match room decor. The project requires careful planning for tissue accessibility while maintaining structural integrity.
Measurement Accuracy:
- Standard tissue box dimensions: 9.5″ x 4.75″ x 4.5″
- Allow clearance for easy box insertion
- Plan opening size for tissue access
- Consider different tissue box brands
Construction Details:
- Build box with removable bottom for access
- Cut top opening after assembly
- Sand opening edges smooth
- Plan for finish before tissue contact
Decorative Options:
- Paint to match room colors
- Wood stain to highlight grain
- Decorative cutouts or patterns
- Hardware additions like handles or feet
19. Simple Desk Organizer
A desk organizer teaches compartment design and introduces efficient space utilization principles. This office accessory project combines multiple storage solutions in one compact unit.
Various compartment sizes accommodate different office supplies while maintaining desktop organization.
Compartment Planning:
- Pencil/pen sections: 1-inch square minimum
- Paper clip storage: shallow wide compartments
- Note pad holder: sized for standard sticky notes
- Business card slots: precise width requirements
Construction Method:
- Build base first with dado slots for dividers
- Cut dividers to exact fit measurements
- Test fit before permanent assembly
- Sand interior surfaces before assembly
Functionality Features:
- Easy access to all compartments
- Stable base prevents tipping
- Smooth surfaces prevent supply damage
- Appropriate height for desktop use
20. Wooden Phone Stand
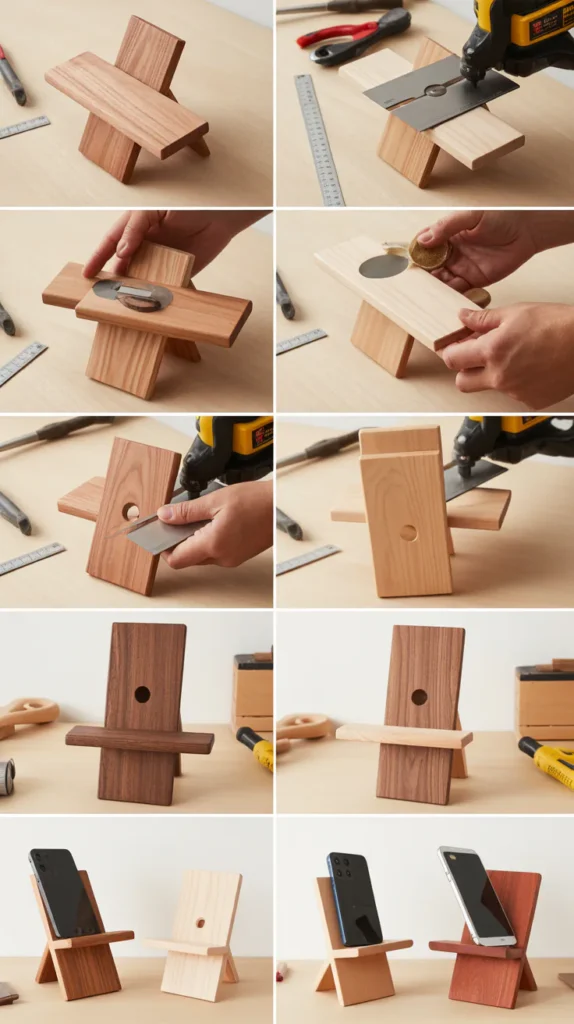
Creating a phone stand teaches angled construction for specific functional requirements. This small project introduces precision cutting for electronic device compatibility.
The stand must accommodate various phone sizes while providing stable support and charging cable access.
Angle Optimization:
- Viewing angle: 60-70 degrees for optimal screen visibility
- Charging port access: plan cutout location
- Stability: base width proportional to phone weight
- Height: appropriate for seated viewing
Device Compatibility:
- Accommodate phones with cases
- Various phone sizes and shapes
- Tablet compatibility with size adjustments
- Future device consideration
Construction Details:
- Precise angle cutting required
- Smooth surfaces prevent device scratching
- Cable management features
- Non-slip base material application
21. Basic Bird House
Building a bird house introduces outdoor construction principles and teaches basic assembly with entrance hole precision.
This project combines woodworking skills with wildlife habitat creation. Proper dimensions and ventilation ensure the house attracts birds while providing safe nesting space.
Bird-Specific Requirements:
- Entrance hole size: 1.25″ for small birds, 1.5″ for larger species
- Interior dimensions: 4″x4″ floor minimum
- Height: 8-12 inches for most songbirds
- Ventilation holes near top for air circulation
Weather Protection:
- Slanted roof for rain runoff
- Overhang to protect entrance
- Drainage holes in floor
- Untreated wood preferred for bird safety
Assembly Considerations:
- Removable side for annual cleaning
- Secure mounting hardware
- Predator protection features
- Appropriate mounting height for target species
22. Wooden Laptop Stand
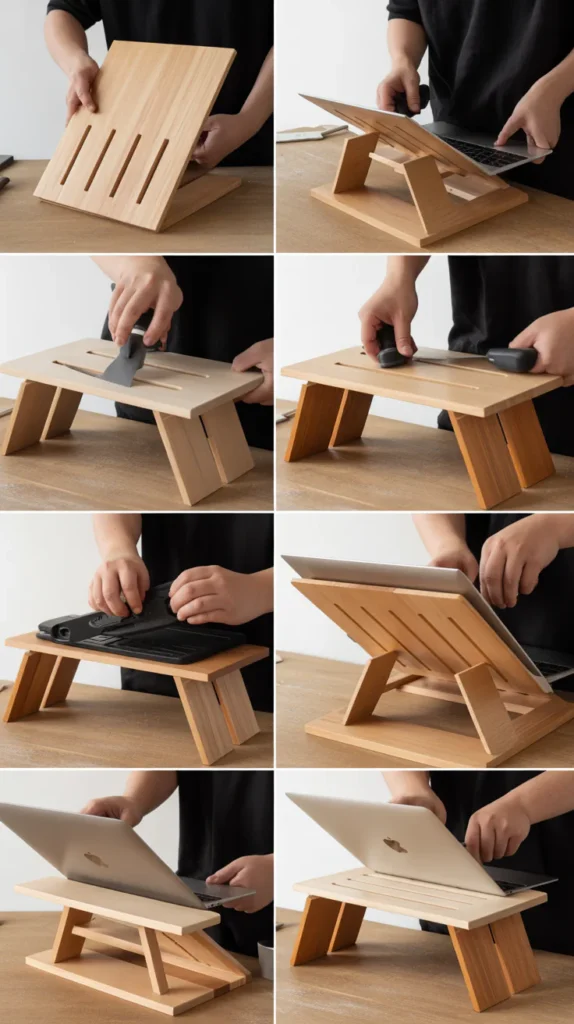
A laptop stand project teaches ergonomic design principles and introduces ventilation considerations for electronic devices.
This office accessory requires precise angling for screen positioning while ensuring adequate airflow. The stand improves workspace ergonomics while showcasing woodworking skills.
Ergonomic Requirements:
- Screen height: top of screen at eye level
- Keyboard angle: 10-15 degrees for comfort
- Wrist support: level typing position
- Viewing distance: 18-24 inches optimal
Ventilation Design:
- Open construction allows airflow
- Raised position improves cooling
- Avoid solid surfaces that trap heat
- Consider laptop exhaust port locations
Adjustability Features:
- Multiple angle positions
- Height adjustment capability
- Folding design for portability
- Cable management integration
23. Simple Serving Tray
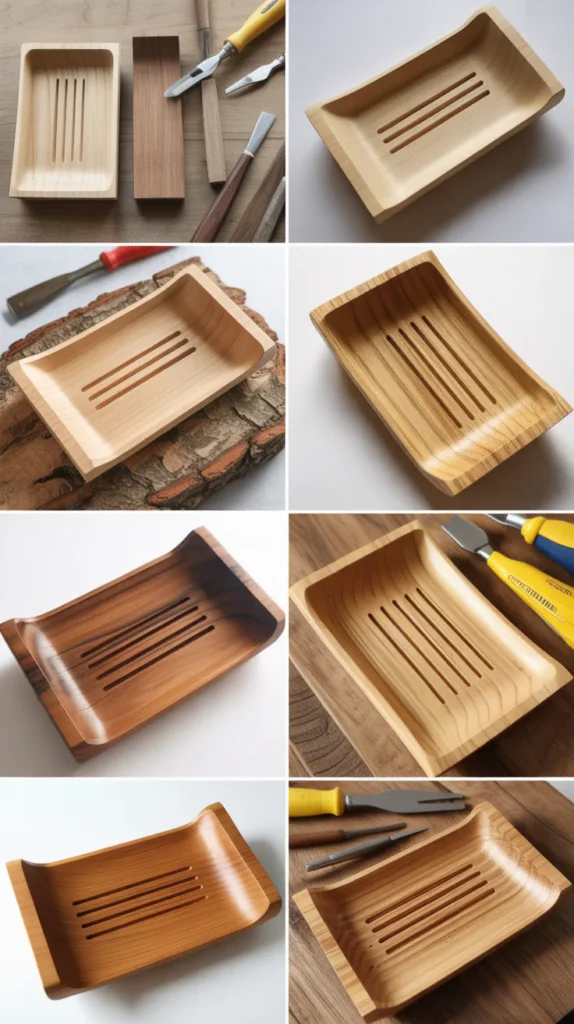
Creating a serving tray teaches handle integration and introduces food-safe finishing requirements.
This kitchen accessory combines practical function with decorative appeal. Proper construction ensures safe food service while the wooden surface adds warmth to dining presentations.
Handle Options:
- Cut-out handles in tray ends
- Attached rope or leather handles
- Wooden dowel handles
- Carved finger grips
Food Safety:
- Select appropriate wood species
- Apply food-safe finishes only
- Avoid toxic wood species
- Plan for easy cleaning maintenance
Size Considerations:
- Standard serving: 12″ x 16″
- Large entertaining: 16″ x 20″
- Breakfast in bed: 10″ x 14″
- Consider carrying comfort when loaded
24. Wall-Mounted Bottle Opener
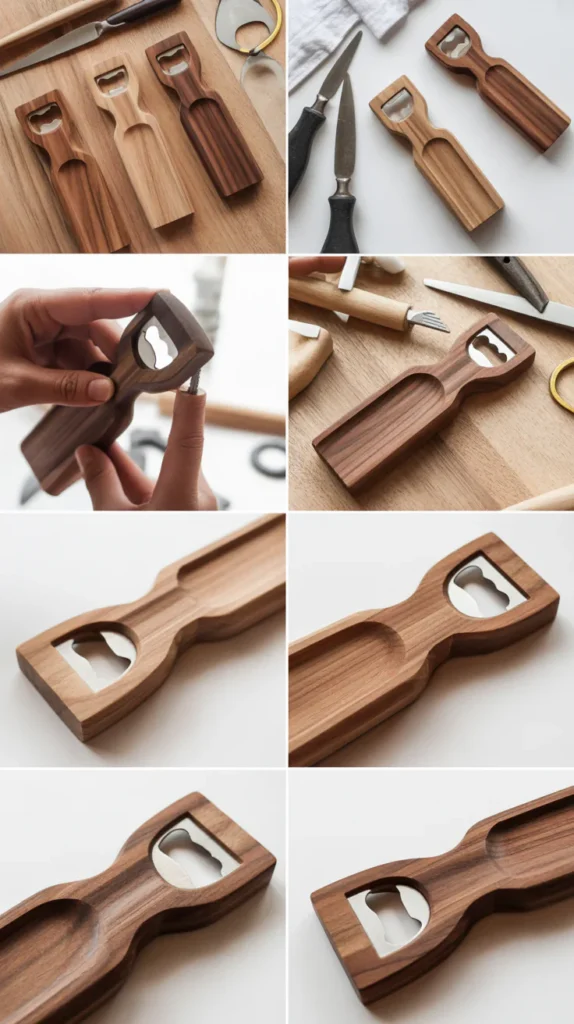
A bottle opener mount teaches metal hardware integration with woodworking projects. This bar accessory project introduces working with purchased components while creating custom mounting solutions.
The finished piece adds personality to entertainment areas while providing convenient bottle opening.
Hardware Integration:
- Select quality bottle opener mechanism
- Plan mounting method for opener attachment
- Include cap catcher feature
- Secure wall mounting system
Design Elements:
- Rustic barn wood appearance
- Modern minimalist style
- Personalized engraving or burning
- Magnetic cap catcher option
Installation Requirements:
- Locate wall studs for secure mounting
- Consider height for comfortable use
- Plan for cap disposal or collection
- Weather resistance for outdoor use
25. Simple Candle Holders
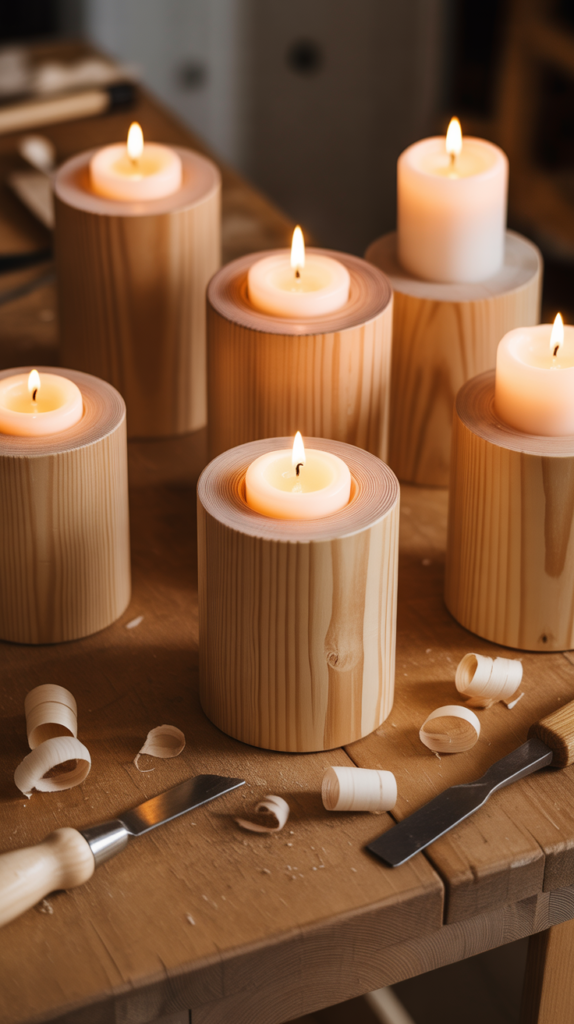
Candle holder construction teaches precise hole drilling and introduces fire safety considerations in woodworking.
This decorative project allows creativity in design while ensuring safe candle burning. Various sizes accommodate different candle types while creating ambient lighting accessories.
Safety Requirements:
- Heat-resistant wood species selection
- Proper candle hole depth and diameter
- Stable base design prevents tipping
- Fire-safe finish application
Candle Compatibility:
- Standard taper candles: 7/8″ diameter holes
- Tea lights: precise circular recesses
- Pillar candles: various diameter accommodations
- Votive candles: glass insert requirements
Design Variations:
- Single candle pedestals
- Multiple candle arrangements
- Seasonal decorative elements
- Grouped sets in varying heights
26. Wooden Wine Rack
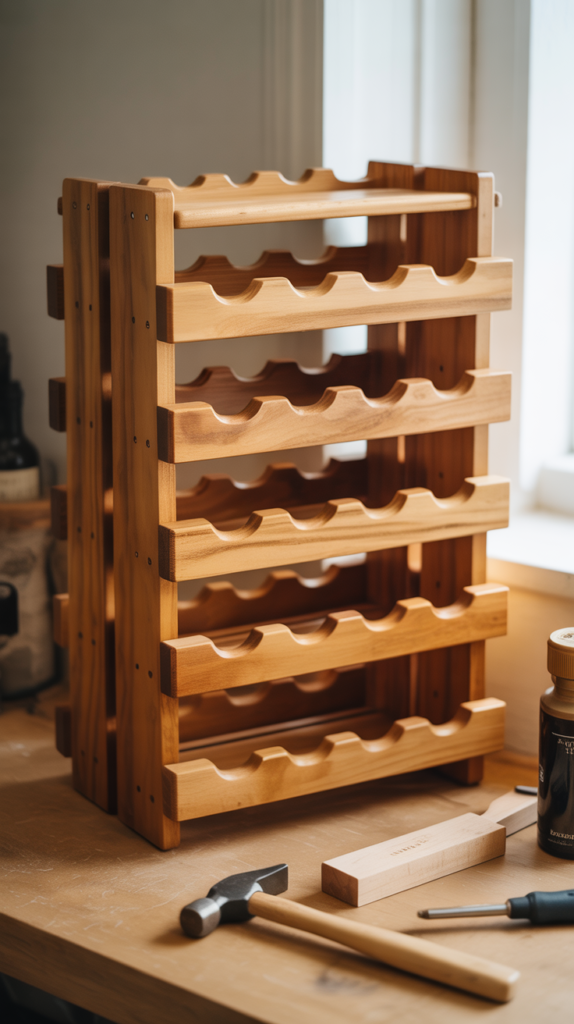
Building a wine rack teaches bottle-specific construction and introduces storage system design principles.
This kitchen or cellar accessory requires precise spacing for bottle security while allowing easy access. Proper angle construction ensures bottles store correctly while maximizing space efficiency.
Bottle Storage Requirements:
- Standard wine bottles: 3.25″ diameter spacing
- Storage angle: slight tilt keeps corks moist
- Easy insertion and removal access
- Secure bottle retention prevents rolling
Construction Details:
- Precise hole spacing for bottle necks
- Stable base prevents rack tipping
- Smooth surfaces prevent label damage
- Modular design allows expansion
Capacity Options:
- Counter-top: 6-12 bottle capacity
- Wall-mounted: space-efficient vertical storage
- Free-standing: larger capacity floor units
- Cellar storage: maximum capacity designs
27. Basic Cutting Board with Juice Groove
An advanced cutting board with juice groove teaches router techniques and introduces food preparation surface design.
This kitchen essential project builds on basic cutting board skills while adding professional features. The groove contains liquids during food preparation while maintaining sanitary surfaces.
Groove Construction:
- Router with round-nose bit creates smooth groove
- Consistent depth: 1/8″ to 1/4″ recommended
- Smooth transitions at corners
- Proper spacing from board edges
Advanced Features:
- Hand grips for easy handling
- Non-slip feet on bottom
- Reversible design for different uses
- Easy cleaning and maintenance
Professional Details:
- End grain construction for knife protection
- Laminated strips for visual appeal
- Generous size for meal preparation
- Food-safe finish application
28. Simple Stool
Stool construction teaches three-legged stability principles and introduces basic furniture joinery. This seating project requires careful attention to leg angles and joint strength.
The compact design provides practical seating while teaching skills applicable to larger furniture projects.
Stability Principles:
- Three legs automatically create stable platform
- Proper leg angle prevents tipping
- Strong joint construction supports user weight
- Appropriate seat height for intended use
Joint Options:
- Dowel joints for clean appearance
- Mortise and tenon for maximum strength
- Angled pocket screws for beginner construction
- Wedged through-tenons for traditional look
Seat Considerations:
- Round seats: 12-14″ diameter standard
- Square seats: 12″x12″ minimum
- Thickness: 1.5-2″ for adequate strength
- Comfort shaping with slight concave curve
29. Wooden Trivet
Creating a trivet teaches heat resistance principles and introduces decorative pattern possibilities.
This kitchen accessory protects surfaces from hot dishes while adding handmade charm to table settings. Small size allows experimentation with different wood species and design elements.
Heat Resistance:
- Dense hardwoods handle heat better
- Thick construction provides insulation
- Raised design allows air circulation
- Heat-resistant finish application
Pattern Options:
- Simple geometric shapes
- Traditional carved patterns
- Modern laser-cut designs
- Functional drainage channels
Size Requirements:
- Standard: 8″ square or 9″ diameter
- Large serving dishes: 10-12″ coverage
- Individual plates: 6″ minimum
- Set collections: multiple coordinated sizes
30. Paper Towel Holder
A paper towel holder teaches rotating mechanism integration and spring tension principles. This kitchen accessory project combines functional requirements with convenience features.
Proper construction ensures smooth paper towel dispensing while maintaining roll security.
Mechanism Requirements:
- Smooth dowel rotation for easy tearing
- Spring tension keeps roll secure
- Easy roll replacement system
- Stable base prevents movement during use
Construction Details:
- Precise dowel hole drilling
- Appropriate spring selection
- Base weight for stability
- Finish durability for kitchen use
Design Variations:
- Counter-top models with weighted bases
- Wall-mounted space-saving designs
- Under-cabinet mounting systems
- Decorative elements matching kitchen decor
31. Simple Jewelry Display Stand
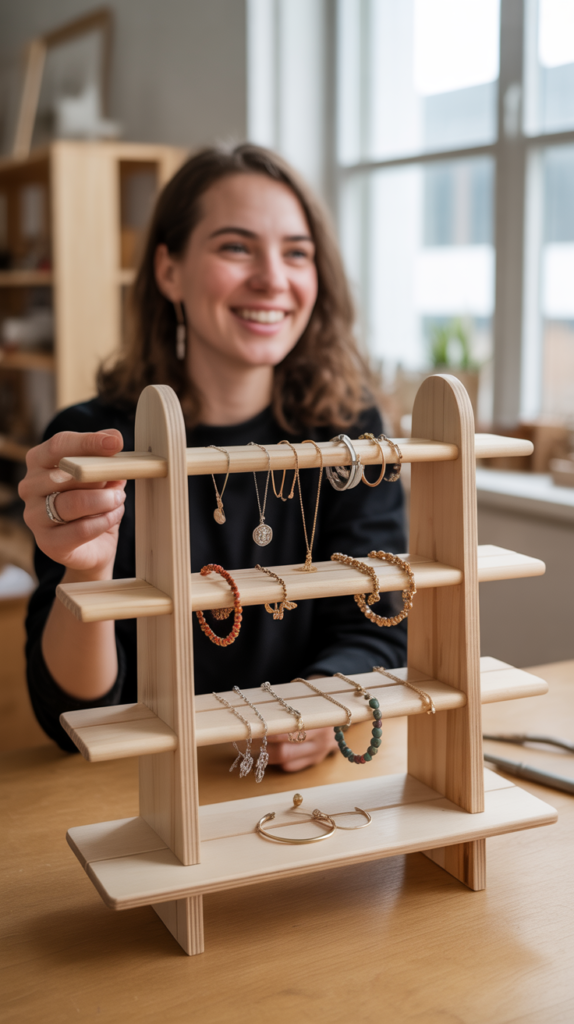
Building a jewelry display stand teaches multi-level construction and introduces retail display principles. This accessory project creates organized storage while showcasing jewelry collections. Various compartment designs accommodate different jewelry types while maintaining easy access.
Display Requirements:
- Multiple height levels for visual interest
- Secure jewelry retention without damage
- Easy access for daily use
- Attractive presentation encouraging organization
Construction Features:
- Stable base prevents tipping
- Smooth surfaces protect jewelry finishes
- Appropriate spacing prevents tangling
- Modular design allows customization
Jewelry-Specific Design:
- Necklace hooks prevent tangling
- Ring slots keep pairs together
- Bracelet bars allow easy selection
- Earring holes provide secure storage
32. Basic Chopping Block
Creating a chopping block teaches end-grain construction and heavy-duty woodworking principles.
This kitchen workhorse requires understanding of wood movement and joint stress distribution. Proper construction creates a lifetime cooking companion that improves with use.
End-Grain Benefits:
- Knife-friendly surface reduces blade dulling
- Self-healing properties from cut fibers
- Superior appearance with exposed grain patterns
- Increased durability under heavy use
Construction Method:
- Edge-glue boards then cross-cut for end-grain exposure
- Alternate grain direction for stability
- Heavy clamping pressure during glue-up
- Multiple finish coats for moisture protection
Size and Thickness:
- Minimum thickness: 2″ for stability
- Working surface: 12″x16″ recommended
- Weight considerations for portability
- Juice groove optional for meat preparation
33. Wall-Mounted Key Cabinet
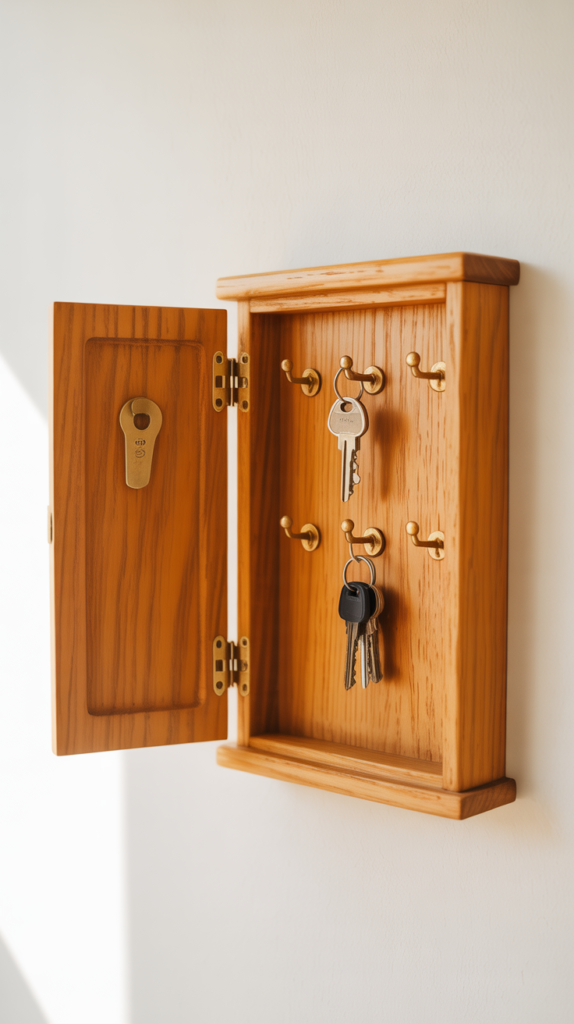
A key cabinet project teaches door construction and introduces concealed storage principles. This entryway accessory combines security with organization while maintaining clean wall appearance.
Proper hinge installation and magnetic closure ensure reliable operation.
Security Features:
- Concealed key storage
- Magnetic or latch closure
- Decorative front panel
- Optional lock mechanism
Interior Organization:
- Multiple hook positions
- Key identification system
- Small item storage shelves
- Emergency key accessibility
Door Construction:
- Smooth hinge operation
- Proper door clearance
- Soft-close mechanisms
- Durable finish for frequent use
34. Simple Clock Shelf
Building a clock shelf teaches bracket construction and introduces wall-mounted furniture principles.
This decorative project combines timekeeping with display space while demonstrating traditional shelf-building techniques. Proper mounting ensures secure support for clocks and decorative items.
Bracket Design:
- Traditional curved profiles
- Adequate support for intended loads
- Proportional to shelf size
- Decorative elements enhance appearance
Shelf Specifications:
- Depth: 6-8″ for standard clocks
- Length: based on clock size plus display space
- Thickness: 1″ minimum for visual weight
- Edge treatments for finished appearance
Mounting Considerations:
- Wall stud location for secure attachment
- Level installation for proper clock operation
- Appropriate height for easy viewing
- Cable management for electric clocks
35. Wooden Soap Dispenser
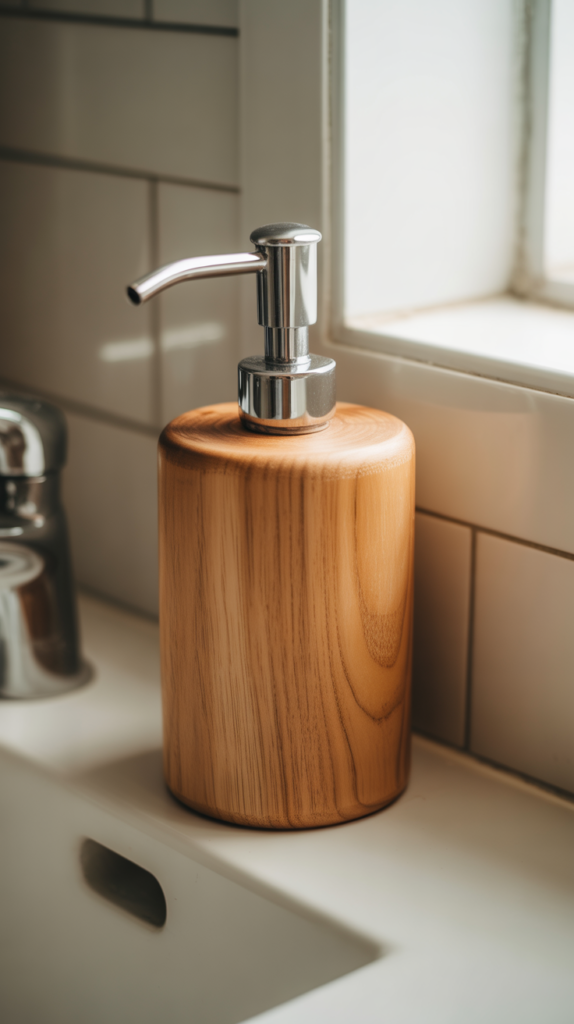
Creating a wooden soap dispenser teaches precise drilling for pump mechanisms and introduces bathroom accessory construction.
This project combines woodworking with plumbing hardware integration while creating a unique alternative to plastic dispensers. Proper sealing ensures water resistance in humid environments.
Mechanism Integration:
- Precise hole drilling for pump assembly
- Thread compatibility with standard pumps
- Seal integration prevents leaking
- Easy refill access design
Water Resistance:
- Marine-grade finishes for bathroom use
- Sealed construction prevents moisture penetration
- Drainage features prevent water accumulation
- Regular maintenance requirements
Size Planning:
- Standard capacity: 8-12 ounces
- Pump reach considerations
- Base stability on wet surfaces
- Refill convenience features
36. Simple Desk Lamp Base
Building a desk lamp base teaches electrical component integration with woodworking skills. This lighting project introduces basic wiring principles while creating functional workspace illumination. Proper construction ensures electrical safety while showcasing natural wood beauty.
Electrical Safety:
- Professional wiring inspection recommended
- Proper wire gauge for lamp requirements
- Secure wire routing through base
- Switch integration and placement
Base Requirements:
- Adequate weight for lamp stability
- Cord management through base
- Switch accessibility and operation
- Heat dissipation for bulb types
Design Elements:
- Modern minimalist styling
- Traditional craftsman appearance
- Adjustable shade positioning
- Coordinated wood and metal finishes
37. Basic Toolbox
Constructing a toolbox teaches portable storage design and introduces hardware integration for moveable furniture.
This workshop essential combines multiple construction techniques while creating practical tool organization. Proper planning ensures adequate capacity for growing tool collections.
Storage Planning:
- Tool inventory assessment
- Compartment sizing for specific tools
- Weight distribution for comfortable carrying
- Growth capacity for future tool additions
Construction Features:
- Reinforced corners for durability
- Quality hinges for lid operation
- Comfortable carrying handle
- Internal organization systems
Hardware Selection:
- Heavy-duty hinges support loaded lid
- Secure latching mechanisms
- Corner reinforcements prevent damage
- Handle attachment strength considerations
These 37 easy wood projects for beginners you can finish this weekend provide an excellent foundation for developing woodworking skills while creating useful and beautiful items for your home.
Each project builds upon fundamental techniques while introducing new concepts that expand your capabilities and confidence.
From simple cutting boards and storage boxes to more complex items like jewelry boxes and tool organizers, these projects offer something for every skill level and interest.
The satisfaction of completing handmade wooden items extends far beyond the weekend spent crafting them, as these pieces become cherished possessions that improve daily life while showcasing your developing craftsmanship.
Start with projects that match your current abilities, focus on learning proper techniques, and most importantly, enjoy the rewarding process of creating something beautiful and functional with your own hands.
Remember that every expert woodworker started with simple weekend projects just like these, and each completed piece represents progress toward mastering this timeless and fulfilling craft.