Woodworking is a rewarding hobby that combines creativity and practical skills.
For beginners, starting with small projects is the best way to build confidence and learn essential techniques.
This article, 37 Easy Small Wood Projects for Beginners, offers a wide variety of simple and fun projects that anyone can tackle.
Whether you want to create useful household items or charming decorative pieces, these projects cover different styles and functions.
By following easy-to-understand instructions and tips, you’ll be able to complete these projects quickly and enjoy the satisfaction of making something with your own hands.
Read on to discover exciting woodworking ideas that require minimal tools and materials but provide great results.
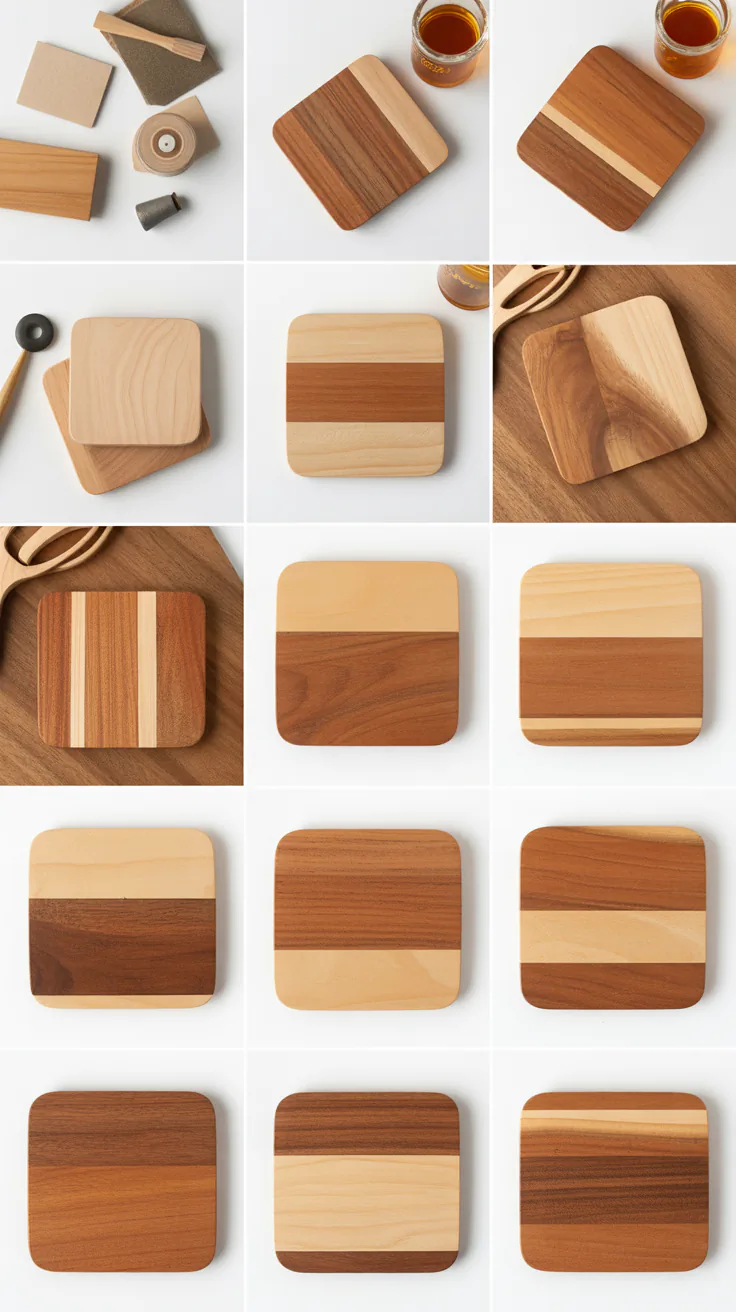
1. Simple Wooden Coasters

Starting with coasters is a perfect introduction to woodworking because they are small, quick, and practical.
They help you practice measuring, cutting, and sanding while creating something useful for everyday life.
- Choose softwood like pine or cedar for easy cutting and shaping.
- Cut wood squares about 4×4 inches and sand the edges smooth.
- Optionally, apply wood stain or paint for added style.
- Finish with a clear coat to protect against water damage.
- Personalize by burning designs or painting patterns for a custom look.
How to Make Simple Wooden Coasters:
- Gather your wood, saw, sandpaper, and finishing supplies.
- Measure and mark four-inch squares on the wood board.
- Cut carefully along the lines with a hand saw or jigsaw.
- Sand all edges and surfaces until smooth.
- Apply your preferred finish and let dry fully before use.
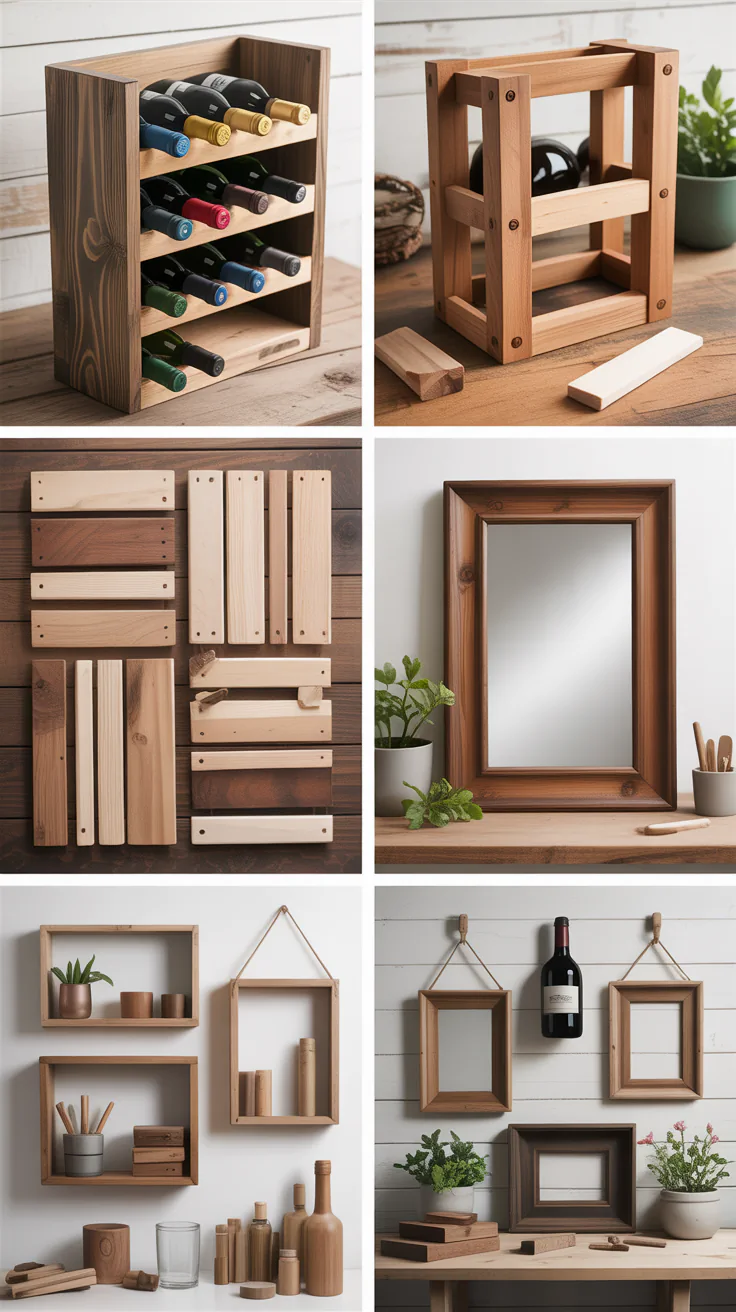
2. Rustic Wooden Picture Frame

Creating a picture frame introduces you to miter cuts and basic joinery techniques.
This project adds charm to any room and makes a great gift idea.
- Select wood with attractive grain or use reclaimed wood for a rustic effect.
- Cut four pieces with 45-degree angled ends to form the frame.
- Join pieces using wood glue and small nails or clamps.
- Sand the frame to remove rough spots and prepare for finishing.
- Apply stain, paint, or a clear sealant depending on your style preference.
How to Make a Rustic Wooden Picture Frame:
- Cut four wood strips to your desired frame size, ensuring angled edges match precisely.
- Use wood glue on the mitered edges and clamp until dry.
- Reinforce corners with small nails or brackets for durability.
- Sand all surfaces to a smooth finish.
- Decorate with paint or stain and seal with a protective finish.
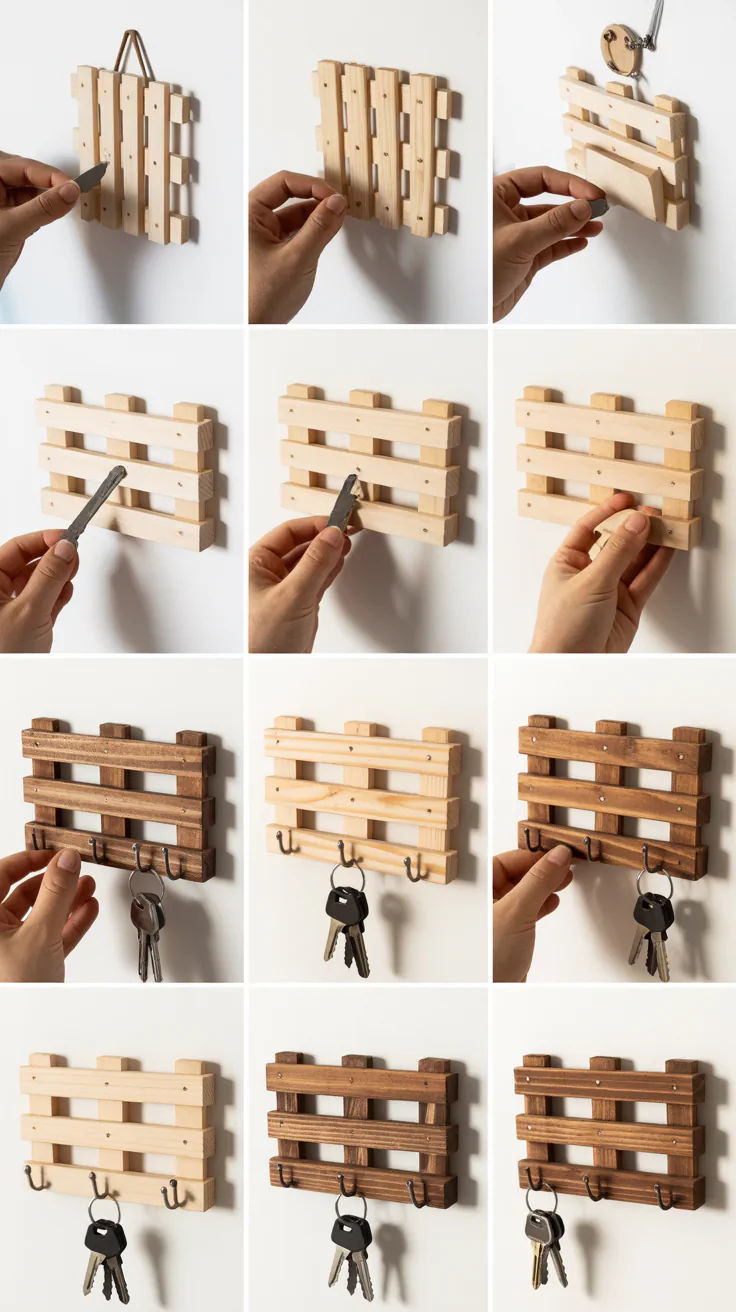
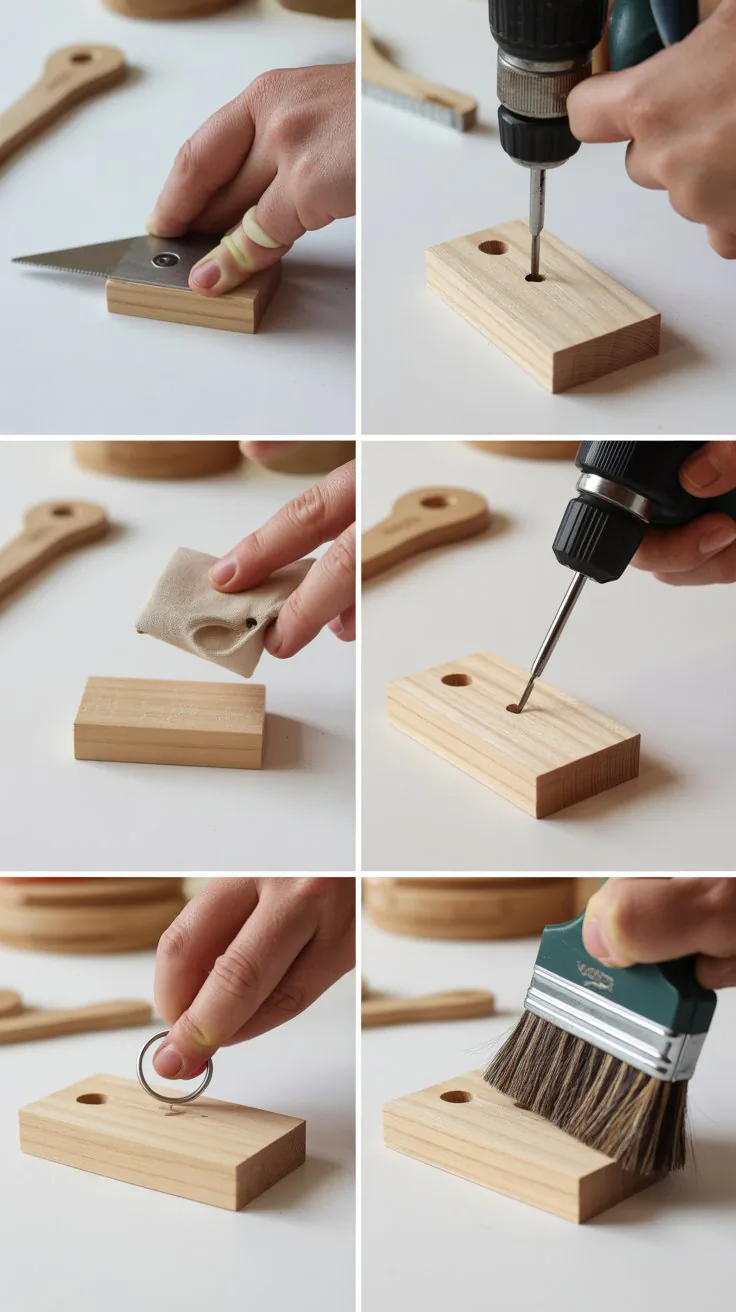
3. Wooden Key Holder

A wooden key holder is a simple yet functional project that keeps keys organized and accessible.
This project is ideal for beginners wanting to practice drilling and hardware installation.
- Choose a sturdy, attractive wood piece about 12 inches long.
- Sand and finish the wood surface smoothly.
- Attach small hooks evenly spaced along the wood plank.
- Add mounting hardware to the back for easy wall hanging.
How to Make a Wooden Key Holder:
- Cut or find a suitable wood plank.
- Sand the wood until it feels smooth to the touch.
- Mark positions for hooks and drill pilot holes to prevent splitting.
- Screw in hooks firmly.
- Attach hanging hardware on the back and mount on your wall.
4. DIY Wooden Shelf

Building a small wooden shelf is an excellent beginner project that introduces you to basic assembly and wall mounting techniques.
Shelves are practical for organizing spaces and add a personal touch to any room.
- Choose lightweight wood such as pine or plywood.
- Cut wood pieces for the shelf base and supports.
- Assemble using wood glue and screws for stability.
- Sand edges and surfaces for a clean finish.
- Mount securely on the wall using brackets or anchors.
How to Make a DIY Wooden Shelf:
- Measure and cut the wood base and two support brackets to your desired dimensions.
- Sand all pieces until smooth.
- Attach the brackets to the underside of the shelf using screws and wood glue.
- Mount the shelf on the wall using appropriate hardware for your wall type.
- Optionally, stain or paint the shelf for added style.
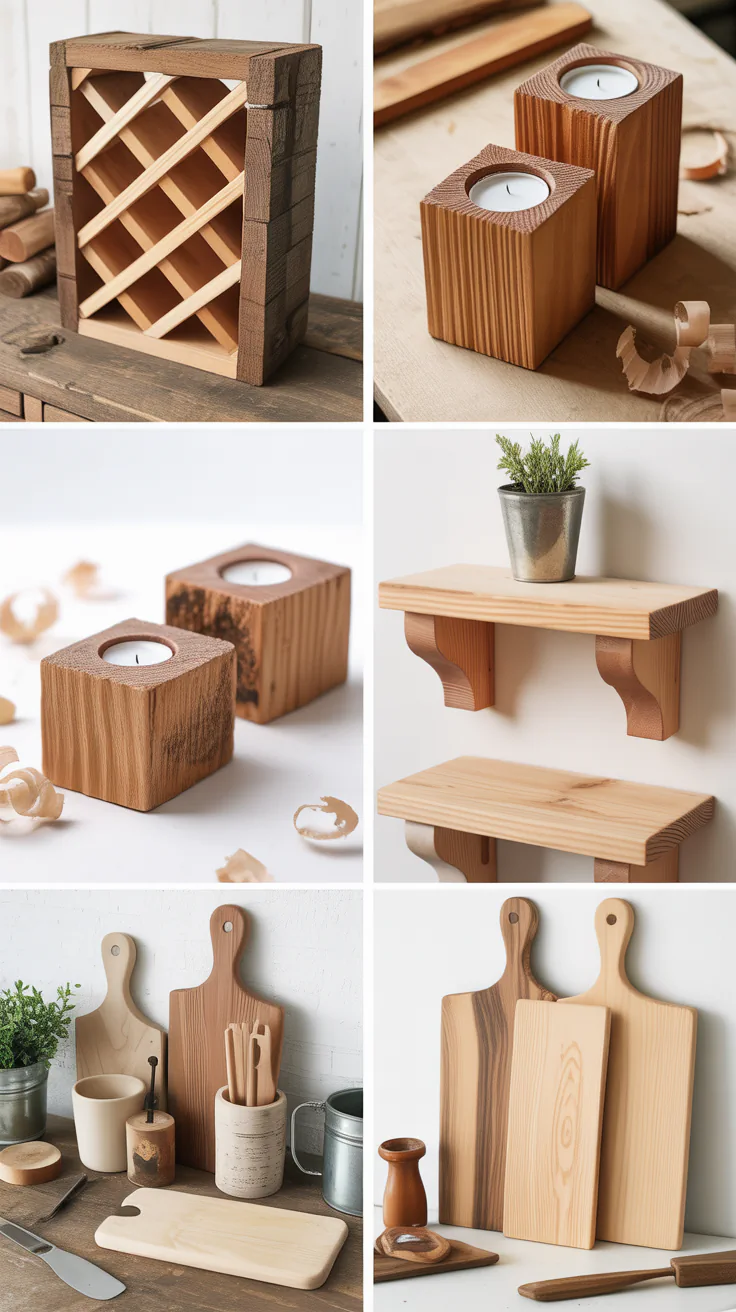
5. Wooden Candle Holders
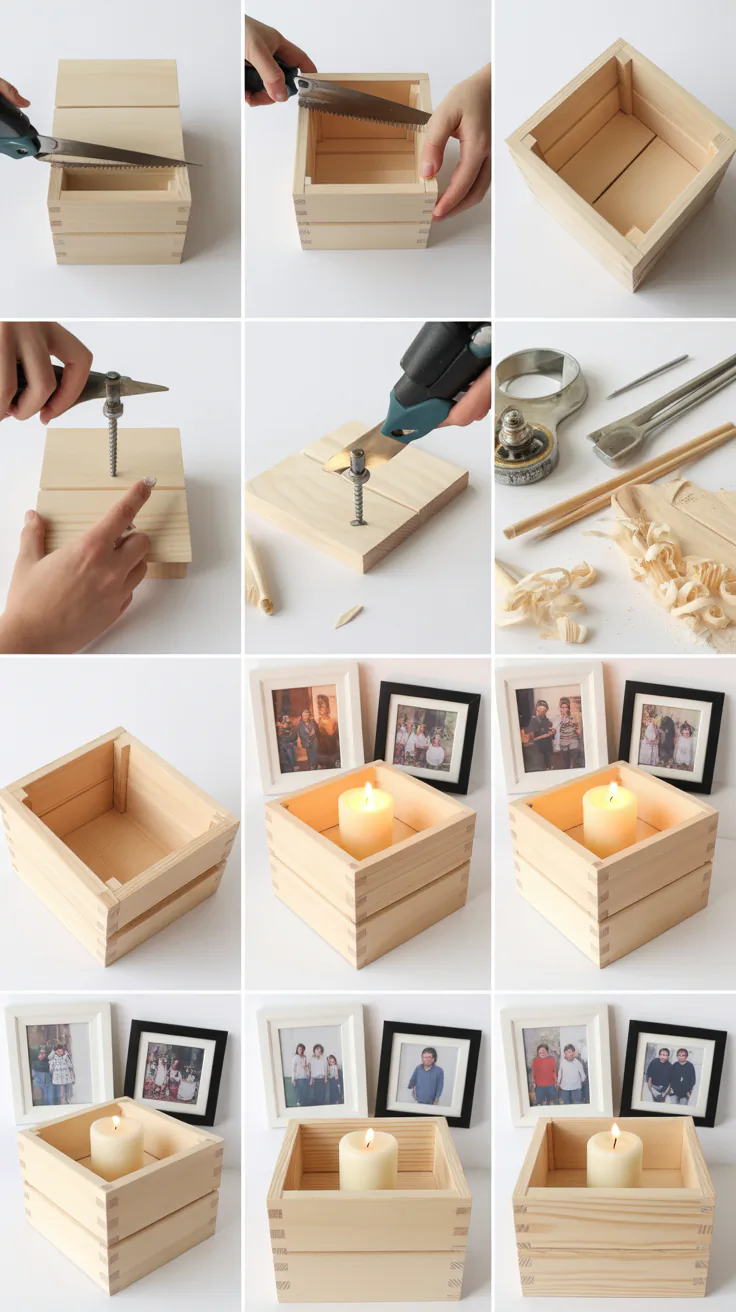
Wooden candle holders are simple projects that teach shaping and finishing techniques.
They make beautiful decorative pieces and thoughtful gifts.
- Use softwood blocks that are easy to carve or drill.
- Sand all surfaces carefully to avoid splinters.
- Drill holes large enough to fit standard candles safely.
- Finish with food-safe oils or varnish for protection.
How to Make Wooden Candle Holders:
- Cut wood blocks into uniform sizes.
- Mark the center and drill a hole to fit the candle base.
- Sand thoroughly, especially around the drilled hole.
- Apply a protective finish and let dry completely before use.
- Place candles and enjoy a warm ambiance.
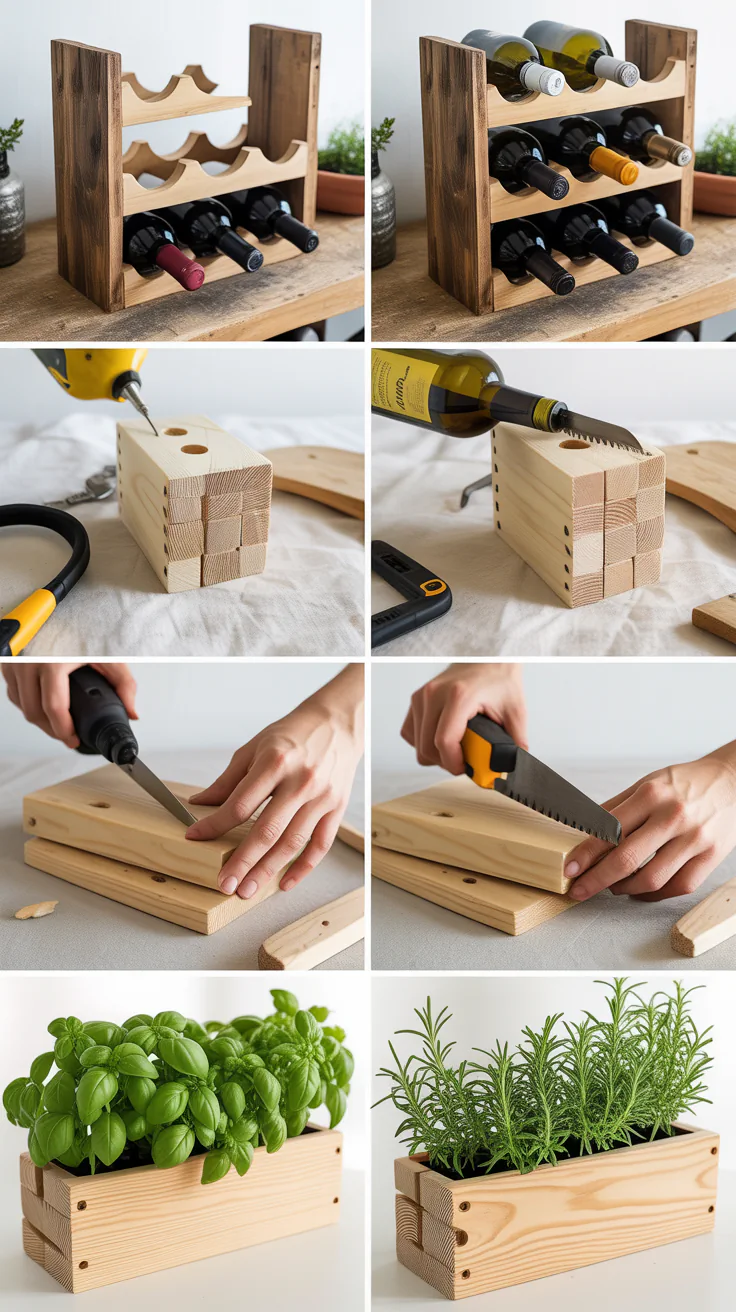
6. Small Wooden Planter Box
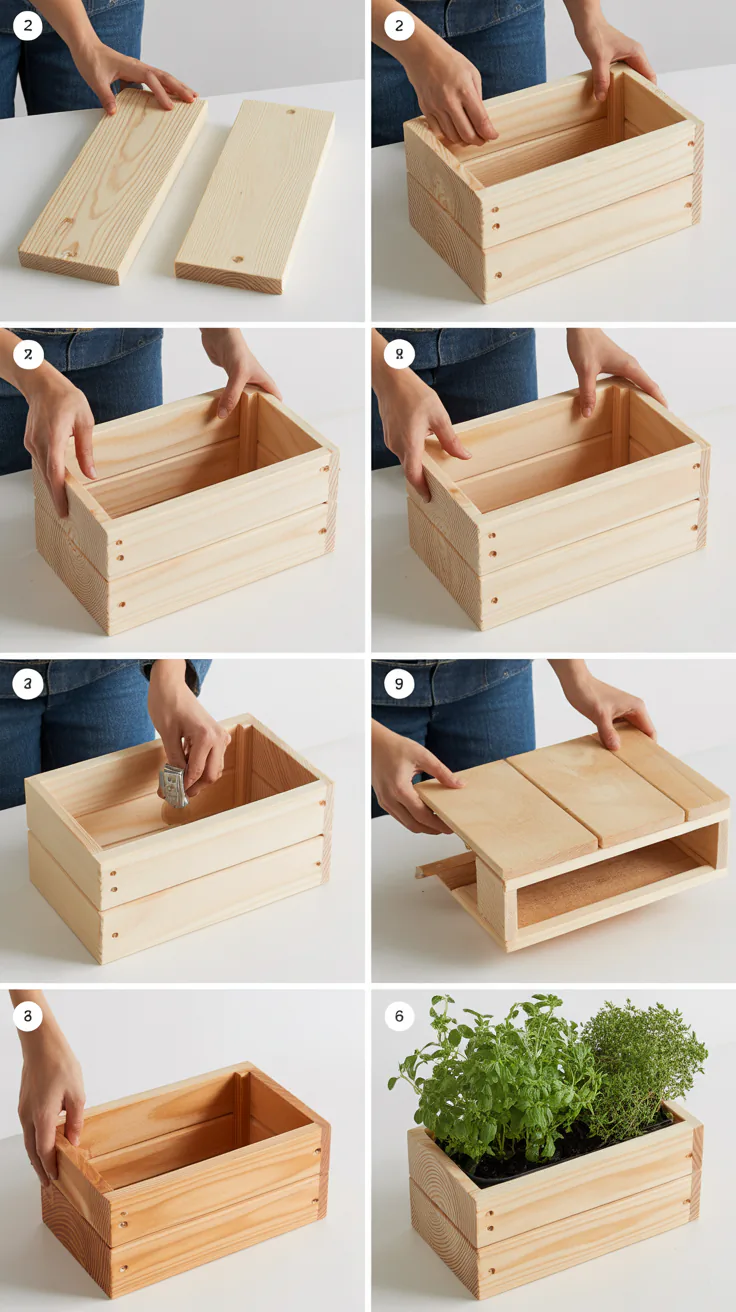
A planter box adds greenery to any space and is a functional beginner’s woodworking project.
This project introduces basic box construction and waterproofing techniques.
- Use untreated cedar or redwood, which resist rot naturally.
- Cut panels for the sides, bottom, and ends.
- Assemble with wood glue and nails or screws.
- Sand all edges smooth to avoid splinters.
- Apply waterproof sealant to protect against moisture.
How to Make a Small Wooden Planter Box:
- Cut all panels to your desired planter size.
- Sand edges to smooth.
- Assemble panels into a box shape, securing corners with nails or screws and wood glue.
- Seal inside and out with a waterproof finish to extend the life.
- Add soil and plants, and place your new planter in a sunny spot.
7. Wooden Phone Stand
A wooden phone stand is a quick and easy project perfect for practicing cutting and shaping.
It’s a handy accessory to keep your device upright and accessible.
- Choose a piece of hardwood or softwood about 6-8 inches long.
- Cut a groove or slot wide enough to hold your phone securely.
- Sand all surfaces to smoothness.
- Optionally, decorate with paint, stain, or wood burning.
How to Make a Wooden Phone Stand:
- Cut the wood to size.
- Use a chisel or router to carve a groove on the top surface to hold the phone.
- Sand all surfaces carefully to avoid rough edges.
- Apply a finish of your choice to protect the wood.
- Place your phone in the groove and enjoy hands-free use.
8. Wooden Jewelry Organizer

A jewelry organizer helps keep necklaces, bracelets, and earrings tidy and untangled.
This project is ideal for beginners looking to combine functionality with decorative woodworking.
- Use a flat wood panel as a base.
- Attach small hooks, knobs, or pegs spaced evenly.
- Sand and finish the wood for a smooth appearance.
- Mount on a wall or place on a dresser.
How to Make a Wooden Jewelry Organizer:
- Cut or select a wood panel of your desired size.
- Sand thoroughly to remove rough patches.
- Mark even intervals and attach hooks or knobs with screws.
- Finish with paint, stain, or varnish as preferred.
- Mount or display your organizer and hang your jewelry.
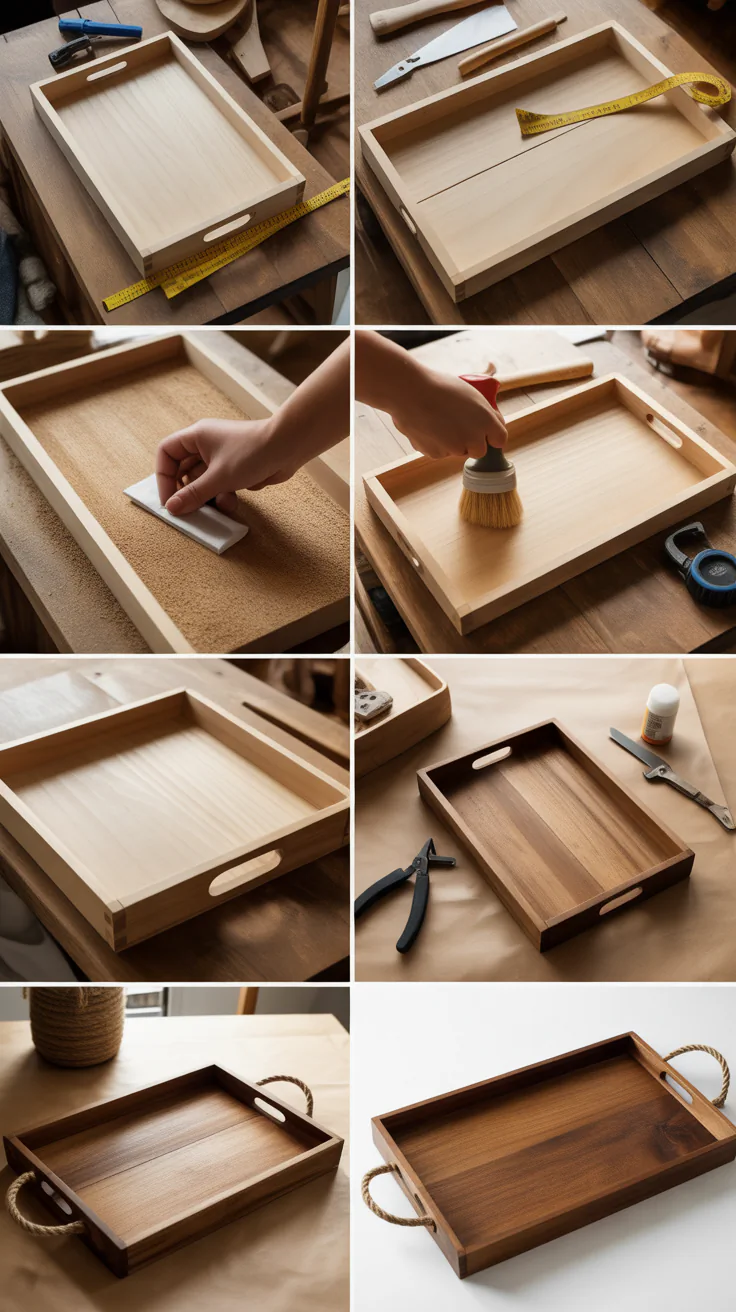
9. Wooden Serving Tray

A serving tray is a practical project that helps you learn about handles and edge assembly.
It makes an elegant addition to your kitchen or a thoughtful gift.
- Choose sturdy hardwood for durability.
- Cut a rectangular base and side pieces.
- Join edges with wood glue and nails or screws.
- Attach handles on each side securely.
- Sand and finish to protect from spills and wear.
How to Make a Wooden Serving Tray:
- Cut a solid wood panel for the tray base.
- Cut four side pieces of equal height and length to form the tray walls.
- Attach sides to base using wood glue and small nails or screws.
- Secure handles on opposite sides with screws.
- Sand all surfaces smooth and apply a protective finish.
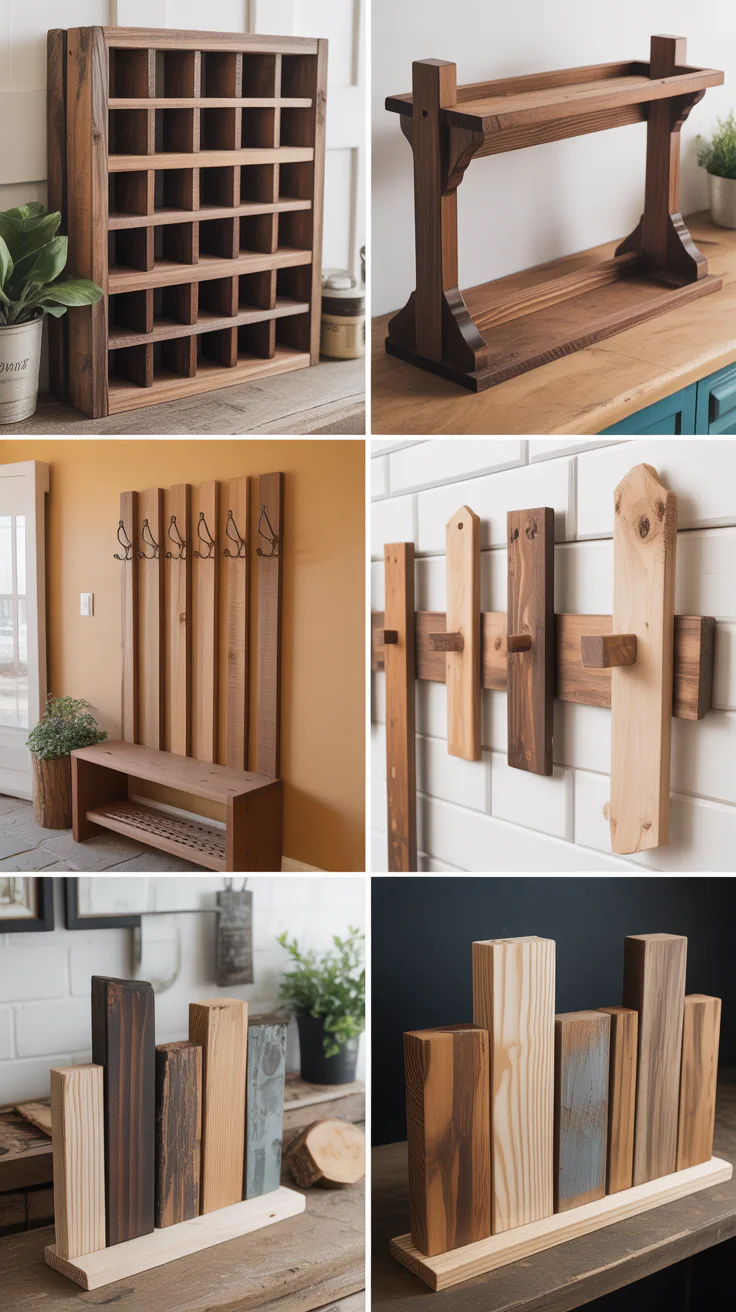
10. Wooden Coatrack with Hooks
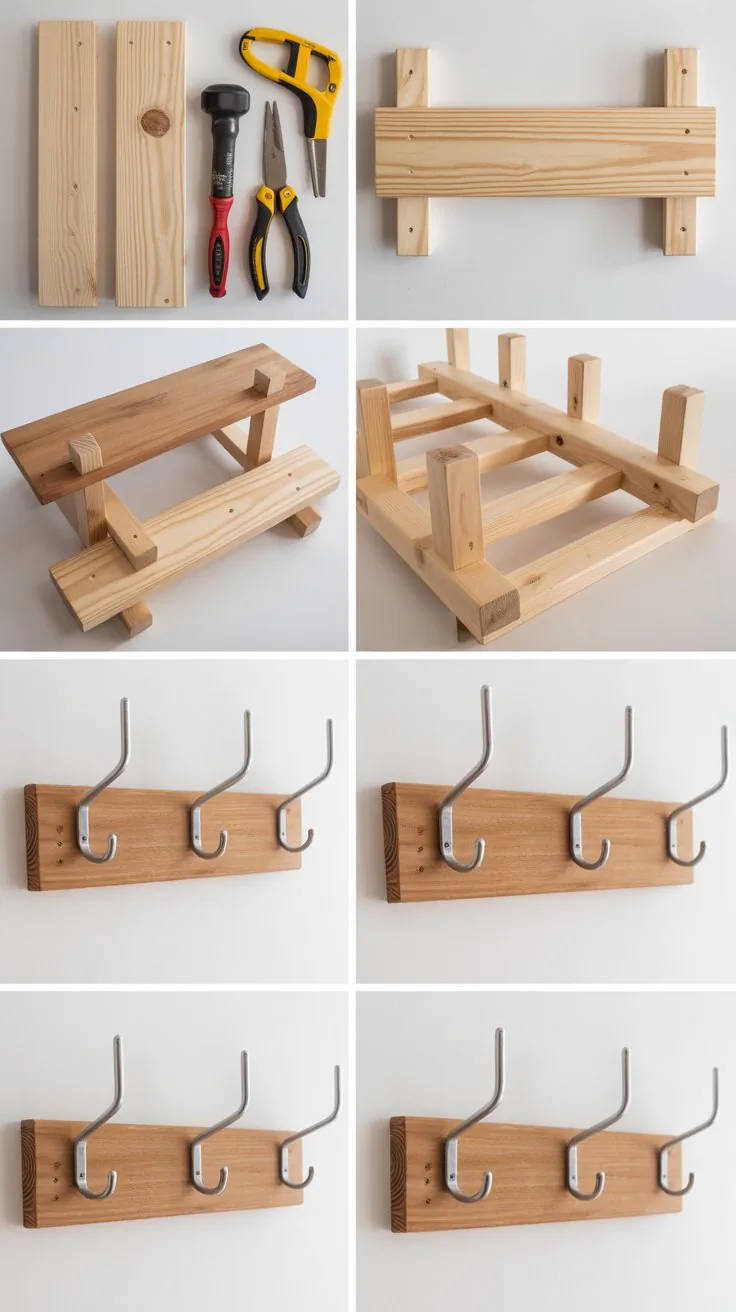
A wooden coatrack is a useful entryway accessory and an easy beginner project.
This project introduces mounting and hardware installation.
- Select a long wood plank.
- Sand smooth and finish.
- Attach hooks evenly spaced for coats and bags.
- Mount securely on a wall.
How to Make a Wooden Coatrack with Hooks:
- Cut or select a plank about 24-36 inches long.
- Sand all edges and surfaces carefully.
- Mark spots evenly for hooks, then screw them into place.
- Attach hanging hardware to the back for wall mounting.
- Mount on a sturdy wall near your entryway.
Helpful Table: Wood Types for Beginners
| Wood Type | Characteristics | Best For | Cost |
|---|---|---|---|
| Pine | Soft, easy to cut, affordable | Coasters, shelves, boxes | Low |
| Cedar | Naturally rot-resistant | Planters, outdoor projects | Moderate |
| Plywood | Stable, versatile | Shelves, trays | Moderate |
| Poplar | Smooth, easy to paint | Picture frames, organizers | Moderate |
| Oak | Hard, durable | Furniture, trays | High |
11. Wooden Bookmark
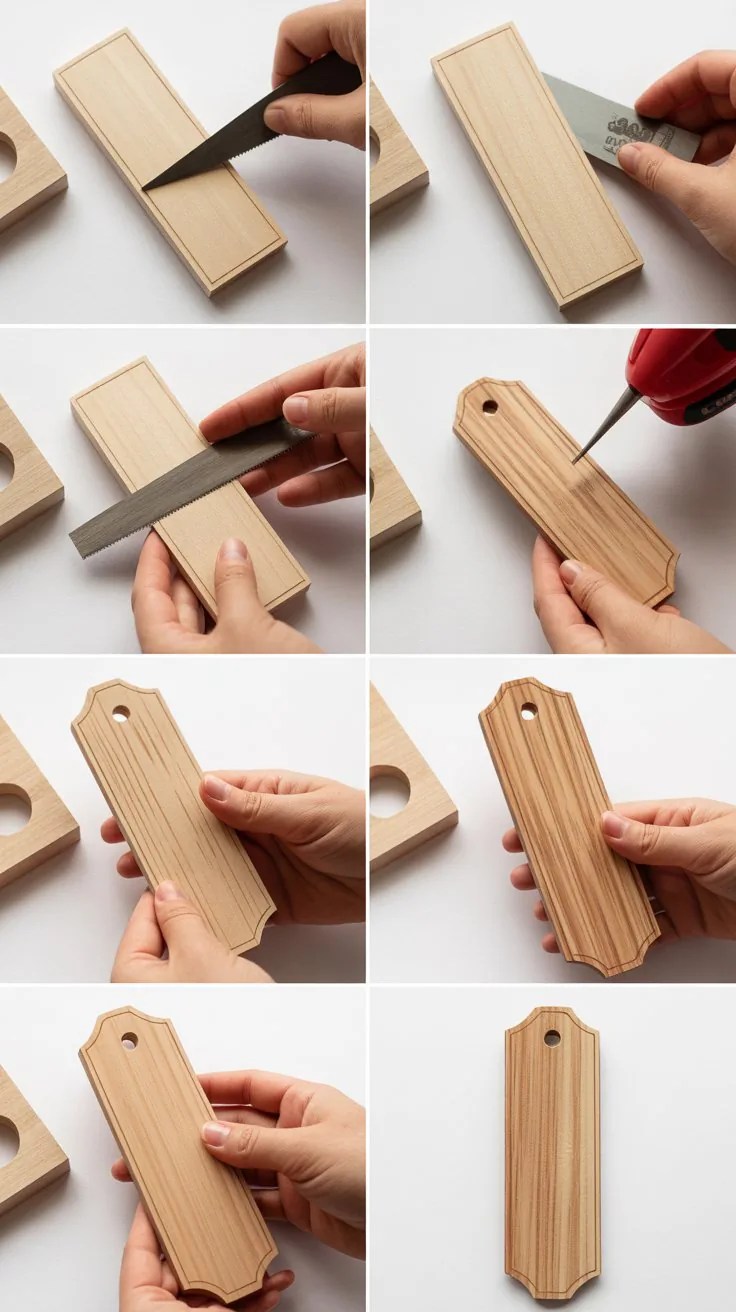
Bookmarks are quick and simple to make, offering a great introduction to sanding and decorative techniques.
They make thoughtful gifts or personal keepsakes that add charm to any reading experience.
- Select a thin, flat piece of wood, about 6 inches long and 1.5 inches wide.
- Sand edges and surfaces smooth for comfortable handling.
- Personalize by burning designs or painting patterns.
- Optionally, drill a hole at the top and add a tassel.
How to Make a Wooden Bookmark:
- Cut wood strips to desired size.
- Sand all surfaces thoroughly.
- Decorate using wood burning tools, paint, or markers.
- Drill a small hole for tassel or ribbon if desired.
- Apply a clear finish for protection.
12. Small Wooden Stool

Building a small stool is a practical project that introduces basic joinery and assembly.
It’s perfect for beginners wanting to create functional furniture for home use.
- Use sturdy hardwood or plywood for the seat and legs.
- Cut a square or round seat and four legs of equal length.
- Join legs to seat using wood glue and screws or dowels.
- Sand all surfaces to a smooth finish.
- Optionally, paint or stain for aesthetics.
How to Make a Small Wooden Stool:
- Cut the seat and legs to size.
- Drill pilot holes for leg attachments.
- Secure legs to seat using screws and glue.
- Sand all edges and surfaces smooth.
- Apply your preferred finish and let dry.
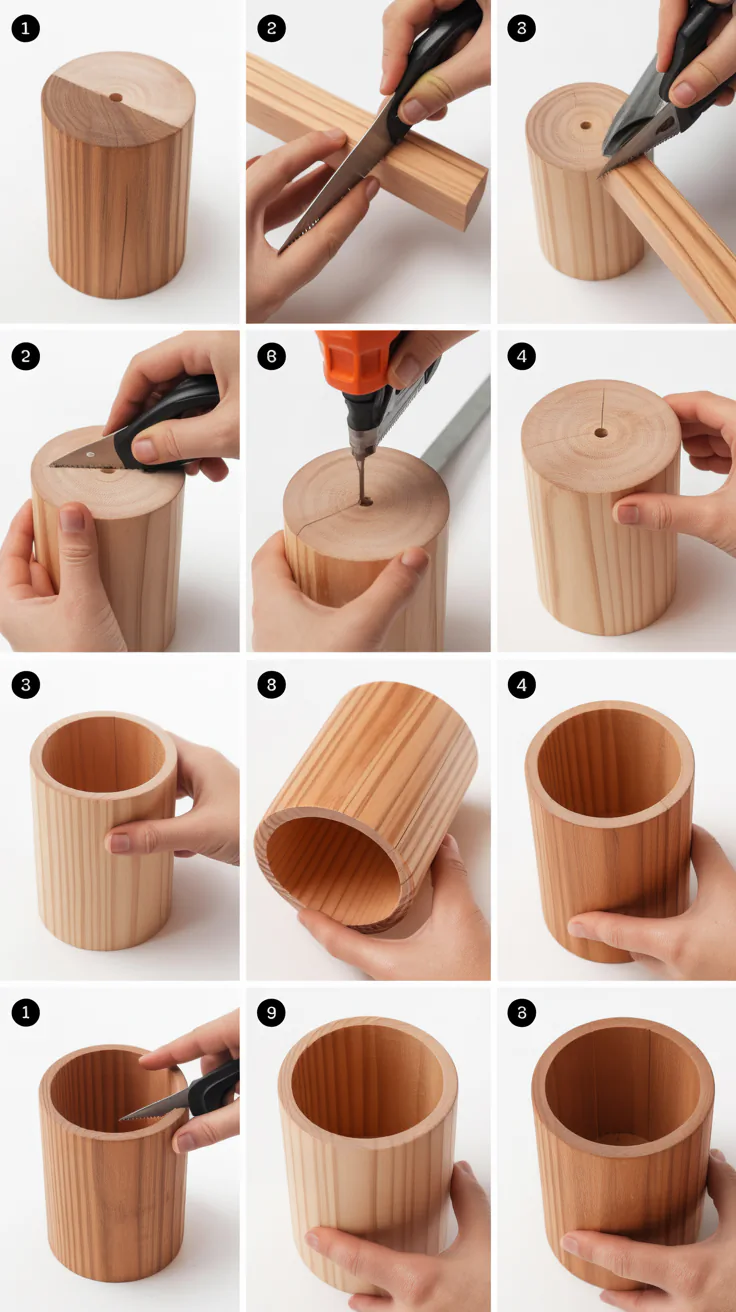
13. Wooden Desk Organizer
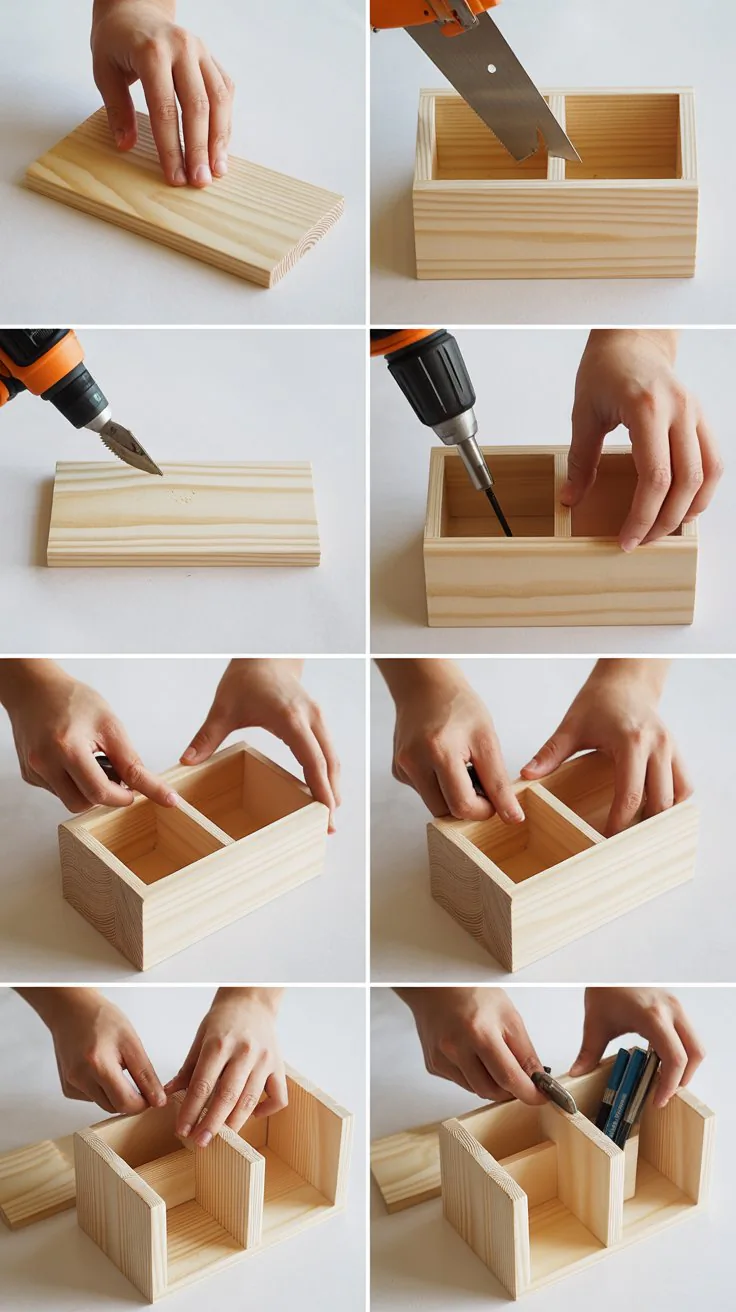
A desk organizer helps keep your workspace tidy and can be tailored to your needs.
This project helps practice cutting multiple pieces and assembling a functional box.
- Choose lightweight wood such as pine or plywood.
- Cut compartments for pens, notes, and accessories.
- Assemble with wood glue and small nails.
- Sand edges and surfaces thoroughly.
- Apply paint or varnish for a professional look.
How to Make a Wooden Desk Organizer:
- Measure and cut panels for each compartment.
- Assemble pieces in desired layout with glue and nails.
- Sand entire organizer until smooth.
- Finish with paint or sealant.
- Place on your desk and organize your supplies.
14. Wooden Toy Blocks
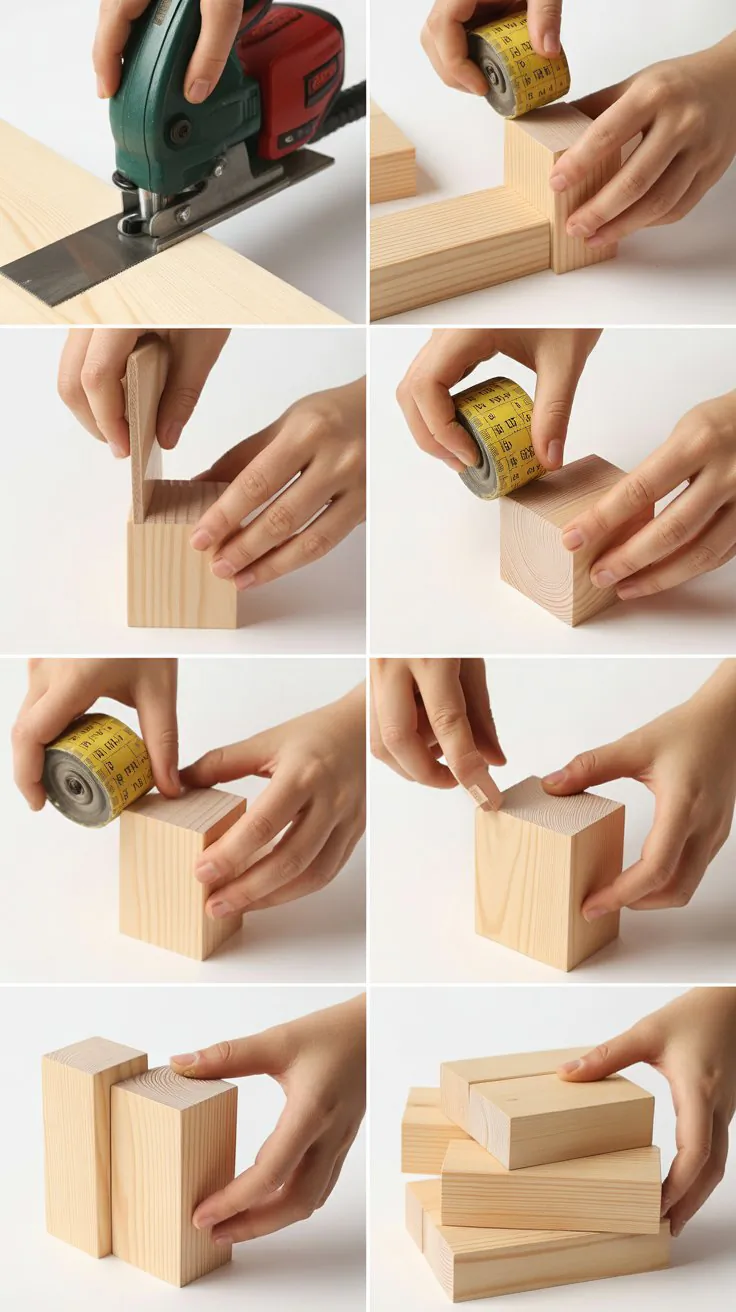
Wooden blocks are classic toys that are simple to make and great for practicing cutting precision.
They are ideal for gifting or selling as handmade children’s toys.
- Use softwood like pine for easy shaping.
- Cut blocks in various shapes and sizes.
- Sand edges to remove splinters.
- Paint or leave natural depending on preference.
- Use non-toxic finishes if intended for children.
How to Make Wooden Toy Blocks:
- Cut wood into cubes or rectangular blocks.
- Sand all surfaces and edges carefully.
- Paint or decorate blocks as desired.
- Apply a safe finish for children’s toys.
- Allow to dry completely before use.
15. Wooden Wall Art
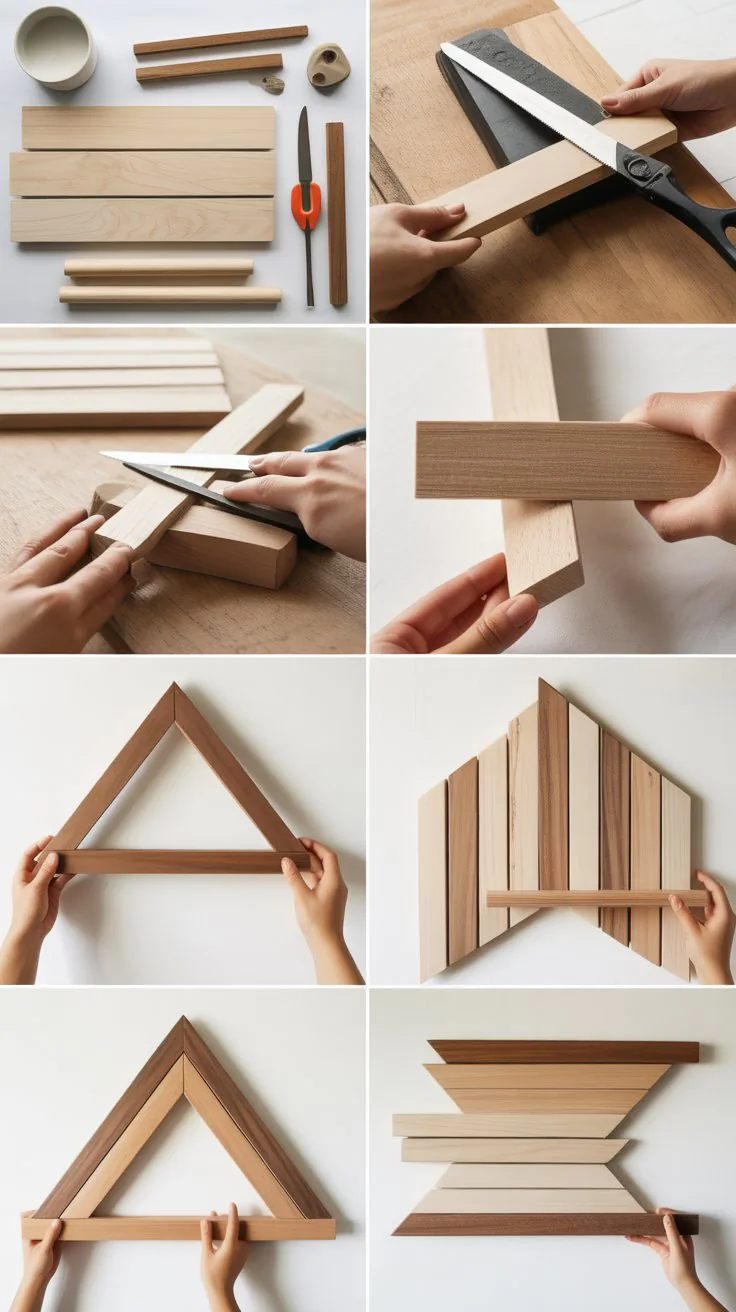
Creating wall art from wood offers a chance to combine woodworking with creativity.
This project is perfect for beginners wanting to make personalized home decor.
- Select a flat wooden panel or assemble small wood pieces.
- Sand and arrange pieces in an appealing pattern.
- Attach pieces using glue or small nails.
- Paint, stain, or decorate as desired.
- Mount on the wall with secure hardware.
How to Make Wooden Wall Art:
- Prepare a base panel or several small wood pieces.
- Sand and arrange pieces into a design.
- Secure pieces to the base with glue or nails.
- Decorate with paint or stain.
- Attach hanging hardware and display proudly.
16. Wooden Drawer Organizer
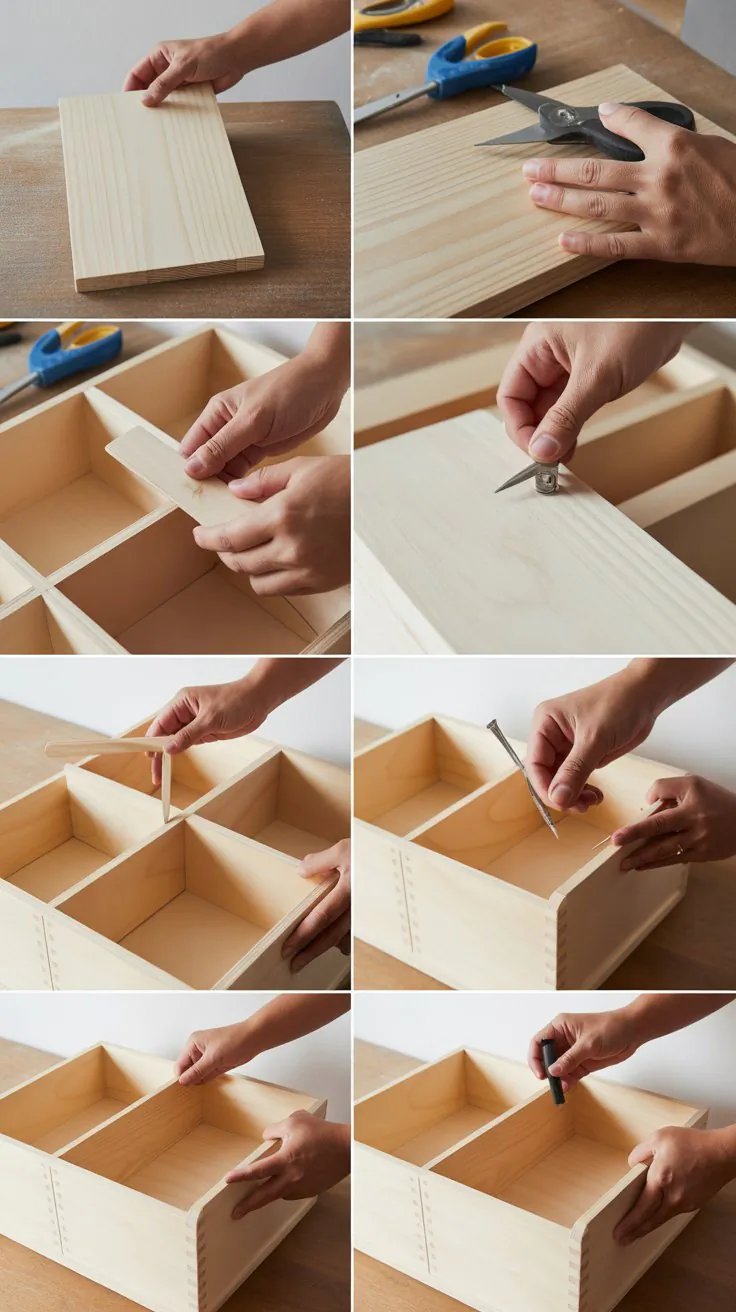
A drawer organizer helps keep small items neatly separated.
This project teaches precision cutting and assembling box compartments.
- Use thin wood or plywood for compartments.
- Measure drawer dimensions carefully.
- Cut panels to fit and create compartments.
- Assemble with glue and nails or staples.
- Sand all edges smooth and finish as desired.
How to Make a Wooden Drawer Organizer:
- Measure your drawer’s interior.
- Cut wood panels to create compartments matching your needs.
- Assemble the panels using wood glue and nails or staples.
- Sand thoroughly to avoid rough edges.
- Finish with paint or varnish to protect the wood.
17. Wooden Phone Docking Station

A phone docking station offers a neat way to charge devices and organize small items.
This project combines functionality with simple woodworking skills.
- Choose wood sturdy enough to hold a phone upright.
- Cut slots or grooves for the phone and charging cables.
- Sand all edges smooth.
- Optionally, add compartments for keys or earbuds.
- Finish with stain or varnish for durability.
How to Make a Wooden Phone Docking Station:
- Cut a wood block to your desired size.
- Create a groove wide enough to hold the phone securely.
- Drill holes or cut additional slots for charging cables.
- Sand all edges and surfaces smooth.
- Apply finish and allow to dry before use.
18. Wooden Napkin Holder

A napkin holder is a quick and easy project ideal for beginners looking to add charm to their dining table.
It helps practice cutting and assembling simple shapes.
- Use thin wood strips for the sides and base.
- Cut pieces to size and sand smooth.
- Assemble with wood glue and nails.
- Finish with paint or stain.
How to Make a Wooden Napkin Holder:
- Cut two side panels and one base panel.
- Sand all pieces carefully.
- Attach sides to base using glue and nails.
- Finish with your preferred paint or stain.
- Let dry completely before placing napkins inside.
19. Wooden Plant Stand
A small plant stand lifts your greenery and adds style to your space.
This project introduces simple angled cuts and assembling legs.
- Use hardwood or treated softwood for strength.
- Cut a flat top surface and four legs.
- Angle legs slightly for stability.
- Attach legs with screws or dowels.
- Sand and finish for outdoor durability.
How to Make a Wooden Plant Stand:
- Cut the top panel to desired size.
- Cut four legs, angling the ends to suit.
- Attach legs to top panel using screws and glue.
- Sand thoroughly to smooth all surfaces.
- Apply a weather-resistant finish if used outdoors.
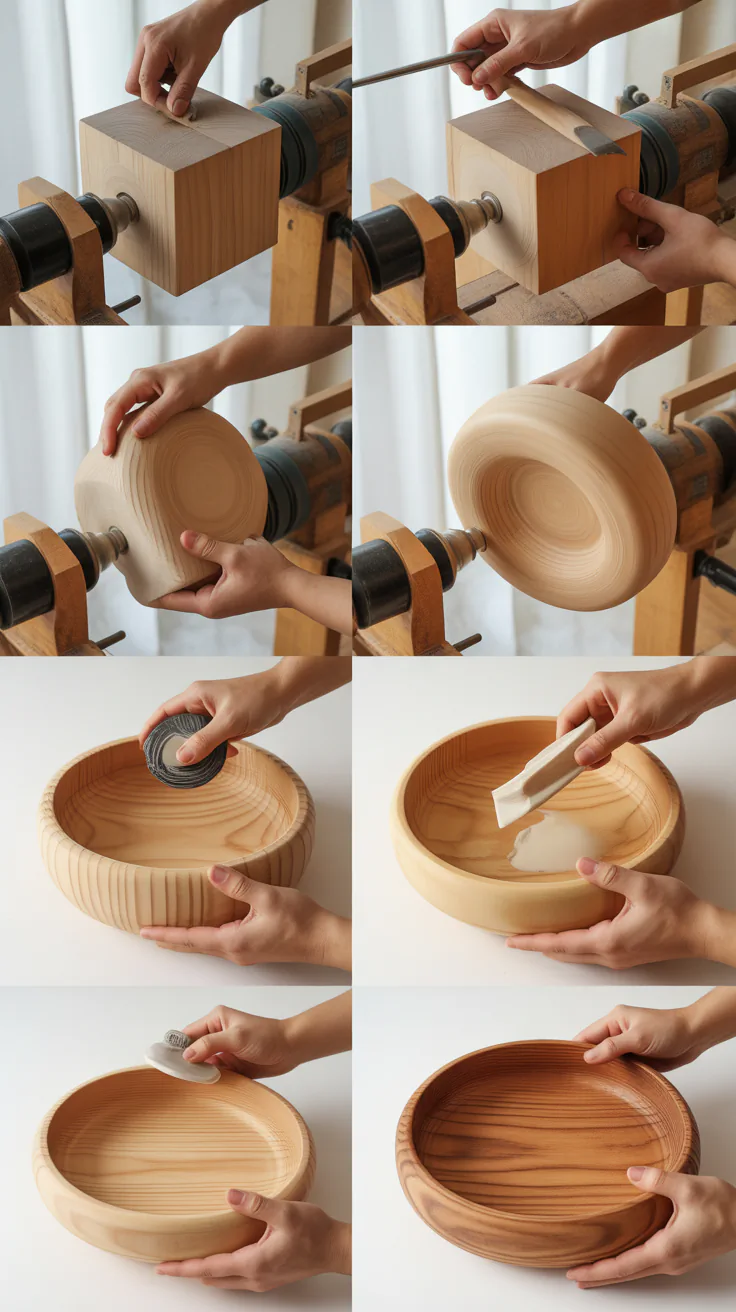
20. Wooden Serving Utensils
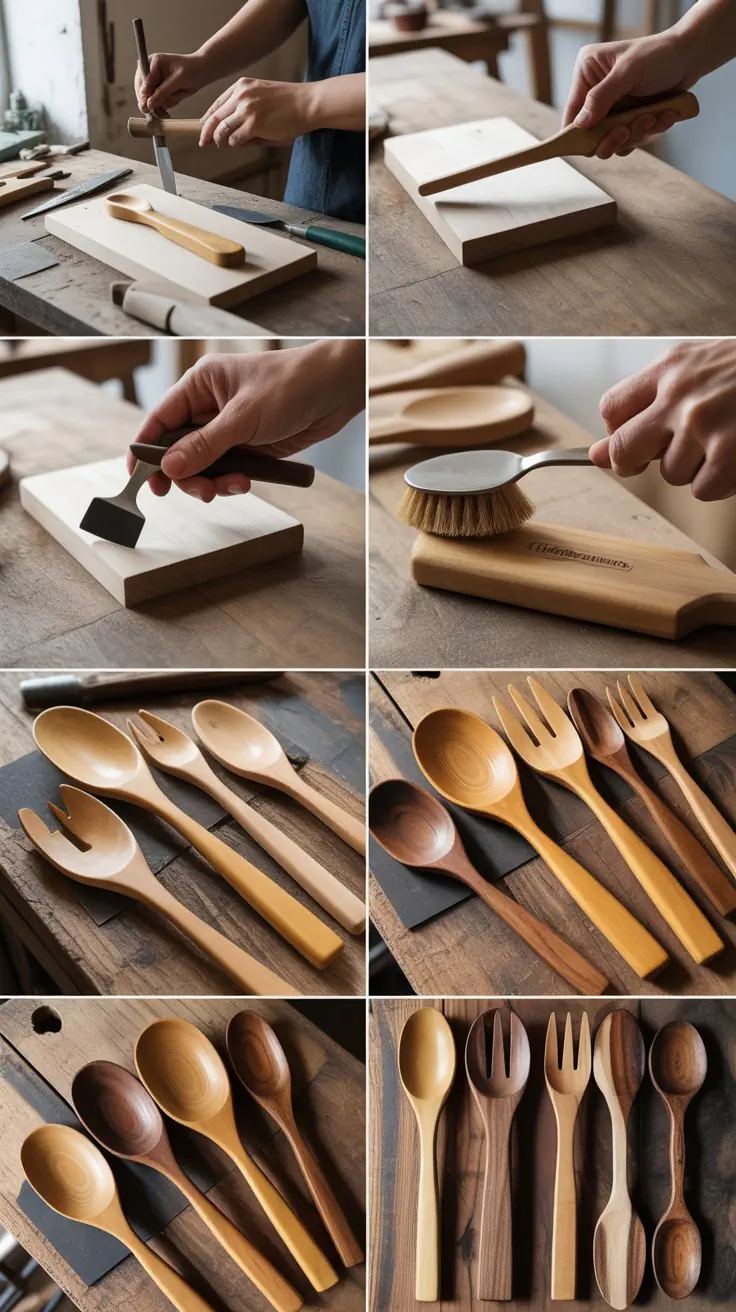
Crafting wooden spoons or spatulas is an enjoyable project that introduces carving and finishing techniques.
They’re functional kitchen tools that also make great gifts.
- Select hardwood such as maple or cherry.
- Trace utensil shapes on wood blanks.
- Cut and carve shapes carefully.
- Sand all surfaces smooth.
- Apply food-safe oil finish.
How to Make Wooden Serving Utensils:
- Draw spoon or spatula designs on hardwood blanks.
- Cut shapes using a jigsaw or coping saw.
- Carve bowls of spoons with gouges or chisels.
- Sand thoroughly, especially curved areas.
- Finish with mineral oil or beeswax for food safety.
21. Wooden Coasters
Wooden coasters are simple, practical, and great for beginners to practice cutting, sanding, and finishing.
They protect surfaces while adding rustic or modern charm to any setting.
- Select hardwood for durability and moisture resistance.
- Cut coasters into squares, circles, or other shapes.
- Sand edges smooth to prevent splinters.
- Optionally, decorate with wood burning, paint, or engraving.
- Finish with waterproof sealant for protection.
How to Make Wooden Coasters:
- Cut wood into desired coaster shapes (4×4 inches typical).
- Sand all edges and surfaces thoroughly.
- Decorate using pyrography tools or paint as desired.
- Apply a waterproof finish like polyurethane or varnish.
- Allow to dry fully before use.
22. Wooden Key Holder
A wooden key holder is both decorative and functional, perfect for organizing keys by the door.
It offers a chance to work with hooks and small mounting hardware.
- Use a flat wood panel for the base.
- Sand and stain or paint the base.
- Attach small hooks or nails spaced evenly.
- Mount on the wall with screws or adhesive strips.
How to Make a Wooden Key Holder:
- Cut and sand a rectangular wood panel (around 10×4 inches).
- Stain or paint the panel to your liking.
- Mark and install hooks evenly spaced across the panel.
- Attach hanging hardware to the back.
- Mount securely on your wall near the entryway.
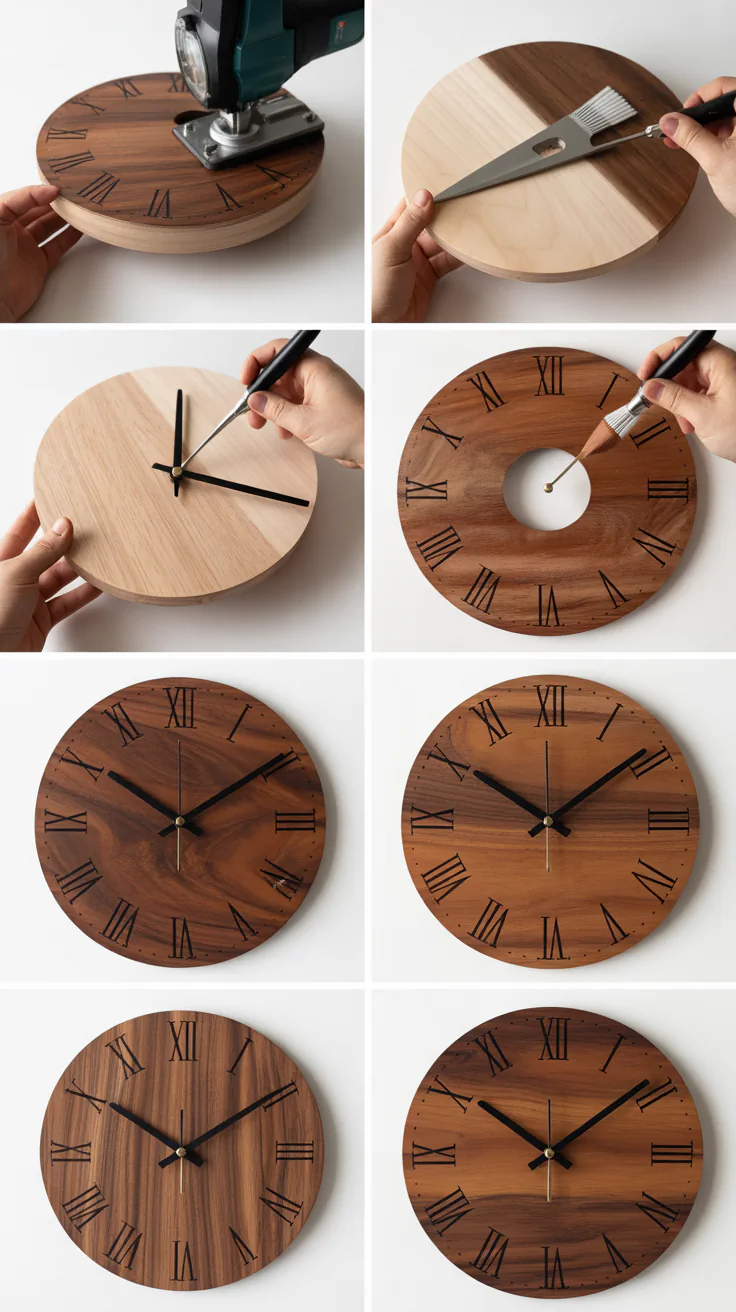
23. Wooden Picture Frame
Crafting a picture frame helps develop measuring and miter-cutting skills.
Frames can be customized to suit any photo size and décor style.
- Measure photo dimensions carefully.
- Cut four wood strips with 45-degree mitered ends.
- Assemble frame using wood glue and clamps.
- Sand and finish with stain or paint.
- Add backing board and glass or acrylic sheet.
How to Make a Wooden Picture Frame:
- Cut frame pieces to match photo size with mitered corners.
- Glue corners together and clamp until dry.
- Sand edges and surfaces smooth.
- Apply paint or stain for finishing.
- Install glass/acrylic and backing, then insert photo.
24. Wooden Candle Holder
Candle holders are charming accents that provide practice drilling and shaping wood.
They can be simple blocks or more intricate designs with multiple holders.
- Choose hardwood or plywood.
- Cut blocks to desired sizes.
- Drill holes to fit candles snugly.
- Sand and finish smooth.
- Optionally paint or stain.
How to Make a Wooden Candle Holder:
- Cut wood blocks to uniform sizes.
- Drill holes slightly smaller than candle diameter.
- Sand all surfaces to remove roughness.
- Decorate with paint or stain as preferred.
- Place candles and enjoy warm ambiance.
25. Wooden Jewelry Box

A small jewelry box introduces working with hinges, lids, and compartment dividers.
It’s a functional and beautiful project ideal for gifting.
- Cut wood panels for the box base and lid.
- Assemble using wood glue and small nails.
- Attach hinges to lid and base.
- Add interior dividers or fabric lining.
- Sand and finish with stain or paint.
How to Make a Wooden Jewelry Box:
- Cut base and lid panels to size.
- Assemble base using glue and nails for strength.
- Attach lid with small brass or stainless steel hinges.
- Install dividers inside if desired.
- Sand thoroughly and apply desired finish.
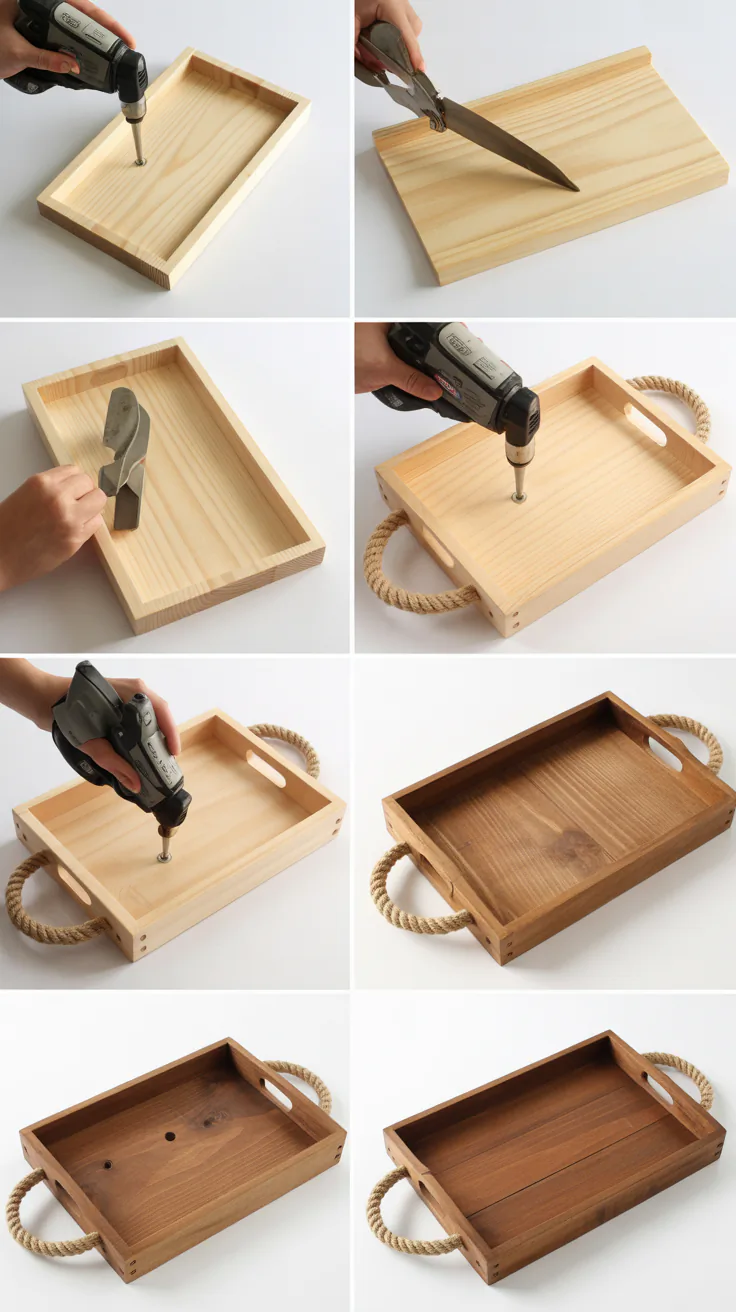
26. Wooden Serving Tray
Serving trays are practical and stylish, perfect for carrying drinks or snacks.
They require precision cutting and assembly with handles.
- Choose a flat wood panel for the tray base.
- Cut side panels for edges and handles.
- Assemble tray box with glue and nails.
- Sand all surfaces smooth.
- Optionally paint or stain, then seal for protection.
How to Make a Wooden Serving Tray:
- Cut base and side panels to desired dimensions.
- Assemble side panels around base using glue and nails.
- Attach handles to sides for easy carrying.
- Sand entire tray thoroughly.
- Finish with paint or varnish for durability.
27. Wooden Birdhouse
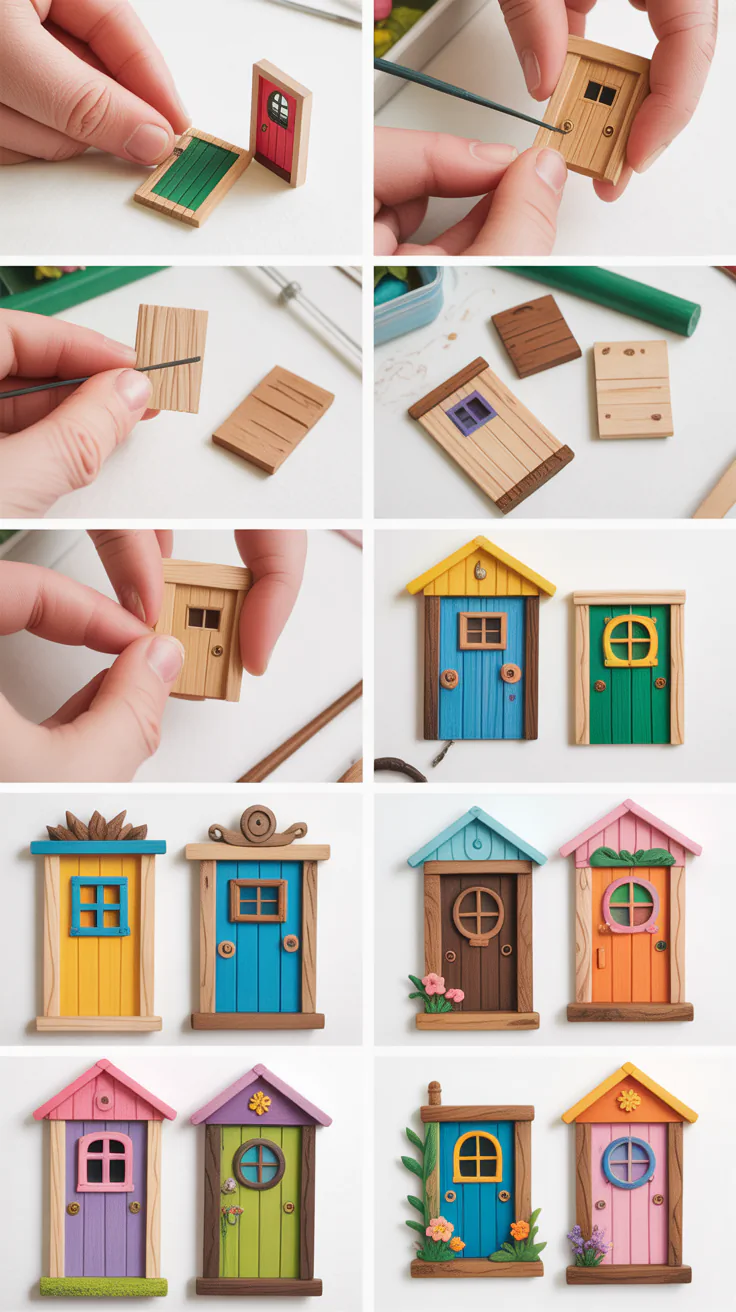
A birdhouse project teaches measuring, cutting angles, and simple assembly.
It offers a rewarding way to attract birds to your garden.
- Design birdhouse with an entrance hole suitable for local birds.
- Cut wood panels for walls, floor, and roof.
- Assemble with nails and wood glue.
- Sand edges to remove splinters.
- Paint or seal with non-toxic outdoor finishes.
How to Make a Wooden Birdhouse:
- Cut wall panels including one with entrance hole.
- Assemble walls, floor, and roof using nails and glue.
- Sand thoroughly inside and outside.
- Paint or apply safe outdoor finish.
- Mount in a suitable outdoor location.
28. Wooden Coat Rack
A wooden coat rack is both functional and decorative, perfect for entryways.
This project introduces mounting hardware and hook installation.
- Cut a sturdy wood plank to desired length.
- Sand and finish surface.
- Attach hooks spaced evenly along plank.
- Secure mounting hardware on the back.
- Mount on wall and hang coats or bags.
How to Make a Wooden Coat Rack:
- Cut and sand wood plank.
- Paint or stain as preferred.
- Attach metal or wooden hooks using screws.
- Install sturdy mounting brackets on back.
- Hang securely on a wall.
29. Wooden Tray with Legs
Adding legs to a wooden tray makes it versatile for breakfast in bed or serving guests.
This project requires basic joinery and attachment of removable or fixed legs.
- Start with a flat tray base and side walls.
- Cut legs to equal length with smooth edges.
- Attach legs with screws or dowels.
- Sand all surfaces smooth.
- Finish with paint or protective sealant.
How to Make a Wooden Tray with Legs:
- Assemble tray base and sides with glue and nails.
- Cut and sand four legs of equal size.
- Attach legs to tray base with screws or dowels.
- Sand all surfaces thoroughly.
- Apply finish and let dry.
30. Wooden Puzzle

A wooden puzzle is a fun project introducing intricate cutting and design.
Ideal as a personalized gift or educational toy.
- Draw puzzle shapes on a thin wood sheet.
- Cut pieces carefully with a scroll or jigsaw.
- Sand edges for safe handling.
- Paint or leave natural.
- Package as a unique gift.
How to Make a Wooden Puzzle:
- Sketch puzzle design on wood panel.
- Use a scroll saw to cut pieces along design.
- Sand edges and surfaces smooth.
- Decorate pieces with paint or markers if desired.
- Store pieces in a box or bag.
31. Wooden Jewelry Stand
A jewelry stand helps organize necklaces and bracelets while adding decor.
This project focuses on vertical assembly and balanced design.
- Cut a flat base and vertical dowels or rods.
- Attach rods to base using glue and screws.
- Sand and finish surfaces.
- Add hooks or knobs if desired.
How to Make a Wooden Jewelry Stand:
- Cut base and dowels to size.
- Drill holes in base for dowels.
- Insert and secure dowels with glue and screws.
- Sand and finish with stain or paint.
- Add hooks for hanging jewelry.
32. Wooden Keychain
Small and simple, wooden keychains are great for practicing fine cutting and finishing.
They’re perfect for gifts or selling at craft fairs.
- Choose thin wood slices or small blocks.
- Cut shapes using a scroll saw or craft knife.
- Drill holes for key rings.
- Sand edges smooth.
- Decorate and seal.
How to Make a Wooden Keychain:
- Cut desired shapes from thin wood.
- Drill a small hole for the keyring.
- Sand all edges smooth.
- Decorate with paint or pyrography.
- Attach key ring through the hole.
33. Wooden Coaster Holder
A coaster holder keeps your wooden coasters organized and adds style.
This project complements coaster sets and involves simple box construction.
- Cut base and side panels to size.
- Assemble panels into a box with open top.
- Sand all surfaces smooth.
- Finish with paint or stain.
How to Make a Wooden Coaster Holder:
- Measure and cut wood panels for base and sides.
- Assemble using glue and nails.
- Sand thoroughly for smooth edges.
- Apply finish and allow drying.
- Insert coasters and display.
34. Wooden Candle Lantern
A wooden candle lantern combines woodworking with decorative design.
It’s great for practicing cutting, assembling glass or plexiglass panels, and finishing.
- Cut wooden frames to hold glass or plexiglass panels.
- Assemble frame with glue and nails.
- Insert panels securely.
- Sand edges and finish wood surfaces.
- Add handle and candle holder inside.
How to Make a Wooden Candle Lantern:
- Cut wood strips for lantern frame.
- Assemble sides with glue and small nails.
- Insert glass or plexiglass panels carefully.
- Sand edges and apply finish.
- Add handle on top and place candle inside.
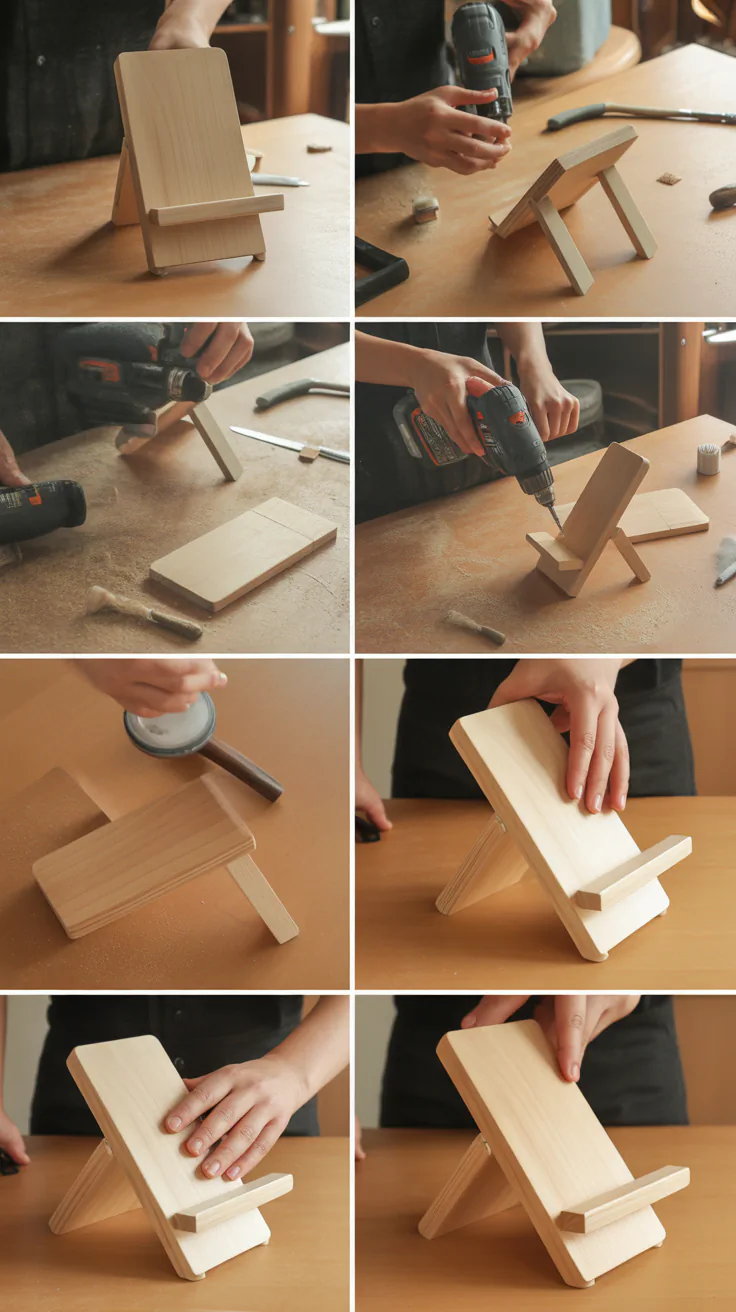
35. Wooden Phone Stand

A wooden phone stand is a practical accessory that keeps your device upright for easy viewing.
This project teaches angled cuts and slot fitting for a stable hold.
- Select a hardwood piece that fits your phone size.
- Cut two main pieces: a base and a backrest with a slot.
- Sand all edges smooth for safety and comfort.
- Assemble by fitting the backrest into the base slot.
- Optionally finish with varnish or paint for durability.
How to Make a Wooden Phone Stand:
- Cut a rectangular base approximately 6×3 inches.
- Cut a backrest piece with an angled bottom to lean backward.
- Cut a slot into the base and corresponding tab on the backrest to fit together snugly.
- Sand all pieces thoroughly.
- Insert backrest into base slot and finish with paint or sealant.
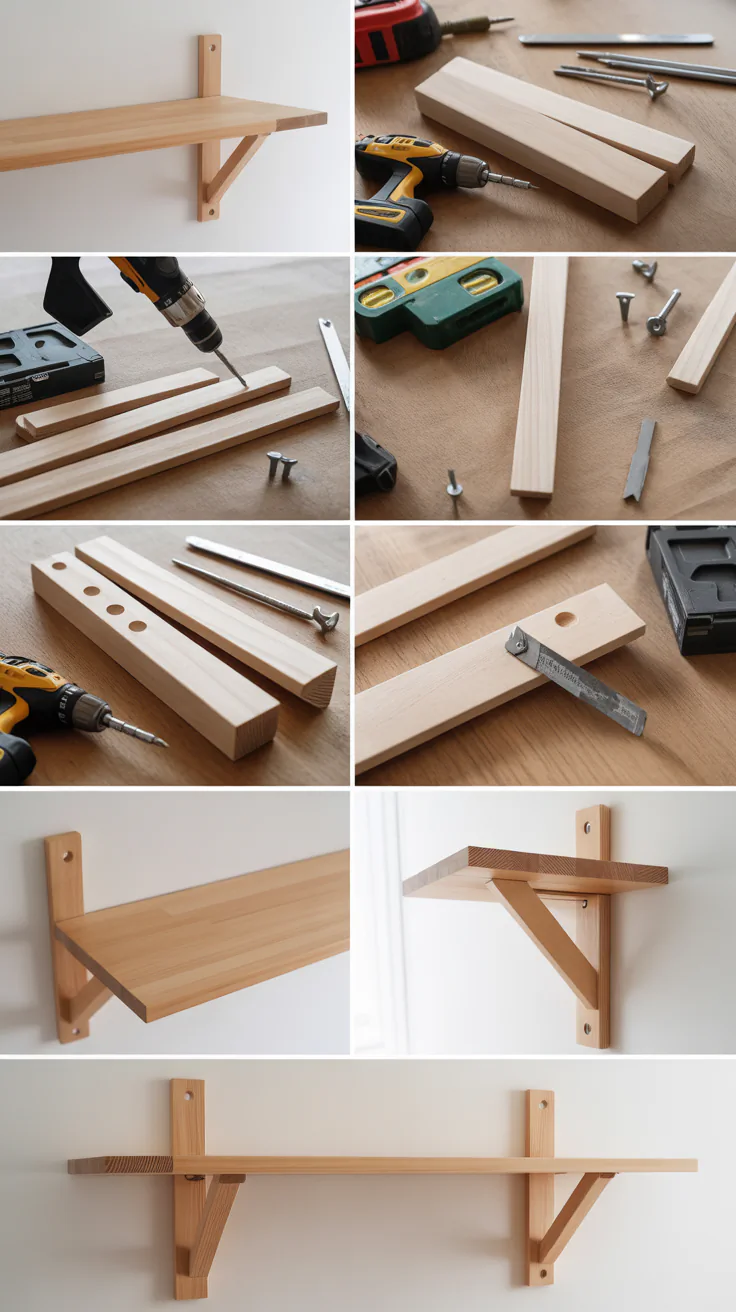
36. Wooden Wall Shelf
A small wooden wall shelf adds storage and style to any room.
This project involves precise measuring and mounting techniques.
- Choose a sturdy wood plank for the shelf surface.
- Cut side brackets or use metal brackets for support.
- Sand all surfaces smooth.
- Secure brackets to shelf and wall with screws.
- Optionally paint or stain to match décor.
How to Make a Wooden Wall Shelf:
- Cut the shelf plank to desired length.
- Sand edges and surfaces thoroughly.
- Attach side brackets or install metal brackets under shelf.
- Mount shelf securely on the wall using wall anchors and screws.
- Decorate or stain as desired.
37. Wooden Plant Stand

A wooden plant stand elevates your greenery and beautifies spaces.
It offers practice in joinery and balanced design.
- Cut wood legs and platform for the plant pot.
- Assemble legs using screws or dowels for stability.
- Sand and finish with paint or stain.
- Optionally add waterproof coating for outdoor use.
How to Make a Wooden Plant Stand:
- Cut four legs of equal length.
- Cut a square or round platform to hold the pot.
- Attach legs securely to platform using screws or dowels.
- Sand all surfaces smooth.
- Apply finish suitable for indoor or outdoor use.
Conclusion
Exploring these 37 Easy Small Wood Projects for Beginners equips you with essential woodworking skills and creative ideas.
Each project is carefully designed to be accessible yet rewarding, perfect for those just starting out.
From simple coasters to elegant plant stands, these projects will inspire confidence and delight.
Begin your woodworking journey with these easy, enjoyable projects and watch your skills—and creativity—grow.