Every mom knows the morning struggle of trying to look put-together while juggling breakfast, school lunches, and a toddler who insists on wearing their superhero cape to daycare.
Your hair is often the last thing on your mind, but it doesn’t have to be a daily battle.
The secret to great mom hair isn’t spending hours in front of the mirror or mastering complicated braiding techniques—it’s finding styles that work with your busy life, not against it.
These 37 Easy Hairstyles for Moms That Actually Stay All Day are designed specifically for real moms with real schedules, featuring looks that hold up through playground visits, grocery runs, and everything in between.
This comprehensive guide walks you through quick updos perfect for those rushed mornings, sleek ponytails that transition from carpool to coffee dates, effortless buns that stay secure during yoga class, practical braids that keep hair out of your face while cooking dinner, and time-saving tricks that cut your styling routine in half.
Whether you have curly, straight, thick, or fine hair, whether you’re working from home or heading to the office, you’ll find styles that actually work for your hair type and lifestyle.
Say goodbye to the messy mom bun that falls apart by noon and hello to hairstyles that look intentional and last from morning coffee to bedtime stories.
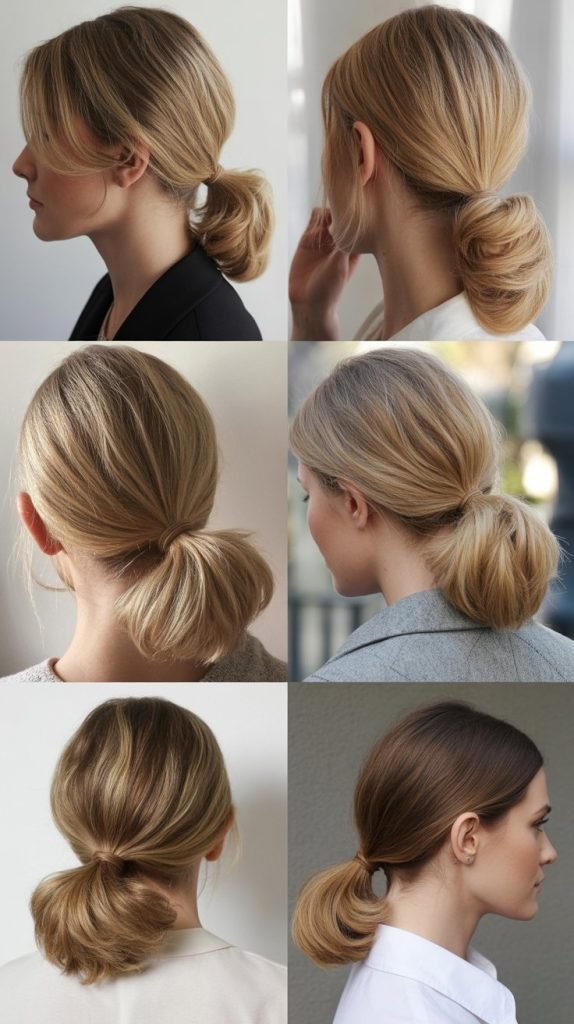
1. The Classic Low Ponytail

The low ponytail is the unsung hero of mom hairstyles because it combines elegance with practicality in under two minutes.
- This timeless style sits at the nape of your neck, making it comfortable for leaning back against car seats or lying down for bedtime snuggles with your kids.
- The key to making it stay all day is positioning the elastic band properly and using the right hair products to prevent slipping.
- Unlike high ponytails that can cause tension headaches, the low version distributes weight evenly and won’t leave you with a sore scalp by afternoon.
- Smooth your hair back with a boar bristle brush to eliminate bumps, then secure with a no-slip elastic band designed for thick hair.
- For extra hold, wrap a small section of hair around the elastic to hide it and pin it underneath with a bobby pin.
- Add a light mist of flexible hold hairspray to tame flyaways without making your hair crunchy or stiff.
- This style works beautifully for all hair lengths past your shoulders and can be dressed up with a silk scarf or kept casual for everyday wear.
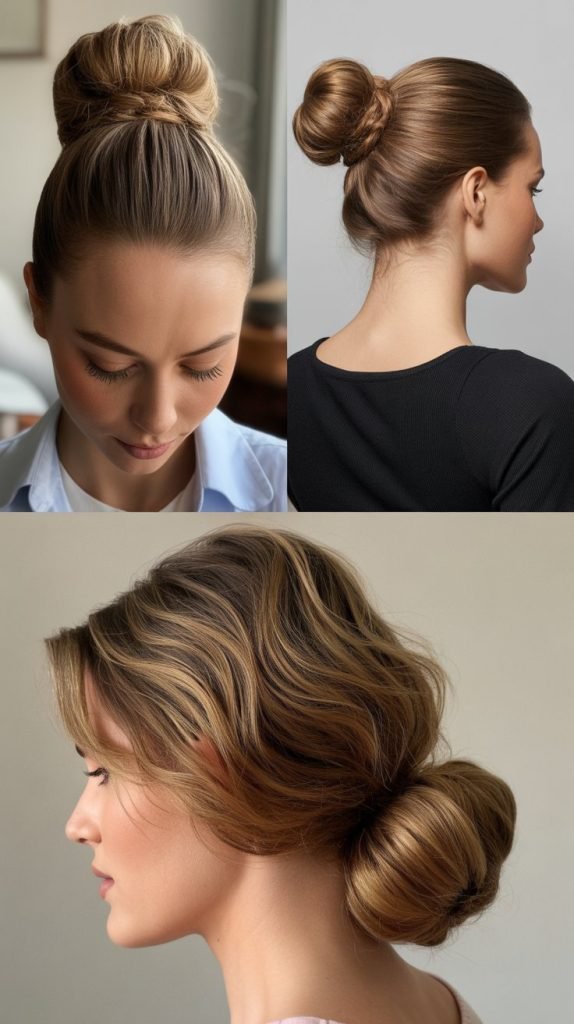
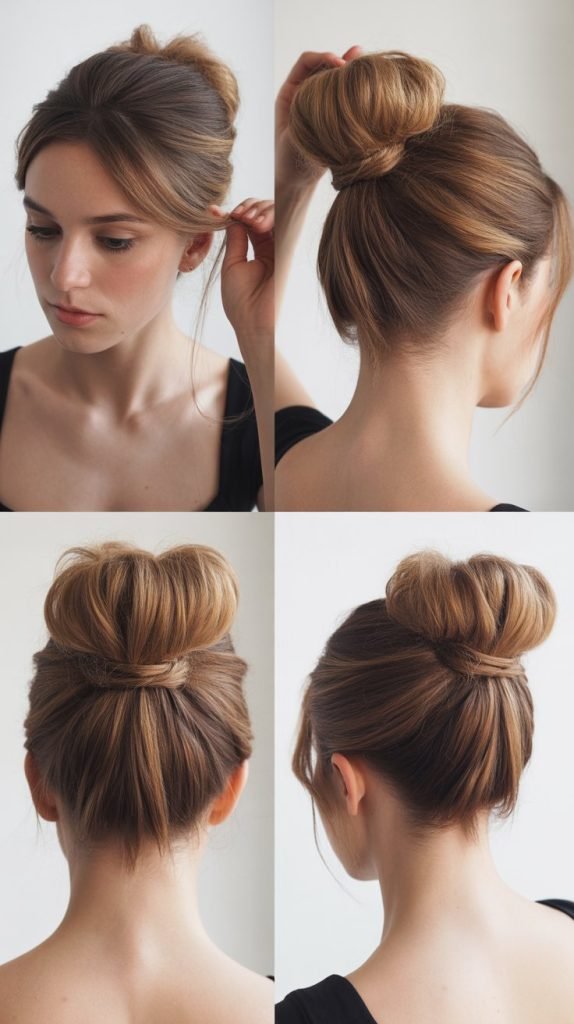
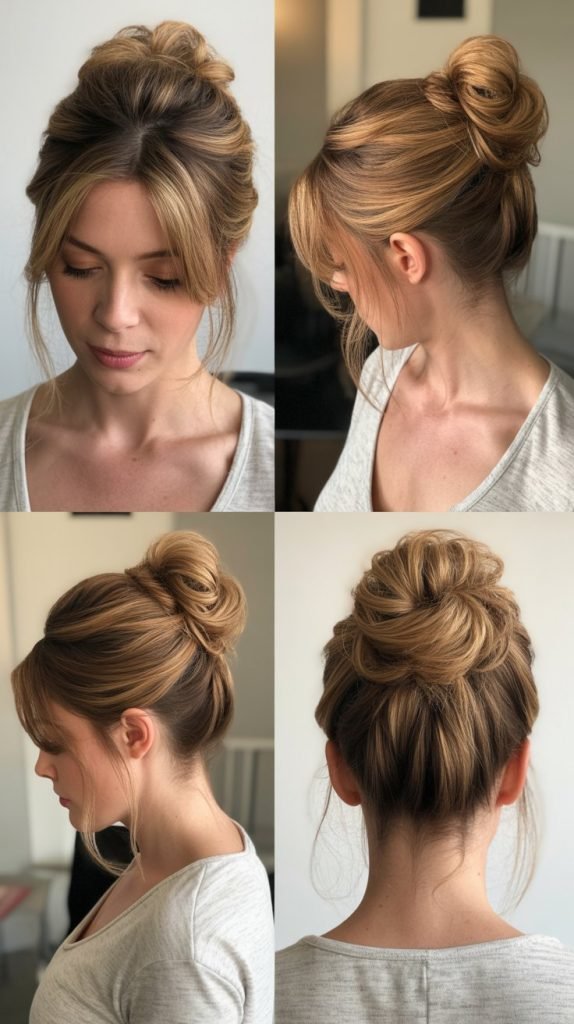
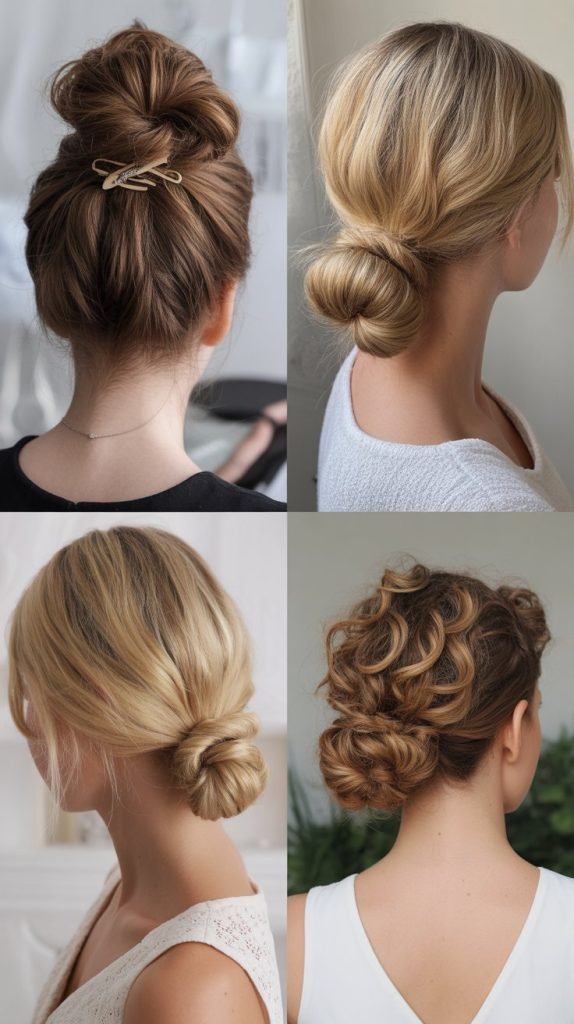
2. The Messy Top Knot
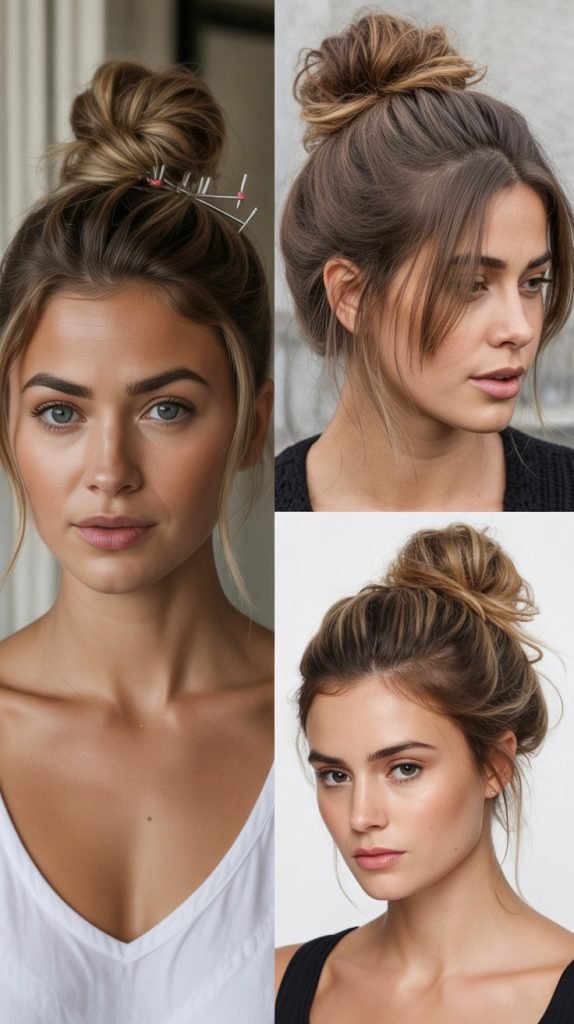
The messy top knot is intentionally undone, giving you that effortlessly chic look that actually requires minimal effort.
- This style works best on second or third-day hair when natural oils provide grip and texture that clean hair lacks.
- Flip your head upside down and gather all your hair at the crown of your head, twisting it loosely as you wrap it into a bun shape.
- Secure the bun with a thick elastic band, then use 2-3 bobby pins inserted in an X pattern to anchor it firmly to your head.
- Pull out a few face-framing pieces to soften the look and hide any awkward hairline angles that bother you.
- The beauty of this style is that it’s supposed to look a little messy, so you don’t need perfect technique or salon-level skills.
- Unlike tight buns that can trigger migraines, the loose construction of this knot prevents unnecessary tension on your scalp.
- This hairstyle stays put during active days because the higher placement keeps it away from collars, scarves, and little hands that love to grab mom’s hair.
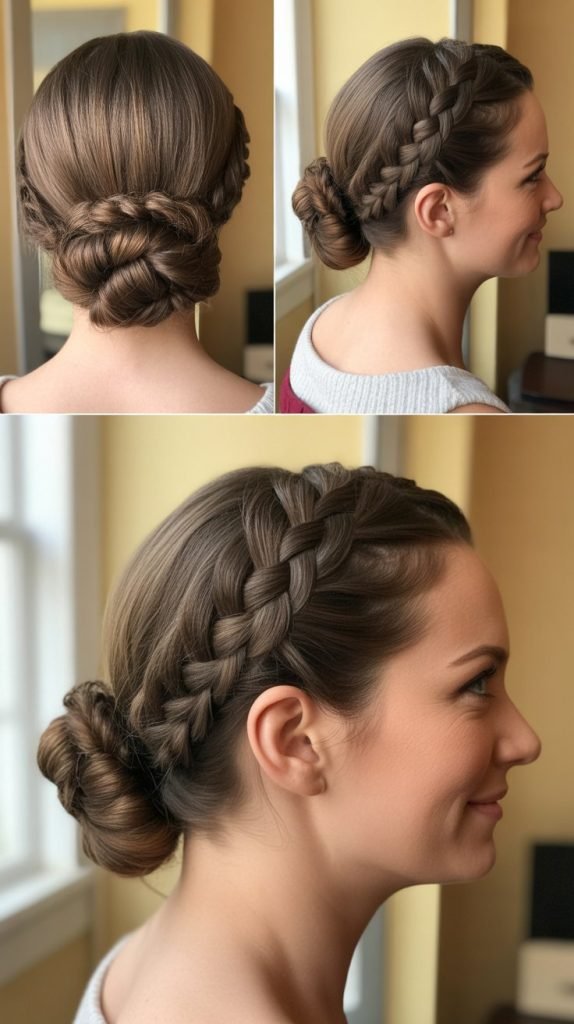
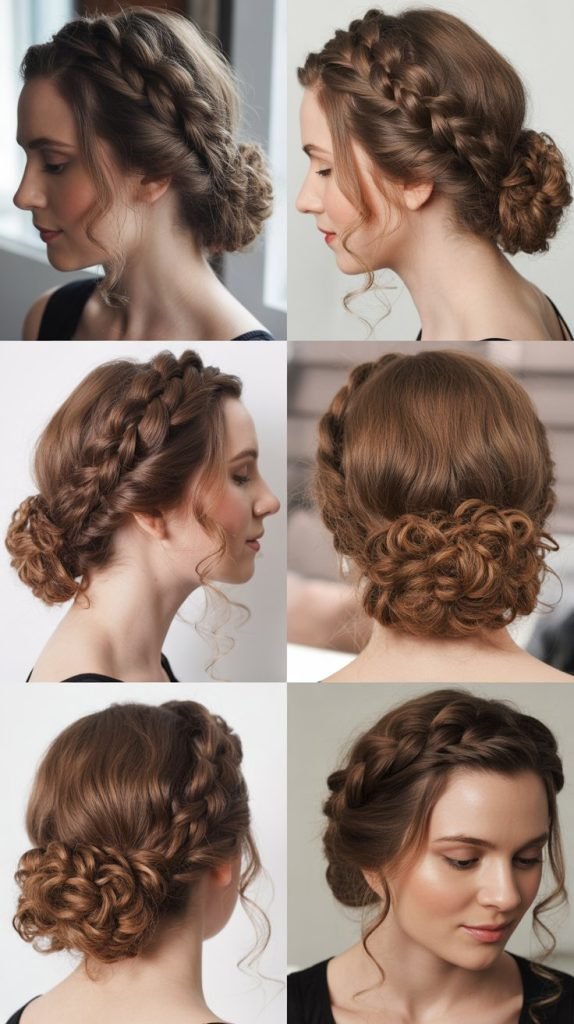
3. The Dutch Braid Crown
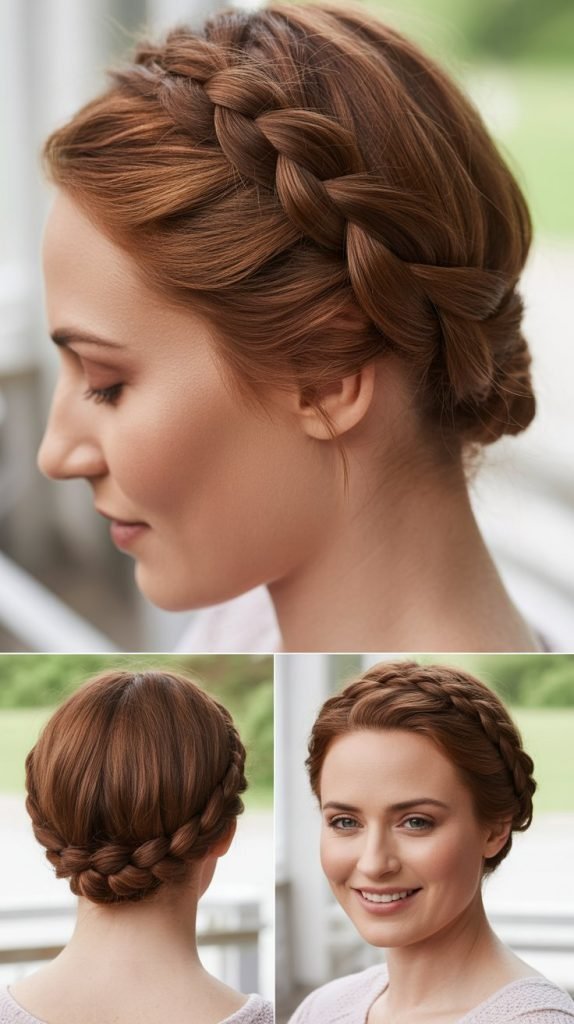
The Dutch braid crown makes you look like you spent an hour on your hair when it actually takes about ten minutes once you master the technique.
- Start by parting your hair down the middle and working with one side at a time to make the process less overwhelming.
- A Dutch braid is created by crossing sections under instead of over, which makes the braid sit on top of your head rather than blending in.
- Begin at your part line near your forehead and braid along your hairline toward the back of your head, adding small sections of hair as you go.
- When you reach behind your ear, continue braiding without adding more hair, then secure the end with a small clear elastic band.
- Repeat the exact same process on the other side, making sure both braids are positioned symmetrically for a polished appearance.
- Cross the two braids at the back of your head and tuck the ends underneath the opposite braid, pinning them securely with several bobby pins.
- Gently pull on the outer edges of each braid section to create volume and width, making the style look fuller and more intentional.
- This style is perfect for keeping hair completely off your face during hot summer days or when you’re chasing toddlers around the backyard.
4. The Half-Up Top Knot

The half-up top knot gives you the best of both worlds by keeping hair out of your face while showing off your length and natural texture.
- Section off the top third of your hair from ear to ear, leaving the bottom two-thirds down to frame your face and cascade down your back.
- Gather the top section into a high ponytail, then twist it around itself to create a small knot on the crown of your head.
- Secure the knot with an elastic band and use two bobby pins crossed over each other to prevent it from unraveling during the day.
- This style works exceptionally well for moms with shorter hair who can’t quite pull off a full updo yet.
- The bottom section can be left straight, curled for special occasions, or kept in its natural state without any additional styling required.
- Because only half your hair is pulled up, there’s less weight and tension on your scalp compared to full updos that can become uncomfortable.
- Add texture spray to the loose hair for a lived-in look that appears intentional rather than like you simply ran out of time.
5. The Sleek High Ponytail
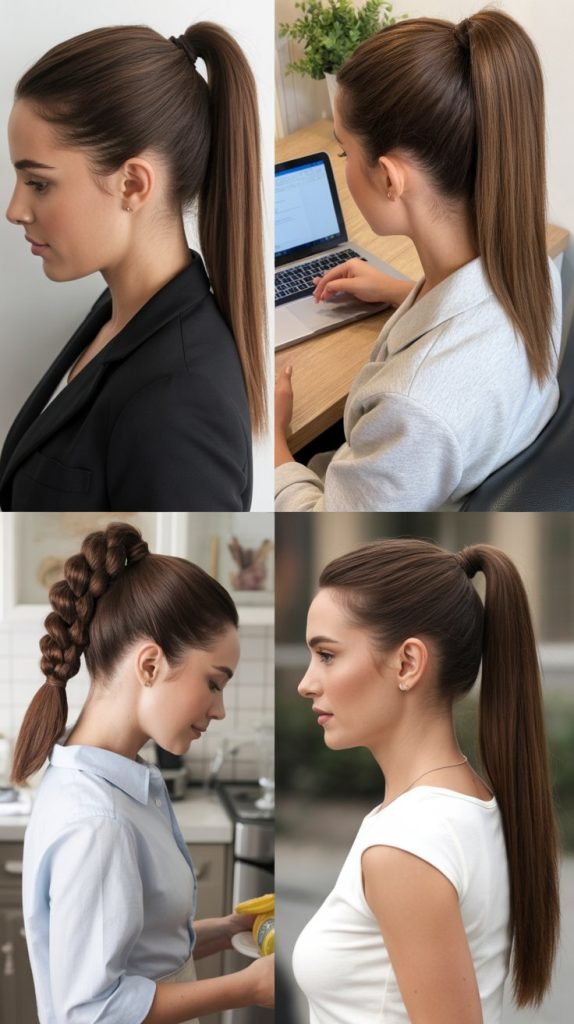
The sleek high ponytail is the epitome of pulled-together professionalism that somehow still feels approachable and mom-friendly.
- This style requires hair that’s either freshly washed or properly dry-shampooed to avoid looking greasy when pulled back tight.
- Use a paddle brush and blow dryer to smooth your hair straight back toward the crown, eliminating any bumps or texture for a polished finish.
- Position your ponytail at the highest point of your head where it naturally wants to sit when you look straight ahead.
- Secure with a strong elastic band, then take a small section from underneath the ponytail and wrap it around the elastic to conceal it.
- Pin the wrapped section underneath the ponytail base with a bobby pin that matches your hair color so it disappears completely.
- Apply a small amount of smoothing serum to your palms and run them over the surface of your hair to eliminate frizz and add shine.
- The high placement prevents your ponytail from getting squished against car seats or chairs throughout your busy day.
- This versatile style transitions seamlessly from morning school drop-off to evening dinner dates with just a change of earrings.
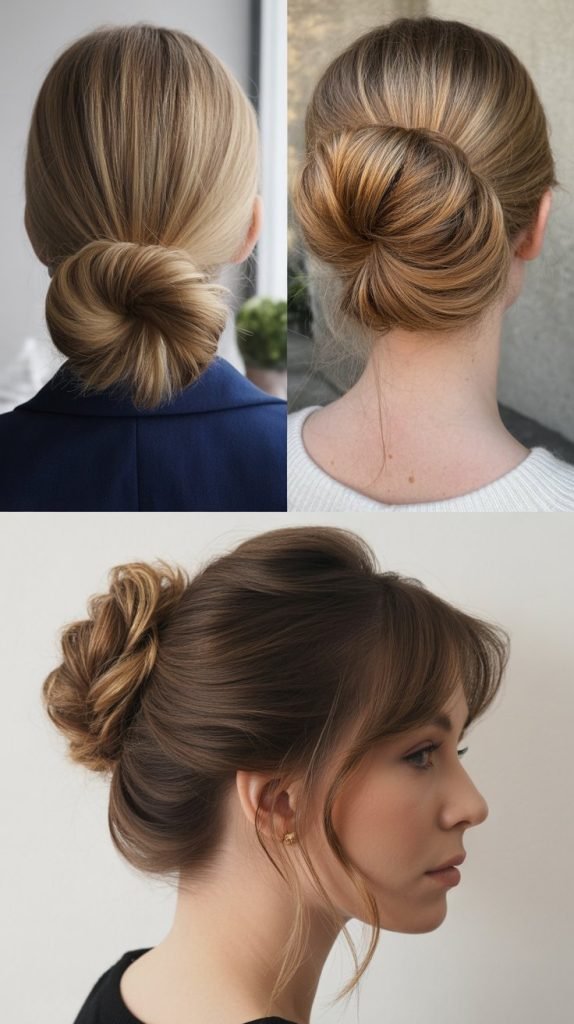
6. The Twisted Low Bun
The twisted low bun combines sophistication with stability, making it perfect for moms who need to look presentable without constant touch-ups.
- Gather your hair into a low ponytail at the nape of your neck, securing it loosely with an elastic band that won’t damage your hair.
- Split the ponytail into two equal sections and twist them around each other in a rope-like pattern until you reach the ends.
- Wrap the twisted rope around the base of your ponytail in a circular motion, forming a compact bun shape.
- Tuck the ends underneath the bun and secure everything in place with 4-6 bobby pins inserted at different angles for maximum hold.
- The twisting technique creates built-in texture that prevents the bun from looking too severe or ballet-dancer formal.
- This style sits low enough to be comfortable when driving or resting your head back but high enough to stay off your collar.
- Finish with a light mist of medium-hold hairspray to lock everything in place without creating helmet hair.
7. The Bubble Ponytail
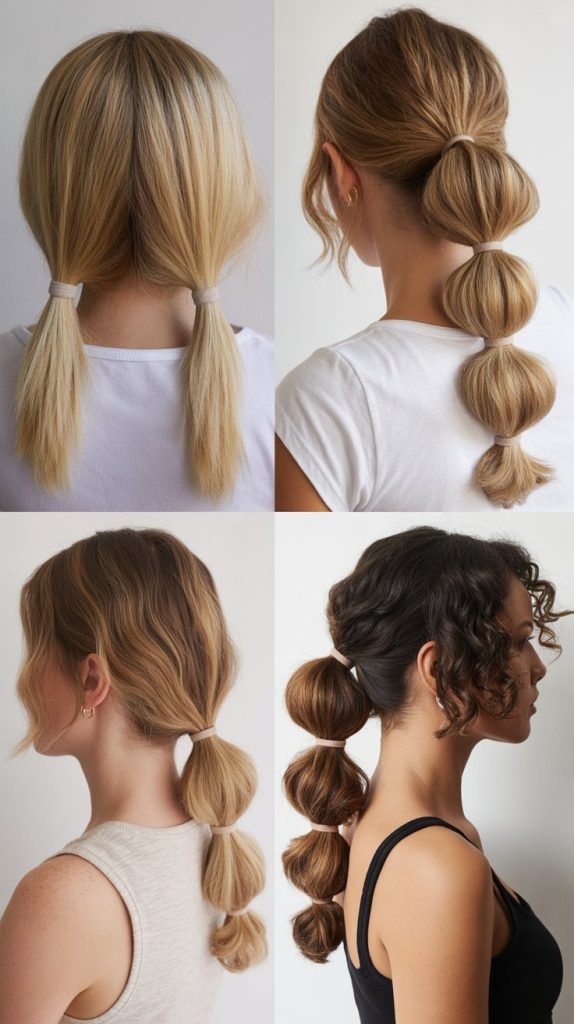
The bubble ponytail adds fun dimension to a basic ponytail with minimal effort and maximum impact throughout your entire day.
- Start with a high or mid-level ponytail secured with your first elastic band at whatever height you find most comfortable.
- Add additional elastic bands down the length of your ponytail, spacing them 2-3 inches apart depending on how many bubbles you want to create.
- Gently pull on each section between the elastics to create volume and the characteristic bubble shape that gives this style its name.
- The multiple elastic bands act as anchor points that prevent the style from slipping or losing shape as the day progresses.
- This playful look works for both casual weekend activities and more dressed-up occasions depending on how you accessorize it.
- Moms with fine or thin hair particularly love this style because the pulling technique makes hair appear much fuller than it actually is.
- Use clear elastic bands for a subtle look or colored ones that match your outfit for a more playful, intentional statement.
8. The French Twist
The French twist is a classic updo that screams sophistication while being surprisingly practical for active moms who need their hair completely secured.
- Brush all your hair to one side of your head, gathering it as if you’re going to create a low side ponytail.
- Hold the gathered hair with one hand while using the other to twist it upward in a rolling motion toward the center back of your head.
- Continue twisting until your hair forms a vertical roll along the back of your head, then tuck the ends into the twist.
- Secure the entire twist with bobby pins inserted vertically along the seam where the twist meets your head, using at least 6-8 pins for stability.
- This elegant style keeps every strand off your neck and face, making it ideal for hot days or when you’re doing messy activities with kids.
- The compact nature of the twist means there are no loose ends to get caught in car doors, pulled by toddlers, or blown around by wind.
- Add a decorative hair comb at the base or top of the twist to elevate the look for special occasions without changing the basic structure.
9. The Braided Headband

The braided headband creates a bohemian look that keeps your bangs and face-framing pieces securely out of the way all day long.
- Take a small section of hair from behind one ear and divide it into three equal strands to begin a standard three-strand braid.
- Braid this section tightly all the way to the ends without adding any additional hair, creating a thin braid that will serve as your headband.
- Bring the braid across the top of your head like a headband and secure the end behind your opposite ear with bobby pins.
- The rest of your hair can hang loose, be gathered into a low ponytail, or styled however you prefer since the braid is purely functional.
- This technique is especially helpful for moms growing out bangs who need a stylish way to keep shorter pieces from falling into their eyes.
- The tight braid structure means it won’t loosen or fall apart even during high-energy activities like running after kids at the park.
- Create matching braids on both sides for a double-headband effect that provides even more control over flyaway hair.
10. The Sock Bun
The sock bun creates a perfectly round, voluminous bun that looks professionally styled but uses a simple household item as its secret weapon.
- Cut the toe section off a clean sock that matches your hair color, then roll it into a donut shape that will serve as your bun form.
- Pull your hair into a high ponytail and thread the end through the center of the sock donut, positioning it at the base of your ponytail.
- Spread your hair evenly around the sock donut, ensuring the sock is completely covered and hidden underneath your hair.
- Roll the sock donut downward toward your head, gathering your hair around it as you go until it reaches your ponytail base.
- Secure the bun by tucking any loose ends underneath and adding bobby pins around the perimeter to lock everything in place.
- The sock form provides structure that prevents the bun from deflating or losing its shape even after hours of wear.
- This technique works particularly well for moms with fine or thin hair who struggle to create full-looking buns with their natural volume alone.
11. The Side Braid

The side braid is effortlessly romantic while being practical enough to survive everything from grocery shopping to bedtime routines without falling apart.
- Sweep all your hair over one shoulder, deciding whether you prefer the left or right side based on your natural part.
- Divide your hair into three equal sections and begin braiding in a standard three-strand pattern, keeping the tension consistent throughout.
- Continue braiding all the way to the ends of your hair, then secure with an elastic band that matches your hair color for a seamless look.
- Gently pull on the outer edges of each braid section to create width and a more relaxed, lived-in appearance.
- The side positioning keeps the braid visible and showcases your effort rather than hiding it down your back.
- This style prevents hair from getting caught in car seat belts, tangled in purse straps, or pulled by curious toddler hands.
- Wrap the braid around itself at the base of your neck and pin it into a low bun for an alternative look using the same braiding foundation.
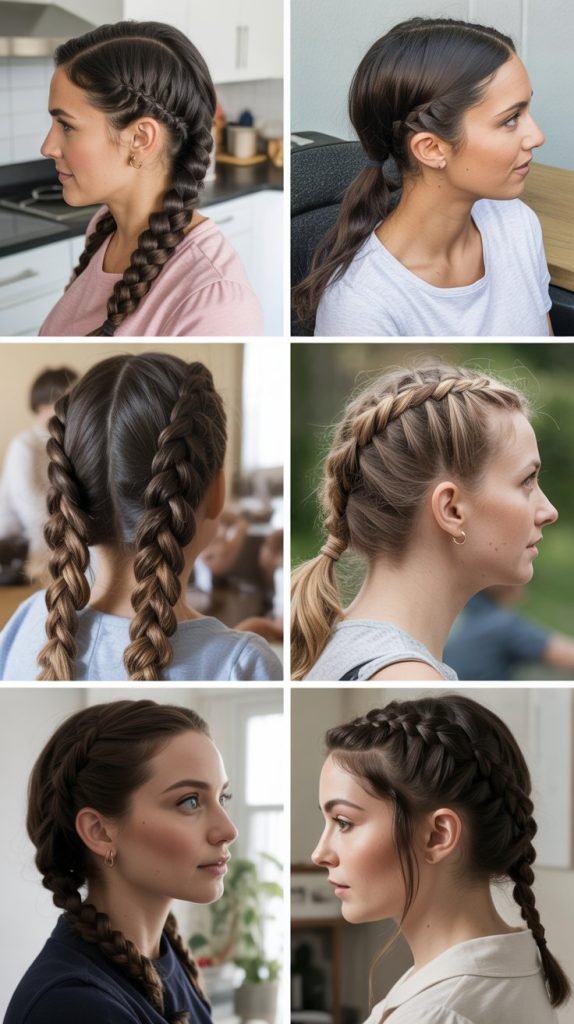
12. The Double Dutch Braids

Double Dutch braids are the ultimate sporty-chic style that keeps absolutely every strand of hair secured from morning until night without any adjustments needed.
- Part your hair straight down the middle from your forehead to the nape of your neck, creating two equal sections to work with.
- Clip one section out of the way while you focus on braiding the other side first to avoid confusion and tangling.
- Start your Dutch braid at the hairline, crossing sections under instead of over, and adding small amounts of hair with each stitch.
- Keep the braid tight against your scalp as you work your way down, maintaining consistent tension to prevent loose sections from forming.
- When you run out of hair to add, continue with a regular three-strand braid to the ends and secure with a small elastic band.
- Repeat the exact same process on the other side, trying to match the tightness and positioning for a symmetrical appearance.
- These braids are perfect for active moms who exercise, play sports with their kids, or simply don’t want to think about their hair all day.
13. The Textured Beach Waves with Headband
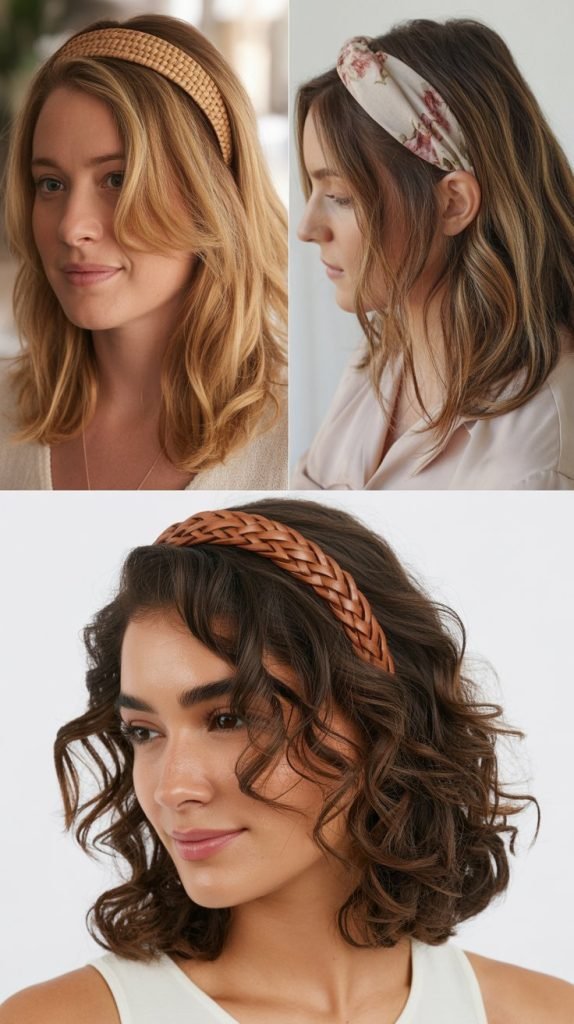
Textured beach waves paired with a stretchy headband create an effortless bohemian vibe that requires minimal styling but looks intentionally gorgeous.
- Apply sea salt spray to damp hair and scrunch it with your hands to encourage natural wave formation as it air dries.
- Once dry, place a wide fabric headband about an inch back from your hairline, pushing it back just enough to control flyaways.
- The headband keeps hair off your face without the severity of a slicked-back style, offering a softer, more approachable appearance.
- This combination works beautifully for moms who embrace their natural texture and don’t want to fight against it with heat styling.
- The headband stays in place throughout the day because it’s positioned behind your hairline where it has the most grip and stability.
- For added texture and hold, twist random sections of hair around your finger and pin them for 10 minutes before releasing.
- This style is incredibly forgiving of roots that need touching up or hair that’s between wash days since the textured look is intentionally undone.
14. The Pull-Through Braid

The pull-through braid creates the illusion of an intricate Dutch braid without requiring any actual braiding skills or finger coordination.
- Start with a high ponytail secured with a clear elastic band, then separate a small section from the top of the ponytail.
- Clip this top section out of the way temporarily while you add another elastic band about 2 inches below the first one.
- Release the clipped section, split it in half, and pull the middle ponytail section up through it, then clip that middle section away.
- Add another elastic band 2 inches below, then repeat the process of splitting the previous section and pulling the new section through.
- Continue this pattern down the entire length of your ponytail until you run out of hair, creating stacked loops that mimic a braid.
- Gently pull on the edges of each looped section to create volume and width, making the “braid” appear fuller and more impressive.
- This technique is revolutionary for moms who never learned to braid properly but still want the sophisticated look braids provide.
15. The Low Braided Bun
The low braided bun combines the security of a braid with the polish of a bun, resulting in a style that absolutely will not budge no matter what your day throws at you.
- Create a low ponytail at the nape of your neck and secure it with a no-slip elastic band designed for thick hair.
- Braid the entire length of your ponytail in a standard three-strand pattern, maintaining even tension from top to bottom.
- Wrap the braid around the base of your ponytail in a circular motion, forming a compact bun shape with built-in texture.
- Secure the bun with bobby pins inserted at multiple angles, ensuring the pins catch both the bun and your scalp for maximum stability.
- The braided structure prevents the bun from becoming loose or messy even during intense physical activity or long work days.
- This style is particularly effective for thick or heavy hair that tends to weigh down regular buns and cause them to sag.
- Finish with a light application of smoothing serum on any flyaways around your hairline for a polished, intentional appearance.
16. The Twisted Half-Up Style

The twisted half-up style adds sophisticated detail to loose hair without requiring advanced styling techniques or expensive salon visits.
- Take a section of hair from one side of your head, about 2 inches wide, starting at your temple and working back toward your ear.
- Twist this section away from your face, continuing the twist as you move toward the back center of your head.
- Secure the twist temporarily with a clip while you repeat the exact same process on the opposite side of your head.
- Bring both twists together at the back center of your head and secure them with bobby pins crossed in an X pattern for stability.
- The twists create a soft, romantic detail that elevates loose hair from casual to polished without appearing overly formal.
- This style keeps face-framing hair controlled and out of your way while showing off your hair length and natural texture.
- Add small decorative pins or a barrette at the point where the twists meet for special occasions or when you want extra visual interest.
17. The High Bun with Wrapped Base
The high bun with wrapped base looks intentionally styled rather than thrown together, yet it takes less than three minutes to create from start to finish.
- Pull your hair into a high ponytail at the crown of your head, positioning it where you’d naturally place a top knot.
- Before securing with an elastic band, separate out a thin section from underneath the ponytail to wrap around the base later.
- Twist the main ponytail section loosely and wrap it around itself to form a bun, securing with bobby pins inserted vertically.
- Take the thin section you separated earlier and wrap it around the elastic band at the base to hide it completely.
- Tuck the end of this wrapping section under the bun and secure with a bobby pin that matches your hair color.
- The wrapped base creates a polished, finished look that appears much more intentional than a visible elastic band.
- This elevated detail makes the difference between looking rushed and looking put-together even when you’re working with the same time constraints.
18. The Rope Braid Ponytail

The rope braid ponytail offers a unique alternative to standard three-strand braids while providing the same level of security and staying power.
- Gather your hair into a ponytail at whatever height you prefer, securing it tightly with a strong elastic band.
- Divide the ponytail into two equal sections, then twist each section individually in the same direction (clockwise or counterclockwise).
- Take both twisted sections and wrap them around each other in the opposite direction from which you twisted them individually.
- This counter-twisting technique creates tension that keeps the rope braid from unraveling throughout the day without any additional products.
- Secure the end with another elastic band, then gently pull on the rope braid to widen it and create a fuller appearance.
- The rope braid is faster to create than a traditional braid because you’re only managing two sections instead of three or more.
- This style works exceptionally well on hair that’s too slippery for regular braids to hold, providing built-in grip through the twisting motion.
19. The Pinned-Back Pixie Style
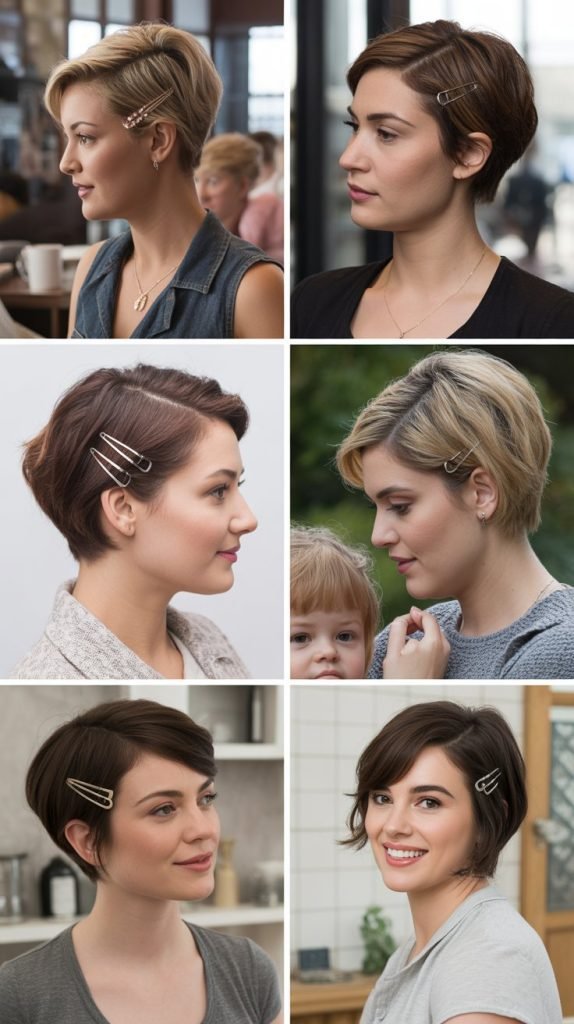
The pinned-back pixie style is specifically designed for moms with shorter hair who want options beyond wearing their cut as-is every single day.
- Apply a small amount of texturizing paste to your fingers and work it through your hair to create grip and piecey definition.
- Take the longer sections from the top and sides of your pixie cut and pin them back away from your face using bobby pins.
- Position the pins behind your ears or along the sides of your head, crisscrossing them for extra hold that lasts all day.
- This technique keeps hair out of your eyes during busy activities while adding visual interest to a short cut that can sometimes feel limiting.
- The pinned-back sections create height and volume at your crown, which elongates your face shape and draws attention upward.
- Spray the pinned sections lightly with flexible-hold hairspray before pinning them to help them stay in place longer.
- Experiment with decorative bobby pins, small barrettes, or even cute hair clips to add personality and style to this functional look.
20. The Faux Hawk Braid
The faux hawk braid brings edgy style to mom life while keeping your hair completely controlled from roots to ends throughout your busiest days.
- Section off a 3-inch wide strip of hair from your forehead straight back to the crown, leaving the sides down temporarily.
- Create a Dutch braid with this center section, keeping it tight against your scalp and adding hair only from the center strip as you work back.
- When you reach the crown of your head, secure the braid with a small elastic band and leave the rest of that section as a regular ponytail.
- Smooth the side sections back toward the braid and secure them underneath it with bobby pins to create the faux hawk shape.
- The raised braid along the center of your head mimics a mohawk without any commitment or extreme styling required.
- This bold look is surprisingly practical because every single strand is contained within the braid or pinned securely down the sides.
- Finish by gently pulling on the edges of the Dutch braid to create width and emphasize the faux hawk effect even more dramatically.
21. The Knotted Ponytail

The knotted ponytail adds unexpected detail to a basic style using actual knots instead of braids for a fresh take on everyday hair.
- Divide your hair into two equal sections as if you’re going to create pigtails on each side of your head.
- Tie these two sections together in a simple overhand knot, the same way you’d tie the first knot in your shoelaces.
- Continue tying knots down the length of your hair until you run out of room, typically creating 3-5 knots depending on your hair length.
- Secure the end with a clear elastic band that won’t distract from the unique knotted pattern you’ve created.
- The knots naturally tighten against themselves, creating a secure structure that won’t come undone even during physical activity.
- This technique works particularly well on smooth, straight hair where the knots can be clearly seen and appreciated.
- For added security, insert a bobby pin horizontally through each knot to lock it in place if you have particularly active days ahead.
22. The Braided Crown with Loose Curls
The braided crown with loose curls creates a princess-worthy look that’s actually practical enough for real moms living real lives with demanding schedules.
- Create loose curls throughout your hair using a large-barrel curling iron or heatless methods like braiding damp hair overnight.
- Once curled, take a 2-inch section from behind one ear and create a standard three-strand braid along your hairline toward the opposite ear.
- Keep the braid relatively loose and position it like a crown around the top of your head, pinning it behind the opposite ear.
- The curls below the braided crown add volume and movement while the crown itself keeps the style feeling structured and intentional.
- This combination of elements means the style looks complex and time-consuming when it actually comes together quite quickly.
- The braid prevents face-framing curls from falling flat or losing their shape while allowing you to showcase your curl work.
- Use bobby pins that match your hair color to secure the braid at multiple points along its path for all-day staying power.
23. The Twisted Bun with Loose Tendrils
The twisted bun with loose tendrils strikes the perfect balance between polished and approachable, giving you an elevated look that doesn’t feel overdone.
- Pull your hair into a low ponytail but don’t pull all the hair through on the final wrap, creating a loop instead of a full ponytail.
- Twist the remaining length of hair around the base of the loop, forming a textured bun with built-in dimension.
- Secure the bun with bobby pins, then intentionally pull out a few thin sections around your face to create soft, face-framing tendrils.
- These loose pieces soften the overall look and prevent the style from appearing too severe or ballet-dancer formal.
- The twisted construction prevents the bun from deflating or losing volume as the day progresses and your hair settles.
- Curl the face-framing tendrils lightly with a small curling iron if you want extra polish, or leave them natural for a more relaxed vibe.
- This style transitions beautifully from casual daytime activities to evening events with just a change of outfit and earrings.
24. The Space Buns

Space buns bring playful energy to mom hairstyles while providing rock-solid security that survives even the most active days with young children.
- Part your hair straight down the middle from forehead to nape, creating two equal sections that will become your two buns.
- Gather one section into a high ponytail positioned above your ear, then twist and wrap it around itself to form a round bun.
- Secure the first bun with bobby pins inserted in multiple directions, then repeat the exact same process on the other side.
- The symmetrical placement of the buns creates a youthful, fun aesthetic that pairs surprisingly well with both casual and trendy outfits.
- Because all your hair is contained in the two buns, there are no loose pieces to get tangled, pulled, or blown around.
- This style works for all hair lengths from shoulder-length to very long, adjusting only the size of the buns themselves.
- Make the buns sleek and tight for a modern look, or pull them apart slightly for a messy, relaxed interpretation of the style.
25. The Waterfall Braid
The waterfall braid creates the illusion of hair cascading through the braid like a waterfall while keeping your top layer controlled and face-framing pieces secured.
- Begin with a small three-strand braid starting at your temple, positioning it where a headband would naturally sit across the top of your head.
- As you braid, drop the bottom strand after each stitch and replace it with a new section of hair from above, creating the cascading effect.
- The dropped strands fall naturally and blend with the rest of your loose hair, creating beautiful dimension and visual interest.
- Continue the waterfall braid around the curve of your head, working toward the opposite temple or ear depending on your preference.
- Secure the end of the braid with a small clear elastic band and pin it behind your ear to hide the finishing point.
- This style keeps the crown area of your head smooth and controlled while allowing you to show off your hair length and texture below.
- The technique works on both straight and wavy hair, though waves make the cascading effect even more dramatic and noticeable.
26. The Slicked-Back Bun

The slicked-back bun is minimalist sophistication personified, creating a clean, modern look that eliminates all texture and flyaways for maximum polish.
- Apply smoothing gel or mousse to damp hair, distributing it evenly from roots to ends with a fine-tooth comb.
- Use a paddle brush to brush your hair straight back from your hairline, eliminating any bumps, parts, or texture as you work.
- Gather all your hair at the crown or nape of your neck, securing it tightly with a strong elastic band that won’t slip.
- Smooth any remaining flyaways with a small amount of gel on your fingertips, focusing on your hairline and the area around your ears.
- Twist the ponytail and wrap it around itself to form a compact bun, securing it with bobby pins inserted vertically for maximum hold.
- The ultra-smooth surface reflects light beautifully, creating a glossy, high-shine finish that looks expensive and intentional.
- This style is perfect for moms who prefer minimal, modern aesthetics and want a no-nonsense approach to looking polished.
27. The Side-Swept Waves

Side-swept waves create old Hollywood glamour that’s been adapted for modern mom life, offering elegance without requiring vintage pin-curling techniques.
- Create loose waves throughout your hair using a large-barrel curling iron, wrapping hair around the barrel and holding for 8-10 seconds.
- Once all sections are curled, run your fingers through them to break up the curls into soft, flowing waves.
- Create a deep side part, positioning it about 2 inches from your center part line for dramatic impact.
- Sweep all your hair over to the opposite shoulder from your part, allowing the waves to cascade dramatically down one side.
- Secure the hair behind your ear on the heavy side with 2-3 bobby pins inserted horizontally to prevent it from falling forward.
- The dramatic asymmetry of this style creates interest and sophistication while keeping hair off one side of your face entirely.
- Finish with flexible-hold hairspray to maintain the wave pattern without creating stiffness or crunchiness that looks dated.
28. The Fishtail Braid

The fishtail braid looks intricate and complicated but actually uses a simple two-section technique that’s easier than traditional three-strand braiding once you understand the pattern.
- Divide your hair into two equal sections instead of the three sections used in regular braids, holding one section in each hand.
- Take a thin piece from the outer edge of the left section and cross it over to join the right section.
- Take a thin piece from the outer edge of the right section and cross it over to join the left section, establishing the alternating pattern.
- Continue this process all the way down the length of your hair, keeping your sections tight enough to maintain structure but not so tight it hurts.
- The smaller the pieces you cross over, the more intricate and detailed your fishtail braid will appear in the finished style.
- Secure the end with an elastic band, then gently pull on the outer edges of the braid to create width and a more relaxed appearance.
- This braid style stays secure longer than regular braids because the overlapping pattern creates more friction and grip between sections.
29. The Top Knot with Headband
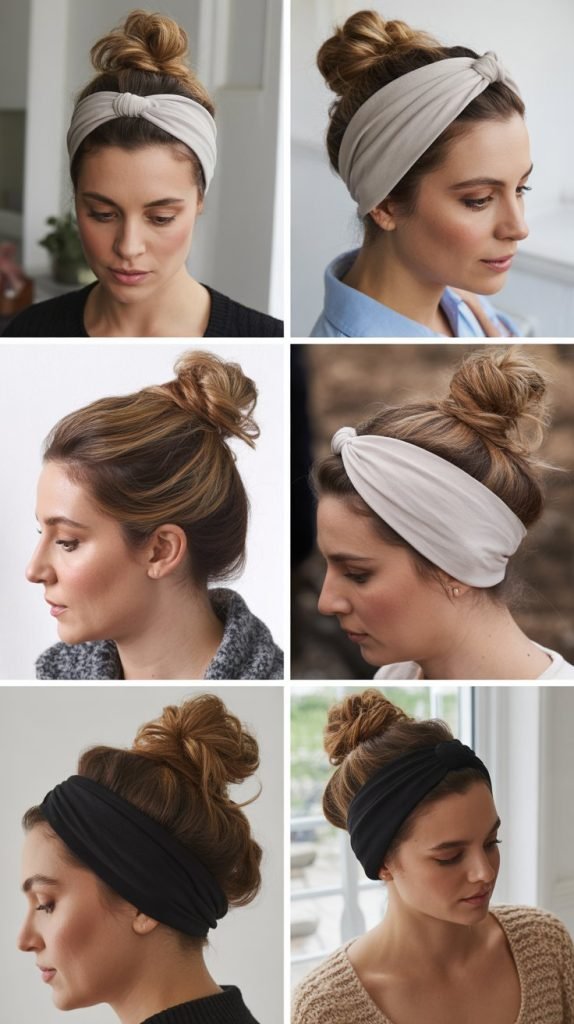
The top knot with headband combines two mom-favorite elements into one reliable style that keeps everything in place from morning coffee to bedtime stories.
- Create a messy top knot following the same technique as outlined earlier, positioning it at the crown of your head for maximum height.
- Once the knot is secured with bobby pins, place a fabric or plastic headband about an inch back from your hairline.
- The headband catches any shorter pieces or flyaways that the knot can’t hold, creating a polished perimeter around your face.
- This combination is particularly effective for moms with layers or bangs that are too short to fit into the top knot itself.
- Choose headbands with rubber grips on the inside to prevent them from sliding back throughout the day during active movements.
- The contrast between the structured headband and the intentionally messy knot creates visual interest and dimension.
- This style works equally well with sporty athletic headbands for workouts or elegant fabric headbands for dressier occasions.
30. The Low Ponytail with Volume
The low ponytail with volume proves that simple styles don’t have to look flat or boring when you add strategic height at the crown area.
- Before creating your ponytail, tease the hair at your crown using a fine-tooth comb, backcombing gently to create lift and texture.
- Smooth the top layer over the teased section so you get volume without seeing the teasing, creating a polished surface.
- Gather your hair into a low ponytail at the nape of your neck, being careful not to pull the crown section too tight and eliminate your volume.
- Secure with an elastic band, then gently push the crown section forward slightly to enhance the volume you created.
- The added height at the crown elongates your face shape and prevents the low ponytail from looking severe or too slicked-back.
- Wrap a small section of hair around the elastic band to conceal it and add a finishing detail that elevates the overall appearance.
- This volumized version takes the basic low ponytail from office-appropriate to dinner-ready without changing the fundamental structure.
31. The Pretzel Bun
The pretzel bun creates a unique twisted shape that looks like complex knotwork but actually comes together through a simple folding technique anyone can master.
- Pull your hair into a high ponytail and secure it with a strong elastic band that can handle your hair’s weight.
- Split the ponytail into two equal sections and twist them around each other loosely, creating a rope-like pattern.
- Take this twisted rope and fold it in half, bringing the end back up to meet the base of your ponytail.
- Wrap the folded twisted section around itself in a figure-eight or pretzel-like pattern, creating dimension and visual interest.
- Secure the entire structure with bobby pins inserted at multiple angles, making sure to catch both the bun and your scalp for stability.
- The pretzel shape prevents the bun from looking like every other mom bun at school pickup while being just as practical.
- This style works particularly well for thick hair because the folding technique distributes bulk more evenly than traditional bun methods.
32. The Scarf-Wrapped Ponytail

The scarf-wrapped ponytail adds color, pattern, and personality to a basic ponytail while providing extra hold that helps fine or slippery hair stay in place.
- Create a ponytail at whatever height you prefer, securing it with a no-slip elastic band as your foundation.
- Take a long, thin scarf or ribbon and tie it around the base of your ponytail, knotting it securely but not so tight it cuts off circulation.
- Wrap the scarf down the length of your ponytail in a spiral pattern, leaving about an inch of hair visible between each wrap.
- Secure the end of the scarf with a small knot or tuck it under the last wrap, ensuring it won’t unravel during the day.
- The scarf adds visual interest while also creating friction that prevents the ponytail from slipping or drooping as hours pass.
- This technique allows you to coordinate your hairstyle with your outfit by choosing scarves in complementary colors or patterns.
- The wrapped sections create built-in texture that makes fine or thin hair appear fuller and more substantial than it naturally is.
33. The Gibson Tuck

The Gibson tuck is a vintage-inspired updo that looks elaborate but simply involves tucking a ponytail under and rolling it upward into a sleek shape.
- Create a low ponytail at the nape of your neck but don’t tighten the elastic all the way to your scalp, leaving about 2 inches of space.
- Create a small hole in the hair above the elastic band by separating it with your fingers into two sections.
- Flip your ponytail up and through this hole from underneath, creating a twist that brings the ponytail end pointing upward.
- Tuck the end of your ponytail under and roll it upward toward the base, creating a smooth, tucked roll against the back of your head.
- Secure the roll with bobby pins inserted horizontally through the tucked section, using at least 4-6 pins for all-day hold.
- The finished look appears much more complicated than the simple tucking technique that creates it, making you look polished with minimal effort.
- This style keeps every strand secured and protected, making it ideal for windy days or when you’re spending time outside with kids.
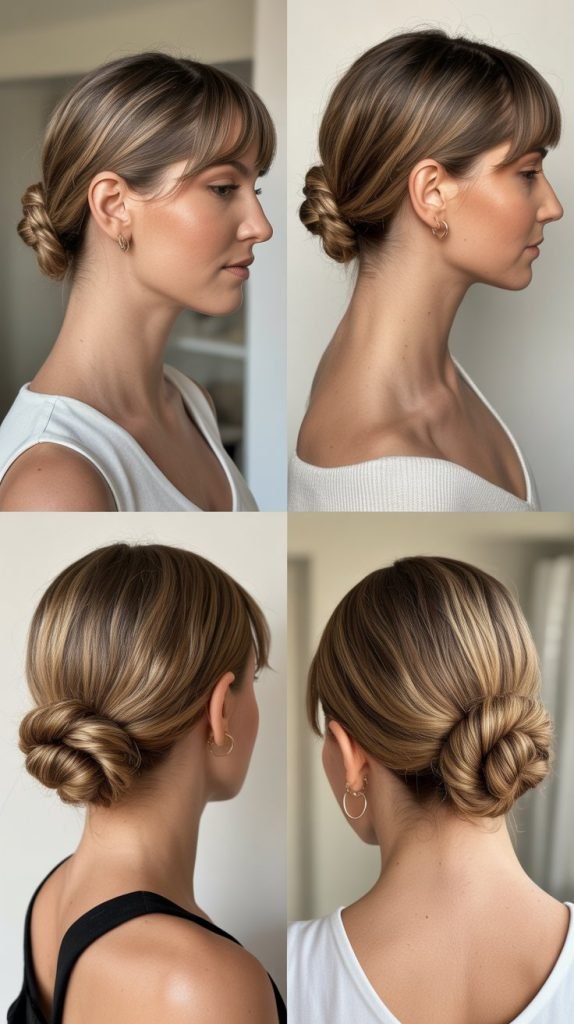
34. The Asymmetrical Low Bun

The asymmetrical low bun positions itself off to one side instead of centered, creating modern visual interest while maintaining all the practical benefits of a regular low bun.
- Gather your hair into a low ponytail positioned behind one ear rather than at the center back of your neck.
- Twist the ponytail loosely and wrap it around itself to form a bun, keeping the shape relatively compact and close to your head.
- Secure the bun with bobby pins, making sure to anchor it firmly since the off-center placement creates different weight distribution than centered buns.
- The asymmetrical positioning makes the style more visually interesting and contemporary compared to traditional centered updos.
- This placement also works well for moms who drive frequently because the bun sits to the side rather than pressing against car seats.
- The off-center look pairs particularly well with statement earrings on the exposed ear, drawing attention to your accessories.
- Smooth any flyaways on the exposed side with a small amount of pomade or gel for a intentionally sleek contrast with the textured bun.
35. The Braided Updo

The braided updo incorporates multiple braids into one cohesive updo structure, creating texture and dimension while ensuring absolutely nothing comes loose during your day.
- Divide your hair into three sections: one at the crown and one on each side, separating them with your fingers or a comb.
- Create a Dutch braid with the center section, working from your forehead back to the crown and securing it with a small elastic band.
- Braid each side section in regular three-strand braids, keeping them relatively tight to ensure they hold their shape all day.
- Gather all three braids together at the back of your head and wrap them around each other to form a textured bun shape.
- Secure the braided bun with multiple bobby pins inserted at different angles, making sure each braid is anchored independently.
- The combination of multiple braids creates incredible texture and visual interest that looks much more complex than the simple technique that creates it.
- This style is virtually indestructible because every section is braided before being incorporated into the updo structure.
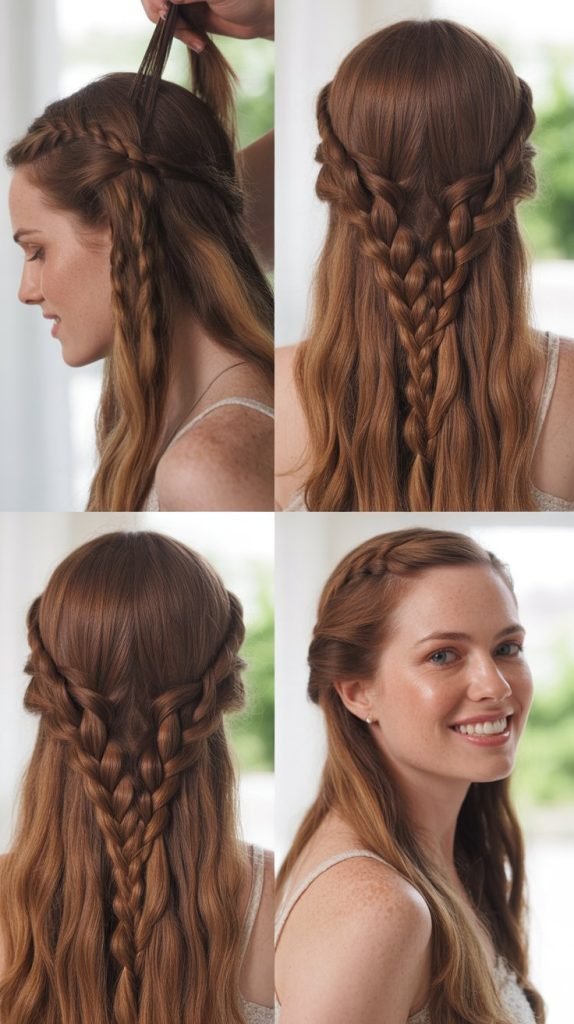
36. The Half-Braid with Loose Ends

The half-braid with loose ends strikes a balance between controlled and carefree, keeping your crown area neat while showing off your hair length below.
- Section off the top half of your hair from ear to ear across the back of your head, leaving the bottom section completely loose.
- Create a standard three-strand braid with the top section, working from the crown of your head downward toward where the two sections meet.
- Stop braiding when you reach the point where your top section ends and secure it with a clear elastic band that disappears into your hair.
- The braided portion keeps your crown smooth and flyaway-free while the loose bottom section flows freely and shows off natural texture.
- This style works exceptionally well for wavy or curly hair because the loose ends showcase your natural pattern beautifully.
- The braid prevents the top layer from becoming frizzy or losing definition while the unbraided portion maintains its natural movement and body.
- Add beach waves or curls to the loose section for special occasions, or leave it natural for everyday ease and simplicity.
37. The Quick Twist and Pin

The quick twist and pin is the ultimate emergency hairstyle when you have literally two minutes to make yourself look intentional before running out the door.
- Gather sections of hair from both sides of your head near your temples, working back toward the crown area.
- Twist each section away from your face, continuing the twist as you bring both sections toward the back center of your head.
- Cross the two twisted sections over each other at the back and secure them together with 2-3 bobby pins inserted in an X pattern.
- The rest of your hair hangs loose below the twisted and pinned section, creating a half-up style with minimal effort required.
- This technique takes less than 90 seconds once you’ve practiced it a few times and becomes pure muscle memory.
- The twisted sections keep face-framing hair controlled without the commitment or time investment of a full updo or elaborate braid.
- Adjust the height of where you pin the twists to change the look from casual to more formal depending on your day’s activities.
Conclusion
Finding hairstyles that survive the chaos of mom life doesn’t mean sacrificing style or settling for the same boring ponytail every single day.
These 37 Easy Hairstyles for Moms That Actually Stay All Day prove that you can have both practicality and polish without spending your precious morning minutes struggling with complicated techniques.
From quick twists that take two minutes to secure braids that last through swimming lessons, each style in this collection serves the real needs of real moms navigating real life.
The secret isn’t having more time or better hair products—it’s having a reliable arsenal of go-to styles that work with your hair type, match your lifestyle, and genuinely stay put from coffee to bedtime.
Whether you’re heading to important meetings, chasing toddlers at the playground, or simply trying to look like you have your life together at school pickup, these hairstyles have your back.
Start with one or two styles that appeal to you most and practice them until they become second nature, then gradually expand your repertoire as your confidence grows.
Your hair can be one less thing to worry about in your already-full schedule, and these tested, mom-approved styles ensure you’ll always look intentional and put-together no matter what your day brings.
Remember that the best hairstyle is the one you’ll actually do consistently, so choose styles that fit naturally into your morning routine and make you feel confident as you tackle whatever challenges and joys motherhood brings your way.