If you’ve ever wondered how to turn your woodworking hobby into a profitable venture, you’re in the right place.
37 Best Small Wood Projects to Sell Fast is your go-to guide for practical, high-demand wooden crafts that are both simple to make and quick to sell.
Whether you’re a beginner with basic tools or a seasoned woodworker looking to expand your side hustle, this article offers a variety of small wood projects that combine creativity with commercial appeal.
From rustic home décor to personalized gifts and functional storage pieces, each idea has been carefully selected for its low material cost, easy production process, and fast turnover potential.
Many of these projects are perfect for craft fairs, online shops like Etsy, and local markets.
Get ready to be inspired and confident as you explore these 37 wood projects that could be your next bestsellers.
1. Wooden Phone Stands
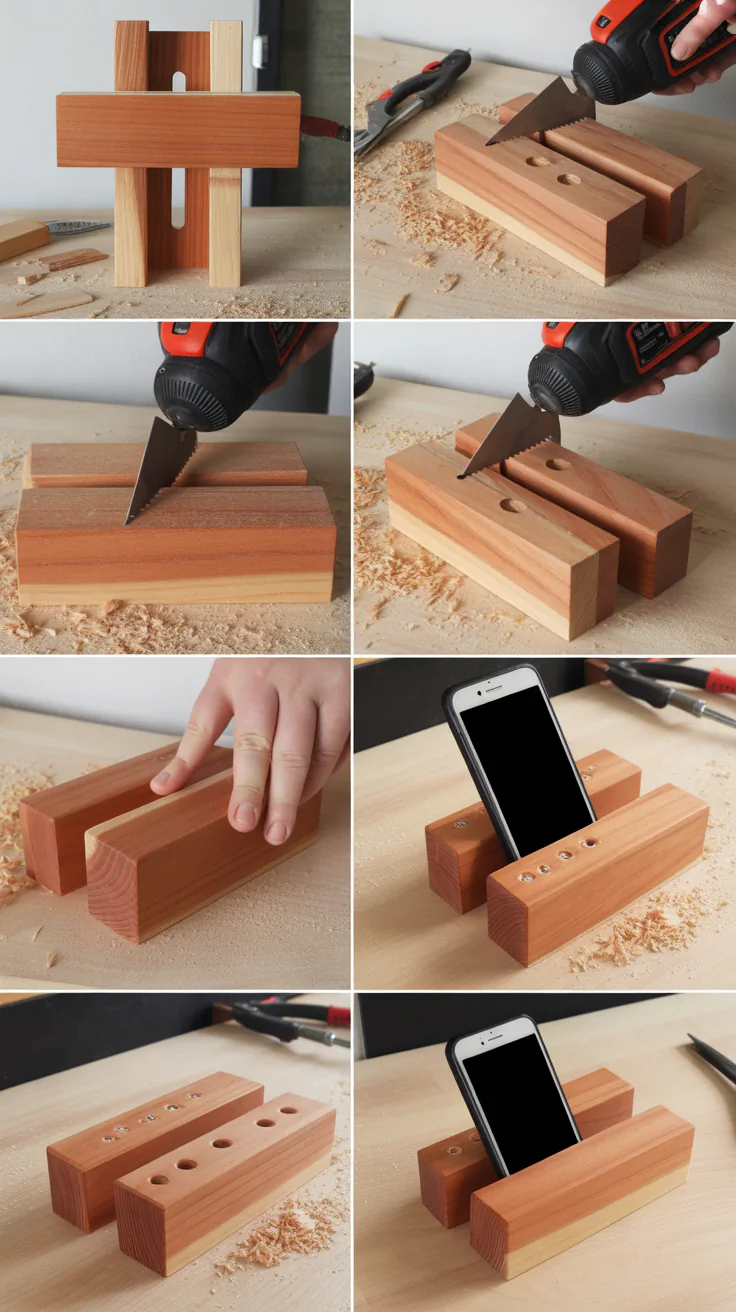
These compact accessories are ideal for desks, nightstands, and work-from-home setups. They’re functional, customizable, and one of the easiest wooden crafts to mass-produce.
How to Make a Wooden Phone Stand:
- Cut a rectangular piece of wood approximately 3″ x 5″ and ¾” thick.
- At a 15–20 degree angle, make a centered groove ½” deep using a table saw or router.
- Sand all edges smooth using 120 and 220 grit sandpaper.
- Optionally, apply stain or paint, then finish with a polyurethane coat.
- Add rubber pads underneath to avoid slipping.
2. Rustic Candle Holders
Rustic candle holders are charming décor items perfect for farmhouse, boho, or cottage-style homes. They sell well during holidays, weddings, and craft fairs.
How to Make Rustic Candle Holders:
- Use a 4×4 wood post and cut it into varying heights (e.g., 4″, 6″, and 8″).
- Drill a shallow hole (1.5″ wide, ½” deep) on the top center for tea lights or votives.
- Sand all surfaces lightly but leave minor imperfections for rustic charm.
- Optionally distress the wood with a hammer or chain for an aged look.
- Stain in natural or weathered tones and seal with a matte polyurethane.
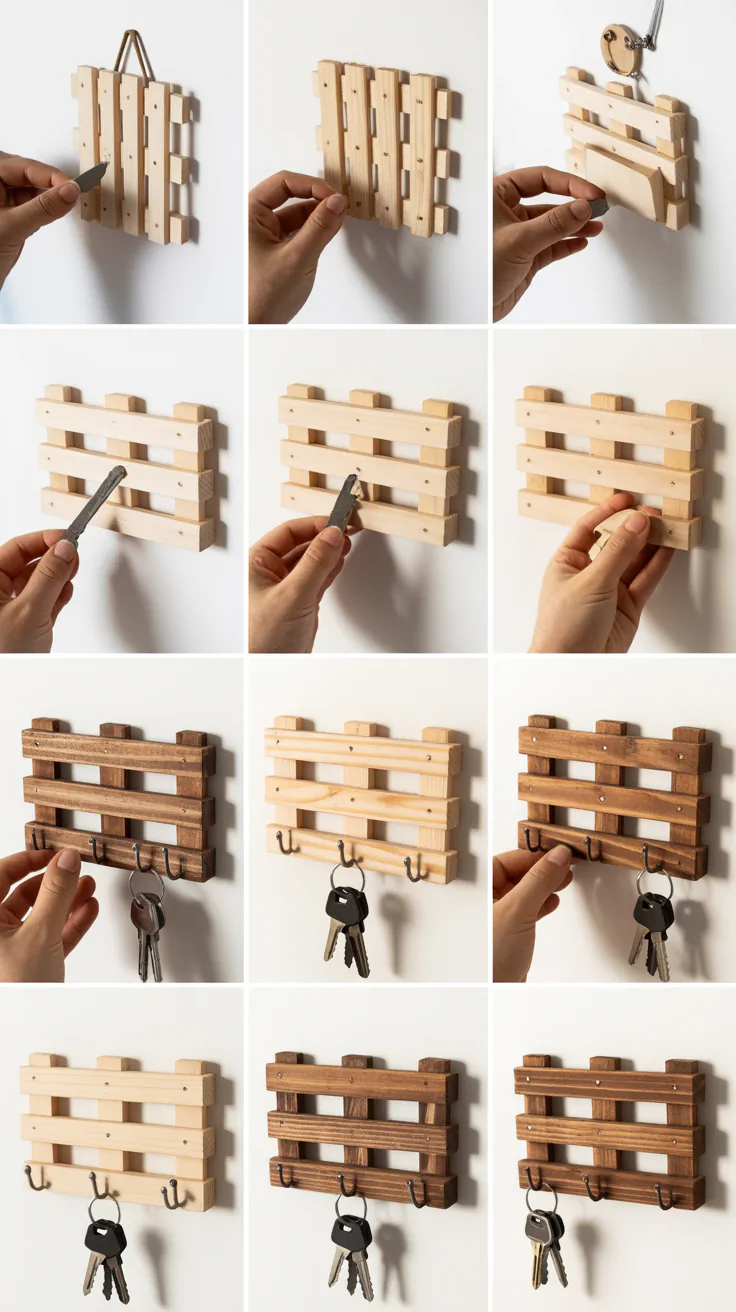
3. Personalized Key Holders
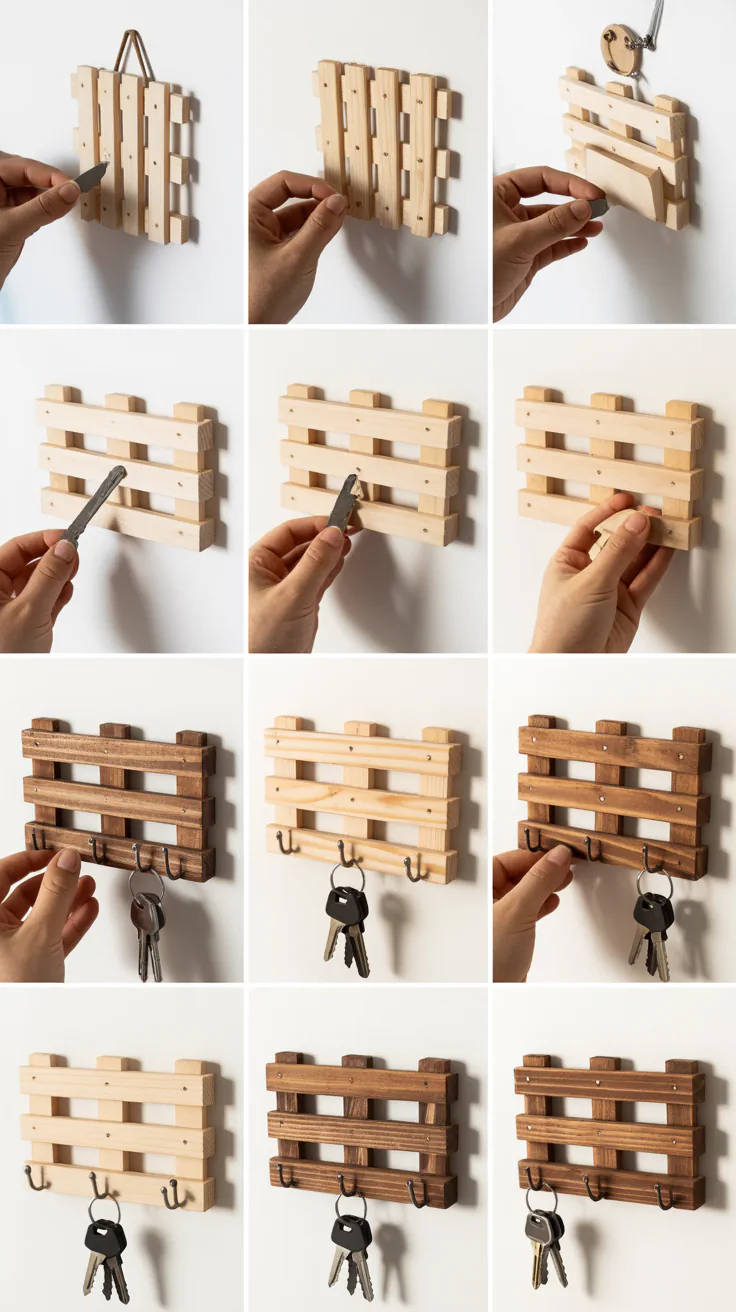
Key holders are great sellers because they are useful, wall-mounted, and easy to personalize. A great entry-level project for beginner woodworkers.
How to Make a Personalized Key Holder:
- Cut a 10″ x 5″ board (¾” thick) of pine or oak.
- Sand and finish the front surface.
- Attach 4–5 metal hooks spaced evenly.
- Engrave or stencil the family name or phrase like “Home Sweet Home” on the board.
- Add two D-rings or a keyhole bracket on the back for hanging.
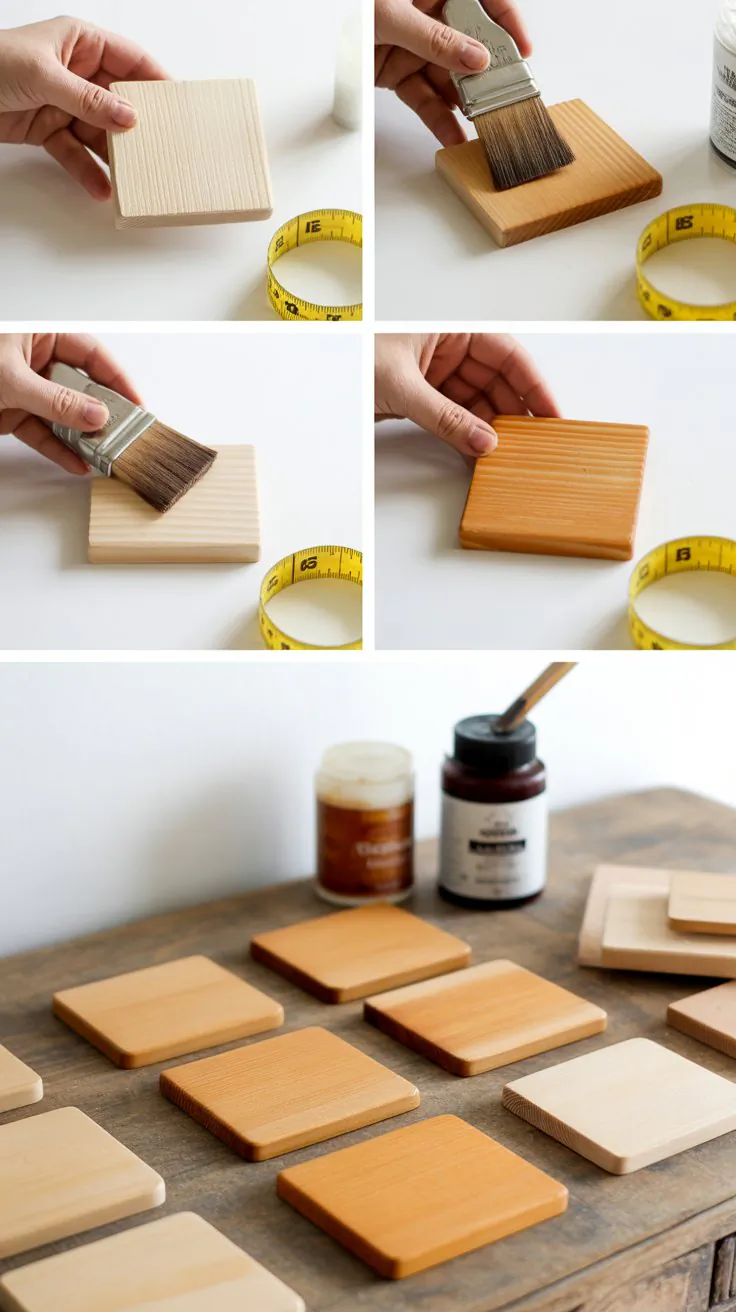
4. Wooden Coasters
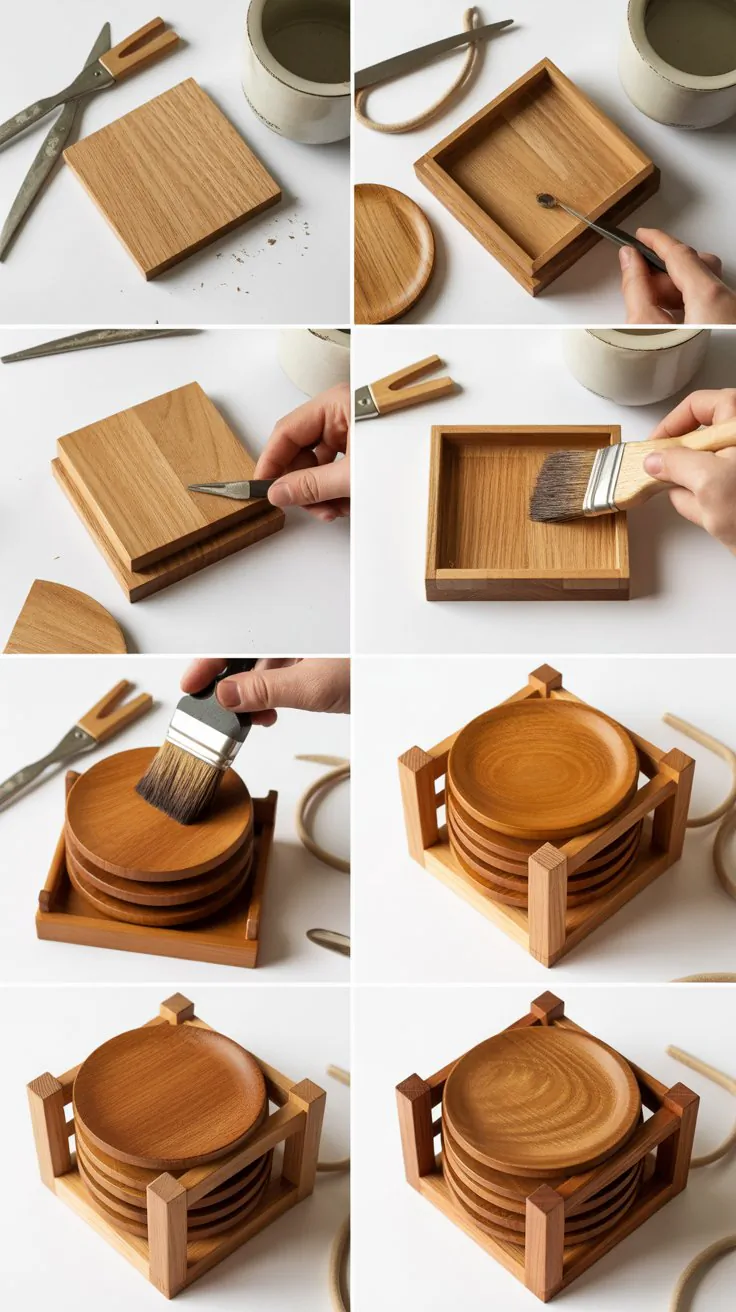
Coasters are simple, fast to make in bulk, and excellent for upselling as gift sets. They offer plenty of space for personalization through woodburning or laser engraving.
How to Make Wooden Coasters:
- Cut 4″ x 4″ squares from ½” thick hardwood (oak, walnut, or cherry).
- Round the corners and sand down all edges smooth.
- Customize with woodburned initials, patterns, or resin inlays.
- Apply mineral oil or food-safe finish.
- Package in sets of 4 with twine or a wooden holder.
5. Wall-Mounted Bottle Openers
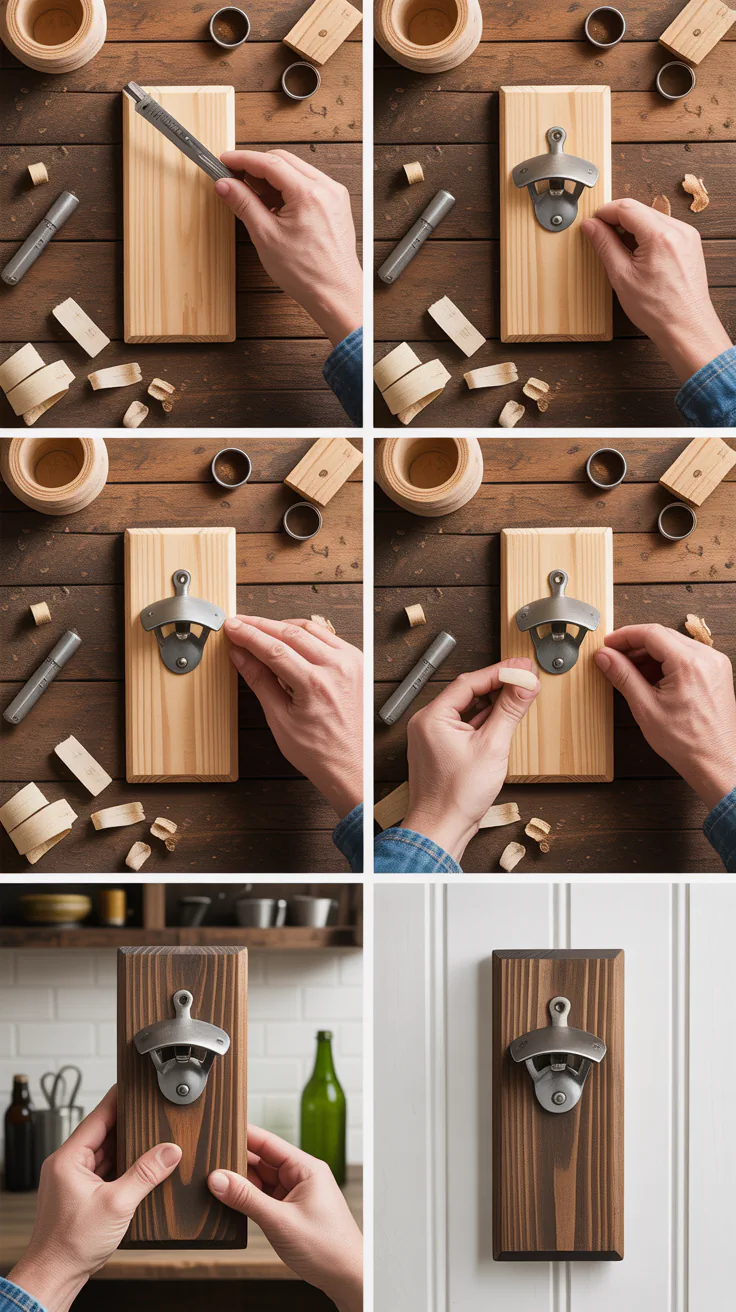
Popular with home bars, man caves, and as groomsmen gifts, wall bottle openers combine functionality with rustic charm.
How to Make a Wall-Mounted Bottle Opener:
- Cut a board to roughly 12″ x 4″.
- Sand and finish the wood (stain, paint, or distress it).
- Attach a cast iron or metal bottle opener near the top.
- Add a small tray or magnet at the bottom to catch caps.
- Drill mounting holes or attach keyhole brackets for wall hanging.
🛠️ Handy Table: Suggested Tools & Materials
| Project Type | Tools Needed | Recommended Wood Type | Suggested Add-ons |
|---|---|---|---|
| Phone Stand | Table saw, sander | Maple or Oak | Rubber pads, wood stain |
| Rustic Candle Holders | Drill, miter saw | Pine or reclaimed wood | Tea light inserts |
| Personalized Key Holders | Drill, engraving tool or stencil | Poplar or Oak | Metal hooks, paint pens |
| Wooden Coasters | Table saw, woodburner | Cherry or Walnut | Resin, branding iron |
| Wall-Mounted Bottle Opener | Drill, sander, screwdriver | Cedar or Pine | Metal opener, cap catcher |
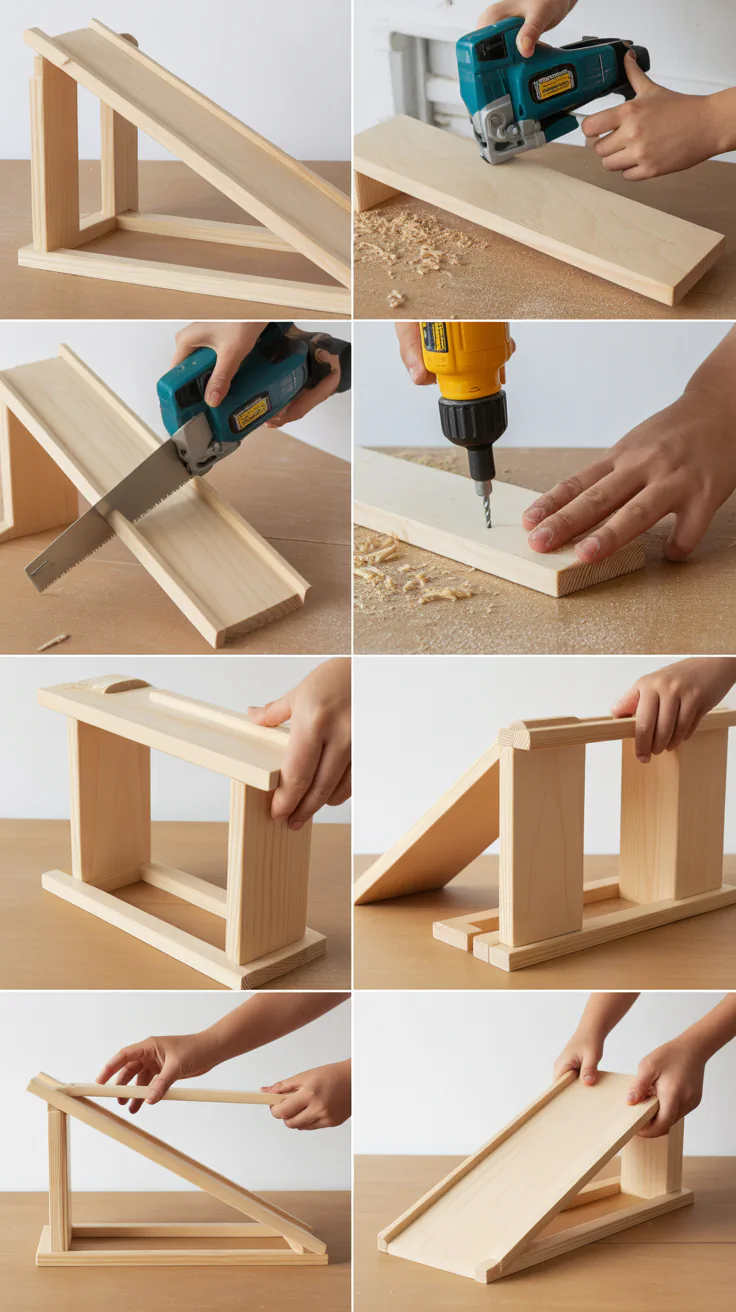
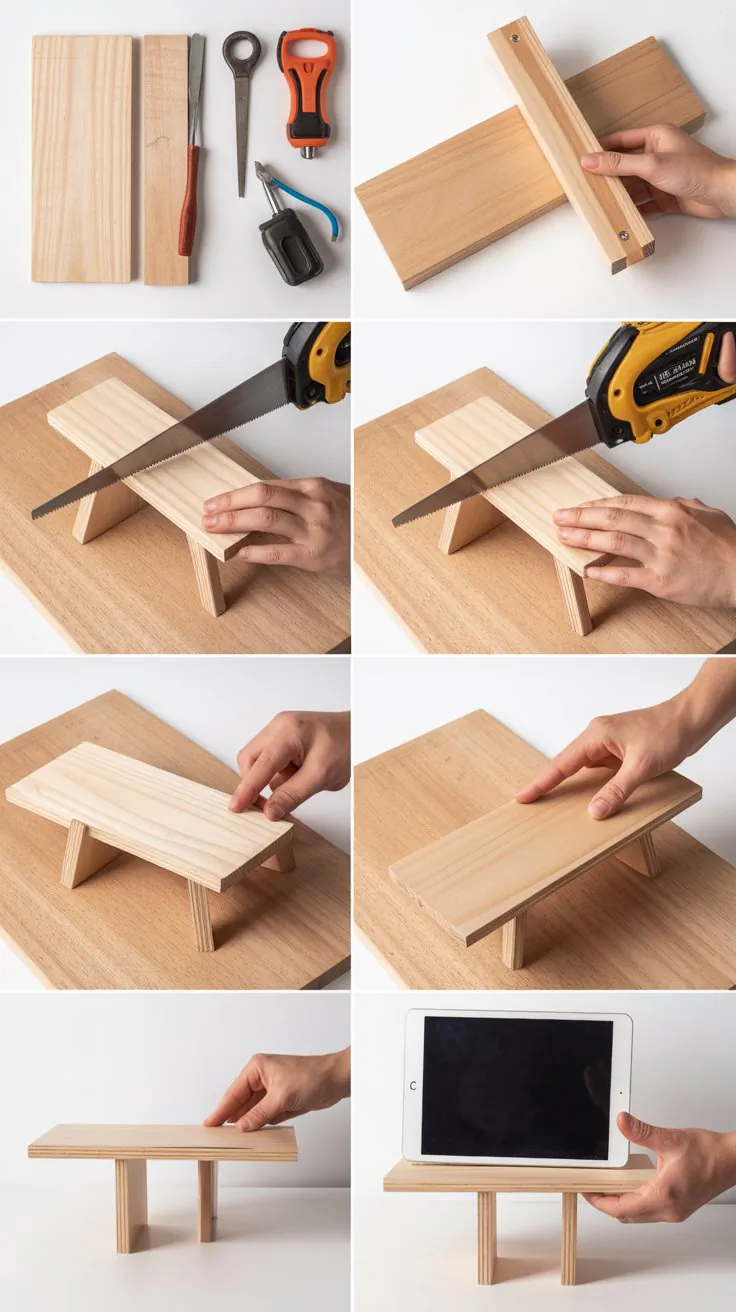
6. Wooden Tablet Holders
Perfect for kitchens, workspaces, or schools, tablet holders are sleek and stylish helpers for multitaskers.
How to Make a Tablet Holder:
- Cut a 10″ x 7″ backing board and a 10″ x 2″ base piece.
- Cut the base at a 15-degree angle on one side.
- Glue and nail the angled side to the base of the backing board.
- Add a small lip (¾” strip) to the front of the base to hold the tablet.
- Sand, paint, or stain as desired and add felt feet.
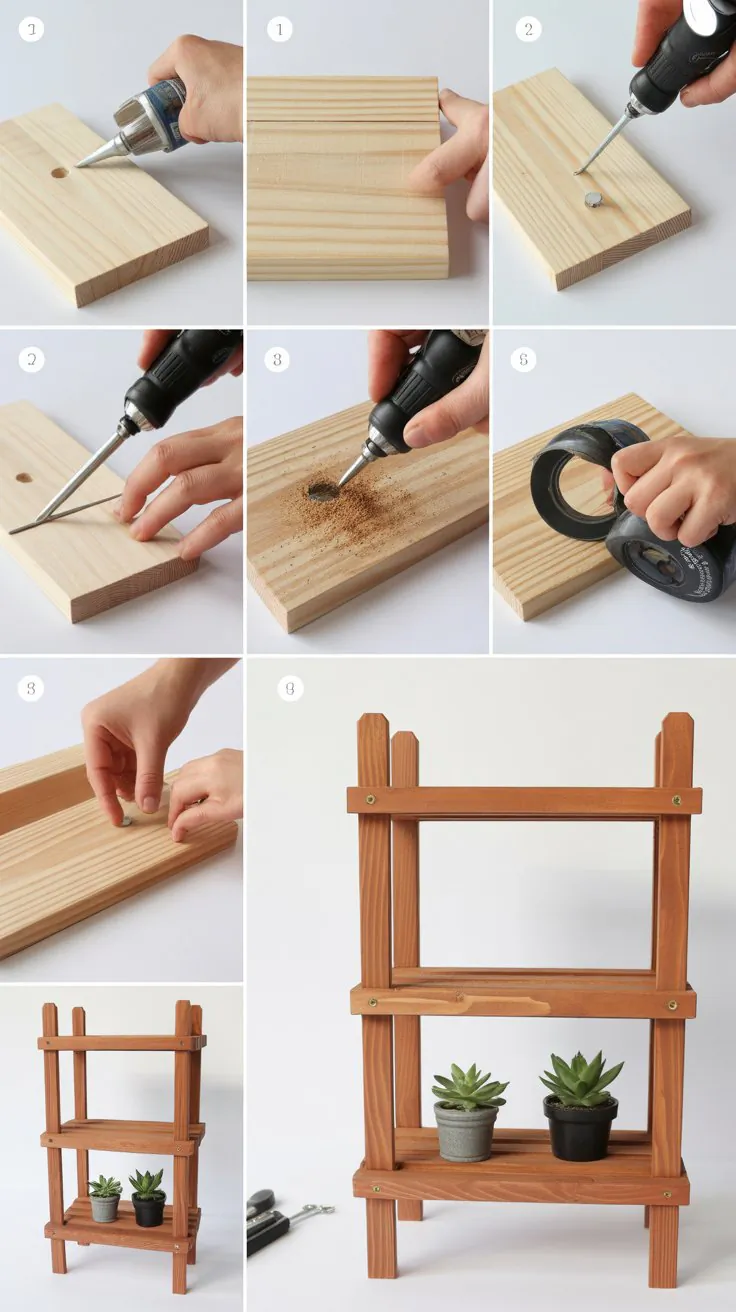
7. Wooden Planter Boxes
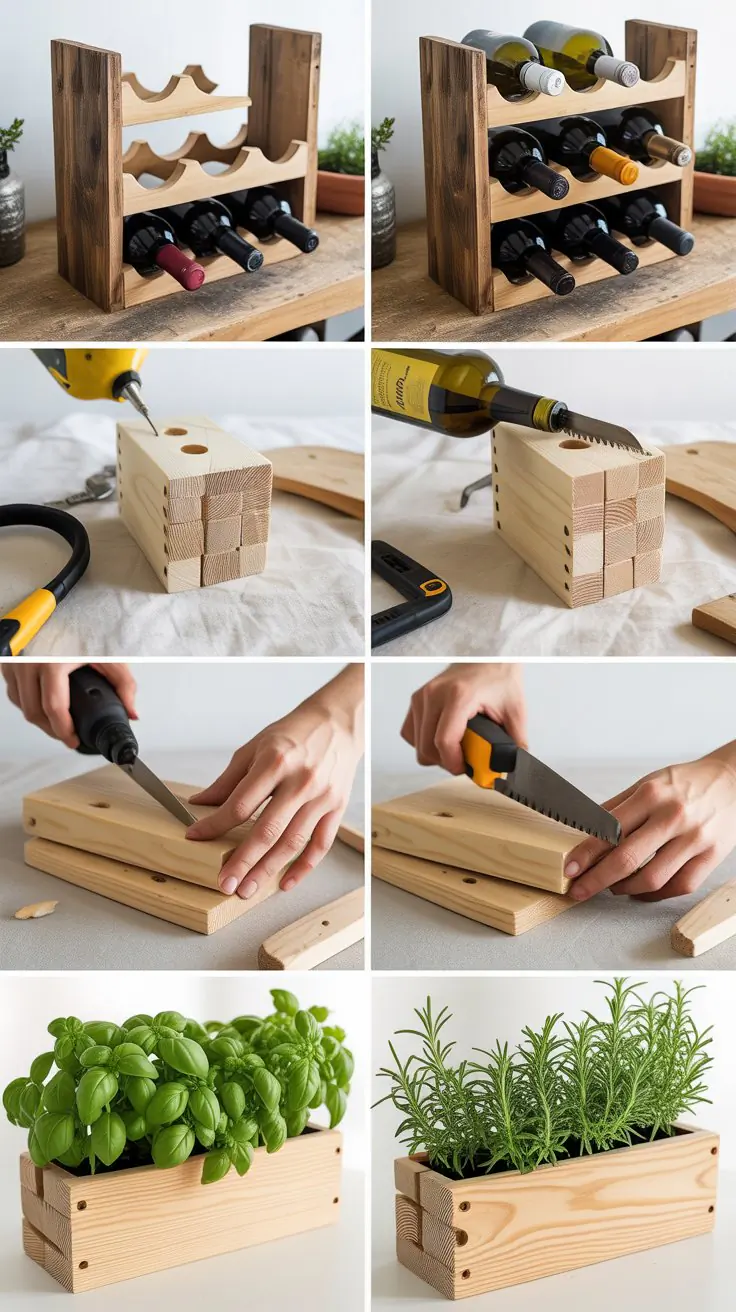
Planter boxes are a timeless home and garden item that people love for patios, windows, and centerpieces.
How to Make a Wooden Planter Box:
- Cut 4 side panels and a base (size: 12″ x 6″ x 5″).
- Nail or screw together with waterproof wood glue.
- Drill 2–3 drainage holes in the bottom.
- Sand edges and apply an exterior-grade finish or paint.
- Optional: Add rope handles for easy carrying.
8. Wooden Desk Organizers
With the rise of remote work, desk organizers help people stay productive and decluttered.
How to Make a Desk Organizer:
- Design and cut compartments (for pens, phones, notepads) from thin plywood or hardwood.
- Use wood glue and clamps to secure sections.
- Sand all edges and apply a professional finish.
- Personalize with initials, logos, or colors.
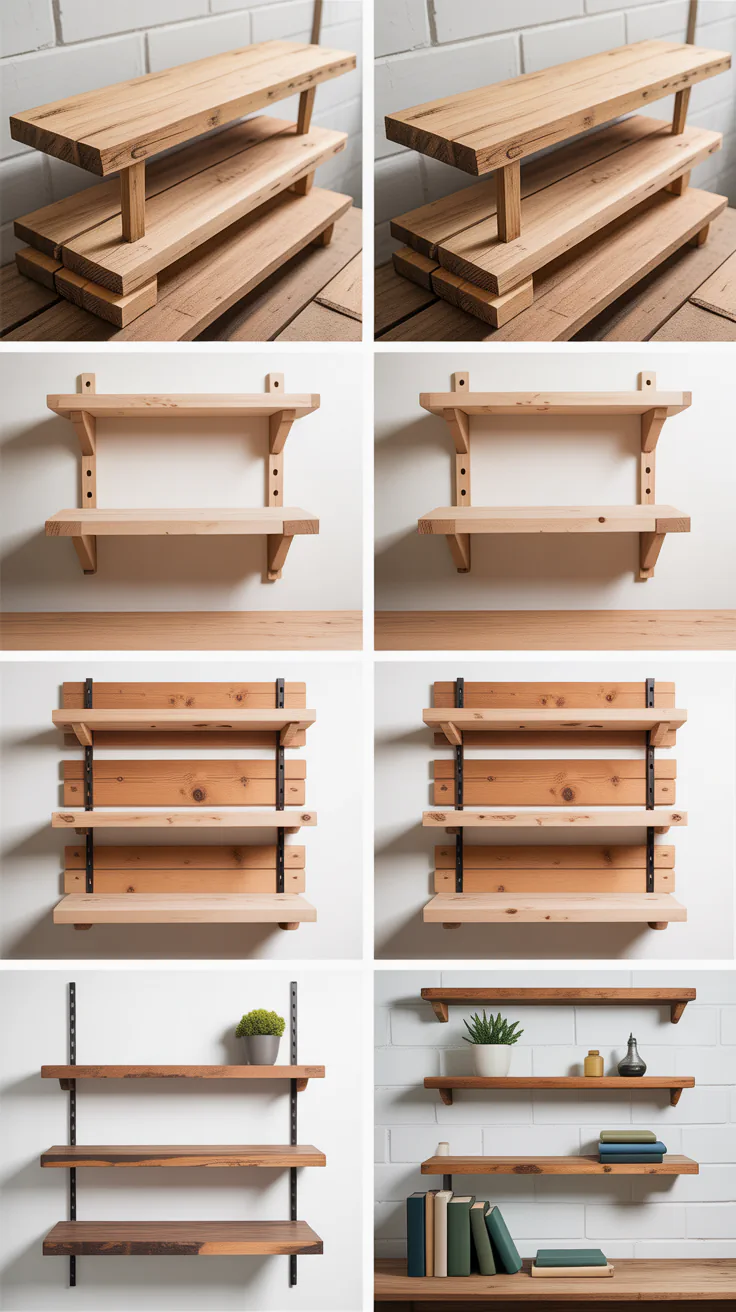
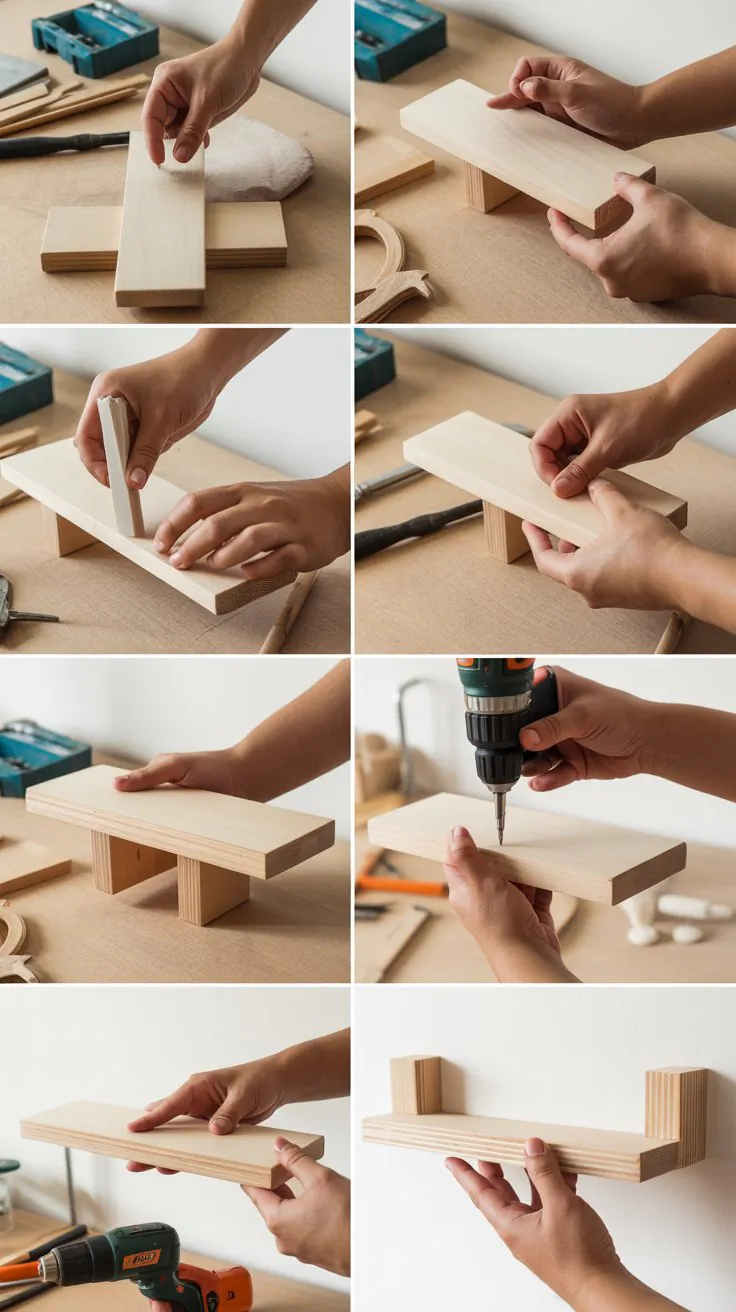
9. Mini Wooden Shelves
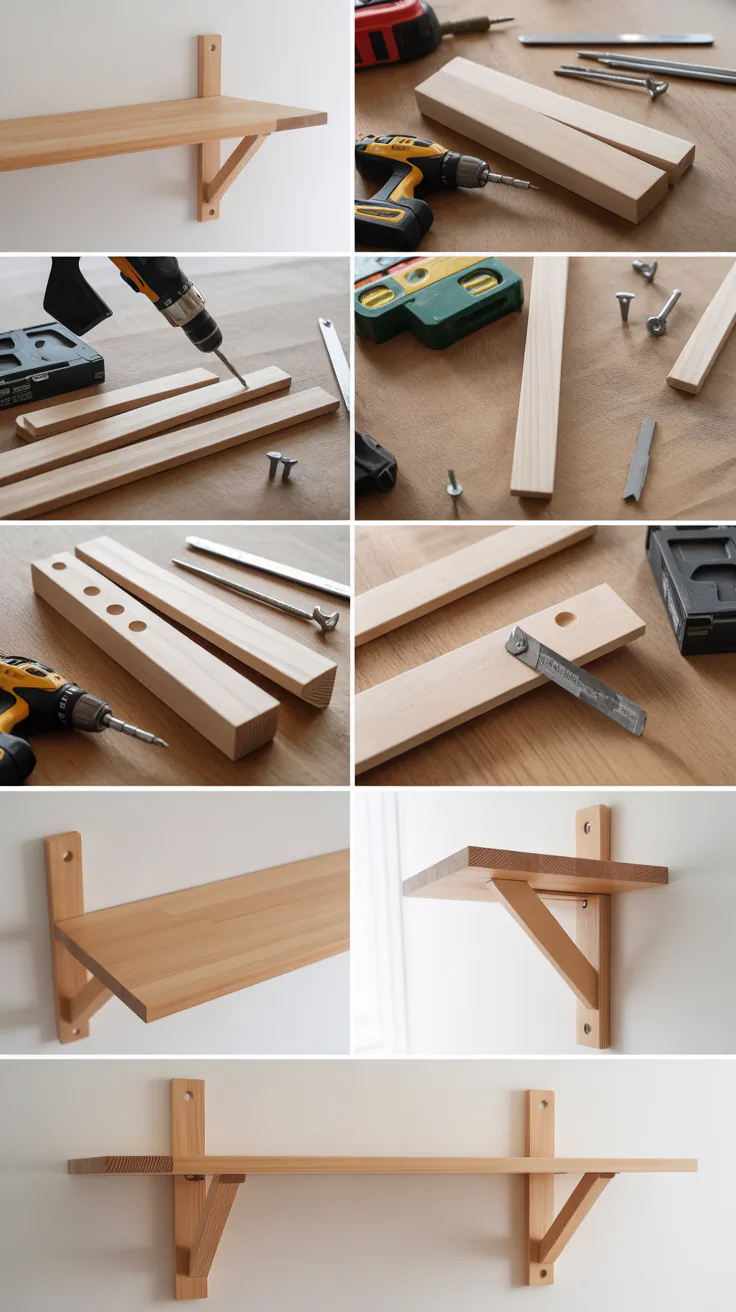
Perfect for displaying small décor or storing spices and trinkets with style.
How to Make a Mini Wooden Shelf:
- Cut a back panel (10″ × 6″) and two side panels (6″ × 4″).
- Join the sides to the back with wood glue and finishing nails.
- Sand and apply stain or paint.
- Attach keyhole hardware for wall mounting.
10. Wooden Picture Frames
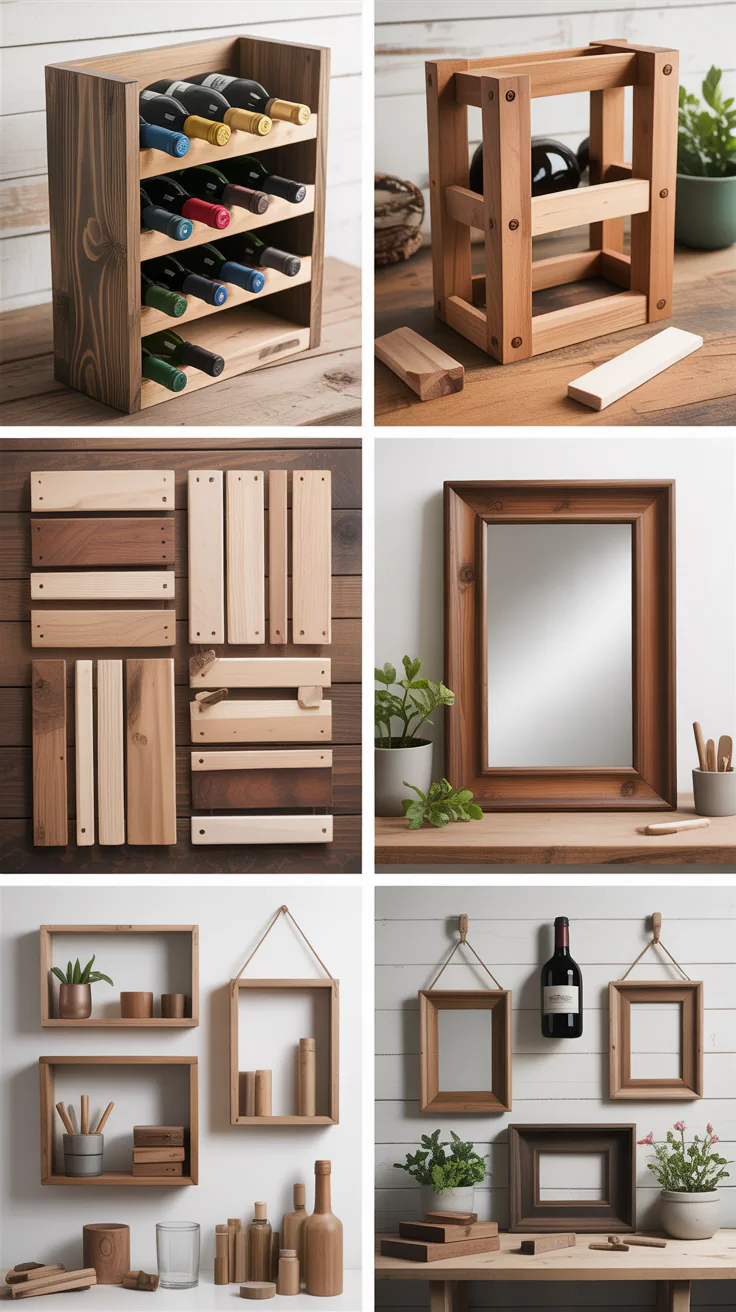
Picture frames are timeless, customizable, and fast sellers year-round.
How to Make a Wooden Picture Frame:
- Cut four mitered pieces (e.g., for 5″ × 7″ photo).
- Glue corners with wood glue and clamp until dry.
- Sand joints and finish with paint or stain.
- Fit glass, photo mat, and backing; add hangers.
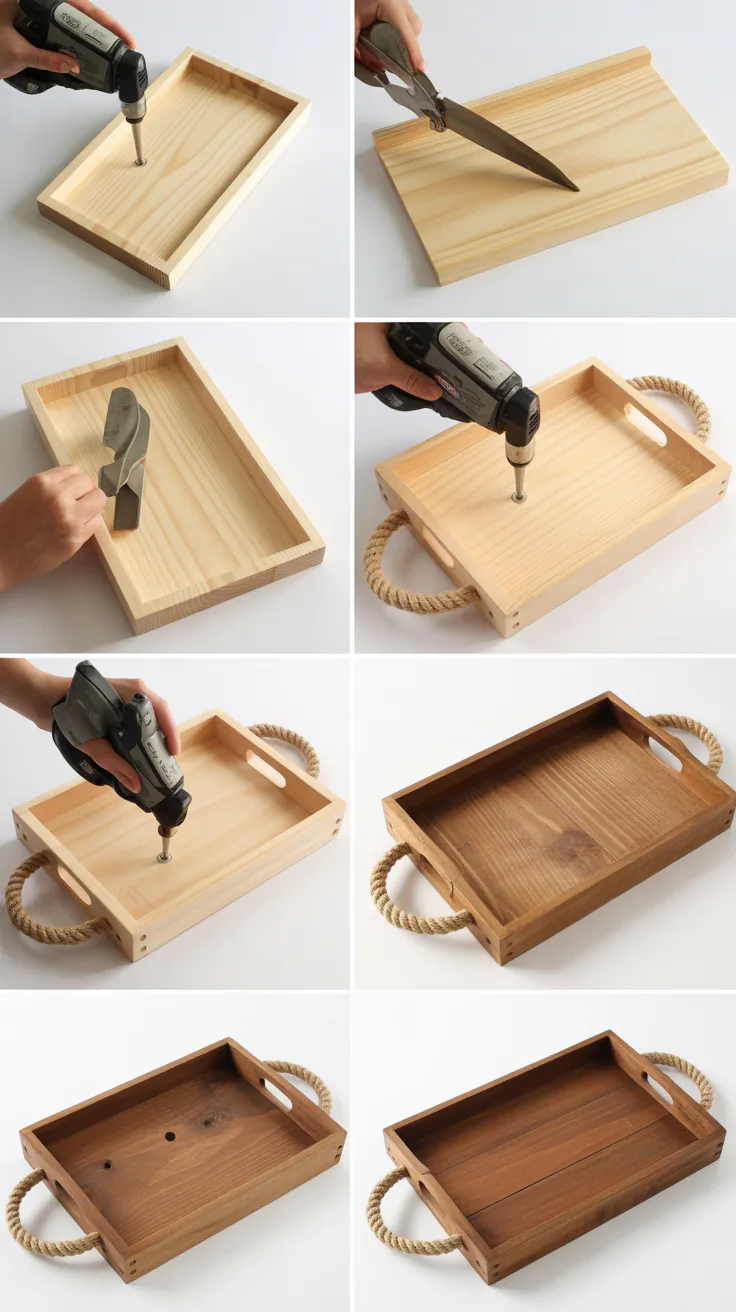
11. Wooden Serving Trays
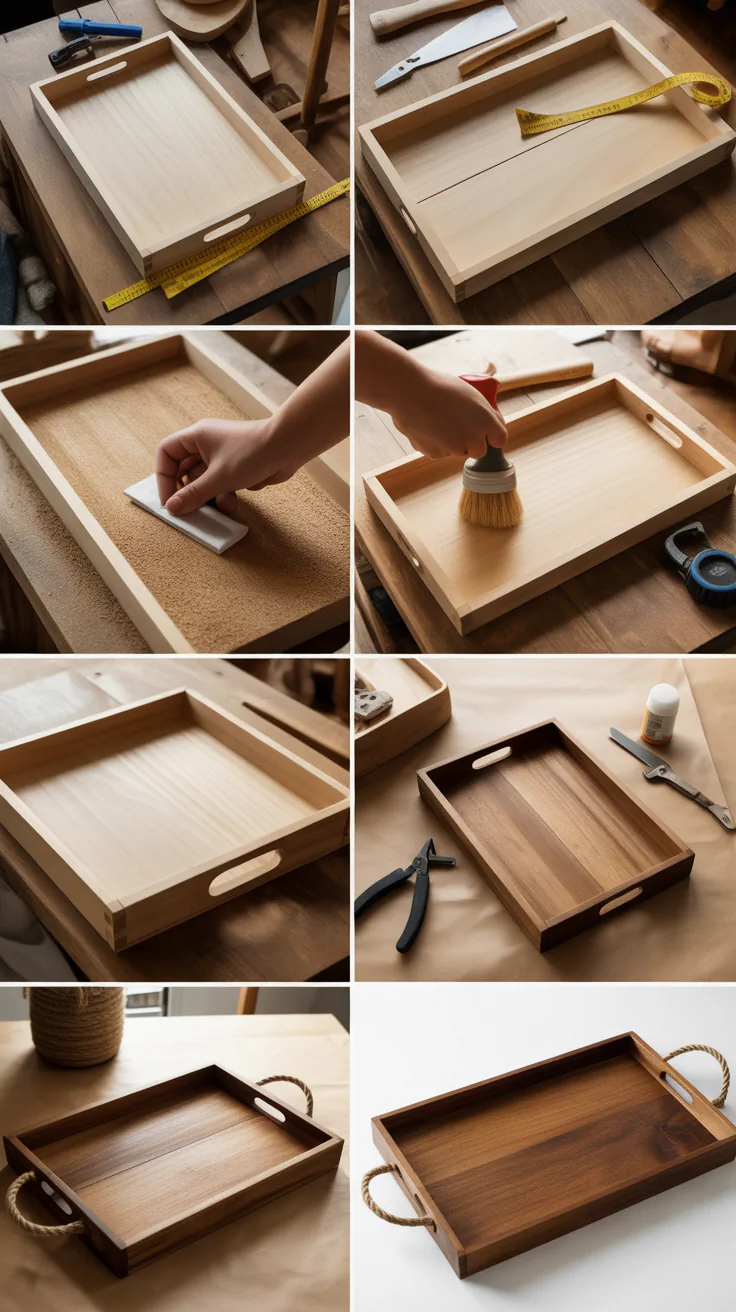
Stylish serving trays with handles are useful and decorative centerpieces.
How to Make a Serving Tray:
- Cut a flat tray base (12″ × 8″) from hardwood.
- Attach side frames (1″ × 2″) around edges.
- Sand and finish; inset handles on the short ends.
- Apply waterproof sealant for durability.
12. Wooden Jewelry Organizer
Ideal for dressing tables: stylish yet organized for accessories.
How to Make a Jewelry Organizer:
- Cut a 12″ × 8″ board and several dowel/peg holders.
- Drill holes for dowels or hooks.
- Sand, stain, and finish.
- Glue in place and add wall-hanging hardware.
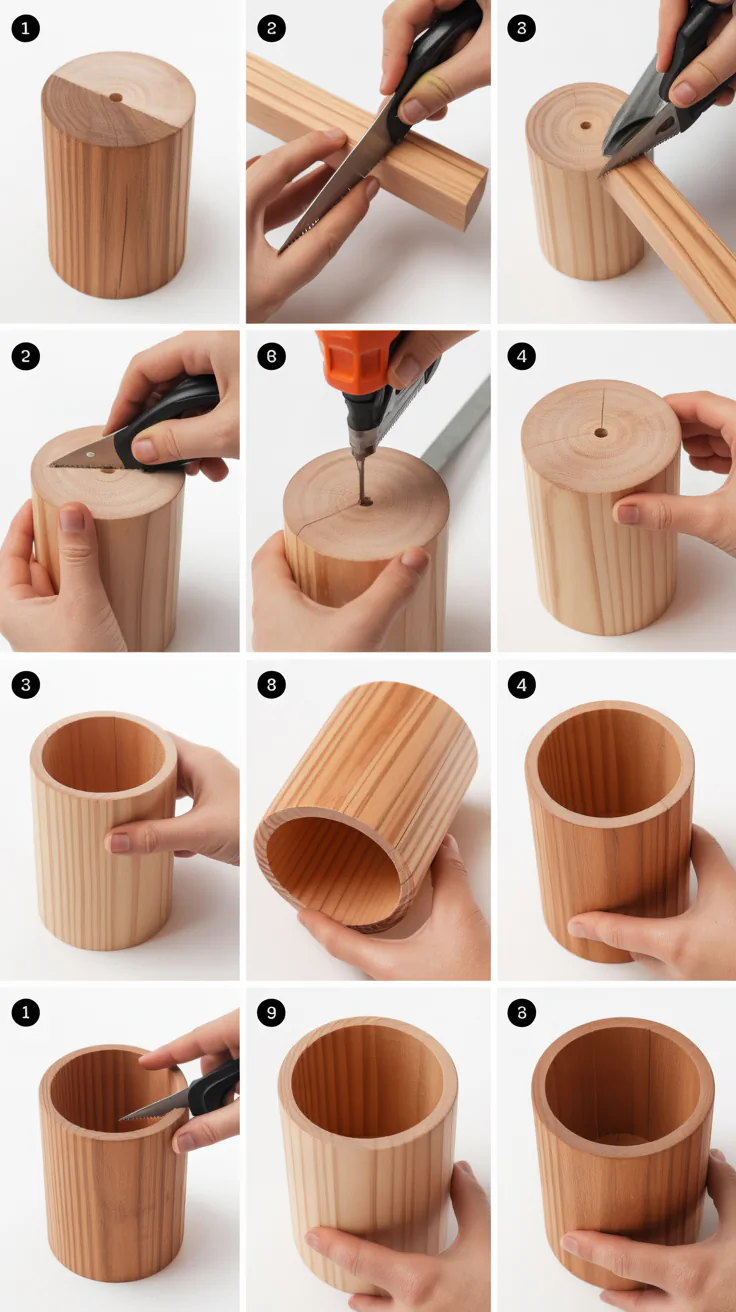
13. Wooden Pen/Pencil Holder
Compact and functional, perfect for teachers, students, and office setups.
How to Make a Pen Holder:
- Cut 4 panels (3″ × 4″) plus a base (4″ × 4″).
- Assemble with wood glue and clamps.
- Sand, finish, and optionally paint the exterior.
14. Wooden Bookends
Classic décor and organization piece for bookshelves and offices.
How to Make Bookends:
- Cut two L-shaped pieces (6″ × 6″ base, 4″ upright).
- Sand and finish with stain or paint.
- Add felt pads to the base for surface protection.
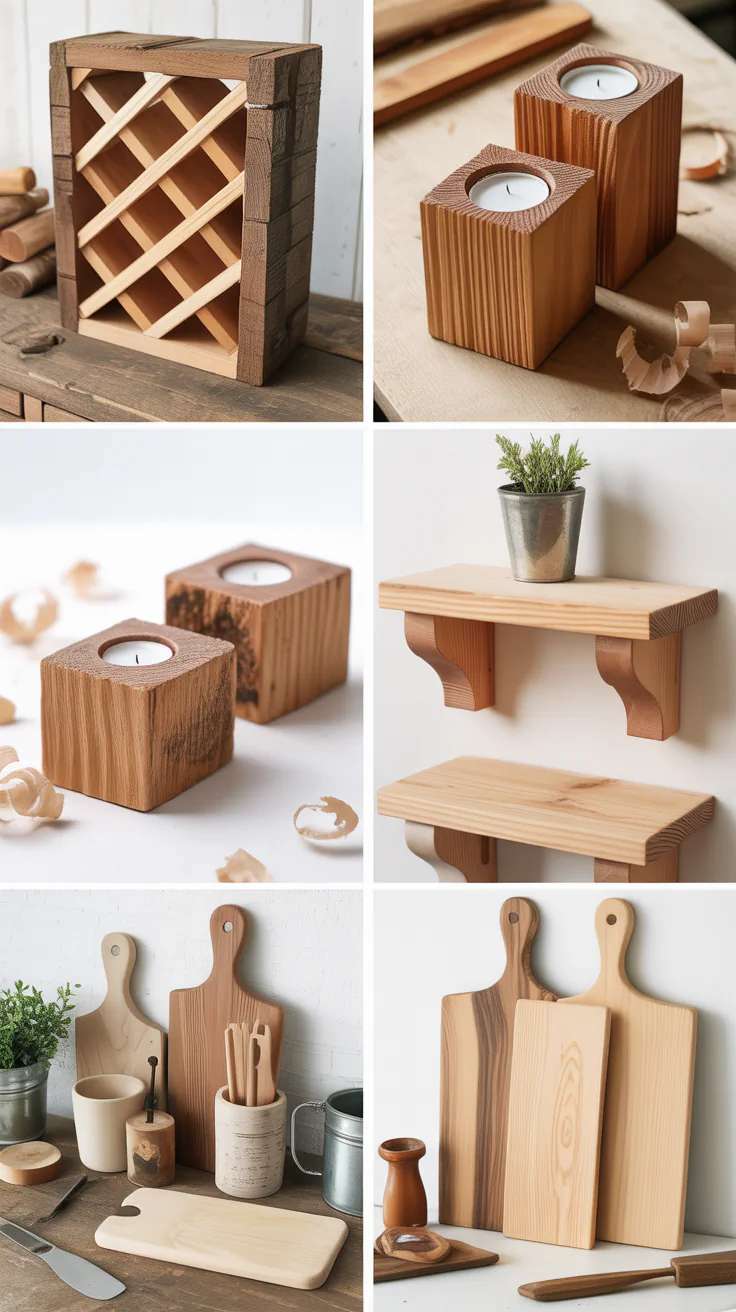
15. Wooden Tea Light Holder

Mood-setting décor ideal for weddings, events, or tablescapes.
How to Make a Tea Light Holder:
- Cut a wooden plank and drill evenly spaced tea light holes.
- Sand edges and surface.
- Stain or paint for color.
- Insert tea lights and optionally seal.
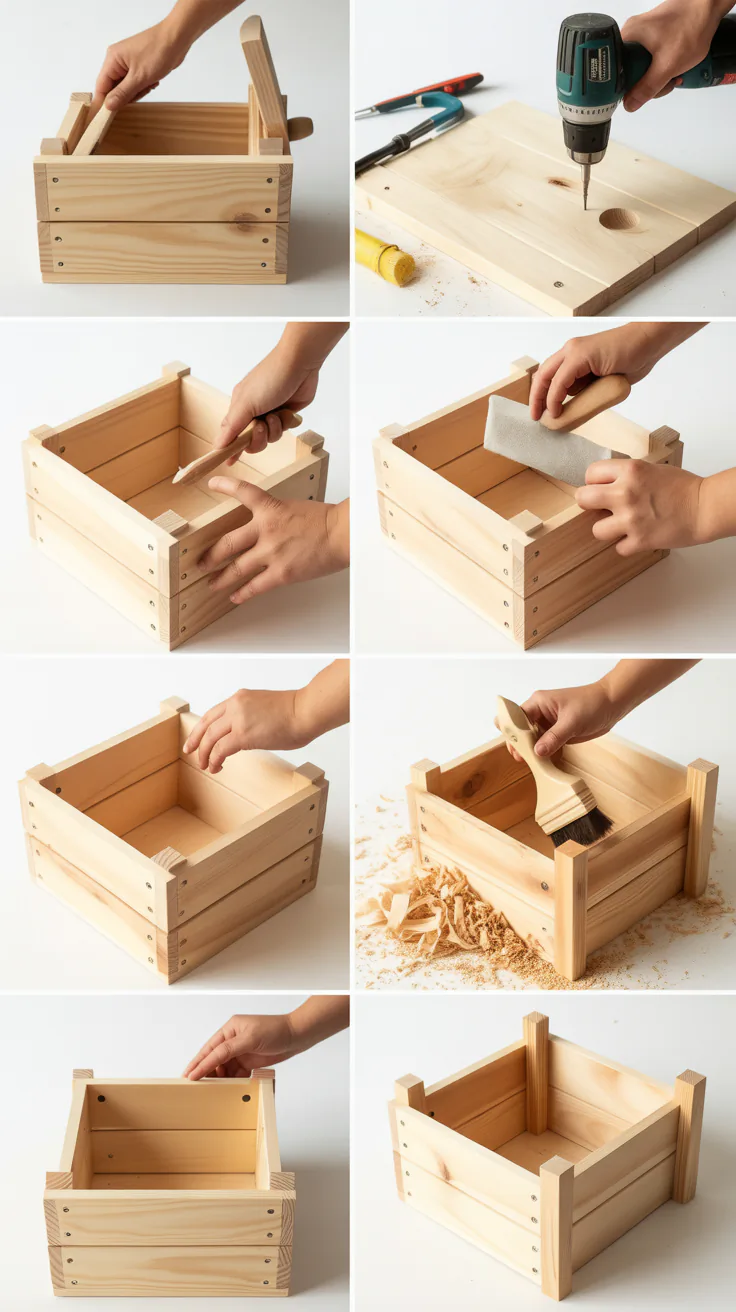
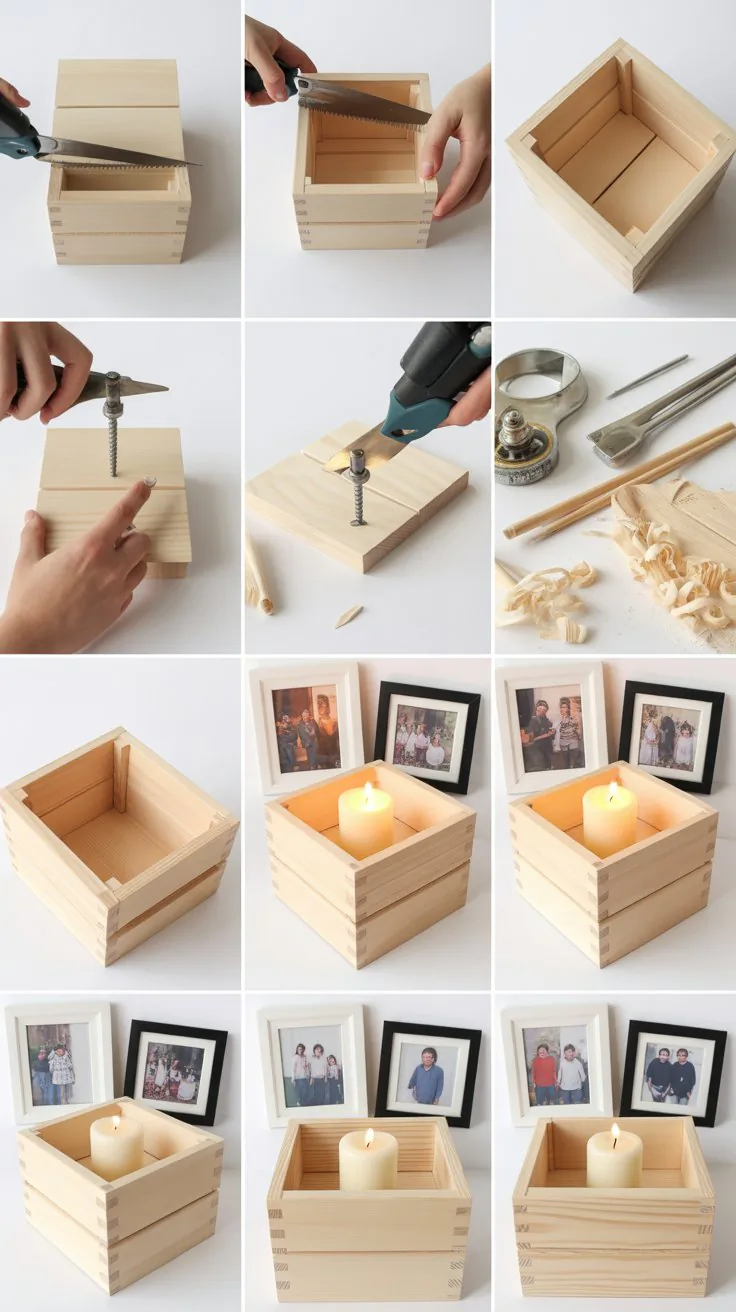
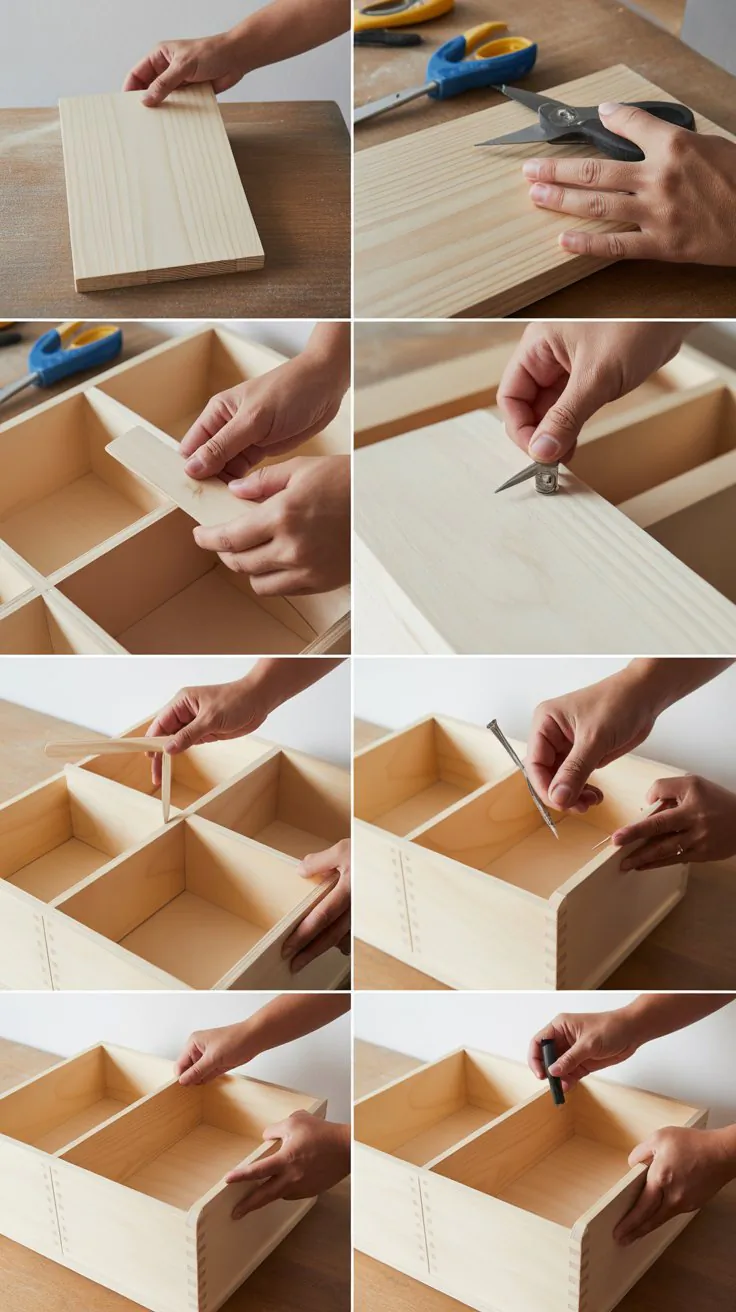
16. Wooden Recipe Box
Practical storage for recipe cards and charming kitchen décor.
How to Make a Recipe Box:
- Cut 5 panels (base + 4 sides).
- Assemble with wood glue and nails.
- Sand inside and out; finish with paint or varnish.
- Optional hinged lid or removable top.
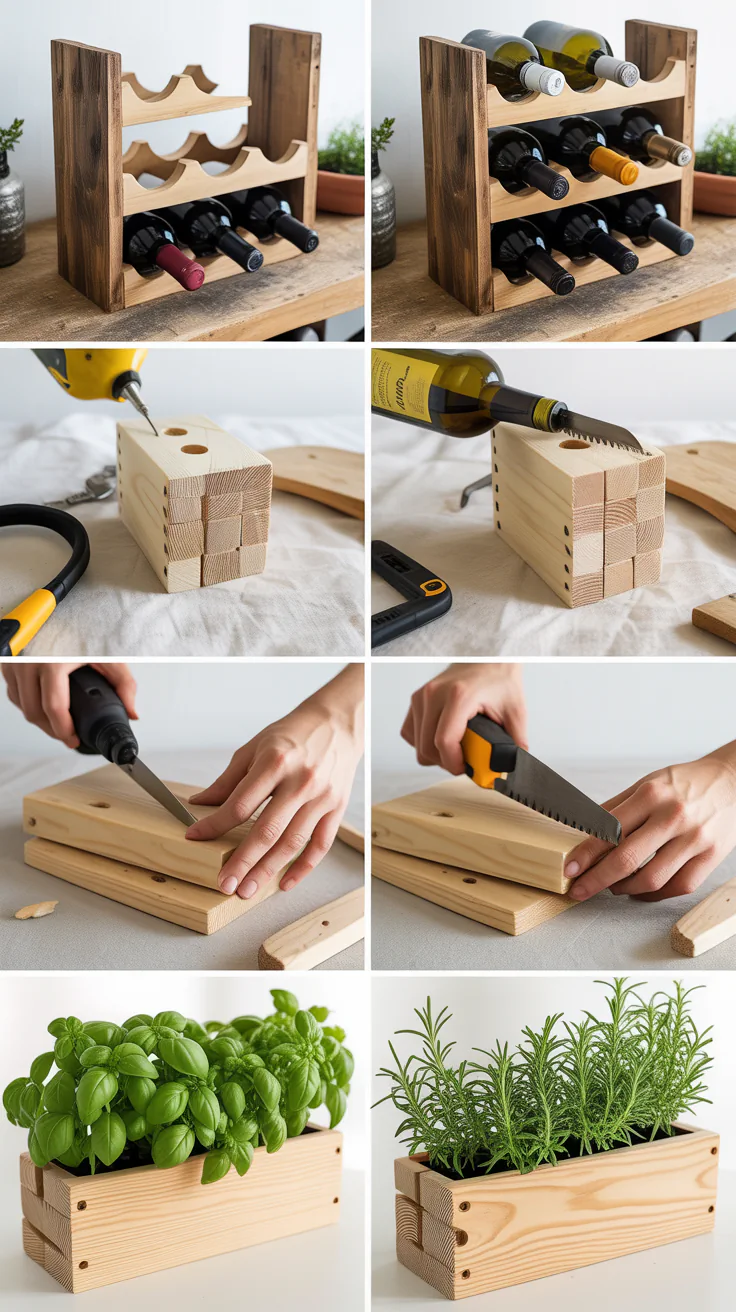
17. Wooden Wine Rack (Countertop)
Small wine rack is both decorative and practical for kitchen counters.
How to Make a Countertop Wine Rack:
- Cut side panels with semi-circles or slots for bottles.
- Fit and glue horizontal shelves between.
- Sand, finish, and optionally add felt pads.
18. Wooden Keychains
Small, personalized, and perfect for craft fair impulse buys.
How to Make Wooden Keychains:
- Cut thin wood blanks (1″ × 3″).
- Sand edges smooth.
- Burn or paint names/designs.
- Drill hole and attach key ring and chain.
19. Wooden Planter Stakes
Garden accessory selling fast among plant lovers and gardeners.
How to Make Planter Stakes:
- Cut 12″ × 2″ stakes with a pointed end.
- Sand and treat for weather resistance.
- Burn plant names or paint vibrant labels.
- Seal with outdoor varnish.
20. Wooden Napkin Holder
Stylish and functional, perfect for dining room or kitchen counters.
How to Make a Napkin Holder:
- Cut two side panels (6″ × 4″ semicircles) and base strip.
- Glue base between the sides.
- Sand edges and finish with stain.
- Optionally personalize with engraving.
21. Wooden Mail Organizer
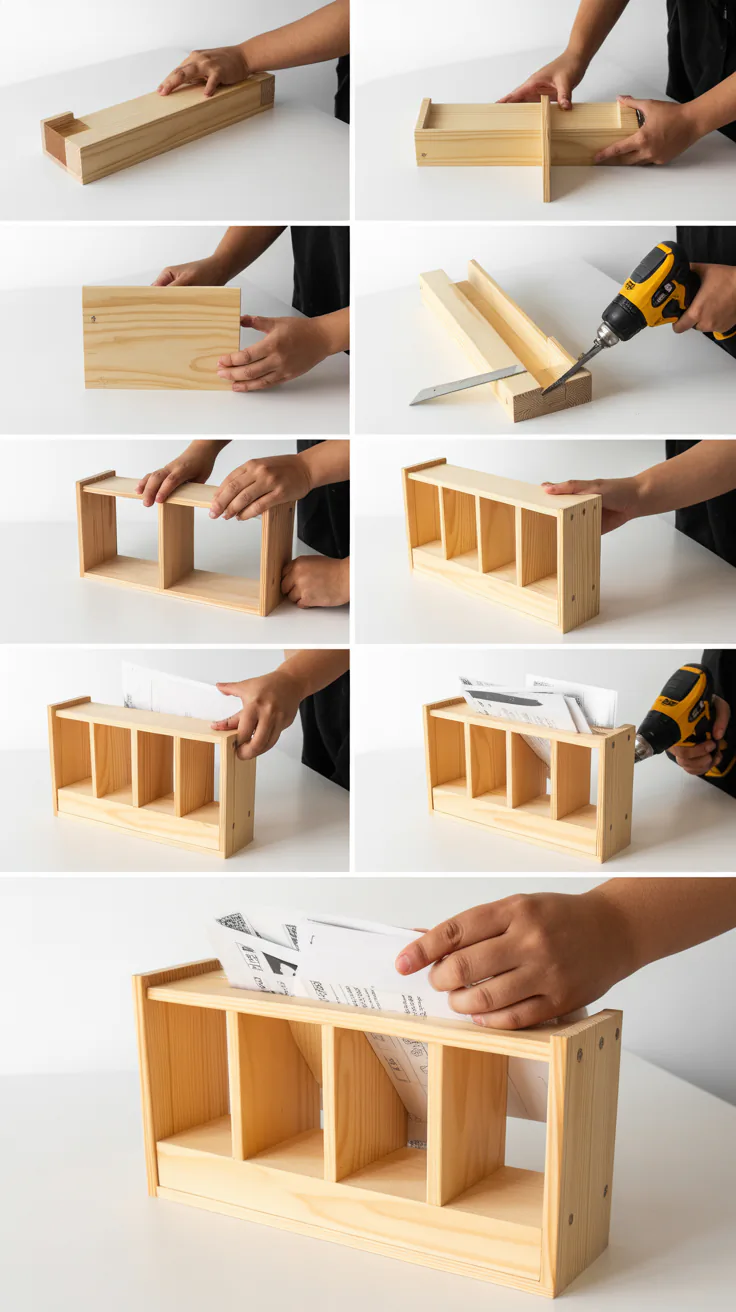
Helps keep paperwork sorted and looks great on entryway tables.
How to Make a Mail Organizer:
- Cut back panel, two side panels, and shelves or dividers.
- Assemble with glue or nails.
- Sand and finish.
- Attach hook or bracket on the back.
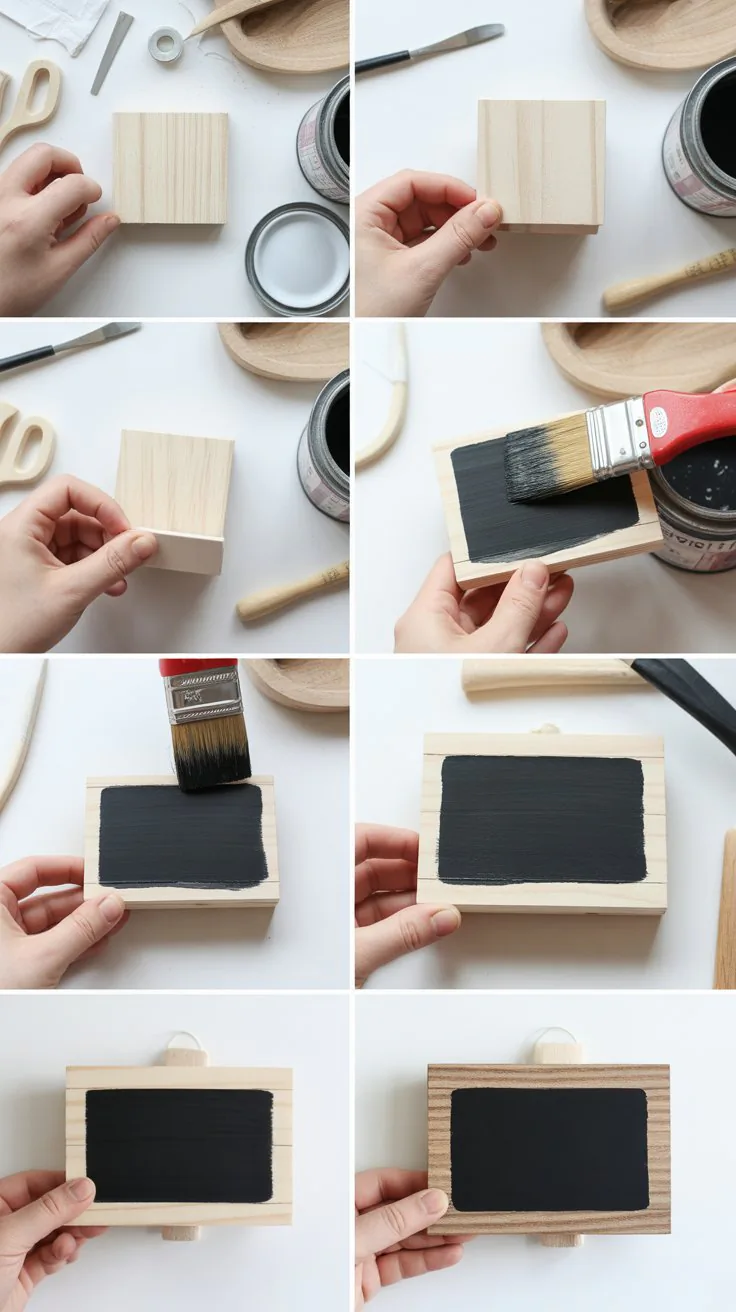
22. Wooden Chalkboard Signs
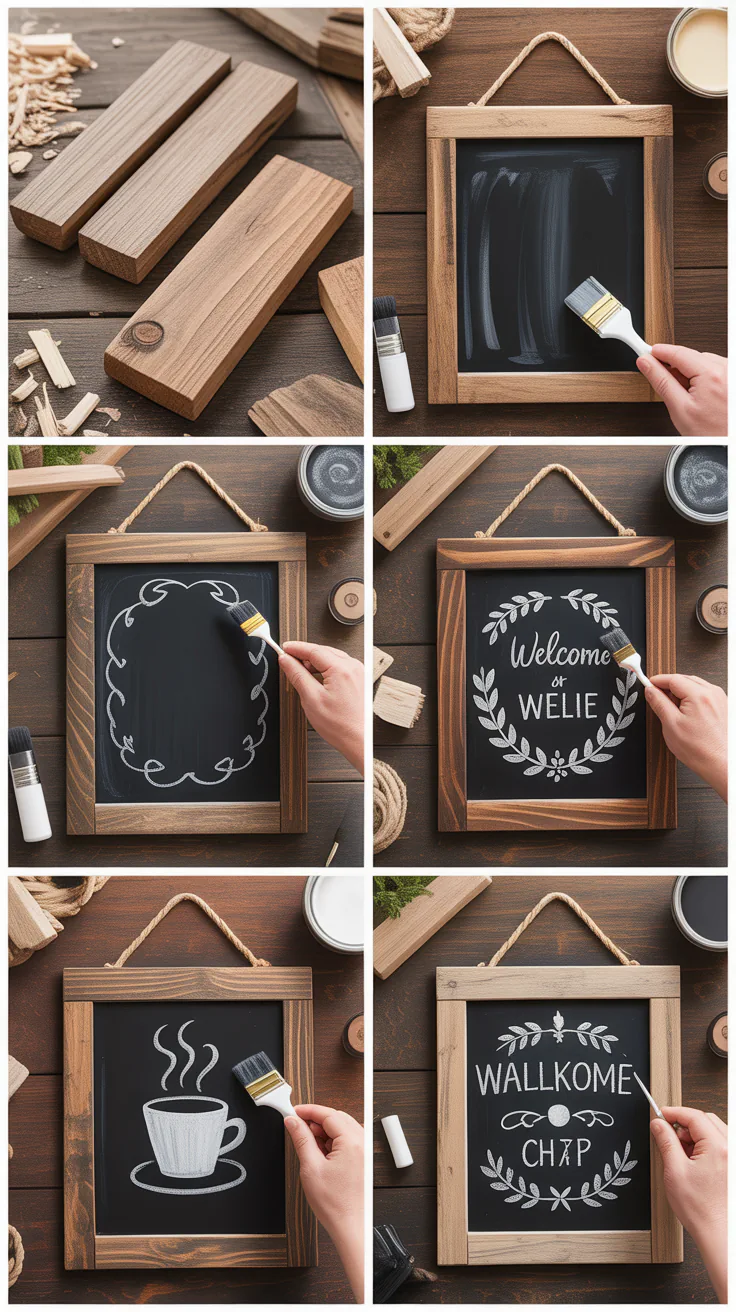
Rustic décor for homes, weddings, or cafés—always in demand.
How to Make Chalkboard Signs:
- Frame a thin board with a wood border.
- Paint inner panel with chalkboard paint.
- Sand edges and decorate frame.
- Attach a hanger or easel back.
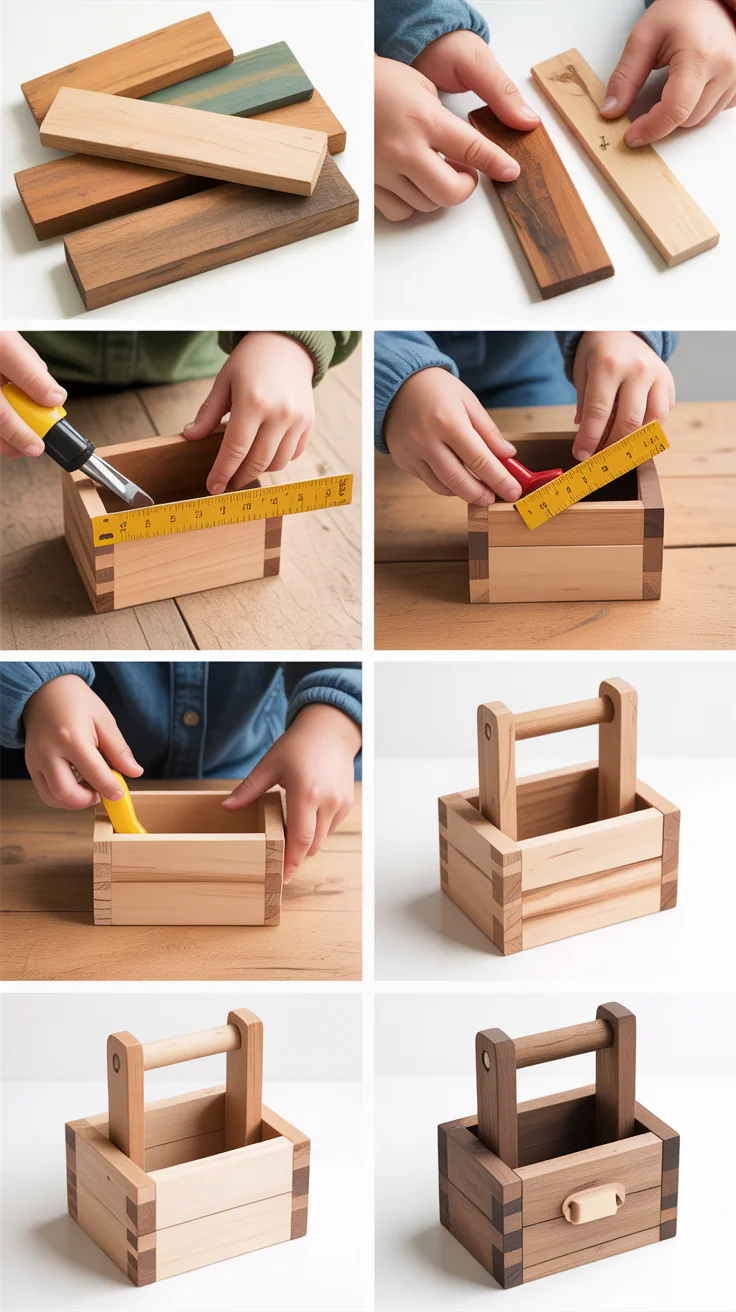
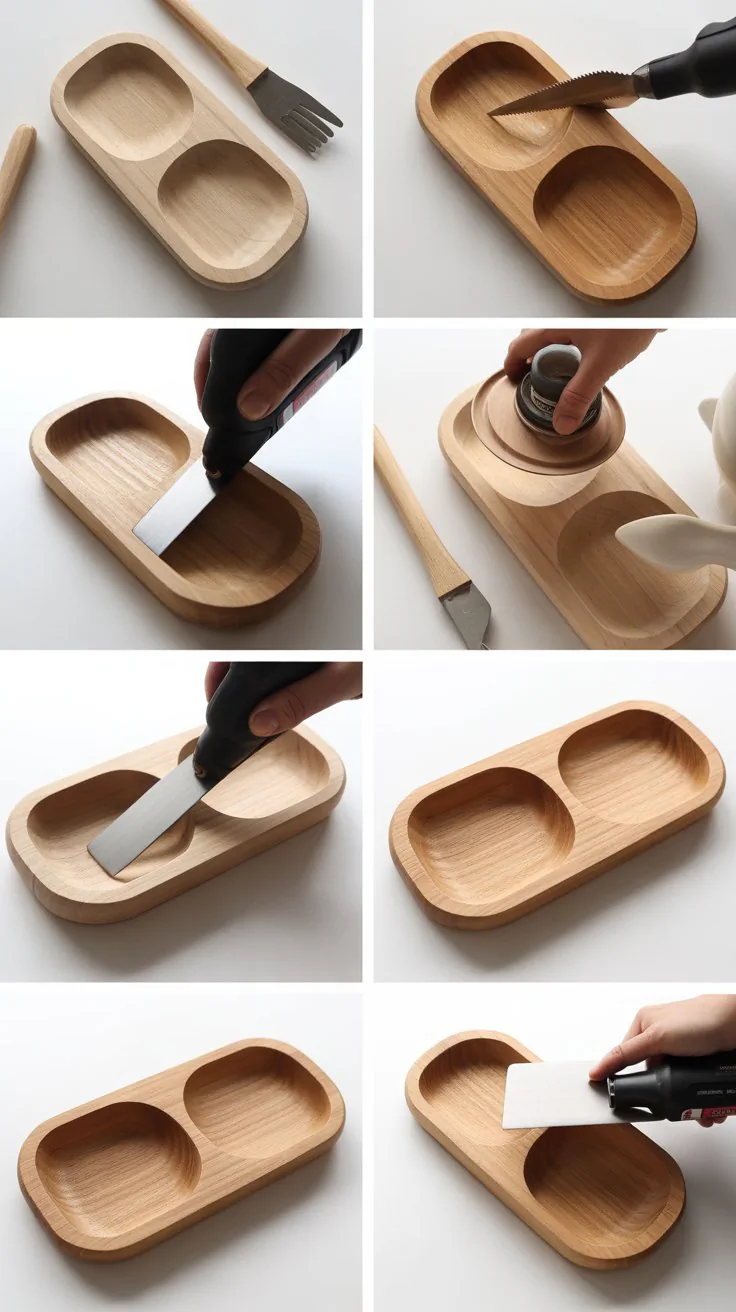
23. Wooden Utensil Caddy
Great for outdoor dining, BBQs, or kitchen counters.
How to Make a Utensil Caddy:
- Build a rectangular box with a handle across the center.
- Sand interior and exterior.
- Finish with stain or paint.
- Optionally label sections for forks, knives, spoons.
24. Wooden Jewelry Box
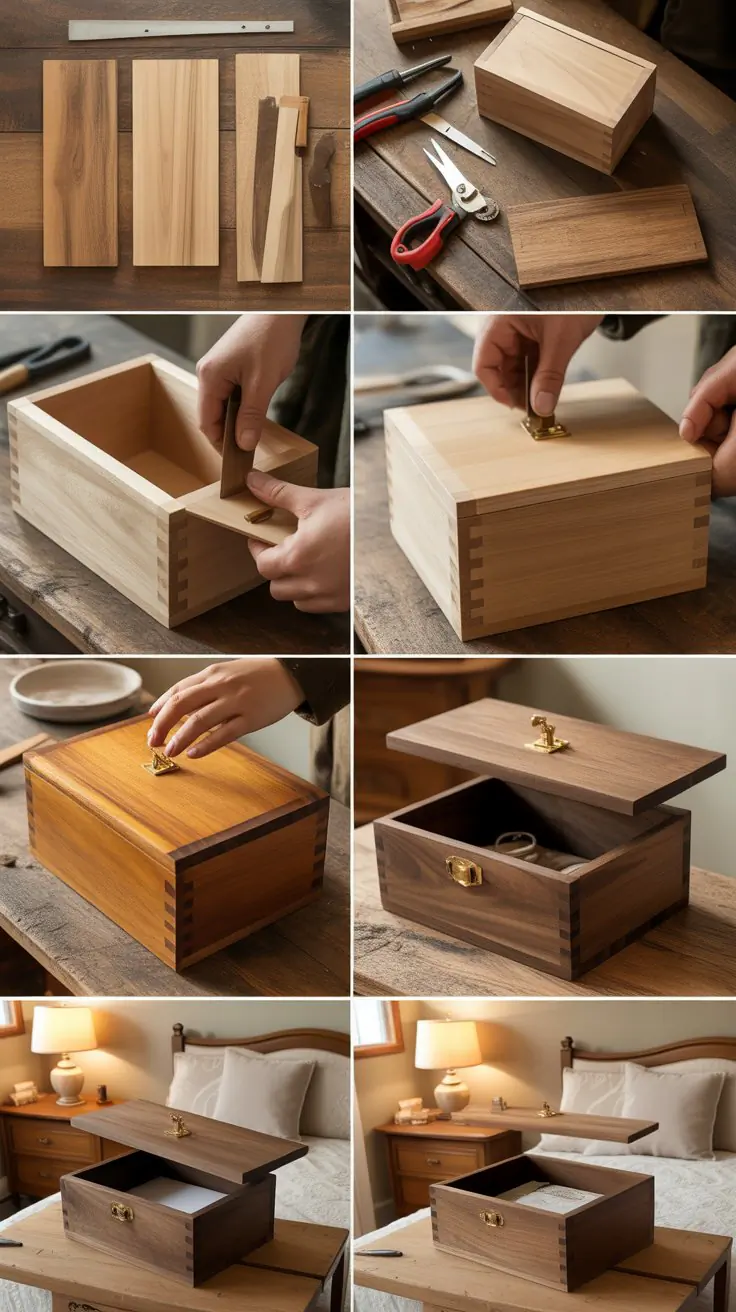
Elegant little boxes are always perfect for gifts or personal use.
How to Make a Jewelry Box:
- Cut box panels and lid.
- Assemble base and lid with mitered edges.
- Sand inside and out.
- Finish and optionally line with velvet.
25. Wooden Hanging Plant Hanger

Combines wood and rope for stylish indoor plant displays.
How to Make Plant Hanger:
- Cut small wood plank for top crossbeam.
- Drill holes on ends and thread macrame rope.
- Attach pot cradle from rope.
- Sand and finish wood; knot rope neatly.
26. Wooden Coaster Holder
Pairs perfectly with coaster sets for a complete selling package.
How to Make Coaster Holder:
- Cut base and two side panels with slots.
- Glue sides to base to form a box.
- Sand and finish.
- Personalize with engraving or paint.
27. Wooden Travel Jewelry Tray
Compact and luxurious, a great gift idea—fast sellers.
How to Make Travel Tray:
- Create a divided shallow tray (e.g., 4″ × 4″ with 2 dividers).
- Sand and finish.
- Optionally attach corner snaps to fold into a tray.
28. Wooden Bottle Caddy

Handy and decorative for carrying drinks to visits or picnics.
How to Make Bottle Caddy:
- Cut base and side panels with handle slot.
- Assemble with glue and nails.
- Sand, finish, and add felt on bottom for grip.
29. Wooden Bookmarks
Ideal low-cost, customizable items perfect for book lovers.
How to Make Wooden Bookmarks:
- Cut thin wood into 2″ × 6″ strips.
- Sand edges.
- Burn or paint designs or quotes.
- Drill hole and add ribbon or tassel.
30. Wooden Candle Snuffer
Elegant accessory for candle lovers; easy to craft and quick to sell.
How to Make Candle Snuffer:
- Turn a small goblet shape on a lathe (~6″ tall).
- Sand smooth.
- Stain or lacquer-finish.
- Attach via stem to snuff wick gently.
31. Wooden Wine Coasters
Protects furniture and adds style—great upsell with wine-themed sets.
How to Make Wine Coasters:
- Cut round pads (~4″ diameter) from hardwood.
- Sand smooth.
- Add rubber gasket rings.
- Finish with food-safe oil.
32. Wooden Magnets
Charming fridge décor perfect for souvenirs or quick gifts.
How to Make Wooden Magnets:
- Cut small shapes (~2″) with a scroll saw.
- Sand edges.
- Paint or burn designs.
- Glue small magnets to the back.
33. Wooden Candle Box
A wooden hinged lid box for storing candles or small items.
How to Make Candle Box:
- Construct box base and lid.
- Install small hinge on the back.
- Sand and finish.
- Insert divider or fabric lining if desired.
34. Wooden Wall Hooks
Functional décor that helps organize jackets, bags, or keys.
How to Make Wall Hooks:
- Cut small wooden plaques (5″ × 2″).
- Drill holes and insert metal hooks.
- Sand, finish, and optionally add engraving.
- Attach hanging hardware on the back.
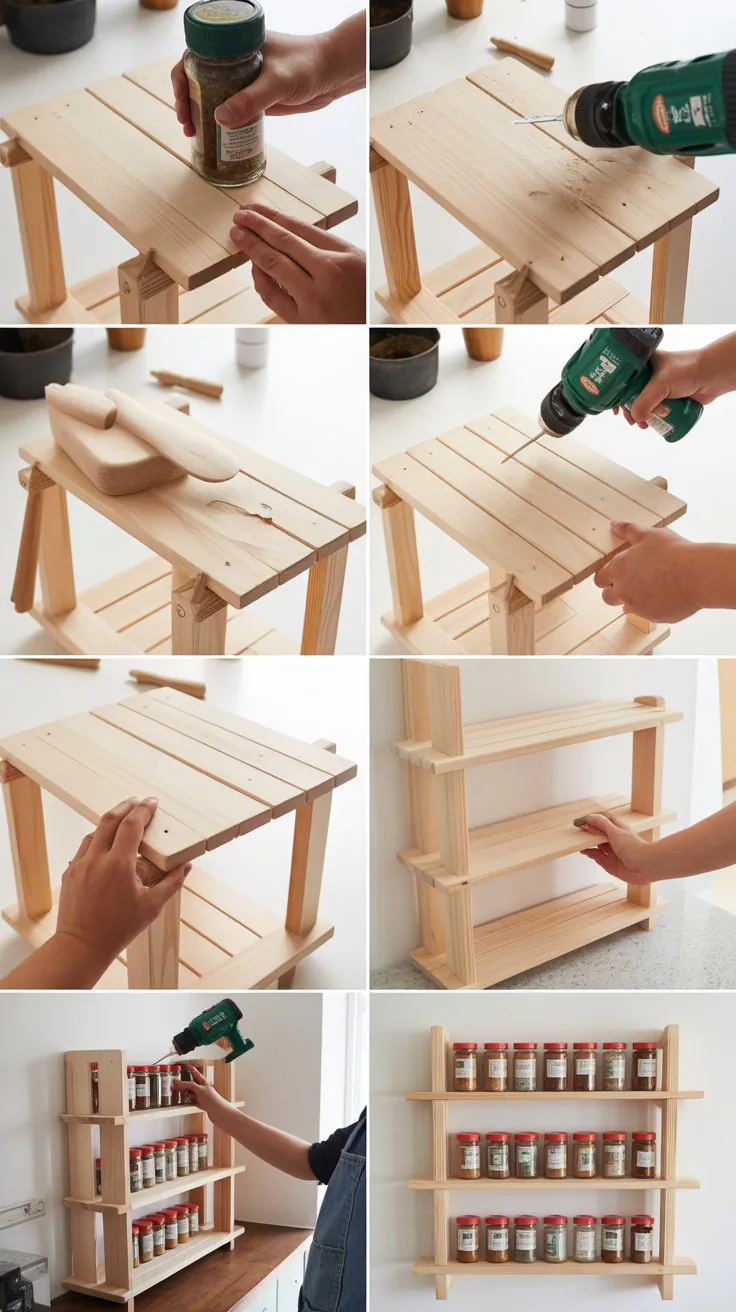
35. Wooden Spice Racks
Saves kitchen counter space and offers visual appeal to cooks.
How to Make Spice Rack:
- Cut back panel, side frames, and shelf ledges.
- Assemble box-style rack.
- Sand, finish, and mount to wall.
- Optionally label tiers for salt, pepper, herbs.
36. Wooden Spoons/Spatulas
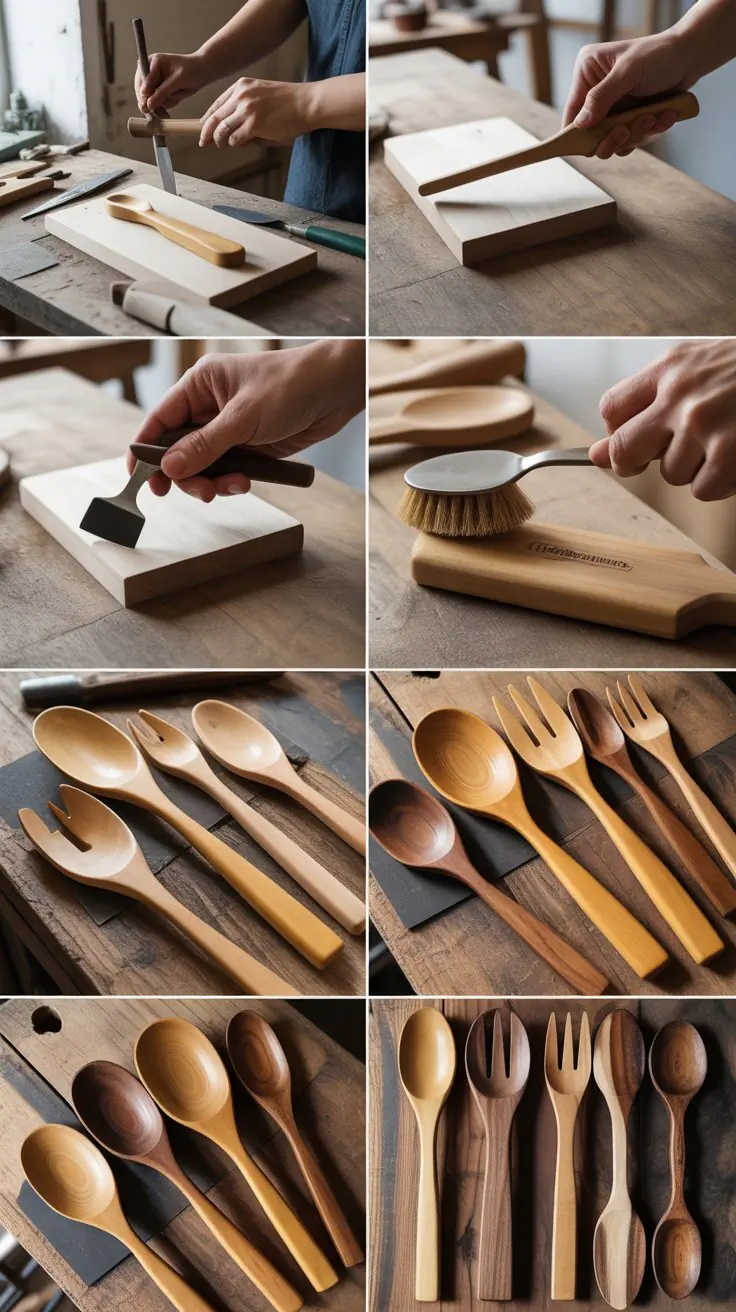
Kitchen essentials that sell well at craft fairs and farmer’s markets.
How to Make Wooden Utensils:
- Carve spoons/spatulas from hardwood planks.
- Use carving knife and sand curved surfaces smooth.
- Apply food-safe mineral oil.
- Optionally add decorative carved handles.
37. Wooden Tic-Tac-Toe Game
Fun desktop item for kids or office desks—easy and charming.
How to Make Wooden Tic-Tac-Toe:
- Cut a 6″ × 6″ board and thin slats for grid lines.
- Glue grid to base.
- Sand edges smooth.
- Create X and O pieces; stain or paint differently.
- Finish with a protective coat.
Conclusion
Whether you’re a weekend woodworker, a hobbyist turning your craft into income, or a seasoned seller at markets and on platforms like Etsy, the 37 Best Small Wood Projects to Sell Fast offer you an incredible range of ideas to build and profit from.
These projects are not just easy to make—they’re proven to attract buyers, spark gift-giving interest, and add charm to homes and everyday spaces.
From simple coasters and phone stands to functional organizers and custom décor, each of these wooden items combines creativity with practicality.
They’re affordable to produce, easy to personalize, and fast to replicate—making them ideal for sellers aiming to grow a business or expand their product range.
As you begin making these 37 Best Small Wood Projects to Sell Fast, remember that the key to success lies in consistent craftsmanship, presentation, and finding the style that reflects your unique brand.
With the right tools, attention to detail, and a bit of marketing, your woodworking projects can become both a fulfilling passion and a reliable source of income.
Happy woodworking—and happy selling!