Dealing with greasy hair doesn’t mean you have to sacrifice style or skip that special event.
In fact, braided hairstyles can be your best friend when your hair needs an extra day before washing, transforming oily strands into stunning, textured looks that appear intentionally sleek and polished.
This comprehensive guide to 36 Braided Greasy Hair Hairstyles for Every Look will show you how to embrace your hair’s natural oils and turn them into a styling advantage, whether you’re heading to the office, hitting the gym, attending a wedding, or enjoying a casual weekend brunch.
From classic three-strand braids to intricate Dutch and fishtail styles, you’ll discover techniques that work specifically well with greasier hair textures, styling tips to maximize hold and minimize shine, and creative ways to disguise oily roots while looking effortlessly chic.
These hairstyles prove that second-day (or third-day) hair can actually be easier to style, more manageable, and create longer-lasting braids than freshly washed locks.
1. Classic Three-Strand Side Braid

The timeless three-strand side braid works beautifully with greasy hair because the natural oils provide extra grip and hold.
This simple yet elegant style keeps hair off your face while creating a relaxed, bohemian vibe that’s perfect for casual outings or busy days when you need a quick styling solution.
- Brush your hair to one side and divide it into three equal sections at the nape of your neck.
- Cross the right section over the middle, then cross the left section over the new middle.
- Continue this pattern all the way down to the ends, keeping consistent tension throughout.
- Secure with a hair elastic and gently pull apart the braid sections for a fuller, more relaxed appearance.
- The natural oils in greasy hair help the braid hold its shape better throughout the day without flyaways.
- Spray with light-hold hairspray if needed to tame any frizz around the hairline.
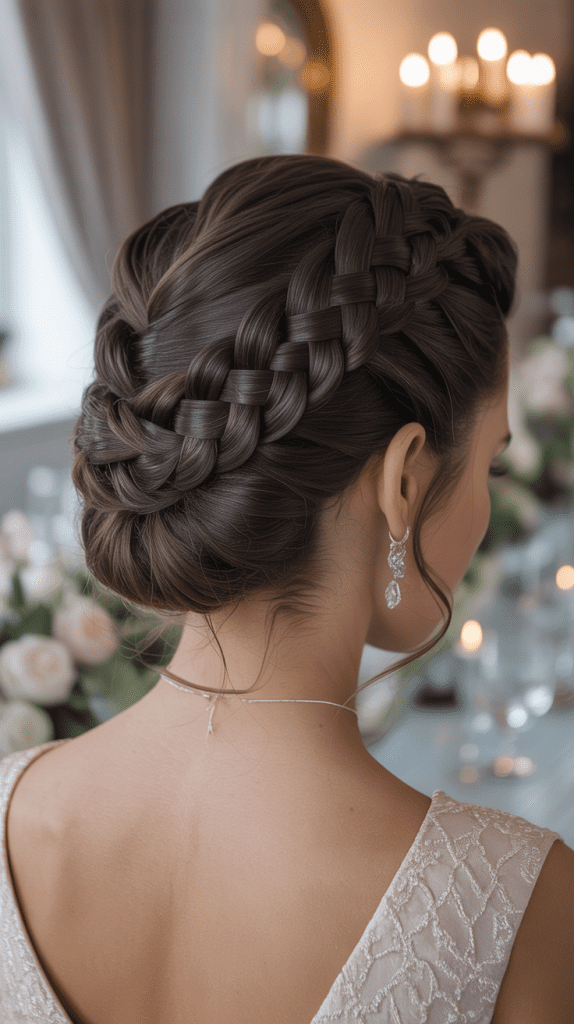
2. Dutch Braid Crown

A Dutch braid crown creates an elegant updo that cleverly conceals greasy roots by incorporating the oiliest parts of your hair into the braid structure.
This sophisticated style works wonderfully for formal events, weddings, or when you want to look polished despite needing a hair wash.
- Start with a deep side part and begin Dutch braiding from one side of your head near the temple.
- Add sections of hair from both sides as you braid along your hairline, working around the crown of your head.
- Continue braiding until you reach the starting point, then tuck the remaining tail underneath the crown.
- Secure all loose ends with bobby pins, hiding them within the braid structure.
- Greasy hair provides the necessary texture and hold to keep the crown secure without slipping.
- Gently pull on the outer edges of the braid to create dimension and hide any oily sections at the roots.
- Finish with decorative pins or small flowers for special occasions.
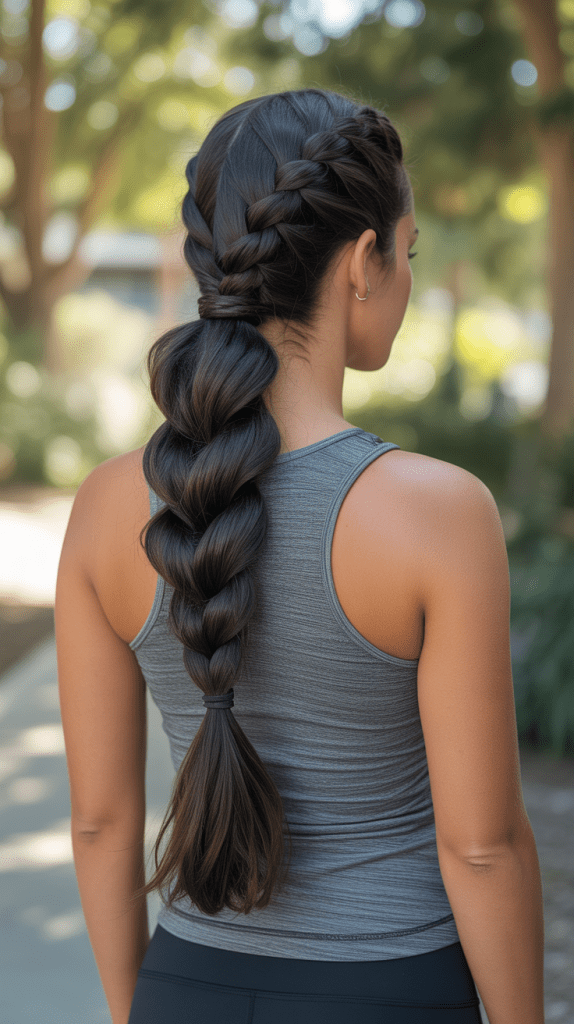
3. Sleek High Ponytail with Braided Wrap

This style combines the polished look of a high ponytail with a braided wrap that disguises greasy roots while adding sophistication.
The natural oils actually help achieve that coveted sleek finish at the crown without needing excessive styling products.
- Gather your hair into a high ponytail at the crown and secure tightly with an elastic.
- The oils in your hair will help smooth down any bumps or flyaways for a cleaner finish.
- Take a small section from the underside of the ponytail and create a simple three-strand braid.
- Wrap this braid around the elastic base of the ponytail to conceal it completely.
- Secure the end of the braid with a bobby pin underneath the ponytail where it won’t be visible.
- Apply a small amount of styling gel or pomade to edges if needed to maintain the sleek appearance.
4. Messy Fishtail Braid

The messy fishtail braid is ideal for greasy hair because the texture created by natural oils enhances the deliberately undone, effortless aesthetic.
This style looks complex but is surprisingly simple to achieve, perfect for casual weekends or music festivals.
- Divide your hair into two large sections instead of three.
- Take a small piece from the outer edge of the left section and cross it over to join the right section.
- Repeat on the opposite side, taking from the right outer edge and crossing to the left.
- Continue alternating sides, keeping the sections loose and textured rather than tight.
- Greasy hair naturally creates the piecey, separated look that makes fishtail braids appear intentionally messy.
- Pancake the braid by gently pulling apart sections to increase volume and hide any excessive oil.
- Leave some face-framing pieces loose for a softer, more romantic appearance.
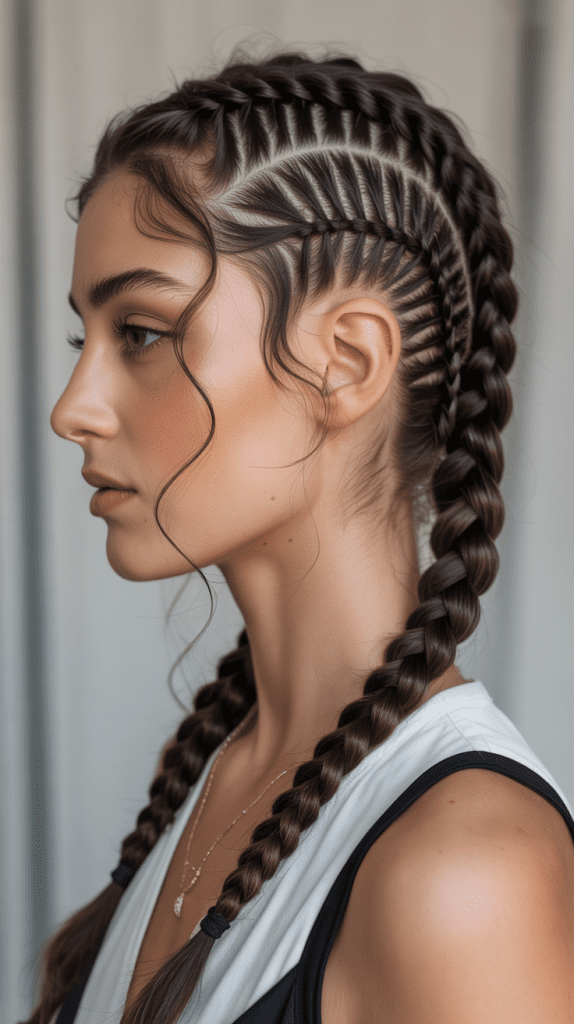
5. Double Dutch Braids (Boxer Braids)

Double Dutch braids, also known as boxer braids, are athletic yet stylish and work exceptionally well with greasy hair that needs to stay put during workouts or active days.
The inverted braiding technique keeps hair secure while the natural oils prevent frizz and flyaways.
- Create a clean center part from your forehead to the nape of your neck.
- Begin Dutch braiding on one side by crossing sections under rather than over the middle strand.
- Add hair from the scalp as you work down, keeping the braid tight and close to the head.
- Repeat the entire process on the other side, ensuring both braids are symmetrical.
- The natural oils provide grip that helps the braids stay secure during physical activity.
- Tie off both braids at the nape or continue braiding to the ends depending on your preference.
- This style can last several days, making it perfect for extending time between washes.
6. Braided Low Bun

A braided low bun combines elegance with practicality, turning greasy hair into a sophisticated updo perfect for professional settings or formal occasions.
The braid adds visual interest while the bun conceals oily ends.
- Create a low ponytail at the nape of your neck and secure with an elastic.
- Braid the entire length of the ponytail using your preferred braiding technique.
- Wrap the braided ponytail around the base of the elastic to form a bun shape.
- Secure with bobby pins, tucking in any loose ends for a polished finish.
- The weight and texture of greasy hair helps the bun stay in place without constant readjustment.
- Use a decorative hair stick or pin to add elegance while providing extra hold.
7. French Braid Mohawk

This edgy style creates a bold statement by braiding the center section of hair while leaving the sides sleek.
Greasy hair is actually ideal for this look because it helps the sides lay flat and smooth while providing grip for the central braid.
- Section off a wide strip of hair from your forehead to the crown, leaving hair on both sides loose.
- Begin French braiding this center section, adding hair only from within the sectioned area.
- Slick the side sections back with the natural oils or add a small amount of gel for extra hold.
- Continue the French braid to the nape, securing with an elastic.
- Pin the loose side sections behind your ears or incorporate them into the braid for variation.
- This style cleverly uses greasy hair’s texture to create contrast between the textured braid and smooth sides.
8. Waterfall Braid

The waterfall braid creates a romantic, cascading effect that looks intricate but works beautifully with greasy hair’s added texture and hold.
This half-up style is perfect for special occasions when you want your hair both up and down.
- Begin with a small section of hair near your temple and divide it into three strands.
- Start a regular braid, but after the first stitch, drop the bottom strand and pick up a new section from the top.
- Continue this pattern across the back of your head, letting strands fall like a waterfall.
- The natural oils help the dropped sections maintain their shape and position throughout the day.
- Secure the braid behind your opposite ear with bobby pins or continue it as a regular braid.
- Curl the loose, flowing sections for added dimension and to further disguise any greasiness.
9. Rope Braid Ponytail
A rope braid ponytail offers a quick alternative to traditional braiding while still looking polished and put-together.
The twisting technique works exceptionally well with greasy hair because the oils prevent the twist from unraveling.
- Pull hair into a ponytail at your desired height and secure with an elastic.
- Divide the ponytail into two equal sections.
- Twist each section clockwise (or in the same direction) until both are tightly wound.
- Wrap the two twisted sections around each other in the opposite direction (counterclockwise).
- The opposing twists create tension that keeps the rope braid secure, especially with greasier hair.
- Secure the end with another elastic and gently pull sections to add volume if desired.
10. Braided Headband with Loose Hair

This style creates a braided headband from your own hair while leaving the rest flowing freely, perfect for disguising greasy roots while showcasing your length.
The natural oils help the headband braid stay in place without accessories.
- Take a section of hair from behind one ear and create a simple three-strand braid.
- Bring the braid across the top of your head like a headband.
- The greasy roots actually help anchor the braid and prevent it from slipping backward.
- Secure the braid behind the opposite ear with bobby pins, tucking the ends underneath.
- Leave the remaining hair loose or add waves for a romantic, effortless look.
- This style effectively hides the greasiest part of your hair (the crown and hairline) while keeping you stylish.
11. Four-Strand Braid

The four-strand braid adds complexity and visual interest to your hairstyle, and greasy hair’s enhanced texture makes this intricate pattern easier to execute and maintain throughout the day.
- Divide your hair into four equal sections instead of the traditional three.
- Cross the rightmost section under the section next to it, then over the following section.
- Take the leftmost section and cross it under the section next to it, then over the following section.
- Continue alternating this under-over pattern from each side until you reach the ends.
- Greasy hair provides the grip needed to keep four sections manageable during the braiding process.
- The intricate pattern helps distract from any oiliness while creating a stunning, unique look.
12. Pull-Through Braid

The pull-through braid creates the illusion of a complex braid without actual braiding, making it perfect for greasy hair that needs volume and texture.
This technique uses multiple ponytails stacked and pulled through each other.
- Create a half-up ponytail at the crown and secure with a clear elastic.
- Make a second ponytail directly below the first, leaving a gap between them.
- Split the first ponytail in half and bring both sections around the second ponytail, securing them with the third ponytail below.
- Continue this pattern down the length of your hair, creating a stacked effect.
- Greasy hair helps each section maintain its shape and prevents the style from falling flat.
- Gently pull apart each segment to create volume and fullness that disguises oily roots.
13. Milkmaid Braid

The milkmaid braid wraps around the crown of your head, creating a vintage-inspired updo that completely conceals greasy roots and oily scalp areas.
This timeless style works for both casual and formal occasions.
- Create two regular three-strand braids, one on each side of a center part.
- Bring the right braid over the top of your head and pin it near the left ear.
- Take the left braid over the top and pin it near the right ear, creating a crown effect.
- Tuck all loose ends underneath the opposite braid and secure with bobby pins.
- The natural oils in greasy hair help the braids mold to your head shape and stay secure.
- Pull gently on the braid sections to add width and better conceal the hairline.
14. Snake Braid
The snake braid creates a unique, textured effect by pulling sections to one side, forming a serpentine pattern.
Greasy hair enhances this style by making the pulled sections more defined and longer-lasting.
- Begin with a regular Dutch or French braid down the back of your head.
- After completing several stitches, gently pull only the sections on one side of the braid to create an asymmetric effect.
- Continue braiding and pulling only the same side throughout the entire length.
- The result is a braid that curves like a snake, with exaggerated sections on one side.
- Greasy hair maintains the stretched sections better than clean hair, which tends to bounce back.
- This bold style draws attention to the braiding technique rather than hair texture.
15. Braided Space Buns
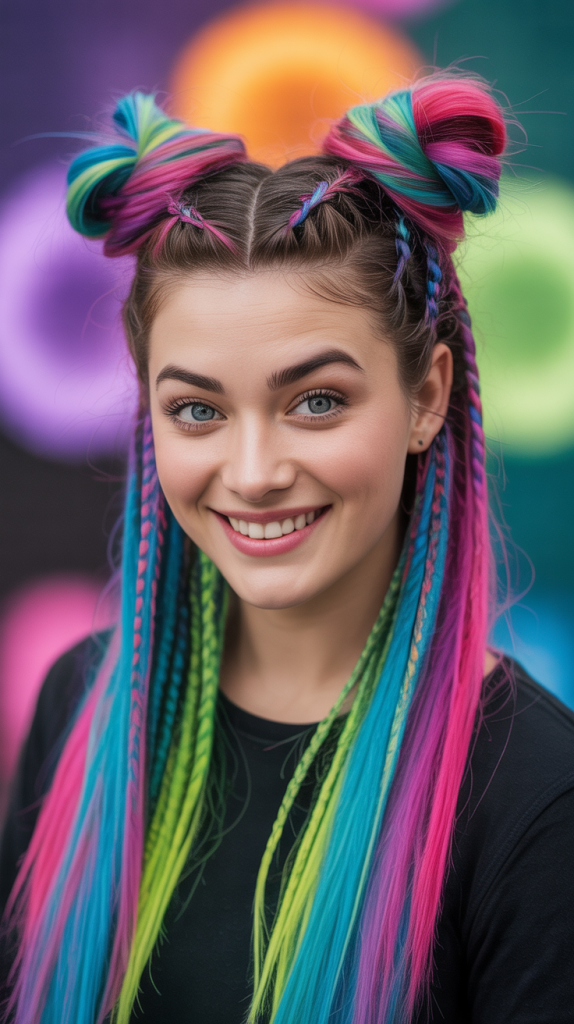
Braided space buns combine playful double buns with braided sections, creating a fun, youthful style that works perfectly with greasy hair.
The braids add structure while the buns hide oily ends.
- Part your hair down the middle and create two high pigtails.
- Dutch braid each pigtail from the elastic down to the ends.
- Wrap each braided pigtail around its elastic base to form a bun.
- Secure with bobby pins and hairspray if needed for extra hold.
- The texture from greasy hair helps the buns maintain their shape without becoming limp.
- This style is perfect for festivals, casual outings, or whenever you want a fun, quirky look.
16. Infinity Braid

The infinity braid creates a figure-eight pattern that looks incredibly intricate, and greasy hair’s added grip makes this complex technique more manageable while ensuring it stays put all day.
- Take two sections of hair and create a figure-eight weaving pattern by crossing them alternately.
- Add small amounts of hair to each section as you work down, similar to a French braid.
- The oil in greasy hair helps maintain the distinct figure-eight shapes without them blending together.
- Continue the pattern to the ends and secure with an elastic.
- This advanced technique creates a stunning visual effect that distracts from any hair oiliness.
- Consider watching video tutorials to master the hand movements for this complex braid.
17. Side-Swept Fishtail
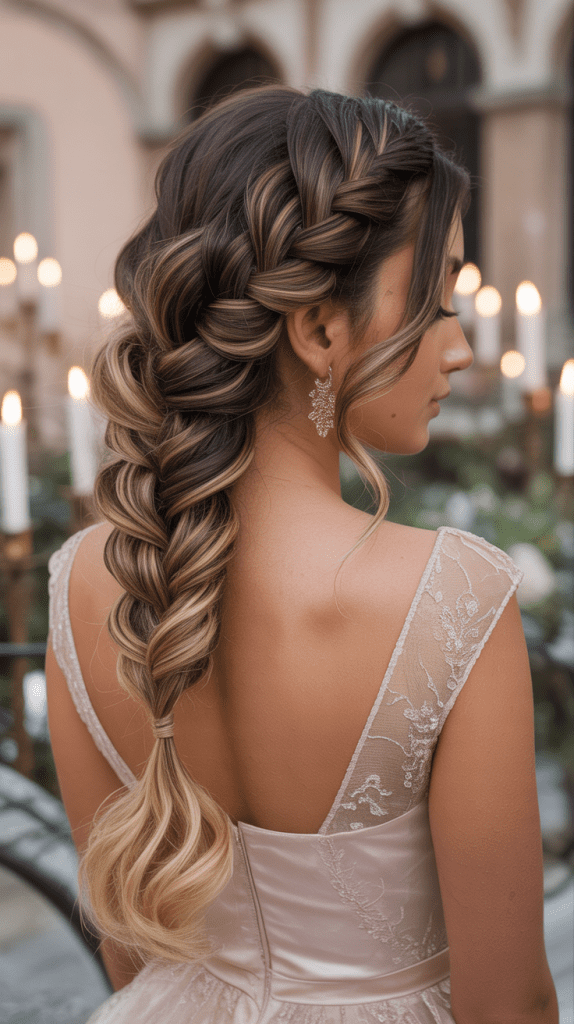
A side-swept fishtail braid drapes elegantly over one shoulder, creating a romantic look that’s perfect for dates or special events.
Greasy hair enhances the textured, piecey appearance that makes this style so appealing.
- Sweep all your hair over one shoulder and divide it into two sections.
- Execute the fishtail braiding technique by crossing small outer pieces to the opposite side.
- Keep the braid loose and textured rather than tight for a more romantic appearance.
- The natural oils create separation between the small sections, enhancing the fishtail effect.
- Secure at the bottom and pull apart sections for additional volume and dimension.
- Leave the braid slightly undone at the ends for an effortlessly chic finish.
18. Braided Faux Hawk

The braided faux hawk creates an edgy, punk-inspired look by incorporating multiple braids into a mohawk silhouette.
Greasy hair helps the side sections stay slicked down while providing texture for the central braids.
- Section the center strip of hair from forehead to nape, about 3-4 inches wide.
- Create multiple small braids within this center section, working from front to back.
- Slick the side sections down with the natural oils or styling gel.
- Pin or tuck the side sections behind the ears or under the braided section.
- The contrast between sleek sides and textured braids creates an intentional, fashion-forward look.
- This style works beautifully for concerts, nights out, or anytime you want to make a statement.
19. Lace Braid Accent

A lace braid accent involves creating a delicate braid that only adds hair from one side, creating a lacy, ribbon-like effect.
This works wonderfully with greasy hair as it can be placed strategically to disguise oily areas.
- Take a small section of hair near your hairline and divide it into three strands.
- Begin braiding, but only add hair from the side closest to your hairline, not from the outside.
- This creates a flat, lace-like braid that sits along your head rather than standing away from it.
- Continue along your hairline or down the side of your head as desired.
- Greasy hair helps this delicate braid stay flat against the head without product.
- Use this technique to create an accent braid while leaving most of your hair loose.
20. Twisted Halo Braid

The twisted halo braid creates a crown effect using twists instead of traditional braids, offering a softer, more romantic alternative.
Greasy hair provides the necessary grip to keep the twists secure all day.
- Part your hair down the middle and create two low pigtails at the nape.
- Twist each pigtail tightly in the same direction until it begins to coil on itself.
- Bring each twisted section up and across the top of your head, pinning as you go.
- Cross the twists at the top center and pin securely to create a halo effect.
- The oils in greasy hair help the twists maintain their shape without unraveling.
- Tuck any loose ends underneath the twists and secure with additional bobby pins.
21. Bubble Braid

The bubble braid creates a fun, segmented look using multiple elastics spaced down a ponytail.
Greasy hair actually enhances this style by giving the bubbles more texture and definition.
- Create a ponytail at your desired height and secure with an elastic.
- Place another elastic 2-3 inches below the first one.
- Gently pull apart the hair between the two elastics to create a “bubble” effect.
- Continue placing elastics and creating bubbles down the entire length of the ponytail.
- Greasy hair holds the bubble shapes better and creates more dramatic volume between each elastic.
- Use colorful or decorative elastics to add personality and visual interest to the style.
22. Braided Pigtails

Classic braided pigtails get a grown-up update when styled intentionally, and greasy hair provides the perfect texture for this youthful yet sophisticated look.
The symmetry and simplicity make this a quick go-to style.
- Create a clean center part from forehead to nape.
- Divide hair into two equal sections and secure each into a pigtail at your desired height.
- Braid each pigtail completely to the ends using your preferred braiding technique.
- Secure with elastics and pull apart sections slightly for a more relaxed, modern appearance.
- The natural oils help the braids maintain their structure without becoming frizzy.
- This style works for casual days, workouts, or anytime you want a practical yet cute look.
23. Criss-Cross Braided Updo
This intricate updo features braids that cross over each other, creating a sophisticated woven effect perfect for weddings or formal events.
Greasy hair’s texture helps the pins grip better and keeps the style secure.
- Create multiple small braids starting from different points around your head.
- Begin crossing these braids over and under each other at the back of your head.
- Pin each braid securely as you weave it into the pattern, tucking ends underneath.
- Continue until all braids are incorporated into the updo.
- Greasy hair provides the grip needed to keep this complex style from slipping throughout the day.
- Finish with hairspray and decorative pins for special occasions.
24. Half-Up Braided Crown

The half-up braided crown combines the best of both worlds, keeping hair off your face while letting the length flow freely.
This style expertly conceals greasy roots while looking effortlessly romantic.
- Take sections of hair from each temple and create two small braids or twists.
- Bring both braids to meet at the back center of your head.
- Cross them over each other and pin securely to create a crown effect.
- Leave the remaining hair loose, or add curls for extra volume and texture.
- The braided crown draws attention upward, away from any oily roots underneath.
- This versatile style works for casual days, dates, or even formal occasions.
25. Wrapped Ponytail Braid

This elegant style wraps sections of hair around a ponytail at intervals, creating a wrapped effect that’s held together with small braids.
Greasy hair helps the wrapped sections stay smooth and secure.
- Create a ponytail at your desired height and secure with an elastic.
- Take a small section from the ponytail and wrap it around the elastic to hide it, pinning underneath.
- Every few inches down the ponytail, take another small section and wrap it around the ponytail, securing with a small elastic underneath.
- Braid the sections between wraps for added texture and interest.
- The natural oils in greasy hair help achieve the smooth, wrapped sections without flyaways.
- This style looks polished and intentional while disguising the need for a hair wash.
26. Diagonal Dutch Braid

A diagonal Dutch braid creates visual interest by braiding at an angle across the head rather than straight down.
This unexpected direction draws the eye and works beautifully with greasy hair’s enhanced grip.
- Begin your Dutch braid at one temple, braiding diagonally toward the opposite shoulder.
- Add sections of hair as you work across and down, maintaining the diagonal angle.
- The natural oils help the braid stay tight against the head along this unusual path.
- Secure at the ends and let the remaining hair fall over the opposite shoulder.
- This asymmetrical style creates a modern, editorial look perfect for fashion-forward occasions.
- Pull apart sections of the braid strategically to add volume and dimension.
27. Braided Bangs
Braiding your bangs or front sections keeps them off your face while cleverly disguising the greasiest part of your hair.
This practical style works whether you’re growing out bangs or just want them out of the way.
- Take your bang section or the front portion of your hair and divide it into three strands.
- Create a side braid along your hairline, adding hair as you work toward your ear.
- Pin the braid behind your ear or continue it into the rest of your hair.
- Leave the remaining hair loose, in a ponytail, or in another style of your choice.
- The oils in your bangs actually help this braid stay secure without slipping forward.
- This technique is especially useful for active days or when your bangs are at that awkward growing-out stage.
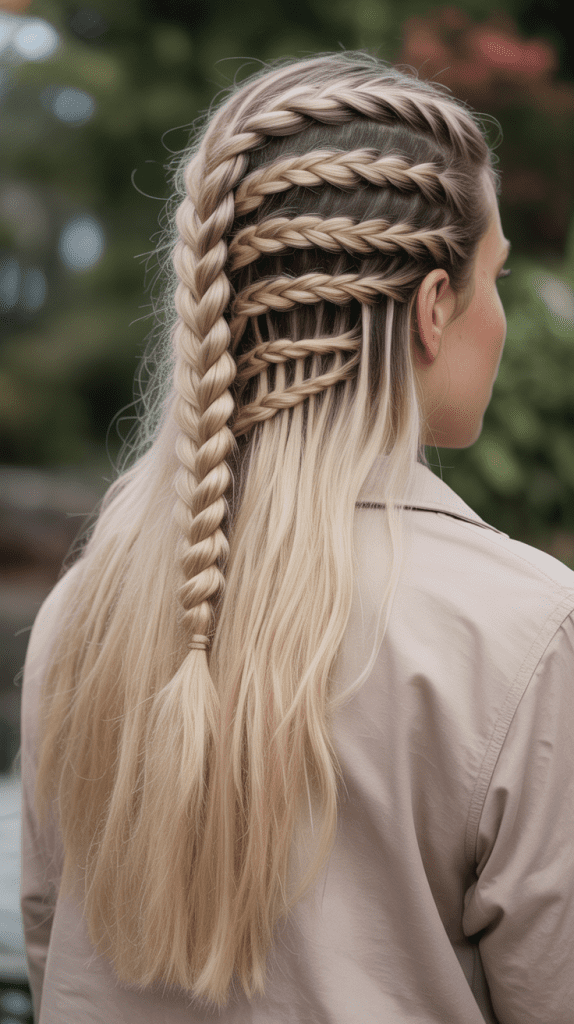
28. Stacked Braids

Stacked braids create multiple horizontal braids layered on top of each other, resulting in a textured, dimensional look.
Greasy hair’s weight and texture help these braids lay flat and stay distinct from each other.
- Section your hair horizontally into multiple layers from top to bottom.
- Braid each section separately, working from the top layer down to the bottom.
- Each braid should sit on top of the one below it, creating a stacked appearance.
- Secure each braid temporarily before moving to the next layer.
- The natural oils help define each individual braid and prevent them from blending together.
- Once all sections are braided, secure the ends together or leave them separate for different effects.
29. Braided Low Ponytail

A braided low ponytail adds sophistication to a simple style by incorporating a braid into the ponytail itself.
This works perfectly with greasy hair, as the oils help achieve a sleek top section while the braid adds texture below.
- Gather your hair into a low ponytail at the nape of your neck, smoothing the top section with the natural oils.
- Secure with an elastic, then braid the entire length of the ponytail.
- The contrast between the smooth top and textured braid creates intentional styling.
- Secure the braid at the ends with another elastic.
- Pull gently on the braid sections to add volume and create a more relaxed appearance.
- This professional yet approachable style works for virtually any occasion.
30. Five-Strand Braid

The five-strand braid takes complexity to the next level, creating an intricate woven pattern that looks incredibly impressive.
Greasy hair’s texture makes managing five sections easier and helps the pattern stay defined.
- Divide your hair into five equal sections across the back of your head.
- Follow a specific over-under pattern: the far right goes over one, under one, then over one section.
- Repeat from the far left side using the same over-under-over pattern.
- Continue alternating from right to left until you reach the ends.
- Greasy hair provides the grip necessary to keep five sections separated and manageable.
- This showstopping braid works beautifully for special events when you want to make an impression.
31. Braided Top Knot

The braided top knot combines the casual coolness of a top knot with the structure of braids, creating a style that’s both practical and stylish.
Greasy hair helps the bun maintain its shape throughout the day.
- Flip your head upside down and French braid from the nape of your neck toward the crown.
- Once you reach the crown, secure all hair in a high ponytail.
- Twist or braid the ponytail and wrap it around the elastic to form a bun.
- Secure with bobby pins, letting some texture show for a deliberately messy appearance.
- The natural oils in greasy hair help the top knot stay secure without constant adjustment.
- This style works perfectly for casual days, workouts, or running errands in style.
32. Accent Braid with Loose Waves

This style features one or two small accent braids woven into loose, flowing waves, creating a bohemian romantic look.
The small braids strategically placed near the hairline help disguise greasy roots.
- Create one or two small three-strand braids starting from near your hairline.
- Position these braids to frame your face or sweep back from your temples.
- Leave the rest of your hair loose and add waves with a curling iron or by braiding damp hair overnight.
- The accent braids draw attention while the natural oils in your hair enhance the wave texture.
- This effortless style looks intentional rather than like hair that needs washing.
- Perfect for festivals, beach days, or casual summer outings.
33. Braided Chignon

The braided chignon creates an elegant low bun at the nape of the neck, incorporating braids for added texture and sophistication.
Greasy hair works exceptionally well for this polished updo.
- Create a low ponytail at the nape and divide it into two or three sections.
- Braid each section completely to the ends.
- Wrap the braids around each other to form a chignon shape at the nape.
- Pin securely, tucking all ends underneath for a clean finish.
- The oils in greasy hair help the chignon maintain its shape and provide grip for the pins.
- This timeless style works for professional settings, formal events, or any occasion requiring sophistication.
34. Zig-Zag Braided Part

This creative style features a zig-zag part with braids following the pattern, creating visual interest at the crown while disguising greasy roots.
The unconventional part draws attention to the styling rather than hair texture.
- Use a rattail comb to create a zig-zag part from your forehead to the crown.
- Create small braids that follow along each side of the zig-zag pattern.
- The unique part pattern immediately draws the eye and distracts from any greasiness.
- Secure the small braids with clear elastics or bobby pins.
- Leave the remaining hair in pigtails, loose, or in another style of your choice.
- This playful style works great for casual days when you want to have fun with your hair.
35. Twisted Side Braid

The twisted side braid combines twists and braids for a hybrid style that’s easier than it looks and perfect for greasy hair.
The combination of techniques creates texture and dimension while the oils provide hold.
- Sweep your hair to one side and divide the top section into two parts.
- Twist these sections around each other several times.
- Begin adding hair to one side and incorporating it into a braid while maintaining some twisted sections.
- Alternate between twisting and braiding as you work down the length.
- The natural oils help both the twists and braids maintain their distinct textures.
- Secure at the ends and pull apart sections for added volume and a more relaxed appearance.
36. Crown Braid with Low Bun
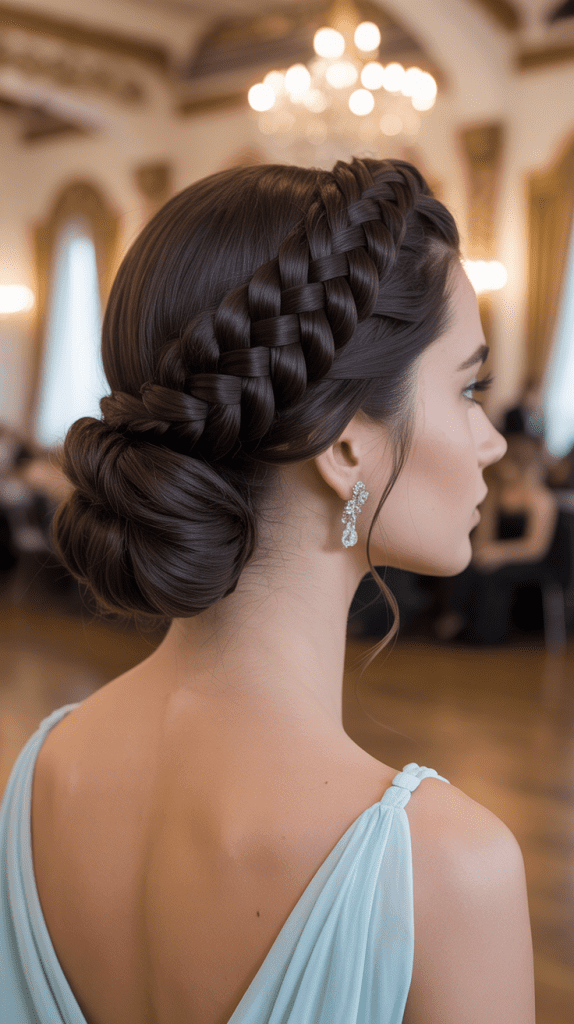
This elegant combination style features a crown braid that flows into a low bun, creating a sophisticated updo perfect for formal occasions.
Greasy hair helps every element stay secure all day or evening.
- Begin with a deep side part and start Dutch braiding along your hairline from one side.
- Continue the braid around the crown of your head toward the opposite side, adding hair as you go.
- When you reach the nape area, gather all remaining hair including the braid into a low ponytail.
- Twist or braid the ponytail and wrap it around the elastic to create a bun at the nape.
- Secure the bun with bobby pins, ensuring all ends are tucked underneath for a polished finish.
- The natural oils in greasy hair provide excellent grip for pins and help the entire style stay intact through long events.
- This sophisticated combination works beautifully for weddings, galas, proms, or any formal occasion.
- Add decorative pins, flowers, or hair jewelry for extra elegance.
Styling Tips for Braiding Greasy Hair
Understanding how to work with greasy hair’s unique properties can transform your braiding results and help you achieve longer-lasting, better-looking styles.
These practical tips will help you maximize the benefits of your hair’s natural oils while minimizing any drawbacks.
- Apply dry shampoo to roots before braiding to absorb excess oil without washing.
- Focus the dry shampoo on the crown and hairline where greasiness is most visible.
- Texture spray can add extra grip if your hair feels too slippery to braid effectively.
- Avoid applying additional oils or serums before braiding as greasy hair already has plenty of natural oils.
- Work with your hair’s texture rather than against it—embrace the sleek, polished look oils naturally create.
- Braid hair when it’s one to three days unwashed for optimal texture and hold.
- Use clear or matching elastics instead of bulky hair ties for a more polished finish.
- Bobby pins grip better in greasy hair, so take advantage of this when securing complex styles.
- If your braid looks too flat, gently pull apart sections to add dimension and volume.
- Finish styles with a light-hold hairspray to set the look without adding crunchiness.
- Consider your hair type—fine hair may look greasier faster while thick hair can handle more days between washes.
- Embrace the naturally sleek appearance at your crown rather than trying to add volume there if it won’t hold.
Common Mistakes to Avoid
- Over-washing your hair in response to greasiness, which actually triggers your scalp to produce more oil.
- Applying too much dry shampoo, which can build up and make hair look dull or white at the roots.
- Braiding too tightly, which can cause breakage and make greasy hair appear even more slicked down.
- Touching your hair constantly throughout the day, which transfers additional oils from your hands.
- Using heavy styling products that add to the greasy appearance rather than masking it.
- Braiding hair that’s too clean and freshly washed, which often results in braids that slip and don’t hold.
- Forgetting to secure braids properly, assuming the oils will hold them when bobby pins are still necessary.
- Starting braids too far from the roots, missing the opportunity to disguise the greasiest areas.
Conclusion
Embracing 36 Braided Greasy Hair Hairstyles for Every Look means transforming what many consider a hair emergency into a strategic styling opportunity.
From elegant updos perfect for formal events to casual braids ideal for everyday wear, greasy hair’s natural texture and enhanced grip actually make these styles easier to achieve and longer-lasting than their freshly-washed counterparts.
The key is understanding how to work with your hair’s oils rather than against them, positioning braids to disguise the greasiest areas while celebrating the sleek, polished appearance those oils can create.
Whether you choose a simple three-strand side braid for a quick morning fix or an intricate five-strand braid for a special occasion, these styles prove that second-day (or third-day) hair deserves celebration, not shame.
By mastering these techniques and understanding the unique advantages greasy hair brings to braided styles, you’ll find yourself actually looking forward to those in-between wash days, knowing your hair is primed for stunning, secure braids that last from morning until night without constant touch-ups or adjustments.