The allure of medieval princess hairstyles transcends centuries, bringing an enchanting blend of elegance, romance, and royal sophistication to modern times.
Whether you’re preparing for a Renaissance fair, a themed wedding, a theatrical performance, or simply want to channel your inner royalty, mastering these timeless hairstyles opens a gateway to historical beauty.
This comprehensive guide walks you through 33 authentic medieval hairstyles that graced the heads of princesses and noblewomen throughout the Middle Ages, from simple braided arrangements to elaborate crowned masterpieces.
Each tutorial is crafted to transform your hair into a work of art, complete with detailed instructions that make these seemingly complex styles accessible to everyone.
You’ll discover techniques for creating cascading braids, elegant updos, flowing half-up styles, and intricate woven patterns that defined centuries of royal fashion.
The 33 Step-by-Step Medieval Hairstyles for Princesses Tutorial brings historical authenticity to your fingertips while ensuring each style remains practical and achievable for contemporary hair enthusiasts.
1. The Classic Crown Braid
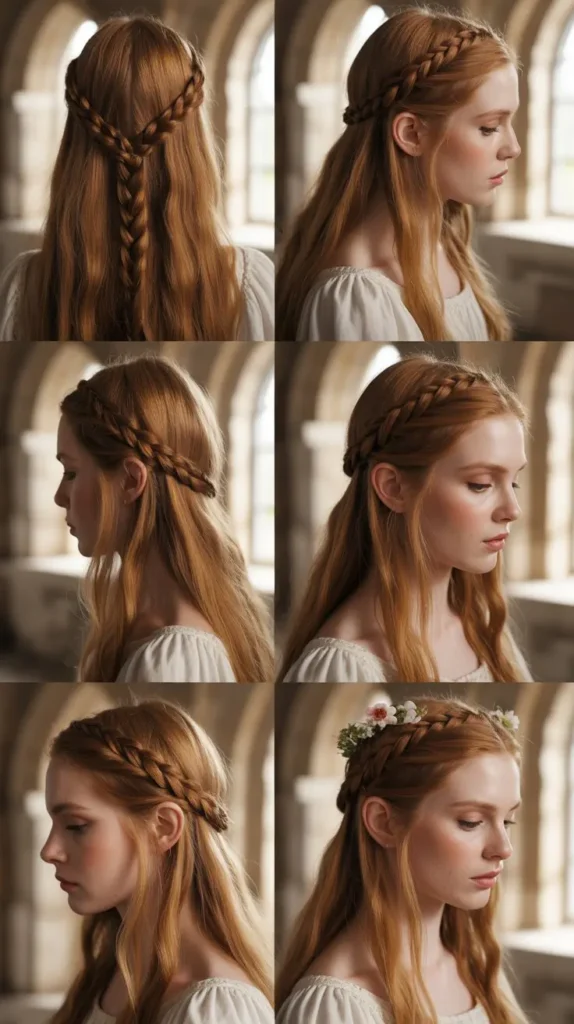
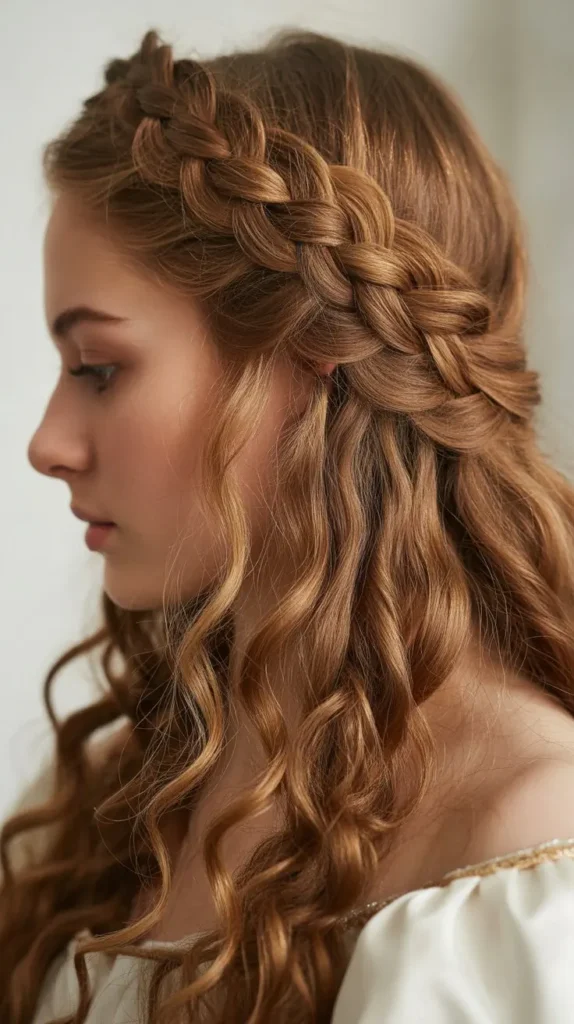
The crown braid served as one of the most iconic hairstyles among medieval princesses, symbolizing nobility and grace.
This circular braid wrapping around the head creates a natural crown effect that requires no additional accessories, though many royals embellished it with ribbons and jewels.
Steps:
- Brush your hair thoroughly to remove all tangles and create a smooth base for braiding.
- Part your hair down the middle from forehead to nape, creating two equal sections.
- Begin with the right section, starting a Dutch braid (reverse braid) at the hairline near your ear.
- Continue the Dutch braid technique, adding hair from the outer edge as you work around the head.
- Keep the braid close to your hairline, maintaining consistent tension for an even appearance.
- When you reach the starting point, continue braiding the remaining hair without adding new sections.
- Tuck the braid tail underneath the crown braid and secure with bobby pins.
- Repeat the process with the left section if creating a double crown, or wrap it around in the opposite direction.
- Gently pull on the braid edges to create a fuller, more voluminous crown effect.
- Secure any loose pieces with decorative pins or leave subtle wisps for a romantic touch.
2. Flowing Waterfall Braid

Medieval maidens often wore their hair partially down to showcase length and beauty, and the waterfall braid perfectly captures this aesthetic.
This romantic style allows sections of hair to cascade through the braid like a gentle waterfall, creating movement and dimension.
Steps:
- Start with clean, brushed hair that has a slight wave for better texture and hold.
- Take a three-inch section of hair near your temple on one side.
- Divide this section into three equal strands to begin a standard braid.
- Create one stitch of a regular braid, crossing the back strand over the middle.
- Drop the front strand completely, allowing it to fall and create the waterfall effect.
- Pick up a new section of hair from the top to replace the dropped strand.
- Continue this pattern: braid once, drop the front strand, pick up a new section.
- Work the waterfall braid horizontally across your head toward the opposite ear.
- Maintain consistent spacing between dropped strands for a uniform waterfall appearance.
- Secure the braid end with a small elastic or decorative ribbon when you reach the opposite side.
3. Double Rope Braid Crown

The double rope braid combined strength with beauty, representing the dual nature of medieval princesses as both gentle and powerful.
This twisted style creates a textured crown that sits elegantly atop the head.
Steps:
- Divide your hair into two equal sections using a center part from forehead to nape.
- Take the right section and divide it into two smaller, equal subsections.
- Twist each subsection clockwise (to the right) several times until tight.
- Wrap the two twisted sections around each other counter-clockwise (to the left) to create the rope effect.
- The opposing twist directions prevent the rope braid from unraveling naturally.
- Continue rope braiding all the way to the ends of your hair.
- Wrap the completed rope braid around your head like a crown, starting at the base.
- Secure with bobby pins every few inches, tucking pins underneath the braid to hide them.
- Repeat the entire process with the left section of hair.
- Arrange both rope braids to meet at the front or back, securing where they connect.
4. Heart-Shaped Braid

This romantic style captured the essence of courtly love that dominated medieval culture, literally wearing one’s heart in their hair.
The heart-shaped braid created a stunning visual statement at formal court gatherings.
Steps:
- Begin with straight or slightly wavy hair for the cleanest heart shape definition.
- Part your hair down the center from forehead to crown, stopping mid-head.
- Take the right section and create a curved French braid that arcs outward and then down.
- The curve should form one half of a heart shape when viewed from behind.
- Continue braiding in a regular three-strand technique once you’ve established the heart curve.
- Repeat the same curved French braid technique on the left section, creating the mirror image.
- Both braids should meet at a center point below where your part ended.
- Join the two braids together and continue as one single braid down the remaining length.
- The combined braid hangs down the center of your back from the bottom point of the heart.
- Secure with a ribbon or elastic, and pancake the braids slightly to emphasize the heart shape.
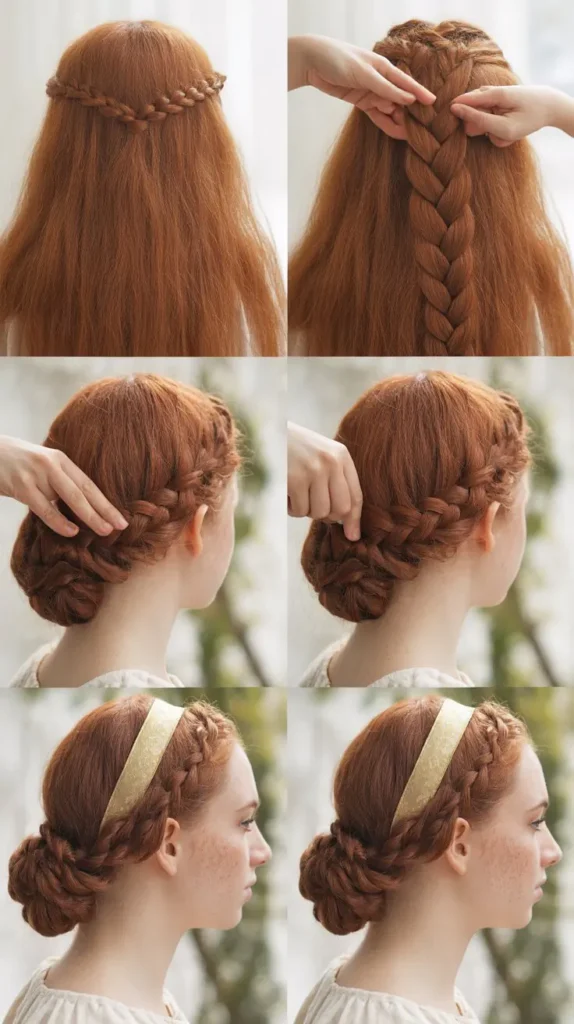
5. Milkmaid Braids

Contrary to its humble name, milkmaid braids were actually favored by noblewomen for their practicality and charm during daytime activities.
This style kept hair secure while maintaining an air of approachable elegance.
Steps:
- Create a deep side part or center part depending on your preference.
- Divide your hair into two equal sections following your part line.
- Braid each section into a simple three-strand braid, securing the ends with small elastics.
- Take the right braid and lift it up and over your head toward the left side.
- Position it across the top of your head like a headband, about one inch from your hairline.
- Secure the braid with bobby pins every two inches, hiding pins underneath the braid.
- Take the left braid and bring it up and over to the right side, positioning it behind the first braid.
- Continue pinning the second braid securely, creating a double-layered crown effect.
- Tuck the tail ends of both braids underneath the opposite braid to hide them completely.
- Gently pull on the braids to create fullness and soften the overall appearance for a romantic finish.
6. Five-Strand Braid

The five-strand braid represented complexity and sophistication, reserved for princesses who had skilled ladies-in-waiting.
This intricate weaving technique creates a stunning, wide braid with beautiful depth and texture.
Steps:
- Brush hair thoroughly and gather it into a low ponytail at the nape for easier handling while learning.
- Divide the ponytail into five equal sections, holding them separated with your fingers.
- Number the sections mentally from left to right as 1, 2, 3, 4, and 5 for easier following.
- Cross section 5 over section 4, then under section 3 to weave it toward the left side.
- Cross section 1 over section 2, then under section 3 to weave it toward the right side.
- Continue this pattern: the outermost right strand goes over, then under toward center.
- Then the outermost left strand goes over, then under toward center, alternating sides.
- Maintain even tension on all five strands to create a uniform, balanced braid structure.
- Continue the weaving pattern all the way down to the ends of your hair.
- Secure with an elastic or decorative ribbon, and pancake gently to showcase the intricate pattern.
7. Medieval Veil with Braided Base

Medieval princesses often wore veils as symbols of modesty and status, but the hairstyle beneath provided the foundation.
This style combines practical braiding with veil placement for an authentic period look.
Steps:
- Create two simple three-strand braids, one on each side of your head, starting at temple level.
- Keep the braids relatively flat against your head rather than pulling them out.
- Bring both braids to the back of your head and secure them together with an elastic.
- Leave the remaining center section of hair flowing freely down your back or in loose waves.
- Place a metal circlet or decorative headband across your crown to anchor the veil.
- Position your veil on top of the circlet, with the veil edge sitting about one inch behind your hairline.
- Secure the veil to the circlet and braids using small decorative pins with pearl or jewel tops.
- Arrange the veil to flow down your back, allowing it to cascade over your shoulders if desired.
- The braids should be visible at the temples, framing your face beneath the veil.
- Adjust any loose tendrils around your face to soften the look and add romantic appeal.
8. Twisted Half-Up Crown

This style offered medieval princesses the perfect balance between formal and relaxed, suitable for daytime court activities.
The twisted sections create elegant detail while leaving hair flowing freely.
Steps:
- Take a two-inch section of hair from above your right temple.
- Twist this section tightly backward (away from your face) while moving toward the back of your head.
- As you twist backward, incorporate small sections of hair from along your hairline every inch or so.
- This creates a twisted rope effect that follows the curve of your head like a crown.
- Secure the twisted section temporarily at the back center of your head with a clip.
- Repeat the exact same process on the left side, creating a mirror-image twisted section.
- Both twisted sections should meet at the center back of your head at approximately ear level.
- Join both twisted sections together and secure with bobby pins or a decorative barrette.
- Allow the remaining hair to flow freely down your back in natural waves or curls.
- Gently pancake the twists by pulling them slightly to create more volume and a softer appearance.
9. Ladder Braid

The ladder braid’s geometric precision appealed to medieval aesthetics that valued order and symmetry.
This eye-catching style creates a ladder-like effect running through the center of the braid.
Steps:
- Section off a narrow band of hair (about one inch wide) down the center of your head.
- Clip this center section out of the way temporarily.
- Divide the remaining hair into two equal sections, left and right of the center section.
- Create a standard three-strand braid with the right section, securing at the bottom with an elastic.
- Create an identical three-strand braid with the left section, also securing with elastic.
- Position both braids parallel to each other with about two inches of space between them.
- Take the center section you clipped aside and divide it into small horizontal sections.
- Weave each horizontal section over the left braid and under the right braid like lacing.
- Continue this over-under weaving pattern down the entire length of the parallel braids.
- The woven center sections create the “rungs” of the ladder between the two side braids.
10. French Braid Into Low Bun
Medieval princesses needed secure, elegant styles for active pursuits like horseback riding and hunting.
This combination style keeps hair completely controlled while maintaining sophistication.
Steps:
- Begin at your hairline with a three-inch wide section of hair at the center top of your head.
- Start a French braid by dividing this section into three strands.
- Add small sections of hair from each side as you cross the strands over each other.
- Continue the French braid down the center back of your head, incorporating all hair from the sides.
- Maintain tight, even tension to keep the braid close to your scalp for a sleek appearance.
- When you reach the nape of your neck and all hair is incorporated, continue with a regular braid briefly.
- Wrap the remaining braided length around itself in a circular motion to form a bun shape.
- Tuck the tail end of the braid underneath the bun to hide it completely.
- Secure the bun with multiple bobby pins inserted in a crisscross pattern for maximum hold.
- Wrap a decorative ribbon or hair net around the bun for added security and medieval authenticity.
11. Braided Headband with Loose Curls

This style exemplified youthful princess beauty with its combination of structured detail and flowing romance.
The braided headband kept hair from the face while allowing length to be displayed.
Steps:
- Take a one-inch section of hair from behind your right ear.
- Braid this section into a tight three-strand braid all the way to the ends.
- Bring the braid up and across the top of your head like a headband, about two inches from your hairline.
- Secure the braid behind your left ear with multiple bobby pins hidden underneath.
- Leave all remaining hair loose and flowing for contrast with the structured braid.
- Use a curling iron to create loose, flowing waves in the loose hair if desired.
- The curls should start at mid-length rather than from the roots for a more natural appearance.
- Gently separate the curls with your fingers to create soft, romantic waves rather than defined ringlets.
- Apply a light hair spray to the braided headband to keep any flyaways controlled.
- Leave a few face-framing tendrils loose around your temples for a softened, feminine effect.
12. The Celtic Knot Braid

Celtic influences permeated medieval European culture, and this intricate knotwork hairstyle represented eternity and interconnection.
The style requires patience but creates a stunning focal point.
Steps:
- Section your hair into three equal vertical sections down the back of your head.
- Begin with the right section, creating a regular three-strand braid for about four inches.
- Take the left section and weave it over and under the center and right braids in a figure-eight pattern.
- Secure this woven section temporarily while you work on the next layer.
- Continue braiding the right section for another few inches.
- Weave the left section again in the figure-eight pattern, going over and under alternately.
- The key is maintaining the over-under-over-under pattern consistently for authentic knotwork appearance.
- Continue this pattern down the length of your hair, creating multiple interlocked “knots.”
- Each completed knot should show the characteristic Celtic interwoven design when viewed from behind.
- Secure the finished braid with a decorative Celtic-inspired hair tie or leather cord for authenticity.
13. Rose Braid Bun

This romantic style transformed a simple braid into a blooming rose, symbolizing love and beauty in medieval symbolism.
The rose bun served as a centerpiece for formal occasions and celebrations.
Steps:
- Create a Dutch braid (reverse braid) starting at the crown and working down to the nape.
- Pancake the Dutch braid heavily by pulling on the outer edges to create maximum width and volume.
- The braid should look very wide and flat with visible, separated sections for the rose petal effect.
- When you reach the ends, secure the braid with a small elastic.
- Begin rolling the wide braid from the bottom end upward toward your scalp in a spiral motion.
- As you roll, the pancaked edges of the braid will naturally fan outward like rose petals.
- Keep the spiral tight at the center but allow the edges to remain loose and petal-like.
- Pin the rolled braid securely at the base where it meets your head using multiple bobby pins.
- Insert pins at various angles through the rose bun to ensure it stays in place throughout the day.
- Adjust the outer “petals” to create a more realistic rose shape, pulling some slightly outward for dimension.
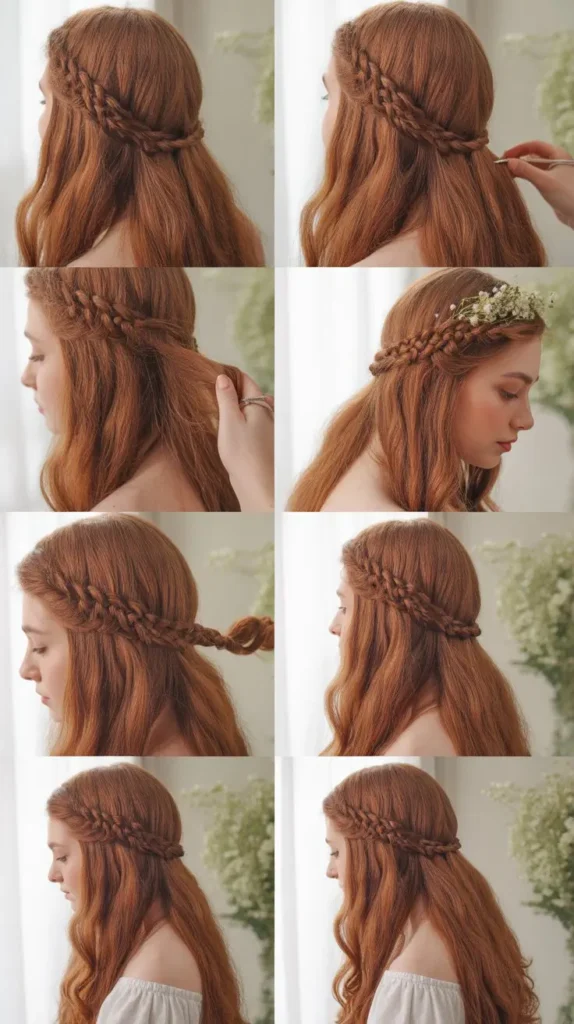
14. Medieval Side Braid with Flowers

Fresh flowers adorned medieval hairstyles during warm seasons, representing fertility, youth, and connection to nature.
This side-swept braid provides the perfect base for floral embellishment.
Steps:
- Sweep all your hair over your right or left shoulder, whichever side you prefer.
- Begin a loose three-strand braid starting at ear level on your chosen side.
- Keep the braid relaxed and slightly loose rather than tight for a softer, romantic appearance.
- Braid all the way to the ends and secure with a thin elastic that matches your hair color.
- Pancake the braid gently by pulling on the outer edges to create fullness and texture.
- Select small, delicate flowers like baby’s breath, daisies, or rosebuds for authentic medieval appeal.
- Insert flower stems into the braid by weaving them between the strands at regular intervals.
- Space flowers about three to four inches apart down the length of the braid for balanced decoration.
- Secure each flower with a small bobby pin if needed to prevent slipping.
- The flowers should look natural and integrated into the braid rather than heavily clustered in one area.
15. Double Dutch Braids

Double Dutch braids provided medieval princesses with a secure, symmetrical style perfect for long days of royal duties.
The raised braids create striking dimension and visual interest.
Steps:
- Part your hair straight down the middle from forehead to nape, creating two equal sections.
- Clip one section aside while working on the other to prevent tangling.
- Take a three-inch section at the hairline of the first side to begin the Dutch braid.
- In Dutch braiding, cross strands under rather than over the middle strand for the raised effect.
- Add small sections of hair from the sides as you work down, incorporating all hair on that side.
- Keep the braid tight and close to the center part for clean, parallel lines.
- Secure the first Dutch braid at the bottom with an elastic, then begin the second side.
- Mirror the exact same process on the second section, maintaining consistent tension and tightness.
- Both braids should run perfectly parallel down the back of your head with your center part visible between them.
- Pancake both braids equally to create matching volume and texture on each side.
16. The Twisted Flower Crown

Combining twists with floral elements created a natural crown effect that medieval maidens wore for spring festivals and celebrations.
This style works particularly well for outdoor events.
Steps:
- Section your hair into four equal parts: left front, right front, left back, right back.
- Take the right front section and twist it tightly backward, moving toward the back of your head.
- Secure this twist at the back center with a bobby pin temporarily.
- Repeat with the left front section, twisting backward and securing at the same center point.
- Take the right back section and twist it forward, bringing it up and over to meet the front twists.
- Secure all twists together at the crown area, creating a circular pattern around your head.
- Repeat with the left back section, completing the circular crown of twists.
- Weave small flowers into the twisted sections by tucking stems between the twists.
- Distribute flowers evenly around the entire crown for balanced color and visual interest.
- Secure any loose twists or flowers with additional bobby pins hidden within the hair.
17. Infinity Braid

The infinity symbol’s endless loop resonated with medieval concepts of eternal love and divine connection.
This mathematically inspired braid creates a stunning repeating pattern.
Steps:
- Divide your hair into two equal sections, left and right.
- Take a small subsection from the outer edge of the right section.
- Cross this small piece over the right section and under the left section in a figure-eight motion.
- Take a small subsection from the outer edge of the left section.
- Cross it over the left section and under the right section, creating the opposite figure-eight motion.
- Continue alternating sides, creating the repeating infinity symbol pattern down the length.
- Each crossover should maintain the over-under-over-under sequence for proper pattern formation.
- Keep consistent tension and use equal-sized sections for a uniform, recognizable infinity pattern.
- The braid will naturally create the characteristic loops of the infinity symbol when viewed from behind.
- Secure at the bottom with a decorative elastic and pancake gently to highlight the pattern.
18. Medieval Wrapped Ponytail

When princesses needed simplicity with elegance, the wrapped ponytail provided a refined solution.
The hair-wrapped base conceals the elastic while adding sophistication.
Steps:
- Brush all hair back smoothly and gather into a low ponytail at the nape of your neck.
- Secure with a strong elastic that matches your hair color.
- Take a one-inch section of hair from underneath the ponytail.
- Wrap this section tightly around the elastic base, covering it completely with hair.
- Continue wrapping until the elastic is no longer visible from any angle.
- Secure the wrapped section with a bobby pin inserted vertically through the wrapped hair into the ponytail.
- For added security, insert a second bobby pin from the opposite angle, creating an X pattern.
- Smooth the ponytail length with your hands or a brush for a sleek, polished appearance.
- Apply a small amount of hair oil or serum to the ponytail for shine and medieval authenticity.
- Allow a few wisps to frame your face naturally, or smooth them back for a more severe look.
19. The Triple Braided Crown

Three braids intertwined created a more elaborate crown effect reserved for the highest-ranking princesses.
This complex style demonstrates hair artistry at its finest.
Steps:
- Divide your hair into three equal sections using two parallel parts running from forehead to nape.
- Create three separate regular three-strand braids with each section, securing all ends with small elastics.
- Take the right braid and bring it across the top of your head toward the left side.
- Position it about one inch from your hairline and secure with bobby pins every two inches.
- Take the center braid and position it directly behind and slightly overlapping the first braid.
- Pin the center braid securely, creating a layered crown effect with the first braid.
- Take the left braid and position it behind the other two, creating a third layer of crown.
- All three braids should now wrap around your head in concentric circles at the crown area.
- Tuck the tail ends of all three braids underneath each other to hide them completely.
- Adjust the braids to create even spacing and consistent layering all around your head.
20. Mermaid Braid
The mermaid braid’s flowing, intricate appearance captured medieval fascination with mythical creatures and water symbolism.
This pull-through braid technique creates exceptional volume and dimension.
Steps:
- Create a half-up ponytail at the crown of your head and secure with a clear elastic.
- Take a section of loose hair from below the first ponytail and create a second ponytail directly beneath it.
- Split the first ponytail in half vertically, creating two equal sections.
- Bring these two sections around the outside of the second ponytail and temporarily clip them aside.
- The second ponytail should now appear to come through the middle of the first ponytail.
- Gather the two split sections from the first ponytail together with a new section of loose hair below.
- Create a third ponytail with this combined hair directly below the second ponytail.
- Split the second ponytail in half and bring those sections around the outside of the third ponytail.
- Continue this pattern of stacking, splitting, and pulling through down the entire length of your hair.
- Pancake each ponytail section heavily to create the characteristic voluminous mermaid appearance.
21. Braided Chignon

The low chignon represented mature sophistication among medieval noblewomen, particularly for formal evening events.
Adding braids transforms the simple chignon into an intricate work of art.
Steps:
- Create three equal sections of hair and braid each into a regular three-strand braid.
- Secure all three braids at the ends with small elastics that match your hair color.
- Take the first braid and roll it into a circular coil at the nape of your neck.
- Secure this coiled braid with bobby pins inserted through the center and around the edges.
- Take the second braid and wrap it around the outside of the first coiled braid.
- Pin the second braid securely, creating a larger circular shape around the first.
- Take the third braid and wrap it around the outside of both previous braids, creating the largest circle.
- The final chignon should show all three braids nested within each other like a target pattern.
- Insert bobby pins throughout all three braided layers to ensure the entire structure is secure.
- Spray with hairspray and tuck any loose ends underneath the chignon to hide them completely.
22. Viking-Inspired Side Braids

Although Vikings influenced medieval culture, particularly in Northern Europe, these warrior-princess braids combine fierce and feminine elements.
The tight side braids frame the face dramatically.
Steps:
- Take a two-inch wide section of hair at your temple on the right side.
- Divide this section into three strands and create a very tight, sleek three-strand braid.
- Braid down about six inches, stopping at approximately chin level.
- Secure this braid with a small elastic or leather cord for authentic Viking-inspired appearance.
- Repeat the exact same process on the left side, creating a mirror-image braid.
- Both braids should frame your face symmetrically and hang down in front of your shoulders.
- Leave all remaining hair loose and flowing down your back for contrast with the tight side braids.
- You can add small metal rings, beads, or leather wraps to the braids for additional Viking aesthetic.
- The contrast between the structured front braids and loose back hair creates dramatic visual interest.
- This style works particularly well with wavy or slightly textured hair in the loose back section.
23. The Halo Braid Updo

The halo braid created a saintly appearance appropriate for religious ceremonies and solemn occasions.
This completely raised style keeps all hair elegantly contained.
Steps:
- Part your hair down the center from forehead to nape, creating two equal sections.
- Begin a Dutch braid on the right side, starting at the nape rather than the crown.
- Braid upward and around the right side of your head, adding hair as you progress.
- The braid should curve around the right side of your head like a halo or crown.
- Continue the Dutch braid all the way around until you reach the starting point at the nape.
- When you meet the starting point, incorporate the braid tail into the existing braid to hide it.
- Secure the end by tucking it underneath the braid and pinning thoroughly.
- The completed halo should sit about one inch from your hairline all the way around.
- Insert bobby pins every two inches throughout the entire halo for maximum security.
- Pancake the braid gently all around to create even fullness and texture throughout the halo.
24. Diagonal Cascade Braid
This asymmetrical style added visual interest through its diagonal flow across the head and shoulder.
Medieval fashion occasionally embraced asymmetry for dynamic appeal.
Steps:
- Take all your hair and sweep it diagonally across your head toward your opposite shoulder.
- If starting from the right side, sweep hair toward your left shoulder, and vice versa.
- Begin a Dutch or French braid at your temple on the starting side.
- Angle the braid diagonally across the back of your head as you incorporate hair.
- Keep the diagonal angle consistent, moving toward the opposite shoulder at approximately 45 degrees.
- Continue adding hair from both sides until you reach the opposite shoulder area.
- Once all hair is incorporated, switch to a regular three-strand braid for the remaining length.
- The finished braid should drape over your opposite shoulder in front.
- Pancake the braid to create volume and emphasize the diagonal cascade effect.
- Secure the end with a decorative ribbon or elastic, allowing the braid to rest on your chest.
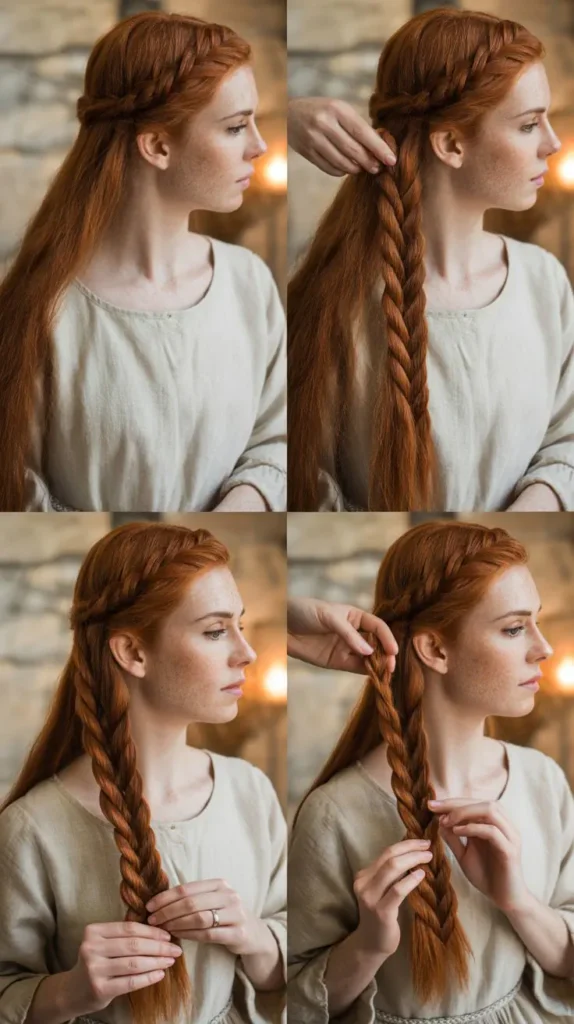
25. The Twisted Low Bun

Simplicity and elegance combined in this understated style favored for everyday wear among nobility.
The twisted technique adds subtle detail to a classic bun shape.
Steps:
- Gather all hair into a low ponytail at the nape of your neck and secure with an elastic.
- Divide the ponytail into two equal sections.
- Twist the right section clockwise (to the right) until it’s tight and rope-like.
- Twist the left section clockwise as well, in the same direction as the right.
- Wrap the two twisted sections around each other counter-clockwise to create a rope braid effect.
- Coil the entire rope braid around the base of the ponytail to form a bun shape.
- The twisted texture will be visible on the surface of the bun, creating subtle detail.
- Secure the bun with bobby pins inserted at various angles throughout.
- Tuck the tail end of the rope braid underneath the bun to hide it completely.
- This style works beautifully with a hair net placed over the bun for added medieval authenticity.
26. Four-Strand Braid

The four-strand braid offered more complexity than three strands while remaining more accessible than five-strand techniques.
This braid creates a beautiful woven appearance with excellent definition.
Steps:
- Gather hair into a low ponytail to make the braiding process easier while learning the technique.
- Divide the ponytail into four equal sections, mentally numbering them 1, 2, 3, 4 from left to right.
- Cross section 1 over section 2, positioning it between sections 2 and 3.
- Cross section 4 under section 3, positioning it between the original sections 2 and 3.
- Continue the pattern: the outermost left strand goes over its neighbor.
- Then the outermost right strand goes under its neighbor.
- Alternate this over-under pattern while always working with the outermost strands.
- The braid will develop a distinctive woven appearance different from three-strand braids.
- Maintain even tension on all four sections to create a uniform, balanced braid.
- Secure at the bottom with an elastic and pancake gently to showcase the intricate four-strand weaving.
27. Romantic Twisted Half-Down Style

This effortless-looking style actually required careful construction to achieve the perfect balance of structure and softness.
Medieval princesses wore this for informal social gatherings.
Steps:
- Take a two-inch section from your right temple area.
- Take a second section of hair from slightly behind and below the first twist.
- Add this new section to the existing twist, continuing the backward twisting motion.
- Secure the twisted section at the back center of your head with a small clip temporarily.
- Repeat the same process on the left side, creating a mirror-image twisted section.
- Both twisted sections should meet at the center back of your head.
- Join the two twisted sections together and secure with bobby pins or a decorative barrette.
- Leave the remaining two-thirds of your hair flowing freely down your back.
- Create soft waves in the loose hair using a curling iron or braiding technique for romantic texture.
- Pull a few face-framing tendrils loose to soften the overall appearance.
28. The Elizabethan-Inspired Braided Updo

Though technically post-medieval, late medieval styles began incorporating elements of what would become Elizabethan fashion.
This elaborate updo showcases height and intricate braiding patterns.
Steps:
- Section the crown area of your hair into a large rectangle from forehead to mid-crown.
- Tease this section at the roots to create volume and height.
- Smooth the outer layer of the teased section while maintaining the volume underneath.
- Pin this section temporarily at the crown to maintain the height you’ve created.
- Divide the remaining hair into three sections: left side, right side, and back.
- Create a three-strand braid with each section, securing all three braids with small elastics.
- Take the back braid and coil it into a bun at the base of the teased crown section.
- Pin the bun securely, creating a foundation for the other braids to attach to.
- Wrap the right braid around the bun in a clockwise direction, pinning as you go.
- Wrap the left braid around the bun in a counter-clockwise direction, creating an interwoven pattern.
- Tuck all braid ends underneath the updo structure to hide them completely.
- The finished style should have significant height at the crown with intricate braiding at the back.
29. Braided Ponytail Wrap

This style transformed a simple ponytail into a sophisticated statement through strategic braid placement.
Medieval princesses appreciated practical styles that still conveyed elegance.
Steps:
- Gather all your hair into a high ponytail at the crown and secure with a strong elastic.
- Take a one-inch section of hair from underneath the ponytail.
- Create a thin three-strand braid with this section, braiding all the way to the ends.
- Keep this braid separate from the main ponytail for now.
- Beginning at the base of the ponytail, wrap the thin braid around the ponytail in a spiral pattern.
- Angle the braid diagonally as you wrap, creating a candy-cane or barber-pole effect.
- Space the wraps about two inches apart as you work down the length of the ponytail.
- When you reach the bottom, secure the wrapping braid together with the ponytail using one elastic.
- The thin braid should create a decorative spiral pattern all the way down the ponytail length.
- Tuck the end of the wrapping braid into the ponytail to hide where it terminates.
30. The Bohemian Side Braid

Combining multiple braid techniques created this textured, romantic style perfect for outdoor celebrations and festivals.
The bohemian aesthetic resonated with medieval festival culture.
Steps:
- Sweep all your hair over one shoulder, choosing your preferred side.
- Take a small section at your temple on that side and create a regular three-strand braid.
- After a few inches, transition this braid into a fishtail braid technique for texture variation.
- Continue the fishtail for several inches, then switch back to a three-strand braid.
- This alternating pattern creates visual interest and varied texture throughout the length.
- Continue alternating between three-strand and fishtail techniques every few inches.
- Keep the braid relatively loose rather than tight for a more relaxed, bohemian appearance.
- Pancake each section as you complete it to maximize fullness and texture.
- Add small flowers, ribbons, or leather cords woven through the braid for decoration.
- Secure at the bottom with a loose elastic or ribbon, allowing some strands to escape naturally.
31. Medieval Loop Braid

The loop braid created distinctive circular patterns along its length, representing the circular nature of time and seasons.
This advanced technique produces stunning architectural detail.
Steps:
- Divide your hair into three equal sections at the back of your head.
- Begin with the right section, creating a small loop by folding the hair back on itself.
- Secure this loop temporarily with a small clip to hold its shape.
- Take a small section from the left side and weave it through the loop you just created.
- Pull this woven section through completely, creating an interlocked appearance.
- Create a new loop with the center section, positioning it below the first loop.
- Weave a section from the right through this new center loop.
- Continue creating loops and weaving sections through them in an alternating pattern.
- Each loop should be clearly visible and maintain its circular shape in the finished braid.
- The pattern creates a stunning chain-like effect down the length of your hair.
- Secure at the bottom and avoid pancaking this braid to maintain the distinct loop definition.
32. The Maiden’s Twist

This simple yet elegant style represented innocence and youth among medieval maidens.
The twisted back section keeps hair controlled while the loose front suggests carefree beauty.
Steps:
- Leave the front sections of hair loose on both sides of your face, about two inches wide.
- Gather the remaining hair from behind your ears to the back of your head.
- Divide this gathered hair into two equal sections.
- Twist the right section clockwise several times until it becomes a tight rope.
- Twist the left section clockwise as well, matching the tension of the right section.
- Wrap these two twisted sections around each other counter-clockwise to create a rope effect.
- Pin the twisted rope horizontally across the back of your head at ear level.
- The loose front sections should hang freely, framing your face naturally.
- Allow the remaining hair below the twisted section to flow freely down your back.
- Create soft waves in all the loose hair for a romantic, youthful appearance.
- This style beautifully showcases face-framing layers while keeping hair manageable.
33. The Royal Dutch Crown Braid
Reserved for the most formal occasions, this elaborate crown braid incorporated Dutch braiding technique for maximum height and presence.
This style literally crowned the wearer with their own hair.
Steps:
- Create a circular part around the crown of your head, about three inches from your hairline all around.
- Clip the hair inside this circular part aside temporarily.
- Begin a Dutch braid at the center of your forehead with the hair outside the circular part.
- Braid along your hairline, moving to the right side of your head while adding hair from the outer edge only.
- Keep the Dutch braid tight and close to the circular part line for clean definition.
- Continue the Dutch braid all the way around your head, following the circular part exactly.
- When you complete the circle and return to your starting point, continue braiding the remaining length without adding hair.
- Wrap this remaining braided tail around the inside of the crown braid to conceal it.
- Secure the end underneath the crown braid with multiple bobby pins.
- Release the center section of hair and style it separately – wear it down, curl it, or create an additional bun in the center.
- Pancake the Dutch crown braid dramatically to create maximum volume and royal presence.
- Add a jeweled circlet on top of the crown braid for ultimate medieval princess authenticity.
Conclusion
The timeless elegance of medieval princess hairstyles continues to captivate modern enthusiasts, offering a portal to an era where hair artistry reached extraordinary heights.
Through this 33 Step-by-Step Medieval Hairstyles for Princesses Tutorial, you’ve gained access to centuries of beauty wisdom, from simple twisted styles perfect for daily wear to elaborate braided crowns worthy of coronation ceremonies.
Each technique honors the craftsmanship of medieval ladies-in-waiting while adapting to contemporary needs and skills.
Whether you’re preparing for a special event, exploring historical recreation, or simply seeking to add romance and elegance to your everyday look, these hairstyles provide endless inspiration.
The beauty of these medieval styles lies not only in their visual appeal but in their versatility – they work with various hair types, lengths, and textures when adapted thoughtfully.
As you practice these techniques, remember that medieval hairstyling was an art form passed down through generations, and your patience in mastering these braids, twists, and arrangements connects you to countless women throughout history who wore their hair as a crown.
Let these royal hairstyles empower you to express your own inner princess, embracing the grace, strength, and beauty that defined medieval nobility.