Woodworking is one of those timeless crafts that transforms raw lumber into functional art, and the best part? You don’t need a professional workshop or decades of experience to get started.
If you’ve been dreaming of creating something beautiful with your own hands but feel intimidated by complex techniques or expensive tools, this guide is your perfect starting point.
In this comprehensive article on “33+ Easy Wood Projects for Beginners: Start Your Woodworking Journey Today!”, you’ll discover a carefully curated collection of projects that build your confidence while developing essential skills. From simple coasters that take just an hour to complete, to stylish furniture pieces that look professionally crafted, each project is designed with beginners in mind.
We’ll walk you through rustic home décor items, practical storage solutions, charming outdoor accents, and even gift-worthy creations that will impress everyone who sees them.
Whether you have a tiny apartment balcony or a spacious garage, these projects adapt to your space and budget.
You’ll learn which basic tools are truly necessary, how to choose the right wood for each project, and most importantly, how to avoid common beginner mistakes that can derail your enthusiasm.
By the end of this article, you’ll have a clear roadmap for your woodworking journey, complete with project ideas that progress naturally from simple to slightly more challenging, ensuring you never feel overwhelmed.
Let’s turn that stack of lumber into something extraordinary, one satisfying cut and sand at a time.
1. Essential Tools and Materials for Beginner Woodworkers
Before diving into your first project, understanding what tools you actually need versus what professionals use will save you hundreds of dollars and prevent garage clutter. The woodworking industry is filled with specialized equipment, but beginners can accomplish impressive results with a surprisingly modest toolkit.
Basic Hand Tools You’ll Use Constantly
- A quality tape measure (25-foot minimum) becomes your constant companion for accurate measurements and marking.
- A combination square ensures your cuts are perfectly straight and your corners form true 90-degree angles.
- A handsaw or Japanese pull saw gives you cutting capability without the investment in power tools.
- Multiple grades of sandpaper (80, 120, and 220 grit) transform rough cuts into smooth, professional-looking surfaces.
- Wood glue and clamps hold pieces together while adhesives cure, creating bonds often stronger than the wood itself.
- A quality pencil and marking knife allow precise layout work that determines the accuracy of your final piece.
Power Tools Worth the Investment
- A cordless drill/driver combination handles both drilling pilot holes and driving screws efficiently.
- A random orbital sander saves hours of hand-sanding and produces consistently smooth surfaces.
- A circular saw or miter saw makes straight, accurate cuts that would be exhausting to accomplish by hand.
- A jigsaw handles curved cuts and intricate shapes that other saws cannot manage.
Safety Equipment Is Non-Negotiable
- Safety glasses protect your eyes from flying wood chips and dust particles during cutting and sanding.
- Hearing protection preserves your hearing when operating loud power tools for extended periods.
- A dust mask or respirator prevents inhalation of fine wood dust that can cause respiratory issues.
- Work gloves protect your hands during rough handling of lumber but should be removed when operating power tools.
Selecting the Right Wood for Your Projects
- Pine remains the beginner’s best friend due to its affordability, softness for easy cutting, and widespread availability.
- Poplar offers slightly better quality than pine with a smoother finish and still maintains budget-friendly pricing.
- Cedar works beautifully for outdoor projects due to its natural weather resistance and pleasant aroma.
- Plywood provides stability for larger panels and comes in various grades suitable for different project types.
- Reclaimed wood offers character and sustainability but requires careful inspection for nails and damaged sections.
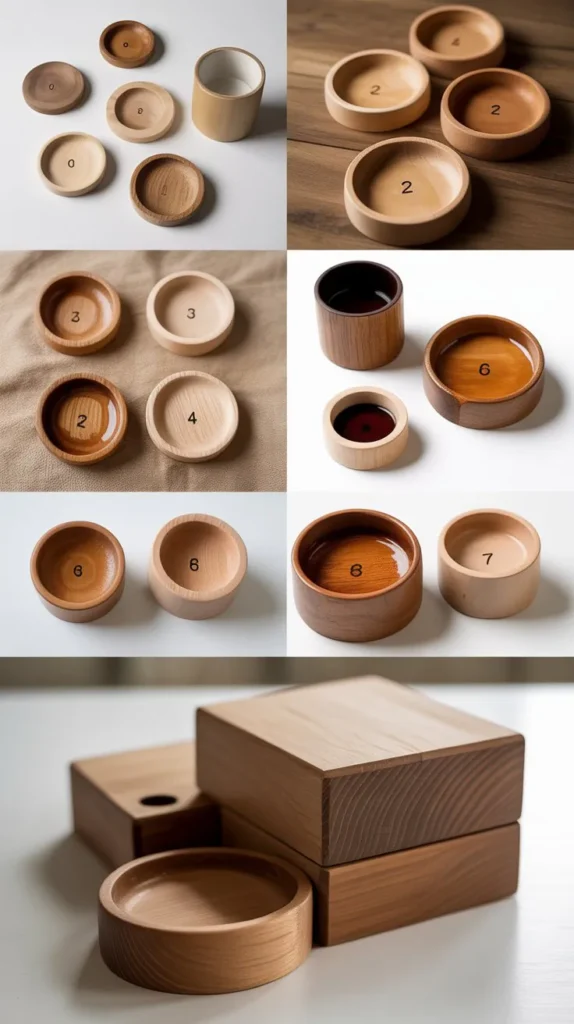
2. Simple Coasters and Trivets
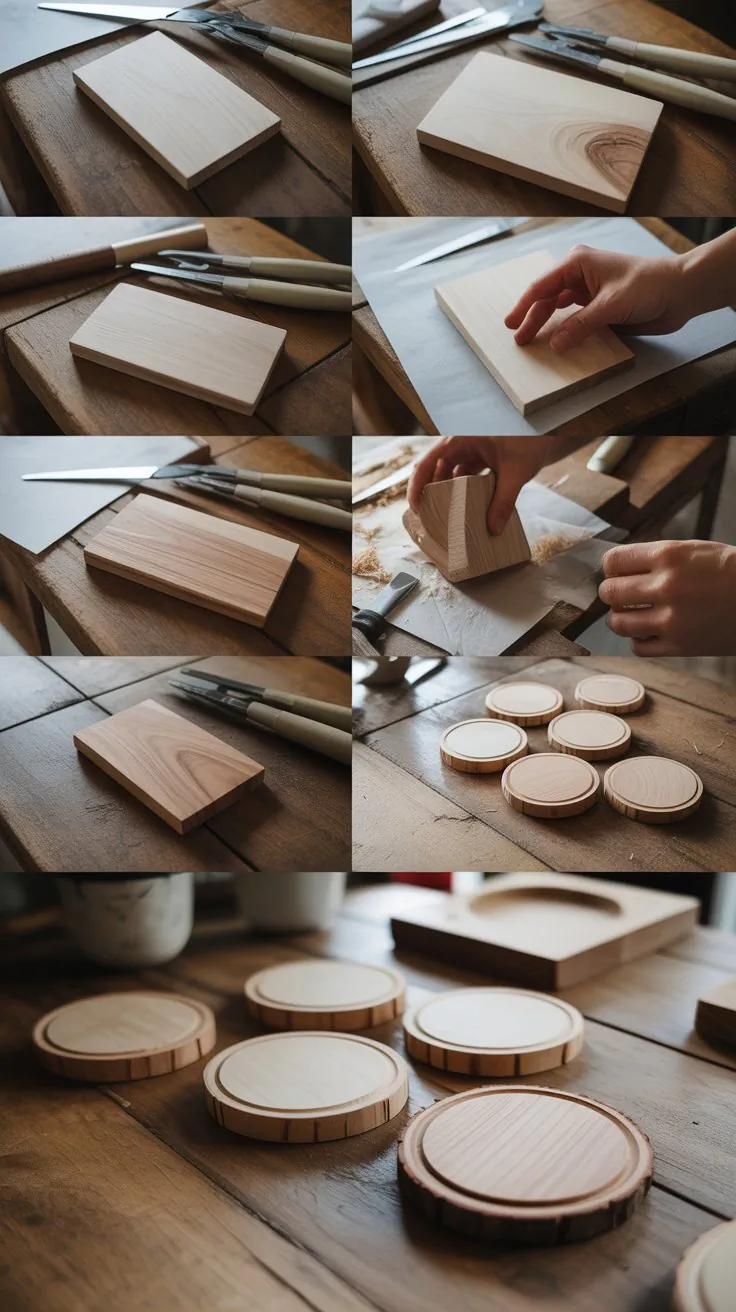
Coasters and trivets represent the perfect gateway into woodworking because they require minimal materials, basic cuts, and deliver satisfying results within a single afternoon. These projects teach fundamental skills like measuring, cutting, sanding, and finishing while producing practical items your home actually needs.
Classic Square Coasters
- Cut 4×4 inch squares from 1/2 inch thick wood using a miter saw or hand saw for perfectly uniform pieces.
- Sand all surfaces and edges thoroughly, rounding the corners slightly to prevent sharp edges from catching on surfaces.
- Apply food-safe mineral oil or polyurethane to protect against water rings and moisture damage.
- Consider creating sets of four or six coasters, keeping dimensions consistent for a professional matched set.
- Add felt pads to the bottom surface to prevent scratching furniture and provide cushioning.
Round Coasters with Natural Edge
- Use a compass or circular object to trace 4-inch diameter circles onto your wood piece.
- Cut along the traced lines using a jigsaw, moving slowly for smooth curves without jagged edges.
- Preserve the natural bark edge on one side for rustic character, or sand smooth for modern aesthetics.
- Seal the bark edge with thin cyanoacrylate glue to prevent deterioration and bark separation over time.
Hexagonal Coaster Set
- Cut six equal sides to create geometric hexagons approximately 4 inches across for contemporary design appeal.
- Use a miter saw set at 30-degree angles to ensure perfectly matching angles at each corner junction.
- Experiment with different wood species in the same set to create visual interest through contrasting colors.
- Sand edges smooth while maintaining crisp corner definition for sharp, professional-looking geometry.
Wooden Trivet for Hot Dishes
- Create a larger version (8×8 inches) using thicker wood (3/4 inch) to withstand heat from cooking vessels.
- Space multiple wooden slats with small gaps between them to allow heat dissipation and air circulation.
- Apply heat-resistant finish specifically designed for kitchen use to maintain food safety standards.
- Add rubber feet or cork pads underneath to protect countertops and provide stability on various surfaces.
3. Decorative Picture Frames
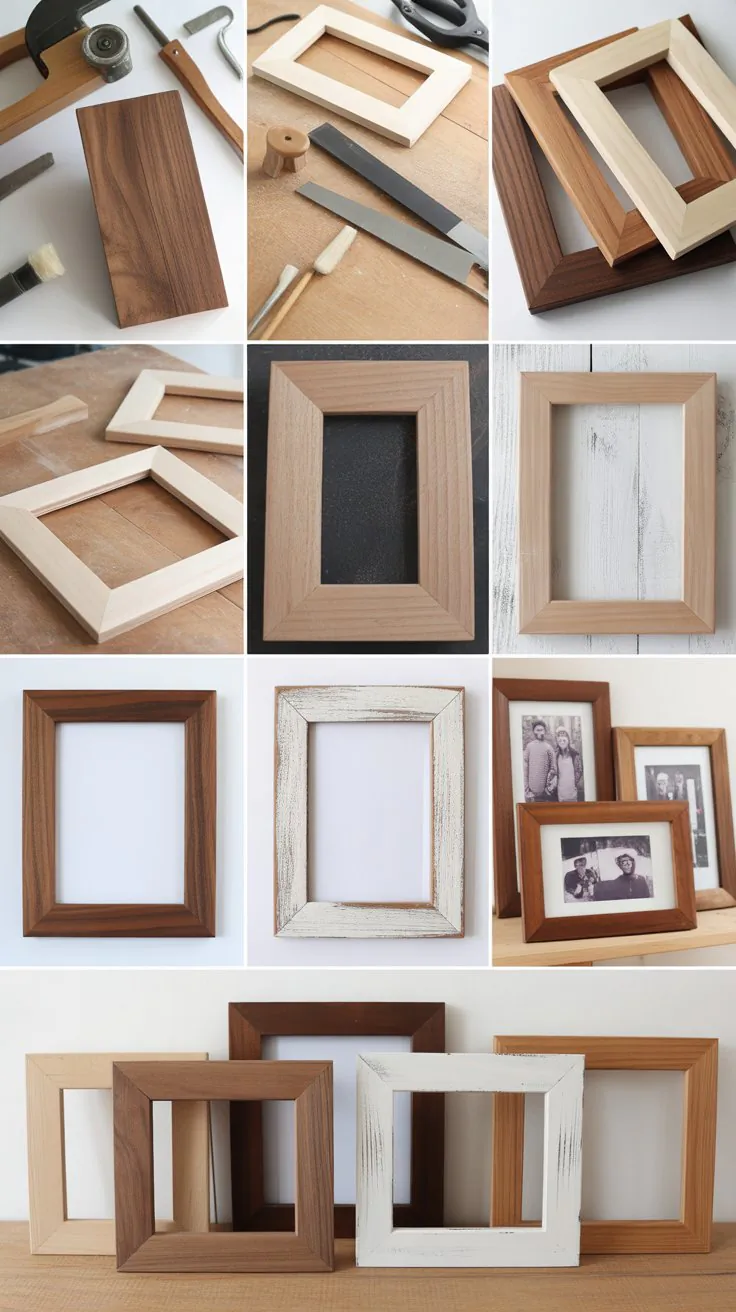
Picture frames combine functionality with personal style, allowing you to display cherished memories while practicing essential woodworking joints and finishing techniques. Building your own frames costs a fraction of store-bought options and can be customized to perfectly match your décor and photo dimensions.
Simple Butt Joint Frame
- Cut four pieces of 1×2 inch wood to create a rectangular frame sized to your photo dimensions plus mat board.
- Join corners using wood glue and finishing nails, ensuring corners form perfect 90-degree angles with a square.
- Clamp corners while glue dries to maintain alignment and create strong, invisible joints.
- Rout a rabbet (groove) on the back inside edge to hold glass, photo, and backing board securely.
- Sand smooth and apply stain or paint to complement your room’s color scheme and design aesthetic.
Rustic Barn Wood Frame
- Source reclaimed barn wood or fence boards for authentic weathered character and textural interest.
- Cut pieces slightly wider (2-3 inches) for a chunkier, more substantial country-style appearance.
- Leave the weathered patina intact or lightly sand to remove loose splinters while preserving character.
- Apply clear matte finish to protect wood while maintaining the natural aged appearance.
- Add wire or sawtooth hangers on the back for easy wall mounting in horizontal or vertical orientations.
Mitered Corner Frame
- Cut frame pieces at precise 45-degree angles using a miter saw for seamless corner joints.
- Apply glue to both mating surfaces and use corner clamps or band clamps for even pressure distribution.
- Fill any small gaps at corners with wood filler matched to your wood species or finish color.
- This technique creates more sophisticated, gallery-quality frames that eliminate visible end grain at corners.
Shadow Box Frame
- Build a deeper frame (2-3 inches) using thicker lumber to accommodate three-dimensional objects and memorabilia.
- Add a backing board and glass front to protect displayed items from dust and handling damage.
- Include small shelves or mounting points inside for arranging medals, shells, tickets, or small collectibles.
- Consider adding small LED lights inside to highlight your displayed treasures and create dramatic presentation.
4. Basic Cutting Boards and Serving Trays
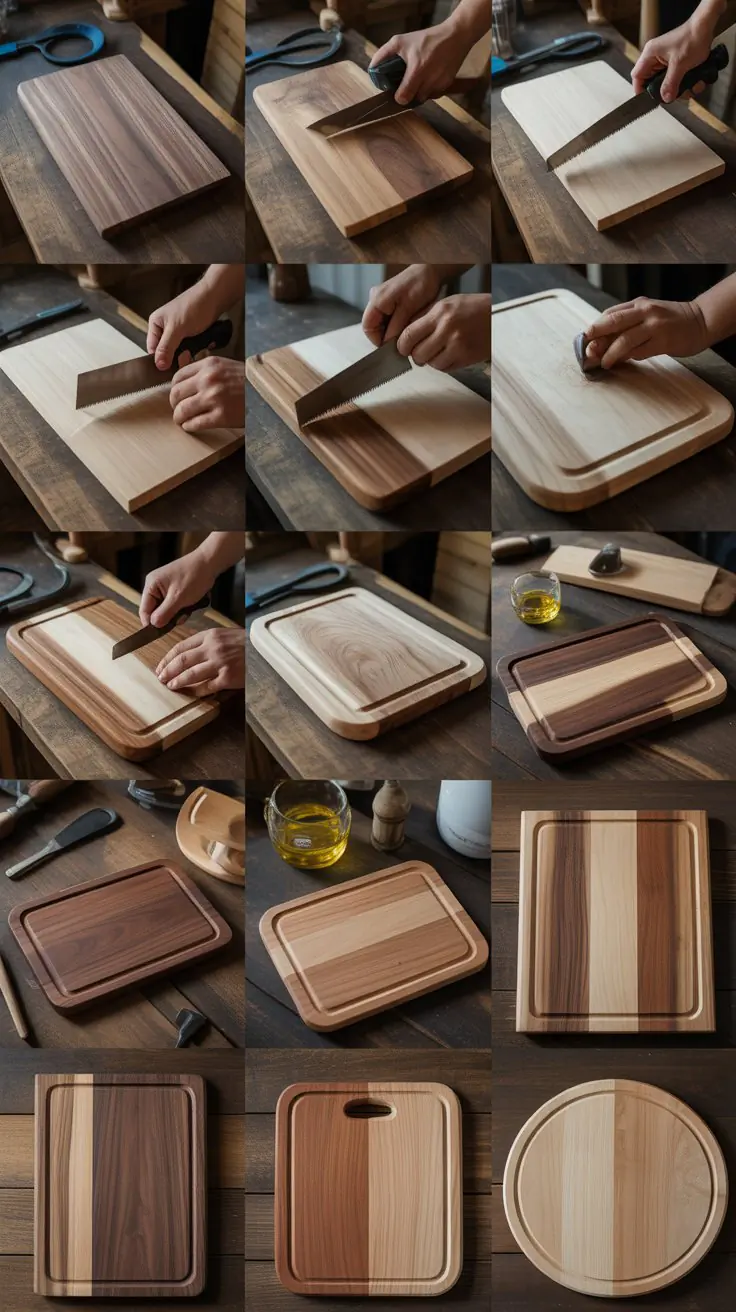
Cutting boards and serving trays merge practicality with beauty, teaching you about wood selection, grain orientation, and food-safe finishing while creating kitchen essentials that make wonderful gifts. These projects introduce you to edge-gluing techniques and proper wood conditioning for surfaces that contact food.
Edge-Grain Cutting Board
- Select hardwoods like maple, walnut, or cherry that resist knife marks and bacterial growth better than softwoods.
- Cut boards into strips of equal width (1.5 to 2 inches) and arrange them for pleasing grain patterns.
- Apply wood glue to edges and clamp strips together, ensuring surfaces remain flat and aligned during drying.
- Sand progressively from 80 to 220 grit for ultra-smooth surfaces that won’t splinter or harbor bacteria.
- Condition with food-grade mineral oil and beeswax mixture monthly to maintain water resistance and prevent cracking.
- Add rubber feet to the bottom corners to lift the board off counters for air circulation and prevent moisture trapping.
End-Grain Cutting Board
- Position wood so the end grain faces up, creating a self-healing surface that’s gentler on knife edges.
- Cut blocks into small squares or rectangles and arrange in checkerboard or random patterns for visual interest.
- This construction requires more precision but produces premium cutting surfaces preferred by professional chefs.
- Expect longer glue-up time as multiple pieces require careful alignment across multiple glue joints.
Breakfast Serving Tray with Handles
- Build a rectangular tray base approximately 18×12 inches using 3/4 inch hardwood or quality plywood.
- Attach edge pieces around the perimeter to contain items and prevent dishes from sliding off edges.
- Cut handle openings on the short ends using a jigsaw, then sand smooth to prevent splinters on hands.
- Apply waterproof polyurethane finish to protect against spills and moisture from coffee cups and breakfast items.
- Consider adding foldable legs to create a lap tray perfect for breakfast in bed or working from the couch.
Charcuterie Board with Personalization
- Create an irregular, organic shape following the natural edge of the wood for artisan appeal.
- Leave bark on one edge and sand other edges smooth for interesting textural contrast.
- Use a wood burning tool to add initials, dates, or simple designs for personalized gift-giving.
- Include a small groove around the perimeter to catch juices from cheeses and fruits.
- Season with mineral oil to bring out the wood’s natural color and protect against staining from foods.
5. Floating Shelves and Wall Storage
Floating shelves provide practical storage while teaching important concepts about weight distribution, wall anchoring, and creating clean, modern lines in your woodworking projects. These versatile pieces work in every room and can be customized to any length or depth to fit your specific space requirements.
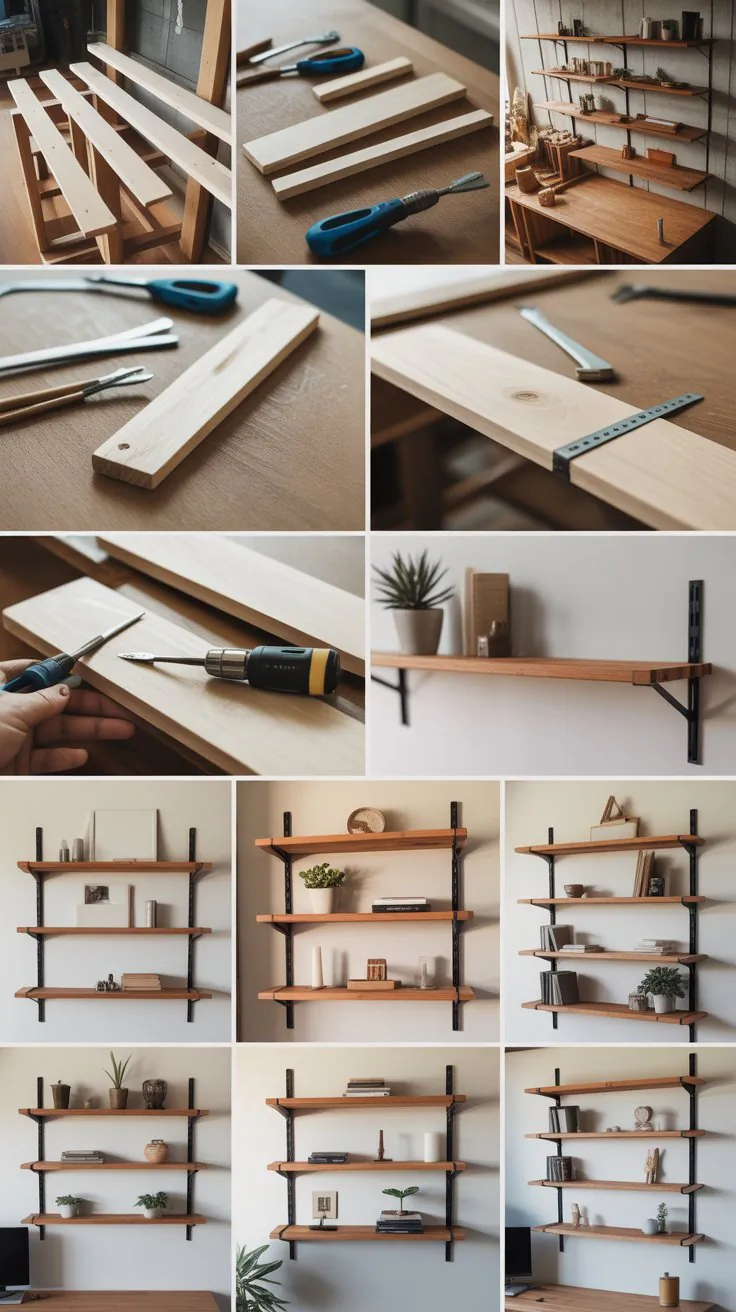
Basic Floating Shelf
- Cut a piece of hardwood or quality plywood to your desired length and depth (typically 8-12 inches deep).
- Sand all surfaces smooth, paying special attention to the top surface and front edge that remain visible.
- Install a French cleat or floating shelf bracket system for secure mounting that handles significant weight.
- Apply finish before mounting to avoid visible drill holes and make installation cleaner and more efficient.
- Ensure proper anchoring into wall studs or use appropriate heavy-duty wall anchors for drywall installation.
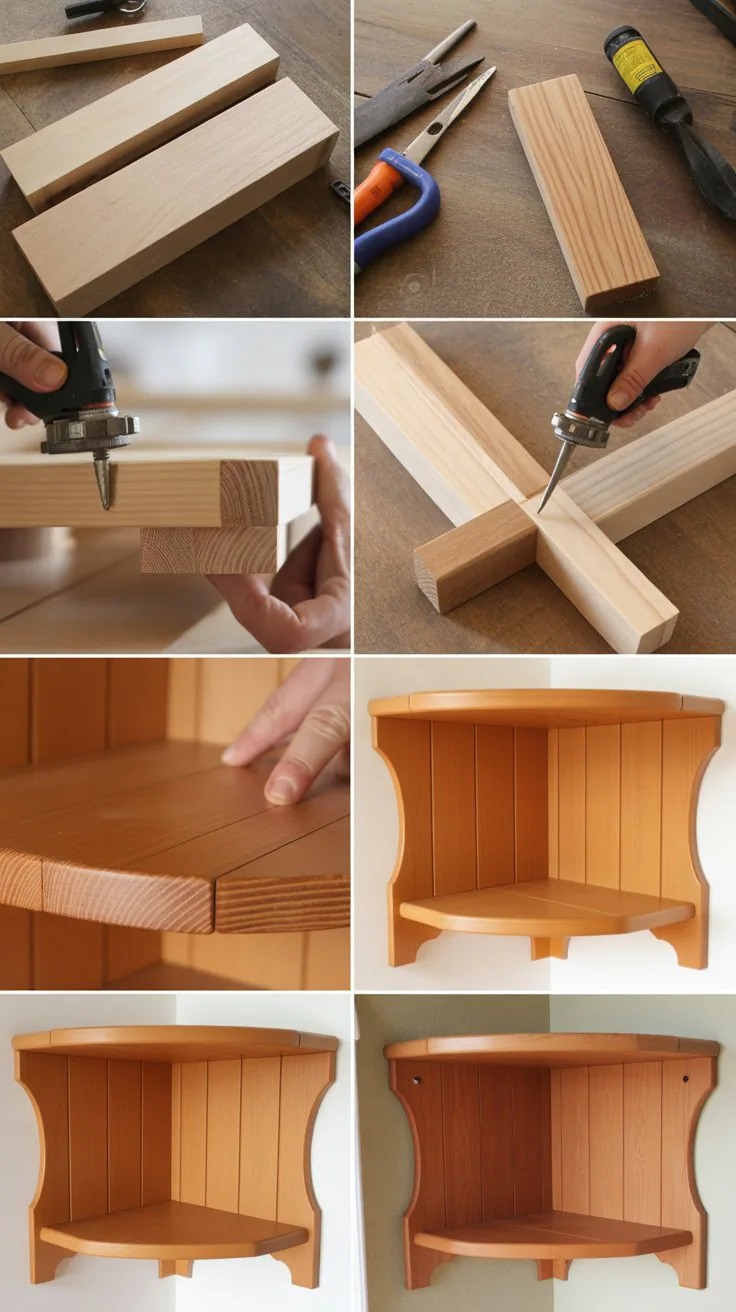
Corner Floating Shelf
- Cut two pieces at 45-degree angles that meet in the corner, maximizing unused space in room corners.
- Join pieces using biscuits, pocket screws, or dowels before mounting to create one stable unit.
- This design works exceptionally well in small bathrooms, kitchens, or bedrooms where space is limited.
- Consider stacking multiple corner shelves at different heights for cascading visual interest and increased storage capacity.
Floating Shelf with Lip
- Add a small raised edge (1-2 inches) along the front to prevent items from sliding off.
- This design works perfectly for displaying plates, picture frames, or children’s books with covers facing forward.
- Cut the lip piece from contrasting wood species for design interest or match existing shelf for cohesive appearance.
- Attach lip using glue and finishing nails, then fill nail holes and sand smooth before finishing.
Rustic Floating Mantel
- Use a substantial piece of reclaimed beam wood (6×6 or 8×8 inches) for dramatic presence above fireplaces.
- Hollow out the back portion to reduce weight while maintaining the appearance of solid, heavy timber.
- Secure with heavy-duty floating shelf hardware rated for significant weight loads (50+ pounds).
- Leave natural imperfections like knots, cracks, and weathering for authentic rustic character and charm.
- Apply clear sealer to protect wood while preserving its natural, aged appearance and texture.
6. Simple Storage Boxes and Organizers
Storage boxes teach fundamental box construction techniques while solving everyday organizational challenges throughout your home. These projects progress from basic square boxes to more complex designs with lids, dividers, and decorative details that showcase your growing skill set.
Basic Storage Crate
- Cut six pieces (four sides, top, and bottom) from 1/2 inch plywood or solid wood boards.
- Assemble using wood glue and finishing nails or brad nails, ensuring corners are square using a framing square.
- Add rope handles by drilling holes through opposite sides and threading sturdy rope with knots inside.
- Sand all surfaces and apply stain or paint to match your existing décor and storage aesthetic.
- Stack multiple crates to create modular storage systems for closets, pantries, or garage organization.
Desktop Organizer with Compartments
- Design a rectangular base with vertical dividers creating sections for pens, phones, notepads, and office supplies.
- Cut dividers from 1/4 inch plywood or hardboard and secure in slots or dadoes cut into the base.
- Keep dimensions compact (8×12 inches) to fit comfortably on desks without consuming too much workspace.
- Sand edges smooth and apply a clear finish to protect against pen marks and everyday wear.
- Customize compartment sizes based on the specific items you use most frequently at your workspace.
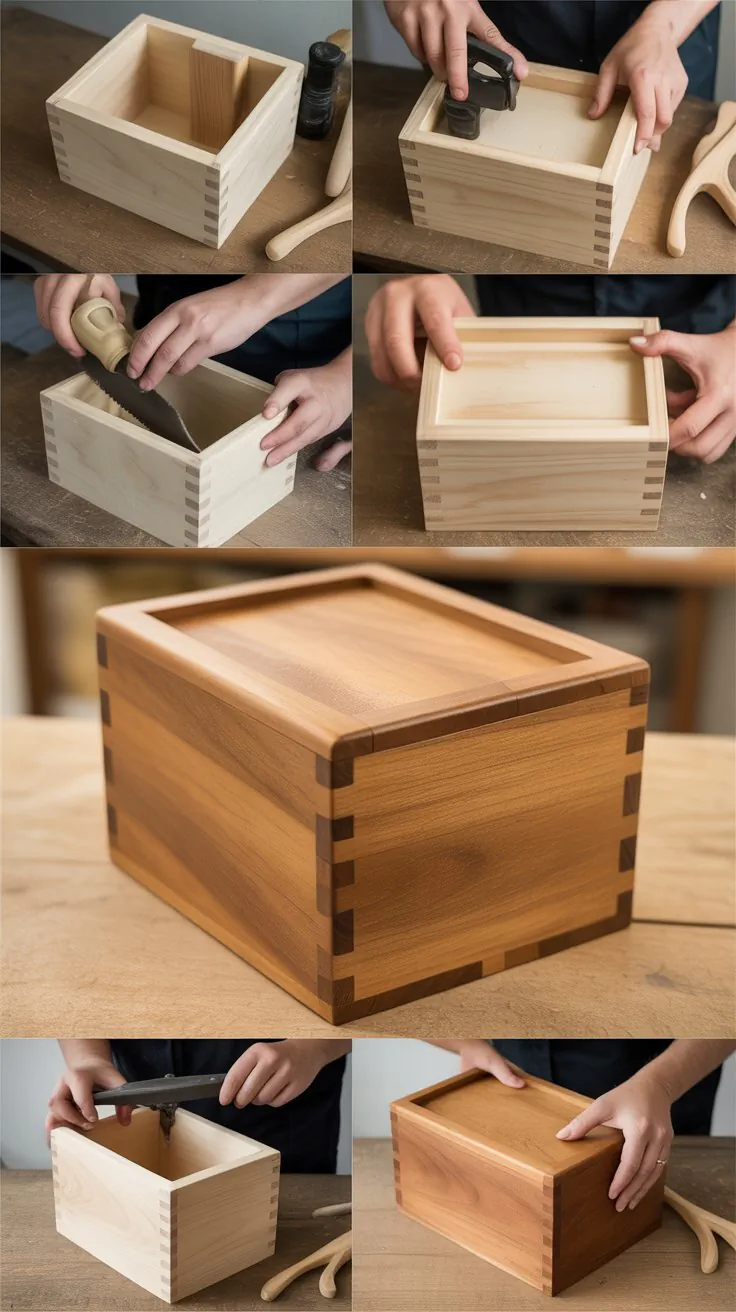
Sliding Lid Storage Box
- Create a rectangular box with sides slightly taller than the contents you plan to store inside.
- Cut grooves (dadoes) near the top of opposite sides to accept a sliding panel lid.
- Make the lid from 1/4 inch plywood that slides smoothly within the grooves for easy access.
- Add a small finger pull or cutout in the lid for easier opening without needing to pry.
- This design works beautifully for jewelry, craft supplies, or small tool storage with dust protection.
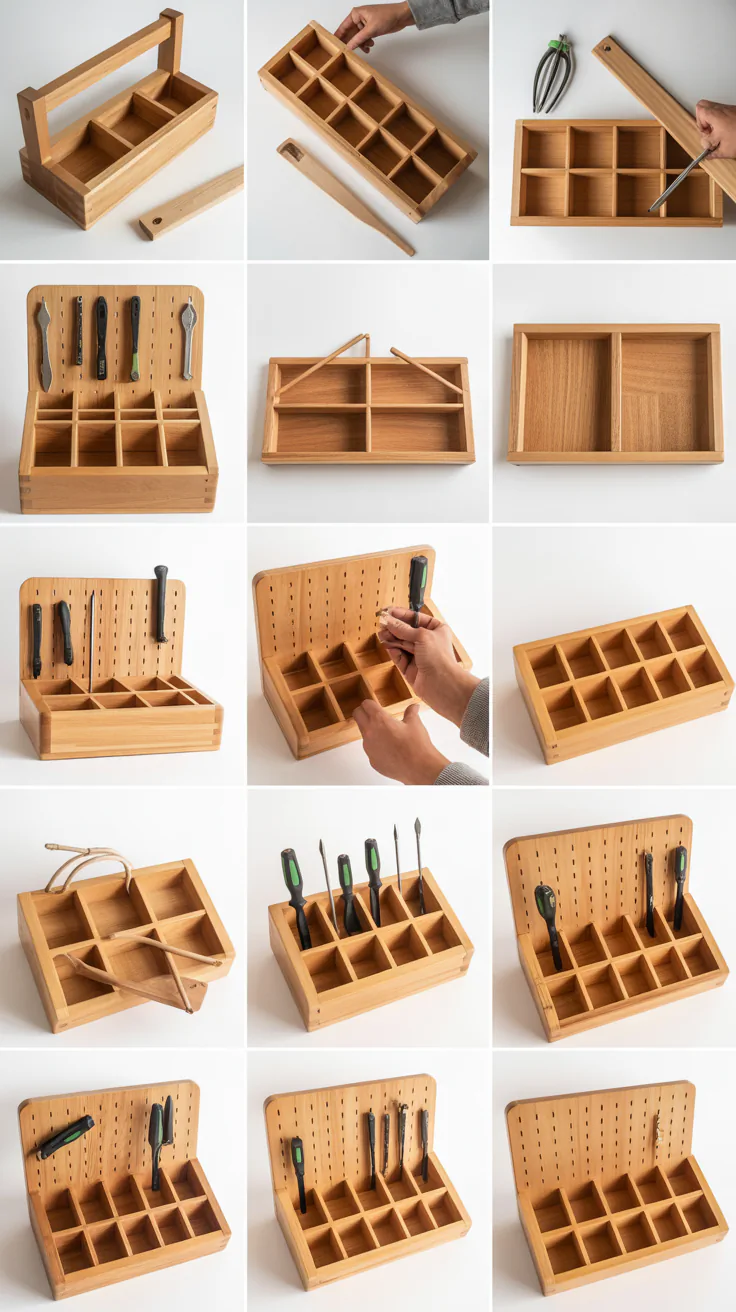
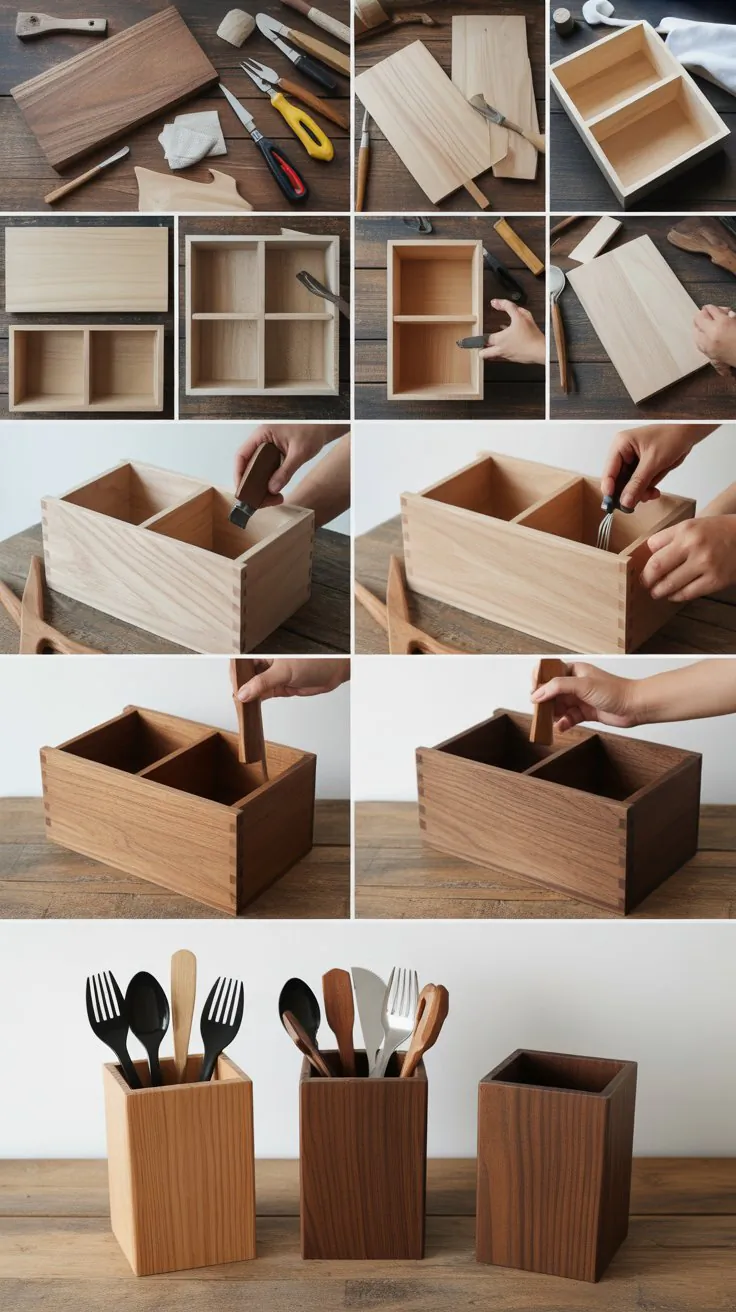
Utensil Caddy with Handle
- Build a rectangular box with a centered handle running lengthwise for easy carrying and mobility.
- Create four compartments for organizing forks, spoons, knives, and serving utensils separately.
- Use 1/2 inch thick wood for durability and apply food-safe finish since it will hold eating utensils.
- Round all edges and corners smooth to prevent splinters and make cleaning easier.
- Perfect for outdoor dining, buffets, or simply keeping kitchen drawers organized and accessible.
7. Plant Stands and Garden Projects

Outdoor woodworking projects introduce you to weather-resistant woods and finishes while creating functional items that enhance your garden and patio spaces. These projects tolerate beginner mistakes more forgivingly since rustic, imperfect aesthetics often complement garden settings perfectly.
Simple Plant Stand
- Cut four legs from 2×2 inch lumber to your desired height (18-24 inches works well for most applications).
- Create a square top frame from 1×4 inch boards to support your plant pot securely.
- Add lower cross-braces between legs for stability and to prevent wobbling on uneven ground.
- Apply exterior-grade polyurethane or deck stain to protect against moisture, UV rays, and temperature fluctuations.
- Space legs wide enough to provide stability for top-heavy plants in full bloom or windy conditions.
Tiered Plant Stand
- Build two or three platforms at different heights (stair-step fashion) for displaying multiple plants together.
- Ensure each level is deep enough for plant pots and has adequate drainage for water runoff.
- Use cedar or treated lumber for longevity in outdoor conditions and resistance to rot and insects.
- Stagger platform sizes (large bottom, medium middle, small top) for visual balance and architectural interest.
- This design maximizes vertical space in small patios or balconies while showcasing various plant species.
Garden Tool Organizer
- Create a wall-mounted rack with hooks, slots, and holders specifically sized for shovels, rakes, and hand tools.
- Cut a backing board and attach smaller pieces to create custom holders for each tool type.
- Mount securely to shed or garage walls, positioning at comfortable reaching height for frequent access.
- Apply weatherproof finish if mounting outdoors under eaves or covered areas.
- Label sections to encourage family members to return tools to their designated spots after use.
Raised Garden Bed
- Build a rectangular frame using 2×10 or 2×12 inch boards cut to desired dimensions (4×8 feet is standard).
- Join corners using galvanized screws or corner brackets for strength against soil pressure and moisture exposure.
- Use untreated cedar or rot-resistant lumber, avoiding pressure-treated wood if growing edible plants due to chemical concerns.
- Add landscape fabric to the bottom to prevent weed growth while allowing drainage and root penetration.
- Fill with quality soil mix and compost for immediate planting of vegetables, herbs, or flowers.
- Consider adding a second level of boards for deeper beds accommodating root vegetables and improving ergonomic accessibility.
8. Rustic Home Décor Items
Rustic décor projects embrace imperfections and natural wood characteristics, making them ideal for beginners who worry about achieving perfect precision. These items add warmth and character to modern homes while teaching distressing techniques, creative finishing, and how to work with reclaimed materials.
Wooden Arrow Wall Art
- Cut arrow shapes from 1×6 inch boards using a jigsaw for the pointed tip and feather end.
- Sand edges smooth while maintaining distinct arrow shape definition and crisp lines.
- Distress wood using chains, hammers, or screws to create aged appearance and textural interest.
- Paint or stain in colors matching your décor, considering trendy color combinations like gray and white.
- Attach sawtooth hanger to back for easy wall mounting in entryways, nurseries, or living spaces.
- Group multiple arrows pointing in different directions for dynamic, layered wall art installations.
Mason Jar Wall Sconce
- Cut a backing board sized appropriately for the mason jar you plan to mount (typically 4×10 inches).
- Secure metal pipe clamps or hose clamps around the jar to hold it firmly against the board.
- Stain or paint the board in farmhouse colors like weathered gray, barn red, or distressed white.
- Add fresh or artificial flowers, greenery, or battery-operated candles inside jars for decoration.
- Mount in pairs flanking doorways, bathroom mirrors, or bed headboards for balanced, symmetrical design.
Wooden Bead Garland
- String large wooden beads (1-2 inch diameter) onto sturdy jute twine or leather cord.
- Alternate bead sizes or add tassels at the ends for visual variety and design interest.
- Leave beads natural or paint some in accent colors coordinating with your room’s palette.
- Drape across mantels, weave through greenery, or hang on walls as textural, organic décor elements.
- This project requires virtually no tools beyond scissors, making it perfect for absolute beginners.
Inspirational Quote Signs
- Cut boards to desired sign dimensions (popular sizes include 12×24 or 10×20 inches).
- Sand smooth and apply base coat of paint or leave natural for authentic rustic appearance.
- Use stencils, vinyl lettering, or hand-painting for adding inspirational phrases and quotes.
- Distress edges with sandpaper after painting to reveal underlying wood for vintage, worn appearance.
- Seal with clear matte finish to protect lettering and allow for easy dusting and cleaning.
- Prop on shelves using small easels or add hanging hardware for wall mounting versatility.
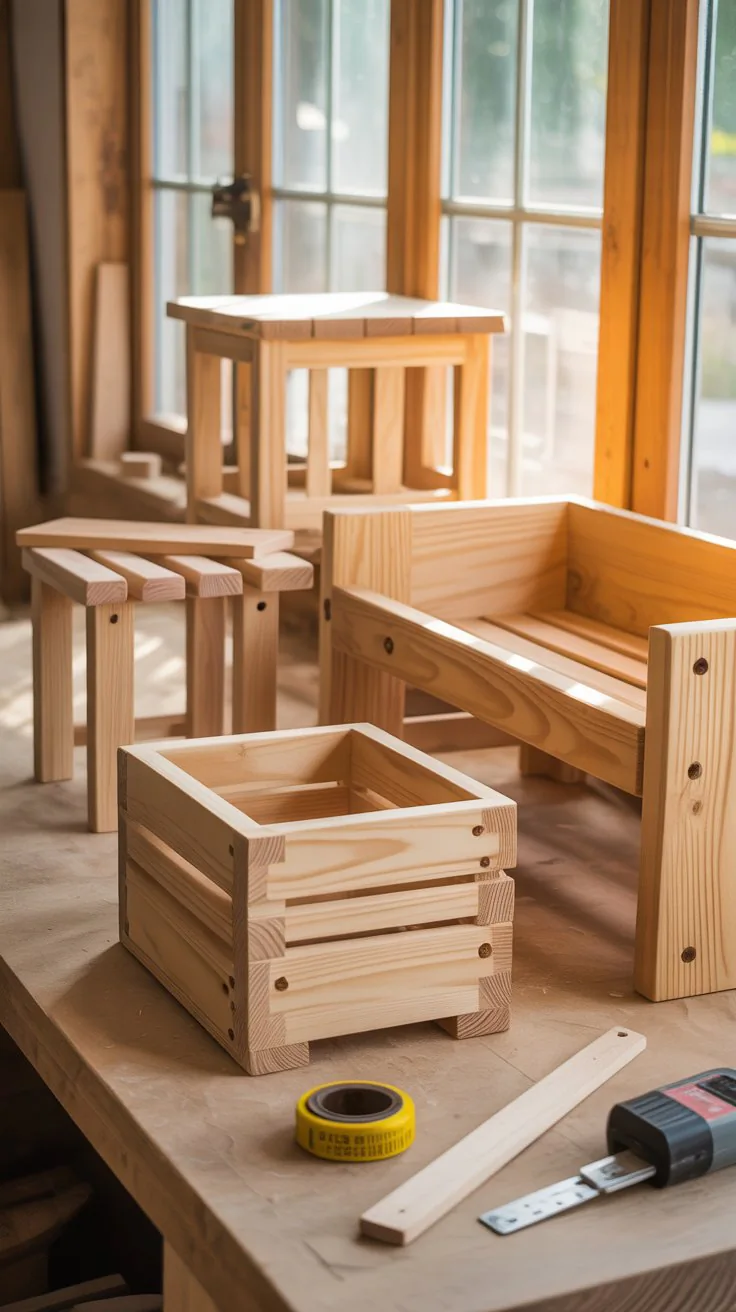
9. Beginner-Friendly Furniture Projects
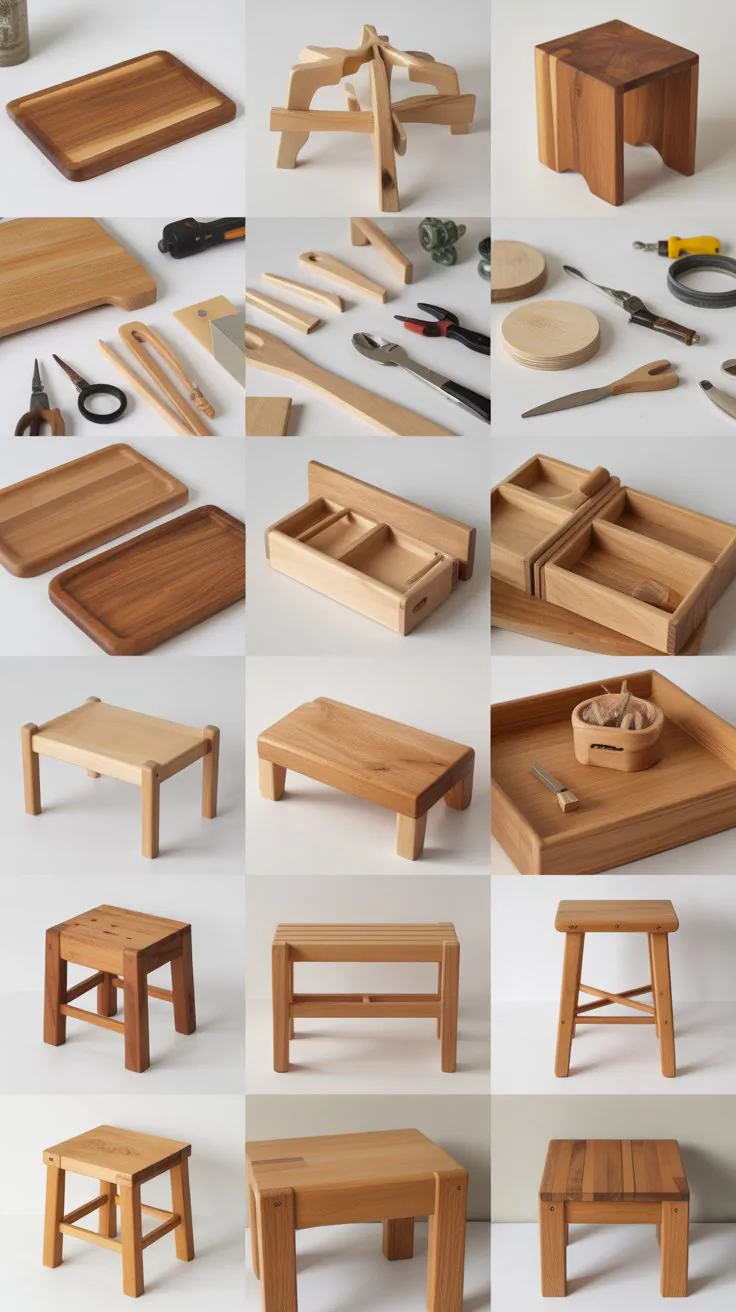
Furniture construction represents a significant milestone in your woodworking journey, but several beginner-appropriate designs provide entry points without overwhelming complexity. These projects focus on straightforward joinery, stable construction, and functional results that furnish your home with pieces you’ll use daily.
Simple Side Table
- Build a basic table using four legs (2×2 inch lumber) and a top (1×12 inch board or plywood).
- Connect legs to top using corner brackets or pocket screws for strong, hidden connections.
- Add a lower shelf between legs for storage and structural stability, positioning 6-8 inches from floor.
- Sand all surfaces smooth and apply stain and polyurethane for durable, furniture-quality finish.
- Keep dimensions modest (16×16 inches) for manageable construction and versatile placement options.
- This project teaches fundamental furniture construction principles applicable to larger projects later.
Farmhouse-Style Bench
- Cut two end supports from 2×10 inch boards, creating stable bases for bench seating surface.
- Join supports with a 2×10 inch top board and add a lower stretcher for rigidity and foot support.
- Build to standard bench height (18 inches) and length appropriate for your space (48-60 inches is common).
- Distress wood before finishing for authentic farmhouse character, or keep clean for modern interpretations.
- Add cushions or pillows for comfort, transforming this functional piece into inviting seating.
Two-Step Stool
- Create two levels of steps using 1×10 or 1×12 inch boards for each step surface.
- Connect steps with side supports cut at angles to create stable, ladder-like structure.
- Ensure steps are deep enough (10-12 inches) for secure foot placement and confident climbing.
- Add non-slip tread tape or rubber pads to step surfaces for safety, especially in kitchens and bathrooms.
- Keep construction sturdy enough to support adult weight (200+ pounds) for safe, reliable use.
- This project proves invaluable for accessing high shelves, changing light bulbs, and helping children reach sinks.
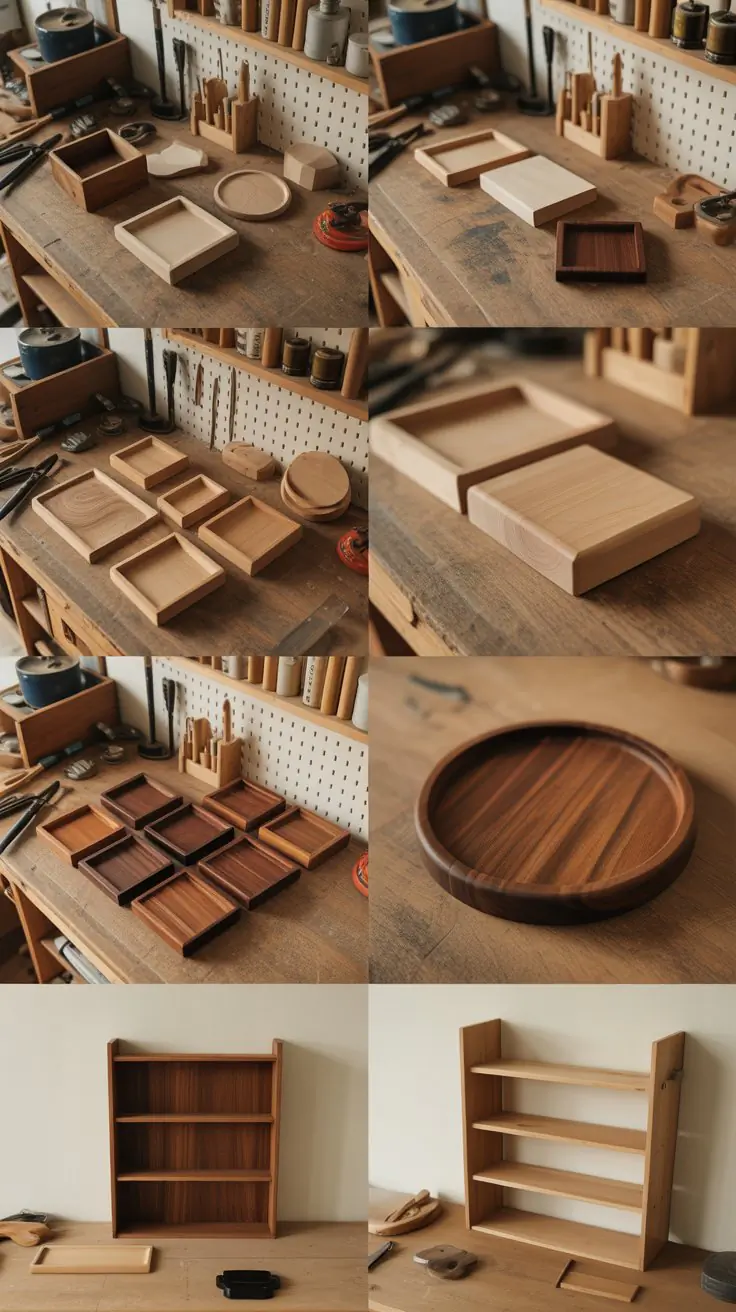
Open Bookshelf
- Build a rectangular frame using 1×10 or 1×12 inch boards for sides, top, and bottom.
- Add 2-3 horizontal shelves spaced appropriately for your book collection (12-14 inches allows most book sizes).
- Secure shelves using pocket screws, dados, or shelf pins for adjustable positioning options.
- Back the unit with 1/4 inch plywood for stability, or leave open for lighter, airier appearance.
- Apply finish appropriate for your décor style, from natural wood tones to painted colors matching your space.
- Add decorative molding to edges for more refined, finished appearance if desired.
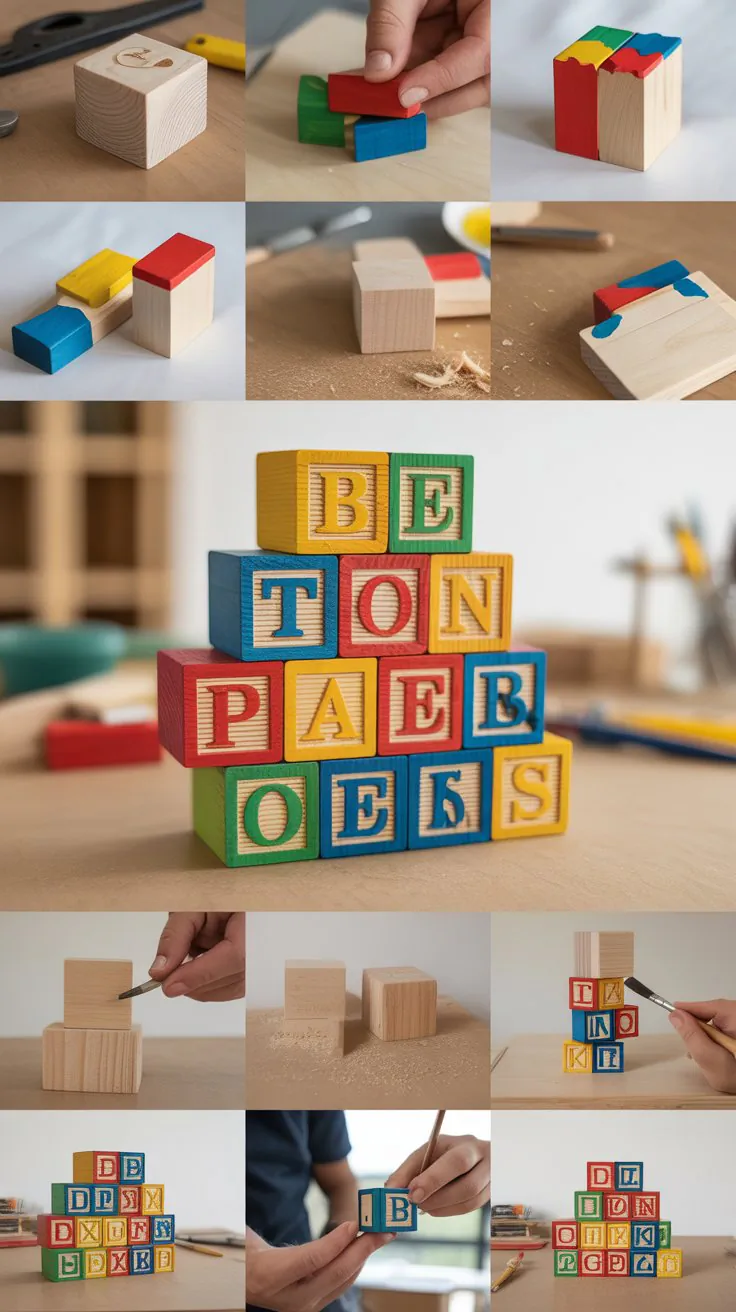
10. Wooden Toys and Children’s Items
Crafting wooden toys connects you to traditional woodworking while creating safe, durable playthings that children treasure for years. These projects demand attention to safety details like smooth edges and non-toxic finishes while allowing creativity in design and decoration that delights young recipients.
Building Blocks Set
- Cut uniform blocks in various sizes (2x2x2 inch cubes, 2x2x4 inch rectangles) from hardwood for durability.
- Sand every surface and edge until perfectly smooth with rounded corners preventing splinters and injuries.
- Leave natural or apply non-toxic, child-safe paint in primary colors for visual stimulation and learning.
- Create a storage box or bag to contain blocks, teaching children organization skills along with building play.
- Hardwood blocks withstand decades of use and can be passed down through multiple children and generations.
Simple Wooden Cars
- Cut basic car shapes from 2×4 or 2×6 inch lumber using a jigsaw or band saw.
- Drill holes for dowel axles and attach wooden wheels (purchased or cut from dowels) that spin freely.
- Round all edges and sand smooth, checking carefully for any rough spots that could cause splinters.
- Add details with paint, wood burning, or leave natural for timeless, minimalist toy cars.
- Create multiple vehicles (cars, trucks, trains) in different sizes for expanded imaginative play options.
Beginner’s Puzzle
- Cut simple shapes (animals, vehicles, geometric forms) from 3/4 inch thick wood.
- Trace shape onto backing board and cut matching recess slightly larger than the piece itself.
- Sand pieces and backing thoroughly, ensuring pieces fit easily without forcing but aren’t too loose.
- Paint pieces in bright colors and seal with child-safe finish for easy cleaning and durability.
- Start with 3-5 large pieces for toddlers, progressing to more complex puzzles as woodworking skills improve.
Simple Dollhouse Frame
- Build a three-sided open box structure with multiple levels representing different rooms and floors.
- Divide vertical space into 2-3 levels using horizontal shelf boards secured to side walls.
- Leave front completely open for easy access during play and arrangement of miniature furniture.
- Keep construction basic without elaborate details, allowing children’s imagination to complete the design story.
- Add simple roof using two angled boards meeting at center peak for recognizable house shape.
- Paint exterior in house colors (siding, roof, windows) while leaving interior natural for versatility.
11. Outdoor Furniture and Accessories
Outdoor projects benefit from straightforward construction and rustic aesthetics while teaching you to work with weather-resistant materials and finishes. These pieces endure the elements while providing functional seating and surfaces for enjoying your yard, patio, or deck throughout the seasons.
Adirondack Chair
- Cut angled back slats and curved seat slats from 1×4 inch boards following available free plans online.
- Assemble using exterior-grade screws and waterproof wood glue for permanent outdoor durability.
- Sand all surfaces smooth and apply multiple coats of exterior stain or paint for weather protection.
- This project requires more cuts and angled joints but remains manageable for determined beginners with templates.
- Build two chairs for paired seating around fire pits or facing scenic views in your yard.
Simple Outdoor Side Table
- Construct a basic square or rectangular table using 2×4 lumber for legs and frame.
- Add slat top using 1×4 boards with small gaps for water drainage during rainstorms.
- Keep height appropriate for pairing with outdoor chairs (typically 18-20 inches tall).
- Apply exterior polyurethane or outdoor wood stain to protect against moisture, sun fade, and temperature swings.
- Add shelf below for storing outdoor magazines, sunscreen, or small gardening tools within easy reach.
Wooden Planter Box
- Build a rectangular box using 1×8 or 1×10 inch cedar boards for naturally rot-resistant construction.
- Drill drainage holes in the bottom to prevent waterlogging and root rot for healthier plants.
- Add trim pieces around the top edge for finished appearance and added structural rigidity.
- Line interior with landscape fabric to prevent soil leakage while maintaining drainage capability.
- Build in various sizes for different plant types, from herbs to flowering annuals to small shrubs.
- Create matching sets for symmetrical porch or patio arrangements flanking doorways.
Outdoor Beverage Tote
- Build a wooden carrier with handle for transporting drinks, condiments, and utensils to outdoor gatherings.
- Include dividers creating separate compartments for different bottle sizes and preventing tipping during transport.
- Cut comfortable handle from hardwood dowel or router curved handle into wood itself.
- Apply waterproof finish since this project will inevitably encounter spills and condensation from cold beverages.
- Size appropriately to hold 6-8 bottles or cans for picnics, beach trips, and backyard barbecues.
12. Kitchen and Dining Accessories
Kitchen projects combine functionality with food safety considerations, teaching you about appropriate wood selection and finishes for surfaces that contact food. These practical items elevate your cooking and dining experience while making impressive handmade gifts for food-loving friends and family.
Knife Block
- Cut a solid block from hardwood (maple or walnut) measuring approximately 8x6x6 inches.
- Create slots by making multiple parallel cuts with a table saw or by drilling and chiseling channels.
- Angle slots slightly backward so knives lean against the rear wall for secure storage and easy removal.
- Sand interior slots smooth to prevent dulling knife edges during insertion and removal.
- Apply food-safe mineral oil finish to protect wood while maintaining safety for surfaces touching knife handles.
Magnetic Spice Rack
- Build a wooden board with embedded magnets for attaching magnetic spice tins to vertical surface.
- Mount on wall near cooking area for space-saving storage and easy access during meal preparation.
- Cut board to length accommodating your spice collection, typically 24-36 inches long.
- Stain or paint to match kitchen cabinets and hardware for cohesive design integration.
- Label jars clearly for quick identification while cooking and to prevent seasoning mistakes.
Napkin Holder
- Create a simple standing holder using three pieces of wood forming a stabilizing base and vertical sides.
- Cut a slot or groove to hold folded napkins upright on countertops or dining tables.
- Keep dimensions compact (approximately 6×4 inches) to avoid consuming excessive table space.
- Sand edges smooth and apply food-safe finish since contact with napkins touching food is possible.
- Add decorative elements like routed edges or burned designs for personalized, artistic touches.
Paper Towel Holder
- Mount a wooden dowel between two vertical supports for freely spinning paper towel roll.
- Create weighted base or wall-mount design depending on preferred placement and kitchen layout.
- Use 1.5 inch diameter dowel to accommodate standard paper towel roll cores securely.
- Apply durable finish able to withstand moisture and frequent handling with potentially messy hands.
- Add decorative carved details or contrasting wood species for visual interest on this everyday item.
13. Gift Ideas You Can Build

Handmade wooden gifts carry special meaning that store-bought items cannot match, showing recipients you invested time and thought into creating something unique. These projects range from quick crafts perfect for last-minute gifts to more involved pieces suitable for milestone occasions.
Personalized Cutting Board with Engraving
- Select premium hardwood like walnut or cherry for gift-quality appearance and durability.
- Add recipient’s name, initials, or meaningful date using wood burning tools or engraving equipment.
- Include decorative border patterns or designs reflecting recipient’s interests and personality.
- Finish with multiple coats of food-safe mineral oil and beeswax for rich color and water protection.
- Package with care instructions and maintenance supplies like additional mineral oil for long-term preservation.
Wooden Phone Stand
- Cut a simple angled holder supporting phones vertically for hands-free viewing and video calls.
- Include a groove or slot perfectly sized for holding phone securely without sliding forward.
- Add a channel in the bottom for charging cable to pass through during use.
- Keep design compact for desk use while ensuring stability with weighted or wider base design.
- Personalize with initials or apply finish matching recipient’s desk décor and personal style preferences.
Small Jewelry Box
- Build a small box with divided interior for organizing rings, earrings, and other jewelry pieces.
- Add a hinged lid using small brass hinges for smooth opening and elegant, refined appearance.
- Include a small latch or magnetic closure to keep the lid securely closed during storage.
- Finish exterior with high-gloss polyurethane or paint in recipient’s favorite colors for personalized appeal.
- Consider adding small mirror inside lid for convenient jewelry checking and trying on pieces.
Wooden Bookmarks
- Cut thin strips (1/4 inch thick) of interesting wood species into bookmark-sized pieces (6-8 inches long).
- Sand edges ultra-smooth and round corners to prevent catching on delicate book pages.
- Add decorative elements through wood burning, painting, or applying thin wood veneer in contrasting patterns.
- Drill small hole at top and thread with ribbon, leather cord, or tassel for decorative accent.
- Create sets of 3-5 bookmarks in complementary designs for book-loving friends and family members.
- Apply thin coat of finish to protect wood while keeping bookmarks slim enough to not damage book spines.
Wooden Coaster Set with Custom Holder
- Craft 4-6 matching coasters and build a dedicated holder or caddy to keep them organized.
- Design holder with slots or compartments sized precisely for your coaster dimensions for snug fit.
- Add handle to holder for easy transport from storage area to coffee table when guests arrive.
- Choose contrasting wood species for holder versus coasters to create visual interest and definition.
- Package as complete set with care instructions for maintaining wood finish over years of use.
14. Workshop Organization Projects
Creating organizational solutions for your growing tool collection teaches practical woodworking while improving your workspace efficiency and safety. These projects pay dividends every time you work by keeping tools accessible, protected, and ready for your next creative endeavor.
Pegboard Tool Organizer
- Mount a 4×8 foot pegboard panel to wall studs using spacers to allow peg insertion from front.
- Cut custom wooden holders and hooks sized specifically for your most frequently used tools.
- Outline each tool’s position with paint or marker to ensure tools return to correct locations after use.
- Add small shelves or bins below pegboard for storing sandpaper, hardware, and small supplies.
- Organize tools by function (measuring tools together, cutting tools together) for intuitive workflow and efficiency.
Lumber Storage Rack
- Build a wall-mounted horizontal rack using 2×4 lumber creating multiple levels for material storage.
- Space arms 16-24 inches apart to support various lumber lengths without sagging or bowing.
- Mount securely to wall studs with heavy-duty lag screws capable of supporting significant weight loads.
- Angle arms slightly upward to prevent boards from rolling off accidentally during retrieval.
- Organize lumber by species and size for quick identification when starting new projects.
- Keep longer pieces on bottom levels and shorter cutoffs on upper levels for safe, ergonomic access.
Workbench with Storage
- Construct a sturdy bench using 2×4 framing and 3/4 inch plywood or solid wood top surface.
- Add shelf or drawers below for storing power tools, hand tools, and project supplies within arm’s reach.
- Build to comfortable working height (typically 36 inches) for standing work without excessive bending.
- Include vise mounting location and dog holes for clamping work pieces securely during operations.
- Apply durable finish to work surface that can withstand abuse, spills, and repeated clamping pressure.
Mobile Tool Cart
- Build a rolling cart using 2×4 frame, plywood shelves, and heavy-duty locking casters for mobility.
- Create multiple shelf levels for organizing different tool categories and project supplies separately.
- Add drawer or small bins for hardware like screws, nails, and fasteners sorted by type and size.
- Include power strip mounting for convenient access to electricity for cordless tool charging stations.
- Keep dimensions compact enough to maneuver in tight workshop spaces while maximizing storage capacity.
15. Safety Practices and Common Beginner Mistakes to Avoid

Understanding safety protocols and learning from common mistakes prevents injuries and frustration while building your confidence as a woodworker. Experienced woodworkers develop safety habits that become automatic, but beginners must consciously practice these essential protective measures until they become second nature.
Essential Safety Equipment and Practices
- Always wear safety glasses when cutting, drilling, or sanding to protect eyes from flying debris and dust particles.
- Use hearing protection during extended power tool operation to prevent cumulative hearing damage over time.
- Wear dust masks or respirators when sanding or cutting to avoid inhaling fine particles harmful to lungs.
- Keep work area well-lit with multiple light sources eliminating shadows that obscure cut lines and hazards.
- Maintain clean workspace by regularly sweeping sawdust which creates slip hazards and fire risks when accumulated.
- Never operate power tools when tired, distracted, or under influence of medications affecting coordination and judgment.
- Keep first aid kit readily accessible and know how to respond to common workshop injuries before they occur.
- Ensure proper ventilation when applying finishes, especially solvent-based products that release harmful fumes.
Common Measurement and Cutting Mistakes
- “Measure twice, cut once” isn’t just a cliché—it prevents wasted materials and frustration from irreversible mistakes.
- Mark cut lines clearly with sharp pencil on correct side of material to avoid cutting on wrong side of line.
- Account for blade width (kerf) when measuring multiple pieces from single board to avoid cumulative length errors.
- Use stop blocks for repetitive cuts to ensure perfect consistency across multiple identical pieces without remarking.
- Check square frequently during assembly because small errors compound quickly, resulting in projects that don’t fit together properly.
- Never force pieces together during assembly as this indicates measurement or cutting errors requiring correction before proceeding.
Tool Usage Mistakes Beginners Make
- Read tool manuals completely before first use to understand proper operation, maintenance, and specific safety requirements.
- Never remove or disable safety guards on power tools regardless of convenience temptation or workflow interruption.
- Use appropriate tool for each task rather than improvising with wrong tool which risks injury and damage.
- Keep blades sharp because dull blades require excessive pressure, increasing likelihood of slips and dangerous kickback.
- Secure workpieces properly with clamps rather than attempting to hold materials by hand during cutting operations.
- Allow power tools to reach full speed before contacting material and let blades stop completely before setting down tools.
- Maintain proper stance and body position, keeping hands clear of blade path and maintaining stable balance throughout operations.
Finishing and Assembly Errors
- Apply finishes in thin, multiple coats rather than single thick coat which leads to drips, uneven coverage, and extended drying times.
- Sand between finish coats with fine grit paper (220+) to ensure smooth surface and proper adhesion of subsequent layers.
- Allow adequate drying time between coats regardless of impatience to complete project quickly and display results.
- Test stains and finishes on scrap wood from same species to verify color and appearance before applying to finished project.
- Use appropriate glue for application (wood glue for interior, waterproof glue for outdoor) and allow full cure time before stressing joints.
- Don’t over-tighten clamps during glue-up as excessive pressure squeezes out too much adhesive and can deform wood surfaces.
Wood Selection and Storage Mistakes
- Inspect lumber carefully before purchase, avoiding boards with excessive knots, splits, warping, or moisture damage.
- Allow wood to acclimate to your workshop environment for several days before cutting to prevent movement after assembly.
- Store lumber flat and supported to prevent warping, twisting, and bowing that makes material unusable for precision projects.
- Choose appropriate wood species for project requirements considering strength, appearance, workability, and environmental exposure.
- Understand grain direction and orientation for strength and appearance, cutting with grain rather than against whenever possible.
16. Finishing Techniques for Professional Results
Finishing transforms raw wood projects into polished, professional-looking pieces while protecting your work from moisture, wear, and environmental damage. Mastering basic finishing techniques dramatically improves your project outcomes and separates amateur work from craftsmanship that looks store-bought or better.
Preparing Wood Surfaces for Finishing
- Sand progressively through grits (80, 120, 180, 220) rather than jumping directly to fine grit which doesn’t remove previous scratches.
- Always sand with the grain direction, never across grain which creates scratches visible under finish coats.
- Remove all sanding dust thoroughly using tack cloth, vacuum, or compressed air before applying any finish products.
- Fill nail holes, gaps, and imperfections with appropriate wood filler matched to final finish color for invisible repairs.
- Raise the grain by wiping with damp cloth, allowing to dry, then final sanding before staining for smoother results.
- Test finish on scrap piece from same wood species to verify color, absorption rate, and final appearance before committing.
Staining Techniques for Rich Color
- Apply pre-stain wood conditioner on softwoods like pine to prevent blotchy, uneven stain absorption and appearance.
- Use foam brushes or clean rags to apply stain in direction of grain for consistent coverage and natural appearance.
- Allow stain to penetrate wood for manufacturer-recommended time (typically 5-15 minutes) before wiping off excess.
- Wipe off excess stain using clean, lint-free rags with even pressure to prevent dark patches and streaking.
- Apply multiple thin coats for deeper color rather than single heavy coat which can look artificial and muddy.
- Consider gel stains for more controlled application and consistent color on woods with varying grain densities.
Clear Finish Options and Applications
- Polyurethane provides durable, water-resistant protection ideal for high-use items like tables, cutting boards, and shelves.
- Apply polyurethane in thin coats using quality brush or foam applicator, flowing finish onto surface without excessive brushing.
- Sand lightly with 220-grit sandpaper between coats after complete drying to ensure adhesion and remove dust nibs.
- Water-based polyurethane dries faster and has less odor than oil-based but provides slightly less warm amber tone.
- Tung oil and Danish oil penetrate deeply, enhancing grain while providing moderate protection for decorative pieces.
- Paste wax adds subtle sheen and protection over other finishes, buffing to desired luster with soft cloth.
- Lacquer spray provides smooth, professional finish but requires well-ventilated area or respirator for safe application.
Painting Wood Projects
- Prime bare wood with quality primer designed for wood surfaces to seal grain and provide uniform base for paint.
- Use fine-grit sandpaper (220) to smooth primer coat before applying colored paint layers for flawless final surface.
- Apply 2-3 thin paint coats rather than single thick coat which drips, shows brush marks, and dries unevenly.
- Allow adequate drying time between coats following manufacturer’s recommendations to prevent lifting of previous layers.
- Consider paint sprayers for larger projects achieving factory-smooth finish without visible brush strokes or roller marks.
- Distress painted finishes after drying using sandpaper on edges and corners for trendy farmhouse or shabby chic appearance.
Specialty Finishing Techniques
- Wood burning (pyrography) adds decorative designs, patterns, or text using heated metal tips creating permanent dark markings.
- Whitewashing technique uses diluted paint wiped on then partially removed to create vintage, weathered beach house appearance.
- Antiquing glaze applied over base paint then wiped selectively creates aged, dimensional appearance in recesses and details.
- Natural edge finishes use thin cyanoacrylate glue or epoxy to stabilize live bark edges on rustic projects and slabs.
- Food-safe finishes like mineral oil and beeswax mixture protect cutting boards and utensils without toxic chemicals.
17. Budget-Friendly Sourcing and Cost Management

Managing material costs allows you to pursue woodworking without breaking the bank while developing skills that will serve you for years. Smart sourcing and creative thinking transform woodworking from expensive hobby into affordable creative outlet producing valuable, functional items.
Finding Affordable Lumber Sources
- Visit local lumber yards and home improvement stores asking about cull bins containing discounted dimensional lumber with minor defects.
- Check classified ads and online marketplaces for people dismantling decks, fences, or structures offering free or cheap lumber.
- Source free pallets from businesses, warehouses, and shipping companies willing to give away rather than dispose of them.
- Look for fallen trees in your neighborhood or contact tree removal services offering free trunk sections for hauling away.
- Join woodworking groups and forums where members share bulk lumber purchases or trade materials they don’t need.
- Shop end-of-season sales at home improvement stores clearing inventory before new stock arrives for significant discounts.
Working with Reclaimed and Pallet Wood
- Inspect reclaimed wood carefully for nails, screws, and metal hardware that can damage saw blades during cutting.
- Use metal detector wand or handheld magnet to locate hidden fasteners before running wood through power tools.
- Clean dirty reclaimed wood with stiff brush, and then power wash if extremely grimy before bringing into workshop.
- Remove nails carefully using cat’s paw pry bar or end-cutting pliers to minimize damage to surrounding wood.
- De-nail pallet wood before disassembly or carefully remove nails from individual boards after breaking apart pallet frames.
- Sand reclaimed surfaces thoroughly to remove weathered gray layer revealing beautiful natural wood underneath for refinishing.
- Accept character marks like nail holes, saw marks, and discoloration as desirable features rather than defects in rustic projects.
Maximizing Material Usage
- Plan cutting layouts carefully before making first cut to minimize waste and get maximum pieces from each board.
- Save all cutoffs and scrap pieces organizing by size for future small projects instead of immediately discarding.
- Build smaller projects specifically designed to use up accumulated scrap pieces creatively and economically.
- Cut multiple project parts from single board when possible to reduce per-project lumber costs significantly.
- Consider dimensional lumber sizes when designing projects to avoid excessive ripping or planing of materials.
- Use plywood for large panels and backs of projects where solid wood isn’t structurally necessary or visible.
Tool Investment Strategies
- Start with essential hand tools before investing in power tools to minimize initial financial commitment while learning fundamentals.
- Purchase quality tools gradually as skills develop rather than buying complete tool sets with items you may never use.
- Consider renting expensive specialty tools needed for single projects instead of purchasing equipment used infrequently.
- Buy used tools from estate sales, pawn shops, or online marketplaces at fraction of new prices for functional equipment.
- Invest in quality safety equipment first (eye protection, hearing protection, dust masks) before luxury convenience tools.
- Build shop-made jigs and fixtures that replicate expensive commercial versions for fraction of retail cost.
- Watch for holiday sales and clearance events at home improvement stores offering significant discounts on quality tools.
18. Next Steps in Your Woodworking Journey

After completing several beginner projects and developing fundamental skills, knowing how to progress prevents stagnation while building confidence for increasingly complex work. Strategic skill development combined with continuing education resources accelerates your growth from novice to accomplished woodworker capable of tackling ambitious projects.
Advancing Your Skills Progressively
- Attempt projects slightly beyond your current comfort level to expand capabilities without overwhelming yourself with complexity.
- Learn one new joinery technique with each project (dado joints, mortise and tenon, dovetails) building comprehensive skillset.
- Progress from pocket screws and nails to glued joints and proper woodworking joinery for stronger, more professional construction.
- Challenge yourself to work with hardwoods after mastering softwoods to understand different cutting and finishing characteristics.
- Experiment with hand tools even if you primarily use power tools to develop understanding of wood behavior and grain.
- Document completed projects with photos noting what worked well and what you’d improve for future reference and learning.
Learning Resources and Education
- Subscribe to woodworking YouTube channels offering free tutorials demonstrating techniques and project builds step-by-step (channels like Steve Ramsey’s Woodworking for Mere Mortals or Jay Bates’ projects provide excellent beginner-to-intermediate content).
- Join online woodworking communities and forums where experienced woodworkers answer questions and share advice generously.
- Purchase or borrow woodworking books focusing on fundamental techniques rather than just project collections for deeper understanding.
- Take local woodworking classes at community colleges, makerspaces, or woodworking stores offering hands-on instruction and mentorship.
- Follow woodworking blogs and websites regularly exposing yourself to different styles, techniques, and creative problem-solving approaches.
- Attend woodworking shows and exhibitions observing professional work and discovering new tools, techniques, and inspiration for projects.
Building Your Workshop Gradually
- Invest in dedicated workspace even if small, creating environment conducive to regular woodworking practice and project completion.
- Improve dust collection and air quality systems to protect health and create more pleasant working environment for extended sessions.
- Add specialized tools as projects require them rather than purchasing based on speculation about future needs.
- Build custom workbenches, tool storage, and jigs that enhance efficiency while providing valuable building experience and skill practice.
- Organize workshop systematically so every tool has designated location reducing time spent searching and increasing productive work time.
- Improve lighting conditions with task lighting at workbench and general illumination throughout shop for safety and precision.
Setting Woodworking Goals
- Create project wish list ranging from simple to complex providing clear progression path and motivating milestones to achieve.
- Set specific skill-development goals like mastering dovetail joints or learning to use hand planes effectively by target dates.
- Consider building furniture for your home systematically furnishing rooms with custom pieces reflecting your developing skills.
- Challenge yourself to replicate professionally made furniture pieces understanding construction methods through reverse engineering and analysis.
- Explore woodworking specialties (turning, carving, furniture making, toy making) discovering which aspects resonate most strongly with interests.
- Share your work with others through social media, local craft fairs, or gifts building confidence and receiving valuable feedback.
Turning Woodworking into Income (Optional)
- Start selling simple projects at local craft fairs and markets testing demand while developing production efficiency and business skills.
- Create online shop through platforms like Etsy showcasing handmade items to broader audience beyond local community.
- Accept custom commission work from friends and family building portfolio and reputation for quality craftsmanship before marketing widely.
- Teach beginner woodworking classes sharing knowledge while generating income and reinforcing your own understanding through teaching.
- Document your projects through blog or YouTube channel potentially generating income through advertising, sponsorships, or affiliate marketing.
- Remember that profitability requires efficiency, marketing skills, and business acumen beyond just woodworking ability and craftsmanship alone.
Conclusion
Embarking on your woodworking journey through these “33+ Easy Wood Projects for Beginners: Start Your Woodworking Journey Today!” opens doors to a deeply satisfying craft that combines creativity, practicality, and the timeless pleasure of working with your hands.
From your first simple coaster to more ambitious furniture pieces, each project builds upon previous lessons, gradually developing skills that will serve you for a lifetime.
The beauty of woodworking lies not just in the finished pieces you create, but in the meditative process of transforming raw materials into functional art that enhances your home and brings joy to those who receive your handmade gifts.
Remember that every master woodworker started exactly where you are now, making mistakes, learning from them, and slowly building confidence with each cut and joint.
Don’t let perfectionism paralyze your progress or fear of mistakes prevent you from starting that first project sitting in your imagination. Gather those basic tools, select a simple project that excites you, and make that first cut with confidence knowing that the woodworking community welcomes beginners with encouraging support and generous knowledge sharing.
Your workshop, whether it’s a corner of your garage or a dedicated studio space, will become a sanctuary where stress melts away and creativity flourishes with each passing project.
The projects outlined in this article provide years worth of building opportunities, each one teaching new techniques while producing items that genuinely improve your daily life and living spaces.
As your skills grow and your confidence builds, you’ll find yourself naturally progressing to more complex designs, experimenting with different wood species, and developing your own signature style that reflects your unique aesthetic vision.
Start today with whatever tools and materials you have available, because the perfect moment to begin your woodworking journey is right now, and the satisfaction of completing your first handmade wooden piece will fuel your enthusiasm for countless projects to come.