Embarking on woodworking projects that are both simple and profitable is a dream for many DIY enthusiasts.
In this article, 33 Easy DIY Small Woodworking Projects to Sell Fast, you will discover creative and practical ideas perfect for beginners and seasoned woodworkers alike.
Each project is designed to be straightforward, budget-friendly, and highly marketable, helping you turn your passion into profit quickly.
From home décor to functional everyday items, these small woodworking projects can be crafted with minimal tools and materials.
Read on to explore a variety of projects that combine ease of creation with strong selling potential.
1. Wooden Coasters

Wooden coasters are an excellent starting point for anyone new to woodworking.
They require minimal materials and basic cutting and sanding skills, making them quick to produce and ideal for selling at markets or online.
Coasters are versatile—they can be personalized with designs, stains, or even wood burning techniques to add unique value.
- Choose a hardwood like oak, maple, or walnut for durability.
- Cut into uniform squares or circles, typically 4×4 inches.
- Sand edges smooth to prevent splinters.
- Optionally, apply a food-safe finish or sealant.
- Personalize with paint, engraving, or resin inlays for added appeal.
How to Make Wooden Coasters:
- Measure and mark your wood into coaster-sized pieces.
- Use a saw to cut them accurately.
- Sand all surfaces and edges thoroughly.
- Apply finish as desired and allow to dry.
- Package sets attractively for sale.
2. Simple Wooden Picture Frame
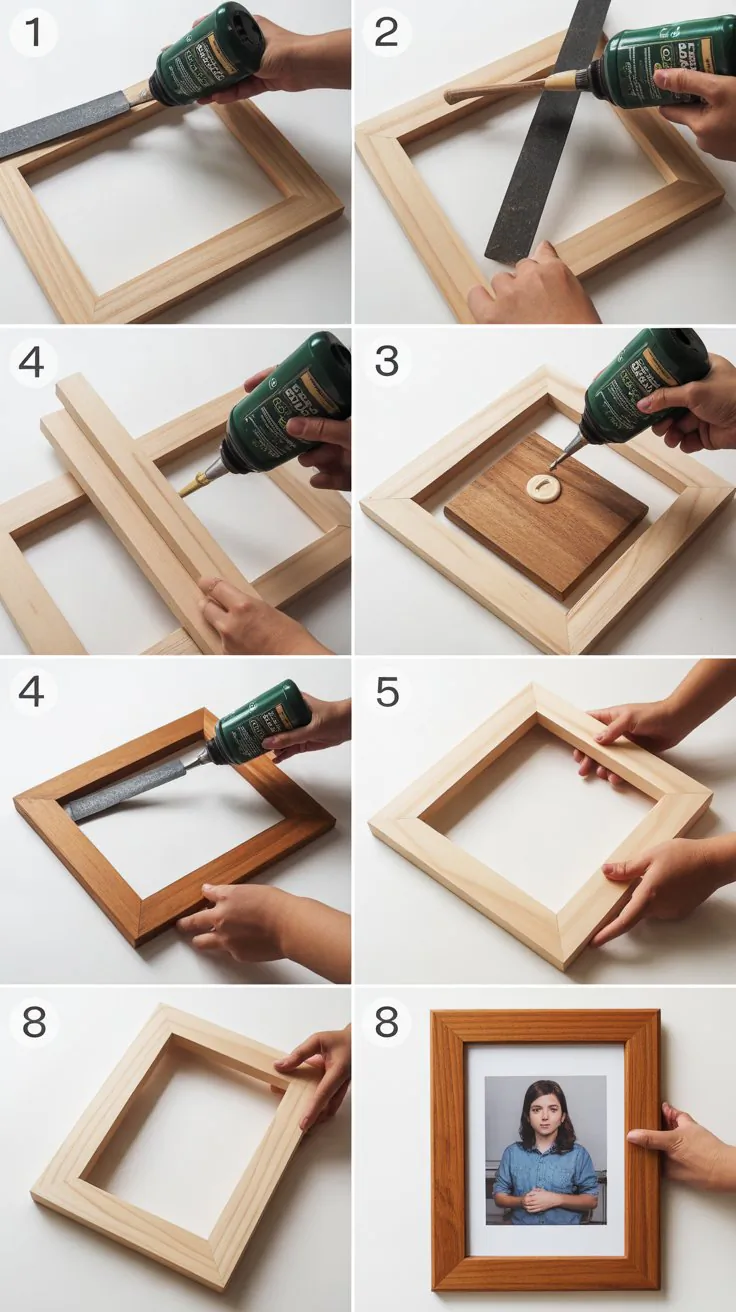
Picture frames are timeless, popular, and easy to customize.
This project helps develop precision in miter cuts and assembling techniques.
Frames can be made in various sizes and styles, catering to different tastes and decor.
- Select wood with a fine grain such as pine or cherry.
- Cut four pieces with 45-degree mitered ends.
- Sand and assemble using wood glue and corner clamps.
- Add a backing board and glass or acrylic insert.
- Finish with paint, stain, or varnish.
How to Make a Simple Wooden Picture Frame:
- Measure the photo size and cut frame pieces accordingly with mitered edges.
- Sand all pieces and assemble using wood glue and clamps.
- Attach a backing board and transparent front.
- Finish with your choice of paint or stain.
- Ensure the frame is sturdy and presentable.
3. Wooden Key Holder
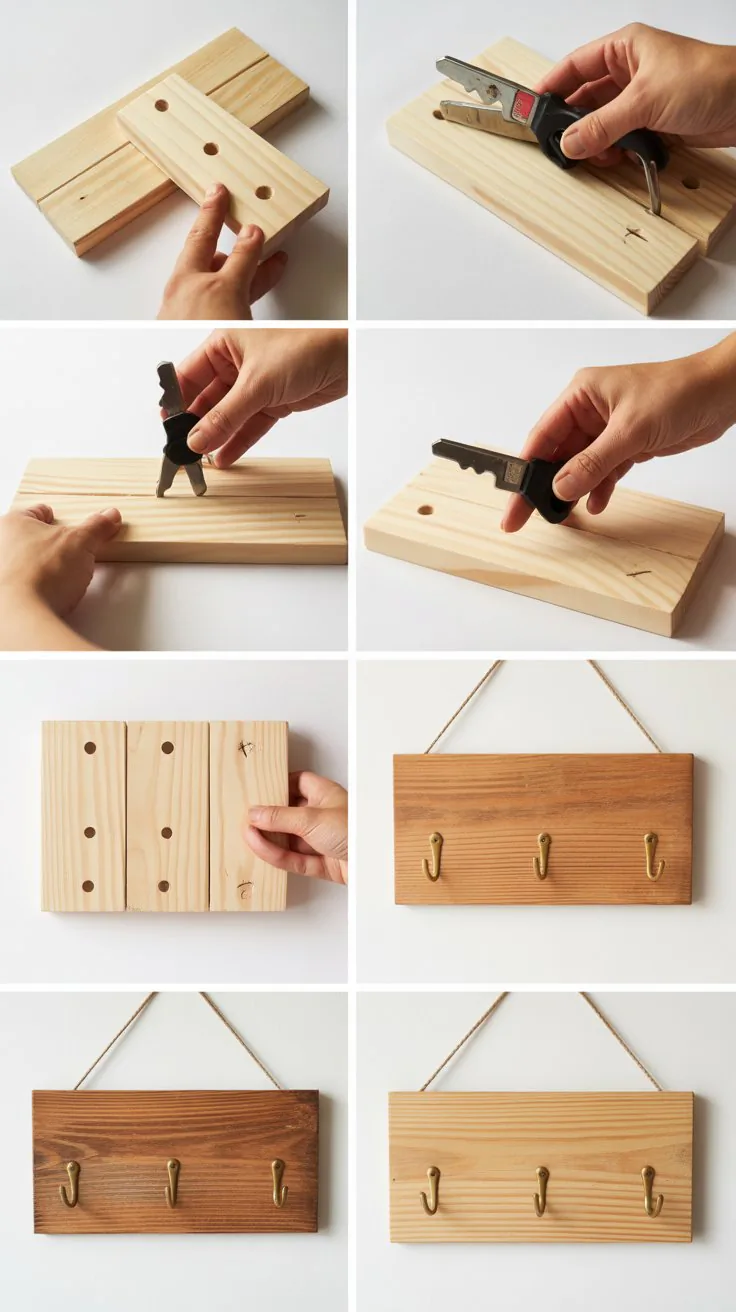
A wooden key holder is a practical home accessory that’s always in demand.
This project introduces mounting techniques and the installation of hardware such as hooks or knobs.
It’s easy to personalize with shapes or painted designs to match home aesthetics.
- Use a small, rectangular plank of hardwood or softwood.
- Sand to smooth and round off edges.
- Attach hooks, knobs, or nails evenly spaced for keys.
- Drill holes for wall mounting hardware.
- Optionally decorate with paint, stain, or decals.
How to Make a Wooden Key Holder:
- Cut the wood plank to a suitable size (e.g., 12×3 inches).
- Sand the plank and edges thoroughly.
- Evenly space and install hooks or knobs for keys.
- Drill holes for wall mounting and attach hanging hardware.
- Decorate as desired before final assembly.
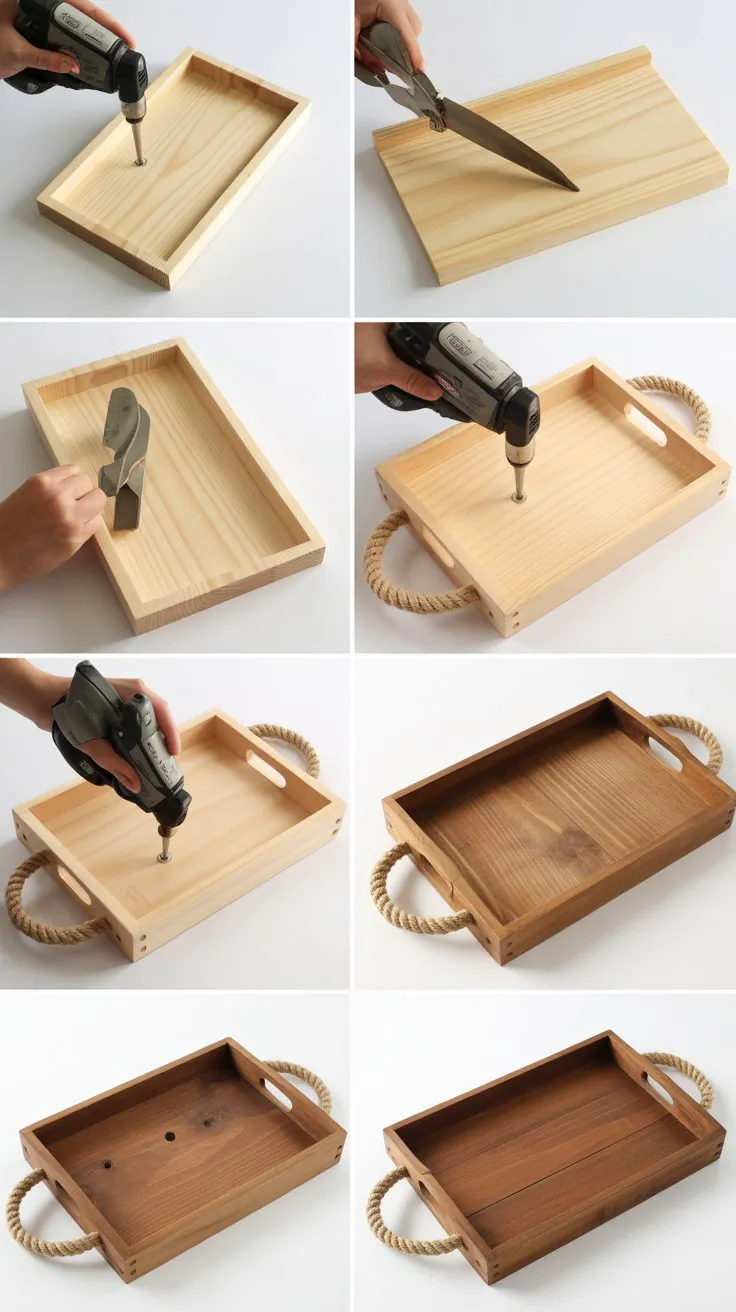
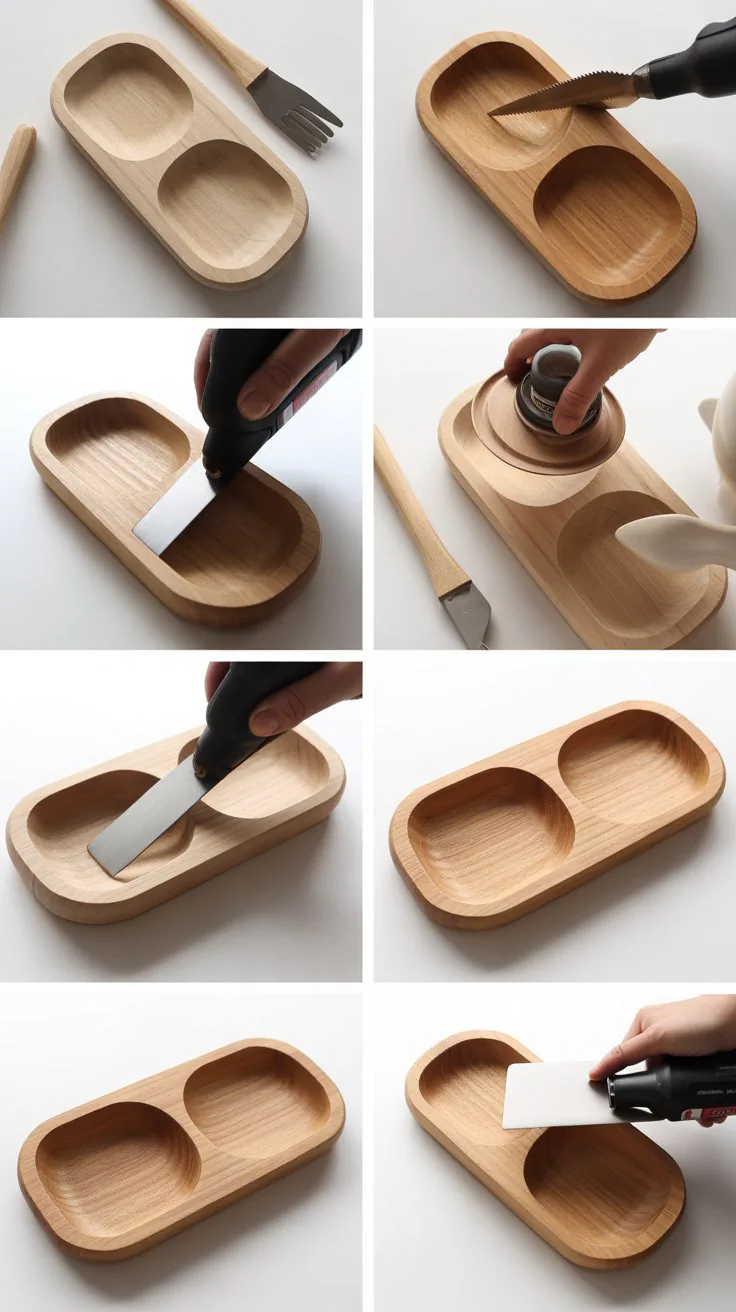
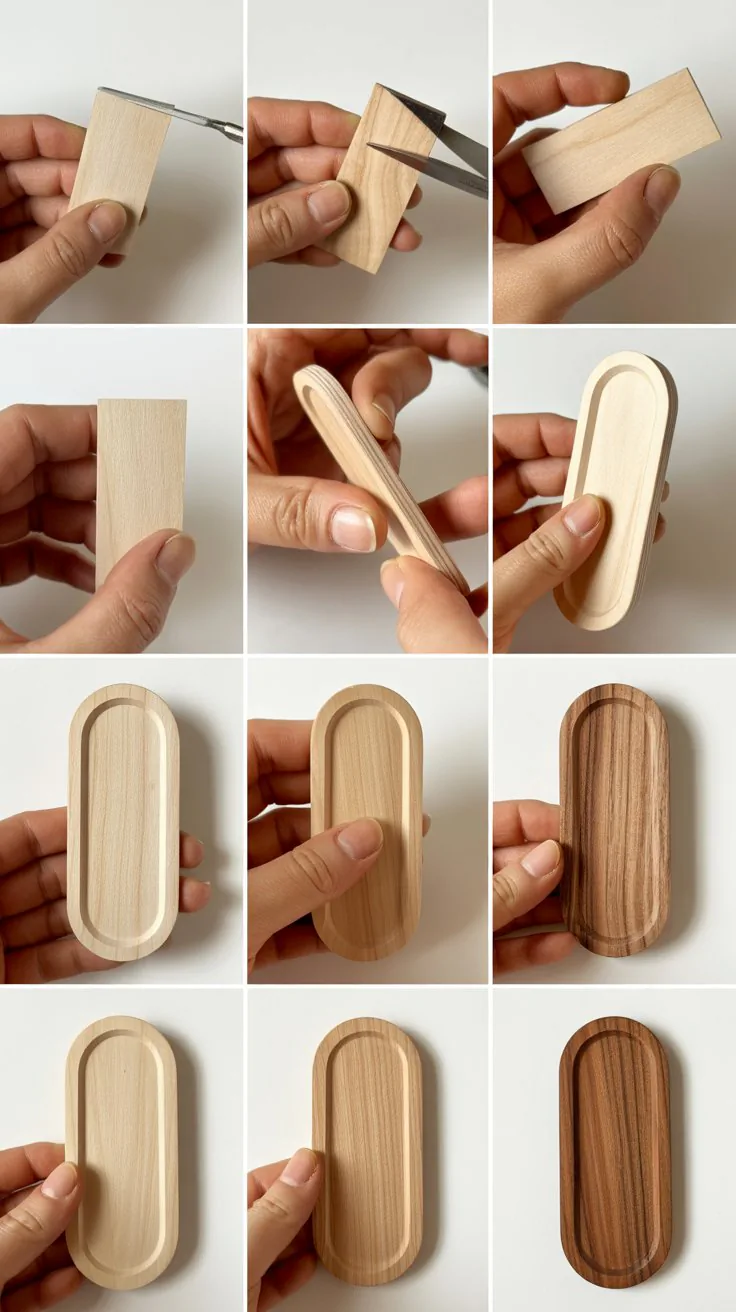
4. Wooden Serving Tray
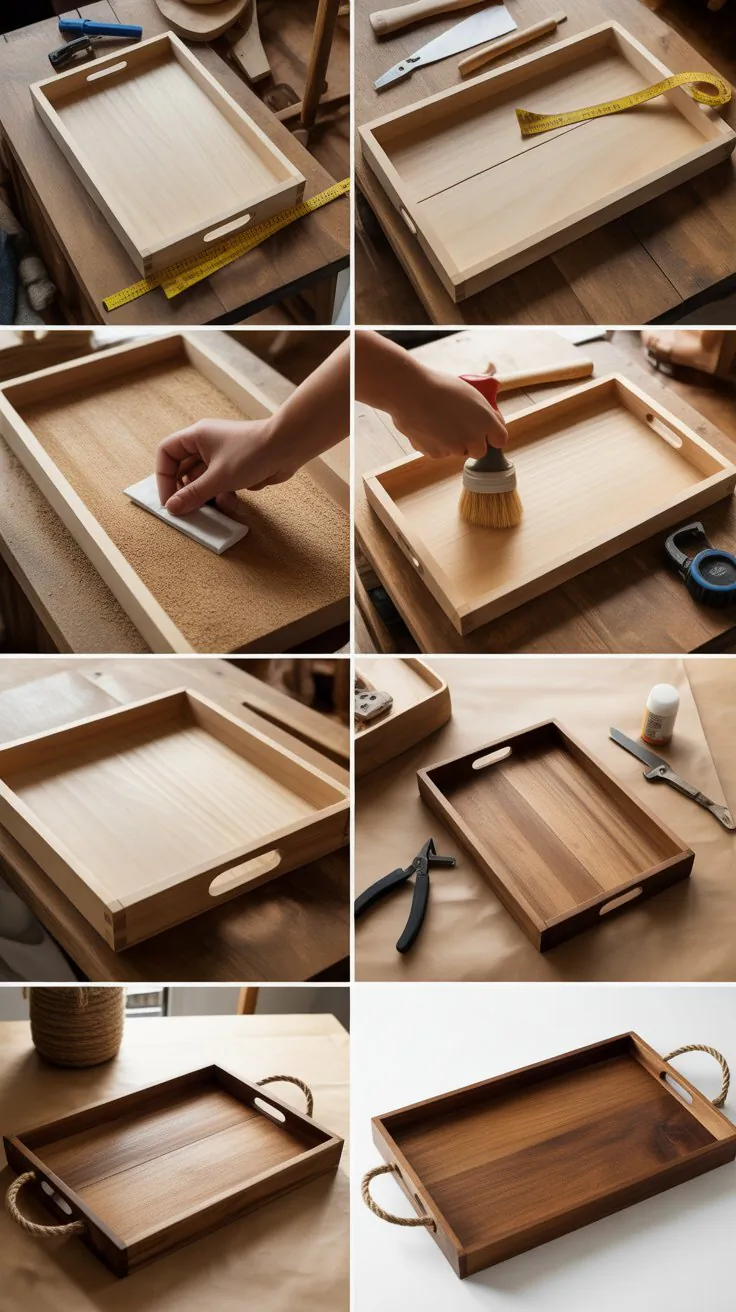
Serving trays are functional and stylish additions to any home.
This project teaches basic frame construction and handle installation for ease of carrying.
Perfect for selling at craft fairs or online, they can be customized with paint or stains.
- Choose a flat wood board for the tray base.
- Cut side rails to create raised edges.
- Attach wooden or metal handles on either side.
- Sand all surfaces for a smooth finish.
- Apply varnish or stain to protect and enhance the wood.
How to Make a Wooden Serving Tray:
- Cut the base board to desired size (e.g., 16×12 inches).
- Cut four rails for the sides, ensuring they are slightly taller than the base thickness.
- Assemble the rails around the base using wood glue and small nails or screws.
- Attach handles securely on the short sides.
- Sand everything smooth and apply finish.
5. Wooden Jewelry Organizer
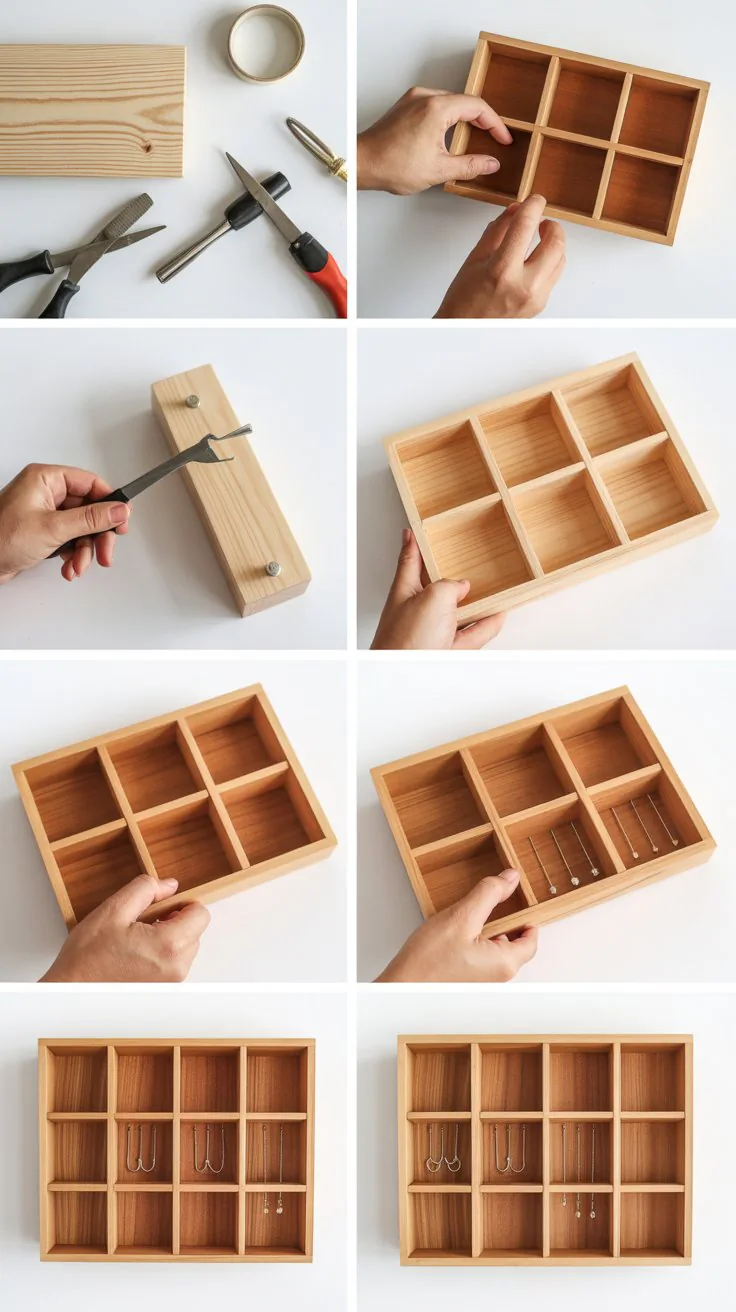
A jewelry organizer keeps accessories neat and easy to access.
This project is simple, involving creating compartments or hooks on a wooden panel.
Its compact size makes it easy to ship or display.
- Select a thin wooden board for the base.
- Add small hooks or pegs for hanging necklaces and bracelets.
- Create small compartments or slots for rings.
- Sand and finish with paint or stain.
- Personalize with designs or decals.
How to Make a Wooden Jewelry Organizer:
- Cut a board approximately 12×8 inches.
- Sand all edges thoroughly.
- Attach hooks or small knobs evenly spaced.
- Add small wooden dividers if desired.
- Finish with your choice of paint or stain.
6. Wooden Plant Stand
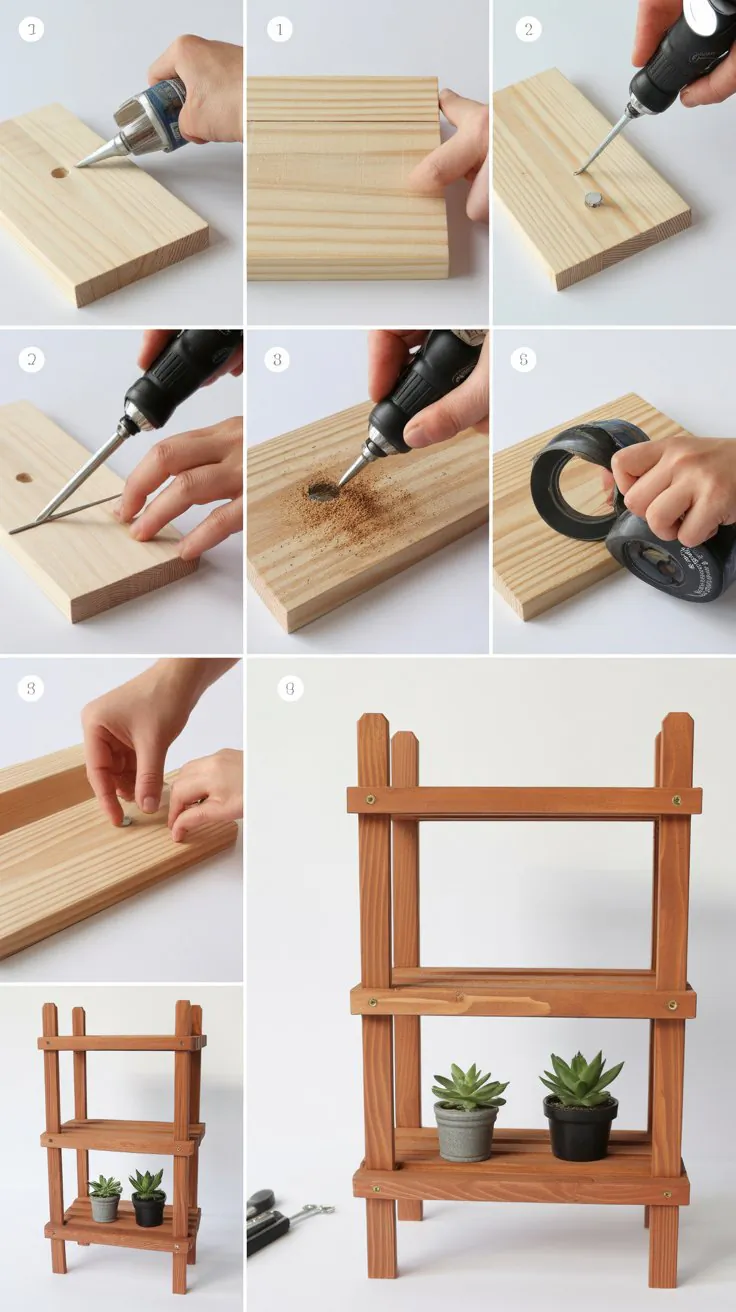
Plant stands elevate indoor plants and enhance home decor.
This project provides experience in cutting and assembling legs and platforms.
Can be made in various heights and shapes to accommodate different pots.
- Use sturdy hardwood for durability.
- Cut four legs of equal length.
- Create a square or round platform for the plant pot.
- Attach legs securely using screws or dowels.
- Sand and finish with paint or varnish.
How to Make a Wooden Plant Stand:
- Measure and cut four legs to desired height (e.g., 12 inches).
- Cut the platform board to fit the pot size.
- Attach legs to the underside of the platform.
- Sand all surfaces thoroughly.
- Apply protective finish.
7. Wooden Coaster Set with Holder
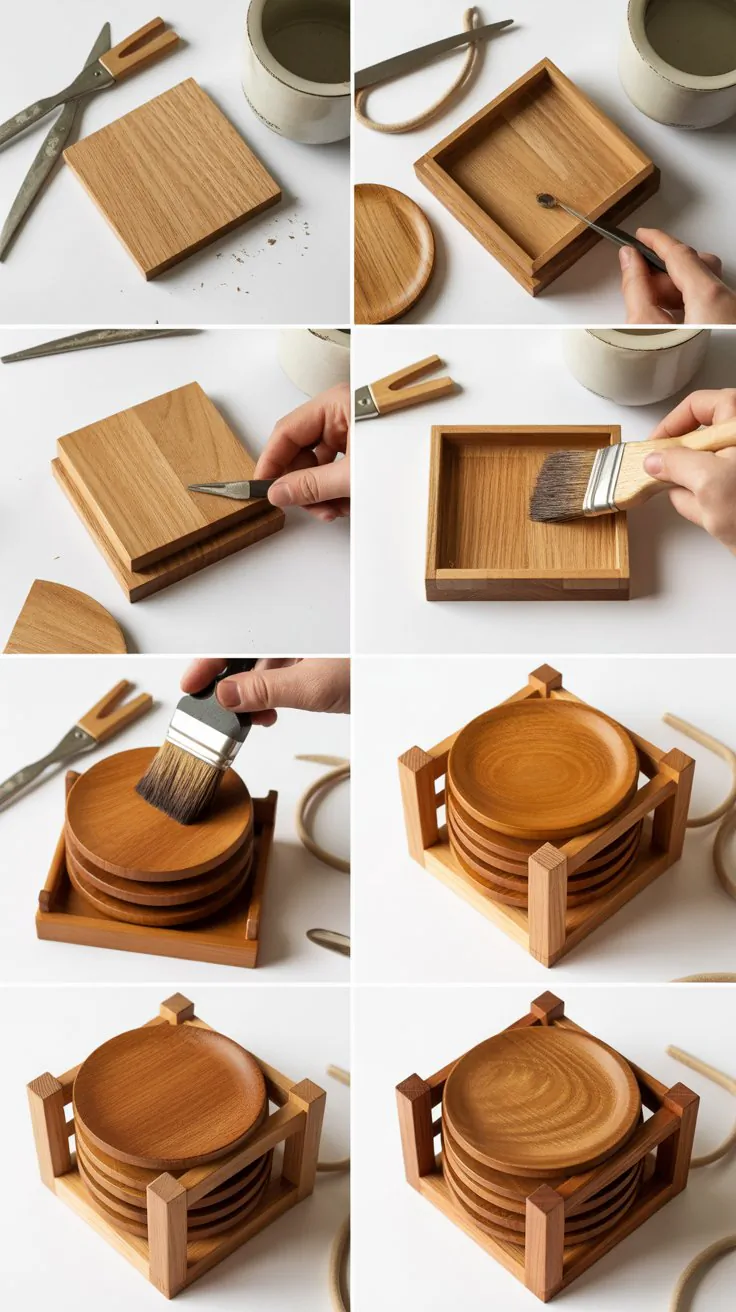
Combining coasters with a holder increases functionality and gift appeal.
This project adds complexity by including a storage box, enhancing sales potential.
- Make coaster set as in project #1.
- Design a simple wooden box or holder with an open top.
- Sand and finish both coasters and holder uniformly.
- Personalize with engraving or painting.
How to Make a Wooden Coaster Set with Holder:
- Prepare 4-6 coasters as described earlier.
- Cut wood pieces for a small box (e.g., 5x5x2 inches).
- Assemble the box with glue and nails.
- Sand everything smooth and apply finish.
- Package together for sale.
8. Rustic Wooden Candle Holder
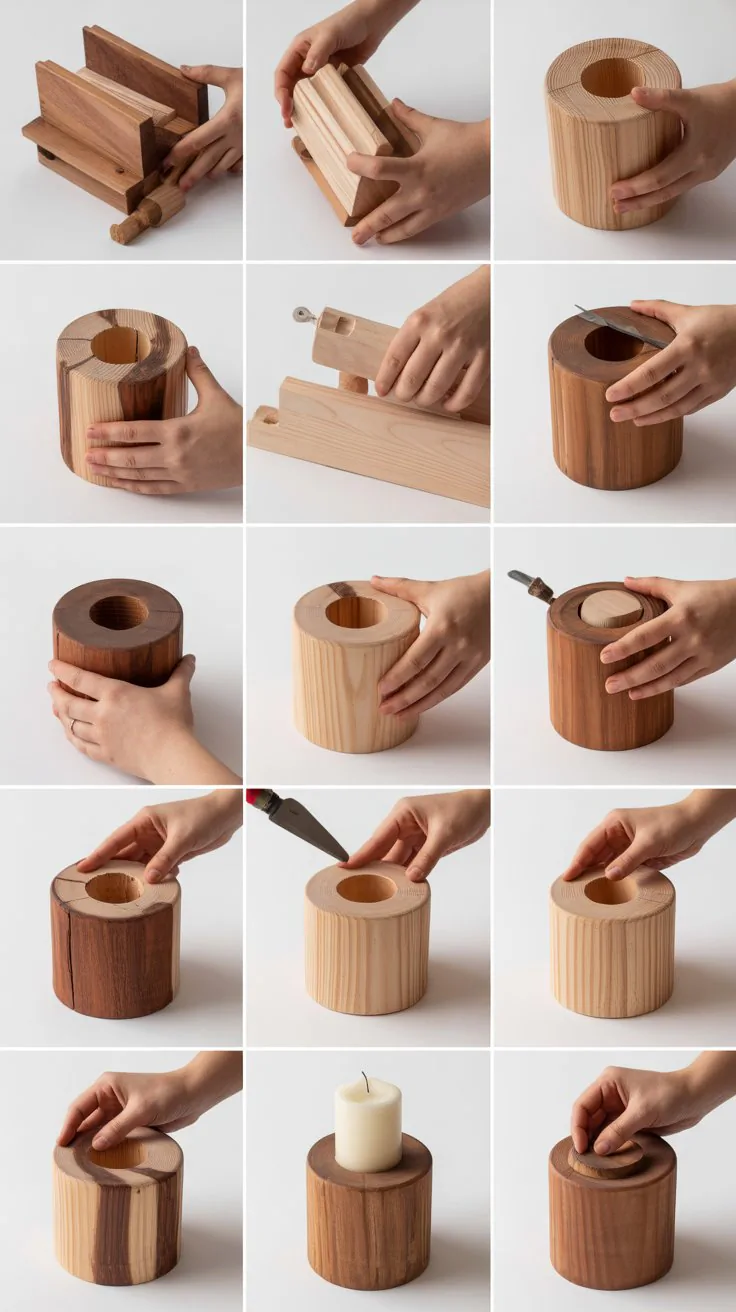
Rustic candle holders add charm and ambiance to any space.
This project requires drilling and sanding skills and can use scrap wood pieces.
- Use a thick wooden block or log section.
- Drill holes sized for tea lights or small candles.
- Sand the block smooth, keeping some natural texture for rustic appeal.
- Optionally add stain or sealant.
How to Make a Rustic Wooden Candle Holder:
- Cut a block of wood approximately 6x2x2 inches.
- Mark positions for candle holes evenly spaced.
- Drill holes about 1.5 inches deep and sized to fit candles.
- Sand the block carefully to smooth edges but preserve rustic look.
- Finish with oil or sealant for protection.
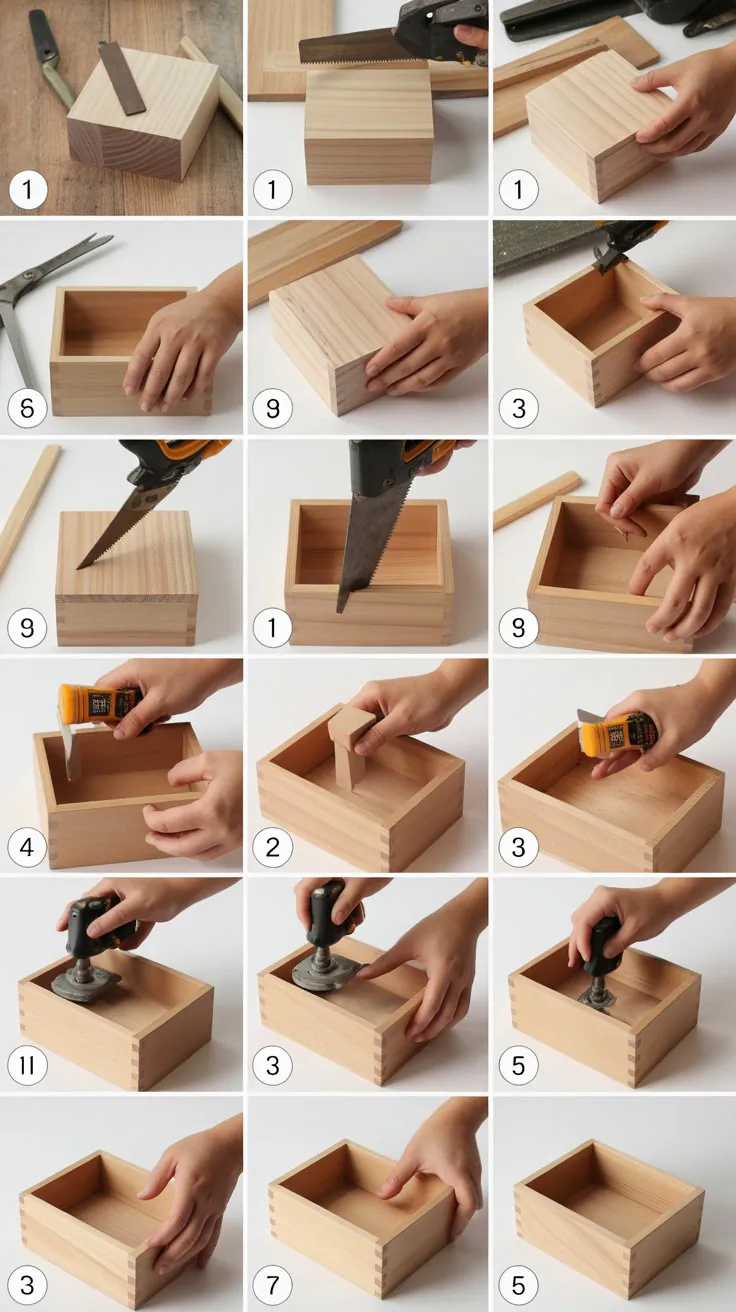
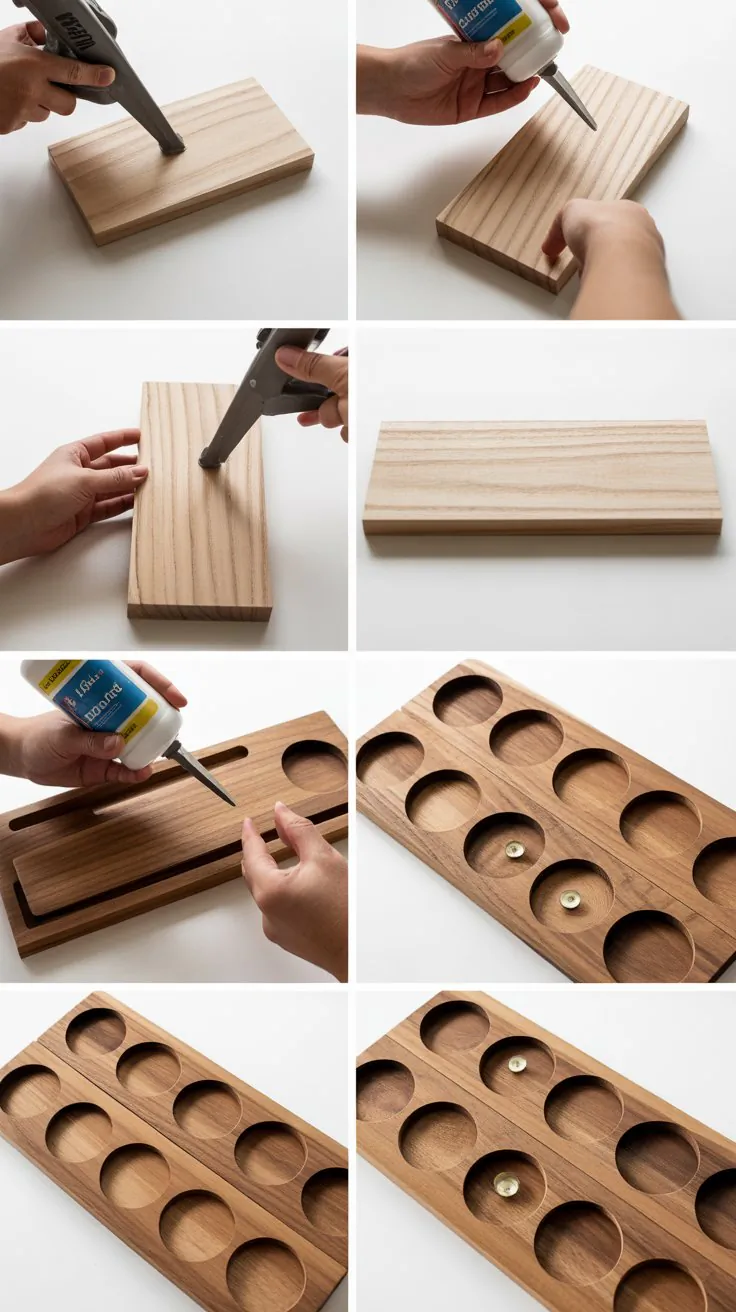
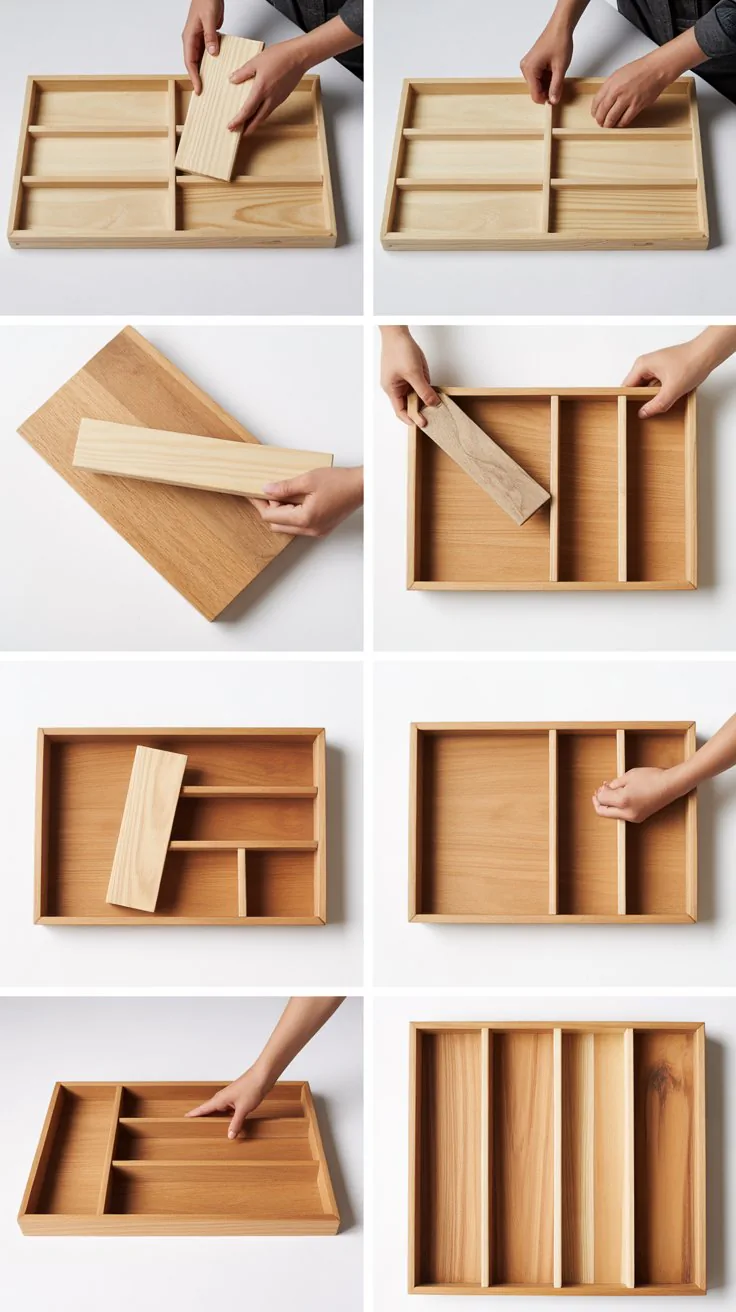
9. Wooden Desk Organizer
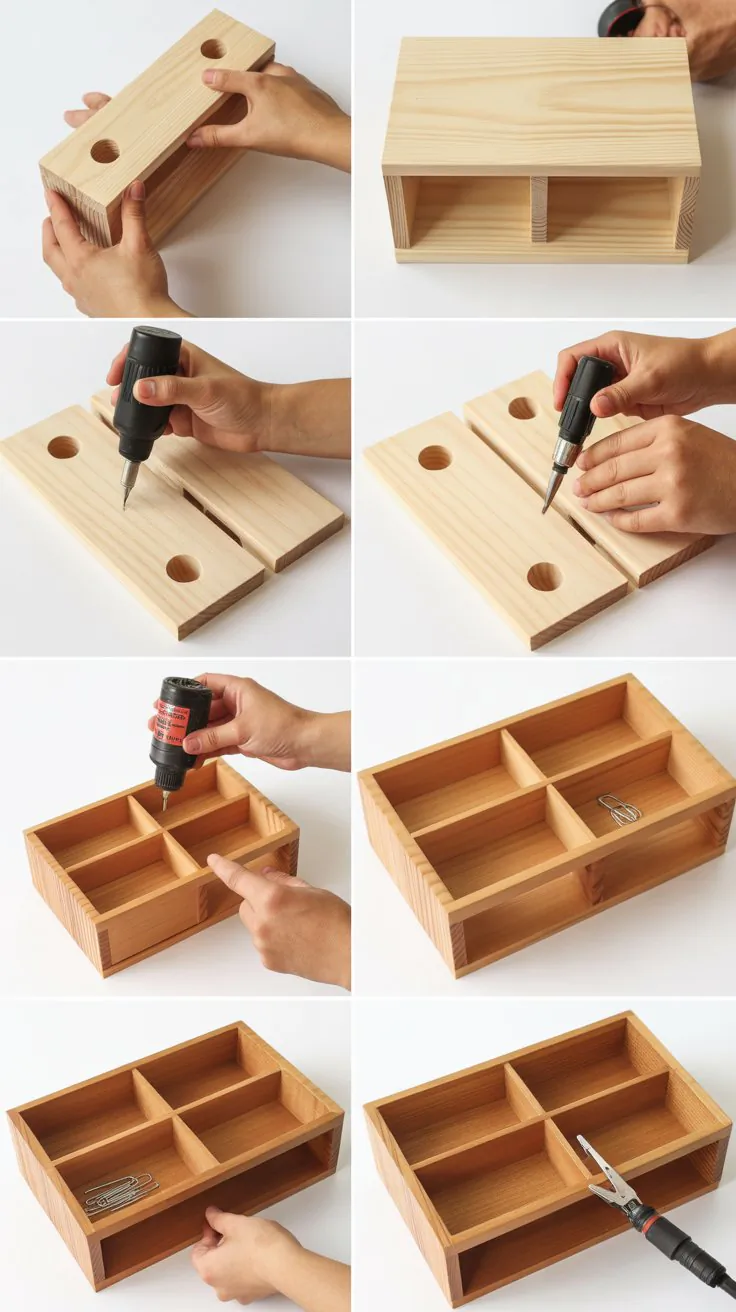
Desk organizers help keep office supplies tidy and accessible.
This project teaches box-making and partitioning within a container.
- Use plywood or hardwood for the base and dividers.
- Cut multiple compartments for pens, paperclips, and notes.
- Assemble with glue and nails.
- Sand thoroughly and finish with paint or stain.
How to Make a Wooden Desk Organizer:
- Cut a base rectangle (e.g., 8×5 inches).
- Cut dividers to create sections of different sizes.
- Assemble using wood glue and clamps.
- Sand all edges and surfaces smooth.
- Apply finish of choice.
10. Wooden Wall Hooks
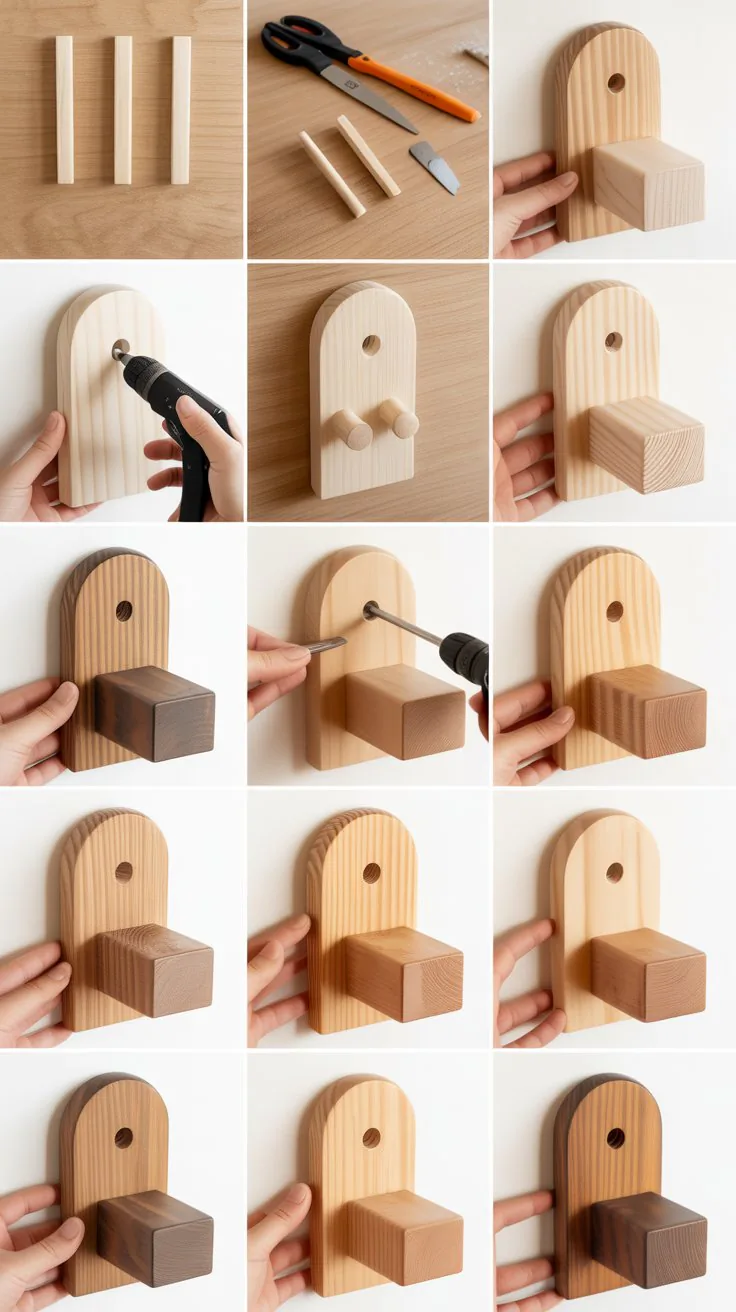
Wall hooks are useful for hanging coats, bags, or keys.
They are small, quick projects ideal for selling in sets.
- Cut small wooden blocks or plaques.
- Attach decorative hooks or knobs.
- Sand and finish the wood surface.
- Drill holes for mounting.
How to Make Wooden Wall Hooks:
- Cut a block about 5×2 inches.
- Sand edges smooth.
- Screw in hooks or attach knobs.
- Drill two holes for wall mounting.
- Paint or stain as desired.
11. Wooden Jewelry Box
Jewelry boxes combine beauty and utility, perfect for gifting and sales.
This project introduces hinge installation and box joinery.
- Choose hardwood or plywood for the box.
- Cut panels for sides, bottom, and lid.
- Assemble with glue and small nails.
- Attach hinges and a clasp.
- Sand and finish.
How to Make a Wooden Jewelry Box:
- Cut six panels: four sides, bottom, and lid.
- Assemble sides and bottom using glue and nails.
- Attach lid with hinges and add clasp.
- Sand thoroughly and finish with varnish or paint.
12. Wooden Serving Utensils
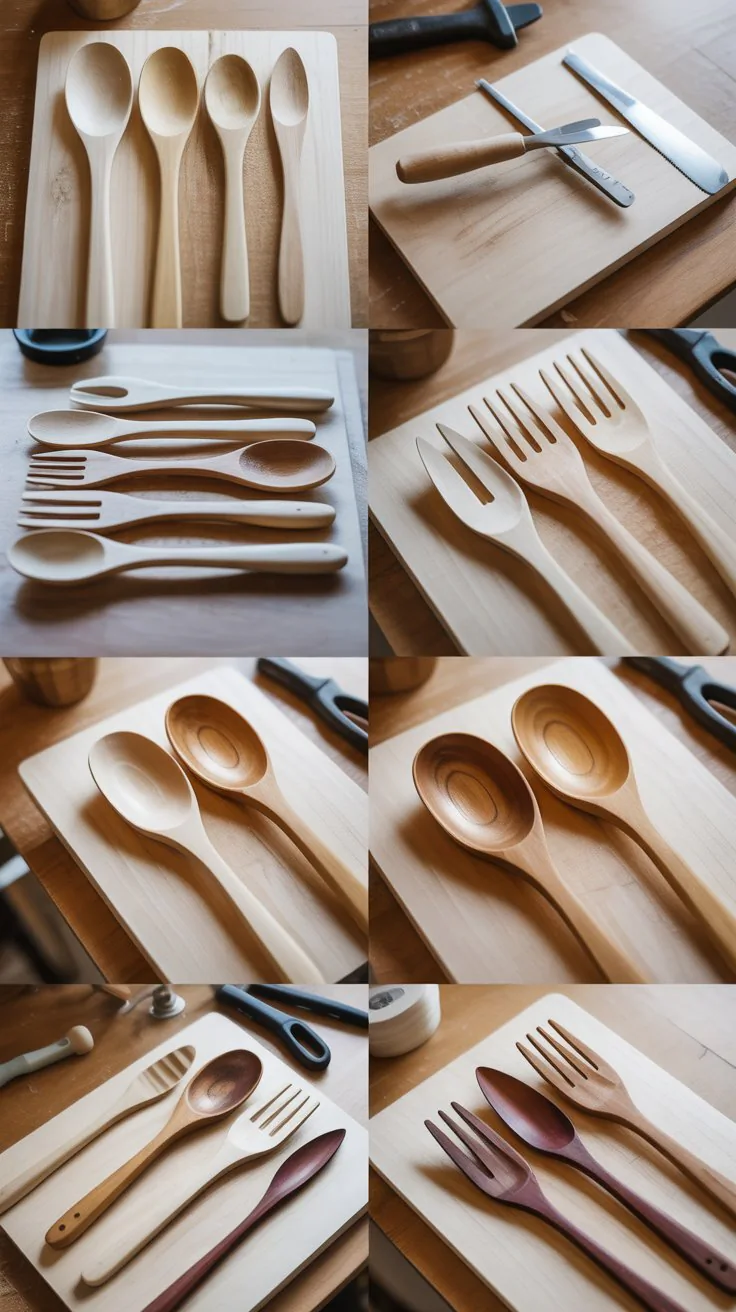
Wooden spoons and spatulas are useful kitchen tools and attractive handmade items.
Requires shaping and sanding skills.
- Select hardwoods like maple or cherry.
- Trace utensil shapes onto wood.
- Cut and carve shapes using saws and carving tools.
- Sand thoroughly to food-safe smoothness.
- Finish with food-safe mineral oil.
How to Make Wooden Serving Utensils:
- Draw utensil shapes on wood blanks.
- Use a bandsaw or coping saw to cut out shapes.
- Carve handles and bowls with carving tools.
- Sand all surfaces extensively.
- Treat with mineral oil for safety.
13. Wooden Bookends
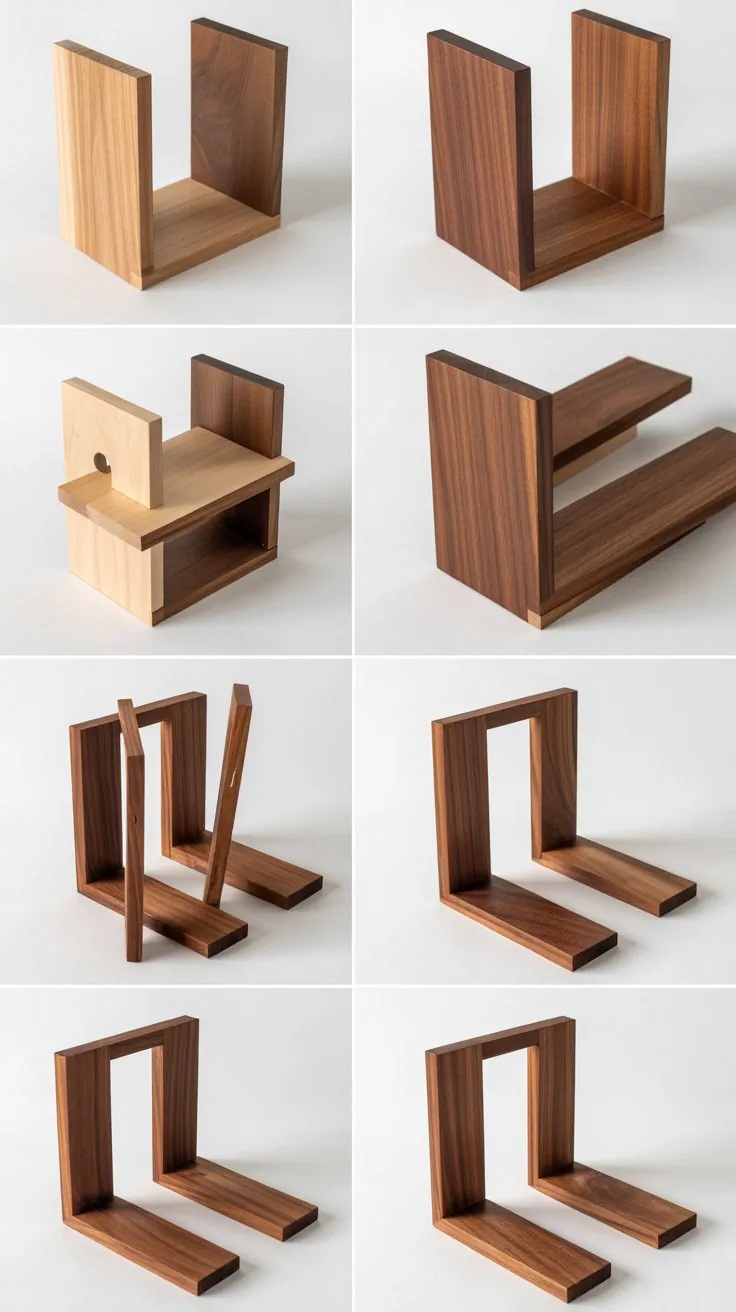
Bookends combine function with style.
They can be simple blocks or more decorative shapes.
- Cut wood into rectangular blocks or custom shapes.
- Sand all edges and surfaces.
- Optionally paint or stain.
- Add felt pads underneath to protect surfaces.
How to Make Wooden Bookends:
- Cut two matching blocks (e.g., 6x6x3 inches).
- Sand all surfaces smooth.
- Paint, stain, or decorate as desired.
- Attach felt pads to bottom edges.
14. Wooden Serving Bowl
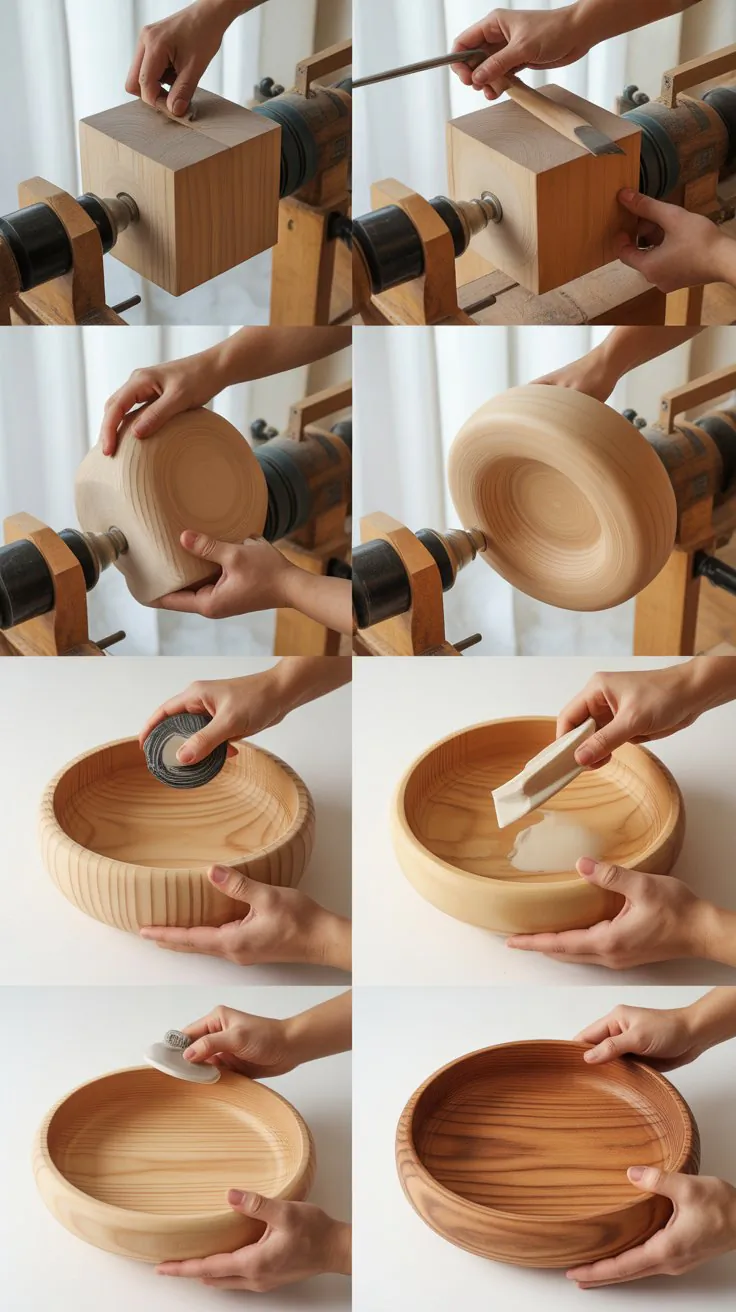
Serving bowls are elegant additions to the kitchen but require some turning or shaping skills.
Great for sellers who want to offer more premium items.
- Use a wood lathe or carve from a solid block.
- Shape the bowl to desired size and depth.
- Sand thoroughly for a smooth finish.
- Apply food-safe finish.
How to Make a Wooden Serving Bowl:
- Select a suitable hardwood block.
- Use a lathe to hollow and shape the bowl.
- Sand extensively.
- Finish with food-safe oils or wax.
15. Wooden Plant Box
Wooden plant boxes are stylish containers for herbs or flowers.
They teach box construction and waterproof finishing.
- Cut wood panels for four sides and a base.
- Assemble using screws or nails.
- Sand and apply waterproof sealant or paint.
How to Make a Wooden Plant Box:
- Cut four side panels and a base board to size.
- Assemble with wood glue and screws.
- Sand all surfaces smooth.
- Apply outdoor wood sealant or paint.
16. Wooden Wall Art
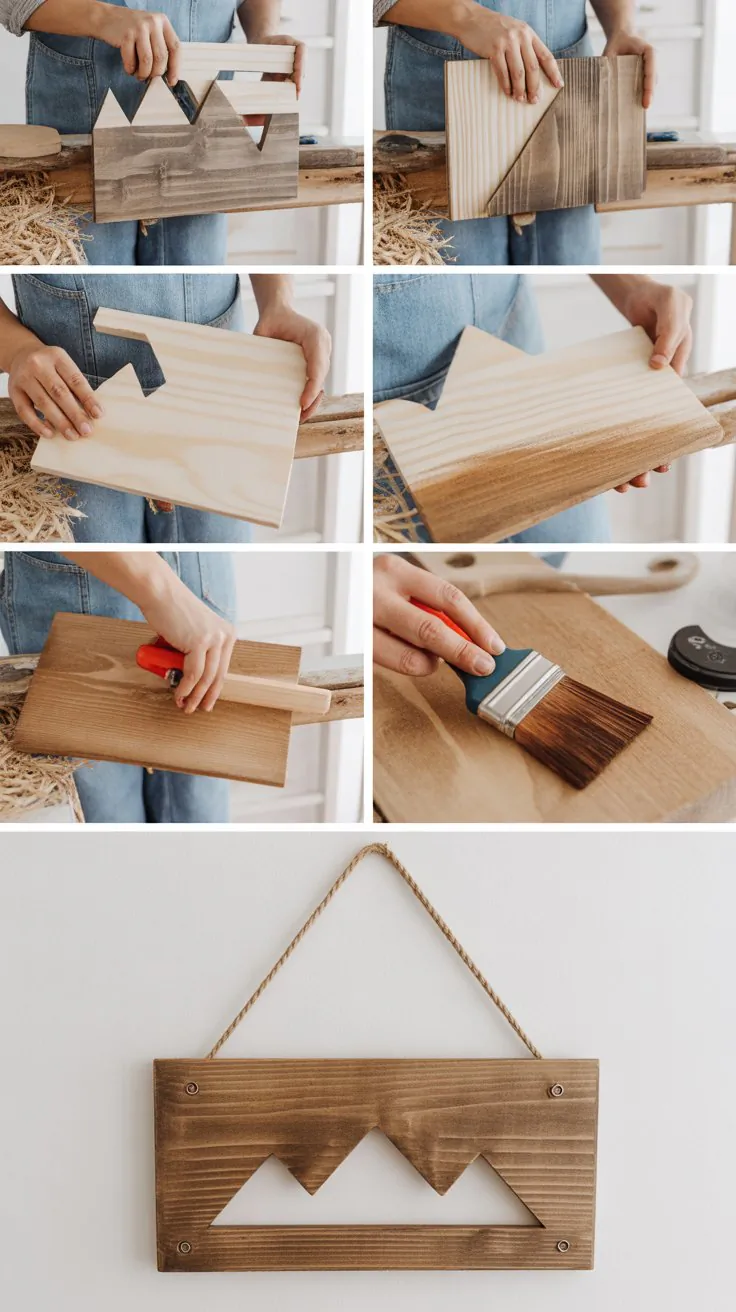
Wooden wall art pieces add personality to any room.
Can range from simple geometric shapes to intricate designs.
- Cut wood into desired shapes or patterns.
- Sand and assemble layered pieces if needed.
- Paint or stain for color and texture.
How to Make Wooden Wall Art:
- Design your art on paper first.
- Cut wood pieces accordingly.
- Sand and assemble with glue or nails.
- Finish with paint or stain.
17. Wooden Tray with Handles
Similar to project #4 but more decorative or larger scale.
Great for breakfast in bed or serving drinks.
- Use thicker wood for sturdy base.
- Attach decorative side rails and handles.
- Sand and finish carefully.
How to Make a Wooden Tray with Handles:
- Cut base and rails.
- Assemble with glue and screws.
- Attach handles securely.
- Sand and finish with varnish or paint.
18. Wooden Napkin Holder

A wooden napkin holder is simple but functional.
Ideal as a kitchen or dining table accessory.
- Cut base and two side panels with slots or curves.
- Assemble using glue and nails.
- Sand and finish.
How to Make a Wooden Napkin Holder:
- Cut a rectangular base and two curved sides.
- Sand edges smooth.
- Glue sides to base and secure with nails.
- Apply finish or paint.
19. Wooden Keychain
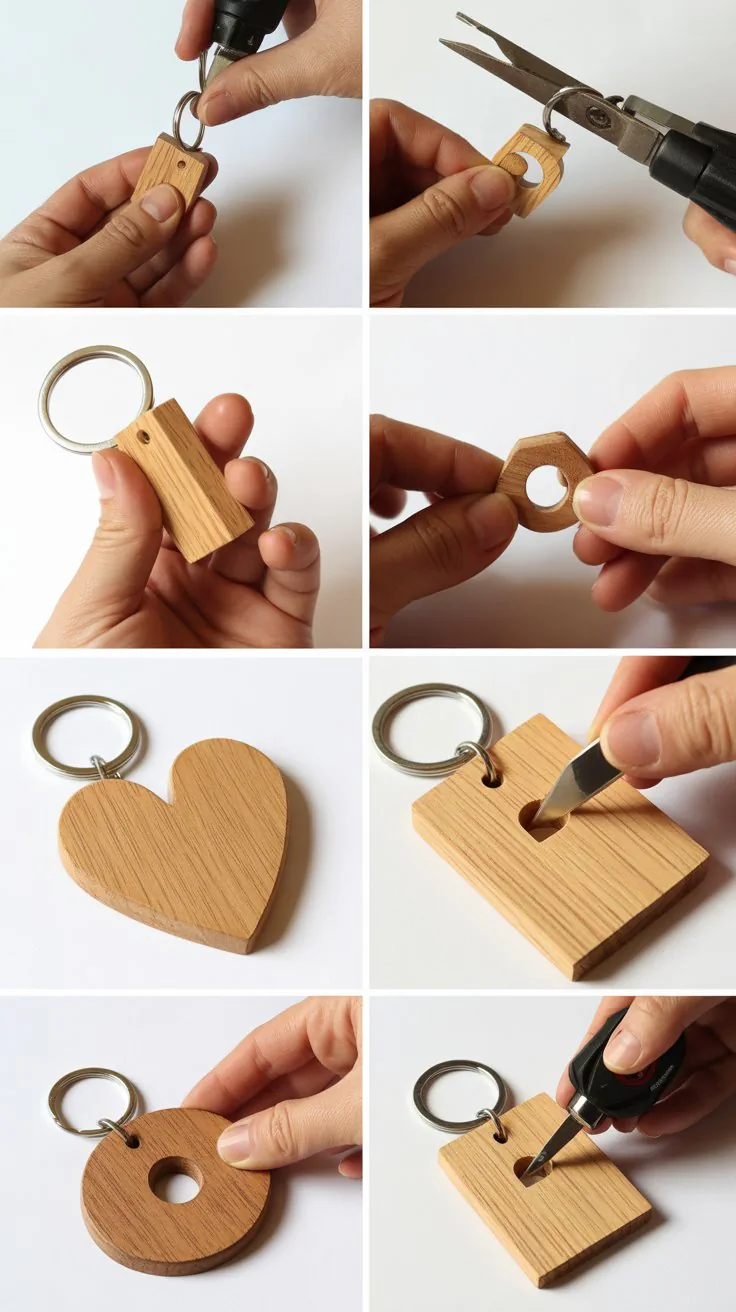
Small wooden keychains are quick projects perfect for gifts and sales.
Allows practice in cutting and finishing small pieces.
- Cut small shapes from scrap wood.
- Sand smooth.
- Drill holes for key rings.
- Personalize with paint or engraving.
How to Make a Wooden Keychain:
- Cut shapes like hearts, circles, or animals.
- Sand thoroughly.
- Drill a small hole near the edge.
- Attach key rings.
- Decorate if desired.
20. Wooden Spoon Rest
A wooden spoon rest keeps cooking surfaces clean.
Simple to make and always useful.
- Cut a small curved or flat piece.
- Sand smooth.
- Apply food-safe finish.
How to Make a Wooden Spoon Rest:
- Cut wood to approx. 7×3 inches.
- Sand all edges and surfaces.
- Apply mineral oil or food-safe finish.
21. Wooden Candle Tray
A candle tray groups candles safely and stylishly.
Easy to make with a shallow wooden board.
- Cut a shallow tray shape.
- Sand thoroughly.
- Finish with varnish.
How to Make a Wooden Candle Tray:
- Cut base board approx. 12×4 inches.
- Cut side rails about 1 inch tall.
- Assemble and sand.
- Apply finish.
22. Wooden Phone Dock
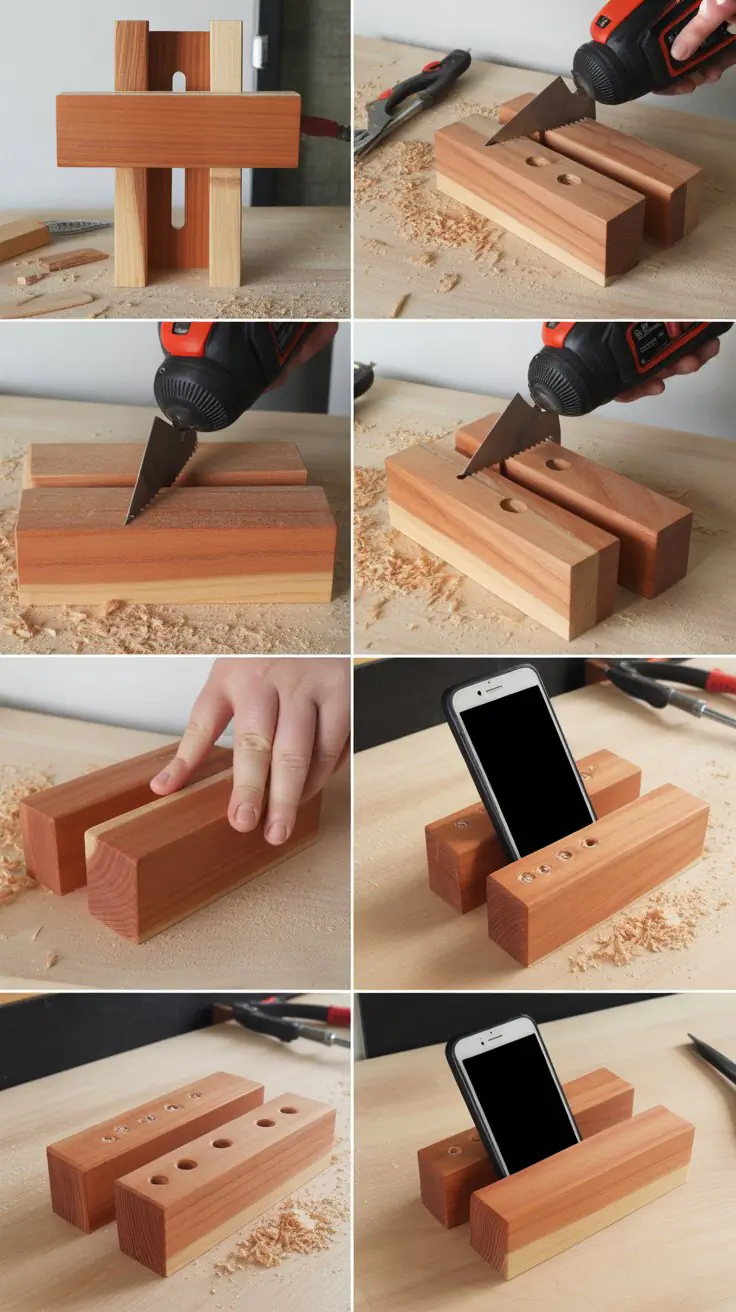
A phone dock keeps devices upright and charged.
Simple project that can be customized.
- Cut base with angled slot.
- Sand and finish.
How to Make a Wooden Phone Dock:
- Cut base and a slotted back piece.
- Sand edges smooth.
- Fit slot and glue if needed.
- Finish with paint or varnish.
23. Wooden Bookmark
Wooden bookmarks are easy and unique gifts.
Great for quick cuts and sanding practice.
- Cut thin strips of wood.
- Sand all edges.
- Decorate or engrave.
How to Make a Wooden Bookmark:
- Cut strips approx. 6×1 inches.
- Sand edges smooth.
- Add designs or varnish.
24. Wooden Wall Shelf
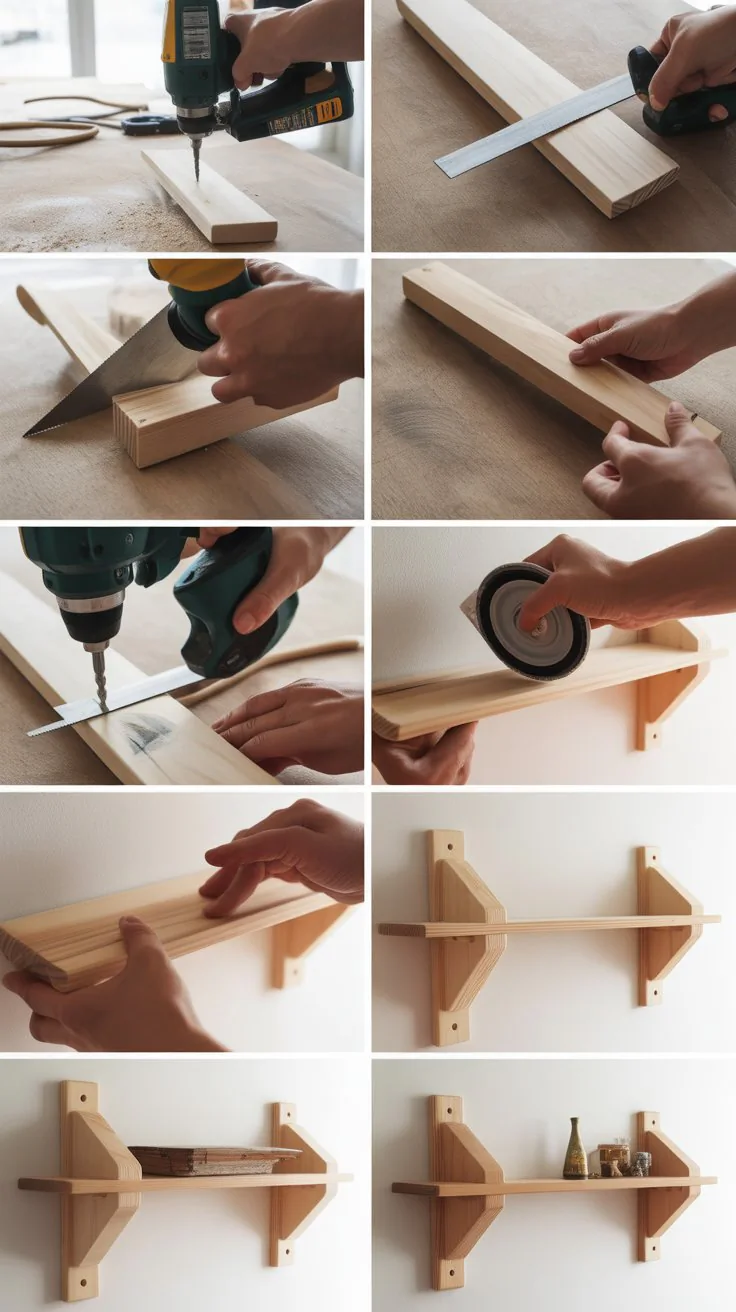
A wall shelf adds space and style.
This project teaches mounting and load-bearing basics.
- Cut shelf board and mounting brackets.
- Assemble and sand.
- Mount securely.
How to Make a Wooden Wall Shelf:
- Cut shelf board to desired size.
- Cut brackets or use metal ones.
- Attach brackets to shelf.
- Sand and finish.
- Mount on wall with screws.
25. Wooden Pencil Holder
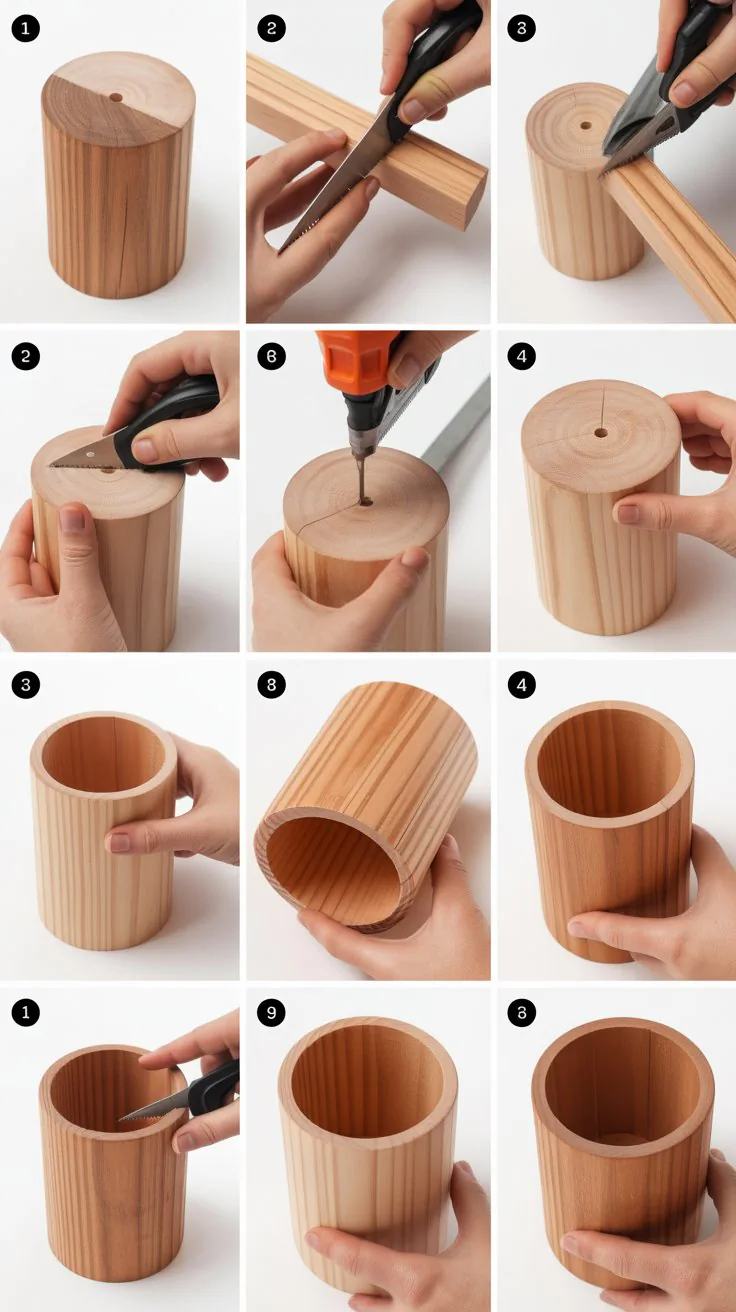
Organize desk pencils with a simple wooden holder.
Easy to make and decorate.
- Cut a small block.
- Drill holes for pencils.
- Sand and finish.
How to Make a Wooden Pencil Holder:
- Cut a block approx. 4x4x2 inches.
- Drill multiple holes evenly spaced.
- Sand smooth.
- Finish with paint or varnish.
26. Wooden Plant Marker Set
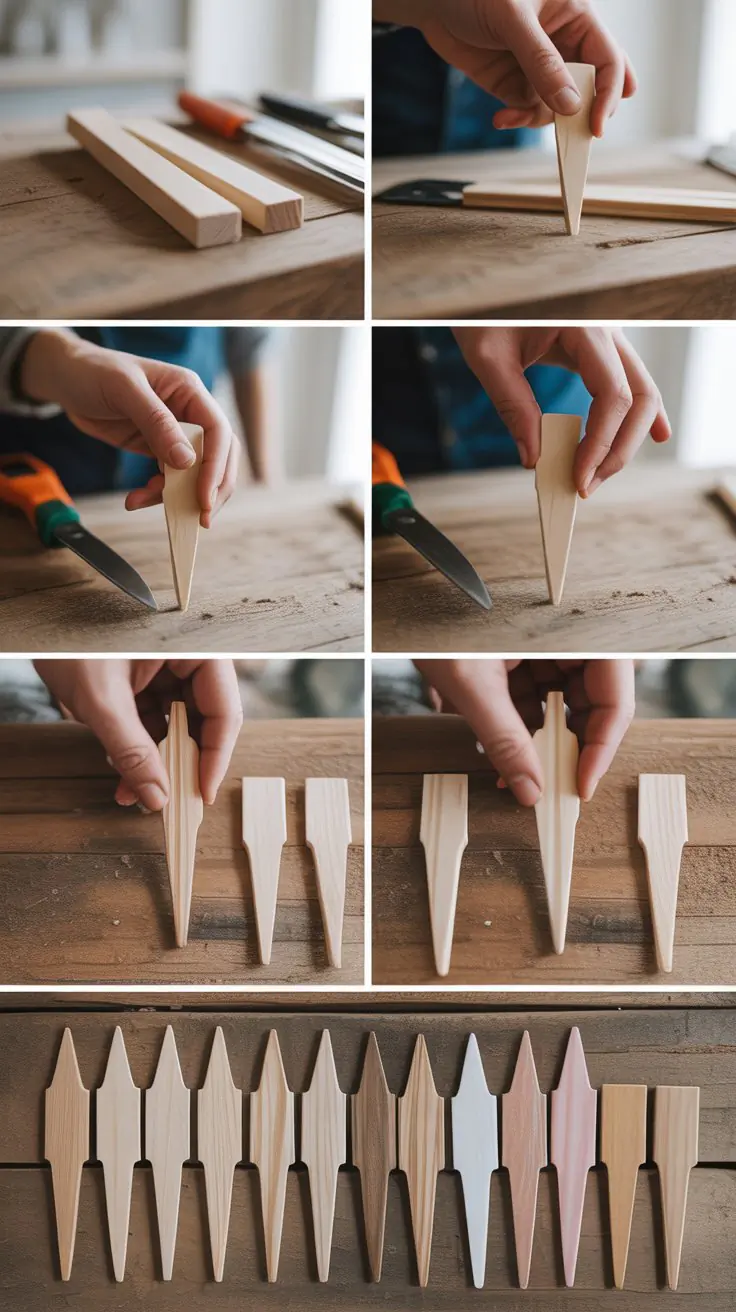
Plant markers help gardeners identify plants easily.
Small, simple, and customizable.
- Cut small stakes or tags.
- Sand smooth.
- Write or paint plant names.
How to Make Wooden Plant Markers:
- Cut thin wood strips approx. 6 inches long.
- Sand edges.
- Write or paint names with waterproof ink.
27. Wooden Tray with Compartments
More complex than basic trays, adds storage sections.
Great for organizing jewelry or small items.
- Cut base and dividers.
- Assemble securely.
- Sand and finish.
How to Make a Wooden Tray with Compartments:
- Cut base board and several divider strips.
- Glue dividers in place creating compartments.
- Sand thoroughly.
- Apply finish.
28. Wooden Bottle Opener
A handy kitchen tool with a mounted opener.
Useful and popular item.
- Cut a wooden block.
- Attach metal bottle opener.
- Sand and finish.
How to Make a Wooden Bottle Opener:
- Cut block approx. 8×3 inches.
- Sand edges smooth.
- Screw metal opener onto block.
- Apply finish.
29. Wooden Jewelry Stand
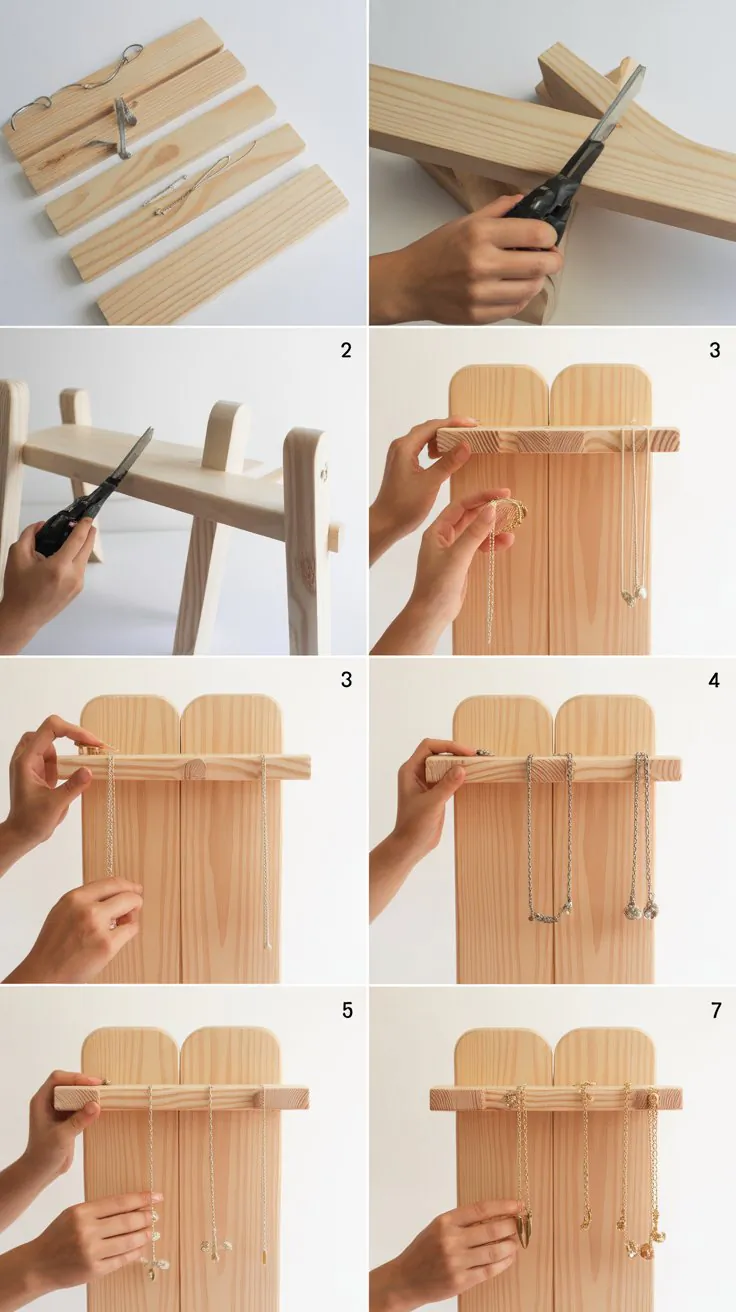
Display necklaces and bracelets on a wooden stand.
Teaches drilling and assembly skills.
- Cut base and vertical supports.
- Drill holes or add hooks for hanging.
- Sand and finish.
How to Make a Wooden Jewelry Stand:
- Cut base and two vertical panels.
- Drill holes for hooks.
- Assemble with glue and screws.
- Sand and finish.
30. Wooden Desk Nameplate
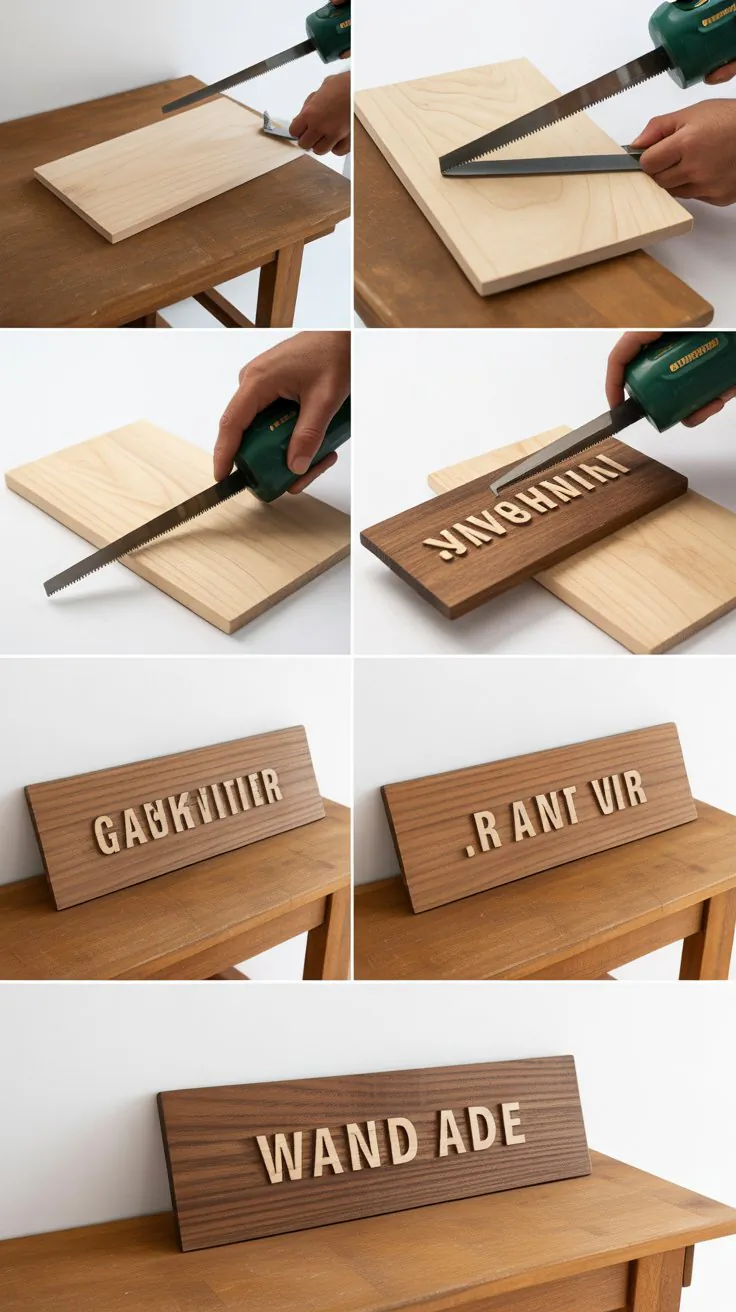
Personalized nameplates are perfect gifts or office accessories.
Simple and customizable.
- Cut flat wooden piece.
- Sand smooth.
- Paint or engrave name.
How to Make a Wooden Desk Nameplate:
- Cut a board approx. 10×3 inches.
- Sand thoroughly.
- Add lettering using paint or engraving.
- Apply finish.
31. Wooden Napkin Ring Set
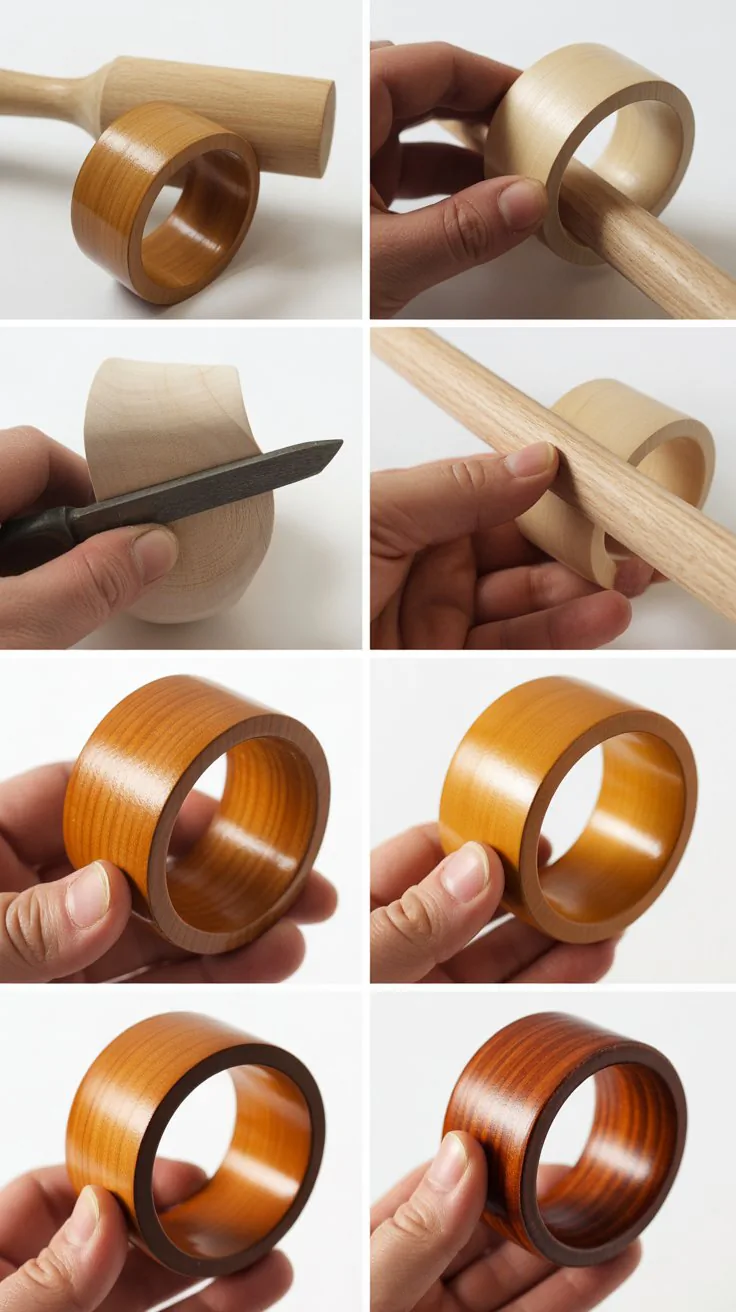
Napkin rings are elegant table accessories.
Easy to make from dowels or cut rings.
- Cut wooden rings or shape from dowels.
- Sand smooth.
- Paint or stain.
How to Make Wooden Napkin Rings:
- Cut dowels into 1.5-inch thick rings.
- Sand edges smooth.
- Decorate as desired.
32. Wooden Wall Clock
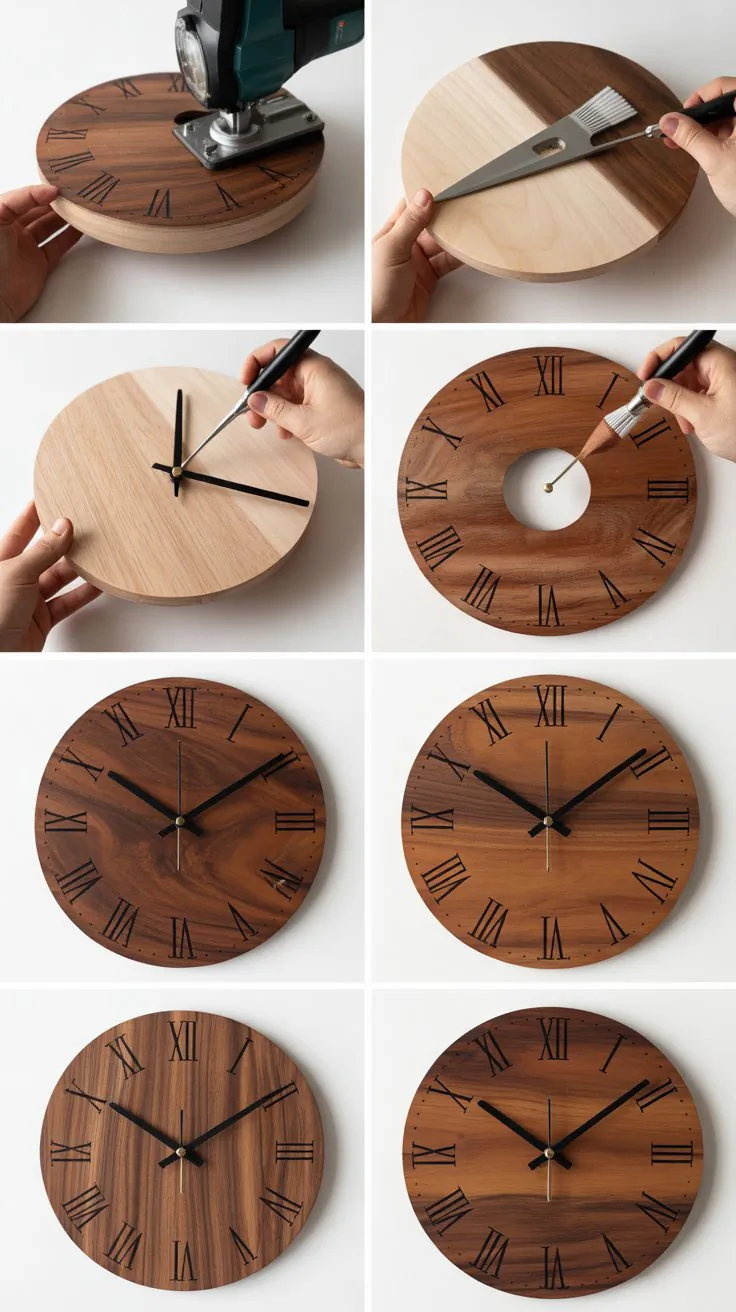
A functional and decorative piece.
Requires clock mechanism and some cutting skills.
- Cut round wood face.
- Sand smooth.
- Attach clock mechanism.
How to Make a Wooden Wall Clock:
- Cut a round wood piece approx. 12 inches diameter.
- Sand thoroughly.
- Drill hole for clock shaft.
- Attach clock mechanism and hands.
- Finish with paint or stain.
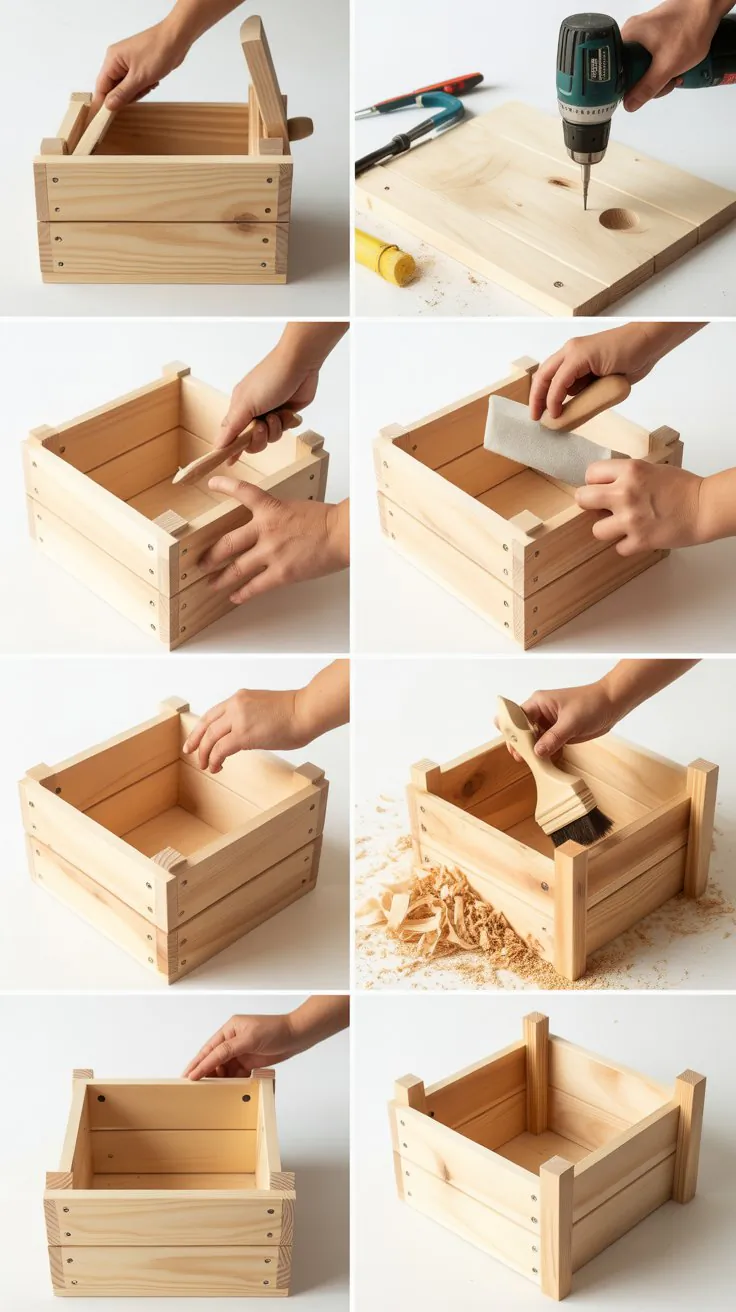
33. Wooden Storage Crate
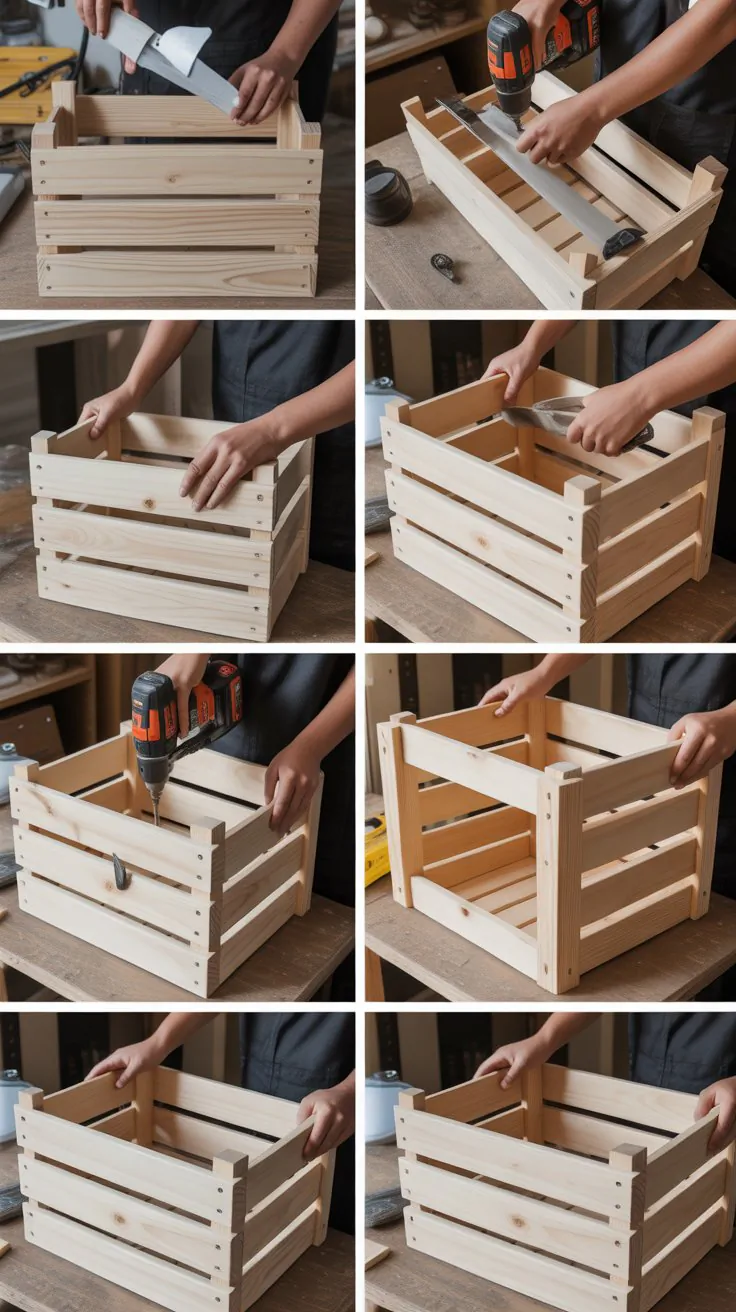
Storage crates are useful for home organization.
Teaches box construction and reinforcement.
- Cut side panels and base.
- Assemble with nails or screws.
- Sand and finish.
How to Make a Wooden Storage Crate:
- Cut panels for sides and base (e.g., 12x12x8 inches).
- Assemble with wood glue and nails or screws.
- Sand edges and surfaces smooth.
- Apply protective finish or paint.
Conclusion
These 33 Easy DIY Small Woodworking Projects to Sell Fast are perfect for beginners looking to build their skills and create items with strong market appeal.
Each project combines simplicity with profitability, allowing you to craft unique wooden products that customers love.
By following these detailed instructions and tips, you can confidently start your woodworking journey and turn your creations into a successful side hustle or business.
Explore these projects one by one, enjoy the process, and watch your woodworking skills and sales grow!