Finding the perfect hairstyle for a wedding can feel overwhelming, especially when you’re blessed with long, luxurious locks that offer endless styling possibilities.
Whether you’re attending a formal evening ceremony, a casual beach wedding, or an elegant garden celebration, your hair should complement your outfit while keeping you comfortable throughout the festivities.
This comprehensive guide to “30+ Easy Wedding Guest Hairstyles for Long Hair” will walk you through stunning options ranging from romantic loose curls to sophisticated updos, each designed to make you look effortlessly elegant without requiring professional salon skills.
You’ll discover step-by-step approaches to creating beautiful hairstyles that last all day, tips for choosing the right look based on your face shape and wedding theme, and practical advice on styling tools and products that ensure your hair stays picture-perfect from ceremony to reception.
Get ready to turn heads at the next wedding you attend with these achievable, gorgeous hairstyles that celebrate the beauty and versatility of long hair.
1. Classic Hollywood Waves
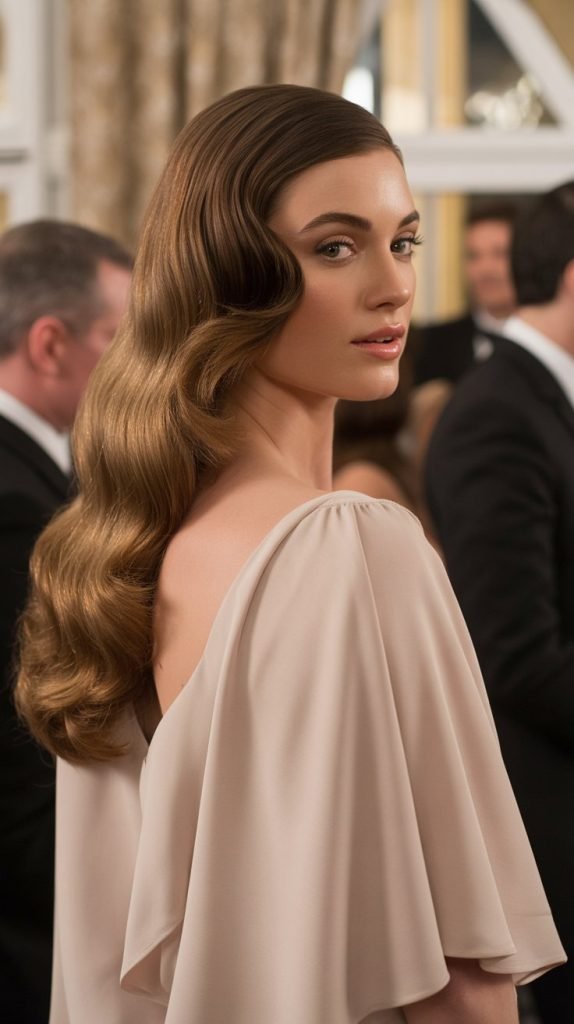
Hollywood waves bring timeless glamour and Old Hollywood elegance to any wedding celebration, making them a perennially popular choice for guests who want to channel vintage sophistication.
This style works beautifully with floor-length gowns and statement jewelry, creating a cohesive red-carpet-worthy look.
- Hollywood waves are characterized by their deep, S-shaped curves that flow smoothly from roots to ends, creating a polished and luxurious appearance.
- This hairstyle gained popularity in the 1920s through 1940s when silver screen actresses like Veronica Lake and Rita Hayworth made waves their signature look.
- The key to achieving authentic Hollywood waves lies in using a large-barrel curling iron (1.5 to 2 inches) and setting the curls with clips while they cool completely.
- Start by applying a heat protectant spray and volumizing mousse to damp hair, then blow-dry your hair smooth using a round brush.
- Section your hair into 2-inch horizontal layers, beginning at the bottom and working your way up to ensure even heat distribution.
- Wrap each section around the curling iron away from your face, holding for 8-10 seconds before releasing the curl into your palm and securing it with a clip.
- Once all sections are curled and cooled (wait at least 15 minutes), remove the clips and gently brush through the curls with a paddle brush to create the characteristic wave pattern.
- Apply a shine serum or light hair oil to the mid-lengths and ends to achieve that signature glossy Hollywood finish.
- Set the entire style with a flexible-hold hairspray to maintain the waves throughout the wedding day without creating stiffness or crunchiness.
2. Romantic Loose Curls

Romantic loose curls offer an effortlessly beautiful aesthetic that combines casual elegance with feminine charm, perfect for outdoor or garden weddings. This versatile style suits nearly every face shape and can be dressed up or down depending on accessories.
- Loose curls create a softer, more natural appearance compared to tight ringlets, giving you a relaxed yet polished look.
- This style is particularly flattering for guests with round or square face shapes as the cascading curls help elongate facial features.
- Begin by washing your hair with a volumizing shampoo and conditioner, then apply a curl-enhancing cream to towel-dried hair.
- Use a diffuser attachment on your blow dryer set to medium heat to dry your hair about 80%, maintaining natural texture while reducing frizz.
- Section your hair into four quadrants and work with 1.5-inch sections, curling some pieces away from your face and others toward it for a more natural, dimensional look.
- Vary the direction of your curls intentionally rather than curling everything the same way, which creates a more organic, lived-in appearance.
- Allow the curls to cool completely before touching them, then use your fingers to gently separate and loosen them for that romantic, tousled effect.
- Apply a texturizing spray or sea salt spray to add body and definition while maintaining the soft, touchable quality of the curls.
- For weddings lasting several hours, carry a small bottle of curl-refreshing spray to revive any curls that may lose their shape during the celebration.
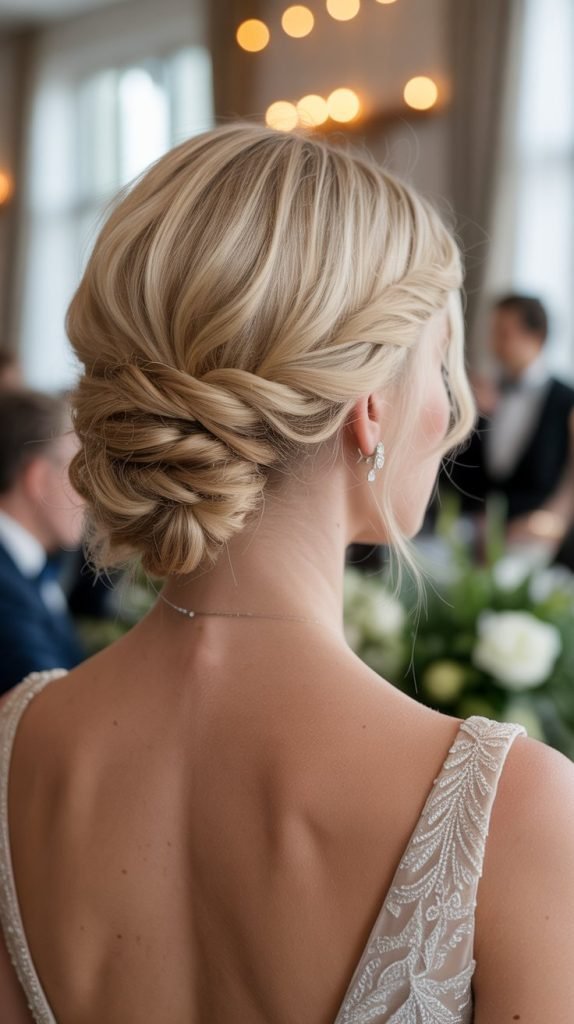
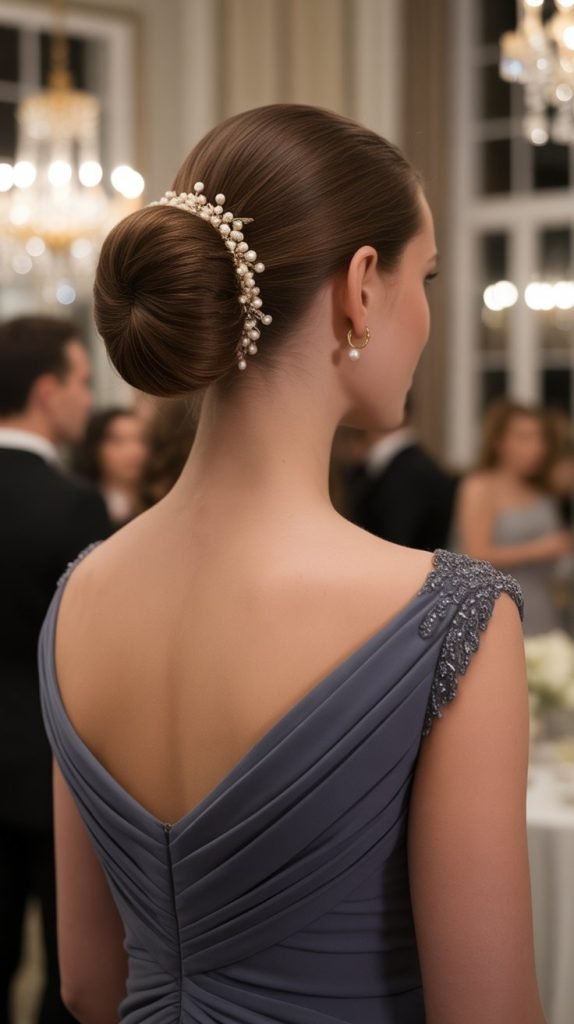
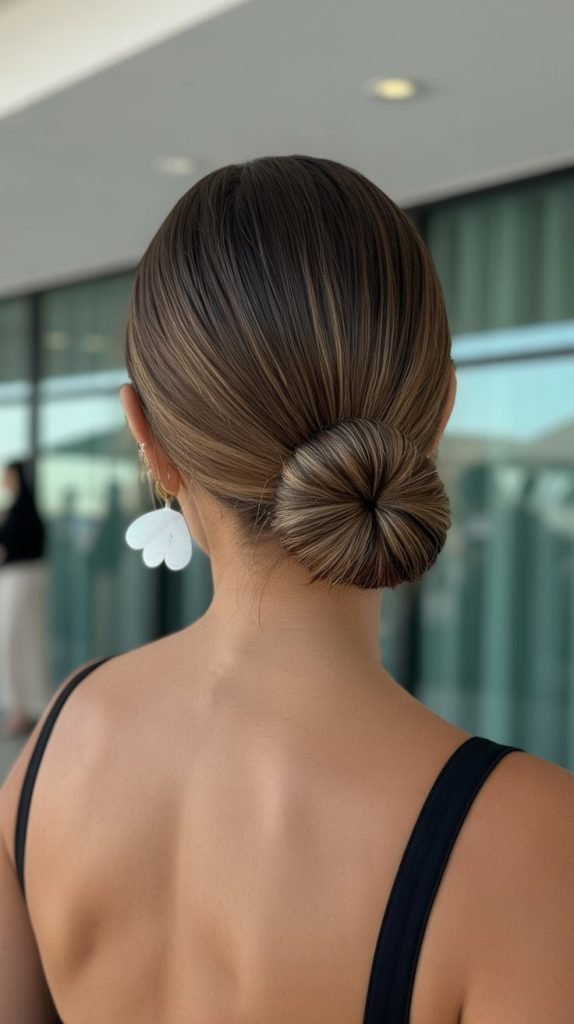
3. Elegant Low Bun
The elegant low bun represents timeless sophistication and practicality, keeping hair securely styled while showcasing your neck and shoulders beautifully.
This classic updo works exceptionally well for formal evening weddings and pairs perfectly with statement earrings.
- Low buns sit at the nape of the neck, creating a balanced silhouette that works harmoniously with various necklines from high-neck to off-shoulder styles.
- This hairstyle is ideal for guests who want to stay comfortable during long wedding ceremonies and receptions without constantly adjusting their hair.
- Start with second-day hair or hair that has been lightly textured with dry shampoo, as slightly dirty hair holds styles better than freshly washed hair.
- Create a deep side part or center part depending on your preference, then brush all hair back into a low ponytail at the nape using a boar bristle brush for smoothness.
- Secure the ponytail with a hair elastic, then divide it into two equal sections and twist them around each other to create a rope-braid effect.
- Wrap the twisted hair around the base of the ponytail in a circular motion, tucking the ends underneath and securing with bobby pins inserted vertically for maximum hold.
- Pull out a few face-framing pieces at the front to soften the look and create a more romantic, less severe appearance.
- Smooth any flyaways with a small amount of hair gel or pomade on a toothbrush or fine-tooth comb, focusing on the hairline and part.
- Finish with a strong-hold hairspray, spraying from 10-12 inches away to create an invisible shield that keeps the bun intact throughout dancing and celebrating.
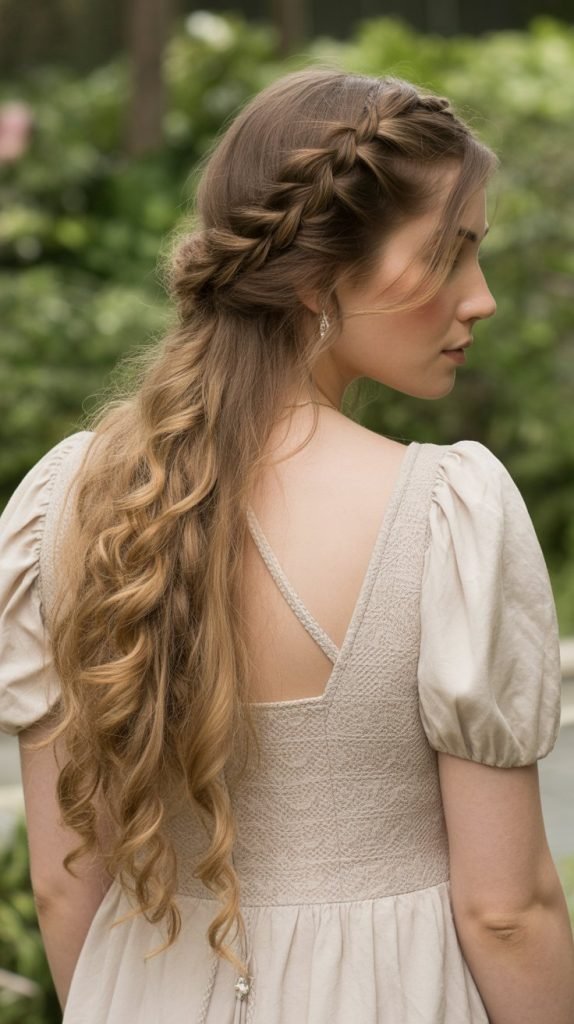
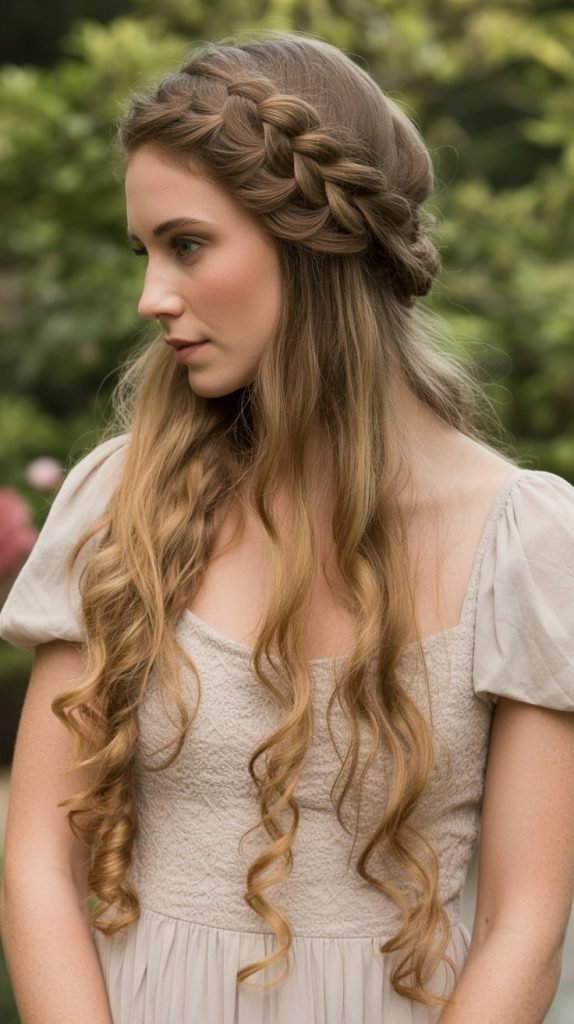
4. Braided Crown

A braided crown creates a whimsical, bohemian-inspired look that’s both romantic and practical for outdoor or destination weddings. This style beautifully frames the face while keeping hair off the neck in warm weather.
- The braided crown involves creating one or two braids that wrap around the head like a halo, secured with pins to create a regal, ethereal appearance.
- This hairstyle works particularly well for guests with thick, textured hair that provides sufficient volume and grip for braiding.
- Begin by applying a texturizing spray throughout your hair to create grip and prevent the braids from slipping or looking too slick.
- Part your hair down the center or slightly off-center, dividing it into two equal sections from the part down to behind each ear.
- Take one section and create a Dutch braid (inverted French braid) by crossing sections under rather than over, starting from behind one ear and braiding toward the opposite side.
- Continue the braid across the back of your head, gently pulling on the outer edges of each braid section to create width and volume (this technique is called pancaking).
- Secure the end of the first braid with a clear elastic, then repeat the process on the other side, braiding in the opposite direction so both braids meet at the back.
- Wrap the ends of both braids around your head in opposite directions, tucking them underneath the opposite braid and securing with bobby pins.
- For a softer look, pull out small wisps of hair around your face and gently curl them with a small-barrel curling iron.
- Accessorize with small flowers, pearl pins, or delicate hair jewelry woven into the braids for added wedding-appropriate elegance.
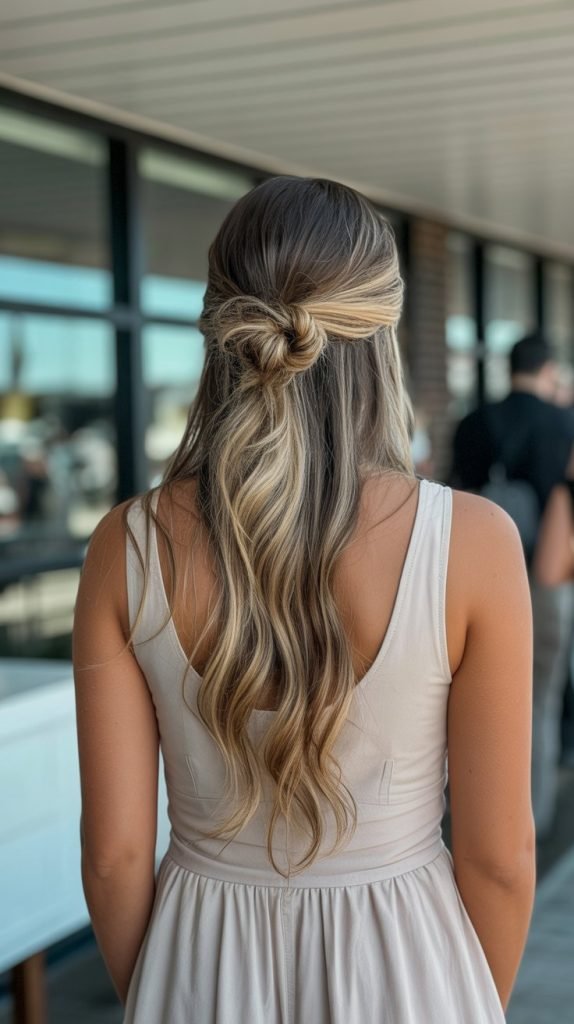
5. Half-Up Half-Down with Twists

The half-up half-down style with twists strikes the perfect balance between having your hair styled and down, showcasing length while keeping hair away from your face. This versatile option suits virtually any wedding dress code or venue.
- This style combines the elegance of an updo with the romance of flowing hair, making it a favorite among wedding guests who can’t decide between up or down.
- The twisted sections add visual interest and texture without requiring advanced braiding skills, making it accessible for styling beginners.
- Start by curling all of your hair with a 1.25-inch curling iron, creating loose waves that will serve as the foundation for the style.
- Section off the top half of your hair from temple to temple, creating a horizontal part approximately level with the tops of your ears.
- Divide this top section into two equal parts, separating them at the center back of your head.
- Take the right section and twist it tightly toward the back of your head, pulling it slightly upward to create volume at the crown.
- Secure the twist with bobby pins in an X-formation at the center back of your head, inserting them so they grip both the twist and the hair underneath.
- Repeat the twisting process with the left section, bringing it to meet the right section at the center back and securing with pins.
- Gently tug on the twists to loosen them slightly and create a softer, more voluminous appearance that looks intentionally effortless.
- Finish by curling any straight pieces in the lower half of your hair and applying a light-hold hairspray to maintain the style without weighing down the curls.
6. Sleek High Ponytail
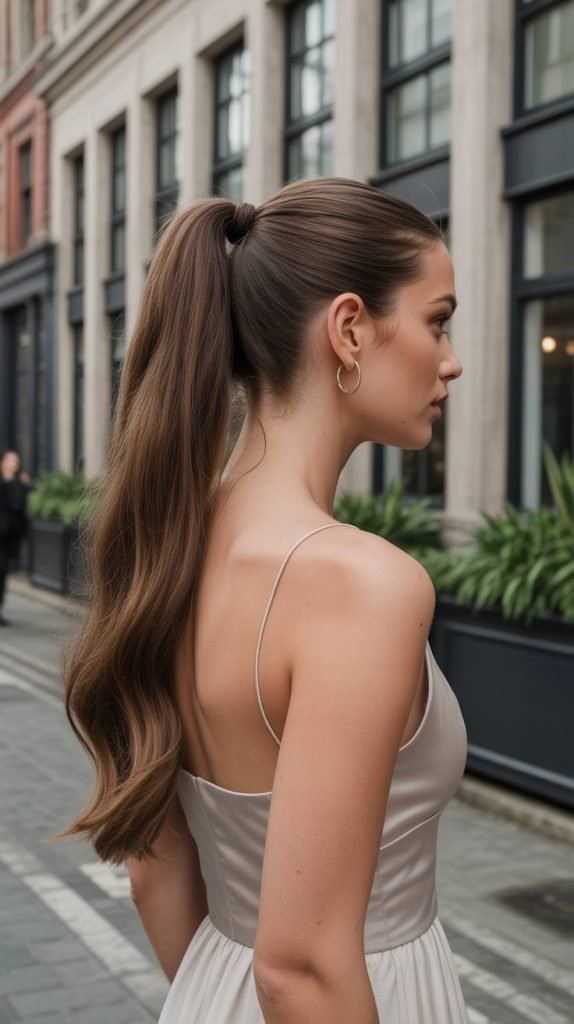
The sleek high ponytail exudes modern sophistication and youthful energy, making it an excellent choice for contemporary wedding venues and evening celebrations. This style elongates the neck and highlights facial features beautifully.
- High ponytails sit at the crown of the head, creating a lifted, energetic look that’s both polished and playful.
- This hairstyle is particularly flattering for guests with oval or heart-shaped faces as it emphasizes cheekbones and draws attention upward.
- Begin with freshly washed hair, applying a smoothing cream or serum to damp hair before blow-drying with a paddle brush for maximum sleekness.
- Use a fine-tooth comb to brush all hair upward toward the crown of your head, ensuring there are no bumps or irregular sections.
- Tilt your head back slightly while gathering the hair to maintain the height at the crown and prevent the ponytail from sliding backward.
- Secure the ponytail with a strong elastic, wrapping it multiple times until it feels tight and stable enough to last throughout the wedding.
- Take a small section of hair from underneath the ponytail and wrap it around the elastic to conceal it, securing the end with a bobby pin tucked underneath.
- Apply a small amount of shine serum to the length of the ponytail, distributing it evenly with your hands for a glossy, healthy finish.
- Use a flat iron on the ponytail itself to ensure every strand is perfectly straight and smooth, working in small sections from top to bottom.
- Set the style with a strong-hold hairspray, paying special attention to the roots and hairline to prevent any pieces from escaping during dancing or outdoor activities.
7. Textured Side Braid
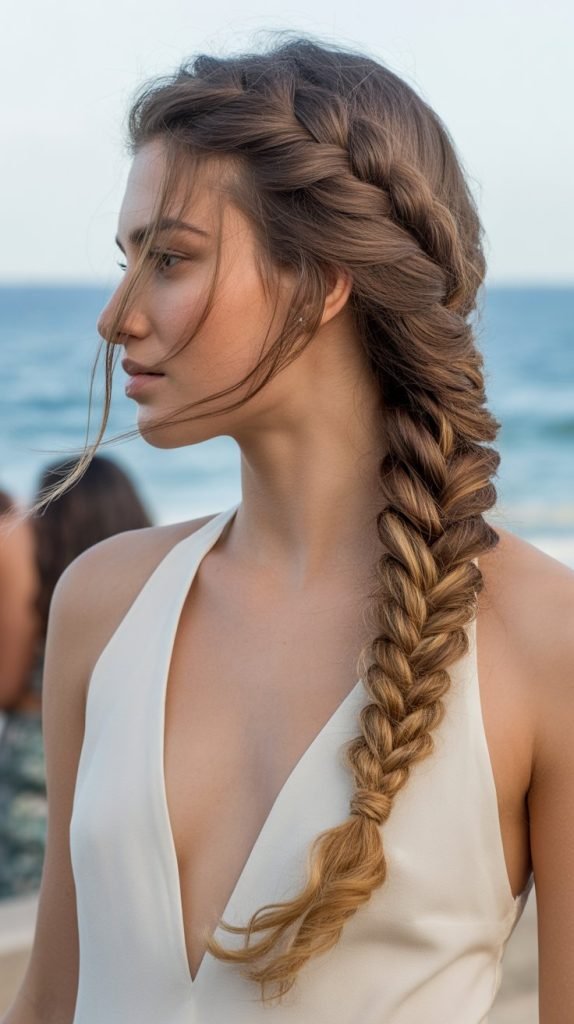
A textured side braid offers bohemian charm with a sophisticated twist, creating an effortlessly chic look that’s both romantic and fashion-forward. This style works beautifully for both casual and semi-formal weddings.
- Side braids create asymmetry that’s visually interesting and flattering, drawing the eye downward and showcasing the braid’s intricate texture.
- This hairstyle is especially suitable for guests with layered haircuts as the varying lengths add natural dimension and fullness to the braid.
- Start by creating a deep side part, sweeping the majority of your hair over one shoulder to establish the foundation for your side braid.
- Apply a texturizing spray or dry shampoo throughout your hair to create grip and prevent the braid from appearing too flat or tight.
- Gather all your hair over one shoulder and divide it into three equal sections to begin a traditional three-strand braid.
- As you braid, maintain loose tension rather than pulling tightly, which creates a softer, more romantic appearance with better volume.
- After braiding to the ends and securing with an elastic, use your fingers to gently pull on the outer edges of each braid section to create width and texture.
- This “pancaking” technique transforms a simple braid into a voluminous, textured statement piece that looks more intricate than it actually is.
- Pull out a few small pieces around your face and at the hairline to create a lived-in, effortless quality that softens the overall look.
- For added security, especially for outdoor weddings with potential wind, insert a few bobby pins along the length of the braid to anchor it against your head.
8. Vintage-Inspired Victory Rolls
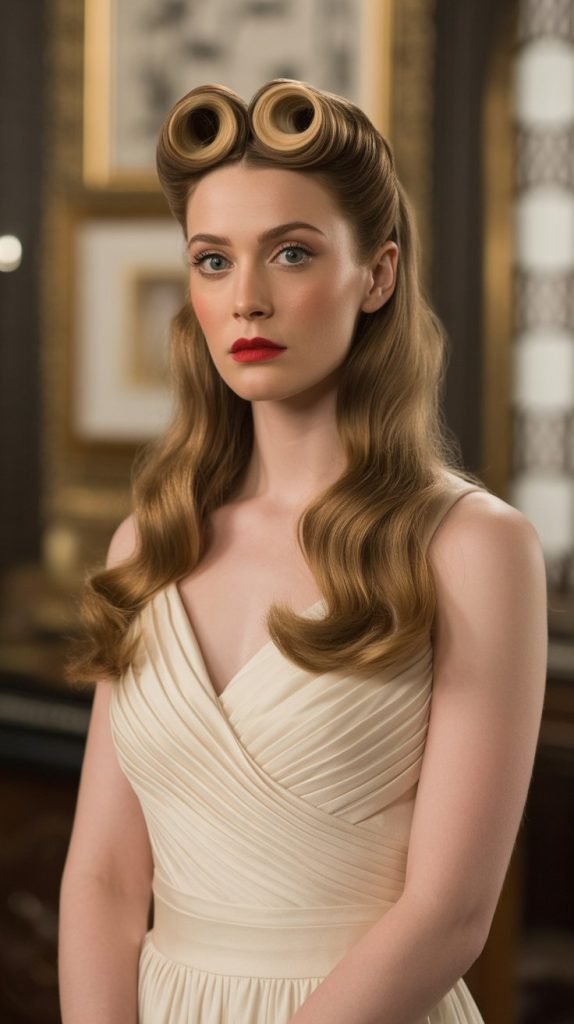
Victory rolls bring 1940s glamour and vintage sophistication to wedding celebrations, making them perfect for themed weddings or guests who love retro aesthetics. This style makes a bold statement while remaining elegantly timeless.
- Victory rolls are characterized by their distinctive rolled sections at the front of the hair, typically positioned symmetrically on either side of a center or side part.
- This iconic hairstyle originated during World War II and has experienced renewed popularity among vintage fashion enthusiasts and classic style lovers.
- Begin with dry hair that has been straightened or smoothed, as the sleekness is essential for creating the clean lines characteristic of victory rolls.
- Section off the front portions of your hair from your part to just above your ears, leaving the back sections loose for now.
- Take one front section and backcomb it lightly at the roots to create a cushion of volume that will support the roll structure.
- Roll the section backward toward your scalp, tucking the ends underneath to create a smooth, tubular roll that sits against your head.
- Secure the roll with bobby pins inserted horizontally into the base and vertically through the roll itself to ensure it stays in place.
- Repeat the process on the opposite side, making sure both rolls are symmetrical in size and position for a balanced, polished appearance.
- Style the remaining loose hair into soft waves or curls that complement the structured rolls at the front, creating contrast between the styled and flowing sections.
- Finish with a strong-hold hairspray and a shine spray to achieve the glossy, polished finish that’s signature to vintage hairstyles.
9. Waterfall Braid
The waterfall braid creates a cascading, ethereal effect that looks intricate and romantic while being surprisingly simple to execute. This style beautifully combines braided detail with flowing hair, perfect for garden or outdoor weddings.
- Waterfall braids involve dropping sections of hair as you braid, creating the appearance of hair “falling” through the braid like a waterfall.
- This style is particularly stunning on guests with highlighted or multi-tonal hair as it showcases the color dimension beautifully.
- Start by curling all of your hair with a medium-barrel curling iron to create waves that will blend seamlessly with the dropped sections.
- Part your hair to the side and begin with a small section near the part, dividing it into three strands as you would for a regular braid.
- Cross the back strand over the middle, then cross the front strand over the middle, just like a traditional braid.
- Here’s where the waterfall technique begins: instead of continuing with the front strand, drop it and let it fall naturally with the rest of your hair.
- Pick up a new section of hair from the top to replace the dropped strand, then cross it over the middle strand and continue the pattern.
- Continue this drop-and-replace pattern as you work the braid around your head from one side to the other, creating the cascading waterfall effect.
- Keep the braid relatively loose and positioned at or slightly above ear level to create an elegant crown-like effect that frames your face.
- Secure the end with a small clear elastic and tuck it behind your ear or pin it underneath a section of hair to hide the ending point, then set with hairspray for lasting hold.
10. Chignon with Face-Framing Pieces
A chignon offers French-inspired elegance with its low, gathered bun that sits gracefully at the nape of the neck. Adding face-framing pieces softens the look and creates a romantic, less formal appearance.
- The chignon is a classic French updo that has remained popular for decades due to its timeless elegance and versatility across different wedding styles.
- This hairstyle works exceptionally well for guests with medium to thick hair density as it creates the fullness necessary for an impressive chignon.
- Begin by applying volumizing mousse to damp hair and blow-drying with a round brush to create body and smoothness.
- Create a low ponytail at the nape of your neck, positioning it slightly off-center for a more modern, asymmetrical look if desired.
- Divide the ponytail into two sections and twist them together in a rope-braid fashion, creating texture and dimension within the chignon.
- Wrap the twisted ponytail around its base in a circular coiling motion, tucking the end underneath and securing with bobby pins throughout.
- Before securing the chignon completely, gently pull on sections to create a slightly undone, voluminous appearance rather than a tight, severe bun.
- Pull out several thin sections around your face and at the nape of your neck, then use a small-barrel curling iron to curl these pieces for soft, romantic framing.
- These face-framing pieces should be strategically placed to complement your face shape—pull out more pieces near features you want to soften.
- Finish with a medium-hold hairspray that keeps the style in place while allowing the face-framing pieces to move naturally and maintain their soft, touchable quality.
11. Bubble Ponytail
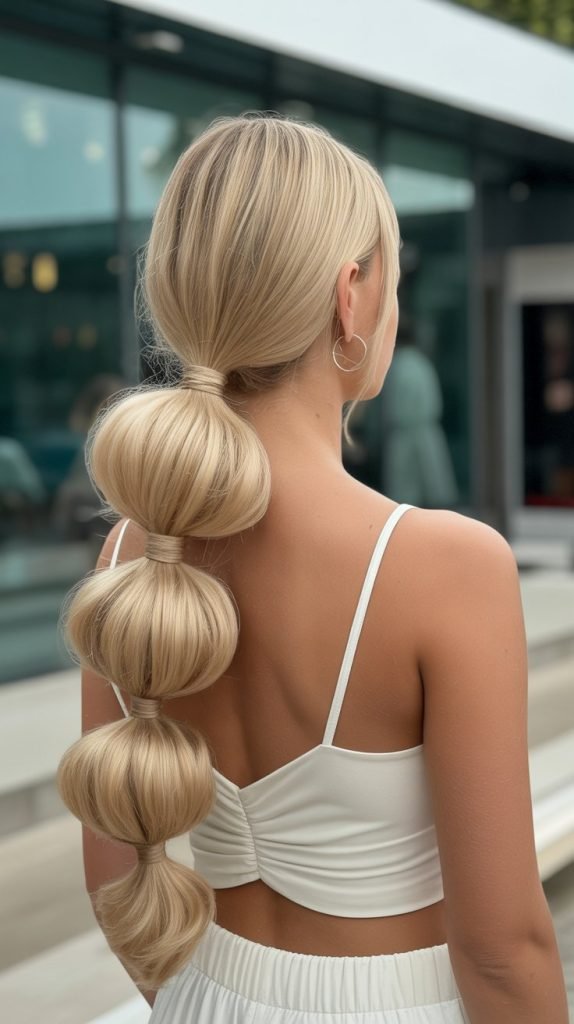
The bubble ponytail transforms a simple ponytail into a playful, dimensional style that’s both trendy and appropriate for modern wedding celebrations. This contemporary look adds visual interest through its segmented bubble effect.
- Bubble ponytails are created by sectioning a ponytail with multiple elastics and gently pulling on the hair between each elastic to create rounded, bubble-like segments.
- This style became popular on social media and red carpets, offering a fresh take on the traditional ponytail that looks complex but is remarkably simple.
- Start with straight or slightly wavy hair, applying a volumizing spray throughout to provide the body necessary for full, impressive bubbles.
- Create a ponytail at your desired height (high, mid, or low) and secure it tightly with a hair elastic that matches your hair color.
- Measure approximately 2-3 inches down from the first elastic and secure another elastic around the ponytail at this point.
- Gently pull on the hair between the two elastics with your fingers, tugging outward and slightly upward to create the first bubble shape.
- Continue adding elastics every 2-3 inches down the length of the ponytail, creating the bubble effect in each section as you go.
- The key to impressive bubbles is pulling gently but thoroughly on all sides of each section to create symmetrical, rounded shapes.
- For added dimension, slightly tease the hair in each section before pulling it outward to create the bubble, which adds fullness and prevents deflation.
- Secure the ends with a final elastic and either leave them straight or curl them for a finished look, then set everything with hairspray to maintain the bubble shapes throughout the wedding.
12. Twisted Low Updo
A twisted low updo combines elegance with texture, creating a sophisticated style that’s perfect for formal weddings while remaining comfortable enough for all-day wear. This versatile updo suits various wedding themes and personal styles.
- Twisted updos rely on twisting hair sections rather than braiding, creating a softer, more romantic texture that’s less structured than traditional braided styles.
- This hairstyle is ideal for guests with naturally textured or wavy hair as the inherent texture adds dimension and interest to the twists.
- Begin with second-day hair or hair that has been prepared with texturizing spray to create the grip necessary for twists to hold securely.
- Part your hair down the center and divide it into four quadrants: two in front of your ears and two behind.
- Take one of the front sections and twist it tightly toward the back of your head, securing it with bobby pins at the nape area.
- Repeat with the opposite front section, bringing it to the back and pinning it alongside the first twist, allowing some overlap for dimension.
- Take one of the back sections and twist it, then wrap it around and through the existing twisted sections, creating an interwoven effect.
- Continue with the final section, incorporating it into the existing twists and pinning strategically to create a cohesive, textured low updo.
- Gently pull on the twists to loosen them slightly and create volume, being careful not to pull so much that they unravel.
- Finish by securing any loose ends with bobby pins tucked invisibly into the updo, then set with hairspray and add decorative pins or accessories if desired.
13. Braided Ponytail
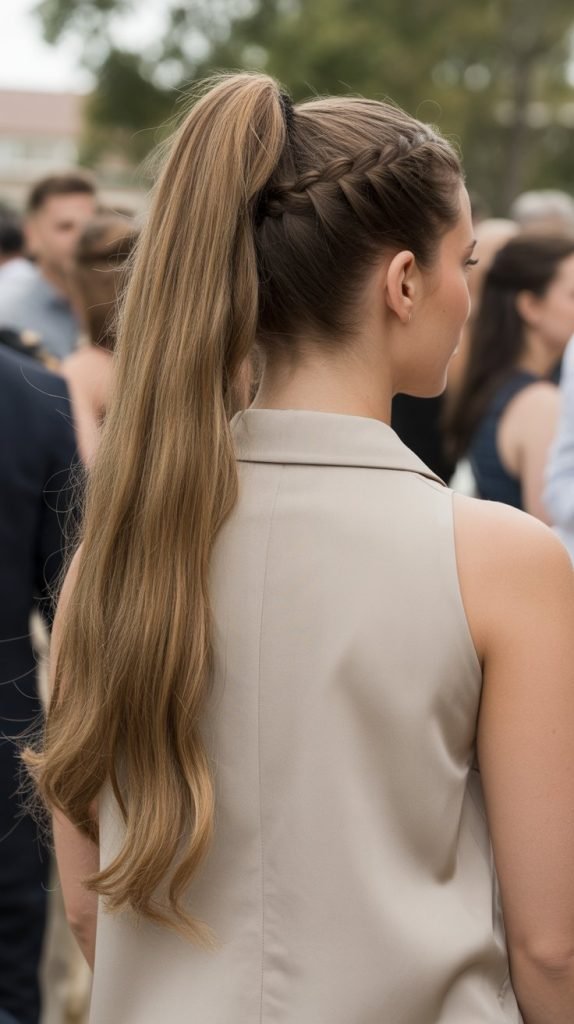
A braided ponytail elevates the standard ponytail with textured detail that’s both practical and stylish, perfect for guests who want a polished look that keeps hair completely off the face. This style works for weddings of any formality level.
- Braided ponytails can feature braids in various positions—wrapping around the base, incorporated into the ponytail itself, or leading into the ponytail from the scalp.
- This style is particularly practical for outdoor or summer weddings where keeping hair secured and off the neck is both comfortable and necessary.
- Start by deciding whether you want a high, mid, or low ponytail based on your face shape and the formality of the wedding.
- Brush all hair back smoothly and secure it at your chosen height with a strong elastic that can support the weight of long hair.
- Take a small section from underneath the ponytail and braid it traditionally using three strands, braiding all the way to the ends.
- Wrap this braid around the base of the ponytail to conceal the elastic, securing the end with a bobby pin tucked underneath for an invisible finish.
- Alternatively, you can braid the entire ponytail length for a more textured, bohemian appearance that’s appropriate for casual or outdoor weddings.
- For added volume at the crown, gently backcomb the hair at the top of your head before creating the ponytail, then smooth the surface layer.
- Use a toothbrush with a small amount of gel to smooth any flyaways or bumps, particularly at the hairline and around the part.
- Finish with a light-hold hairspray that maintains the sleekness while allowing the ponytail to swing naturally when you move.
14. Messy Side Bun
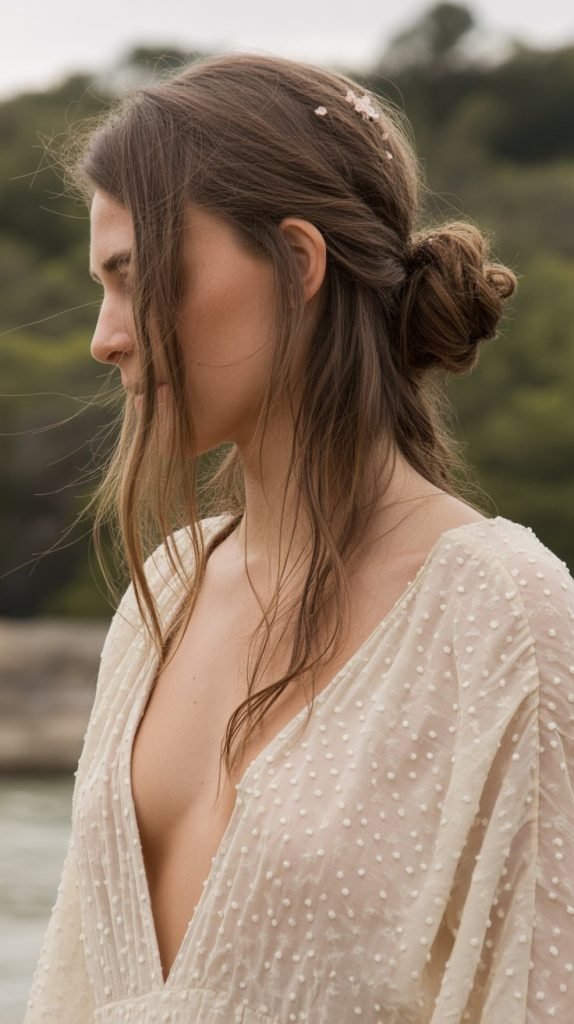
The messy side bun embodies effortless elegance with its deliberately undone appearance that looks both romantic and sophisticated. This style is perfect for guests who want to appear polished without looking overly formal or stiff.
- Messy buns intentionally incorporate texture, looseness, and strategically placed flyaways to create an organic, lived-in appearance.
- This hairstyle works beautifully for guests with naturally wavy or textured hair as it embraces rather than fights natural texture.
- Start with day-old hair or hair that has been sprayed with dry shampoo and texturizing spray to create the grip and texture necessary for a messy style.
- Create a side part and gather all hair over one shoulder, holding it loosely at a point behind and slightly below your ear.
- Instead of creating a smooth ponytail, twist the gathered hair loosely and begin wrapping it around itself in an irregular, organic pattern.
- Allow pieces to escape naturally as you wrap and secure the bun with bobby pins inserted randomly rather than in a systematic pattern.
- Gently pull on sections of the bun to create volume and looseness, intentionally creating an asymmetrical, imperfect shape.
- Pull out face-framing pieces, especially around your temples and in front of your ears, to soften the look and create romantic framing.
- Use your fingers to gently mess up the texture further, pulling on random sections to create that perfectly imperfect appearance.
- Set with a flexible-hold hairspray that maintains the style without eliminating the movement and natural quality that makes this look special.
15. Dutch Braid into Ponytail
Combining a Dutch braid with a ponytail creates a sporty-chic look that’s both practical and stylish, perfect for guests attending active or outdoor weddings. This style keeps hair secure while adding visual interest.
- Dutch braids, also called inverted French braids, are created by crossing sections under rather than over, making the braid appear to sit on top of the hair rather than woven into it.
- This style is excellent for guests with active lifestyles or those attending weddings with outdoor activities like lawn games or dancing where hair security is important.
- Begin with slightly textured hair achieved through dry shampoo or texturizing spray to help the braid grip properly.
- Section off hair from your forehead to the crown, leaving the sides and back loose for now.
- Divide this front section into three equal strands and begin the Dutch braid by crossing the right strand under the middle, then the left strand under the middle.
- With each crossing motion, add more hair from the sides into the outer strands before crossing them under, continuing this pattern as you braid toward the crown.
- Keep the braid relatively tight and close to the scalp to ensure it stays secure and creates that prominent raised appearance characteristic of Dutch braids.
- When you reach the crown of your head where you want the ponytail to begin, stop adding new hair and secure all hair (including the braid) into a ponytail.
- Gently pull on the outer edges of the braid sections to create width and dimension, being careful not to pull so hard that you loosen the braid’s security.
- Take a small section from the ponytail and wrap it around the elastic to conceal it, then finish with hairspray focusing on the braid to prevent flyaways.
16. Pinned Back Waves
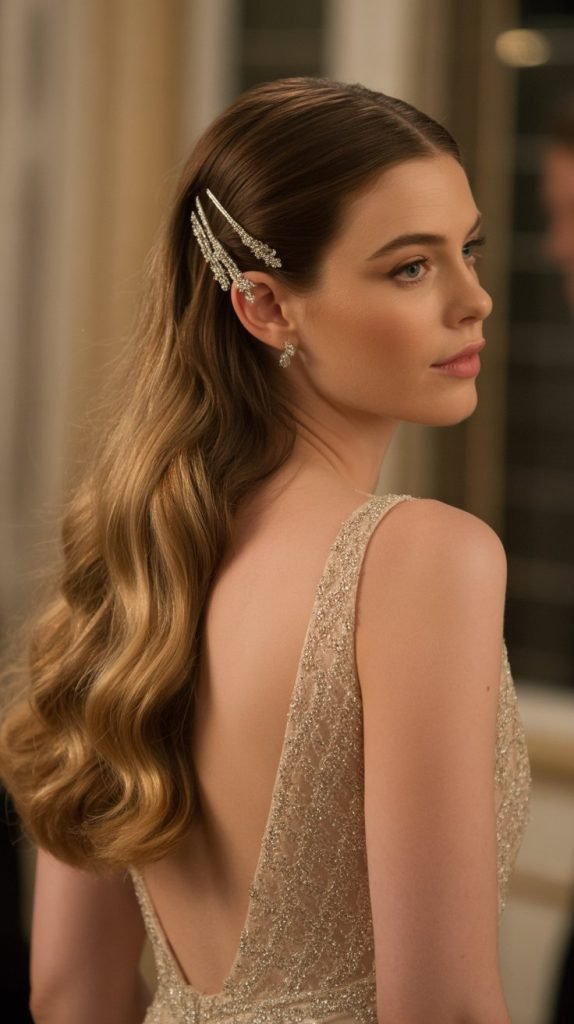
Pinned back waves offer Hollywood glamour with a practical twist, keeping hair away from the face while showcasing beautiful, flowing waves. This style is perfect for guests who want drama and elegance without a full updo.
- This asymmetrical style creates visual interest by styling hair differently on each side, with one side pinned back and the other left flowing freely.
- Pinned back waves work exceptionally well for guests with thick, voluminous hair that can support the weight of decorative pins and accessories.
- Start by creating loose waves throughout all your hair using a 1.5-inch curling iron, alternating curl directions for natural-looking dimension.
- Create a deep side part, sweeping the larger section of hair over one shoulder and leaving the smaller section on the opposite side.
- On the side with less hair, take a section from near your temple and gently twist it backward toward your ear, maintaining some volume rather than pulling it tight.
- Secure this twisted section behind your ear with bobby pins or decorative pins, depending on how much embellishment you want to incorporate.
- Continue taking sections from this same side and pinning them back in layers, creating a cascading pinned effect that reveals your ear and the side of your face.
- Leave the opposite side completely loose with waves flowing naturally over your shoulder for dramatic asymmetry.
- For added security, especially if using heavy decorative pins, use regular bobby pins first to create a stable foundation, then add decorative pins on top.
- Finish with a flexible-hold hairspray that maintains the waves’ shape without sacrificing their soft, touchable movement.
17. Fishtail Braid
The fishtail braid creates an intricate, woven appearance that looks complex but requires only basic braiding skills. This bohemian-inspired style works beautifully for casual and semi-formal weddings alike.
- Fishtail braids are created using only two sections of hair rather than three, crossing small pieces from the outer edges to create a distinctive herringbone pattern.
- This braid style is particularly stunning when “pancaked” or pulled apart to create width and dimension, transforming a thin braid into a statement piece.
- Begin with dry, slightly textured hair enhanced with dry shampoo or texturizing spray for better grip and hold.
- Gather all hair into a low ponytail at the nape of your neck and divide it into two equal sections instead of the traditional three.
- Take a small piece (about a half-inch) from the outer edge of the right section and cross it over to join the left section.
- Then take a small piece from the outer edge of the left section and cross it over to join the right section.
- Continue this alternating pattern of taking small pieces from the outer edges and crossing them to the opposite side, maintaining even tension throughout.
- The smaller the pieces you take from the outer edges, the more intricate and detailed your fishtail braid will appear when finished.
- After braiding to the ends and securing with an elastic, use your fingers to gently pull on the outer edges of the braid sections to create that signature voluminous, pancaked look.
- For a more bohemian vibe, leave the braid slightly loose and messy rather than making it perfectly uniform, and pull out a few face-framing pieces at the front.
18. Ballerina Bun
The ballerina bun embodies grace and sophistication with its high placement and sleek execution, perfect for formal weddings where elegance is paramount. This classic updo showcases the neck and shoulders beautifully.
- Ballerina buns sit at the crown of the head, creating an elongated silhouette that’s both regal and youthful, reminiscent of classical ballet aesthetics.
- This hairstyle is especially flattering for guests with long, graceful necks and defined shoulders as it draws attention to these features.
- Start with freshly washed hair that has been dried completely smooth using a paddle brush and blow dryer for the sleek foundation necessary for this style.
- Apply a smoothing serum or gel throughout your hair, focusing on the roots and mid-lengths to eliminate any frizz or flyaways.
- Brush all hair upward toward the crown of your head, tilting your head back slightly to maintain the height and prevent the ponytail from slipping.
- Secure the high ponytail tightly with a strong elastic, wrapping it multiple times to ensure it can support the weight of the bun throughout the day.
- Twist the ponytail tightly in one direction, maintaining the twist as you wrap it around the base in a circular, coiling motion.
- Tuck the ends underneath the bun and secure the entire structure with numerous bobby pins inserted in a spoke-like pattern from the base outward.
- For extra security and a more polished appearance, wrap a hair donut or bun maker into the ponytail before twisting it around the base.
- Use a toothbrush with edge control gel or pomade to slick down any baby hairs or flyaways at the hairline, then finish with a strong-hold hairspray for all-day perfection.
19. Romantic Low Ponytail with Volume
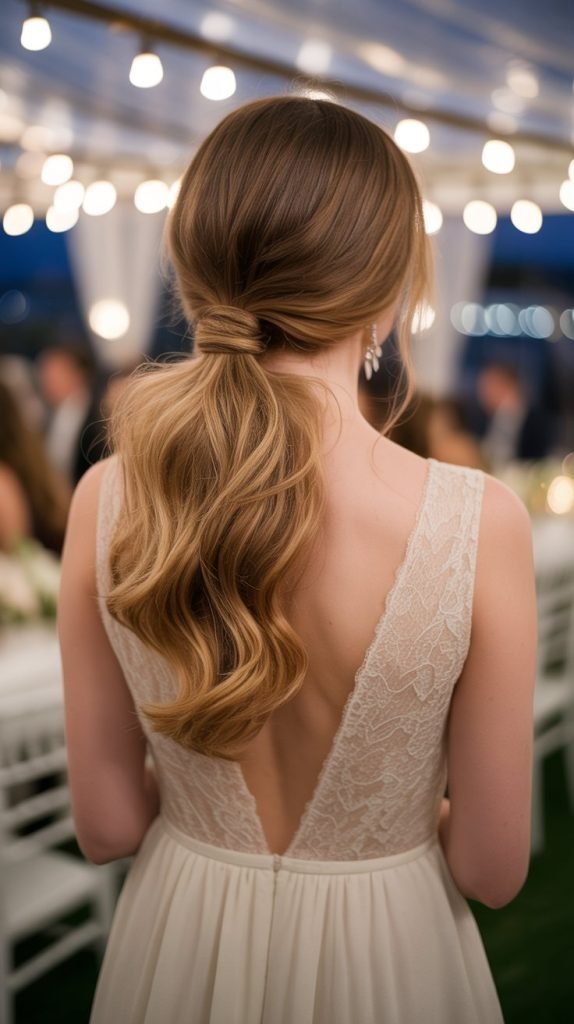
A romantic low ponytail with volume at the crown offers elegant simplicity with a touch of glamour, perfect for guests who want a polished look that’s less formal than an updo. This style elongates the face while maintaining femininity.
- This style combines the sophistication of a low ponytail with the drama of volumized crown height, creating dimension and visual interest.
- Low ponytails with volume work particularly well for guests with fine or thin hair as the teasing technique creates the illusion of thickness and fullness.
- Begin by sectioning off the crown area (from temple to temple and from forehead to mid-crown) and clipping it away temporarily while you work on the lower sections.
- Apply volumizing mousse to the roots of the crown section, then use a fine-tooth comb to backcomb this section in small layers, creating a cushion of volume.
- Smooth the top layer of the teased section gently with a boar bristle brush to create a polished surface while maintaining the volume underneath.
- Gather all remaining hair at the nape of your neck into a low ponytail, keeping the tension loose enough to maintain the volume you’ve created at the crown.
- Secure the ponytail with an elastic, positioning it slightly off-center if desired for a more modern, asymmetrical appearance.
- Take a small section from underneath the ponytail and wrap it around the elastic to conceal it, securing with a bobby pin tucked invisibly underneath.
- Use a curling iron on the ponytail length to create loose waves or curls that add movement and romance to the overall style.
- Pull out a few wispy pieces around the face and hairline to soften the look and create that effortlessly romantic, lived-in quality.
- Apply a medium-hold hairspray focusing on the crown area to lock in the volume while allowing the ponytail to move naturally and maintain its soft texture.
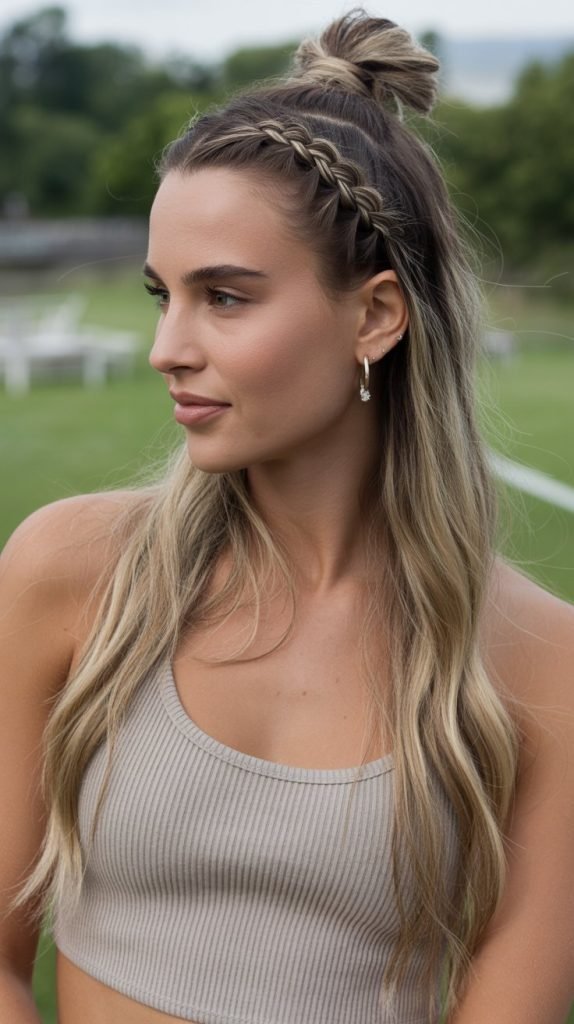
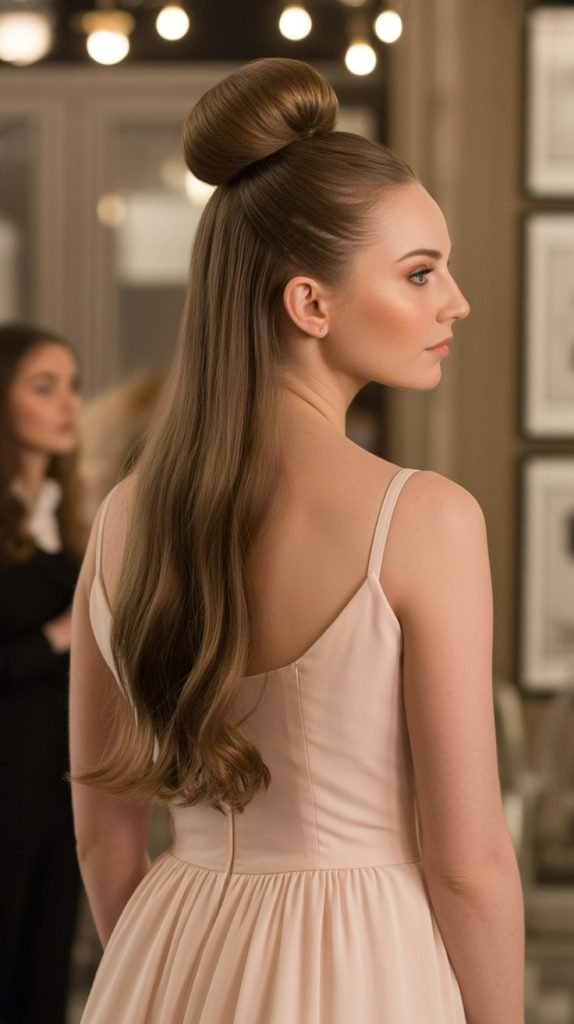
20. Twisted Half-Up Top Knot
The twisted half-up top knot combines trendy top knot styling with romantic twists, creating a youthful, fashion-forward look that’s perfect for contemporary weddings. This style keeps hair off the face while showcasing length and texture.
- Top knots positioned at the crown create a playful, youthful vibe that’s appropriate for daytime or casual evening weddings with a modern aesthetic.
- This style works exceptionally well for guests with naturally textured or wavy hair as the texture adds dimension and interest to both the knot and flowing sections.
- Start by sectioning the top half of your hair from temple to temple, creating a horizontal part approximately at ear level.
- Divide this top section into two equal parts at the center back, creating a clear division point where the two twists will meet.
- Take the right section and begin twisting it tightly from the front toward the back, maintaining tension as you twist to ensure it holds its shape.
- As you twist toward the center back, angle the twist slightly upward toward the crown to position the eventual top knot at a flattering height.
- Repeat the twisting process with the left section, bringing both twisted sections together at the crown where they meet.
- Combine both twisted sections and wrap them around each other or around themselves to create a small, textured top knot.
- Secure the top knot with bobby pins inserted in multiple directions, creating a stable structure that won’t slip or unravel during movement.
- Leave the bottom half of your hair loose and flowing, curling it lightly if desired or leaving it natural for a more relaxed, bohemian appearance.
- Pull out a few face-framing pieces and gently loosen the twists slightly for a softer, more romantic finish.
21. Braided Headband Style
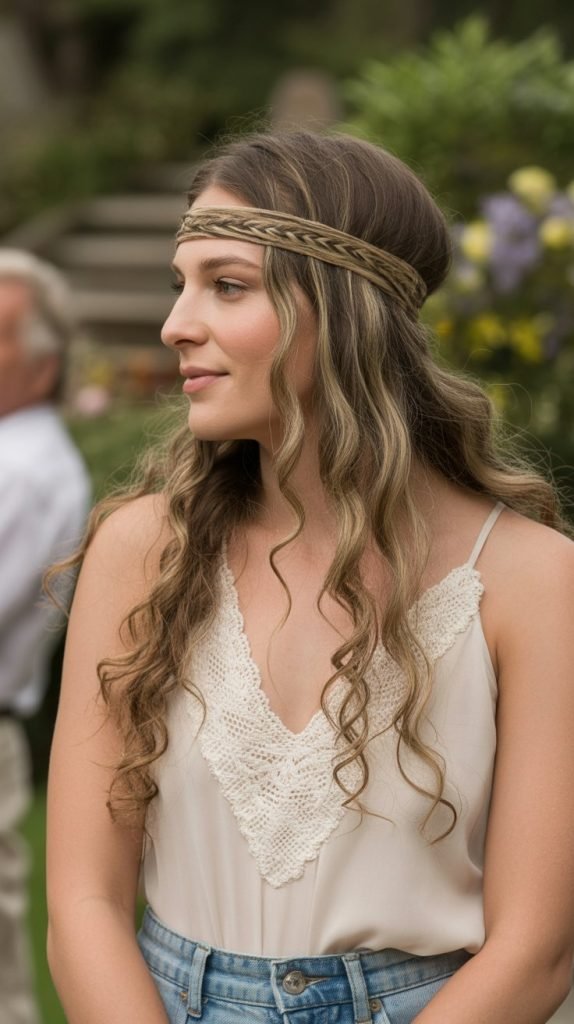
A braided headband style uses your own hair to create a natural headband effect across the front, offering bohemian charm with practical elegance. This look keeps hair away from the face while maintaining a romantic, flowing appearance.
- Braided headbands eliminate the need for actual accessories while creating the same visual effect using your natural hair texture and color.
- This style is particularly effective for guests with highlighted or multi-dimensional hair color as the braided headband showcases the color variation beautifully.
- Begin by creating a deep side part and sectioning off a thin layer of hair (about one inch wide) from one side of the part near your temple.
- Braid this thin section tightly using a traditional three-strand braid, maintaining even tension to ensure it holds its headband shape across your head.
- Continue braiding all the way to the ends of this section, securing temporarily with a small elastic while you prepare the rest of your hair.
- Style the remaining loose hair as desired—leave it natural, curl it, or create waves depending on the wedding’s formality and your personal preference.
- Take the braided section and bring it across the front of your head like a headband, positioning it approximately one to two inches back from your hairline.
- Secure the braid behind your opposite ear with bobby pins, tucking the end underneath the loose hair to hide it completely.
- For added dimension, create a second thin braid on the opposite side and layer it parallel to the first braid for a double headband effect.
- Gently pull on the outer edges of the braid to loosen it slightly and create width, making it more prominent and visible as a headband element.
- Finish with a light-hold hairspray that maintains the braid’s position without creating stiffness in the flowing hair below.
22. Voluminous Blowout
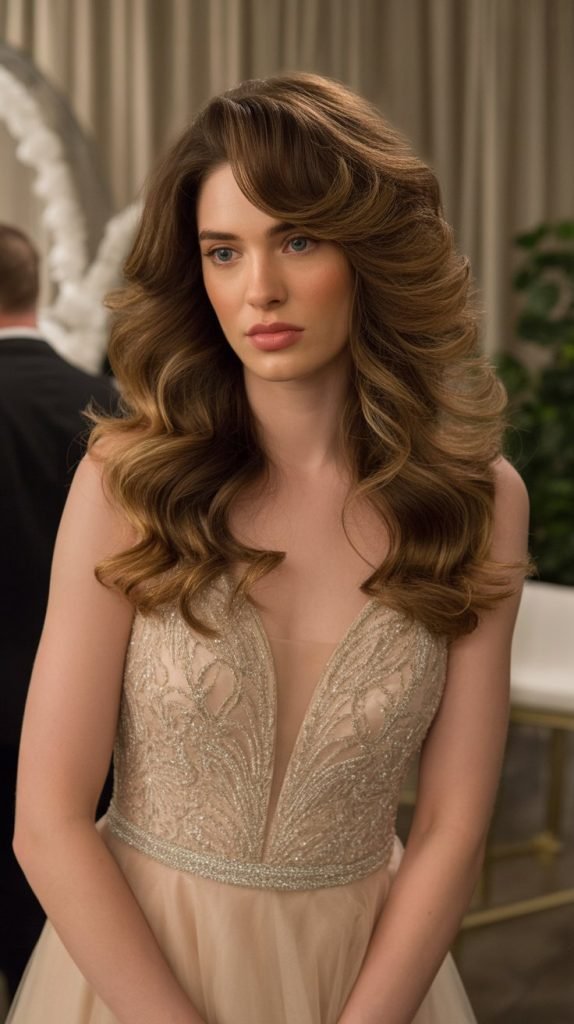
A voluminous blowout creates red-carpet glamour with its bouncy, full-bodied waves that exude confidence and sophistication. This style is perfect for guests who want maximum impact with their long hair showcase.
- Professional-quality blowouts at home require the right tools and techniques but deliver salon-worthy results that last throughout wedding celebrations.
- This style works particularly well for guests with naturally thick hair as it provides the foundation necessary for impressive, long-lasting volume.
- Start with freshly washed hair, applying a volumizing mousse from roots to ends while the hair is still soaking wet for maximum product absorption.
- Rough-dry your hair with your head flipped upside down until it’s about 60% dry, which builds natural volume at the roots.
- Section your hair into four quadrants (two in front, two in back) and work with one section at a time for systematic, thorough styling.
- Using a large round brush (at least 2.5 inches in diameter), wrap small sections of hair around the brush and direct heat from above, following the brush as you pull it through.
- Roll the brush under at the ends to create that signature curved, bouncy finish rather than straight ends.
- After blow-drying each section completely, immediately wrap it around your finger or a large-barrel curling iron and pin it to your head to set while cooling.
- This setting step is crucial for longevity—hair must cool in the desired shape to maintain volume and bounce throughout the event.
- Once all sections have cooled completely (wait at least 20 minutes), remove the pins and gently brush through with a paddle brush, then finish with volumizing hairspray.
- For extra shine and that professional finish, apply a small amount of hair oil or shine serum to the mid-lengths and ends.
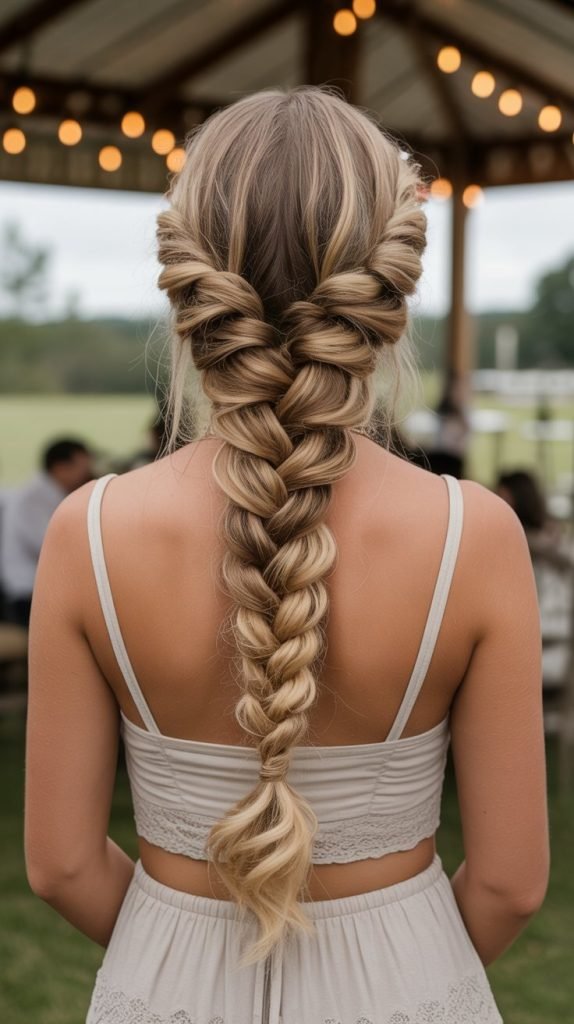
23. Boho Loose Braid
The boho loose braid embodies relaxed elegance with its deliberately undone appearance and textured, voluminous quality. This style is ideal for outdoor, rustic, or garden weddings where a more casual aesthetic is appropriate.
- Boho braids intentionally embrace imperfection, with loose sections, irregular tension, and strategically placed flyaways creating an organic, effortless appearance.
- This hairstyle is particularly stunning for guests with naturally textured, wavy, or curly hair as it celebrates rather than conceals natural texture.
- Start with hair that has been enhanced with sea salt spray or texturizing spray to create grip and that lived-in, beachy texture.
- Create loose waves throughout your hair using a large-barrel curling iron or by braiding damp hair and allowing it to air dry before styling.
- Sweep all hair over one shoulder and divide it into three sections, but make them intentionally uneven rather than perfectly equal for added dimension.
- Begin braiding loosely, maintaining minimal tension so the braid appears soft and relaxed rather than tight and structured.
- As you braid, allow small pieces to escape naturally rather than trying to incorporate every strand—this imperfection is intentional and desirable.
- After braiding to the ends and securing with an elastic (preferably a fabric-covered or decorative one), aggressively pull on the outer edges of each braid section.
- This pancaking should be dramatic for boho braids, creating significant width and volume that transforms the braid into a thick, textured statement piece.
- Pull out additional face-framing pieces and allow some shorter layers to fall naturally around your shoulders rather than being contained in the braid.
- Finish with minimal hairspray or a texturizing spray mist that enhances the undone quality while providing just enough hold.
24. Elegant French Twist
The French twist represents timeless sophistication with its vertically rolled updo that showcases grace and refinement. This classic style is perfect for formal evening weddings and black-tie celebrations.
- French twists have been a staple of elegant hairstyling for decades, favored by style icons and formal events for their sophisticated vertical silhouette.
- This updo works best for guests with medium to long hair with some natural body, as very fine or slippery hair may struggle to hold the twist structure.
- Begin with second-day hair or hair that has been lightly textured with dry shampoo to provide grip necessary for the twist to hold securely.
- Brush all hair over to one side of your head (traditionally the left), gathering it as if creating a low side ponytail.
- Hold the gathered hair with your non-dominant hand and begin twisting it upward along the center back of your head.
- As you twist, the hair will naturally want to fold inward and roll against your head—encourage this rolling motion as you continue twisting upward.
- When you reach the crown, continue tucking the ends into the vertical roll you’ve created, concealing them completely within the twist.
- Secure the twist by inserting bobby pins vertically along the length of the roll, angling them slightly toward your head for maximum grip.
- For extra security, insert additional pins horizontally through the twist from alternating sides, creating an invisible crisscross support structure.
- Smooth any flyaways with a small amount of pomade or gel on a fine-tooth comb, then set the entire style with strong-hold hairspray.
- Add decorative pins, a jeweled comb, or fresh flowers along the twist for wedding-appropriate embellishment if desired.
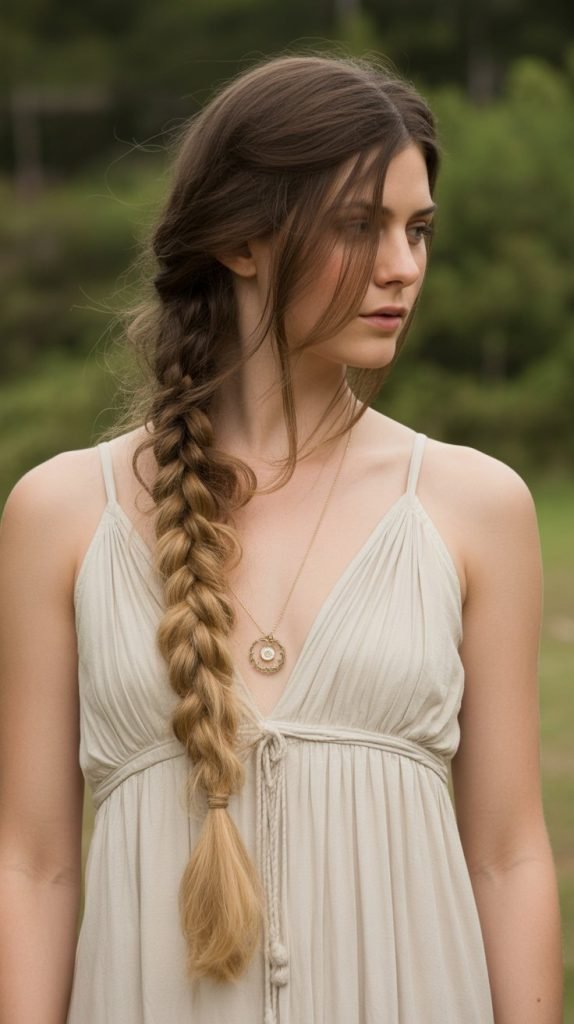
25. Rope Braid Ponytail
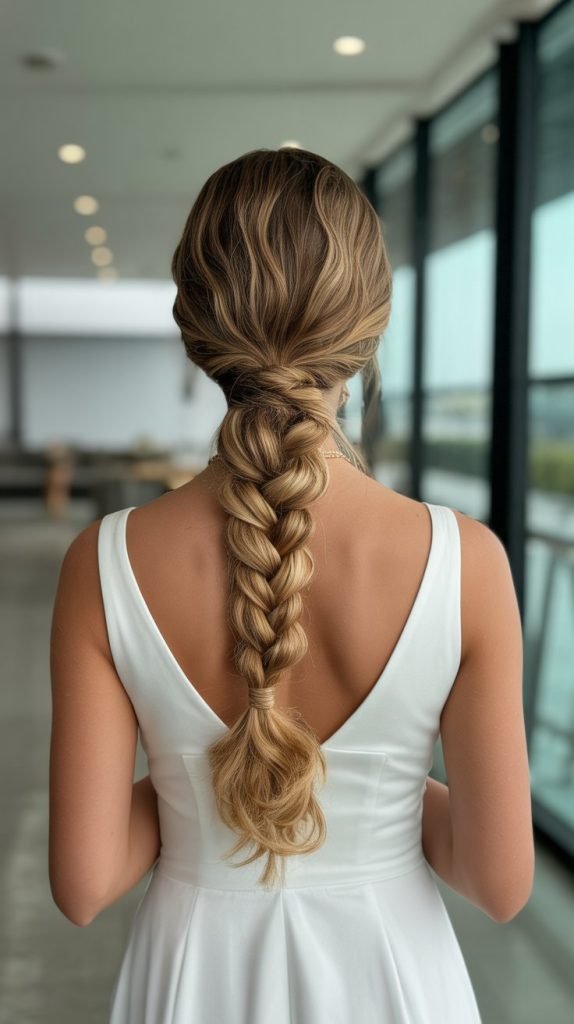
A rope braid ponytail offers textured interest through its twisted, rope-like appearance that’s simpler to create than traditional braids. This style provides a unique alternative to standard ponytails while maintaining security and polish.
- Rope braids are created by twisting two sections of hair individually and then wrapping them around each other, creating a spiral, rope-like effect.
- This technique is ideal for styling beginners who find traditional braiding challenging as it requires only twisting and wrapping motions.
- Start by creating a ponytail at your desired height—mid-level tends to be most flattering for this style as it showcases the rope texture.
- Divide the ponytail into two equal sections and twist each section tightly in the same direction (either both clockwise or both counterclockwise).
- Hold the ends of both twisted sections firmly to prevent them from unraveling as you prepare for the next step.
- Begin wrapping the two twisted sections around each other in the opposite direction from which you twisted them individually.
- This counter-direction wrapping is crucial—if you twisted both sections clockwise, wrap them around each other counterclockwise to create the rope effect.
- Continue wrapping all the way to the ends, maintaining firm tension to ensure the rope braid holds its distinctive twisted appearance.
- Secure the end with a hair elastic, preferably one that matches your hair color for an invisible finish.
- Gently pull on the outer edges of the rope braid sections to create width and dimension without fully unraveling the rope structure.
- Finish with a light-hold hairspray that maintains the twist definition while allowing natural movement in the ponytail.
26. Side-Swept Curls
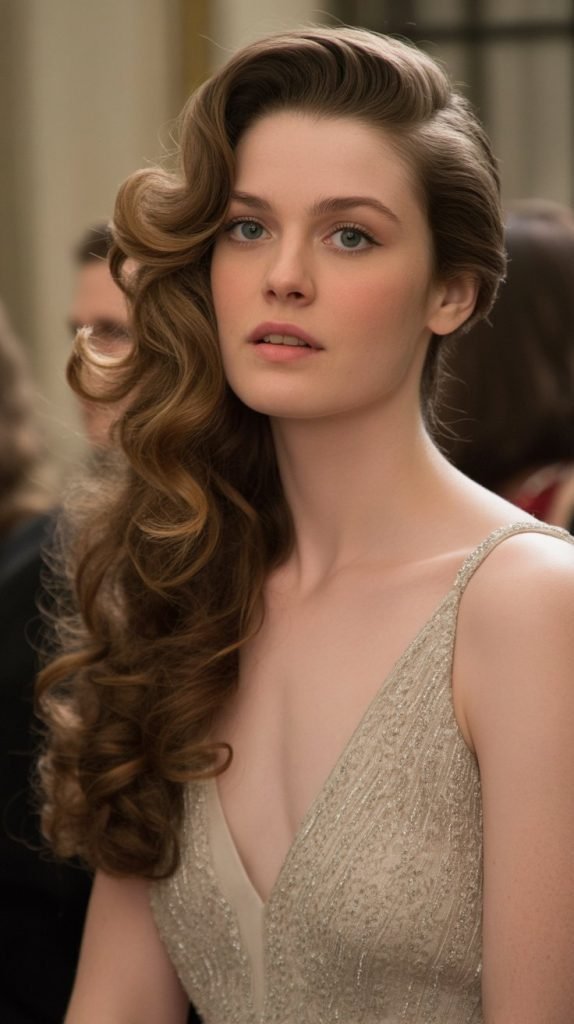
Side-swept curls create old Hollywood glamour with their dramatic asymmetry and flowing, romantic waves. This style is perfect for guests who want to make a sophisticated statement while keeping hair away from one side of the face.
- Side-swept styles create natural asymmetry that’s visually interesting and flattering, emphasizing one shoulder while revealing the opposite ear and neck.
- This hairstyle is particularly effective for guests with longer, one-shouldered, or asymmetrical dress necklines as it complements the garment’s design.
- Begin by creating a deep side part, positioning it further to one side than you normally would to create dramatic asymmetry.
- Curl all of your hair with a medium-barrel curling iron, focusing on creating uniform, well-defined curls that will blend seamlessly when swept to one side.
- Allow the curls to cool completely while pinned to your head, which sets them and ensures they maintain their shape throughout the event.
- Once cooled, brush through the curls gently with a paddle brush to create soft waves rather than defined ringlets.
- Sweep all hair over one shoulder (choose the side that best complements your dress neckline and accessories).
- On the opposite side with minimal hair, use bobby pins to secure the hair behind your ear, creating a clean, sleek appearance on that side.
- Apply a small amount of shine serum to the swept curls to enhance their glossy, luxurious appearance.
- Set the style with medium-hold hairspray, focusing particularly on the pinned side to ensure it stays sleek and doesn’t develop flyaways.
- For added security and elegance, insert decorative pins or a small jeweled comb on the side where hair is pinned back.
27. Crown Braid with Loose Hair
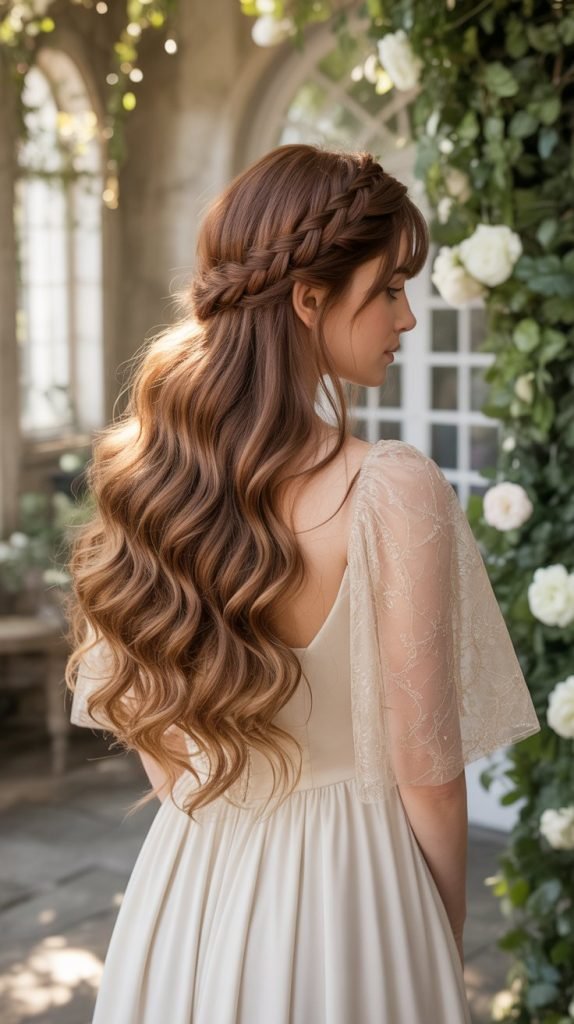
A crown braid encircling the head while leaving hair flowing below creates a princess-like aesthetic that’s both romantic and regal. This style works beautifully for garden or fairytale-themed weddings.
- Crown braids create a halo effect around the head, offering a fairy-tale quality that’s particularly popular for romantic, outdoor, or themed wedding celebrations.
- This style works exceptionally well for guests with naturally wavy or curly hair in the loose sections as the texture contrast enhances the overall look.
- Start by creating a center part from your forehead to the crown, then part your hair horizontally from ear to ear across the back of your head.
- The hair below this horizontal part will remain loose, while the hair above will form the crown braid.
- Beginning on one side near your temple, start a Dutch braid by dividing a small section into three strands and crossing them under rather than over.
- Continue the Dutch braid around the front of your head like a headband, incorporating new sections of hair from the hairline as you braid toward the opposite side.
- When you reach the opposite temple, continue braiding around the back of your head, staying above the horizontal part line you created earlier.
- As you braid around the back, you’ll eventually run out of new hair to incorporate—at this point, continue with a regular three-strand braid.
- Bring the braid back around to where you started and secure the end by tucking it underneath the beginning of the braid and pinning it invisibly.
- Gently pull on the outer edges of the crown braid to create width and prominence, making it stand out as a substantial crown rather than a thin braid.
- Style the loose hair below the braid as desired—leave it natural, create waves, or curl it for added romance and movement.
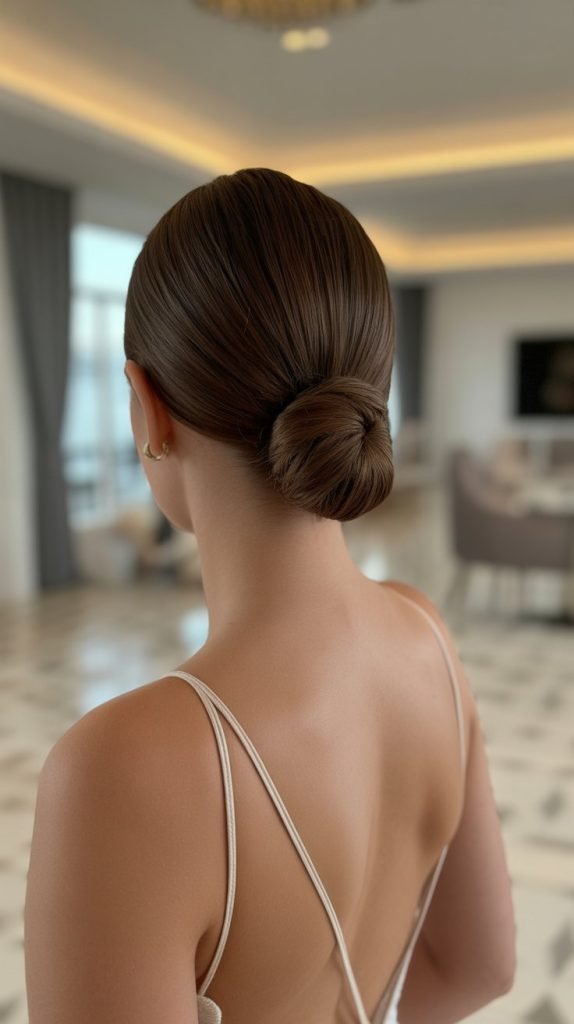
28. Sleek Low Bun with Middle Part
A sleek low bun with a precise middle part embodies modern minimalism and understated elegance, perfect for contemporary weddings with clean, sophisticated aesthetics. This timeless style never goes out of fashion.
- Middle parts create symmetry and balance, offering a modern alternative to side parts while working with virtually every face shape when styled correctly.
- This ultra-sleek style is ideal for guests with naturally straight or easily straightened hair as achieving the necessary smoothness is more manageable.
- Begin with freshly washed hair, applying a smoothing serum or cream to damp hair before blow-drying with a paddle brush for maximum sleekness.
- Create a precise center part using a fine-tooth comb, ensuring it’s perfectly straight from your hairline to the crown of your head.
- Use a flat iron on small sections throughout all of your hair to achieve pin-straight smoothness that’s essential for this polished look.
- Apply a small amount of hair gel or pomade to the roots and along the part line to eliminate any frizz or flyaways before gathering the hair.
- Brush all hair back to the nape of your neck using a boar bristle brush, maintaining the center part and keeping everything smooth and tight.
- Create a low ponytail at the nape, securing it with an elastic that provides firm hold without causing bumps or irregularities.
- Twist the ponytail and wrap it around its base in a circular coiling motion, creating a compact, neat bun at the nape.
- Secure the bun with bobby pins inserted systematically around the perimeter and through the center for comprehensive hold.
- Use a toothbrush with edge control product to slick down baby hairs and perfect the part line, then finish with strong-hold hairspray for all-day perfection.
29. Textured Updo with Accessories
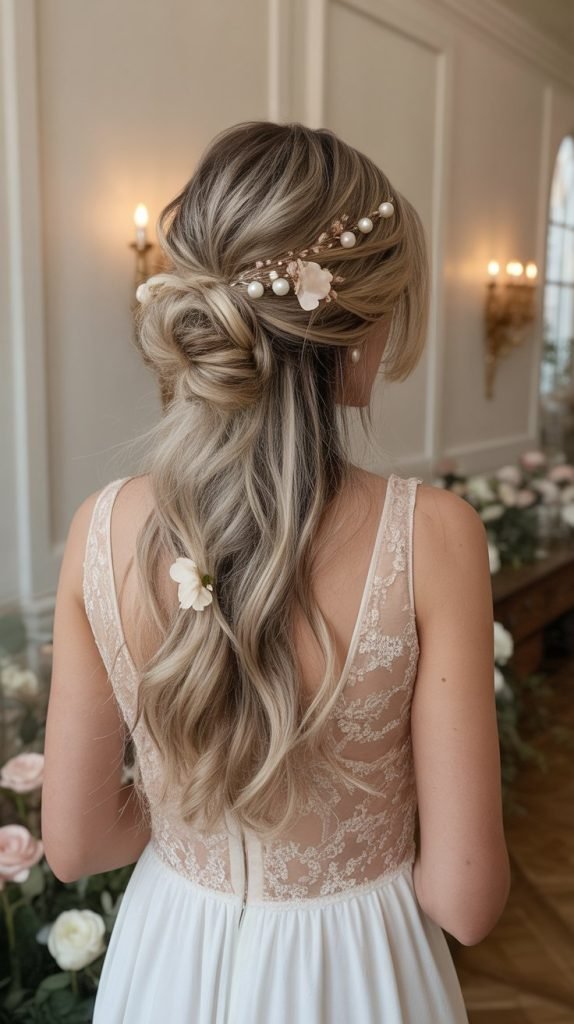
A textured updo enhanced with decorative accessories combines practical styling with personal embellishment, creating a customizable look that’s perfect for formal weddings. This versatile approach allows you to match your hairstyle to your outfit and the wedding theme.
- Accessorized updos allow you to incorporate wedding-appropriate embellishments like pearl pins, floral clips, jeweled combs, or metallic accessories that complement your outfit.
- This style is particularly effective for evening or formal weddings where adding elegant accessories elevates the sophistication of the overall look.
- Begin by curling all of your hair with a medium-barrel curling iron to create texture that will give the updo dimension and interest.
- Apply texturizing spray throughout to enhance grip and create that lived-in texture that’s characteristic of modern textured updos.
- Section your hair into multiple parts (front sides, crown, and back) and work with each section individually to create a more organic, pieced-together appearance.
- Take the back section and twist it loosely, then pin it at the nape, allowing the ends to stick out rather than tucking them completely for textured interest.
- Take the side sections and twist or braid them loosely, bringing them back to join the center section and pinning them in an overlapping, layered manner.
- Leave the twists and sections intentionally loose and messy rather than tight and smooth, creating that desirable undone quality.
- Pull out face-framing pieces around your hairline and curl them for soft, romantic framing that softens the updo.
- Insert your chosen accessories strategically throughout the updo—space pearl pins evenly, cluster floral elements on one side, or position a decorative comb at the base.
- Finish with a flexible-hold hairspray that maintains the style while preserving the textured, touchable quality of the updo.
30. Half-Up Space Buns
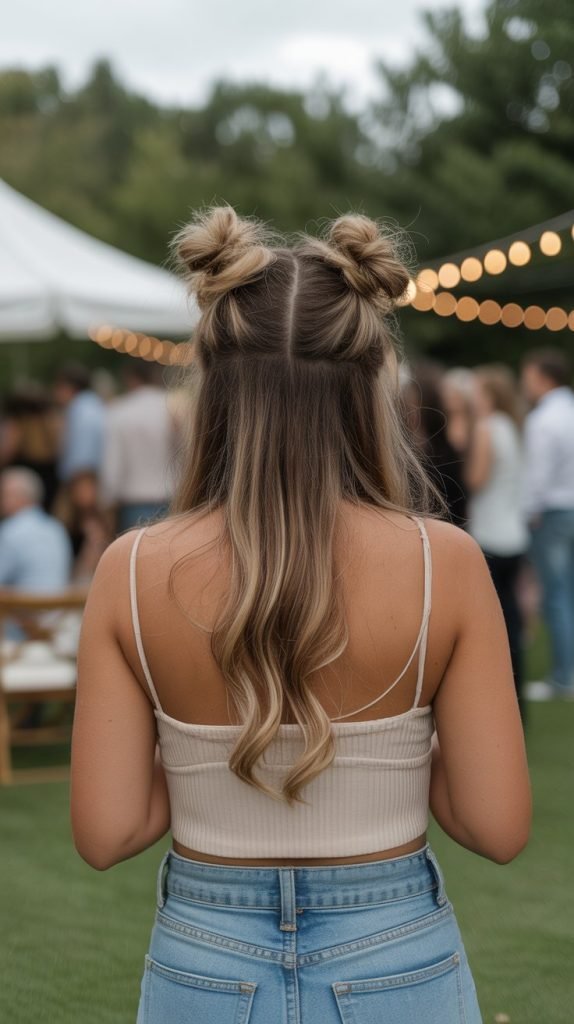
Half-up space buns offer a playful, youthful aesthetic that’s perfect for casual, outdoor, or festival-style weddings where fun and personality are encouraged. This trendy style makes a bold, fashion-forward statement.
- Space buns bring a fun, modern vibe to wedding guest styling and work particularly well for younger guests or those attending non-traditional celebrations.
- This style is especially suited for guests with colorful or highlighted hair as the buns showcase the color variation beautifully.
- Start by parting your hair down the center from your forehead to the nape of your neck, creating two equal sections.
- Section off the top half of each side (from approximately temple to ear level), leaving the bottom half loose and flowing.
- Take one of the top sections and gather it into a high ponytail on that side of your head, positioning it where you want the space bun to sit.
- Twist the ponytail and wrap it around its base in a circular motion, creating a small, compact bun that sits prominently on your head.
- Secure the bun with bobby pins and ensure it feels stable—space buns should be firm enough to maintain their rounded shape throughout wear.
- Repeat the process on the opposite side, ensuring both space buns are positioned symmetrically at the same height for visual balance.
- Leave the bottom half of your hair completely loose and flowing, styling it naturally or adding waves for texture and movement.
- For added playfulness, wrap small sections of hair from the loose portion around each bun base before securing them to create more intricate detail.
- Finish with a light-hold hairspray and consider adding fun accessories like small decorative pins or hair rings around the buns for personality.
Essential Styling Tips
Hair Preparation
- Wash your hair the day before the wedding rather than the same day, as slightly textured hair holds styles better than freshly washed, slippery hair.
- Invest in quality heat protectant products to prevent damage when using hot tools for curling, straightening, or blow-drying.
- Consider your hair’s natural texture when choosing a style—work with your hair’s natural tendencies rather than against them for easier styling and longer-lasting results.
Product Selection
- Use lightweight products for fine hair to avoid weighing it down, while thicker hair can handle heavier creams and oils without losing volume.
- Always apply hairspray from 10-12 inches away to create an even, invisible hold rather than concentrated wet spots.
- Dry shampoo serves double duty by absorbing oil and creating texture that helps styles grip better and last longer.
Tool Recommendations
- Invest in a quality curling iron with adjustable heat settings and ceramic or tourmaline barrels that distribute heat evenly and minimize damage.
- Boar bristle brushes are essential for creating smooth, sleek styles as they distribute natural oils and minimize static.
- Keep a variety of bobby pins, small elastics, and decorative accessories on hand for versatility in styling options.
Timing Considerations
- Practice your chosen hairstyle at least once before the wedding day to ensure you’re comfortable with the technique and timing required.
- Allow extra time on the wedding day—rushing through hairstyling often results in frustration and less-than-perfect results.
- Complete your hairstyle after applying makeup but before getting dressed to avoid disturbing your hair while pulling clothing over your head.
Weather Adaptations
- For humid conditions, use anti-humidity products and opt for updos or secured styles that minimize the impact of frizz on loose hair.
- In windy outdoor settings, choose styles with secure pinning rather than loose, flowing styles that will become messy.
- For hot weather weddings, consider updos that keep hair off your neck and shoulders for comfort throughout the celebration.
Conclusion
Selecting and creating the perfect wedding guest hairstyle for long hair doesn’t have to be an overwhelming task when you have a comprehensive collection of options to inspire you.
This guide to “30+ Easy Wedding Guest Hairstyles for Long Hair” has provided you with an extensive range of styles suitable for every wedding theme, formality level, and personal aesthetic preference, ensuring you’ll find the ideal look that makes you feel confident and beautiful.
From timeless classics like Hollywood waves and elegant chignons to trendy options like bubble ponytails and space buns, each hairstyle offers unique appeal while remaining achievable for home styling.
Remember that the best hairstyle is one that complements your natural hair texture, matches the wedding’s formality, stays comfortable throughout the celebration, and most importantly, makes you feel like your most beautiful, authentic self. With these detailed instructions, helpful tips, and practical guidance at your fingertips, you’re now equipped to create stunning, professional-looking hairstyles that will have you looking effortlessly elegant from the ceremony through the last dance.
Whether you prefer romantic and soft or sleek and sophisticated, your long hair is your greatest accessory, and these versatile styling options ensure you’ll celebrate in style while letting the bride shine on her special day.