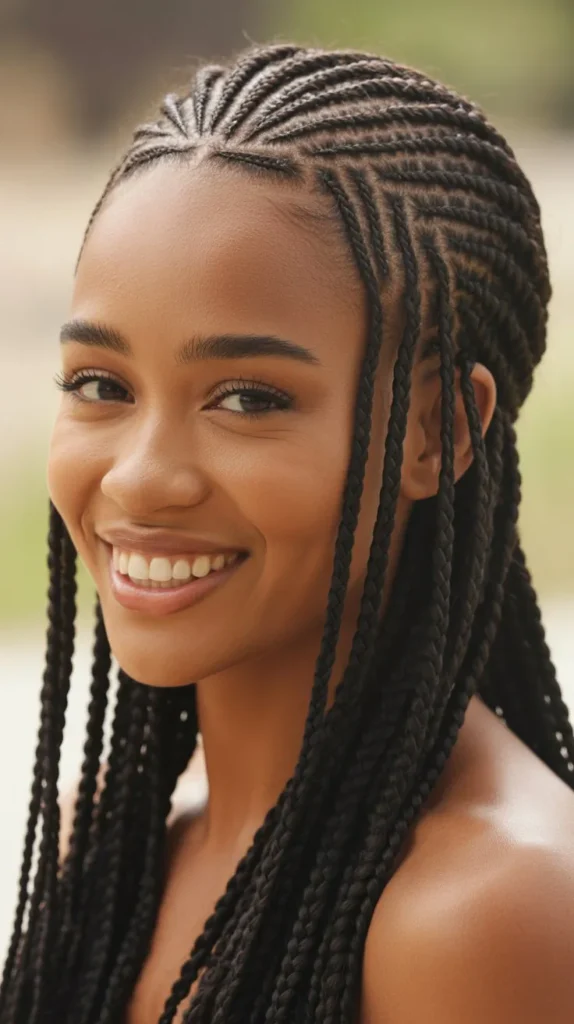
Medieval hairstyles carry an enchanting allure that continues to captivate modern imagination, blending romance with historical elegance.
Whether you’re preparing for a themed event, Renaissance fair, costume party, or simply seeking inspiration for a dramatic everyday look, recreating these timeless styles can transport you to an era of castles and courtly love.
This comprehensive guide to 30 Easy Medieval Hairstyles for Princesses will walk you through simple yet stunning techniques that range from flowing maiden locks to intricate braided crowns, each designed to make you feel regal without requiring professional hairstyling skills.
You’ll discover methods for creating authentic period looks using modern tools, learn which styles suit different hair lengths and textures, and understand the historical significance behind each design, empowering you to channel your inner princess with confidence and grace.
1. The Classic Maiden Braid

The classic maiden braid represents one of the most recognizable medieval hairstyles, characterized by its simplicity and timeless beauty.
This foundational style served as both a practical solution for managing long hair and a symbol of youth and purity in medieval society.
Step-by-Step Instructions:
- Begin with clean, brushed hair to eliminate all tangles and knots.
- Gather all your hair at the nape of your neck or center back of your head.
- Divide the hair into three equal sections for a traditional three-strand braid.
- Cross the right section over the middle, then cross the left section over the new middle.
- Continue this alternating pattern, keeping consistent tension throughout the braid.
- Secure the end with a ribbon, leather cord, or hair tie that matches your medieval aesthetic.
- Gently pull at the edges of the braid to create a fuller, more romantic appearance.
Historical Context:
- Unmarried young women commonly wore their hair in single braids to signify their maiden status.
- The longer the braid, the more it was considered a symbol of beauty and femininity.
- Peasant women favored this style for its practicality during daily labor.
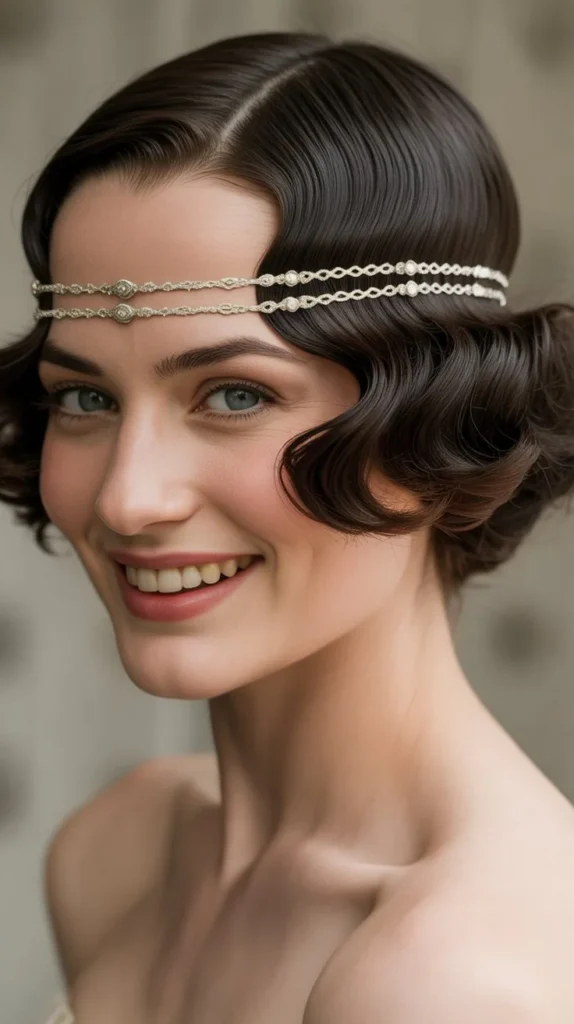
2. Double Braids with Ribbons

Double braids adorned with colorful ribbons elevated the simple maiden braid into a more decorative style suitable for festivals and celebrations.
This versatile look works beautifully for various medieval character portrayals and offers endless customization options.
Styling Technique:
- Part your hair down the center from forehead to nape, creating two equal sections.
- Secure one section temporarily while working on the other side.
- Take a long ribbon and position it at the root of the section you’re braiding.
- Incorporate the ribbon as a fourth strand, weaving it through the traditional three-strand braid.
- Alternatively, wrap the ribbon around the completed braid in a spiral pattern.
- Repeat the process on the opposite side, ensuring both braids are symmetrical.
- Leave the ribbon ends long to tie into decorative bows at the bottom.
Ribbon Selection Tips:
- Velvet ribbons provide an authentic medieval texture and rich appearance.
- Silk ribbons offer a more delicate, aristocratic aesthetic.
- Choose colors that complement your costume, with jewel tones being historically accurate.
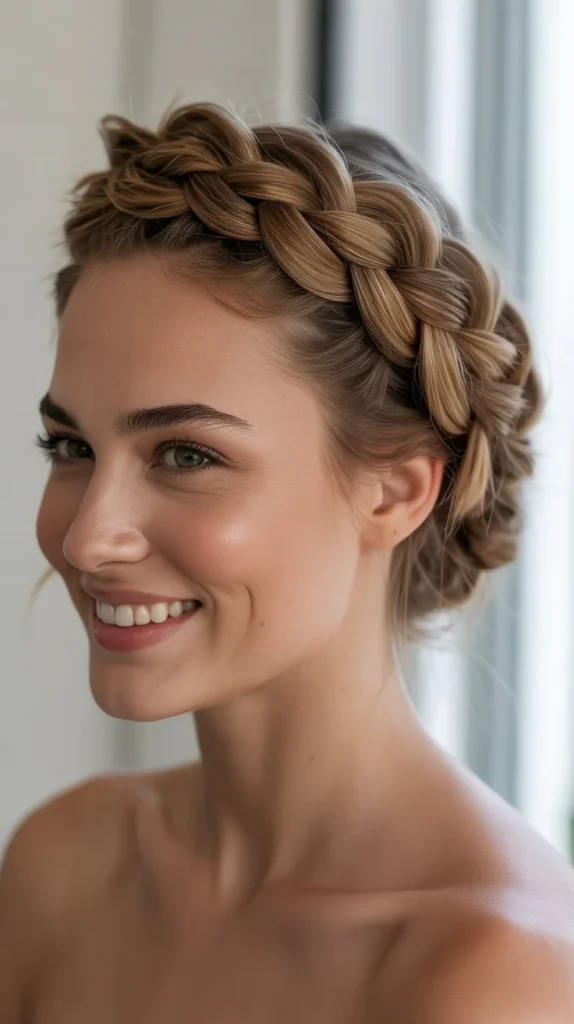
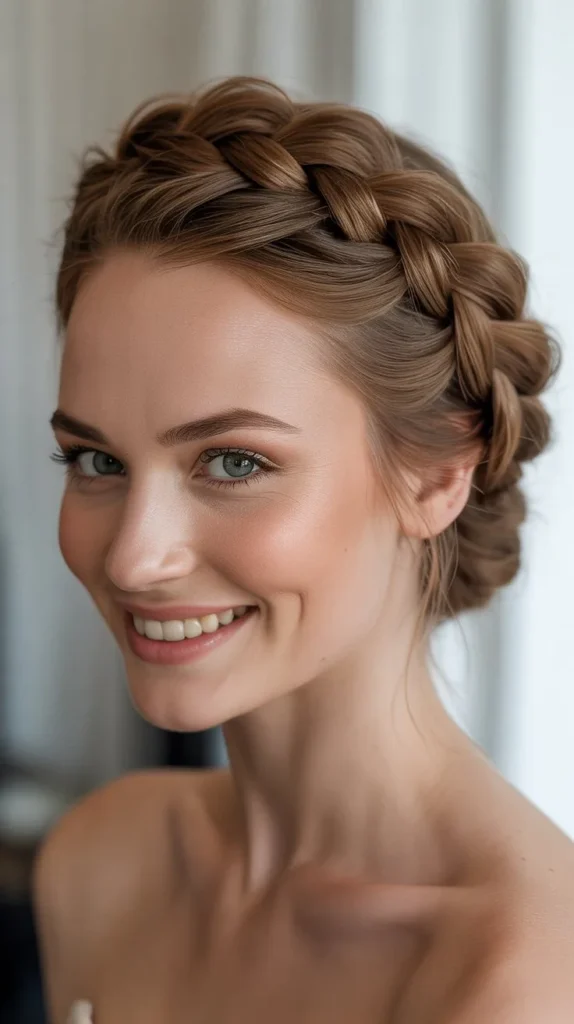
3. The Crown Braid

The crown braid circles the head like a natural tiara, creating an instantly regal appearance perfect for portraying royalty.
This style keeps hair completely off the face while maintaining an elegant, feminine silhouette that medieval noblewomen would have appreciated.
Creation Method:
- Part your hair on one side, just above the ear.
- Begin a Dutch braid (reverse French braid) by taking a section at the part.
- Braid along your hairline, adding hair only from the outside edge as you work around your head.
- Continue the braid around the entire circumference of your head, following your natural hairline.
- When you return to the starting point, continue braiding the remaining length without adding new hair.
- Tuck the tail underneath the crown and secure with bobby pins.
- Adjust the braid by gently pulling sections to create volume and hide any gaps.
Enhancement Options:
- Weave small flowers throughout the braid for a spring or summer medieval festival.
- Add pearl-headed pins along the braid for a more luxurious appearance.
- Incorporate thin chains or metalwork for a fantasy-inspired variation.
4. Half-Up Medieval Twist

The half-up twist combines the practicality of keeping hair away from the face with the romantic flow of loose locks cascading down the back.
This style particularly suited medieval ladies engaged in courtly activities where both elegance and function were required.
Construction Steps:
- Section off the top third of your hair from temple to temple.
- Divide this top section into two equal parts.
- Twist each section away from the face, keeping the twists tight and smooth.
- Bring both twisted sections to meet at the center back of your head.
- Cross the twists over each other and secure with decorative pins or a small barrette.
- Allow the remaining loose hair to flow naturally or curl it for added texture.
- Optional: braid the twisted sections instead of twisting them for variation.
Best Hair Types:
- Works exceptionally well on medium to long hair lengths.
- Wavy or curly hair adds natural volume and medieval authenticity.
- Fine hair benefits from light teasing at the crown before twisting.
5. The Wrapped Chignon

The wrapped chignon represents a sophisticated updo favored by married medieval women and those of higher social standing. This elegant style conveys maturity and status while keeping hair completely secured and out of the way.
Assembly Instructions:
- Brush all hair back and gather it at the nape of your neck.
- Create a low ponytail and secure with a hair elastic.
- Twist the ponytail tightly in one direction until it begins to coil upon itself.
- Wrap the twisted hair around the base of the ponytail, forming a circular bun.
- Secure the bun with bobby pins, ensuring it feels stable and tight.
- Take a decorative cord, ribbon, or braid made from contrasting hair.
- Wrap this decorative element around the base and throughout the bun.
- Secure the ends by tucking them into the bun or pinning them discreetly.
Historical Significance:
- Married women were often required to cover or bind their hair according to medieval custom.
- The wrapped chignon served as an elegant solution before adding veils or other head coverings.
- Noble women would use precious fabrics and gold cords to wrap their chignons.
6. Loose Waves with Circlet

Flowing waves adorned with a metallic circlet epitomize the medieval princess aesthetic in popular culture.
This style requires minimal effort while delivering maximum visual impact, making it perfect for those seeking an authentic yet simple medieval look.
Styling Process:
- Start with clean hair and apply a heat protectant if using hot tools.
- Use a large-barrel curling iron or wand to create loose, natural-looking waves.
- Curl away from the face for a more flattering, open appearance.
- Alternatively, braid damp hair overnight and release in the morning for heat-free waves.
- Gently separate the waves with your fingers rather than brushing to maintain texture.
- Position a circlet, crown, or decorative headband across your forehead.
- Adjust the circlet to sit comfortably, typically about an inch above the eyebrows.
- Use bobby pins behind the ears to secure the circlet if needed.
Circlet Options:
- Simple metal bands offer an understated, authentic appearance.
- Jeweled circlets create a more opulent, fantasy-inspired look.
- Leather bands with Celtic designs suit a more rustic medieval aesthetic.
7. The Barbette and Fillet
The barbette and fillet combination represents an authentic medieval styling technique that involves wrapping fabric under the chin and around the head.
This sophisticated style was particularly popular among noblewomen during the 13th and 14th centuries.
Wrapping Technique:
- Begin with hair either braided or coiled at the sides of the head.
- Take a long strip of linen or similar fabric approximately four inches wide.
- Place the center of the fabric strip under your chin.
- Bring both ends up along your cheeks and over the top of your head.
- Cross the ends at the crown or tie them, depending on fabric length and preference.
- Position a decorative band (fillet) horizontally across your forehead over the barbette.
- Secure the fillet with pins if necessary to keep it properly positioned.
- Ensure the barbette fabric lays smooth and flat without bunching.
Fabric Recommendations:
- Linen provides the most historically accurate appearance and texture.
- White or natural undyed fabric was most common for lower classes.
- Nobility might use silk or finely woven fabrics in various colors.
8. Side-Swept Braid with Flowers

A romantic side-swept braid adorned with fresh or silk flowers captures the essence of medieval spring festivals and May Day celebrations. This style beautifully showcases both the braid’s intricate detail and the delicate floral accents.
Creation Guide:
- Sweep all hair to one side, either left or right depending on preference.
- Secure the hair temporarily at shoulder level to keep it in position.
- Begin a traditional or fishtail braid starting from below the ear.
- As you braid, periodically insert flower stems into the woven sections.
- Position flowers at varying intervals rather than uniformly for a natural appearance.
- Continue braiding to the desired length, ensuring flowers are secure.
- Fasten the end with a ribbon that coordinates with your flower colors.
- Apply light hairspray to help maintain the braid and keep flowers in place.
Flower Selection:
- Baby’s breath creates a delicate, ethereal effect suitable for innocent maiden characters.
- Roses or rose buds add richness and are historically accurate for nobility.
- Daisies, lavender, and wildflowers suit a more rustic, pastoral aesthetic.
- Silk flowers offer a practical alternative that won’t wilt during extended events.
9. The Horned Hennin Style
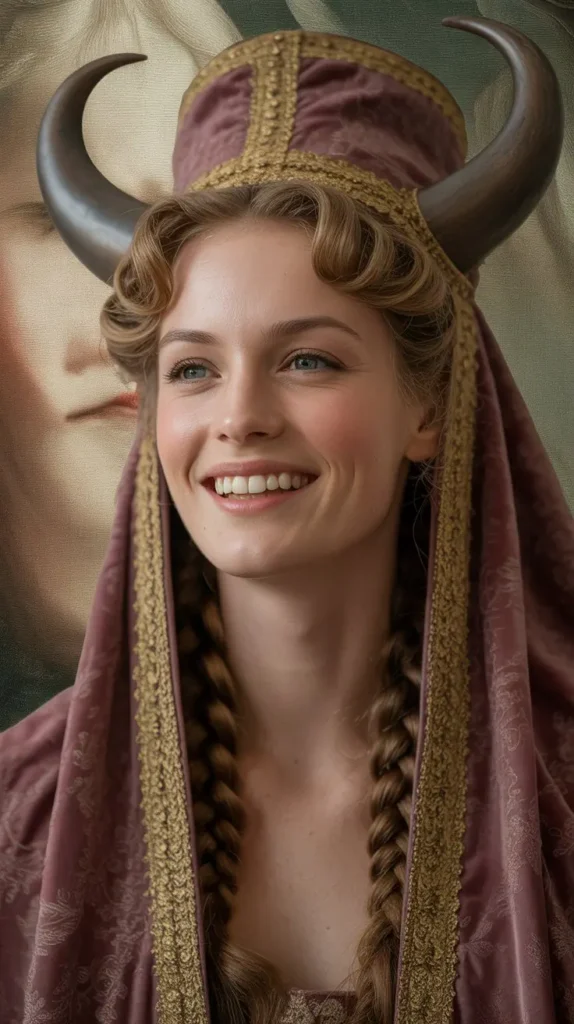
The horned hennin style mimics the iconic conical headdresses of the late medieval period, though this adaptation creates the shape using hair rather than a structural headpiece.
This dramatic style makes a bold statement at Renaissance fairs and medieval-themed events.
Construction Method:
- Part hair down the center from forehead to nape.
- Create two high ponytails positioned where you want the “horns” to sit.
- Backcomb each ponytail section to create significant volume and texture.
- Twist each section upward and pin it in place, forming a cone or horn shape.
- Use additional bobby pins to secure the structure and maintain the pointed shape.
- Wrap decorative netting, fabric, or ribbon around each horn.
- Smooth any flyaways with hairspray or a light pomade.
- Optional: extend the horns’ height with hair padding or extensions for added drama.
Historical Background:
- The hennin headdress was fashionable among nobility in the 15th century.
- Church authorities sometimes criticized these elaborate styles as vain or excessive.
- The higher and more elaborate the hennin, the greater the wearer’s status.
10. Simple Center Part with Tucked Sides

This understated style features a clean center part with sides smoothly tucked behind the ears, often seen in medieval illuminated manuscripts depicting everyday women.
Its simplicity makes it accessible while still maintaining period authenticity.
Styling Steps:
- Create a precise center part using a rattail comb from forehead to crown.
- Brush all hair smooth, ensuring no bumps or irregularities.
- Tuck sections behind each ear, keeping the hair flat against the head.
- Optional: secure the tucked sections with small bobby pins for longer hold.
- Allow the remaining length to flow naturally down the back.
- Apply a small amount of styling cream to control flyaways and add shine.
- This style works best on straight to slightly wavy hair textures.
When to Choose This Style:
- Ideal for portraying common medieval women or servants.
- Perfect for those new to historical hairstyling who want simple authenticity.
- Works well under veils, coifs, or other head coverings.
- Suitable for hot weather events where elaborate styles would be uncomfortable.
11. The Fishtail Princess Braid

The fishtail braid creates an intricate, textured appearance that looks complex but requires only basic braiding skills. This style gained romantic associations with medieval imagery through fantasy literature and period dramas.
Braiding Instructions:
- Gather all hair and divide it into two equal sections instead of three.
- Take a small strand from the outer edge of the left section.
- Cross this small strand over to join the right section.
- Take a small strand from the outer edge of the right section.
- Cross this strand over to join the left section.
- Continue this alternating pattern, keeping the small strands consistent in size.
- The smaller the strands you take, the more intricate and detailed the braid appears.
- Secure the end with an elastic or ribbon once you reach the desired length.
- Gently pull at the edges of the braid to create a fuller, more voluminous effect known as “pancaking.”
Variations:
- Side fishtail braid for an asymmetrical medieval look.
- Double fishtail braids for a more youthful, maiden appearance.
- Fishtail crown braid wrapped around the head like a halo.
12. Braided Updo with Gold Chains

Incorporating gold chains or decorative metalwork into braided updos reflects the medieval nobility’s love of displaying wealth and status through personal adornment.
This luxurious style suits formal medieval events and fantasy-themed celebrations.
Assembly Process:
- Create multiple braids throughout the hair, varying sizes for visual interest.
- Coil and pin these braids at the back of the head, forming an intricate updo.
- Secure each coiled braid section with bobby pins, building a stable structure.
- Drape fine gold chains across the updo, weaving them between braids.
- Attach the chains using decorative pins or small clips at strategic points.
- Add jeweled pins or combs throughout the style for additional sparkle.
- Ensure the overall structure feels balanced and secure before finishing.
- Set the style with strong-hold hairspray to maintain its shape throughout your event.
Chain Selection:
- Fine jewelry chains create an elegant, refined appearance.
- Costume jewelry offers affordable options with similar visual impact.
- Consider chains with small dangling elements for added movement and interest.
13. The Coiled Side Buns
Coiled side buns positioned over each ear create the iconic “Princess Leia” silhouette that actually draws inspiration from medieval and Renaissance hairstyles. This symmetrical style appeared frequently in artwork from the period depicting noble ladies.
Creation Technique:
- Part hair down the center and divide into two equal sections.
- Create a low ponytail on each side, positioned just above and in front of the ears.
- Twist each ponytail tightly in one direction until it begins to coil.
- Wrap the twisted hair around the base of the ponytail, forming a flat, spiral shape.
- Pin the coil securely using multiple bobby pins inserted from different angles.
- Repeat the process on the opposite side, ensuring both buns are symmetrical in size and position.
- Adjust the coils to sit flat against the head rather than protruding outward.
- Finish with decorative pins, small combs, or netting for added authenticity.
Historical Context:
- Similar styles appeared in 14th and 15th century European portraiture.
- The style kept hair contained while still displaying its length and abundance.
- Noble women often covered these coils with decorative cauls or nets.
14. Waterfall Braid with Loose Curls

The waterfall braid creates a cascading effect where strands appear to fall through the braid like water, combining intricate detail at the crown with flowing curls below. This romantic style perfectly captures medieval fantasy aesthetics.
Braiding Method:
- Begin with curled or waved hair for the best visual effect.
- Take a section of hair near the temple and divide it into three strands.
- Start a regular braid for one stitch (right over middle, left over middle).
- Drop the front strand and let it fall, replacing it with a new section from behind.
- Continue braiding, consistently dropping the front strand and replacing it.
- Work around the crown of the head from one side to the other.
- Secure the braid at the opposite temple with a small elastic or pin.
- Curl any unbraided sections to blend with the waterfall strands.
Styling Tips:
- The waterfall braid shows best on hair with highlights or multiple tones.
- Keep the braid relatively loose for a softer, more romantic appearance.
- This style works on medium to long hair lengths for the best effect.
15. The Medieval Low Ponytail

A simple low ponytail secured with period-appropriate accessories offers a practical yet historically accurate option for medieval hairstyling.
This understated style appears frequently in depictions of working women and young girls from the medieval period.
Styling Instructions:
- Brush all hair back smoothly without creating excessive volume at the crown.
- Gather hair at the nape of the neck, positioned at or slightly below ear level.
- Secure with a leather cord, ribbon, or fabric strip rather than modern elastic.
- Wrap the tie multiple times and knot it securely.
- Allow the ponytail to hang naturally without additional styling.
- Optional: add a simple braid to the ponytail for subtle interest.
- This style works for all hair textures and lengths past shoulder length.
Accessory Options:
- Leather cords provide authentic texture and rustic appeal.
- Wool yarn or strips of fabric suit lower-class character portrayals.
- Ribbon in muted, natural-dyed colors adds modest decoration.
16. Rope Braid Crown
The rope braid creates a twisted, textured appearance distinct from traditional three-strand braids, and when formed into a crown, it creates elegant dimension. This technique offers a fresh variation on the classic crown braid style.
Technique Instructions:
- Gather hair into a side ponytail positioned above one ear.
- Divide the ponytail into two equal sections.
- Twist each section clockwise (or in the same direction) until tight.
- Wrap both twisted sections around each other counterclockwise.
- The opposing directions create a rope-like texture that won’t unravel.
- Continue rope braiding until you reach the end of the hair.
- Wrap the rope braid around your head following the hairline.
- Tuck the end underneath the crown and secure with bobby pins.
- Pull gently at the braid to increase volume and create a fuller crown.
Best Practices:
- Keep consistent tension while twisting and wrapping for uniform appearance.
- This technique works particularly well on thick, coarse hair.
- The rope braid creates more texture and interest than smooth twists.
17. The Juliet Cap Style

The Juliet cap style references the Renaissance period that followed the Middle Ages but maintains medieval aesthetic principles. This delicate style features a small, jeweled cap or snood that sits at the crown while hair flows from beneath.
Arrangement Method:
- Curl or wave hair to create soft, romantic texture throughout.
- Section off a small portion at the crown where the cap will sit.
- Secure this section with pins if needed to create a stable base.
- Position the Juliet cap, snood, or decorative caul at the crown.
- Secure the cap using built-in combs or additional bobby pins.
- Arrange the remaining loose hair to flow naturally around and beneath the cap.
- Ensure the cap sits securely without sliding forward or backward.
- Optional: pull small face-framing pieces forward for a softer look.
Cap Selection:
- Beaded or jeweled caps suit formal occasions and noble characters.
- Simple metalwork caps offer authentic medieval appearance.
- Crocheted or netted snoods provide a handmade, artisan quality.
18. Braided Headband with Down Hair

A braid created from the front sections of hair and wrapped like a headband across the crown offers both practical function and decorative appeal. This style keeps hair away from the face while showcasing the remaining length.
Construction Steps:
- Part hair from ear to ear across the top of the head.
- Clip the back section out of the way temporarily.
- Take a small section near one temple from the front portion.
- Braid this section traditionally, incorporating hair as you work across (French braid technique).
- Continue the braid across the top of the head to the opposite temple.
- Secure the braid temporarily while you release the back section.
- Allow the back section to flow naturally or add waves for texture.
- Tuck the braid’s ends behind the ear or pin them discreetly.
- Pull gently at the braid to soften and add volume.
Versatility Notes:
- Adjust the braid’s thickness by varying how much hair you include in the front section.
- This style transitions well from casual to formal depending on hair texture and dress.
- Works effectively on hair too short for full updos or complete braids.
19. The Butterfly Braid

The butterfly braid creates a dramatic, dimensional effect through strategic pulling and shaping of a traditional braid, resulting in wing-like loops along its length. While modern in execution, the romantic result suits medieval fantasy aesthetics perfectly.
Shaping Process:
- Create a standard three-strand braid down the center back.
- Secure the end temporarily with a clear elastic.
- Working from top to bottom, gently pull the outer edges of the braid outward.
- Create distinct “wings” by pulling specific sections more dramatically than others.
- Leave gaps of unpulled braid between the pulled sections for contrast.
- Shape the pulled sections into rounded, petal-like or wing-like forms.
- Apply hairspray to each shaped section before moving to the next.
- Once satisfied with the shape, replace the temporary elastic with a decorative ribbon.
Enhancement Ideas:
- Weave thin ribbons through the braid before shaping for added color.
- Add small decorative pins at the centers of the “wings.”
- This style works best on long, thick hair that can support the structure.
20. Side Part with Veil

The combination of a deep side part with a flowing veil represents one of the most iconic medieval women’s styles, frequently depicted in historical art and religious imagery. This elegant style suits formal events and adds authentic medieval character.
Arrangement Technique:
- Create a deep side part, positioning it several inches from center.
- Brush hair smooth and sleek, keeping it close to the head.
- Position the veil at the crown, slightly behind the hairline.
- Secure the veil with a decorative comb, circlet, or pins.
- Allow the veil to drape naturally over the shoulders and back.
- The hair beneath may remain loose or be gathered into a low arrangement.
- Ensure the veil doesn’t slip by securing it at multiple points if needed.
Veil Options:
- Sheer silk or chiffon creates an elegant, aristocratic appearance.
- Linen veils offer more historical accuracy for common women.
- Length can vary from shoulder-length to floor-length depending on formality.
- Consider colored veils for specific character portrayals or to coordinate with costumes.
21. The Four-Strand Braid

A four-strand braid creates a sophisticated, complex appearance that elevates beyond the standard three-strand technique. This intricate braid suits noble characters and special occasions while remaining achievable with practice.
Braiding Instructions:
- Divide hair into four equal sections, numbering them 1, 2, 3, 4 from left to right mentally.
- Cross section 1 over section 2.
- Cross section 4 under section 3.
- Cross the current center-left section over the current center-right section.
- Repeat this pattern: outer left over, outer right under, center sections cross.
- Maintain consistent tension throughout for a uniform appearance.
- Continue until you reach the desired length or run out of hair.
- Secure with a decorative tie and gently pull edges to enhance dimension.
Learning Tips:
- Practice with four different colored ribbons before attempting with hair.
- Work slowly until the pattern becomes automatic and rhythmic.
- The resulting braid has a unique woven appearance distinct from three-strand braids.
22. Twisted Half-Crown

The twisted half-crown takes sections from each temple, twists them toward the back, and joins them at the crown, creating a natural tiara effect. This versatile style works for both casual and formal medieval events.
Creation Steps:
- Section off hair from temple to temple across the top third of the head.
- Divide this top section into two parts, one on each side of a center part.
- Beginning at the left temple, twist the hair back toward the crown.
- Keep the twist tight enough to hold its shape but not so tight it causes discomfort.
- Repeat the twisting process on the right side, creating a symmetrical match.
- Bring both twists together at the center crown point.
- Secure where they meet using bobby pins or a decorative hair accessory.
- Allow the remaining hair to flow naturally or add curls for enhanced texture.
Accessory Suggestions:
- Decorative brooches at the joining point add medieval authenticity.
- Small jeweled clips enhance the regal appearance.
- Natural elements like small flowers or leaves create a woodland fairy effect.
23. The Ladder Braid

The ladder braid creates a unique visual effect with horizontal “rungs” crossing through vertical strands, resembling an actual ladder. This advanced technique produces a stunning result worthy of medieval royalty.
Complex Instructions:
- This advanced technique requires practice and patience to master properly.
- Take a section of hair and create a small standard braid on each outer edge.
- Leave the center section loose between these two side braids.
- Take a small section from one side braid and cross it horizontally to the other side braid.
- Continue taking alternating sections from each side braid, creating horizontal connections.
- These horizontal sections form the “rungs” of the ladder effect.
- Continue down the length of hair until the desired length is achieved.
- Secure all three components (two side braids and ladder sections) together at the end.
Best Conditions:
- Long, thick hair shows the ladder effect most clearly.
- Contrasting hair colors or highlights emphasize the intricate pattern.
- This style requires significant time and may benefit from assistance.
24. Pinned Curls at the Nape

Pinned curls arranged at the nape create a sophisticated updo reminiscent of medieval court ladies’ styles. This technique works particularly well for formal events requiring elegant, period-appropriate hairstyling.
Styling Method:
- Curl hair using a small-barrel curling iron or hot rollers.
- Allow curls to cool completely before arranging them.
- Brush the crown and sides smooth, creating a sleek silhouette.
- Gather the curled section at the nape of the neck.
- Pin individual curls in place, arranging them in an artistic cluster.
- Use bobby pins that match hair color for a seamless appearance.
- Create depth by layering some curls over others.
- Secure decorative pins or small combs throughout the arrangement.
- Apply strong-hold hairspray to maintain the style throughout the event.
Historical Accuracy:
- Similar styles appeared in late medieval and early Renaissance periods.
- Noble women often had servants create these elaborate arrangements.
- The style indicated leisure time and social status, as it was impractical for working women.
25. The Celtic Knot Braid

Celtic knot designs woven into braids create visually stunning patterns that reference the medieval Celtic cultures of Ireland, Scotland, and Wales. These intricate braids require skill but produce breathtaking results.
Pattern Creation:
- This style requires multiple small braids woven together in specific patterns.
- Start with four to six small braids created from different sections of hair.
- Follow Celtic knot diagrams, weaving braids over and under each other.
- Secure intersections with small, discreet bobby pins as you work.
- The knot pattern can be created at the crown, nape, or along one side.
- Remaining hair can flow freely or be incorporated into the design.
- This technique demands patience and often benefits from reference images or assistance.
Cultural Significance:
- Celtic knot work symbolizes eternity due to its continuous, endless patterns.
- Different knot patterns held various meanings in Celtic tradition.
- This style celebrates the rich heritage of medieval Celtic cultures.
26. Simple Coif with Hair Visible

The coif represents an essential medieval head covering, typically made of linen, with variations allowing some hair to remain visible at the front or sides.
This practical style offers historical accuracy while accommodating modern preferences for showing hair.
Wearing Instructions:
- Style hair in a low bun, braid, or coiled arrangement at the nape.
- Place the coif over the head, ensuring it covers most of the hair.
- Adjust the front edge to allow a small band of hair to show if desired.
- Tie the coif strings under the chin or behind the head depending on style.
- Alternatively, pin the coif in place rather than using ties.
- The coif should fit snugly without causing discomfort or headache.
- This style works for all-day wear at extended medieval events.
27. Braided Low Bun with Accessories

The braided low bun combines multiple braiding techniques into a sophisticated updo positioned at the nape of the neck, enhanced with period-appropriate decorative elements.
This versatile style suits both noble and common character portrayals depending on the accessories chosen.
Assembly Instructions:
- Divide hair into three or more sections depending on thickness and desired complexity.
- Create individual braids from each section, varying the braid types for visual interest.
- Gather all completed braids at the nape of the neck.
- Coil the braids together, wrapping them around a central point to form a bun shape.
- Pin each braid securely as you wrap it, ensuring the structure remains stable.
- Tuck any loose ends underneath the bun and secure them with additional pins.
- Insert decorative elements like jeweled pins, small combs, or metalwork throughout the bun.
- Balance the placement of accessories to create visual harmony without overcrowding.
- Finish with hairspray to control flyaways and maintain the polished appearance.
Accessory Coordination:
- Gold or silver pins complement warm and cool hair tones respectively.
- Pearl accessories add elegance suitable for bridal or formal medieval events.
- Wooden or bone pins offer authentic medieval materials for historical accuracy.
- Match accessory metals to any jewelry or costume embellishments you’re wearing.
Practical Benefits:
- This style keeps hair completely secured for active participation in medieval activities.
- The low positioning prevents headaches from the weight of hair and accessories.
- The braided construction provides texture and interest even from a distance.
28. The Temple Braids
Temple braids feature small, delicate braids beginning at the temples and worked back toward the crown or incorporated into larger styles. This subtle technique adds medieval detail without requiring complete hairstyle commitment.
Braiding Technique:
- Section off a small portion of hair at each temple, about one inch wide.
- Create thin three-strand braids from these temple sections.
- Braid toward the back of the head, keeping the braids close to the scalp.
- These braids can be joined together at the back crown with a decorative clip.
- Alternatively, incorporate them into a larger braid or updo.
- Another option is to wrap them around the head like a delicate crown.
- The remaining loose hair flows naturally, creating a half-up effect.
- Secure the small braids with tiny elastics that match your hair color.
Styling Variations:
- Add tiny flowers or beads to the temple braids for enhanced decoration.
- Create multiple thin braids at each temple instead of single braids.
- Cross the temple braids at the back crown for an X-pattern detail.
- This technique works excellently on all hair lengths from shoulder-length upward.
Historical Inspiration:
- Small decorative braids appear frequently in medieval manuscript illustrations.
- These subtle details indicated care and attention to grooming.
- Temple braids kept face-framing hair controlled during daily activities.
29. The Maiden’s Veil with Circlet

Combining a circlet with a flowing veil creates the quintessential medieval maiden appearance, balancing decoration with modesty.
This elegant combination works beautifully for weddings, formal events, or character portrayals requiring maximum romantic impact.
Arrangement Process:
- Begin with loose, flowing hair that’s been curled or waved for texture.
- Position a circlet across the forehead, approximately one inch above the eyebrows.
- Secure the circlet with bobby pins behind the ears if it doesn’t fit snugly.
- Attach a veil to the back of the circlet using built-in combs or additional pins.
- Allow the veil to drape naturally over the shoulders and down the back.
- Arrange face-framing sections of hair to show beneath the veil at the front.
- Ensure the veil length complements your overall costume and setting.
- The hair remains mostly visible, with the veil adding ethereal enhancement rather than coverage.
Color Considerations:
- White or cream veils create classic bridal or maiden appearances.
- Colored veils can coordinate with specific costume elements or character themes.
- Metallic-threaded veils add sparkle suitable for fantasy interpretations.
30. The Wrapped Crown Braid
The wrapped crown braid creates a regal appearance by braiding hair and wrapping it multiple times around the head, building height and dimension. This sophisticated style suits queens and high-ranking noblewomen portrayals.
Construction Method:
- Gather all hair and create one or two thick braids depending on hair thickness.
- If using two braids, create them on opposite sides and work with both.
- Begin wrapping the braid around the head at the hairline level.
- After completing the first circle, continue wrapping above the first layer.
- Build upward, creating a stacked, dimensional crown effect.
- Secure each layer with bobby pins as you wrap to maintain structure.
- Tuck the final braid end underneath the crown and pin securely.
- The resulting style should have visible height and architectural quality.
- Insert decorative elements like jeweled pins, gold wire, or small flowers between layers.
Enhancement Techniques:
- Gently pull at sections of the braid before wrapping to create fuller texture.
- Use hair padding or foam inserts underneath for added height if desired.
- Weave gold or silver thread through the braid before wrapping for metallic shimmer.
- Position larger statement pieces like brooches or cameos at the front center.
Conclusion
The timeless elegance of medieval hairstyles continues to captivate modern enthusiasts, offering a tangible connection to historical beauty traditions while providing stunning options for contemporary events and celebrations.
Throughout this comprehensive exploration of 30 Easy Medieval Hairstyles for Princesses, we’ve journeyed from simple maiden braids to elaborate wrapped crowns, each style offering its own unique charm and historical significance.
Whether you’re preparing for a Renaissance fair, creating a costume for a special event, planning medieval-themed wedding hair, or simply exploring historical hairstyling as a creative hobby, these techniques provide accessible pathways to achieving authentic period looks.
Remember that the most successful medieval hairstyles balance historical inspiration with practical wearability, allowing you to feel both beautiful and comfortable throughout your experience.
With practice, patience, and the right tools, anyone can master these regal styles and bring a touch of medieval magic into their modern lives.
The key lies in embracing the romantic spirit of the era while adapting techniques to suit your individual hair type, personal style, and specific needs, ultimately creating a look that makes you feel like true royalty from a bygone age of castles, knights, and courtly elegance.