Being a mom means juggling a million tasks at once, and finding time to style your long hair can feel impossible.
But looking polished doesn’t have to take hours in front of the mirror.
This article on 30 Easy Hairstyles for Moms with Long Hair That Look Put Together brings you practical, beautiful styles that work for school runs, work meetings, playdates, and everything in between.
You’ll discover quick updos, elegant braids, simple twists, and no-fuss ponytails that take minutes but look like you spent much longer.
Each style is designed with busy moms in mind—easy enough to do with one hand while holding a coffee, yet sophisticated enough to make you feel confident and put together all day long.
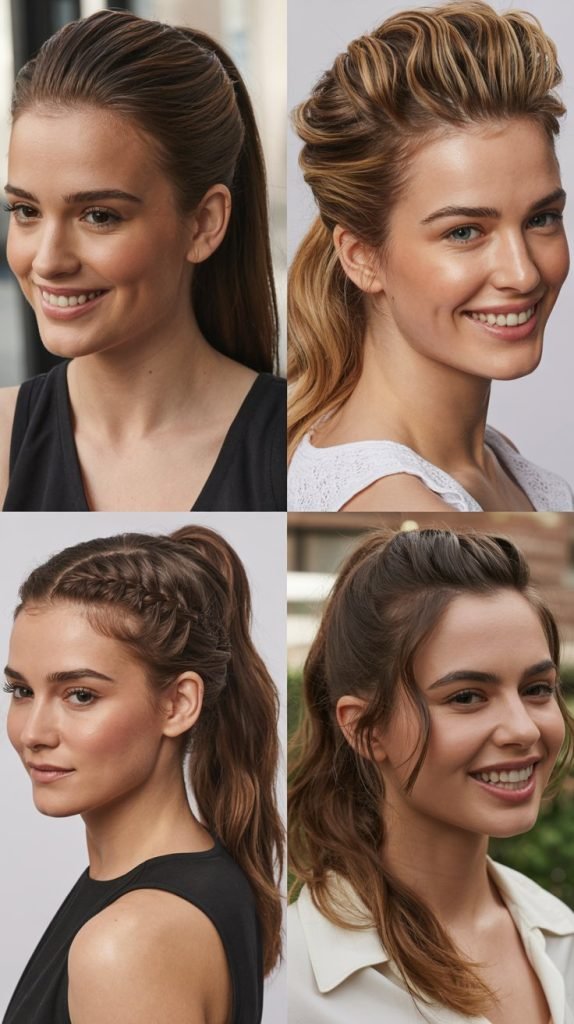
1. The Classic Low Bun

The low bun is a timeless style that works for virtually any occasion and takes less than three minutes to create. It’s elegant enough for professional settings yet casual enough for weekend errands.
This style keeps hair completely off your face and neck, making it perfect for active moms.
- Brush your hair back smoothly to eliminate any bumps or tangles
- Gather all your hair at the nape of your neck into a low ponytail
- Twist the ponytail gently around itself to create a coil
- Wrap the twisted hair around the base of the ponytail to form a bun shape
- Secure with bobby pins in an X pattern for extra hold
- Spray with light hairspray to tame flyaways and add shine
- Pull out a few face-framing pieces for a softer, more relaxed look
2. The Messy Top Knot
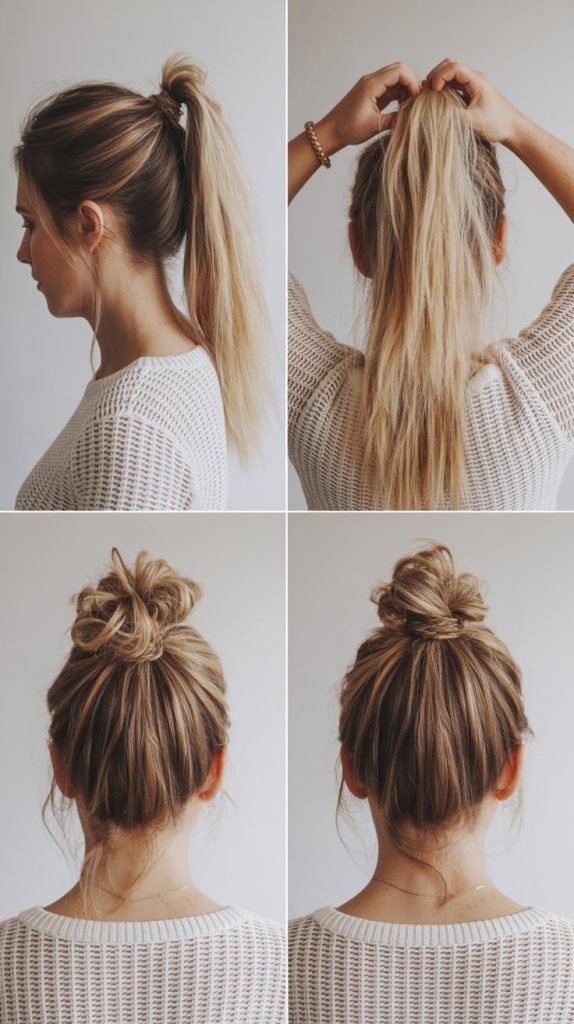
The messy top knot embraces the “undone” aesthetic while still looking intentional and stylish.
It’s the go-to style for busy mornings when you need to look presentable in under two minutes. The beauty of this style is that imperfections actually make it look better.
- Flip your head upside down and gather all hair at the crown
- Create a high ponytail but don’t pull the hair all the way through on the last loop
- Leave the ends sticking out to create volume and texture
- Wrap any loose ends around the base of the bun
- Secure with another hair tie or bobby pins as needed
- Gently pull at sections of the bun to create deliberate messiness
- Allow a few strands to fall naturally around your face
3. The Half-Up Half-Down with Twist

This versatile style combines the best of both worlds by keeping hair off your face while showing off your length.
The twisted detail adds visual interest without requiring advanced braiding skills. It works beautifully for both casual and semi-formal occasions.
- Section off the top portion of hair from temple to temple
- Divide this section into two equal parts down the middle
- Take the right section and twist it away from your face as you move toward the back
- Secure the twist temporarily with a clip
- Repeat the twisting process with the left section
- Bring both twisted sections together at the back of your head
- Secure with bobby pins or a small elastic, allowing the rest of your hair to flow freely
- Adjust the twists to make them looser or tighter depending on your preference
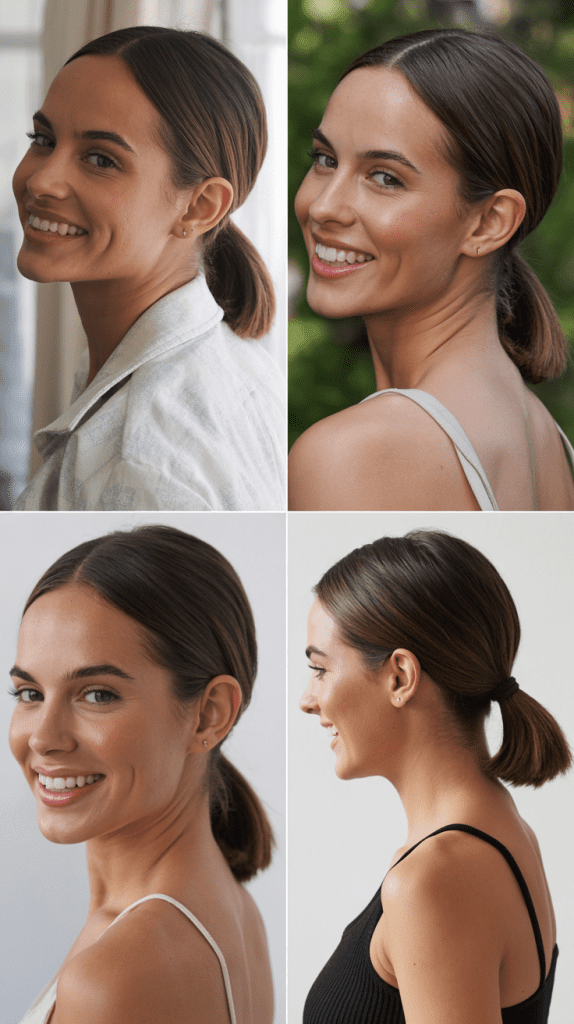
4. The Sleek Ponytail

A sleek ponytail exudes confidence and sophistication while being incredibly practical for active moms.
This polished look works equally well for the office, gym, or a night out. The key is achieving that smooth, glossy finish that makes the style look intentional.
- Apply smoothing serum or cream to damp or dry hair for shine and control
- Brush hair back thoroughly using a paddle brush or fine-tooth comb
- Gather hair at your desired height—mid-level works for most face shapes
- Secure tightly with a strong elastic band that matches your hair color
- Take a small section from the ponytail and wrap it around the elastic
- Pin the wrapped section underneath the ponytail to hide the elastic
- Spray the crown and sides with hairspray while smoothing with your hand
- For extra sleekness, run a straightener through the ponytail length
5. The Braided Crown

The braided crown creates a romantic, bohemian look that’s surprisingly easy to achieve. It’s perfect for keeping hair completely secured during outdoor activities or hot weather.
This style looks intricate but requires only basic braiding skills.
- Part your hair down the middle from forehead to nape
- Starting on one side, create a regular three-strand braid close to your hairline
- Braid all the way to the ends and secure with a small clear elastic
- Repeat the braiding process on the opposite side
- Take the first braid and wrap it across the top of your head like a headband
- Pin it securely on the opposite side using bobby pins that match your hair color
- Take the second braid and wrap it parallel to the first
- Tuck the ends underneath and secure with additional pins
- Gently pull at the braids to make them fuller and softer
6. The Low Side Bun

The low side bun offers an asymmetrical twist on the classic bun that feels more modern and fashion-forward.
It’s elegant enough for special occasions yet easy enough for everyday wear. This style keeps hair secure while adding an element of sophistication.
- Brush all your hair to one side of your neck, choosing your preferred side
- Create a low ponytail positioned behind your ear
- Twist the ponytail length around itself to create texture
- Wrap the twisted hair around the base of the ponytail in a circular motion
- Secure the bun with bobby pins inserted in multiple directions
- Leave the bun slightly loose for a softer, more romantic appearance
- Pull out a few wispy pieces around your face and neck
- Finish with a light mist of flexible-hold hairspray
7. The Double Dutch Braids

Double Dutch braids are practical, sporty, and keep hair completely secured for up to several days. They’re ideal for active moms who need a style that won’t budge during workouts or play.
Once you master the technique, they take only about ten minutes.
- Part your hair straight down the center from forehead to nape
- Clip one section away while working on the other side
- Starting at the hairline, divide a small section into three strands
- Cross the outer strands under the middle strand instead of over (this creates the raised effect)
- Add small sections of hair from the sides as you continue braiding down
- Keep tension consistent for neat, even braids
- Braid all the way to the ends and secure with a clear or colored elastic
- Repeat the entire process on the opposite side
- For a fuller look, gently pull at the edges of the braids
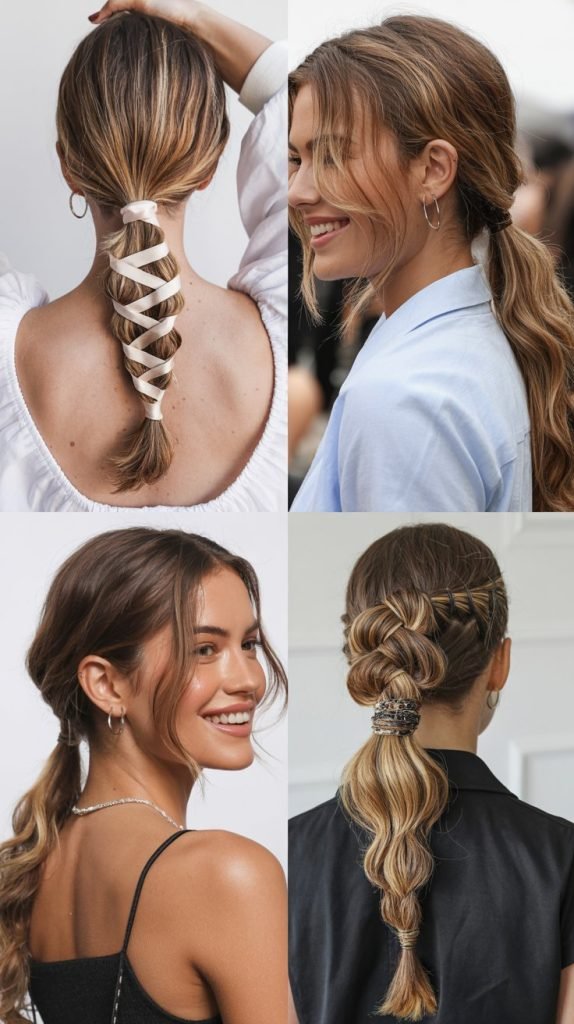
8. The Twisted Low Ponytail

This elegant style elevates a basic ponytail with simple twisting techniques that add dimension and interest.
It’s sophisticated enough for work presentations yet takes only three minutes to complete. The twisted detail makes thin hair appear fuller.
- Create a low ponytail at the nape of your neck with a hair elastic
- Divide the ponytail into two equal sections
- Twist each section individually in the same direction until tight
- Then twist the two sections around each other in the opposite direction
- This creates a rope-like effect that’s visually interesting
- Secure the end with another elastic once you’ve twisted the entire length
- Gently pull at the twists to make them fuller and more textured
- Wrap a small piece of hair around the top elastic to conceal it
9. The Bubble Ponytail

The bubble ponytail is playful, modern, and surprisingly versatile for different occasions. It works beautifully for both casual outings and dressier events depending on how you style it. \
This look is especially flattering as it adds volume and dimension.
- Create a ponytail at your desired height using a strong elastic
- Place additional clear or colored elastics down the length of the ponytail at equal intervals
- The spacing depends on how many bubbles you want—typically two to three inches apart
- Once all elastics are in place, gently pull at the hair between each elastic
- This creates the “bubble” effect by adding volume to each section
- Be careful not to pull too hard or the elastics might slip
- For extra drama, tease each section slightly before pulling it out
- Finish by wrapping a small piece of hair around the top elastic
10. The French Twist

The French twist is a classic updo that never goes out of style and looks incredibly polished.
It’s perfect for professional settings, special events, or when you want to feel extra put together. While it looks complex, it becomes simple with practice.
- Brush all hair to one side of your head, gathering it near your ear
- Hold the hair firmly at this point with one hand
- Twist the hair upward and inward toward the center back of your head
- Continue twisting until the hair forms a vertical roll along the back
- Tuck the loose ends into the twist as you go
- Secure with bobby pins inserted horizontally into the twist
- Add additional pins at the top and bottom for extra security
- Smooth any flyaways with hairspray and a soft brush
11. The Waterfall Braid
The waterfall braid creates a cascading effect that’s romantic and eye-catching without being overly complicated.
It’s beautiful for special occasions or when you want your hairstyle to be a statement piece. The flowing strands give the illusion of hair “falling” through the braid.
- Begin with a small section of hair near your part on one side
- Start a regular three-strand braid with this section
- After crossing the top strand over once, drop it and let it hang
- Pick up a new section of hair from above to replace the dropped strand
- Continue this pattern of dropping and picking up as you braid across
- The dropped strands create the waterfall effect cascading down
- Work your way around the back of your head or just partway across
- Secure the braid with a small clear elastic when you reach your desired endpoint
- Leave the rest of your hair flowing freely or curl it for added texture
12. The Simple Chignon

The chignon is an elegant low bun that sits at the nape of the neck and works for virtually any occasion.
It’s understated yet sophisticated, making it perfect for both professional and social settings. This style is forgiving of minor imperfections which actually add to its charm.
- Gather your hair into a low ponytail but don’t secure it yet
- Twist the gathered hair loosely to create texture
- Wrap the twisted hair horizontally or in a figure-eight pattern at the nape
- Tuck the ends under the wrapped sections
- Secure with bobby pins placed strategically throughout the chignon
- The pins should be hidden within the folds of the hair
- Pull out a few face-framing pieces for softness if desired
- Finish with hairspray to ensure the style holds all day
13. The Knotted Ponytail

This creative style uses sections of your own hair to create decorative knots down the length of a ponytail. It’s a conversation starter that looks much more complicated than it actually is.
The knotted detail adds visual interest and works well for medium to thick hair.
- Create a ponytail at your desired height and secure with an elastic
- Divide the ponytail into two equal sections
- Tie these two sections in a simple overhand knot
- Pull the knot tight and position it close to the elastic
- Divide the remaining hair again into two sections below the knot
- Create another knot with these sections
- Continue this pattern down the length of your ponytail
- Secure the end with a clear elastic and adjust the knots to make them even
14. The Braided Ponytail

Combining a sleek ponytail with a textured braid creates a style that’s both polished and interesting. It’s perfect for moms who want a practical ponytail with an upgraded look. The braid adds dimension and prevents the ponytail from looking too basic.
- Create a ponytail at medium to high height using a strong elastic
- Ensure the ponytail is smooth and positioned exactly where you want it
- Divide the ponytail into three equal sections
- Create a regular three-strand braid from the base to the ends
- Keep consistent tension for an even, neat braid
- Secure the end with a small elastic
- For added polish, wrap a section of hair around the top elastic
- Gently pull at the sides of the braid for a fuller appearance
15. The Side-Swept Waves
This glamorous style sweeps all your hair to one side while showcasing beautiful waves or curls. It’s romantic and feminine without requiring any complicated pinning techniques.
The asymmetrical look is flattering on most face shapes.
- Start with hair that has natural wave or curl, or add waves with a curling iron
- Create a deep side part on your preferred side
- Sweep all hair from the smaller side over to the larger side
- Pin the swept hair behind your ear using bobby pins that match your hair
- The pins should be hidden beneath the top layer of hair
- Allow the hair to drape over one shoulder
- Apply texturizing spray or mousse to enhance the waves
- For extra hold, add a few more pins along the side of your head
16. The Rope Braid Bun
This style combines the texture of a rope braid with the practicality of a bun for a unique look. It’s more interesting than a plain bun but just as easy to create once you know the rope braid technique.
The twisted texture adds dimension and catches the light beautifully.
- Create a ponytail at your desired height using an elastic
- Divide the ponytail into two equal sections
- Twist each section individually in a clockwise direction
- Then wrap the two twisted sections around each other counterclockwise
- This creates the rope braid effect with a spiral appearance
- Once you’ve twisted the entire length, wrap it around the base of the ponytail
- Shape it into a circular bun as you wrap
- Secure with bobby pins inserted at various angles through the bun
17. The Folded Ponytail

The folded ponytail creates the illusion of a bob haircut while actually keeping your long hair secured. It’s a fun way to temporarily change your look without cutting your hair.
This style is perfect for experimenting with shorter lengths.
- Create a low ponytail at the nape of your neck
- Fold the ponytail upward toward the base of the ponytail
- The ends should tuck underneath and point upward inside the fold
- Create a second ponytail with another elastic around the folded section
- This secures the fold in place and creates the bob illusion
- Adjust the fold so the ends are hidden and the style looks smooth
- Use bobby pins if needed to secure any loose sections
- The result should look like you have a sleek bob from the front and sides
18. The Criss-Cross Ponytail

This creative style uses a criss-cross pattern at the base of the ponytail for added visual interest. It’s a simple way to upgrade a basic ponytail with minimal effort.
The woven look at the base makes the style appear more intricate than it is.
- Part your hair down the center from forehead to crown
- Create two small ponytails on each side of the part at the crown
- Cross the right ponytail over to the left side
- Cross the left ponytail over to the right side
- Secure both crossed sections with small elastics below the first ones
- Repeat this crossing pattern two to three times down the back of your head
- Gather all the hair including the crossed sections into one final ponytail
- The criss-cross pattern creates a corset-like effect at the back
19. The Twisted Crown Braid

This style creates a crown effect using twists instead of braids, making it easier for those who struggle with braiding. It’s elegant and keeps hair off your face while showing off your length.
The twisted crown works beautifully for both casual and formal occasions.
- Section off the front portion of hair from temple to temple
- Divide this section into two parts at the center
- Take a small section from one side near the temple
- Twist it tightly away from your face while adding small sections as you go
- This is similar to a French braid but using twists instead
- Secure the twist temporarily when you reach the opposite side
- Repeat the process on the other side, twisting in the opposite direction
- Pin both twists at the back of your head to create the crown effect
- Allow the remaining hair to flow freely down your back
20. The Pull-Through Braid

The pull-through braid creates the appearance of a thick, voluminous braid without actually braiding. It’s perfect for moms who haven’t mastered traditional braiding techniques.
This faux braid looks impressive and holds well throughout the day.
- Create a half-up ponytail at the crown and secure with an elastic
- Create a second ponytail directly below the first one
- Split the first ponytail in half and bring the sections around the second ponytail
- Clip these sections temporarily out of the way
- Create a third ponytail below the second one, incorporating those clipped sections
- Split the second ponytail and bring it around the third ponytail
- Continue this pattern of splitting and pulling through down your head
- Gently pull at each section to create volume and width
- The result looks like a thick, chunky braid
21. The Wrapped Low Ponytail
This sophisticated style wraps sections of hair around a low ponytail to conceal the elastic and add dimension. It’s polished enough for professional settings while being comfortable for all-day wear.
The wrapped detail elevates a simple ponytail into something special.
- Create a smooth low ponytail at the nape of your neck
- Secure with a strong elastic band
- Take a small section from underneath the ponytail
- Wrap it around the elastic band to conceal it completely
- Secure the wrapped section with a bobby pin underneath the ponytail
- Take another section from the ponytail and wrap it just above the first wrap
- Continue wrapping sections around the base to create a stacked, textured look
- Each wrap should be secured with a bobby pin to ensure it stays in place
22. The Fishtail Braid

The fishtail braid creates an intricate, woven appearance that’s surprisingly simple to execute. It’s more bohemian and relaxed than a traditional three-strand braid.
This style works beautifully worn to the side or down the back.
- Divide all your hair into two large sections
- Take a thin strand from the outside of the left section
- Cross it over to join the right section
- Take a thin strand from the outside of the right section
- Cross it over to join the left section
- Continue this pattern of alternating sides down the length of your hair
- The smaller the strands you take, the more intricate the braid will look
- Secure the end with an elastic and gently pull at the braid for fullness
23. The Braided Headband

This style uses a small braid as a functional and decorative headband to keep hair off your face. It’s perfect for adding interest to loose hair without committing to a full updo.
The braid can be positioned for different looks depending on your preference.
- Take a section of hair from behind one ear
- Create a simple three-strand braid with this section
- Braid across the front of your hairline like a headband
- You can follow your natural hairline or position it further back
- Secure the braid behind your opposite ear with bobby pins
- The pins should be hidden beneath the rest of your hair
- Allow the remaining hair to flow naturally or add waves for texture
- This keeps hair off your face while showcasing your length
24. The Space Buns
Space buns are playful, youthful, and surprisingly practical for keeping hair completely secured. They work well for casual days, festivals, or when you want to channel a fun, energetic vibe.
The dual buns distribute hair weight evenly for comfort.
- Part your hair straight down the center from forehead to nape
- Create two high ponytails positioned symmetrically on each side
- The placement should be above and slightly behind your ears
- Twist one ponytail and wrap it around its base to form a bun
- Secure with bobby pins and another elastic if needed
- Repeat the process with the second ponytail
- Adjust both buns to be similar in size and height
- Pull out a few face-framing pieces for a softer, less severe look
25. The Low Twisted Updo
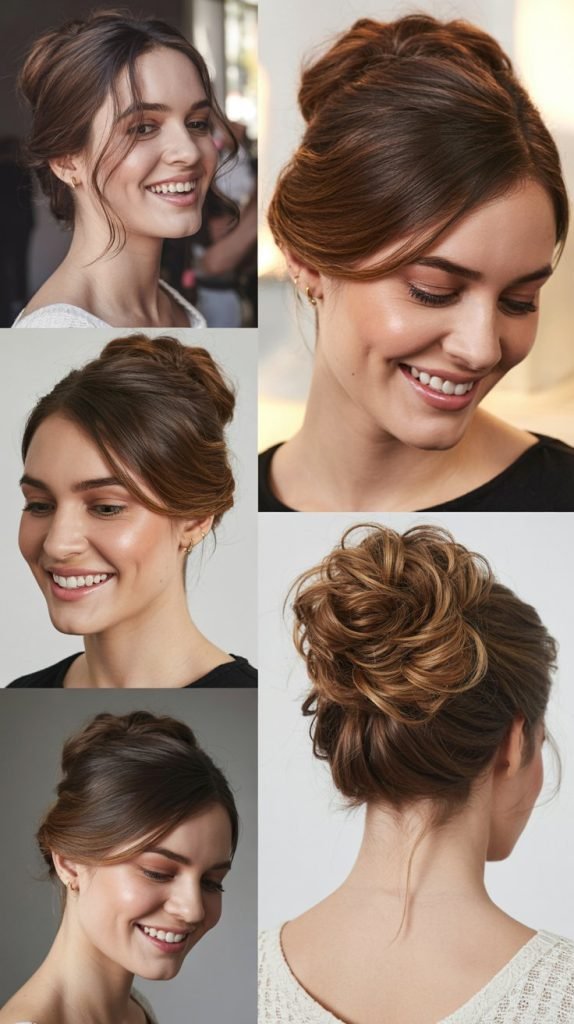
This elegant updo uses simple twisting techniques to create a sophisticated style perfect for special occasions.
It looks complex but requires no braiding skills whatsoever. The twisted sections create beautiful texture and dimension.
- Divide your hair into several sections—front sides, back sides, and center
- Start with one front section and twist it loosely away from your face
- Bring the twist toward the back center and pin it at the nape
- Repeat with the other front section, pinning it near the first
- Take one back side section and twist it toward the center
- Pin this twist over and around the previously pinned sections
- Continue with remaining sections, twisting and pinning each one
- Create a clustered, textured updo at the nape of your neck
- Pull out a few wispy pieces around your face for softness
26. The Scarf-Wrapped Ponytail

Adding a scarf to a ponytail instantly elevates the style while adding a pop of color or pattern. It’s a quick way to make a simple ponytail look intentional and fashion-forward.
The scarf also helps secure flyaways and adds a polished finish.
- Create a ponytail at your desired height using a strong elastic
- Choose a silk or satin scarf in a color or pattern you love
- Fold the scarf into a long strip about two to three inches wide
- Place the center of the scarf under your ponytail at the base
- Bring both ends of the scarf up and cross them over the elastic
- Wrap the scarf around the base of the ponytail to conceal the elastic
- Continue wrapping the scarf down the length of the ponytail if desired
- Tie the scarf ends in a bow or knot, or tuck them into the wrapped sections
27. The Gibson Tuck
The Gibson Tuck is a vintage-inspired updo that looks elegant and sophisticated yet comes together quickly.
It’s perfect for wedding guests, professional events, or any time you want to feel put together. The rolled effect at the nape is both classic and timeless.
- Create a loose low ponytail at the nape of your neck
- Don’t pull the elastic too tight against your head
- Using your fingers, create a gap in the hair just above the elastic
- Flip the ponytail up and tuck it through this gap from above
- This creates a rolled effect at the nape
- Continue tucking the remaining length into the roll
- Secure with bobby pins placed horizontally through the tucked sections
- Smooth any bumps at the crown and adjust the roll to your liking
- For a fuller look, gently pull at the rolled sections
28. The Faux Hawk Ponytail

This edgy style creates the illusion of a mohawk using ponytails and teasing techniques. It’s bold and fashion-forward while still being completely practical.
The faux hawk works well for nights out or when you want to make a statement.
- Section hair down the center from forehead to crown into a mohawk strip
- Clip the side sections away temporarily
- Create several small ponytails down the center strip
- Space them about two inches apart from front to back
- Tease each ponytail section with a comb for volume
- Fold each teased section back over its elastic and pin it down
- This creates height and the mohawk illusion
- Release the side sections and smooth them back into a low ponytail
- The center should stand up while the sides are sleek
29. The Rolled Side Bun

This romantic style rolls hair to one side and secures it in a soft bun near the ear. It’s elegant enough for formal events while being comfortable for extended wear.
The side placement makes it visually interesting and shows off the face beautifully.
- Brush all your hair to one side of your head
- Starting at the opposite side, begin rolling the hair toward your chosen side
- Continue rolling as you move down toward the ear
- The roll should gather all your hair into one side section
- Once you reach your ear, twist the gathered hair loosely
- Wrap the twisted hair into a bun positioned behind or below your ear
- Secure with bobby pins throughout the bun
- Pull out a few pieces around your face for softness and romance
30. The Braided Low Ponytail
This style combines the texture of braids with the simplicity of a ponytail for an elevated everyday look. Small braids frame the face while the ponytail keeps hair practical and manageable.
It’s perfect for moms who want something slightly special without much effort.
- Section off a small piece of hair from near your temple on one side
- Create a small three-strand braid with this section
- Braid all the way to the ends and secure temporarily
- Repeat the process on the opposite side
- Gather all your hair including both small braids into a low ponytail
- Position the ponytail at the nape of your neck
- The small braids will be visible within the ponytail as decorative elements
- Wrap a section of hair around the elastic to conceal it for a polished finish
Conclusion
Finding time for elaborate hairstyles as a busy mom can feel impossible, but these 30 Easy Hairstyles for Moms with Long Hair That Look Put Together prove that you don’t need hours to look polished and confident.
From classic buns to creative braids, twisted updos to playful ponytails, each style offers a practical solution for your daily routine while making you look and feel your best.
The beauty of these hairstyles lies in their versatility—they work for school drop-offs, work meetings, date nights, and everything in between.
With a little practice, these styles will become second nature, giving you back precious time while ensuring you always look put together.
Remember that the most important thing is feeling comfortable and confident, so choose the styles that work best for your hair texture, lifestyle, and personal taste.