Welcome to the ultimate guide for woodworking enthusiasts!
In this article, we’re diving into 30 of the best pine woodworking projects that can transform your home into a haven of handcrafted elegance. Pine wood, with its versatility and ease of use, is perfect for both novice and experienced woodworkers.
Whether you’re looking to enhance your living space with custom furniture, stylish storage solutions, or unique decor pieces, this guide has something for you. Each project is meticulously detailed, providing you with all the information you need to bring your woodworking dreams to life.
From selecting the right materials to the final finishing touches, you’ll find comprehensive instructions, essential tools, and expert tips for every project.
Let’s embark on this creative journey and turn your home into a masterpiece of pine woodworking!
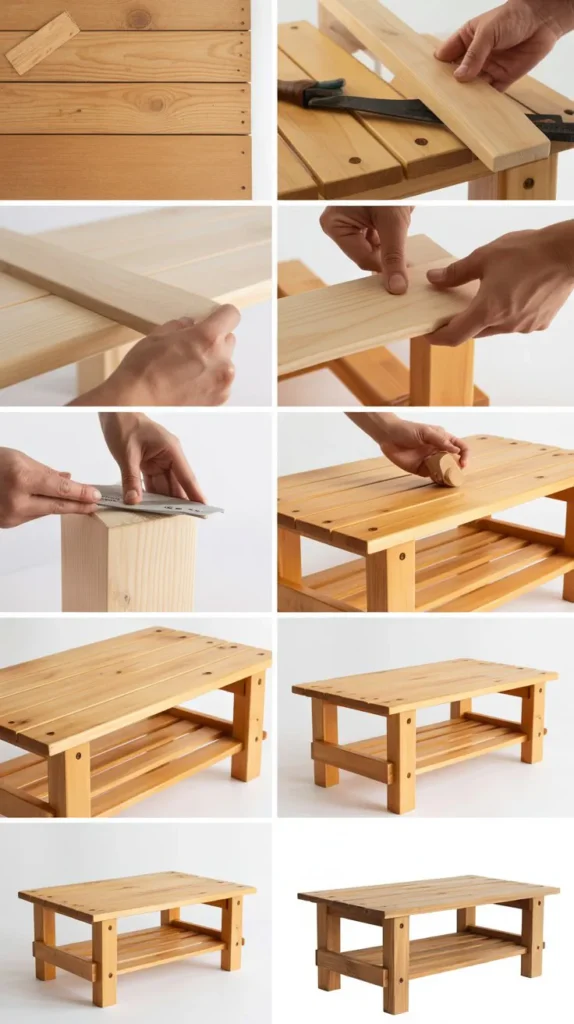
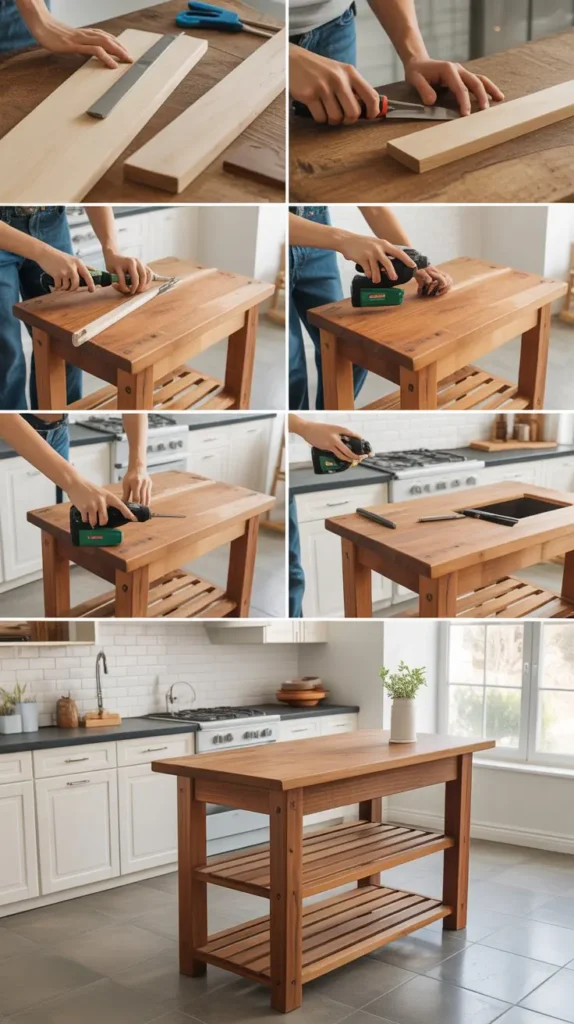
1. Rustic Pine Coffee Table
Materials:
- Pine boards (1x4s and 2x4s)
- Wood screws
- Wood glue
- Sandpaper (120, 220 grit)
- Wood stain or paint
- Clear polyurethane
Tools:
- Circular saw or miter saw
- Drill
- Screwdriver
- Paintbrush or stain applicator
- Clamps
Instructions:
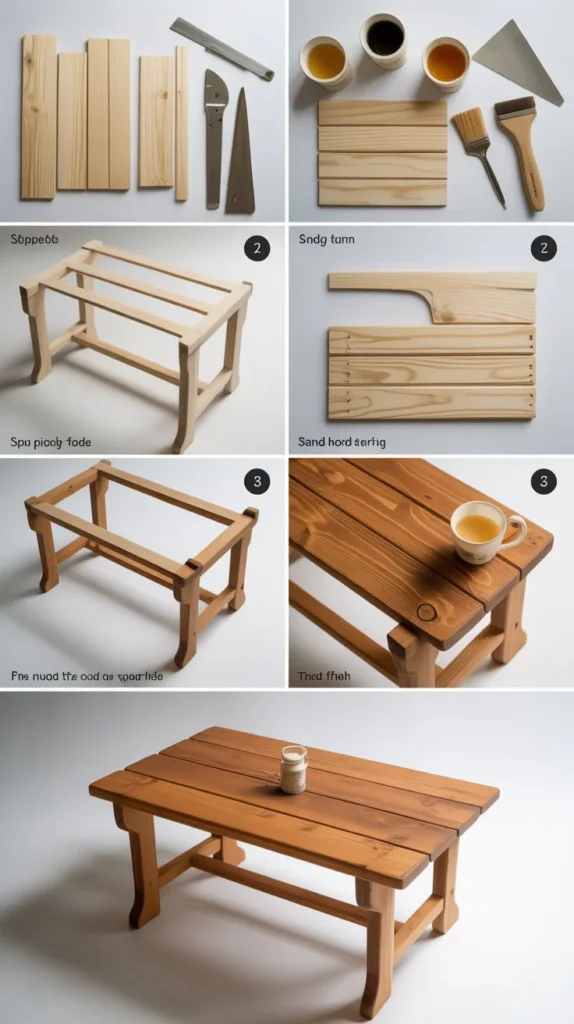
- Cut the Pine Boards: Cut the 1×4 pine boards to the desired length for the table top and the 2x4s for the legs and supports. Typically, a coffee table top is around 40”x20”, with legs about 18” high.
- Assemble the Frame: Using wood screws and wood glue, assemble the 2x4s into a rectangular frame that will support the table top. Secure the frame with clamps and let the glue dry.
- Attach the Table Top: Place the 1×4 boards side by side on top of the frame, securing them with screws from underneath.
- Sand and Finish: Sand the entire table with 120-grit sandpaper, followed by 220-grit for a smooth finish. Apply wood stain or paint and let it dry. Finish with a coat of polyurethane for durability.
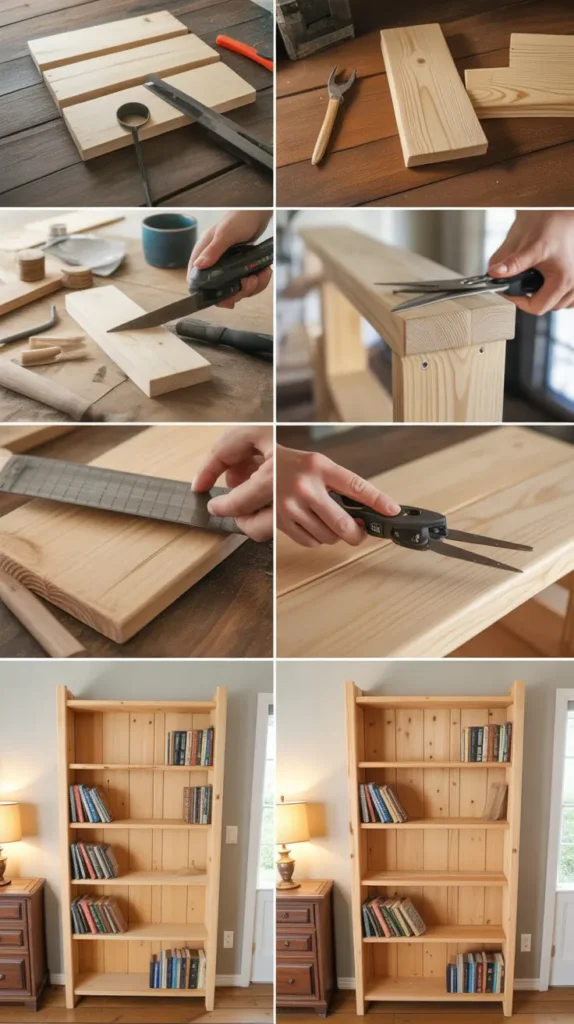
2. Pine Bookshelf
Materials:
- Pine boards (1x6s and 1x12s)
- Wood screws
- Wood glue
- Sandpaper (120, 220 grit)
- Paint or stain
- Shelf brackets (optional)
Tools:
- Table saw or circular saw
- Drill
- Screwdriver
- Level
- Paintbrush or stain applicator
Instructions:
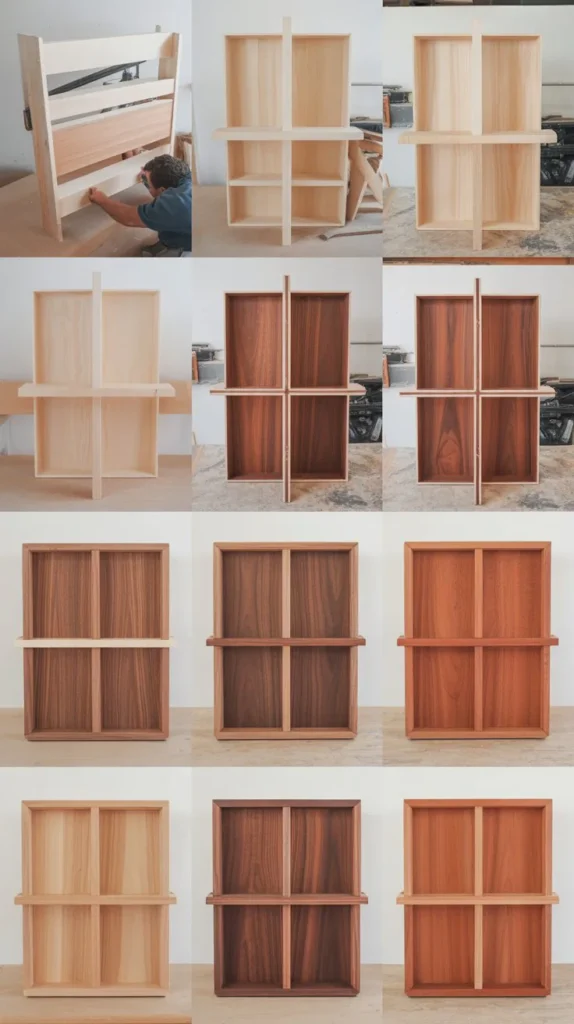
- Cut the Boards: Cut the 1×6 pine boards for the shelves and the 1×12 boards for the sides and back. Common dimensions are 36”x12” for each shelf and 72”x12” for the sides.
- Assemble the Shelf Unit: Attach the shelves to the sides using wood screws and glue. Ensure everything is level before securing. Add the back panel for stability.
- Sand and Finish: Sand the entire bookshelf with 120-grit and then 220-grit sandpaper. Apply your chosen stain or paint and let it dry. Optionally, install shelf brackets for added support.
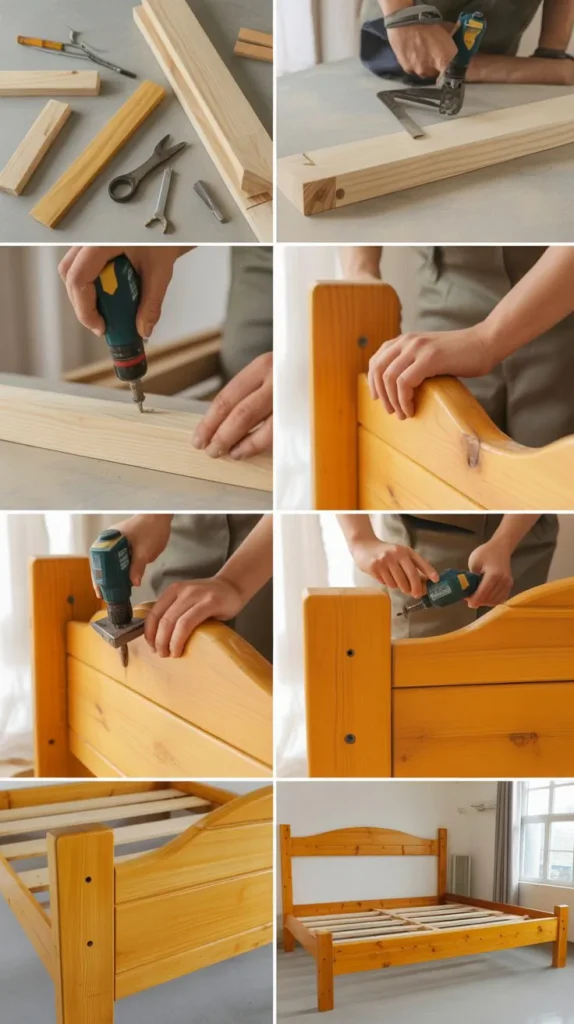
3. Pine Bed Frame
Materials:
- Pine boards (2x6s and 1x4s)
- Wood screws
- Wood glue
- Sandpaper (120, 220 grit)
- Wood stain or paint
Tools:
- Circular saw
- Drill
- Screwdriver
- Tape measure
- Paintbrush or stain applicator
Instructions:
- Measure and Cut: Cut the 2×6 boards for the frame and 1×4 boards for the slats. Typically, a queen-sized bed frame would need 2x6s cut to 80” for the sides and 60” for the end pieces.
- Assemble the Frame: Assemble the frame by attaching the 2×6 boards together using screws and glue. Add support slats using the 1×4 boards, spacing them evenly.
- Sand and Finish: Sand all pieces with 120-grit and 220-grit sandpaper for a smooth finish. Apply stain or paint and let it dry.
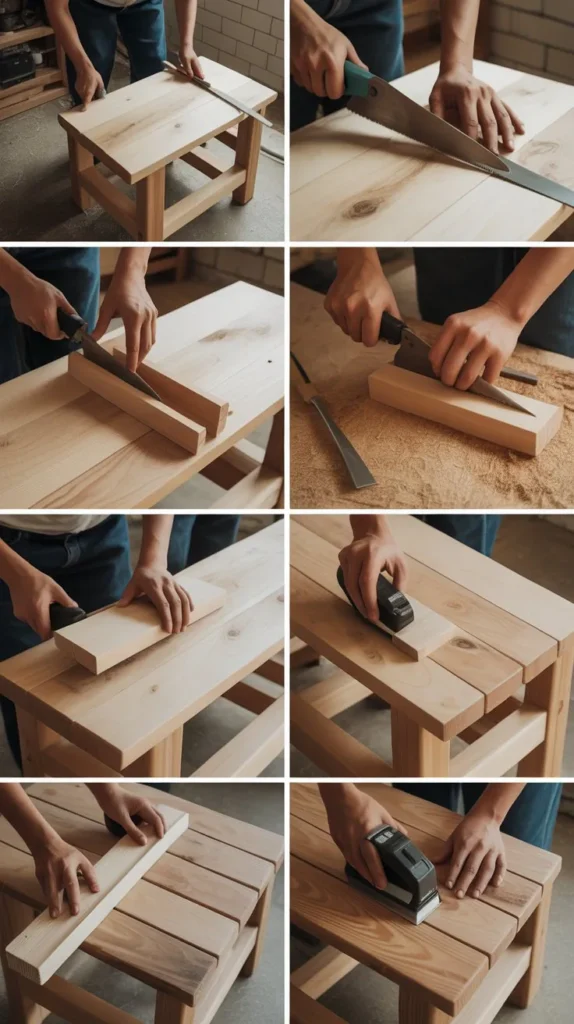
4. Pine Storage Bench
Materials:
- Pine boards (1x8s and 2x4s)
- Wood screws
- Wood glue
- Sandpaper (120, 220 grit)
- Wood stain or paint
- Hinges (for the lid)
Tools:
- Miter saw
- Drill
- Screwdriver
- Tape measure
- Paintbrush or stain applicator
Instructions:
- Cut the Pine Boards: Cut the 1×8 boards for the top and sides, and 2x4s for the frame. A typical storage bench might be 48”x16” for the top with a height of 18”.
- Assemble the Bench: Construct the frame with 2x4s and attach the 1×8 boards to the frame. Secure the top to the frame with hinges so it can open.
- Sand and Finish: Sand all surfaces thoroughly and apply wood stain or paint. Let it dry completely before using.
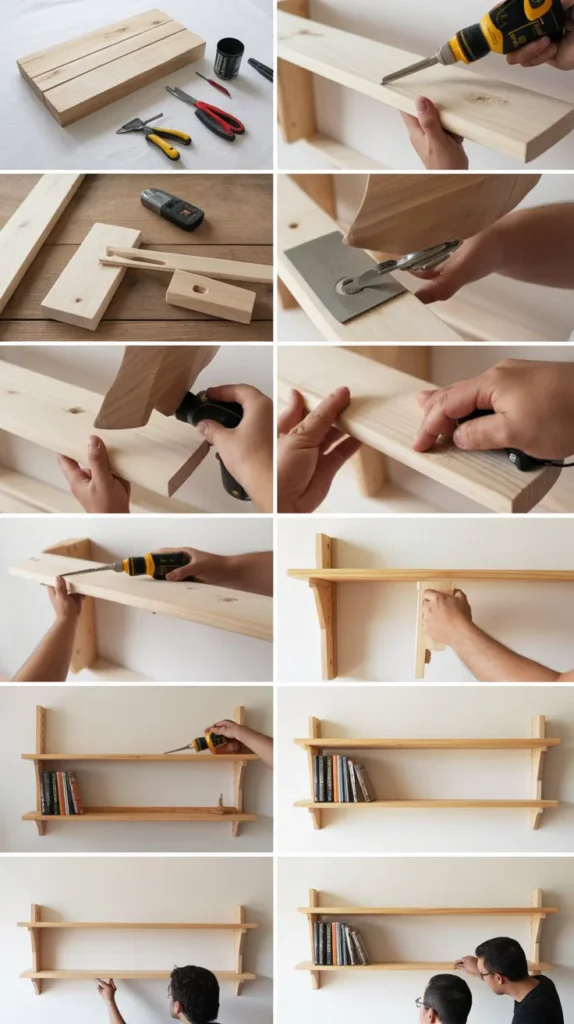
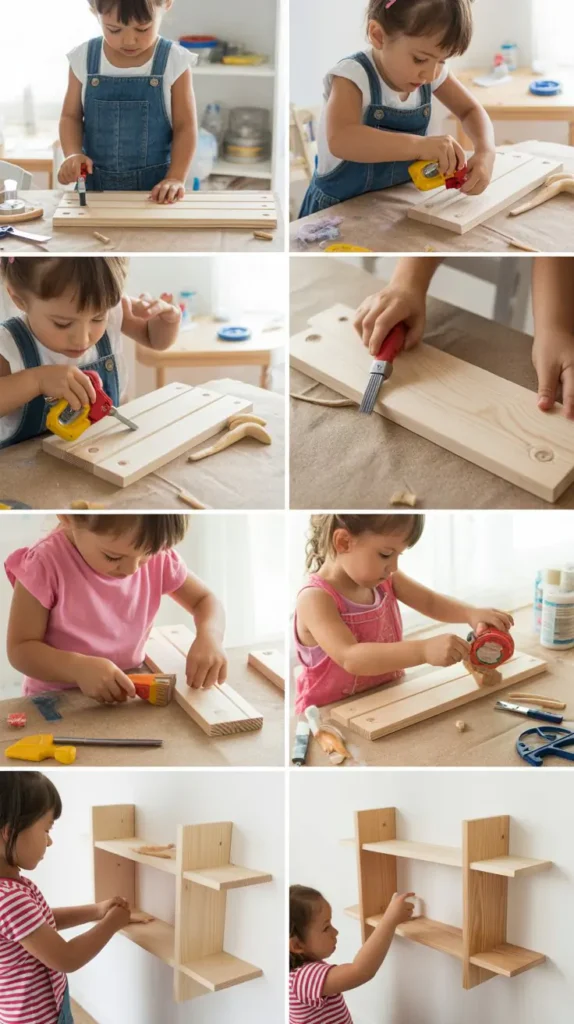
5. Pine Wall Shelf
Materials:
- Pine boards (1x4s)
- Wood screws
- Wood glue
- Sandpaper (120, 220 grit)
- Paint or stain
Tools:
- Circular saw
- Drill
- Screwdriver
- Level
- Paintbrush or stain applicator
Instructions:
- Cut the Boards: Cut the 1×4 pine boards to the desired shelf length. Typically, a wall shelf might be 24” wide.
- Install Brackets: Attach wall brackets to the wall, ensuring they are level. Secure the shelf onto the brackets with screws.
- Sand and Finish: Sand the shelf with 120-gr
Materials:
- Pine boards (1x8s and 2x4s)
- Wood screws
- Wood glue
- Sandpaper (120, 220 grit)
- Wood stain or sealant
Tools:
- Circular saw
- Drill
- Screwdriver
- Level
- Paintbrush or stain applicator
Instructions:
- Cut the Boards: Cut the 1×8 pine boards to create the sides, bottom, and ends of the planter box. Typical dimensions for a planter box are 24”x12”x12”.
- Assemble the Planter Box: Attach the boards together using wood screws and glue to form a rectangular box. Reinforce the corners with additional screws.
- Sand and Finish: Sand the exterior and interior surfaces with 120-grit and 220-grit sandpaper to smooth out any rough edges. Apply a wood stain or sealant to protect the wood from moisture.
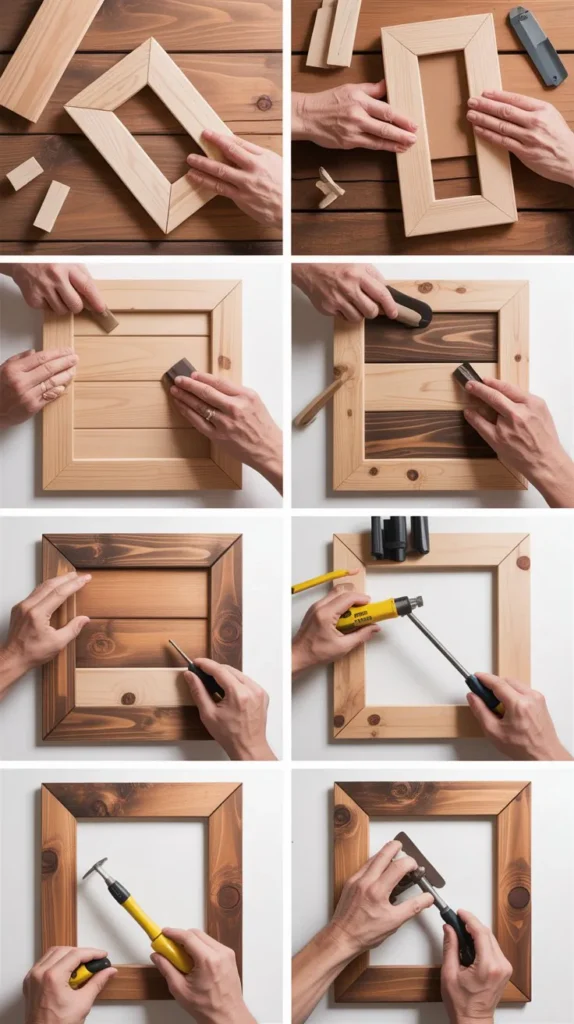
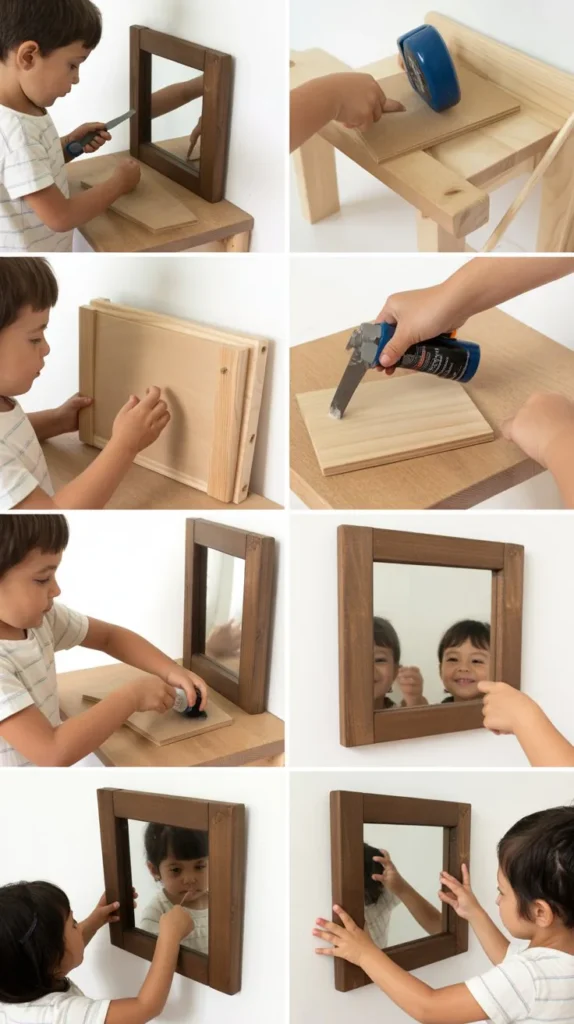
9. Pine Wall Art Frame
Materials:
- Pine boards (1x2s)
- Wood screws
- Wood glue
- Sandpaper (120, 220 grit)
- Paint or stain
Tools:
- Miter saw
- Drill
- Screwdriver
- Paintbrush or stain applicator
- Clamps
Instructions:
- Cut the Boards: Cut the 1×2 pine boards to size for the frame. For a standard photo frame, cut four pieces to form the outer edges and miter the corners.
- Assemble the Frame: Use wood glue and screws to join the corners of the frame. Secure with clamps while the glue dries.
- Sand and Finish: Sand the frame with 120-grit and 220-grit sandpaper to ensure a smooth surface. Apply paint or stain and let it dry.
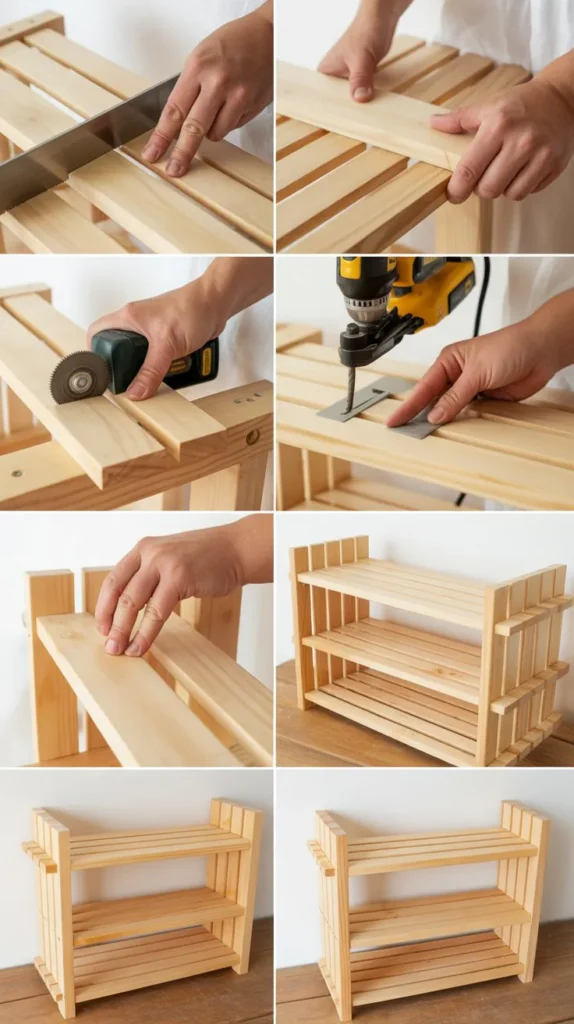
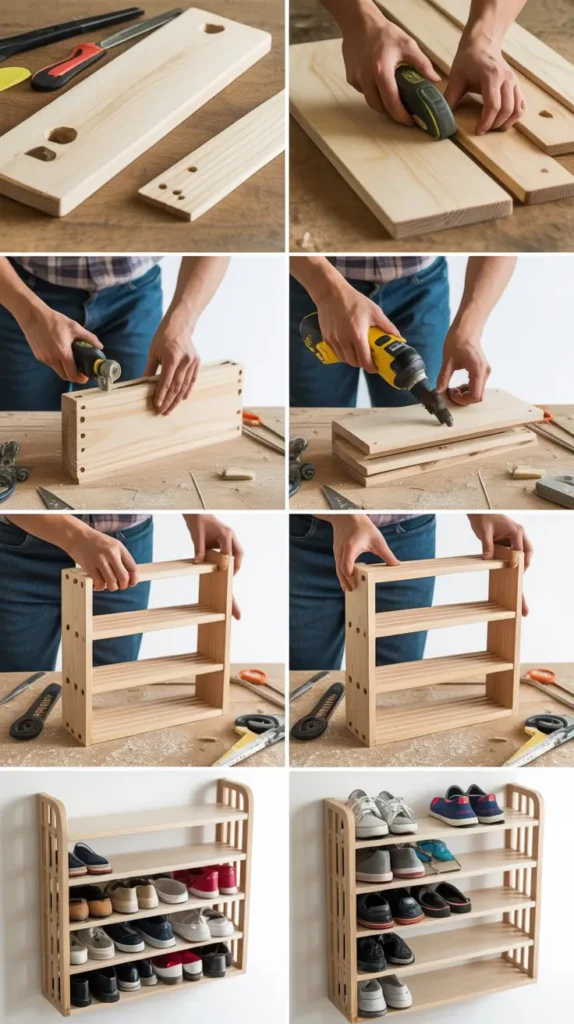
10. Pine Shoe Rack
Materials:
- Pine boards (1x4s and 1x6s)
- Wood screws
- Wood glue
- Sandpaper (120, 220 grit)
- Paint or stain
Tools:
- Miter saw
- Drill
- Screwdriver
- Level
- Paintbrush or stain applicator
Instructions:
- Cut the Boards: Cut the 1x4s and 1x6s to the dimensions needed for the shelves and sides of the shoe rack. A common size is 24”x12”x36”.
- Assemble the Rack: Attach the boards together to create shelves and side supports. Secure with wood screws and glue.
- Sand and Finish: Sand all surfaces thoroughly with 120-grit and 220-grit sandpaper. Apply paint or stain to match your decor.
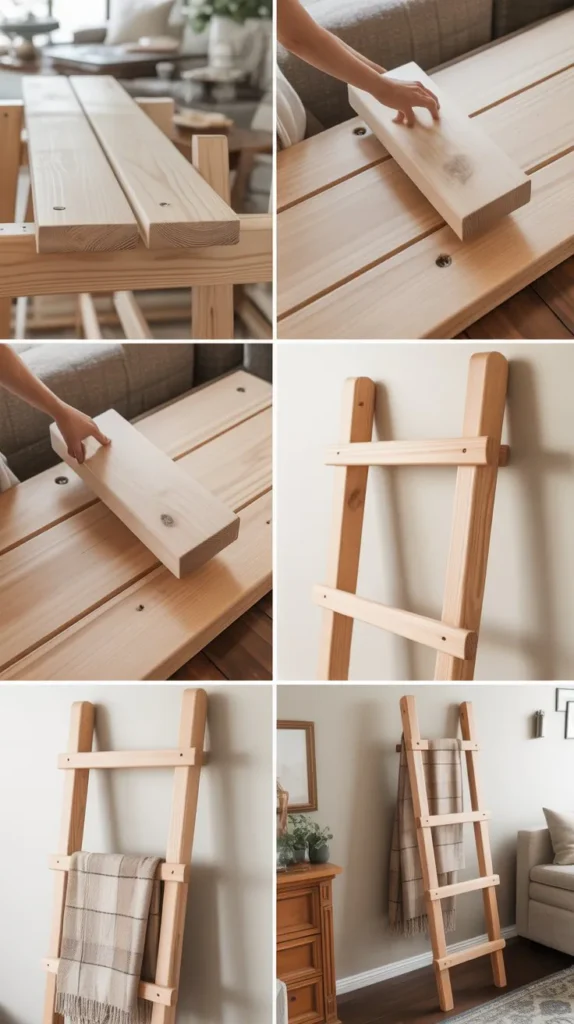
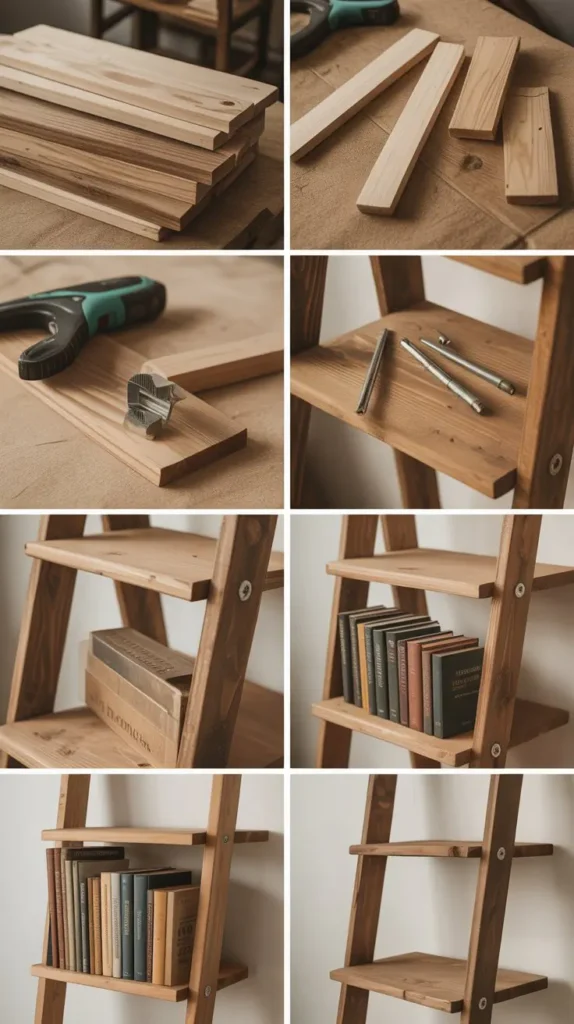
11. Pine Blanket Ladder
Materials:
- Pine boards (1x3s)
- Wood screws
- Wood glue
- Sandpaper (120, 220 grit)
- Paint or stain
Tools:
- Miter saw
- Drill
- Screwdriver
- Paintbrush or stain applicator
Instructions:
- Cut the Boards: Cut the 1×3 pine boards to create the rungs and sides of the ladder. A typical blanket ladder might be 6 feet tall with 4 rungs.
- Assemble the Ladder: Attach the rungs to the sides using wood screws and glue. Ensure the rungs are evenly spaced and level.
- Sand and Finish: Sand the ladder with 120-grit and 220-grit sandpaper. Apply your choice of stain or paint.
How to Construct Image Prompt:
- Illustrate cutting the boards, assembling the rungs and sides, and applying the finish. Highlight the spacing and leveling process.
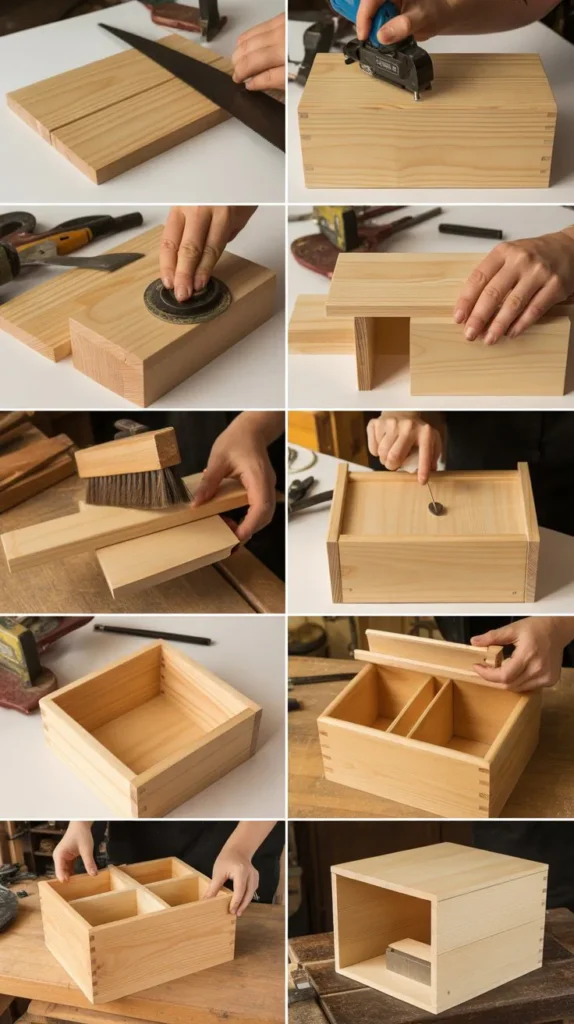
12. Pine Jewelry Box
Materials:
- Pine boards (1x6s and 1x8s)
- Wood screws
- Wood glue
- Sandpaper (120, 220 grit)
- Wood stain or paint
Tools:
- Miter saw
- Drill
- Screwdriver
- Paintbrush or stain applicator
- Hinges (for the lid)
Instructions:
- Cut the Boards: Cut the 1×6 and 1×8 pine boards for the box’s sides, bottom, and lid. Dimensions will vary based on the desired size.
- Assemble the Box: Attach the sides and bottom together using screws and glue. Install the lid with hinges for easy opening.
- Sand and Finish: Sand all surfaces with 120-grit and 220-grit sandpaper. Apply wood stain or paint and let it dry.
13. Pine Picture Frame
Materials:
- Pine boards (1x3s)
- Wood screws
- Wood glue
- Sandpaper (120, 220 grit)
- Paint or stain
Tools:
- Miter saw
- Drill
- Screwdriver
- Paintbrush or stain applicator
Instructions:
- Cut the Boards: Cut the 1×3 pine boards to size for the picture frame. Use a miter saw to create angled cuts for the corners.
- Assemble the Frame: Join the corners using wood glue and screws. Ensure all pieces are aligned correctly.
- Sand and Finish: Sand the frame thoroughly and apply your choice of paint or stain.
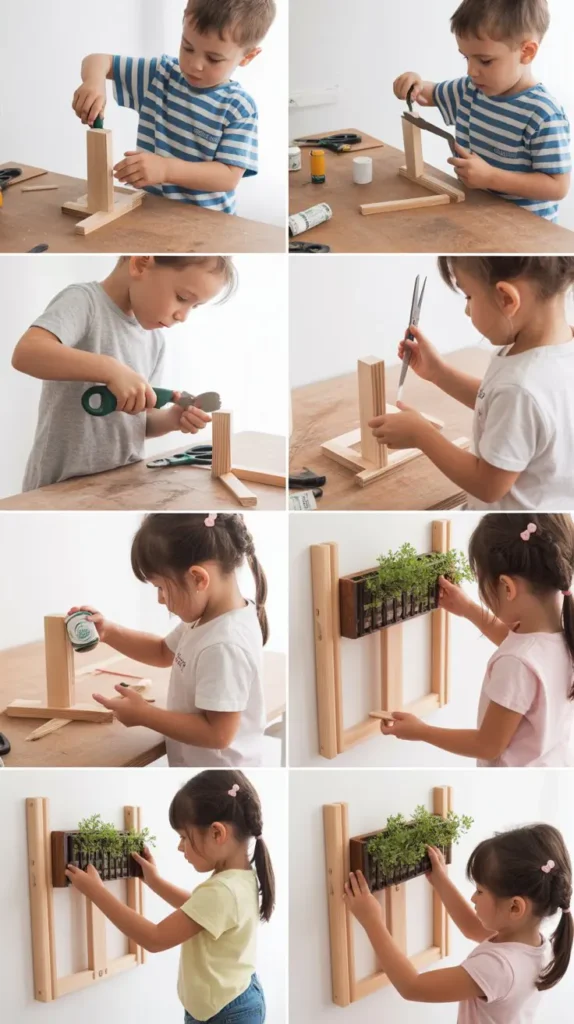
14. Pine Plant Stand
Materials:
- Pine boards (1x4s)
- Wood screws
- Wood glue
- Sandpaper (120, 220 grit)
- Paint or stain
Tools:
- Circular saw
- Drill
- Screwdriver
- Level
- Paintbrush or stain applicator
Instructions:
- Cut the Boards: Cut the 1×4 pine boards for the stand’s base and legs. Typical dimensions might be 12”x12” for the top and legs of varying heights.
- Assemble the Stand: Attach the legs to the base with screws and glue. Ensure the stand is level before securing.
- Sand and Finish: Sand all surfaces with 120-grit and 220-grit sandpaper. Apply paint or stain as desired.
How to Construct Image Prompt:
- Show the cutting of the boards, assembling the legs and base, and finishing touches. Include a level to demonstrate proper alignment.
15. Pine Spice Rack
Materials:
- Pine boards (1x4s)
- Wood screws
- Wood glue
- Sandpaper (120, 220 grit)
- Paint or stain
Tools:
- Miter saw
- Drill
- Screwdriver
- Paintbrush or stain applicator
Instructions:
- Cut the Boards: Cut the 1×4 pine boards to size for the rack’s shelves and sides. Typical dimensions are 24”x4” shelves with adjustable spacing.
- Assemble the Rack: Attach the shelves to the sides using screws and glue. Secure with clamps while the glue dries.
- Sand and Finish: Sand all surfaces to ensure a smooth finish. Apply paint or stain and let it dry.
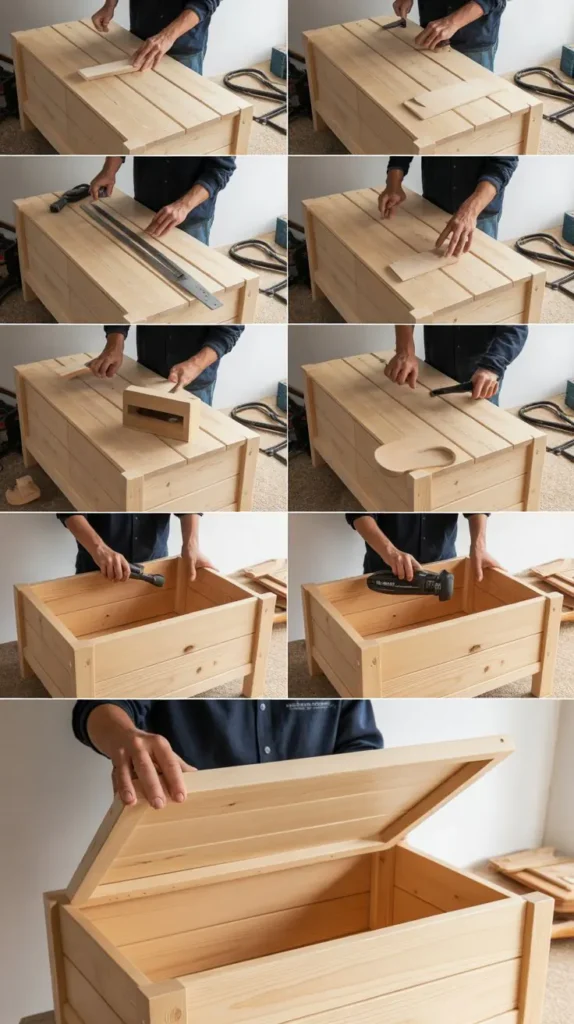
16. Pine Toy Chest
Materials:
- Pine boards (1x8s and 2x4s)
- Wood screws
- Wood glue
- Sandpaper (120, 220 grit)
- Paint or stain
- Hinges (for the lid)
Tools:
- Miter saw
- Drill
- Screwdriver
- Paintbrush or stain applicator
Instructions:
- Cut the Boards: Cut the 1×8 and 2×4 pine boards for the chest’s sides, bottom, and lid. Dimensions will vary based on the desired size.
- Assemble the Chest: Attach the sides and bottom together, adding support with 2x4s if needed. Install the lid with hinges.
- Sand and Finish: Sand all surfaces thoroughly and apply paint or stain. Allow to dry completely before use.
How to Construct Image Prompt:
- Provide images of the cutting and assembling process, installing the lid with hinges, and finishing. Include close-ups of the joints and hinges.
17. Pine Entryway Bench
Materials:
- Pine boards (1x6s and 2x4s)
- Wood screws
- Wood glue
- Sandpaper (120, 220 grit)
- Paint or stain
Tools:
- Circular saw
- Drill
- Screwdriver
- Level
- Paintbrush or stain applicator
Instructions:
- Cut the Boards: Cut the 1×6 and 2×4 pine boards to create the seat and base. A typical entryway bench is around 48”x16”x18”.
- Assemble the Bench: Attach the seat to the base using screws and glue. Reinforce with additional supports if necessary.
- Sand and Finish: Sand all surfaces with 120-grit and 220-grit sandpaper. Apply paint or stain to match your decor.
18. Pine Side Table
Materials:
- Pine boards (1x4s and 1x6s)
- Wood screws
- Wood glue
- Sandpaper (120, 220 grit)
- Paint or stain
Tools:
- Miter saw
- Drill
- Screwdriver
- Paintbrush or stain applicator
Instructions:
- Cut the Boards: Cut the 1×4 and 1×6 pine boards to size for the table top and legs. A standard side table might be 20”x20” with legs 24” tall.
- Assemble the Table: Attach the legs to the table top using screws and glue. Ensure stability by reinforcing the corners.
- Sand and Finish: Sand all surfaces thoroughly and apply paint or stain. Let it dry before using.
19. Pine Mudroom Bench
Materials:
- Pine boards (1x4s and 1x6s)
- Wood screws
- Wood glue
- Sandpaper (120, 220 grit)
- Paint or stain
Tools:
- Circular saw
- Drill
- Screwdriver
- Level
- Paintbrush or stain applicator
Instructions:
- Cut the Boards: Cut the 1×4 and 1×6 pine boards to size for the seat and backrest. A mudroom bench is typically 48”x12”x18”.
- Assemble the Bench: Attach the seat to the backrest and supports using screws and glue. Ensure everything is level and secure.
- Sand and Finish: Sand all surfaces with 120-grit and 220-grit sandpaper. Apply paint or stain as desired.
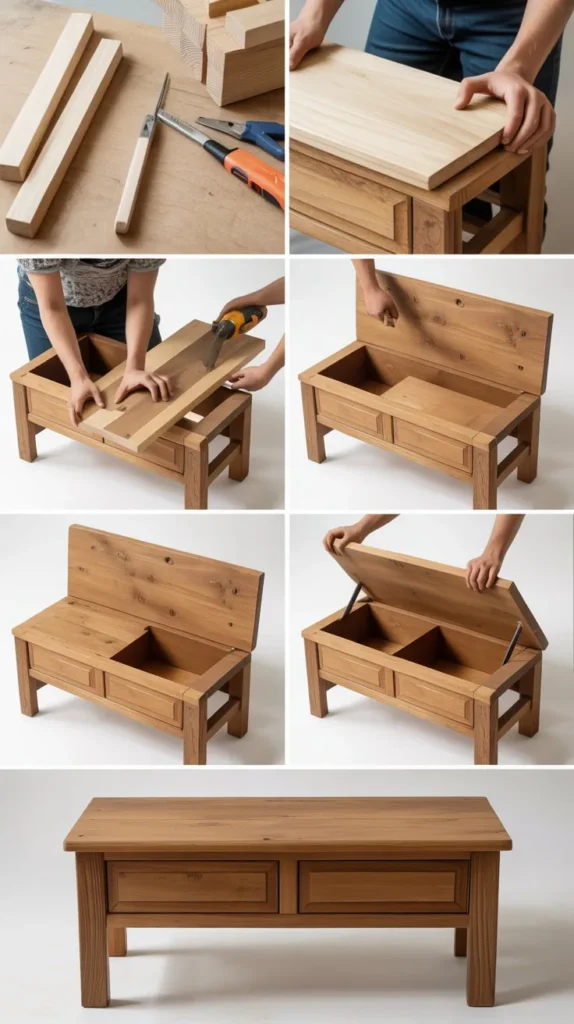
20. Pine Coffee Table with Storage
Materials:
- Pine boards (2x4s and 1x6s)
- Wood screws
- Wood glue
- Sandpaper (120, 220 grit)
- Paint or stain
- Drawer hardware
Tools:
- Circular saw
- Drill
- Screwdriver
- Level
- Paintbrush or stain applicator
Instructions:
- Cut the Boards: Cut the 2x4s and 1x6s for the table top and storage compartments. A coffee table with storage might be 40”x20” with drawers.
- Assemble the Table: Build the frame and attach the top. Install the drawers or storage compartments using screws and glue.
- Sand and Finish: Sand all surfaces thoroughly and apply paint or stain. Attach drawer hardware and let everything dry.
How to Construct Image Prompt:
- Provide images of cutting the boards, assembling the table and storage compartments, and finishing. Include close-ups of drawer installation and finishing touches.
21. Pine Console Table
Materials:
- Pine boards (1x4s and 1x6s)
- Wood screws
- Wood glue
- Sandpaper (120, 220 grit)
- Paint or stain
Tools:
- Miter saw
- Drill
- Screwdriver
- Paintbrush or stain applicator
- Level
Instructions:
- Cut the Boards: Cut the 1×4 and 1×6 pine boards to the desired dimensions for the console table. A common size is 48”x12”x30”.
- Assemble the Table: Attach the tabletop to the legs using screws and glue. Reinforce the structure with cross supports if necessary.
- Sand and Finish: Sand all surfaces to smooth out rough edges. Apply paint or stain and let it dry completely.
How to Construct Image Prompt:
- Show the process of cutting the boards, assembling the tabletop and legs, and the finishing touches. Include images of leveling and securing the structure.
22. Pine Kids’ Play Table
Materials:
- Pine boards (1x3s and 1x4s)
- Wood screws
- Wood glue
- Sandpaper (120, 220 grit)
- Paint or stain
Tools:
- Circular saw
- Drill
- Screwdriver
- Paintbrush or stain applicator
- Level
Instructions:
- Cut the Boards: Cut the 1×3 and 1×4 pine boards to size for the tabletop and legs. A typical play table might be 24”x24” with 18” tall legs.
- Assemble the Table: Attach the legs to the tabletop using screws and glue. Ensure the table is stable and level.
- Sand and Finish: Sand all surfaces thoroughly and apply paint or stain. Allow to dry before use.
How to Construct Image Prompt:
- Provide images of cutting and assembling the tabletop and legs, highlighting the stability and leveling process. Show the painting or staining phase.
23. Pine Floating Shelves
Materials:
- Pine boards (1x6s)
- Wood screws
- Wood glue
- Sandpaper (120, 220 grit)
- Paint or stain
Tools:
- Miter saw
- Drill
- Screwdriver
- Level
- Paintbrush or stain applicator
Instructions:
- Cut the Boards: Cut the 1×6 pine boards to the desired length for the floating shelves. Typical lengths are 24” or 36”.
- Assemble the Shelves: Attach the boards to hidden wall brackets or supports. Ensure the shelves are level and secure.
- Sand and Finish: Sand all surfaces to a smooth finish and apply paint or stain.
How to Construct Image Prompt:
- Illustrate cutting the boards, installing the brackets or supports, and attaching the shelves. Show the finishing process and final installation.
24. Pine Pet Bed
Materials:
- Pine boards (1x4s and 1x6s)
- Wood screws
- Wood glue
- Sandpaper (120, 220 grit)
- Paint or stain
Tools:
- Circular saw
- Drill
- Screwdriver
- Paintbrush or stain applicator
Instructions:
- Cut the Boards: Cut the 1×4 and 1×6 pine boards to size for the pet bed frame. A typical size is 36”x24” with 12” high sides.
- Assemble the Bed: Attach the sides to the base using screws and glue. Ensure the frame is sturdy and level.
- Sand and Finish: Sand all surfaces to remove rough spots. Apply paint or stain to protect the wood and match your decor.
How to Construct Image Prompt:
- Show the cutting and assembling of the pet bed frame, with close-ups on joint reinforcement and the finishing process.
25. Pine Towel Rack
Materials:
- Pine boards (1x3s)
- Wood screws
- Wood glue
- Sandpaper (120, 220 grit)
- Paint or stain
Tools:
- Miter saw
- Drill
- Screwdriver
- Paintbrush or stain applicator
- Level
Instructions:
- Cut the Boards: Cut the 1×3 pine boards to size for the rack’s backboard and towel bars. A common size for a towel rack is 24” wide with 4” deep bars.
- Assemble the Rack: Attach the towel bars to the backboard using screws and glue. Ensure the bars are evenly spaced and level.
- Sand and Finish: Sand all surfaces to a smooth finish. Apply paint or stain to match your bathroom decor.
How to Construct Image Prompt:
- Provide images of cutting the boards, assembling the rack, and the final finishing touches. Highlight the spacing and leveling of the towel bars.
26. Pine Headboard

Materials:
- Pine boards (1x8s and 1x4s)
- Wood screws
- Wood glue
- Sandpaper (120, 220 grit)
- Paint or stain
Tools:
- Miter saw
- Drill
- Screwdriver
- Paintbrush or stain applicator
Instructions:
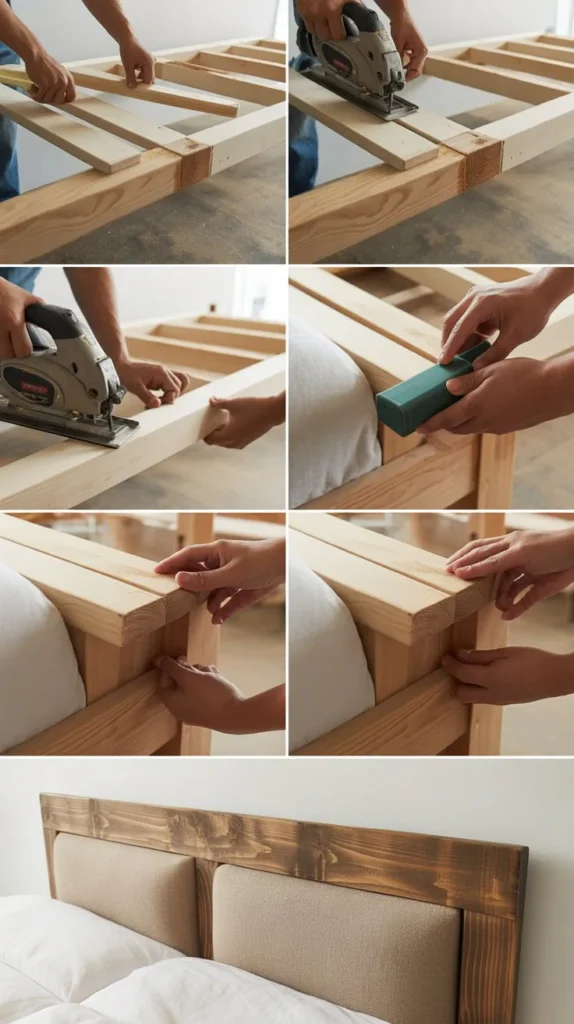
- Cut the Boards: Cut the 1×8 and 1×4 pine boards to size for the headboard. A standard headboard size might be 60”x36”.
- Assemble the Headboard: Attach the boards together using screws and glue to form the headboard. Reinforce with additional supports if needed.
- Sand and Finish: Sand all surfaces thoroughly and apply paint or stain. Allow to dry before mounting.
How to Construct Image Prompt:
- Illustrate cutting the boards, assembling the headboard, and finishing touches. Include images showing the headboard mounted behind a bed.
27. Pine Coffee Table with Magazine Rack
Materials:
- Pine boards (2x4s and 1x8s)
- Wood screws
- Wood glue
- Sandpaper (120, 220 grit)
- Paint or stain
Tools:
- Circular saw
- Drill
- Screwdriver
- Paintbrush or stain applicator
Instructions:
- Cut the Boards: Cut the 2x4s and 1x8s for the table top and magazine rack sections. A coffee table with a magazine rack might be 40”x20” with a lower shelf for magazines.
- Assemble the Table: Build the table top and attach it to the base. Install the magazine rack under the table.
- Sand and Finish: Sand all surfaces to a smooth finish. Apply paint or stain and let dry.
How to Construct Image Prompt:
- Provide images of cutting the boards, assembling the table and magazine rack, and finishing. Include close-ups of the magazine rack installation.
28. Pine Storage Bench with Cubbies
Materials:
- Pine boards (1x4s and 1x6s)
- Wood screws
- Wood glue
- Sandpaper (120, 220 grit)
- Paint or stain
Tools:
- Miter saw
- Drill
- Screwdriver
- Paintbrush or stain applicator
- Level
Instructions:
- Cut the Boards: Cut the 1×4 and 1×6 pine boards for the bench seat and cubby compartments. A typical bench might be 48”x16” with cubbies underneath.
- Assemble the Bench: Attach the seat to the cubby base using screws and glue. Ensure stability with additional supports if needed.
- Sand and Finish: Sand all surfaces thoroughly and apply paint or stain. Let the bench dry before use.
How to Construct Image Prompt:
- Show the cutting and assembling of the bench, including the cubby compartments. Include images of the sanding and finishing process.
29. Pine Wall-Mounted Desk
Materials:
- Pine boards (1x6s and 1x4s)
- Wood screws
- Wood glue
- Sandpaper (120, 220 grit)
- Paint or stain
Tools:
- Miter saw
- Drill
- Screwdriver
- Paintbrush or stain applicator
Instructions:
- Cut the Boards: Cut the 1×6 and 1×4 pine boards to size for the desk top and wall mounts. A wall-mounted desk might be 36”x24” with hidden brackets.
- Assemble the Desk: Attach the desk top to the wall brackets using screws and glue. Ensure the desk is level and secure.
- Sand and Finish: Sand all surfaces thoroughly and apply paint or stain. Let it dry before use.
How to Construct Image Prompt:
- Illustrate cutting the boards, mounting the desk on the wall, and finishing. Include close-ups of the hidden brackets and leveling.
30. Pine Garden Bench
Materials:
- Pine boards (2x4s and 1x6s)
- Wood screws
- Wood glue
- Sandpaper (120, 220 grit)
- Paint or stain
Tools:
- Circular saw
- Drill
- Screwdriver
- Level
- Paintbrush or stain applicator
Instructions:
- Cut the Boards: Cut the 2x4s and 1x6s to size for the bench seat and supports. A garden bench might be 48”x14” with 18” high sides.
- Assemble the Bench: Attach the seat to the supports using screws and glue. Reinforce the joints for added stability.
- Sand and Finish: Sand all surfaces to a smooth finish. Apply paint or stain to protect the wood and complement your garden.
How to Construct Image Prompt:
- Provide images of cutting the boards, assembling the bench, and finishing. Show the bench in a garden setting to highlight its use.
This comprehensive guide provides a variety of pine woodworking projects to enhance your home with style and functionality. Each project is carefully detailed to ensure you achieve professional results.
Happy woodworking!