When you’re carving down snowy slopes, the last thing you want to worry about is your hair falling flat or escaping from your helmet.
If you have thin hair, you already know the challenge of finding hairstyles that create volume while staying put during high-intensity winter sports.
This comprehensive guide to 28 Snowboarding Hairstyles for Thin Hair That Add Volume and Stay Secure will transform your mountain experience by offering practical, stylish solutions that work with your hair type rather than against it.
You’ll discover techniques that add body and texture, protective styles that prevent breakage from helmet friction, and volume-boosting methods that survive hours on the mountain.
From strategic braiding patterns to innovative bun placements, each hairstyle has been selected specifically for thin hair that needs both security and lift.
Whether you’re a beginner hitting the bunny slopes or an advanced rider tackling black diamonds, these hairstyles will keep you looking great and feeling confident from your first run to your last.
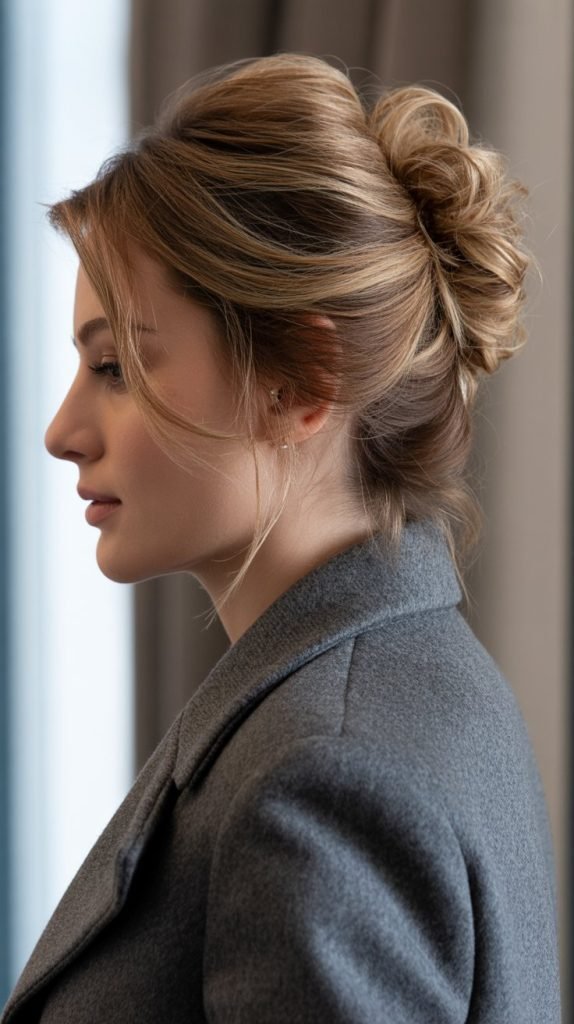
1. The Crown Volume Ponytail
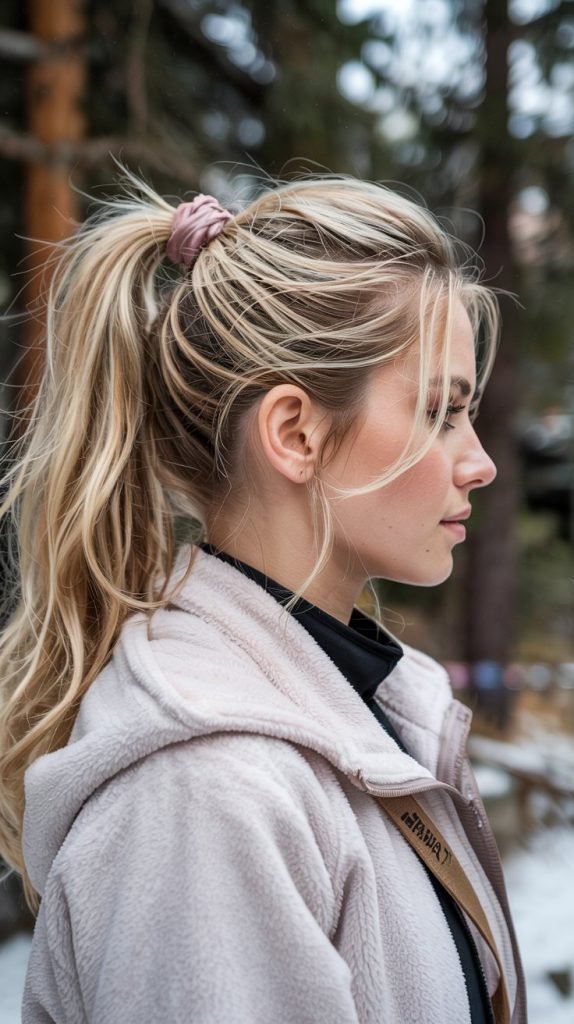
This elevated ponytail creates instant lift at the crown while keeping hair completely secure under your helmet.
Why It Works for Thin Hair:
- The high placement naturally lifts hair away from the scalp, creating the illusion of density and volume.
- Teasing the crown section before securing adds significant height that thin hair typically lacks.
- The tight ponytail base prevents slippage that often occurs with finer hair textures.
- Helmet pressure actually helps maintain the teased volume rather than flattening it completely.
Step-by-Step Creation:
- Begin with dry hair and apply a volumizing powder or dry shampoo directly to the roots at the crown.
- Section off the top portion of hair from ear to ear, creating a horizontal part.
- Backcomb this crown section gently using a fine-tooth comb, working from mid-lengths toward the roots.
- Gather all hair into a high ponytail positioned at the crown of your head.
- Smooth only the surface layer of hair to maintain the teased volume underneath.
- Secure with a strong elastic band, wrapping at least three times for thin hair security.
- Take a small section from the ponytail and wrap it around the elastic to conceal it, securing with a bobby pin.
Pro Tips:
- Use a texture spray before teasing to give thin strands more grip and hold.
- Don’t smooth the teased section too much or you’ll lose all the volume you created.
- Position the ponytail slightly forward on your crown rather than at the very top for optimal helmet fit.
- Consider using two elastic bands stacked together for extra security during aggressive riding.
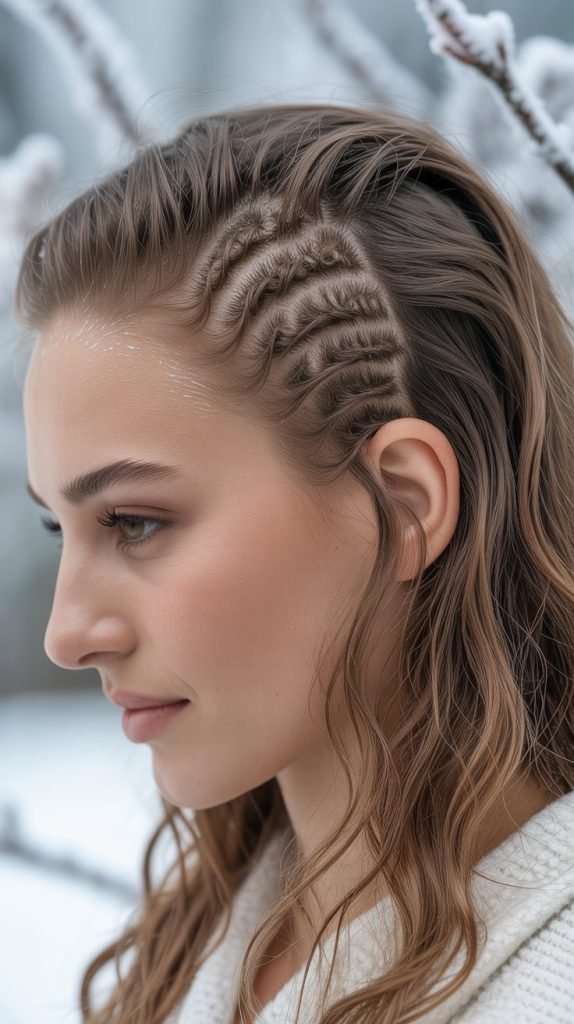
2. Dutch Braid Crown with Loose Ends
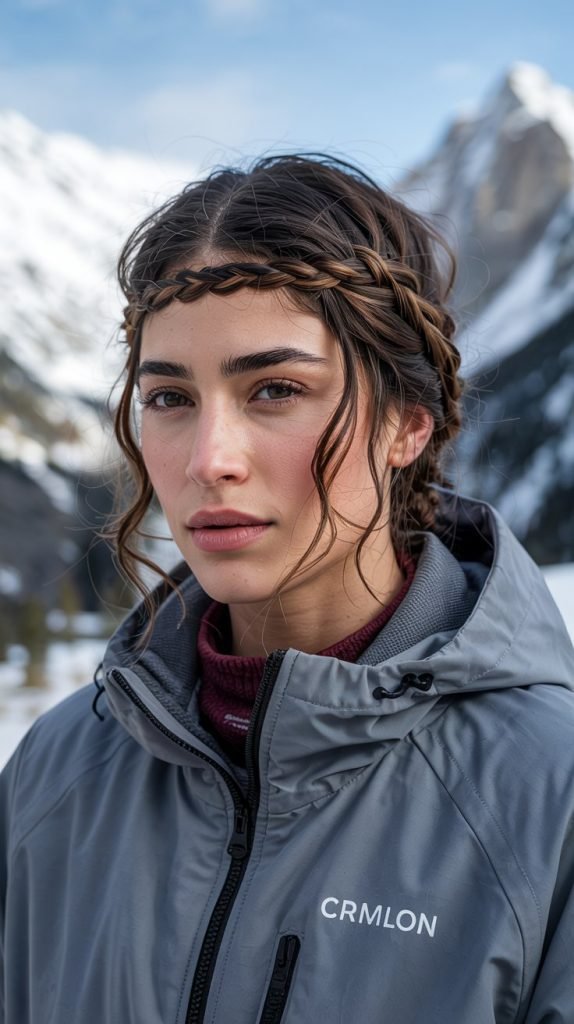
This protective style keeps hair off your neck while the Dutch braiding technique creates visible volume that regular braids cannot achieve.
Volume Benefits:
- Dutch braids sit on top of the hair rather than sinking into it, creating a raised, voluminous effect.
- The braiding pattern itself makes thin hair appear fuller by showcasing each strand.
- Pulling the braid sections apart slightly after completion adds width and dimension.
- The style draws attention away from the scalp where thinness is most visible.
Creating the Style:
- Start with slightly damp hair and apply a volumizing mousse from roots to ends.
- Create a deep side part, then begin your Dutch braid at the hairline on the heavier side.
- Unlike French braids that go under, bring sections over the middle piece for the raised Dutch effect.
- Continue braiding along your hairline like a crown, incorporating new hair as you go.
- Secure the braid end behind your opposite ear with bobby pins.
- Leave the remaining ends loose and curl them gently for added body.
- Gently pull apart the braid sections (called “pancaking”) to maximize width.
Maintenance on the Mountain:
- Apply a light hairspray before putting on your helmet to prevent flyaways.
- The braid structure is strong enough to withstand helmet pressure without losing shape.
- Bring a small travel spray and a few extra bobby pins in your jacket pocket for touch-ups.
- This style typically lasts all day without needing adjustment between runs.
3. The Twisted Low Bun with Volume Boost
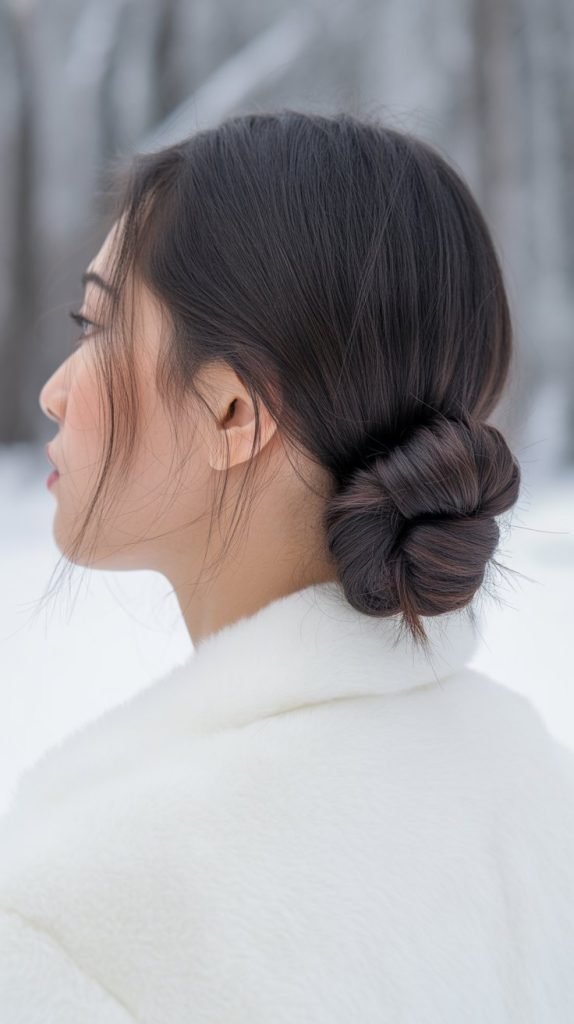
A sophisticated solution that creates thickness through twisting techniques while keeping everything secure at the nape of your neck.
Why Twisting Adds Volume:
- Twisting hair before forming a bun automatically adds dimension and thickness to each section.
- The technique prevents the flat, limp appearance that simple buns create on thin hair.
- Multiple twists layered together create the illusion of much fuller hair.
- The low placement is ideal for helmet compatibility without uncomfortable pressure points.
Construction Method:
- Apply a volumizing cream to damp hair and blow dry with your head flipped upside down for root lift.
- Divide hair into two equal sections down the center back.
- Twist each section tightly in the same direction until it begins to coil on itself.
- Cross the two twisted sections over each other at the nape of your neck.
- Wrap both twists together into a bun shape, securing with bobby pins as you go.
- Pull gently on sections of the bun to loosen slightly and reveal the twisted texture.
- Finish with bobby pins in an X-pattern through the bun center for maximum security.
Helmet Compatibility:
- Position the bun slightly off-center if your helmet has a particularly low back edge.
- The twisted texture provides cushioning between your head and the helmet.
- This style won’t create the headache that high buns can cause under helmets.
- The secure pinning prevents any loosening during falls or aggressive movements.
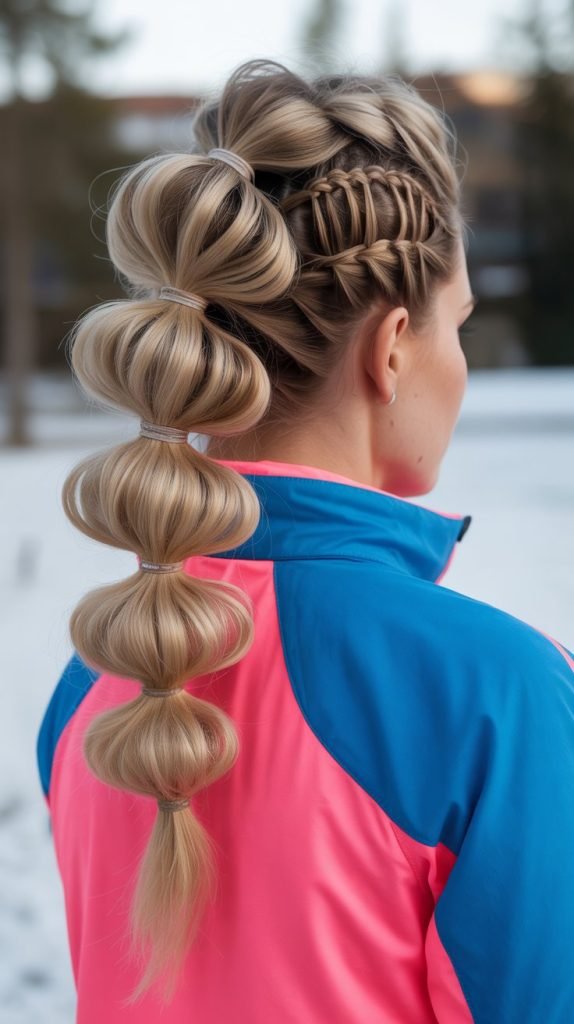
4. Bubble Ponytail with Teased Sections
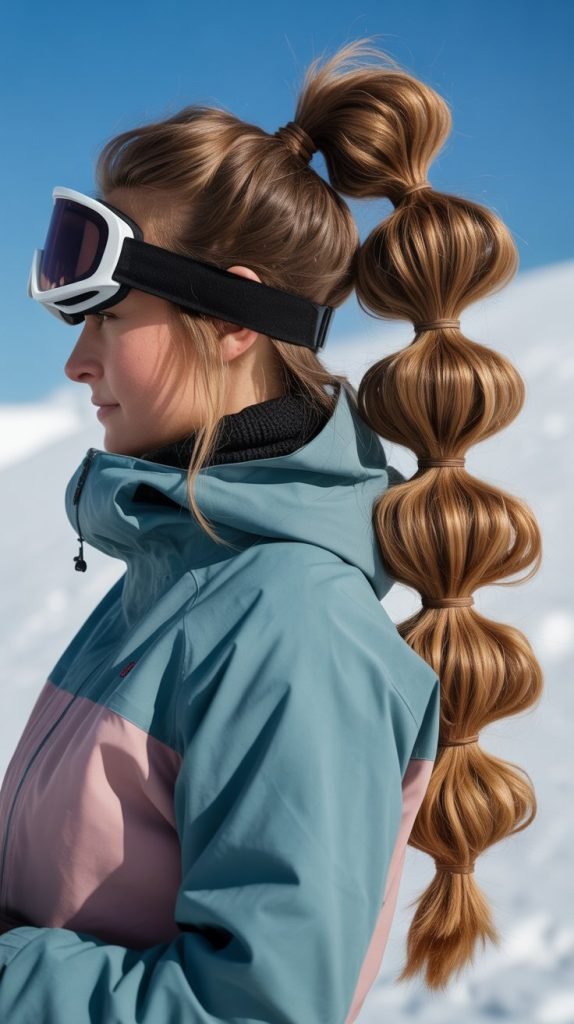
This trendy style uses multiple elastic bands to create dramatic volume bubbles that make thin hair look extraordinarily full.
Volume Creation Technique:
- Each bubble section is individually teased, multiplying the volume throughout the entire ponytail.
- The segmented structure prevents the weighted-down appearance that long ponytails create on thin hair.
- Pulling the bubbles apart creates width that thin hair naturally lacks.
- The style is deceptively simple but delivers dramatic fullness.
Building the Bubbles:
- Create a mid-height ponytail and secure it with a strong elastic band.
- Apply dry shampoo or texturizing spray throughout the ponytail length.
- Measure down approximately 2-3 inches and add another elastic band.
- Gently tease the hair between the two bands, then carefully pull it apart horizontally to create a bubble.
- Continue adding elastic bands every 2-3 inches down the ponytail length.
- Tease and pull apart each section to create uniform bubbles.
- The final result should have 4-6 distinct bubble sections depending on your hair length.
Security Features:
- Multiple elastic bands mean multiple security points that won’t all fail at once.
- The bubble structure actually tightens as you move, maintaining its shape throughout the day.
- Each elastic can be adjusted individually if any section begins to slip.
- This style stays remarkably intact even during falls and tumbles in the snow.
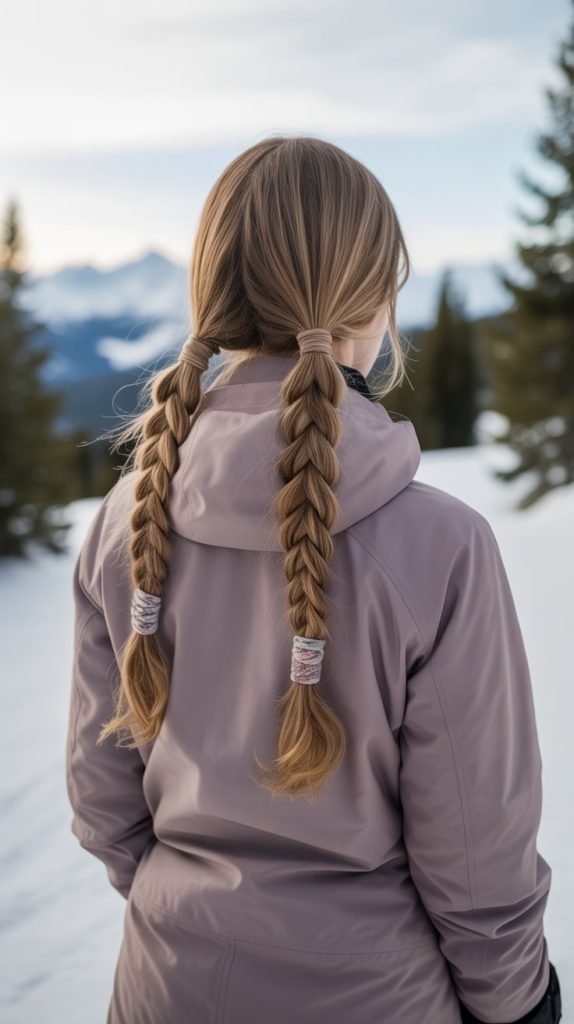
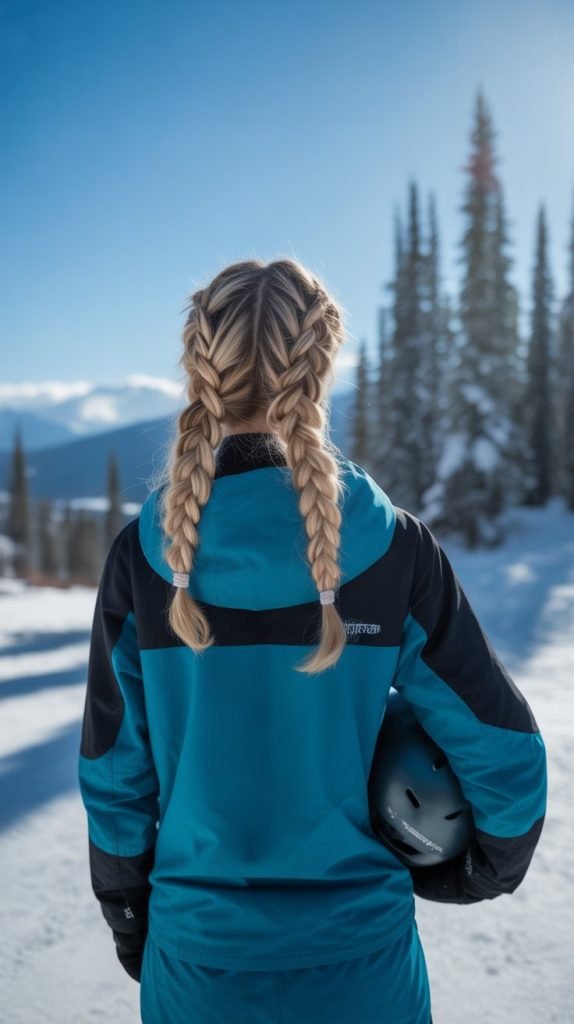
5. French Braid Pigtails with Volumized Roots
Double braids distribute thin hair into two fuller-looking sections while keeping everything completely secure and helmet-friendly.
Dual Braid Advantages:
- Dividing hair into two sections makes each braid appear thicker than a single braid would.
- The French braiding technique from the roots keeps everything tight against the scalp for helmet comfort.
- Volumizing the roots before braiding prevents the pulled-flat appearance.
- This youthful style is functional enough for professional riders yet cute enough for style-conscious snowboarders.
Creation Process:
- Part hair straight down the center from forehead to nape, creating two equal sections.
- Apply volumizing powder directly to the scalp along the part and at the hairline.
- Starting on one side, begin a French braid at the temple area, incorporating hair as you braid down.
- Keep the braid tension tight enough for security but not so tight that it pulls painfully.
- Secure the end with a small elastic band and repeat on the opposite side.
- Gently pull on the edges of each braid to add width without loosening the structure.
- Spray with a flexible-hold hairspray that won’t make hair stiff or crunchy.
Practical Benefits:
- The symmetrical balance prevents your helmet from sitting unevenly.
- If one braid begins to loosen, you can quickly tighten it without redoing your entire hairstyle.
- The braids stay tucked inside your jacket collar, preventing snow from getting into your hair.
- This style transitions beautifully from the slopes to the lodge without looking too sporty.
6. The Textured Top Knot
A messy, deliberately imperfect bun that celebrates texture and creates the appearance of abundant volume through strategic styling.
Texture Equals Volume:
- The intentionally messy appearance disguises the actual density of thin hair.
- Texture products grip individual strands, making them appear thicker and more substantial.
- The high placement creates instant lift and draws the eye upward.
- Loose face-framing pieces prevent the severe, pulled-back look that can emphasize thin hair.
Styling Steps:
- Work a sea salt spray or texturizing spray through dry hair from roots to ends.
- Flip your head upside down and gather hair into a high ponytail, keeping it loose and imperfect.
- Don’t brush or smooth the hair—embrace the texture and natural movement.
- Twist the ponytail loosely and wrap it around the base, leaving the ends sticking out.
- Secure with bobby pins placed randomly rather than in a precise pattern.
- Pull small sections of the bun outward to create a fuller, more dimensional appearance.
- Release a few face-framing pieces around your hairline for a softer look.
Helmet Considerations:
- Position the knot slightly forward so it doesn’t create a pressure point against the helmet back.
- The textured, grippy nature of the style prevents slippage better than smooth, sleek buns.
- The deliberate messiness means that helmet compression actually enhances the style rather than ruining it.
- After removing your helmet, simply fluff the knot with your fingers to refresh the look.
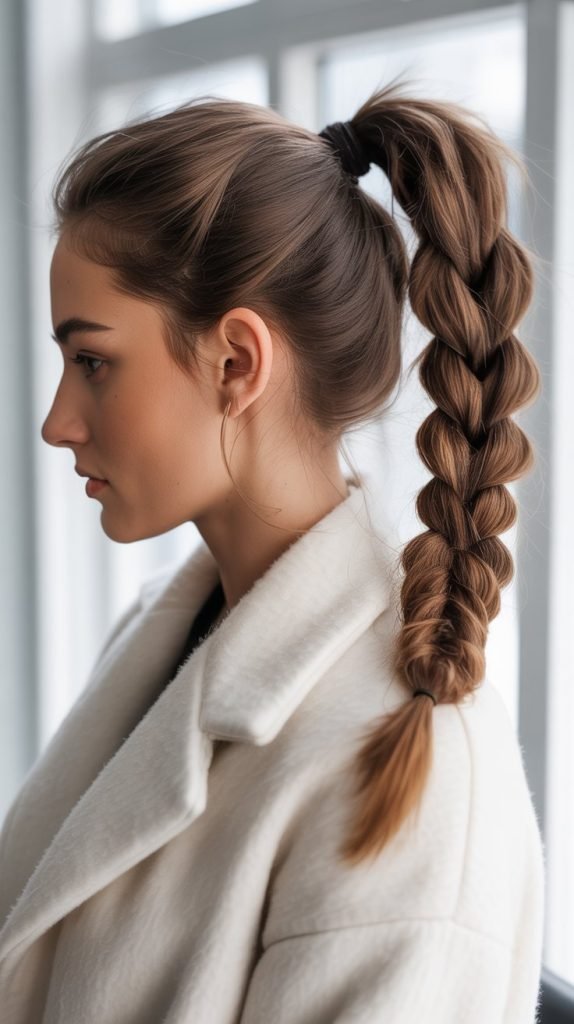
7. Rope Braid Ponytail
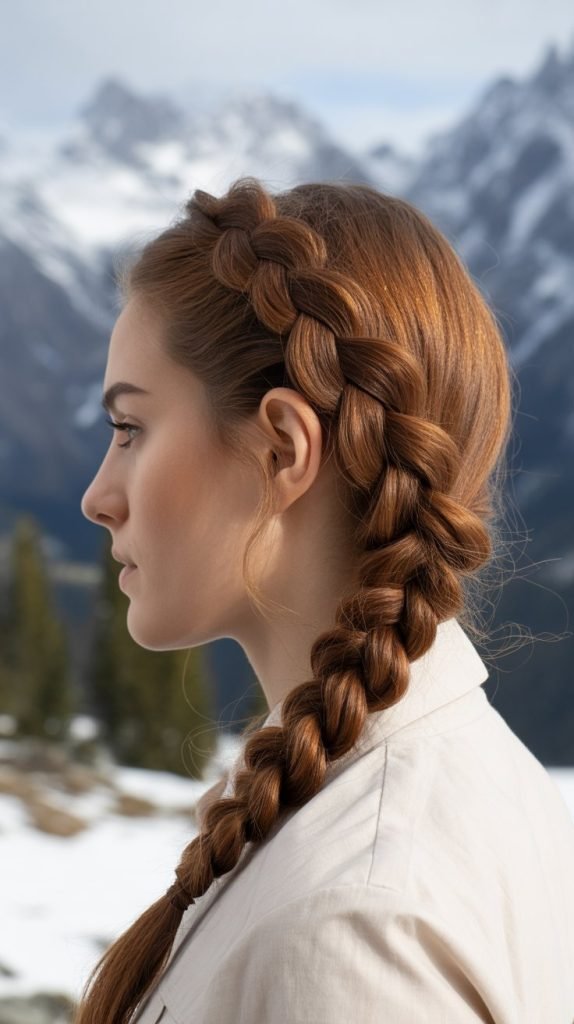
This unique braiding technique creates a thick, rope-like appearance that makes thin hair look substantially fuller while staying completely secure.
The Rope Braid Secret:
- Twisting two sections in opposite directions and then wrapping them around each other creates a chunky, substantial appearance.
- The technique is faster than traditional braiding but delivers more visual volume.
- The tight twist structure won’t loosen or fall out during physical activity.
- This braid type naturally makes thin hair appear twice as thick as it actually is.
How to Create It:
- Gather hair into a ponytail at your desired height and secure with an elastic band.
- Divide the ponytail into two equal sections.
- Twist the right section clockwise several times until it’s tightly wound.
- Twist the left section clockwise as well, matching the tightness of the first section.
- Now wrap the two twisted sections around each other in a counter-clockwise direction.
- The opposing twist directions create the rope effect and prevent unraveling.
- Secure the end with another elastic band.
- Gently pull on the rope braid to add width, but don’t pull so hard that the twists come undone.
Performance Features:
- The rope structure actually tightens with movement rather than loosening.
- There are no complex weaving patterns to come undone during athletic activity.
- The braid maintains its shape even when wet from snow.
- This style requires minimal bobby pins, reducing the risk of painful pressure points under your helmet.
8. Half-Up Top Knot with Volume
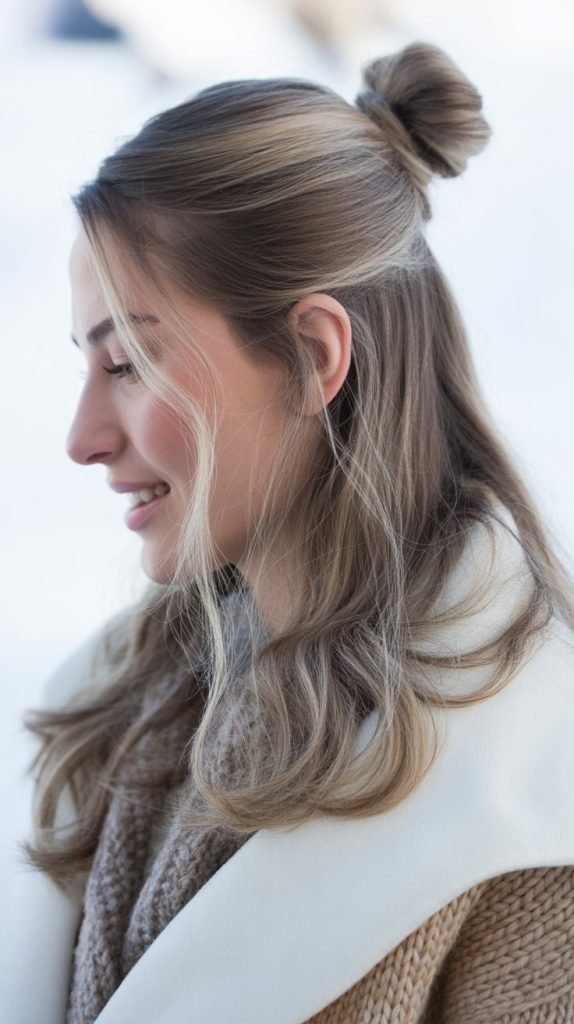
Combining the security of a bun with the flowing appearance of loose hair, this style strategically adds volume where thin hair needs it most.
Strategic Volume Placement:
- Pulling up only the top section creates lift at the crown, the most visible area for adding volume.
- The remaining loose hair provides coverage and prevents the scalp from showing through.
- The contrast between the secured top and flowing bottom creates the illusion of more abundant hair.
- This hybrid style is less severe than a full bun but more secure than completely loose hair.
Step-by-Step Guide:
- Section off the top half of your hair from temple to temple, approximately from eyebrow level back.
- Tease the roots of this top section thoroughly to create a volume base.
- Gather the teased section into a high ponytail, smoothing only the very surface.
- Twist the ponytail and wrap it into a small bun, securing with bobby pins.
- Leave the lower section of hair loose or add loose waves with a curling iron for extra body.
- Pull a few small pieces free around your face to soften the look.
- Set with a light-hold hairspray that allows movement.
Helmet Compatibility:
- The small bun sits high enough to avoid most helmet pressure.
- If your helmet does compress the bun, the teased volume beneath maintains some lift.
- The loose lower section tucks easily into your jacket collar to stay dry.
- This style is easy to adjust or refresh between runs by simply re-pinning the top knot.
9. Crimped Root Volume Style
Using strategic crimping at the roots creates lasting volume that survives helmet compression while adding dramatic fullness to thin hair.
Why Crimping Works:
- The zigzag pattern created by crimping lifts hair away from the scalp at the roots.
- Crimped sections have more surface area, making hair appear thicker overall.
- The texture provides grip that helps styles stay in place longer.
- Root crimping has become a popular volume-boosting technique in hair styling, especially for fine or thin hair types.
Application Technique:
- Work on completely dry hair for best results and hair health protection.
- Apply a heat protectant spray specifically to the root area where you’ll be crimping.
- Section hair into layers, starting with the bottom layer clipped up and out of the way.
- Using a crimping iron, clamp only the first 2-3 inches of hair at the roots.
- Hold for 5-10 seconds, then release and move to the next section.
- Focus on the crown, sides, and back areas where volume is most visible.
- After crimping the roots, style the remaining hair into your chosen snowboarding hairstyle.
Styling Options:
- Pull crimped hair into a ponytail that appears dramatically fuller thanks to the crimped root volume.
- Create a braid that has built-in volume from the crimped texture.
- Leave hair loose with the crimped roots providing all-over body and movement.
- The crimp texture lasts through multiple helmet removals and reapplications.
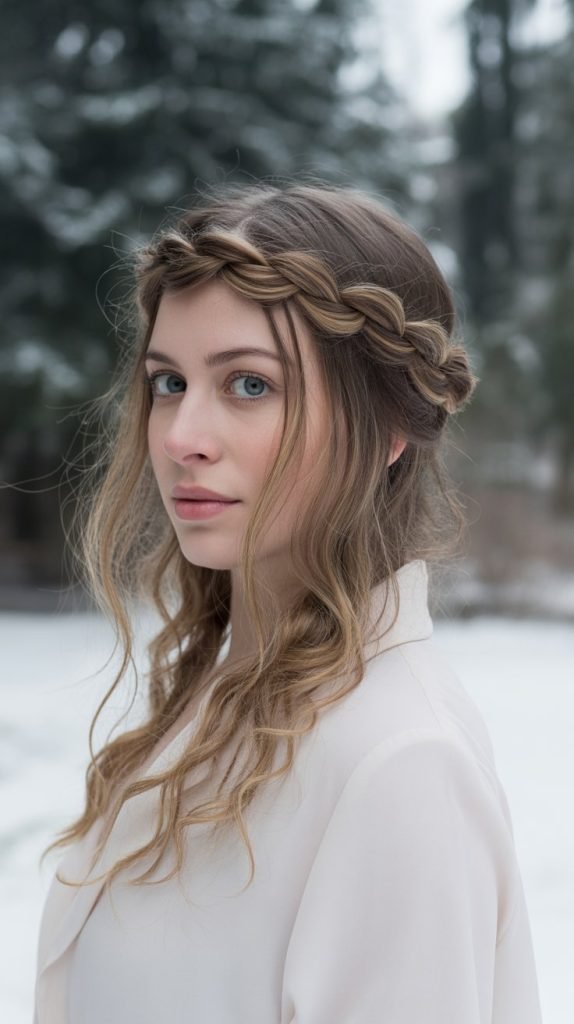
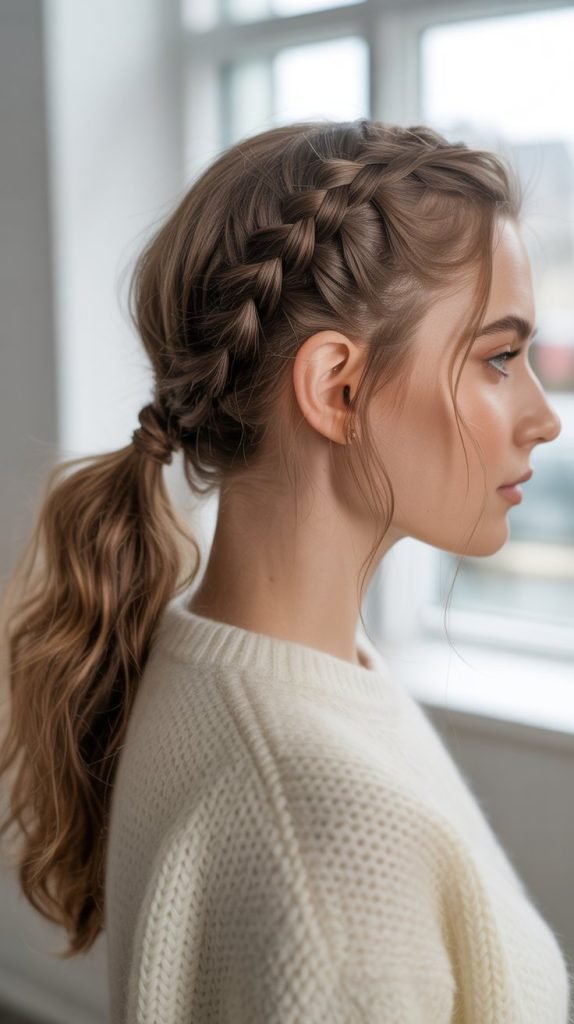
10. Braided Headband with Low Ponytail
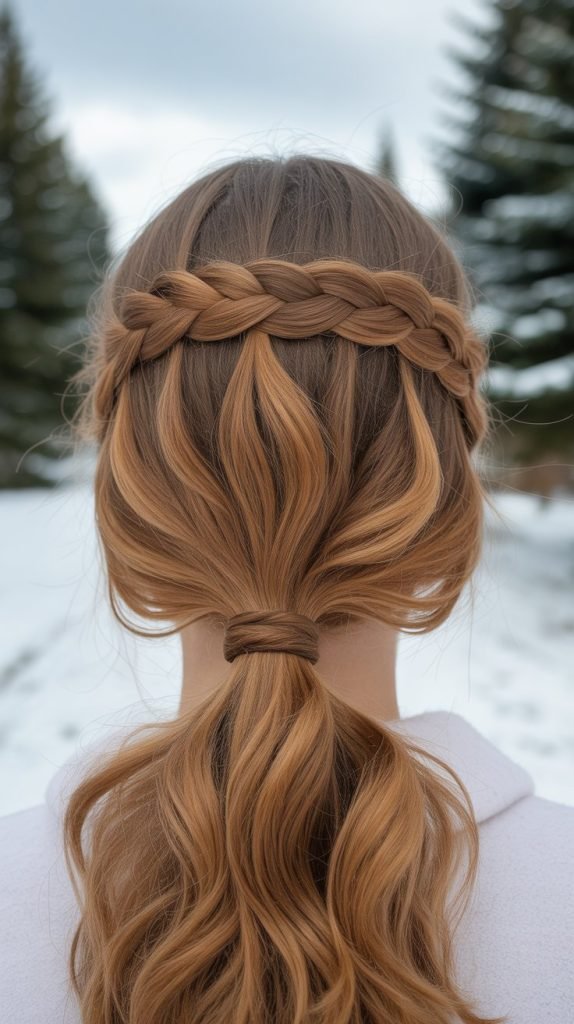
This romantic yet functional style keeps hair secure while creating the appearance of a thicker hairline through strategic braiding.
The Headband Braid Effect:
- The braid draws attention to the hairline and creates a frame that suggests fullness.
- This technique disguises any thinning at the temples or hairline.
- The remaining hair pulled into a low ponytail is easy to add volume to through teasing.
- The combination of textures (braided and smooth) creates visual interest that distracts from hair density.
Creating the Look:
- Start by parting your hair deeply on one side.
- On the heavier side of the part, take a small section from your hairline.
- Begin a regular three-strand braid along your hairline, moving toward the opposite ear like a headband.
- As you braid, incorporate small amounts of hair from the hairline edge to secure it in place.
- When you reach behind your opposite ear, secure the braid with a small clear elastic or bobby pins.
- Gather the remaining hair into a low ponytail at the nape of your neck.
- Tease the ponytail slightly and wrap a small section around the elastic to conceal it.
Practical Advantages:
- The headband braid prevents hair from falling into your face during rides.
- The low ponytail placement won’t interfere with helmet fit or comfort.
- This style effectively manages thin hair that tends to get static and flyaway in cold weather.
- The braid adds a decorative element that elevates the look beyond basic functional styling.
11. Faux Hawk Braid
An edgy, athletic style that creates dramatic height and volume through center braiding while keeping sides sleek and helmet-friendly.
Volume Through Structure:
- The raised center braid creates vertical volume that makes hair appear fuller and more substantial.
- Sleek sides contrast with the textured center, making the voluminous area appear even more dramatic.
- This style works particularly well for thin hair because it concentrates volume in one impactful area.
- The athletic aesthetic is perfect for snowboarding while still looking stylish.
Construction Method:
- Apply volumizing mousse to damp hair and blow dry with a round brush to add body.
- Create a rectangular section down the center of your head, approximately 2-3 inches wide from forehead to crown.
- Smooth the side sections with a gel or pomade and pin them flat against your head.
- Begin a Dutch braid (over instead of under) at your forehead with the center section.
- As you braid, pull each section outward to maximize width and height.
- Continue the braid to the nape of your neck and secure with an elastic.
- Gently pull apart the braid sections to add even more volume and width.
- Pin any short layers or flyaways from the side sections for a clean finish.
Performance Benefits:
- The sleek sides mean your helmet slides on smoothly without catching on loose hair.
- The center braid stays secure and doesn’t shift during athletic movements.
- The style looks intentional even after hours of helmet wear.
- This bold look transitions well to lodge socializing after your riding session.
12. Zigzag Part with Double Twist Buns

Creative parting techniques combined with twisted buns add visual interest and volume to thin hair while maintaining complete security.
The Zigzag Advantage:
- A zigzag part creates the illusion of more hair by preventing the scalp from showing in a straight line.
- The irregular pattern naturally adds volume at the roots where straight parts create flatness.
- The dual bun placement distributes thin hair into two sections that appear fuller.
- This playful style adds personality while remaining completely functional for snowboarding.
How to Create:
- Use the pointed end of a tail comb to create a zigzag pattern down the center of your head.
- Work from forehead to crown, making sharp angles that go back and forth across where a straight part would be.
- Divide hair into two equal sections following your zigzag part.
- Take one section and twist it tightly from roots to ends until it begins to coil.
- Wrap the twisted hair into a bun and secure with bobby pins in multiple directions.
- Repeat the twisting and wrapping process on the opposite side, matching the placement.
- Gently pull on each bun to add width and create a fuller appearance.
Helmet Considerations:
- Position the buns slightly lower on your head if your helmet sits particularly low.
- The twisted texture provides cushioning that prevents discomfort from helmet pressure.
- The zigzag part won’t flatten out under your helmet like straight parts do.
- This style remains intact and looks intentional even after full days on the mountain.
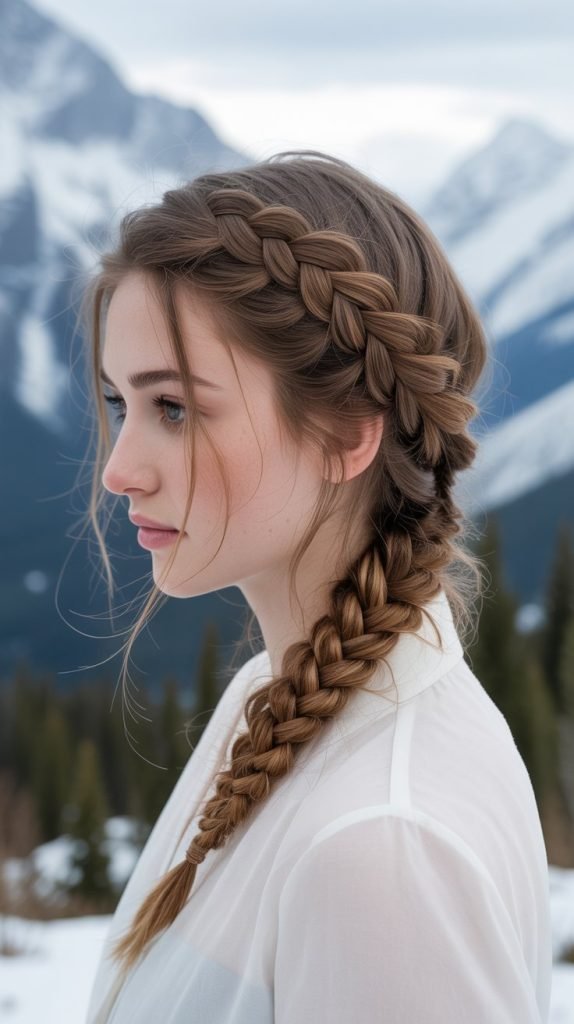
13. Voluminous Side Braid
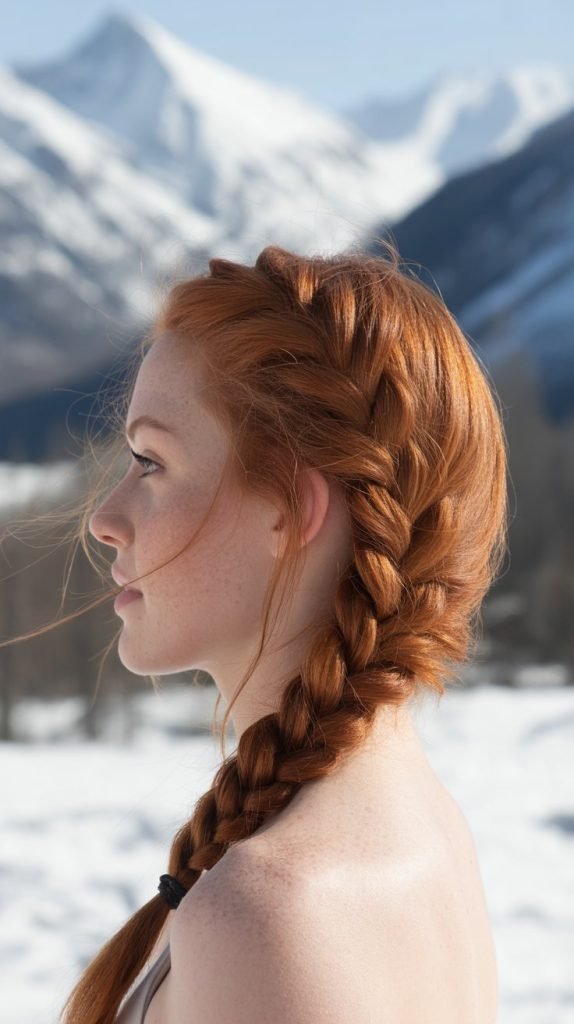
A single side braid created with specific volumizing techniques transforms thin hair into a thick, impressive braid that stays put during all mountain activities.
Volume Maximization:
- Braiding to the side naturally creates more visual fullness than center-back braids.
- The pancaking technique (pulling braid sections apart) dramatically increases apparent thickness.
- Starting the braid lower rather than from the crown gives you more length to work with for volume manipulation.
- Texturizing products applied before braiding give thin strands the grip needed for fuller-looking results.
Detailed Instructions:
- Apply dry shampoo or texturizing spray throughout your hair, focusing on roots to ends.
- Create a deep side part, bringing all hair over one shoulder.
- Begin a Dutch braid (sections crossing over rather than under) starting at temple height.
- As you braid, keep moderate tension—too tight will make thin hair look sparse, too loose won’t hold.
- Secure the braid end with a small elastic approximately 2 inches from your ends.
- Starting from the bottom and working up, gently pull on the outer edges of each braid section.
- The braid should double in width through this pancaking process.
- Set with a flexible-hold hairspray to maintain the volume.
Practical Features:
- The side placement keeps the braid from sitting between your back and backpack straps.
- You can easily bring the braid forward to check its security without removing your helmet.
- The braid won’t catch in jacket zippers or goggle straps like loose hair can.
- This style looks polished enough for slope-side photos and après-ski socializing.
14. Teased Crown Bun

Strategic teasing at the crown before forming a bun creates lasting height that survives helmet compression while keeping all hair secured.
Crown Volume Strategy:
- Teasing creates a cushion of volume at the most visible part of your head.
- The secured bun prevents the teased section from falling flat throughout the day.
- This technique works even for very thin hair because it’s about texture manipulation, not actual hair density.
- The crown area is the first thing people see, so volume here creates the overall impression of fuller hair.
Step-by-Step Process:
- Section off a rectangular area at the crown of your head, approximately 4 inches wide and long.
- Hold this section straight up and spray with a volumizing or texture spray.
- Using a fine-tooth comb, backcomb from mid-lengths toward the roots with short, firm strokes.
- Set the teased section down and smooth only the very top layer with a soft brush.
- Gather all hair (including the teased section) into a low ponytail at the nape.
- Twist the ponytail and wrap it into a bun, securing with pins in an X-pattern.
- The teased volume should remain visible as a lifted area at your crown.
- Lightly spray the crown area to set the volume without weighing it down.
Longevity Tips:
- The bun keeps the teased section in place so it doesn’t brush out during movement.
- Apply a small amount of texture powder at the roots before teasing for even longer-lasting lift.
- Don’t touch or adjust the crown area throughout the day—the more you manipulate it, the faster it falls.
- This style typically maintains its volume through 6-8 hours of helmet wear.
15. Braided Pigtails with Wrapped Bases
Low pigtails with braided bases create a secure foundation while the wrapping technique adds visual thickness at the most prominent points.
Base Wrapping Benefits:
- Wrapping hair around the elastic base creates the illusion of thicker hair at the ponytail origin.
- The wrapped sections add a decorative element that elevates simple pigtails.
- Braiding from the wrapped base keeps everything secure without sacrificing style.
- This technique works particularly well for thin hair by creating focal points of apparent density.
Creation Steps:
- Part hair down the center from forehead to nape, creating two equal sections.
- Gather each section into a low ponytail positioned just behind the ears.
- Take a small section (about 1 inch wide) from each ponytail before securing it.
- Secure each ponytail with a strong elastic band, keeping that small section separate.
- Wrap the separated section around the elastic base, covering it completely.
- Secure the wrapped section with a bobby pin hidden underneath.
- Begin a three-strand braid on each wrapped ponytail, continuing to the ends.
- Secure each braid with a small clear elastic and pull apart braid sections gently for added width.
Functional Advantages:
- The low placement keeps braids from creating pressure points under your helmet.
- The symmetrical balance prevents your helmet from sitting crooked.
- Braids starting from secure wrapped bases won’t loosen at the top even if ends get messy.
- This style keeps all hair contained so no strands can escape to stick to your face or neck.
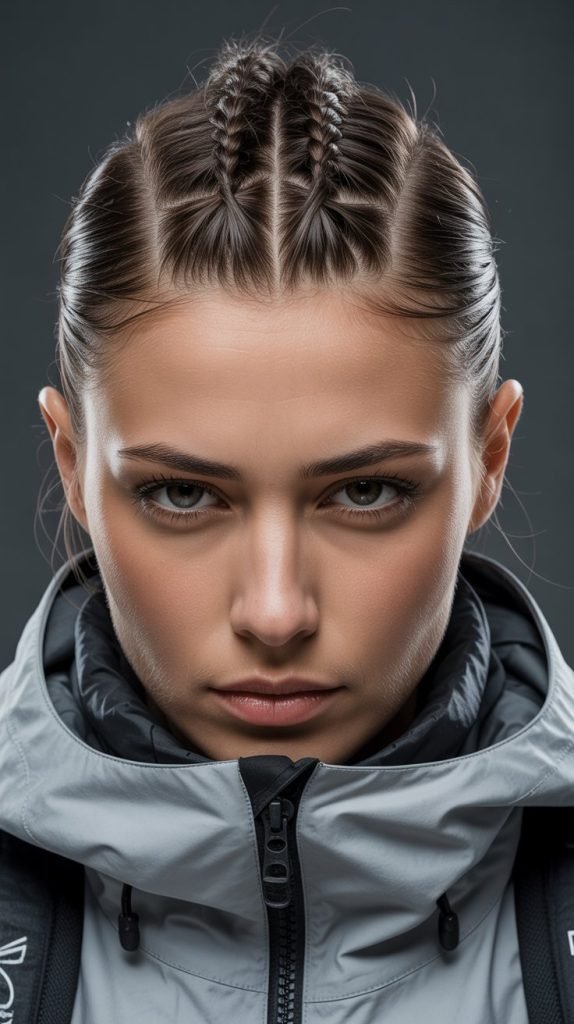
16. Mohawk Braid with Teased Sections
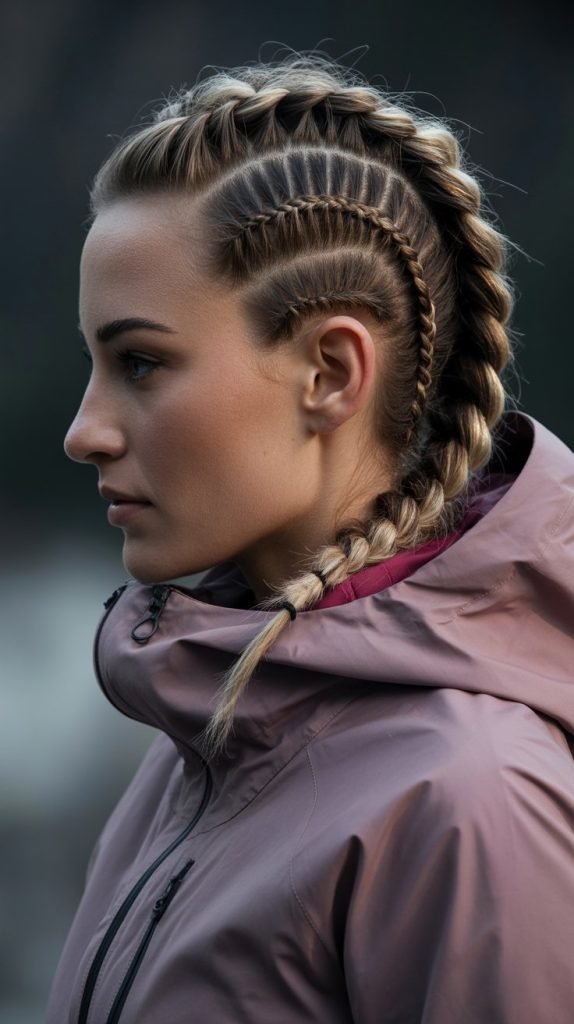
A bold, edgy style that combines multiple volumizing techniques—teasing, braiding, and strategic placement—for maximum impact on thin hair.
Multi-Technique Volume:
- Teasing sections before incorporating them into the braid adds dimension throughout.
- The raised center placement naturally lifts hair away from the scalp.
- Sleek sides create contrast that makes the voluminous center appear even fuller.
- This high-impact style proves that thin hair can absolutely create dramatic looks.
Building the Mohawk:
- Create a center section approximately 3 inches wide from hairline to crown.
- Apply volumizing powder generously throughout this center section.
- Divide the remaining side hair into sections and sleek them down with gel or pomade.
- Pin or braid the side sections tight against your head to keep them secure.
- Starting at the front, take a small piece from the center section and tease it lightly.
- Begin a Dutch braid incorporating the teased pieces as you move back.
- Tease each new section slightly before adding it to the braid for continuous volume.
- Continue to the crown area and secure with a decorative elastic or pins.
Performance Features:
- The sleek sides prevent hair from escaping your helmet during active riding.
- The center braid stays raised and secure even during falls and crashes.
- The structured nature of this style means it looks intentional throughout the entire day.
- This bold aesthetic makes a statement both on the slopes and in lodge areas.
17. Twisted Halo with Loose Waves
This romantic style combines practical functionality with feminine appeal, creating the appearance of volume through twisting and waves.
Halo Volume Effect:
- The twisted crown draws attention upward and creates height at the hairline.
- The style frames the face beautifully while keeping hair off your forehead and temples.
- Loose waves in the lower section add body and movement that thin hair typically lacks.
- The combination of structured (twisted) and flowing (wavy) textures creates a balanced, full appearance.
Creating the Halo:
- Apply heat protectant and curl the lower sections of your hair with a large-barrel curling iron for loose waves.
- Create a center part or deep side part depending on your preference.
- Take a 2-inch section from one side of your hairline.
- Twist this section back toward your crown, picking up small amounts of hair as you twist (like a French twist).
- Secure the twisted section at the back of your head with bobby pins.
- Repeat the twisting process on the opposite side, meeting the first twist at the back center.
- Pin both twists together to create a connected halo effect.
- Leave the remaining hair loose and gently tousle the waves for added texture.
Helmet Compatibility:
- The twisted sections lie relatively flat against your head, making helmet fit comfortable.
- The pinned areas are distributed around your head rather than concentrated in one pressure point.
- Loose waves can be tucked into your jacket collar to stay dry and warm.
- After removing your helmet, simply fluff the waves and smooth the halo twists for instant refresh.
18. High Ponytail with Wrapped Faux Braid
This clever styling trick makes a simple ponytail appear to have a thick braided base when it’s actually just wrapped sections creating the illusion.
The Faux Braid Secret:
- Wrapping small sections around the ponytail base mimics the appearance of a braid without the actual braiding.
- This technique adds visual thickness where thin ponytails typically look their weakest—at the base.
- The wrapped sections disguise the elastic and create a polished, styled appearance.
- This method is faster than actual braiding but delivers similar visual results.
How to Create:
- Gather hair into a high ponytail and secure tightly with a strong elastic band.
- Take a small section (about 1 inch) from the underside of the ponytail.
- Wrap this section around the ponytail base once, pulling snugly but not too tight.
- Secure the end of this section with a small bobby pin hidden underneath the wrap.
- Take another small section from the opposite side of the ponytail.
- Wrap it around the base next to the first wrap, slightly overlapping.
- Continue with 2-3 more wrapped sections, creating a thick, braided-looking base.
- Secure each wrap with hidden bobby pins for security.
Volume Enhancement:
- The multiple wrapped sections create dimension and apparent thickness.
- Gently pull on the wrapped sections to loosen them slightly for even more volume.
- The wrapped base elevates the ponytail away from your head for added lift.
- Tease the ponytail length lightly and use dry shampoo for extra body.
19. Braided Bun with Face-Framing Pieces
A braided bun combines security with volume while strategic face-framing pieces soften the look and prevent the severe appearance that all-back styles can create on thin hair.
Strategic Element Combination:
- Braiding hair before forming a bun creates a thicker, more textured result than simply twisting.
- The bun keeps everything secure while the braid texture adds visual interest and apparent density.
- Face-framing pieces prevent the harsh pulled-back look that can emphasize thin hair.
- This balanced style works for both athletic performance and style-conscious riders.
Step-by-Step Construction:
- Leave out two small sections of hair at your temples for face-framing.
- Gather the remaining hair into a ponytail at your desired height.
- Create a regular three-strand braid with the ponytail length.
- Gently pull apart the braid sections to add width before forming the bun.
- Wrap the braided ponytail around its base to form a bun shape.
- Secure with bobby pins placed in multiple directions for maximum hold.
- The braided texture should be visible throughout the bun.
- Use a curling iron to add gentle waves to the face-framing pieces for a softer finish.
Practical Considerations:
- The face-framing pieces can be tucked behind your ears when you need maximum visibility.
- The braided bun has more grip and texture than smooth buns, preventing slippage throughout the day.
- Position the bun at mid-height to avoid both helmet pressure and neck discomfort.
- The braid structure within the bun means it won’t completely unravel if a few pins come loose during activity.
20. Double Dutch Braids into Low Buns
This athletic style maximizes security while creating the appearance of two substantial braids that transition into voluminous buns.
Volume Through Division:
- Dividing hair into two sections makes each braid appear fuller than a single braid would.
- Dutch braiding creates raised, visible braids that sit on top of the hair rather than sinking into it.
- The bun endings add additional fullness at the nape where thin hair can look particularly sparse.
- This style distributes volume throughout your entire head rather than concentrating it in one area.
Creation Method:
- Part hair straight down the center from forehead to nape, creating two perfectly equal sections.
- Apply texturizing spray to both sections for added grip and volume.
- Starting on one side at the hairline, begin a Dutch braid by crossing sections over the middle.
- Continue braiding down to the nape, keeping consistent tension throughout.
- When you reach the nape, continue braiding to the ends and secure with a small elastic.
- Wrap the remaining braided length into a small bun and pin securely.
- Repeat the entire process on the opposite side, matching the braid tightness and bun placement.
- Gently pull apart sections of both braids to add width and dimension.
Performance Benefits:
- The symmetrical structure keeps your helmet balanced and comfortable.
- The low buns won’t create pressure points against the helmet back.
- Each braid and bun can be adjusted independently if one loosens during the day.
- This style provides complete security—no loose ends to get caught in goggles or jacket zippers.
21. Voluminous Side Ponytail with Twisted Sections
A playful side ponytail elevated through twisting techniques that add thickness and dimension to thin hair.
Twist Volume Technique:
- Twisting sections before gathering them into the ponytail adds dimension and apparent thickness.
- The side placement creates asymmetrical visual interest that draws attention away from hair density.
- Multiple twists layered together create a textured, fuller appearance than smooth ponytails.
- This style balances fun aesthetics with practical security for snowboarding.
Building the Style:
- Create a deep side part, bringing most of your hair to one side.
- Apply volumizing powder at the roots for added lift.
- Divide the hair on the heavier side into three sections: front, middle, and back.
- Twist each section individually toward the back of your head.
- Gather all three twisted sections together at a point just below and behind your ear.
- Secure with a strong elastic band, maintaining the twisted texture.
- Take a small section from the ponytail and wrap it around the elastic to conceal it.
- Lightly tease the ponytail length for additional body and volume.
Functional Features:
- The twisted base is more secure than simply gathering hair smoothly into a ponytail.
- The side placement keeps the ponytail from sitting against your back or getting caught in backpack straps.
- The bulk of hair is positioned where you can easily check and adjust it without removing your helmet.
- The style stays intact through full days of riding and remains presentable for après-ski activities.
22. Criss-Cross Crown with Low Ponytail
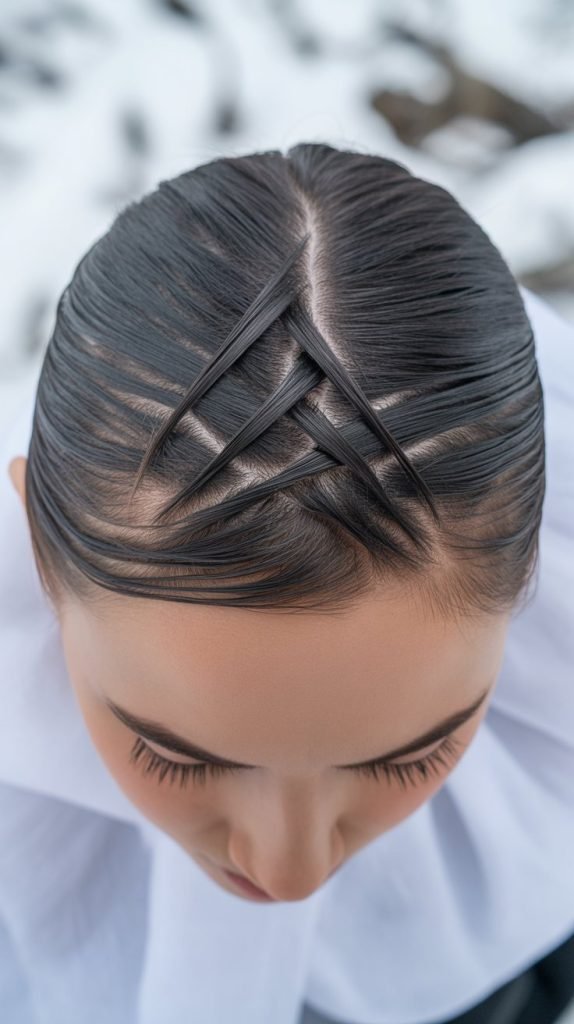
Strategic criss-crossing sections at the crown create eye-catching patterns while adding height and volume to thin hair.
Crown Pattern Benefits:
- The criss-cross technique lifts hair at the roots, creating volume where thin hair typically lies flat.
- The geometric pattern adds visual interest that distracts from hair density concerns.
- This structured crown area prevents the helmet from flattening hair completely.
- The combination of textured crown and smooth ponytail creates a balanced, polished look.
Construction Steps:
- Section off a rectangular area at the crown of your head, approximately 3×4 inches.
- Divide this crown section into six smaller subsections in two rows of three.
- Take the front left section and cross it over to the right side, securing with a bobby pin.
- Take the front right section and cross it over to the left side, pinning it down.
- Repeat the criss-crossing pattern with the middle sections, then the back sections.
- The result should be a visible criss-cross pattern across your crown area.
- Gather all hair including the criss-crossed sections into a low ponytail at the nape.
- Smooth the sides and back while maintaining the criss-cross texture at the crown.
Maintenance Tips:
- Use small, tight bobby pins that won’t slip out of thin hair during activity.
- Apply a light-hold hairspray to the criss-cross sections before putting on your helmet.
- The pattern structure maintains its shape even after hours of helmet compression.
- This style requires slightly more time to create but lasts all day without touch-ups.
23. Textured French Twist
A sophisticated updo that uses teasing and texturing to create the appearance of a full, luxurious twist from thin hair.
French Twist Volume:
- Traditional French twists can look sparse on thin hair, but texturing throughout solves this problem.
- Teasing sections before twisting creates the illusion of much denser hair.
- The vertical structure naturally lifts hair away from the scalp for added height.
- This classic style proves that thin hair can achieve elegant, formal looks.
Creating the Textured Twist:
- Apply volumizing mousse to damp hair and blow dry with maximum volume.
- Once dry, section hair into three horizontal layers: bottom, middle, and top.
- Tease each layer individually before proceeding, creating maximum texture.
- Gather all hair at the center back of your head as if creating a low ponytail.
- Instead of securing, begin twisting the gathered hair upward along your head.
- As you twist upward, tuck the ends into the twist fold.
- Secure the twist with bobby pins placed vertically along the center seam.
- Gently pull on the outer edges of the twist to loosen it slightly and reveal more texture.
Helmet Adaptation:
- This style works best for shorter snowboarding sessions or for riders who take frequent helmet breaks.
- Position the twist slightly off-center if needed to accommodate your helmet’s shape.
- The textured nature means some compression actually enhances the lived-in, textured appearance.
- Consider this style for resort riding rather than backcountry where helmets stay on longer.
24. Space Buns with Teased Centers
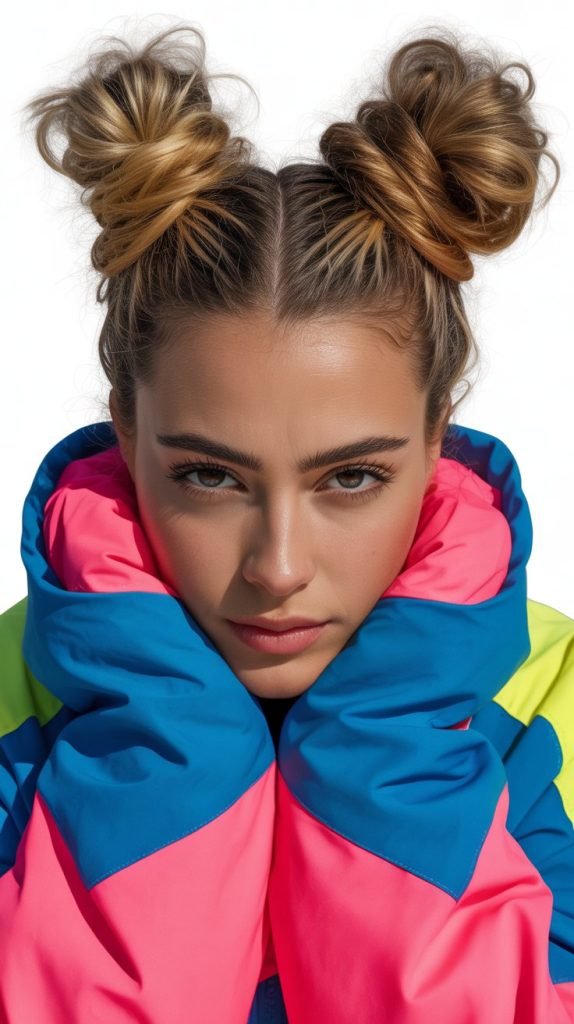
This trendy, youthful style uses two high buns with teased centers to create dramatic volume and a fun aesthetic perfect for confident riders.
Double Bun Volume:
- Two buns mean twice the visual impact and apparent hair volume.
- Teasing the centers before forming buns prevents the flat, deflated appearance thin hair can create.
- The high placement creates lift and draws the eye upward.
- This bold style makes a statement that thin hair can absolutely create trendy, voluminous looks.
Step-by-Step Guide:
- Part hair straight down the center from forehead to nape.
- Gather each section into a high ponytail positioned above and slightly behind each ear.
- Before forming the buns, tease each ponytail thoroughly from base to ends.
- Gently smooth just the surface of each teased ponytail without removing the volume.
- Wrap one teased ponytail around its base to form a bun, keeping it loose rather than tight.
- Secure with bobby pins in a circular pattern around the bun base.
- Repeat on the opposite side, matching the size and placement of the first bun.
- Pull gently on sections of each bun to add even more width and fullness.
Practical Considerations:
- Position buns slightly lower or more toward the back if your helmet sits particularly low.
- The teased texture provides cushioning between your head and helmet.
- This style works best with helmets that have deeper profiles rather than shallow ones.
- The fun aesthetic is perfect for park riding and freestyle snowboarding where style matters.
25. Messy Fishtail Braid
The intricate pattern of a fishtail braid creates exceptional texture that makes thin hair appear substantially thicker, especially when deliberately loosened.
Fishtail Texture Advantage:
- The four-section crossing pattern of fishtail braids creates more visual complexity than three-strand braids.
- Each small section crossing over creates texture that multiplies the appearance of hair density.
- Loosening the braid after completion dramatically increases its width.
- The deliberately messy aesthetic works perfectly with thin hair’s natural texture.
Creating the Fishtail:
- Apply texturizing spray throughout your hair for added grip.
- Gather hair into a side ponytail and secure with an elastic.
- Divide the ponytail into two equal sections.
- Take a small piece from the outer edge of the left section and cross it over to join the right section.
- Take a small piece from the outer edge of the right section and cross it over to join the left section.
- Continue this pattern—left outer to right, right outer to left—down the entire length.
- The smaller your crossing sections, the more intricate and thick-looking the braid becomes.
- Secure the end and gently pull apart the braid sections for a fuller appearance.
Performance Features:
- The complex crossing pattern is extremely secure and won’t unravel easily.
- The braid maintains its shape even when wet from snow.
- The texture provides natural grip that prevents the braid from slipping loose.
- This style looks deliberately styled rather than thrown together, perfect for style-conscious riders.
26. Victory Rolls with Secured Back

This vintage-inspired style creates dramatic volume at the front hairline while keeping the back secure and helmet-compatible.
Front Volume Impact:
- Victory rolls create significant height and volume at the most visible part of your head—the front hairline.
- The rolled sections make thin hair appear thick and abundant through their cylindrical shape.
- This vintage technique has experienced renewed popularity in modern styling.
- The dramatic front contrasts beautifully with a secured back for functional snowboarding.
Creating Victory Rolls:
- Section off the front portion of hair from temple to temple, approximately 3-4 inches back.
- Divide this front section into two equal parts with a center part.
- Apply volumizing spray and tease each front section at the roots.
- Take one front section, roll it backward toward your crown, forming a cylinder.
- Secure the roll with bobby pins placed vertically through the center.
- Repeat on the opposite side, matching the size and height of the first roll.
- Gather the remaining back hair into a low ponytail or bun for security.
- Set the rolls with hairspray to maintain their shape.
Helmet Considerations:
- The rolls sit at the front hairline where most helmets have more space.
- Some helmet adjustment may be necessary to accommodate the front volume.
- This style works best for resort riding with frequent helmet breaks rather than all-day backcountry sessions.
- The secured back ensures complete security even if the front rolls compress slightly.
27. Braided Wrapped Ponytail
A thick braid wrapped around a ponytail base creates the illusion of substantially fuller hair while providing exceptional security.
Wrapped Braid Effect:
- The braid creates a thick, textured band around the ponytail that suggests abundant hair.
- This technique disguises the actual ponytail elastic and thin base.
- The wrapped element adds a decorative touch that elevates a basic ponytail.
- The combination of smooth ponytail and textured braid creates dimensional interest.
Construction Method:
- Gather most of your hair into a ponytail at your desired height, but leave out a 2-inch section from underneath.
- Secure the ponytail with a strong elastic band.
- Take the section you left out and create a three-strand braid with it.
- Gently pull apart the braid sections to maximize its width.
- Wrap this braided section around the ponytail base, covering the elastic completely.
- The braid should wrap around 1-2 times depending on your hair length.
- Secure the braid end with bobby pins tucked underneath the wrap so they’re invisible.
- Lightly tease the ponytail length for added body.
Durability Features:
- The braid maintains its structure throughout the day without loosening.
- The wrapped element actually helps secure the ponytail by adding an extra layer of hold.
- This style can withstand aggressive riding without falling apart.
- The textured wrap prevents the ponytail from sliding down even during extended wear.
28. Stacked Bubble Braids
Multiple bubble sections combined with braiding creates maximum volume and a trendy appearance perfect for riders who want to make a statement.
Maximum Volume Strategy:
- Combining bubble technique with braiding multiplies the volume-creating effects.
- Each bubble section is individually enhanced, creating multiple focal points of fullness.
- The stacked appearance makes hair look substantially more abundant than it actually is.
- This cutting-edge style demonstrates that thin hair can achieve trendy, high-impact looks.
Creating Stacked Bubble Braids:
- Gather hair into a high ponytail and secure with an elastic band.
- Measure down 2-3 inches and add another elastic, creating the first bubble section.
- Take this bubble section and divide it into three parts, creating a small braid.
- Secure the braid and then add another elastic 2-3 inches lower.
- Pull apart this next section to create another bubble.
- Braid this bubble section as well.
- Continue alternating between bubble sections and braiding down the entire ponytail length.
- Gently pull apart each bubble and each braid section to maximize width.
Performance Benefits:
- Multiple elastic bands create numerous security points throughout the style.
- The combination of bubbles and braids provides exceptional hold that lasts all day.
- Even if one section begins to loosen, the other sections maintain their structure.
- This bold, creative style looks intentional and styled rather than simply functional.
Conclusion
Thin hair should never hold you back from enjoying snowboarding with confidence and style.
These 28 Snowboarding Hairstyles for Thin Hair That Add Volume and Stay Secure prove that fine hair can absolutely create impressive, functional looks that survive the demands of mountain sports.
From strategic teasing techniques that create lasting lift to innovative braiding patterns that maximize apparent thickness, you now have a complete arsenal of styling solutions designed specifically for your hair type.
The key to success lies in understanding that thin hair has unique advantages—it’s lightweight, manageable, and responds beautifully to volumizing techniques when approached correctly.
Each style in this guide balances three essential elements: volume creation through smart techniques, security that withstands athletic activity, and helmet compatibility for comfort and safety.
Remember that the best hairstyle is one that makes you feel confident and allows you to focus on your riding rather than your hair.
Experiment with different styles from this collection to discover which techniques work best with your specific hair texture, length, and personal aesthetic.
With these proven methods in your styling repertoire, you’ll hit the slopes looking polished, feeling secure, and ready to ride with the assurance that your hair will stay exactly where you want it from your first run to your last.